
Chapter 45. Working with Assemblies
So many times in this book, and of course in many other .NET resources, you find the word assembly associating it to managed executable files such as .NET applications and libraries. You need to know some key concepts about assemblies to understand how they actually work, what kind of information they offer, and how you can avoid bad surprises when executing them. In this chapter, you first get an overview of assemblies’ structure and base concepts; then you learn about advanced concepts that can help you understand their context of execution.
Assembly Overview
Assemblies can be discussed with two points of view: a physical one and a logical one. From the physical point of view, an assembly is an .exe or .dll file containing executable modules and resources. From a logical point of view, an assembly is the smallest unit for deploying .NET applications that also provides version information and enables code reuse. Chapter 46, “Reflection,” discusses how, from the physical perspective, an assembly is a container of Intermediate Language code, metadata, and resources. Now we focus the discussion on the logical perspective so that you can understand some other purposes of this unit of work. In some cases, details of some of the topics have been previously discussed, but for your convenience they are summarized in this chapter.
Information Stored Within Assemblies
An assembly doesn’t necessarily coincide with a standalone application. In many cases, assemblies are also compiled class libraries. Independently from what kind of assembly you are working with, it exposes the following information:
• Types—Through the IL code necessary to the application execution, assemblies can expose reusable types that can be consumed by other assemblies. This is the reason assemblies are considered the smallest unit for code reuse.
• Version—Assemblies contain version information, and all modules within the assembly have the same version; this is important to the Common Language Runtime (CLR) that can distinguish between assemblies with the same name but with different version numbers without registration.
• Scope—Assemblies provide the scope of exposed types, establishing whether they can be externally visible. This is accomplished in code by Visual Basic qualifiers such as Public, Friend, and Private.
Assembly Location
To understand where assemblies are located, you must consider that they are generally divided into private assemblies and shared assemblies. Private assemblies are standalone assemblies or assemblies that reside exclusively in the same folder of the application that holds a reference. This is a common scenario and makes the deployment easier because you just need to distribute the content of the application folder (known as XCopy deployment). Every application holding a reference to a private assembly needs to have a copy of the assembly inside its folder. This means that if you have 10 applications referencing the assembly, you will also have 10 copies of the assembly. Shared assemblies are instead files with a digital signature that can be installed to a particular location known as the Global Assembly Cache. It allows having a single shared copy of the assembly only if this comes from a trusted publisher. The Global Assembly Cache (GAC) is an important topic that Chapter 50, “Understanding the Global Assembly Cache,” addresses, so read it for further details.
Binding, Codebase, Probing
When one assembly is referenced by another one, the .NET runtime needs to link them. This process is known as binding and is performed based on the assembly version, culture information, and strong name if available. When the runtime resolves binding, it searches for the physical assembly. This search process is known as probing. Because a signed assembly also has signature information that is kept when you add a reference, search is first performed in the GAC. If the assembly is not found there, the runtime searches for it looping through the application folder and subfolders until it’s found. If you plan to place assemblies to locations different from the GAC and the application folder, you can place a codeBase suggestion in the application configuration file to tell the runtime where the required assembly will be found.
Signing Assemblies
To mark your assemblies as trusted, you need to add a digital signature known as a strong name. This becomes mandatory if you want to install an assembly to the GAC. Chapter 50 also provides a thorough discussion on signing assemblies with a strong name.
Assembly Information and Attributes
As you saw in various parts of the book, assemblies contain information that can make them recognizable from the external world, such as name, version, author, and copyright information. All these items are part of the assembly metadata and are injected to the assembly by adding some attribute declarations to the AssemblyInfo.vb file through instances of the Assembly attribute. Such attributes are covered in Chapter 3, “The Anatomy of a Visual Basic Project,” particularly in Listing 3.3, which shows how to map properties assigned via the My Project Designer. Now that you know more about assemblies’ contents and purposes, let’s see where the CLR executes these complex units of work.
Understanding Application Domains
An application domain is a unit of isolation for executing managed code. For a better understanding, let’s make a comparison with the Win32 world. In Win32, you have processes. Each process is isolated from other processes by the system so that a process cannot interfere with other processes or with resources required by such processes. This prevents process corruption and unexpected crashes. In .NET Framework architecture, the idea of isolation is provided by application domains, so an application domain is the place where an assembly runs isolated from other assemblies; when an application is started, the CLR creates one application domain for it. Although a Win32 process can host multiple application domains, when an assembly is executing within an application domain, it cannot interfere with other assemblies within different application domains. However, application domains can communicate with each other. One assembly can create multiple application domains (which are handled by the CLR) and run separate assemblies within such domains, as I will explain in the next section.
Creating Application Domains and Executing Assemblies
You have two ways for executing assemblies inside application domains: getting the instance of the default application domain for the running assembly (that is, your application) and creating a new application domain. The System.AppDomain class provides a shared property named CurrentDomain, of type System.AppDomain, which represents the instance of the current application domain. You get the instance and then execute the assembly as follows:
Dim currentDomain As AppDomain = AppDomain.CurrentDomain
currentDomain.ExecuteAssembly("AnotherApp.exe")
The AppDomain class exposes an instance ExecuteAssembly method that enables executing the specified assembly within an application domain. Executing an assembly in the current application domain is not a good idea because you cannot unload the assembly when the execution has completed. Because of this, a better approach is to create a new application domain. For now, let’s see how you can get information on application domains:
'Shows the AppDomain friendly name
Console.WriteLine(currentDomain.FriendlyName)
'Shows the AppDomain id within the process
Console.WriteLine(currentDomain.Id)
'Shows the working directory for the running
'assembly within the AppDomain
Console.WriteLine(currentDomain.BaseDirectory)
'Returns True if the code is classified as
'fully-trusted
Console.WriteLine(currentDomain.IsFullyTrusted)
You can interrogate some properties for retrieving application domain information. The AppDomain class offers a number of other advanced properties that are not covered here. A useful resource for finding information related to AppDomain properties is the MSDN Library: http://msdn.microsoft.com/en-us/library/system.appdomain(v=vs.110).aspx. Now it’s time to understand how you can create new application domains and execute assemblies. You invoke the AppDomain.CreateDomain static method and then invoke ExecuteAssembly.
Appdomain.Load
The AppDomain class exposes a Load method that also enables you to load an assembly. According to the official MSDN documentation, usage of this method should always be restricted to COM interoperability scenarios. So always use ExecuteAssembly instead.
Also remember to unload the application domain after loaded assemblies have completed their work. The following code provides an example:
Dim secondDomain As AppDomain = AppDomain.
CreateDomain("secondDomain")
Try
secondDomain.ExecuteAssembly("MyApp.exe")
Catch ex As AppDomainUnloadedException
Console.WriteLine("The AppDomain was already unloaded")
Catch ex As Exception
Finally
Try
AppDomain.Unload(secondDomain)
Catch ex As CannotUnloadAppDomainException
Console.Write("Unable to unload the AppDomain")
End Try
End Try
The CLR throws an AppDomainUnloadedException if the code attempts to access an already unloaded application domain. As you can see from the code, you unload an application domain by invoking the AppDomain.Unload shared method that takes the application domain instance as an argument. If the application domain cannot be unloaded, a CannotUnloadAppDomainException is thrown. The AppDomain.CreateDomain method offers several overloads. One of them enables you to take an argument of type AppDomainSetup. It is a special object that gives you the opportunity to set some application domain properties. The following code provides an example:
Dim domainSetup As New AppDomainSetup
With domainSetup
'Sets the current directory for the AppDomain
.ApplicationBase = Environment.CurrentDirectory
'Sets the application name
.ApplicationName = "App domain demo"
'Allows assembly binding redirection
.DisallowBindingRedirects = False
'Disallows code download from assemblies
'via http
.DisallowCodeDownload = True
'Assigns a config file to the new app domain,
'in this case the app.config of the current domain
.ConfigurationFile = AppDomain.CurrentDomain.
SetupInformation.ConfigurationFile
End With
Dim thirdDomain As AppDomain = AppDomain.
CreateDomain("thirdDomain", Nothing, domainSetup)
Notice that the second argument is of type System.Security.Policy.Evidence and is useful if you want to assign specific security policies to the application domain. In this demonstrative code, this is not accomplished. For this particular topic, application domains are important for security policies that you apply to your code. In the next section, you learn about the managed security model in the .NET Framework 4.5.
Creating and Executing Dynamic Code at Runtime
In the next chapter, you learn about Reflection and how you can create assemblies and code at runtime. When you have a dynamically created assembly with custom code, you can execute the assembly within an application domain with the same techniques shown in this section.
Security Model in .NET 4.5
Note
Because the .NET Framework 4.5 is basically an update to version 4.0, this chapter covers changes introduced by the latter version to the managed security model and requires you to have existing knowledge and skills on Code Access Security (CAS) in the .NET Framework, due to the complexity of the topic. We focus on some of the most important features in the security model, remembering that this is a complex architecture that would require an entire book for complete coverage. Keep in mind that we provide an overview of what the MSDN documentation discusses in detail.
Assemblies contain code that is executed when you run the application. As for the operating system and for any development environment, code is executed according to security rules that prevent the code from unauthorized access to system resources. The .NET Framework 4.5 retakes a new security model introduced by version 4.0, highly simplified if compared to the previous Code Access Security platform. The code will still be classified as fully trusted and partially trusted. Full trust means that the code has elevated permissions for accessing resources, whereas partial trust means that the code is restricted by the permissions it has. The security model provided by the CLR is now easier to understand and to implement, differently from what Code Access Security was in the past.
Note on Security Changes
Extensive changes have been introduced to the security model for code access, and the role-based security model offers the same features as in the past. For this reason, in this section we cover changes about the code access security model. For further details on the role-based model, you can check out the MSDN documentation here: http://msdn.microsoft.com/en-us/library/shz8h065(v=vs.110).aspx.
The following are the major changes in the security model introduced by .NET 4.0 and still available in .NET 4.5:
• Code Access Security policies and machine-wide security policies are now turned off by default.
The transparency model has been enforced and applied to the .NET Framework and managed applications. The transparency model can separate code that runs as part of the application (transparent code) and code that runs as part of the .NET infrastructure (critical code). As a result, critical code can access privileged resources, such as native code, but transparent code can access only resources allowed by the specified permissions set and cannot invoke or inherit from critical code. With the transparency model, groups of code are isolated based on privileges. Such privileges are divided into full-trust and partial-trust in the sandboxed model. The following is a list of the most important points that you have to care about with the security model in .NET 4.5:
• The enforcement of the transparency model is also why the .NET Framework configuration tool is no longer available for setting CAS policies.
• The sandboxed model enables you to run code in a restricted environment that grants code the only permissions it actually requires, and the natural place for the model is the application domains described in the previous section.
• Desktop applications always run as fully trusted. This is also true for applications started from Windows Explorer, a command prompt, and a network share.
• Permissions are still a central part in security, but some security actions from the System.Security.Permission.SecurityAction class have been deprecated. They are Deny, RequestMinimum, RequestOptional, and RequestRefuse.
• You can expose partially trusted assemblies via the AllowPartiallyTrustedCallers attribute.
• To enable constraints on types that can be used as evidence objects, .NET Framework 4.5 has the System.Security.Policy.EvidenceBase base class that must be inherited from all objects that want to be candidates as evidence.
Transparency Model
The transparency model is not new in the .NET Framework; it was first introduced with version 2.0 as a mechanism for validating code efficiency. In .NET 4, it has been revisited (this is the reason it is also known as Level 2) and provides an enforcement mechanism for code separation.
The next sections provide explanations and code examples about security features in .NET Framework 4.5 with Visual Basic 2012.
Implementing and Requiring Permissions
With the exceptions described in the previous bulleted list for deprecated security actions, applying permissions in the new security model is similar to the previous versions of the .NET Framework. This means that you can leverage permissions from the System.Security.Permissions namespace, such as FileIOPermission, UIPermission, IsolatedStoragePermission, and EnvironmentPermission. The following code demonstrates how you use the declarative syntax for implementing a class that requires the caller code having the FileIOPermission to execute. Such a class simply implements a method that returns an XDocument from a text file:
'The caller code will need the FileIOPermission permission
'with unrestricted access otherwise it will fail
<FileIOPermission(Security.Permissions.SecurityAction.Demand,
Unrestricted:=True)>
Class XmlParse
Shared Function String2Xml(ByVal fileName As String) As XDocument
'Expects an Xml-formatted string
Return XDocument.Parse(fileName)
End Function
End Class
You can also use the imperative syntax, which looks like this:
Dim fp As New FileIOPermission(PermissionState.Unrestricted)
Try
fp.Demand()
Catch ex As Security.SecurityException
End Try
You create an instance of the required permission and then invoke Demand for checking whether the application has that level of permissions. If not, a System.Security.SecurityException is thrown.
The Transparency Level 2
By default, when you create a new application, it relies on security rules provided by the Transparency Level 2 of .NET Framework 4.5. The level name has this form to allow distinction from the old transparency level of previous .NET versions (known as Transparency Level 1). So the Transparency Level 2 security rules are applied implicitly, but a better idea is applying them explicitly by applying the System.Security.SecurityRules attribute that can be added at the assembly level as follows:
<Assembly: SecurityRules(Security.SecurityRuleSet.Level2)>
Applying the attribute explicitly is appropriate for code reading and future maintenance and avoids confusion. This level of enforcement brings into the .NET Framework some new ways of thinking about security policies. Most rely on the concept of host, where this means an environment is responsible for executing applications; ClickOnce, ASP.NET, and Internet Explorer are host examples. For code trust, applications that are not hosted, such as programs launched from a command prompt, from Windows Explorer, or from a shared network path, now run as full-trust. Instead, hosted or sandboxed applications still run according to host-based policies and run as partial-trust. For hosted and sandboxed applications, they are considered as transparent because they run with the limited permissions set granted by the sandbox. This means that you will no longer need to check for permissions when running partially trusted code because transparent applications run with the permissions set granted by the sandbox, so your only preoccupation should be targeting the sandbox permissions set and to not write code requiring the full-trust policy. It is important to mention that the transparency mechanism can separate code that is part of the .NET infrastructure (and that thus requires high privileges such as invoking native code), which is called critical code, and code that is part of the application, also known as transparent code. The idea behind the scenes is separating groups of code based on privileges. When working with sandboxes, such privileges are of two types: fully trusted, which is the unrestricted level, and partially trusted, which is the level restricted to the permission set established in the sandbox.
Desktop Applications
With the Transparency Level 2 enabled, desktop applications run as full-trust.
The System.Security.SecurityRules attribute is not the only one that you can apply for establishing permissions rules. There are other attributes available, summarized in Table 45.1.
Table 45.1. Security Attributes
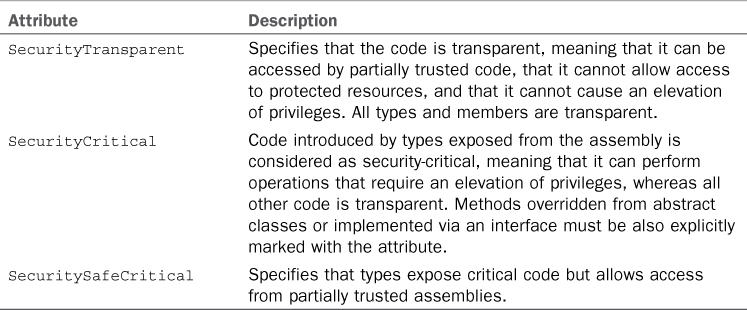
If you do not specify any attribute other than SecurityRules, for fully trusted assemblies the runtime considers all code as security-critical and thus callable only from fully trusted code, except where this could cause inheritance violations. If the assembly is instead partially trusted, specifying no attribute other than SecurityRules will make the runtime consider types and members as transparent by default, but they can be security-critical or security-safe-critical. For further detail on inheritance in the transparency model and on attributes listed in Table 45.1, visit the following page in the MSDN Library: http://msdn.microsoft.com/en-us/library/dd233102(v=vs.110).aspx. This is the reason it is opportune to explicitly provide the most appropriate attribute. The following is an example of applying both the SecurityRules and SecurityTransparent attributes:
<Assembly: SecurityRules(Security.SecurityRuleSet.Level2)>
<Assembly: SecurityTransparent()>
Class Foo
End Class
Transparency enforcements are handled by the Just-in-Time compiler and not by the CLR infrastructure. This means that if you apply the SecurityTransparent attribute to an assembly, the assembly cannot call transparent and security-safe-critical types and members independently from the permissions set (including full-trust). In such a scenario, if the code attempts to access a security-critical type or member, a MethodAccessException will be thrown.
Sandboxing
You can execute partially trusted code within a sandbox that runs with the specified permissions set. Code, including assemblies, executed within the sandbox will be also granted to just the specified permissions set. To create and run a sandbox, you need an instance of the AppDomain class. The example here creates a sandbox for running an external assembly given the LocalIntranet zone’s permissions. Before showing the sandbox example, follow these steps:
1. Create a new Console application and name the new project as ExternalApp.
2. In the Main method, add a Console.Writeline statement for showing whatever text message you like.
3. Build the project; then create a new folder named C:MyApps and copy the newly generated ExternalApp.exe into C:MyApps.
Such steps are required to have a simple external assembly to run inside the security sandbox. Now close the ExternalApp project and create a new Console project, naming it SandBox. The goal is to create a sandbox with LocalIntranet permission and run an external assembly inside the sandbox so that this external application will also be granted the same permissions. When ready, first add the following Imports directives:
Imports System.Security
Imports System.Security.Policy
Imports System.Reflection
Now move inside the Main method. The first thing you need is an Evidence object that you assign with the required permissions set, as demonstrated by the following code:
Dim ev As New Evidence()
ev.AddHostEvidence(New Zone(SecurityZone.Intranet))
When you have the Evidence instance, you can get a sandbox with the specified permissions as demonstrated by the following line:
Dim permSet As PermissionSet = SecurityManager.GetStandardSandbox(ev)
The SecurityManager.GetStandardSandbox returns a sandbox limited to the specified permissions. This sandbox will be used later when running the external assembly. As an alternative, you can set your own permissions and create your custom permissions set using the PermissionSet object as follows:
Dim permSet As New PermissionSet(Permissions.PermissionState.None)
permSet.AddPermission( _
New SecurityPermission(SecurityPermissionFlag.Execution))
permSet.AddPermission(New UIPermission(PermissionState.Unrestricted))
At this point, you can put your hands on application domains. The first thing to do is create an instance of the AppDomainSetup class for specifying the working directory of the external assembly:
Dim ads As New AppDomainSetup()
ads.ApplicationBase = "C:MyApps"
Next, you need to set the host Evidence and then create the AppDomain, passing the security information; then you’ll invoke AppDomain.ExecuteAssembly to run the sandboxed assembly:
Dim hostEvidence As New Evidence()
Dim sandbox As AppDomain = AppDomain.
CreateDomain("Sandboxed Domain", hostEvidence, ads, permSet, Nothing)
sandbox.ExecuteAssemblyByName("ExternalApp")
The AppDomain.CreateDomain method has an overload that enables you to create an application domain with a permissions set. Because the application domain has security permissions, an instance of the Evidence class is required to tell the runtime that the assembly will be affected by such permissions. Other arguments are the AppDomainSetup instance and the permissions set under which the external assembly is going to be run. The last null argument can be replaced with a reference to the strong name, in case you want to add it to the full trust list. This would first require the current application to be signed with a strong name (covered in Chapter 50) and then by getting a reference to the strong name via the System.Security.Policy.StrongName class as shown in the following line:
Dim fullTrustAssembly As StrongName = Assembly.
GetExecutingAssembly.Evidence.GetHostEvidence(Of StrongName)()
The Assembly.Evidence.GetHostEvidence(Of StrongName) method returns the reference to the strong name. (The System.Assembly class is discussed in Chapter 46, “Reflection.”) Finally, you pass the strong name reference to AppDomain.CreateDomain as follows:
Dim sandbox As AppDomain = AppDomain.
CreateDomain("Sandboxed Domain", hostEvidence, ads,
permSet, fullTrustAssembly)
Listing 45.1 shows the complete code example for your convenience.
Listing 45.1. Running a Sandboxed Assembly
Imports System.Security
Imports System.Security.Policy
Imports System.Reflection
Module Module1
Sub Main()
Dim ev As New Evidence()
ev.AddHostEvidence(New Zone(SecurityZone.Intranet))
Dim permSet As PermissionSet = SecurityManager.GetStandardSandbox(ev)
Dim ads As New AppDomainSetup()
ads.ApplicationBase = "C:MyApps"
Dim hostEvidence As New Evidence()
Dim sandbox As AppDomain = AppDomain.
CreateDomain("Sandboxed Domain", hostEvidence, ads,
permSet, Nothing)
'The assembly runs in a LocalIntranet sandboxed environment
sandbox.ExecuteAssemblyByName("ExternalApp")
End Sub
End Module
Sandboxes Complexity
Working with sandboxes can include complex scenarios. Particularly, you might have the need to execute not-trusted code from an external assembly with customized permissions sets. This also requires advanced application domains concepts. Fortunately, the MSDN Library provides an interesting walk-through covering these scenarios, available at http://msdn.microsoft.com/en-us/library/bb763046(v=vs.110).aspx. This is also useful to get a practical example about implementing the MarshalByRefObject for dynamic code execution within application domains.
Conditional APTCA
You can allow an assembly to be called by partially trusted code by applying the System.Security.AllowPartiallyTrustedCallers attribute at the assembly level. This can be accomplished as follows:
Imports System.Security
<Assembly: AllowPartiallyTrustedCallers()>
Without this attribute, only full-trusted code can call the assembly. Different from versions prior to 4.0, in the .NET Framework 4.x this attribute no longer requires an assembly to be signed with a strong name, and its presence involves all the security functions present in the code in the security checks.
Migrating from Old CAS-Based Code
If you move your existing code to .NET Framework 4.x and used Code Access Security policies, you might be advised with a message saying that CAS is obsolete. In these situations, you can add a specific section to the application configuration file, which allows legacy policies that look like this:
<configuration>
<runtime>
<NetFx40_LegacySecurityPolicy enabled="true"/>
</runtime>
</configuration>
Of course, you always need to check whether legacy policies are appropriate in the particular scenario you are facing. I suggest reading the MSDN documentation about CAS migration, available at http://msdn.microsoft.com/en-us/library/ee191568(v=vs.110).aspx.
Summary
Understanding how assemblies work and how they can be managed is a key topic in .NET development. In this chapter, you first got an overview of assemblies, including their structure; their locations; and the type of information they share, such as code and metadata. Next, the discussion focused on application domains and the System.AppDomain class, which provides units of isolation for executing assemblies. Finally, you got an overview of the security model available in .NET Framework 4.x, starting from discussing the transparency level and the sandboxed model to analyzing specific code examples.