16. Finding Things
It may seem like a bit of a stretch, but your iPad can provide three capabilities when it comes to finding things. The first is finding things on the device itself, such as songs, movies, and addresses. The second is finding the way to a physical location. And, the third is using a built-in voice-activated tool called Siri. I’ve lumped these three features together in this chapter for two reasons:
• They’re extremely easy to use.
• They’re all about finding something.
Your iPad has a simple Search feature built in to it that can often help you hunt down something that might be buried in a folder or in an app. It also allows you to jump to the Internet if you can’t find what you need on your tablet. Your iPad also has the Maps app, which allows you to enter an address and have it displayed on the iPad’s screen. Furthermore, you can enter a starting address (such as your home) and get driving directions to the destination. And finally, the Siri service allows you to ask a question (“I need directions to the Atlanta Zoo.”), and then the service goes and retrieves what it can find for you. The Siri service does have some limitations, but what it can do, it does well.
I’ll start our discussion with the Search tool and show you how it works.
Using Search
The Search tool doesn’t have an icon like the standard apps you’ve been using. Instead, you’ll start on your primary home screen and swipe to the right until you see the screen shown in Figure 16.1. (From any home screen, you can swipe to the right until you see the Search screen.)

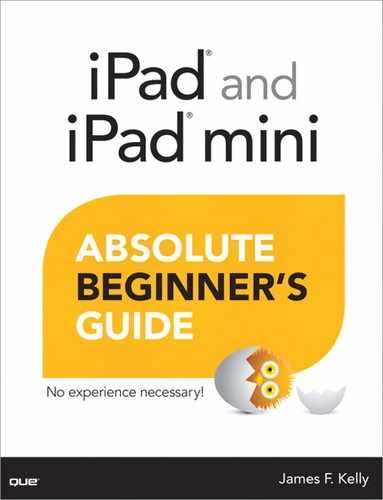
The Search tool will initially be blank. You haven’t attempted to search for anything yet. Use the onscreen keyboard to type a keyword, a song title, a contact name, or anything you care to hunt for (see Figure 16.2). In this example, I’m hunting for a particular contact’s phone number, so I’ve entered his first name in the Search box.
As you type letters in, the Search tool immediately begins offering up possible matches for your search. Suppose you want to enter catalog. When you have entered cat, you might find a picture of a cat or the phone number for Catalina Restaurant. Only when you type the next letter (cata) will the photo of the cat disappear, but Catalina Restaurant will still appear. Next, entering catal will still show Catalina Restaurant, but when you type in the next letter, o, the Catalina Restaurant listing will disappear. Only when you finish typing in catalog will the search list finish updating and offer any possible matches.
Tapping any of the search results opens that item.
 Tip
Tip
I frequently use the Search feature instead of opening up the Contacts app when I need a phone number quickly. I also use it when I obtain a new piece of information for that contact (such as an email address change or a new phone number); I simply type in the name of the contact in Search, tap the search result, and then tap the Edit button to make the change.
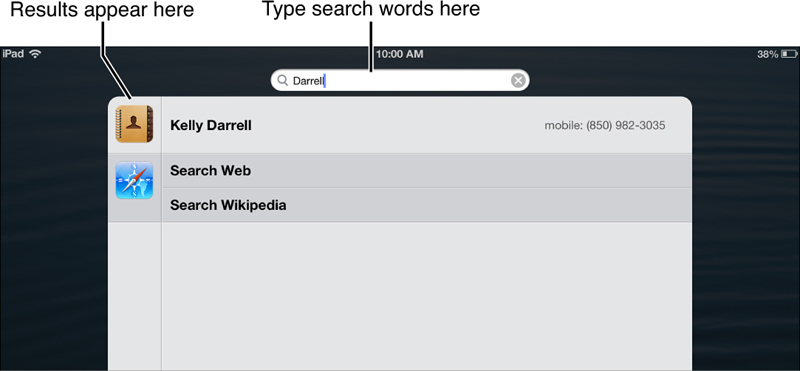
You can also use the Search tool to find files on your iPad. Notice in Figure 16.3 that you can immediately jump to watching a movie downloaded to your iPad from iTunes. Tapping the movie listing opens the movie immediately (skipping the information page) and starts playing from the beginning or the spot where you last closed down the Video app.
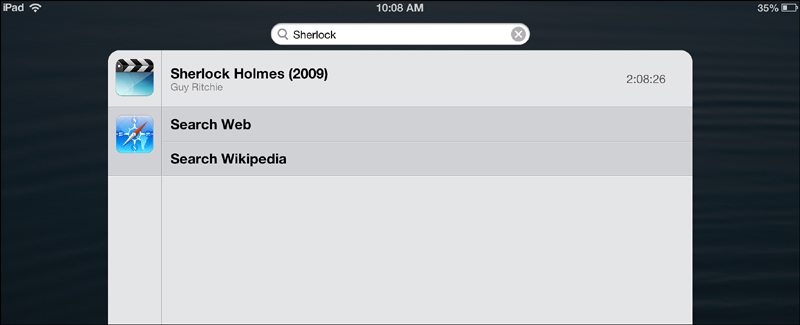
The Search tool also works for music. If you type in the name of a song, it shows up in the listing; a single tap on the song will open up iTunes and begin playing the song. Even better, you can type in the name of a band, as shown in Figure 16.4, and a complete list of all the songs on your device is displayed, allowing you to pick one to start playing.
Finally, one of my favorite uses for the Search tool is for quick Internet search. For instance, let’s say I want to find a good recipe for making molasses cookies. As you can see in Figure 16.5, I searched but no results were provided because I lack a recipe stored on my iPad.
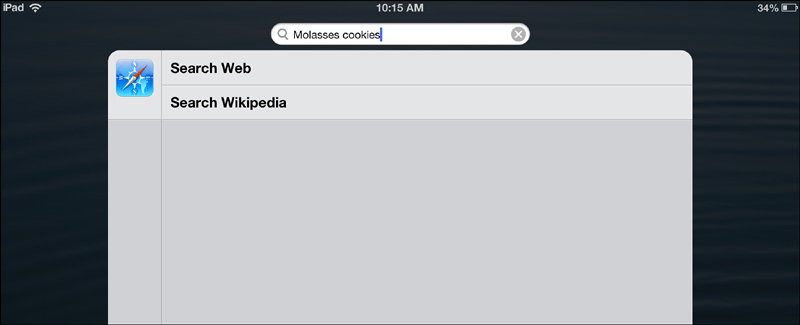
Fortunately, the Search tool allows me to continue my search either on the Internet or on Wikipedia.org.
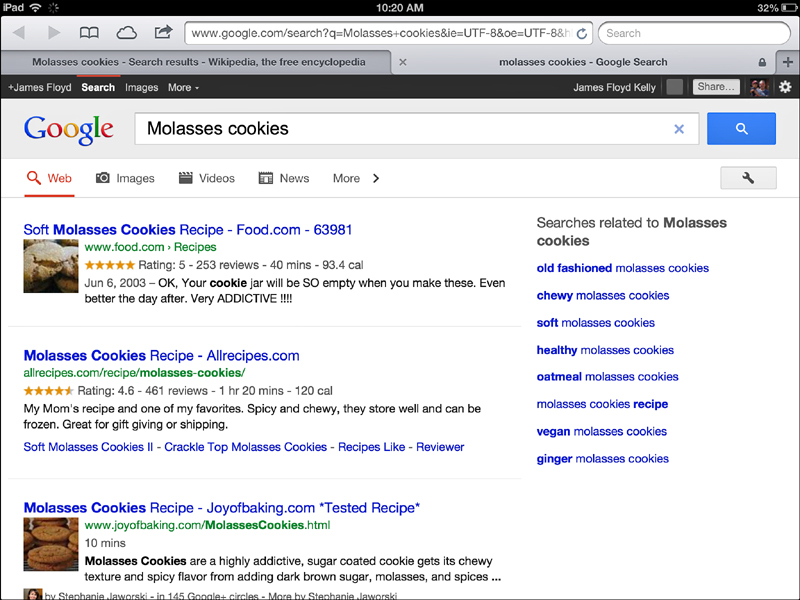
If I tap the Search Web button as shown in Figure 16.6, I find that there’s no shortage of recipes for molasses cookies on the Web.
 Note
Note
Keep in mind that your search results will be provided using the search engine you specify in the Settings app. Your choices are Bing, Google, and Yahoo!, with Google being the default. If you want to change search engines, open the Settings app, scroll down to the Safari option in the left column, and then tap the Search Engine option in the right side of the screen—tap on one of the three search engines to select it.
At this point, it’s in my hands to search through the results provided to find the best recipe. At any time I can return to the Search tool and refine my search using additional keywords (such as “molasses cookies quick recipe”).
What else can the Search tool do for you? Well, it can search the Reminders and Calendar apps, and you can even type in the name of an app to open it directly from the Search tool. It also searches the Messages app and hunts down keywords found in any conversations you’ve saved. It will also sift through the Notes app.
What won’t the Search tool do for you? Unfortunately, the Search feature does not provide search results for eBooks stored on your iPad. I have absolutely no idea why you cannot type in an author’s name and have it display any eBooks you have in the iBooks app. Maybe this will be updated later, but for now you have to open the iBooks app to search for a particular eBook or author.
Also, the Search tool won’t search the Maps app for street addresses or the location for the nearest Greek diner. For that, you’ll actually need to open the Maps app. And speaking of the Maps app, it’s now time to see it in action.
Explore the Maps App
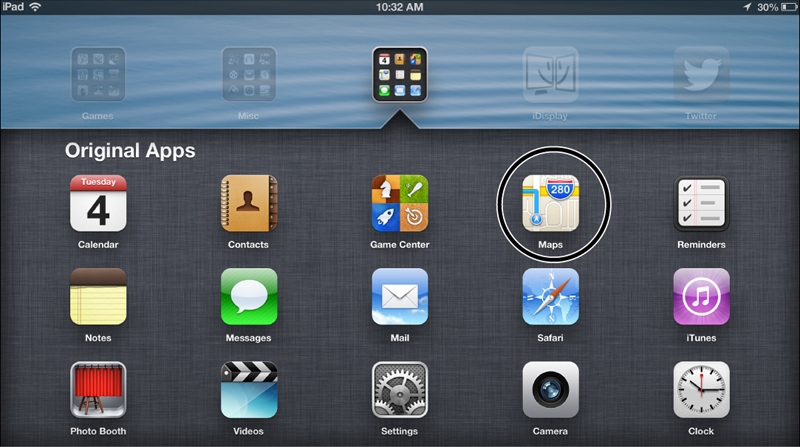
The Maps app icon is shown in Figure 16.7. Go ahead and tap it to open up the Maps app.
I don’t know where you’re currently located, but the easiest way to show you how to use Maps is to start at the world map displayed and type in an address in the upper-right corner, as shown in Figure 16.8.
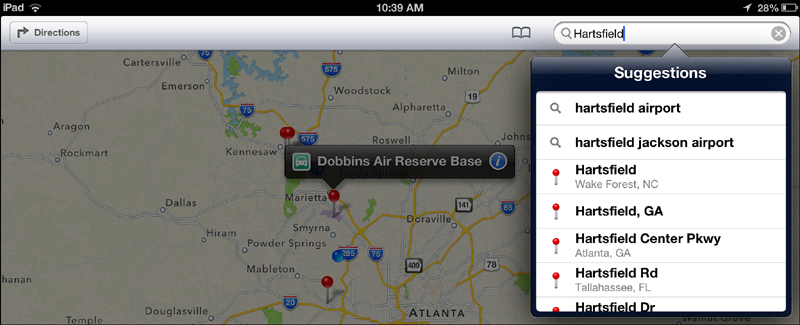
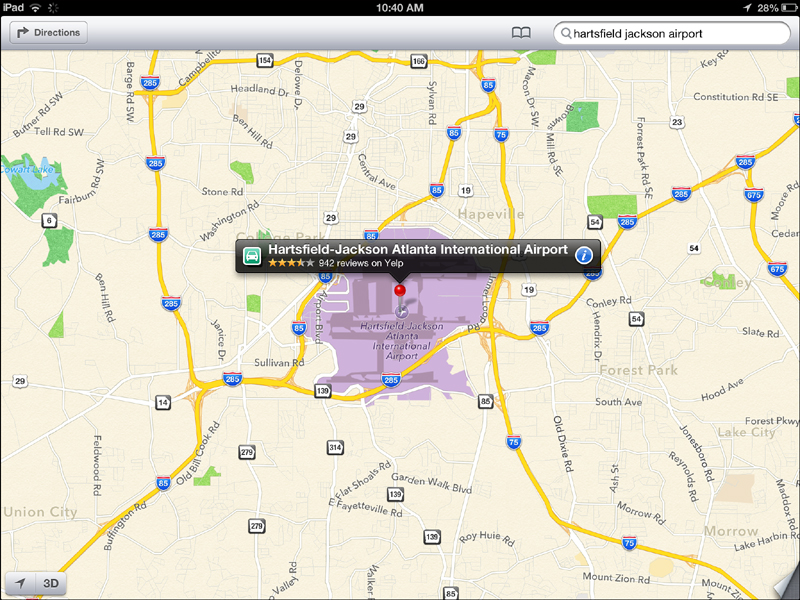
As you type a keyword (or street name) in the search box, Maps attempts to figure out what you’re looking for and offers up some options. Notice in Figure 16.8 that some of the locations have a small red pin to the left of their name—this lets you know that these are actual physical addresses you can find using Maps and not just a general area (such as a park). All you need to do is tap one (such as the Hartsfield Jackson Airport result in this example) and the map zooms in to give you a bird’s-eye view, as shown in Figure 16.9.
If you tap the small blue dot with the i inside (for Information), a much more detailed information page opens, as shown in Figure 16.10.
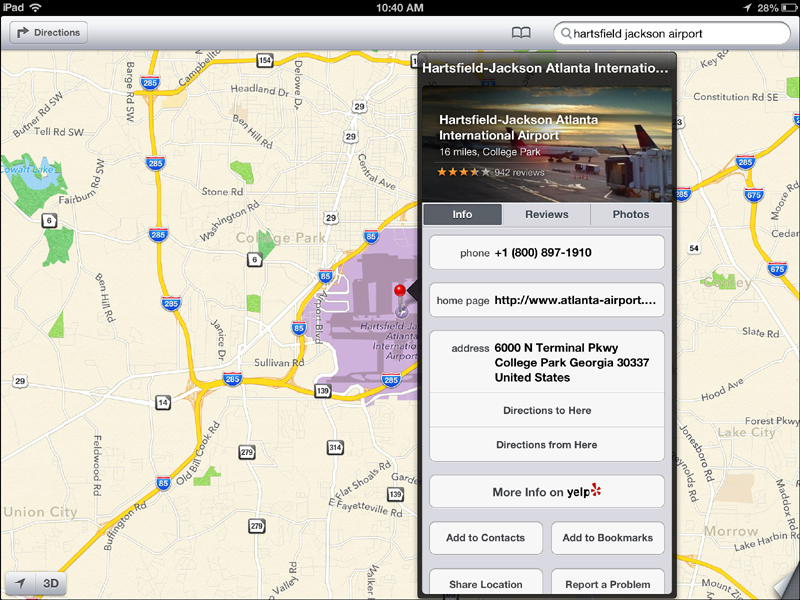
This information page isn’t available for every address you’ll ever type into the Maps app, but it’s usually found for businesses (such as restaurants and shops) and public sites (such as parks and libraries). You’ll often find a phone number, a website, and even reviews for businesses.
Now, let’s say you’d like to get driving directions to the address you’ve just found. Notice in Figure 16.10 the Directions to Here button. Tap it and a small window will appear like the one in Figure 16.11.
 Caution
If you wish to use the Maps feature to find directions from your current location, you will need to enable this feature on your iPad by turning on Location Services. Open the Settings app, tap on the Privacy listing in the left column, and in the right column tap Location Services. You’ll be provided with a list of apps that can use Location Services—make certain that Maps is switched to On.
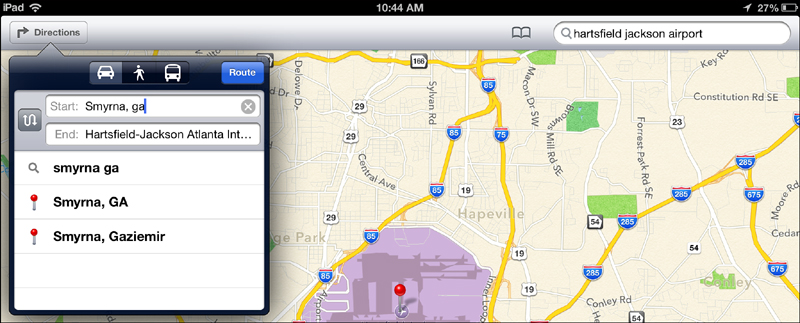
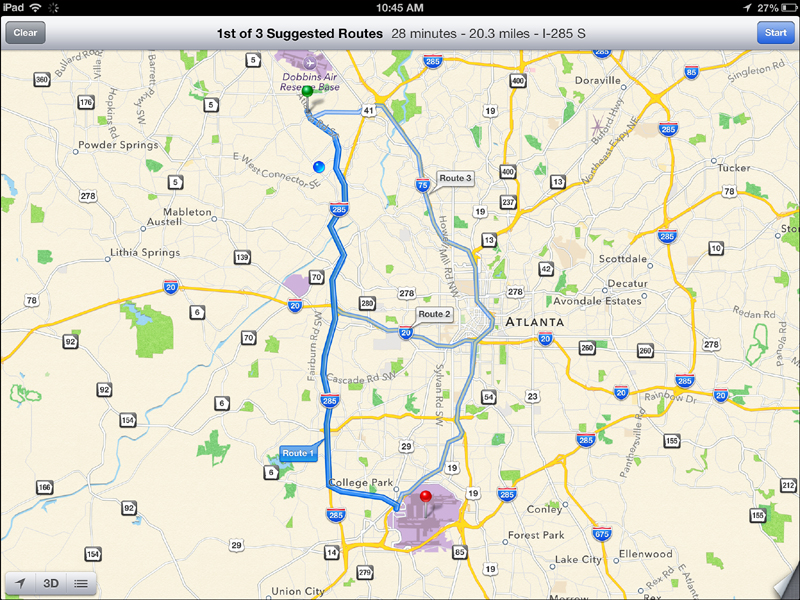
After you’ve typed in an address (or a city or town name), tap the Route button and the path from A to B is displayed on the screen with a nice thick blue line showing the route you’ll take. Figure 16.12 shows the route from a suburb in Atlanta to the Atlanta airport.
The displayed route is nice, but what if what you really want are actual written driving directions. Fortunately, the Maps app offers this capability. In the lower-left corner of the screen are three tool buttons—Current Location, 3D View, and Directions.
Note
If you’ve enabled the use of Location Services (see previous Caution), tap the Current Location button and the map will zoom in to display the iPad’s current location. The 3D View button offers a slightly angled view of the map, but I’ve honestly never had much use for it. I’ve been told it’s helpful for walkers in an urban area, but I much prefer the standard bird’s-eye view.
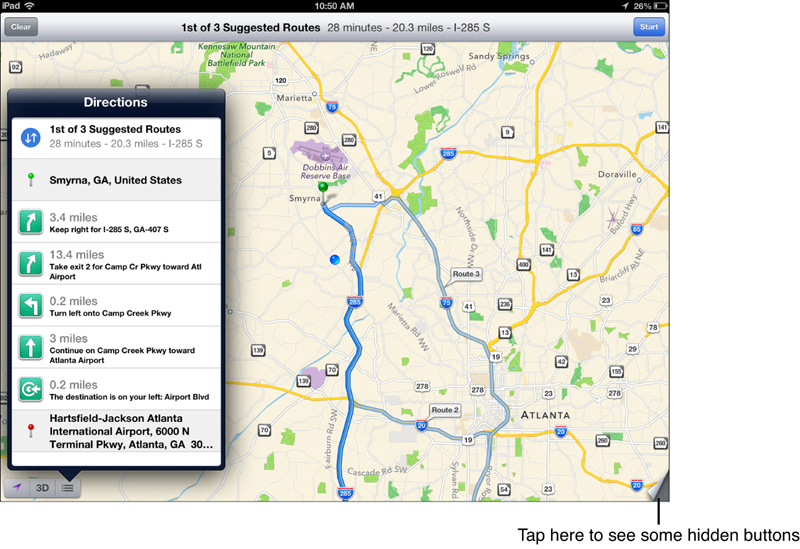
When you tap the Directions button, you get a pop-up window like the one in Figure 16.13 that provides you with turn-by-turn directions, complete with distances and exit numbers! The route is outlined in blue, and a green pin indicates the starting point and a red pin indicates your destination.
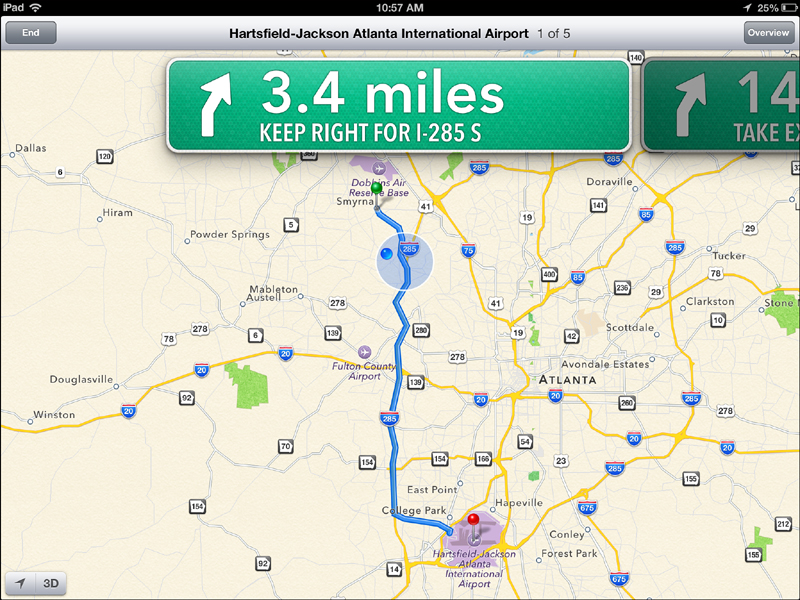
When I’m driving, I usually prefer not to have to look at written directions. Thankfully, I can tap the Start button in the upper-right corner of the screen to get a kind voice that lets me know when exits, turns, and streets are approaching. Figure 16.14 shows how the Maps app offers large, easy-to-read markers for me to glance at so I know what to expect. I can tap the End button at any time to end the guided directions. Keep in mind that step-by-step directions require an Internet connection; this means having an iPad that supports both Wi-Fi and cellular. Because it’s unlikely you’ll have a Wi-Fi connection in your car, this feature is typically used only with iPads that also come with a data plan from your mobile carrier.
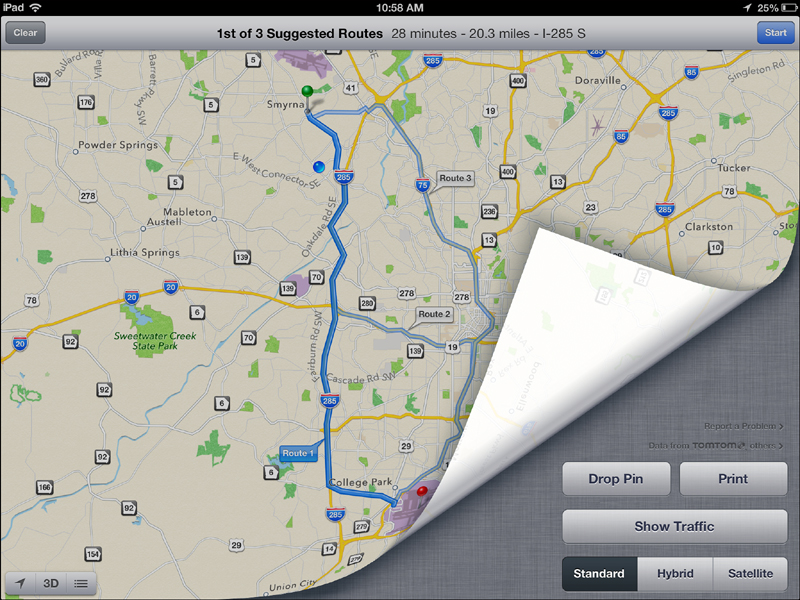
Finally, tap in the lower-right corner of the screen, where it looks like the page is peeling back (refer to Figure 16.13). The map page will expose some hidden buttons, as shown in Figure 16.15.
The Drop Pin button allows you to place a pin on the map and view the address associated with that location, as shown in Figure 16.16, but it also offers up additional options.
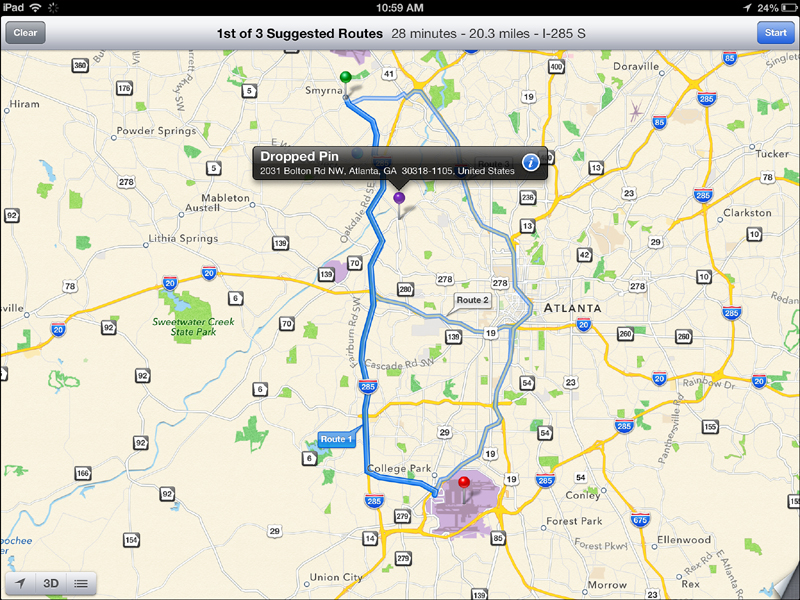
You can tap and hold on the pin to drag it around on the map—release your finger when you wish to drop it in place. As you can see, the pin provides you with the address of where it is dropped, and you can tap the Information icon (small blue circle with an i inside) to get more details. You can drop a pin at a particular location on the map and then use it as the destination. I use pins to mark restaurants and other stores I see during a drive and wish to remember the details.
Refer to Figure 16.15 and you’ll see the following buttons:
• Print—The Print button allows you to print the current map to any printer that supports the AirPrint service.
• Show Traffic—If you tap the Show Traffic button, you’ll see little construction and traffic accident icons appear on the map, like the ones shown in Figure 16.17.
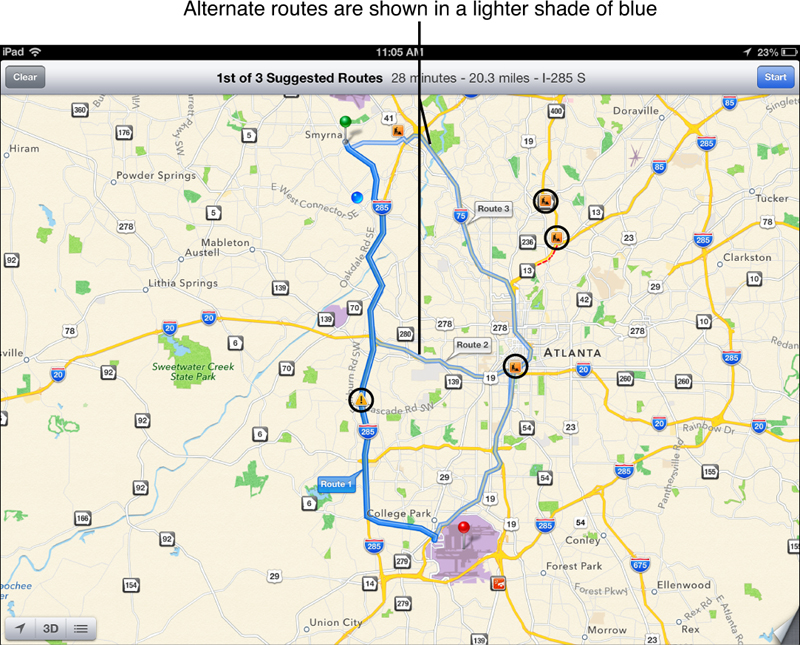
Let’s say you see a car accident or construction on your planned route. Notice in Figure 16.19 that there are two additional lines (lighter blue in color) that also link Point A to Point B. If you tap on either of the blue lines, you get an alternate route, as shown in Figure 16.18.
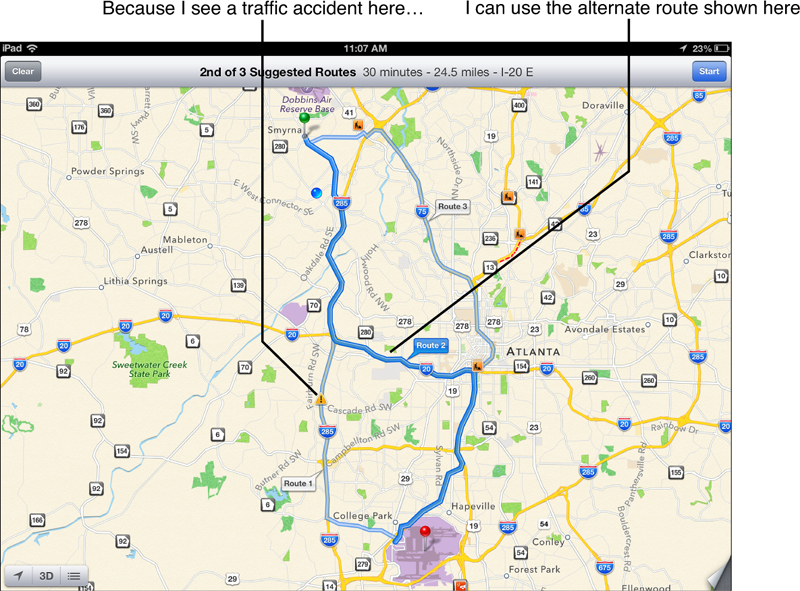
The new route is labeled Route 2, and it will still get you from your current location to the Atlanta airport. Likewise, there’s a third route you could take (using Interstate 75) if Highway 285 is blocked.
As with the original Route 1, you can tap on the Directions button at any time to get written instructions for the new (alternate) route.
Tap again in the lower-right corner of the screen and you’ll see the Satellite button. I don’t use this very often, but it’s sometimes fun to get a satellite view of a house or famous monument. As you can see in Figure 16.19, using Satellite view, you can look down on the Eiffel Tower in Paris, France!
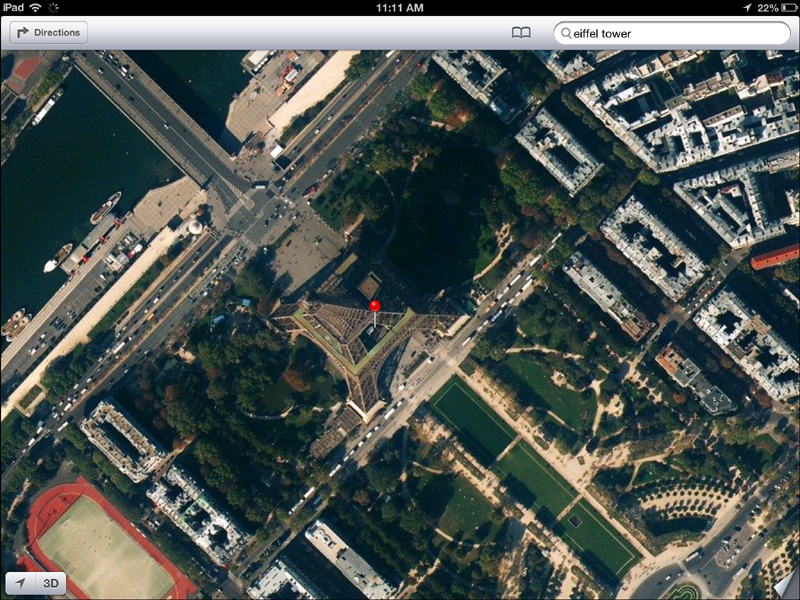
As with photos, you can zoom in on the satellite image by reverse-pinching (tap your thumb and pointer finger on the center of the screen and then move them apart). This will often give you some surprising details on the visible map.
Tip
One popular alternative to Maps is Google Maps, a free app that offers many of the same features as Apple’s Maps. There were some complaints about inaccuracies with Maps during a 2012 update to the application, and to a point, they were valid. Many users prefer the street-level view offered by Google Maps (it provides an image of what you’d see if you were standing and looking left, straight, or to the right), allowing you to see landmarks such as gas stations, statues, street signs, and so on. Try it out! You’ll need to determine for yourself which app works best for you.
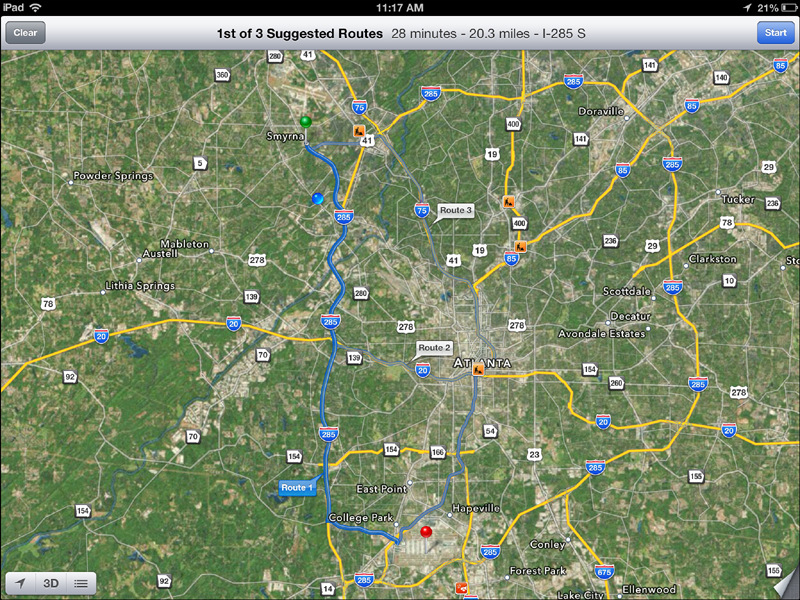
The Hybrid option (to the left of the Satellite button) simply offers up a mix of the Standard map with the Satellite view, as you can see in Figure 16.20.
Tip
Many third-party apps offer the same navigation features found in the Maps app, but they also frequently offer more advanced tools, such as mileage and fuel estimates, recommendations for gas and food stops, and much more. You can search the App Store for alternatives using the Navigation category.
Say Hello to Siri
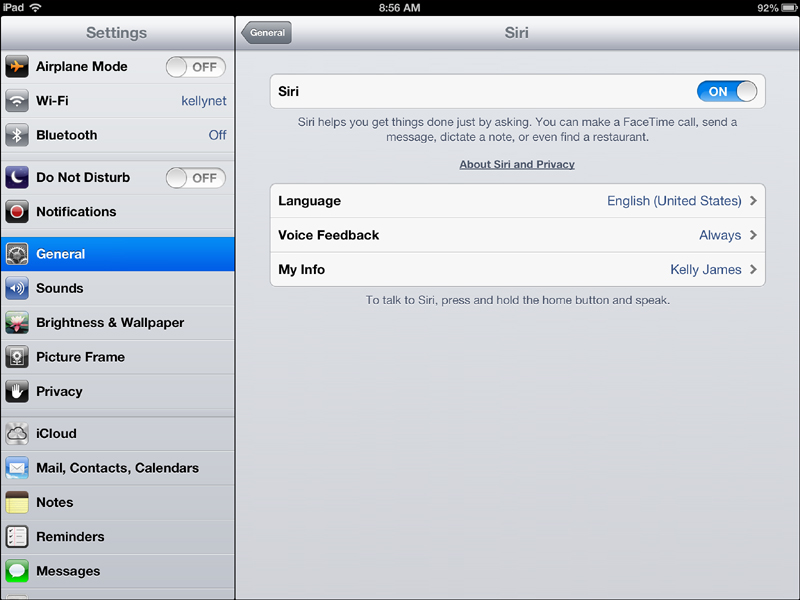
Before you can use Siri, you’ll need to enable it. You might have done so during the iPad setup routine, but if you’re not certain, just open the Settings app, tap on the General option on the left side of the screen, and tap the Siri option in the left panel.
When you tap on the Siri option, another page will open as shown in Figure 16.21. If Siri is turned off, tap the toggle button to turn it on.
Using Siri is fairly straightforward—simply press and hold the Home button for a little longer than one second until you hear a ding-ding sound and see a small microphone appear on screen asking “What can I help you with?” This is shown in Figure 16.22.
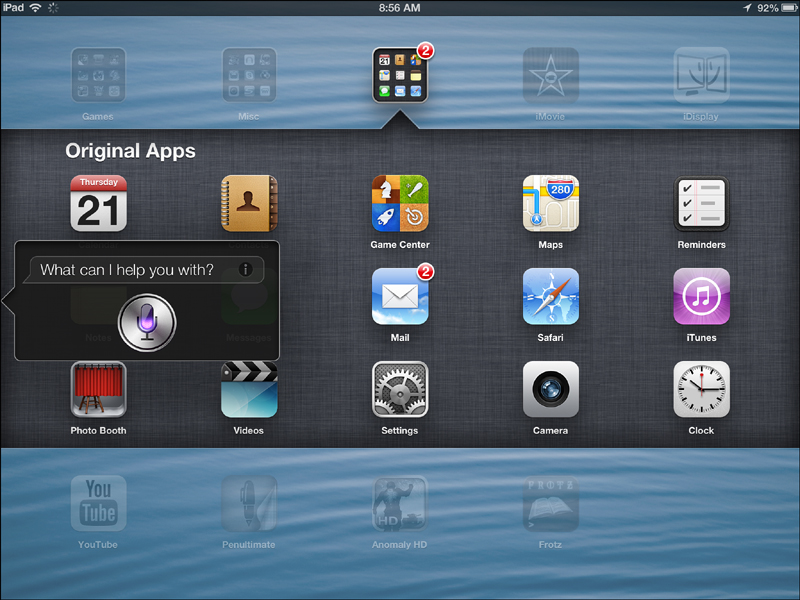
You’ll have about five seconds to ask a question before the microphone turns off. You can simply tap the microphone button again to have Siri start listening for your question.
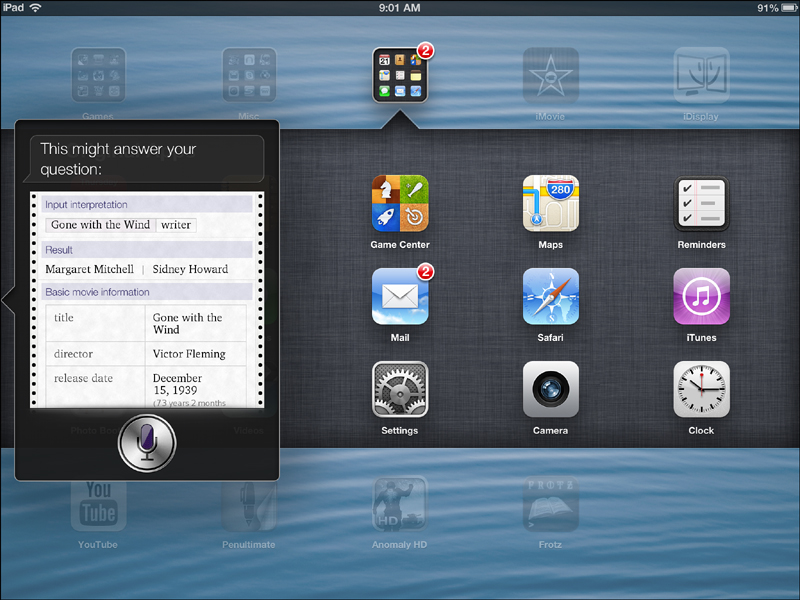
What kinds of questions can you ask? You can request Siri to call a contact using FaceTime (say “Call Donna Kelly with FaceTime.”), ask for directions (“I need directions to Rev Coffee in Atlanta, Georgia.” or even find out who wrote a certain book (“Who wrote Gone with the Wind?). Siri will sometimes answer with a verbal response, but most often will respond with something you must view on the screen. Figure 16.23 shows how Siri responded to my query about the author of Gone with the Wind.
If you’re looking for a nice summary of all the different things Siri can do for you, I’m going to point you to two different sources of information. The first is the official Siri page on Apple.com. You can find it by visiting http://www.apple.com/ios/siri/.
The second source is much more detailed—visit http://www.tuaw.com/2012/09/14/what-can-you-say-to-siri-in-ios-6/ to read an extensive list of sample queries that can be put to Siri.
When it comes to Siri, the requests I use the most include adding events and reminders (to the Calendar and Reminders apps, respectively), getting addresses for restaurants, and asking for game times for various leagues. You’re sure to find your own favorite uses for Siri, so I highly recommend taking Siri for a test.