66
Streaming Video, No Longer an Upstream Row
Peter Zunitch

Figure 66-1
Streaming video has evolved tremendously over the years. It’s as stark a contrast as Dorothy’s barren black and white farm was to the glory of the Emerald City.
My dear friends, we’ve reached the Promised Land, the ability to stream high definition video from one computer to many with a quality everyone predicted, but no one believed we’d actually achieve.
More accurately termed a progressive download, the streaming video we’re talking about here refers to watching a video as the data arrives on the viewer’s machine, without having to download first. Besides being slightly more secure, streaming brings a viewer much closer to instant gratification, a big plus in an era where our attention span has become too short to even watch an entire music video. Plus, given the advances in compression, computer speed and bandwidth, the additional resources streaming requires become largely mitigated.
So how’s it done? More importantly, how is it done correctly? We’ll take you from edit to distribution in no time. The steps are generally the same no matter which encoder you choose and the information here can easily be adapted to run with your particular setup.
Out with the Edit
Many video edit systems provide built-in support for creating a stand-alone video file. However most have limited options, are slow, and/or provide inferior quality. It is for this reason I highly recommend using an external transcoding program whenever possible.
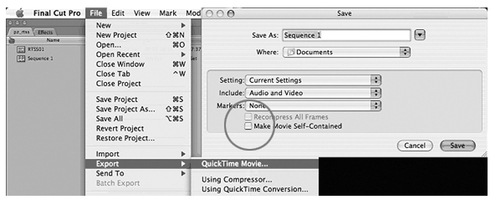
When your edit is complete, look for the “Export” function in your editor. The specific steps will vary by edit system, and possibly by the user preferences you’ve set up, but typically you’ll have to select the sequence you want, mark in and out points, and select the tracks to include (Check your product manual for more specific information.) You’ll also need to choose an output format. Select a format compatible with both your editor and compressor. Choose “QuickTime Reference” if it’s available. If it isn’t, choose the native format of your edit sequence. Likewise, select.wav for audio when possible. The idea is you don’t want to compress your movie at this point. You simply want a file of your edit that you can work with elsewhere.
A Short Cut
If you’re going to a video-sharing site like YouTube or Veoh, then you might be in luck here if you forgo the reference file and export an actual movie. Most of these sites support a massive amount of file types for upload, and will likely take your video as it stands. Know however that doing so basically means leaving the transcoding up to them, and you’ll probably be sacrificing some quality. Being the consummate professionals we are though, we’re going to do it ourselves, right?

Taking Control
Now open up the transcoding program of your choice. Which one you choose should depend primarily on if it can import your source footage without reencoding it, and if it can output all of the file formats you need in a fast, efficient and reliable manner. You’ll then want to add or import the file to be compressed (most of the time you can simply drag the file to the source window).
For video, our most important issues are quality followed by size. So choose your codec and settings based on site and Webmaster recommendations whenever possible. Once you’ve decided, double click it, or drag and drop it on top of your video to apply the presets. Depending on what codec you use, you’ll be presented with different options. The major settings to be concerned with are in the chart provided. It’s OK to leave everything else alone in most cases.
If you’re entirely confused as to where to begin, and have no input from those in the know, then consider optimizing your sequence for 300 kbps. This will allow most broadband users to play the file with no problem. Many transcoding programs provide presets for streaming. It can be helpful to start with these and tweak for your needs, but in a pinch you can rely on them to do a decent job.
Your frame size should be set to accommodate your web page, but consider that a good percentage of users still have a 1024 × 768 monitor. Your web page should fit inside that, and your video should be comfortable within the page. Leaving the video around the 640 or 720 range will work nicely and also avoids up-scaling. The video codec you need must obviously be compatible with your streaming platform.
Which audio codec you choose will largely depend on which media container and video codec you choose, but Mp3 (if supported) is always a safe starting point. Generally 112 kbps or more will be acceptable for dialogue with music, and unless you have a specific reason, don’t bother with anything other than mono or stereo. Most people only have two speakers on their computer setups.
As your last step, add any metadata you feel is necessary, set your destination and hit “go.” When rendering is done, verify that the video is within file size limits and that it plays back satisfactorily. You may have to tweak settings a bit to find optimal balance.
The Great Reveal
Now it’s time to publish. Log in to your destination site and upload your file. There are many options. YouTube is an obvious choice, as are sites like Veoh, Metacafe, Yahoo, etc. They all differ in what options, file formats/size allowed, acceptable content and promotion choices you get at what price point. You’ll need to explore the options of each.
Choose a category for your video and a catchy, yet relevant title. Be sure to fill in the tags with relevant keywords. Careful choices here will help promote your video both within the site and with search engines. Most likely there’s also boxes for linking your video to a website at the bottom. You’ll also want to select if your file is to be viewed by the world at large, or by private invite only.
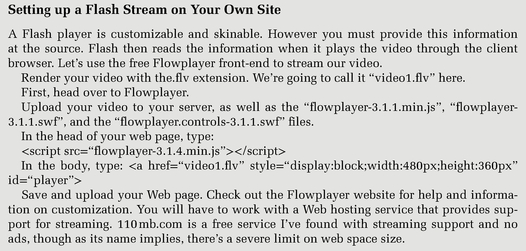
If you’re creating your own site and you’re using Flash or Silverlight, you’ll also need a player front-end. Advanced users can build their own interface, but options like flowplayer.org and slvideoplayer.codeplex.com respectively are good free alternatives. Make sure you find a web hosting service that supports streaming video.
Now that you’ve tested your video (you remembered to do that, right?) you’re ready to announce it to the world. Most of the video hosting sites have options for linking to your site through Facebook, Myspace, etc. Consider also what special interest groups might be interested in your video and put a post on any forums you can find. Remember, too, that there’s nothing keeping you from uploading to more than one site. And of course don’t forget to email a link to everyone in your address book. Yours could be the next viral video hit!