57
Simple Compositing
Morgan Paar
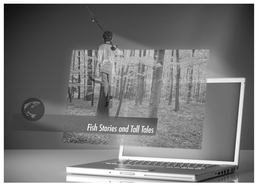
Figure 57-1
Everyone loves to be awed by movie magic, and you can bedazzle your audience using our simple compositing tips that reveal the secret of see-through layers.
Compositing is omnipresent. It would be nearly impossible to watch a Hollywood film or an hour of television and not see some sort of compositing. Some films, such as Zack Snyder’s Spartan Epic, 300 (2006), is nearly all compositing. But what is this technique, and how do we who have less than a Hollywood budget use it?
Compositing is the combination of two or more images to form a single final image. The six o’clock news meteorologist standing in front of a weather map is a good example. The map is not really behind this person, nor is it projected. The composite is made in the “booth,” where a video engineer combines the feed of the live meteorologist with the image of the map and the icons of clouds, the sun, names of counties or towns, etc.
Another great example of common composites is lower thirds. These can be static graphic or flashy motion visuals which usually identify a person and his profession. You find them often in news programs, documentaries and sporting events such as football and baseball games. Similarly, titles in films, commercials and music videos use this graphic type of compositing.
Now, I know what you are thinking: “Ah, I get it, computer-generated effects.” But not all compositing is the product of microchips. George Melies, a stage magician working in France over 100 ago, often gets credit for being the first compositor for moving pictures. Melies admired the works of film pioneers, the Lumière brothers, in 1895 and was inspired to combine some of his sleight-of-hand with film. His famous 16-minute, black-and-white film, A Trip to the Moon ( Le voyage dans la Lune, 1902) can still be found pleasing audiences over a century later.
The Basics
The basic idea behind compositing is transparency. A great analogy is t-shirt silk screening. You stretch fine-mesh cloth or screen over a wooden frame. You can press ink through this screen onto a shirt. Next you adhere a “negative” of the image you want onto the screen. It’s a bit like a stencil: the negative image attached to the screen will not let ink through.
When we composite, our “frame” is the pixel dimension of our video, 720 × 480, 1280 × 720, 1440 × 1080, etc. The screen is usually what’s called an alpha channel. Instead of using a negative, you place

Figure 57-2 The checkerboard pattern seen here in the background represents the alpha channel.
your still or moving image right on your “screen.” The “screen,” “frame” or alpha channel usually disappears completely leaving behind your image. That image can also be something more abstract, such as fog—a tint of color which will alter our image.
The alpha channel is important, because it keeps our visible image on the correct x- and y-axis. If we have a lower third which we want to use in a documentary about school teachers, we can make a template of our lower third and switch out the names and occupations of all the teachers, administrators and students in the video. The alpha channel makes sure that this “floating” lower third is always in the same position on the screen relative to height and width. Does this make sense? Without this layer locking in our graphic to its correct x- and y-axis, it could float around our “frame” and be inconsistent.
There are times we need to be very conscious of this alpha channel and make sure we keep it intact. For example, when we export an image from Photoshop and import it into our editing software, we need to make sure the alpha channel is not compromised. If we create graphics, lower thirds, watermarks or any other “layer” for a composite within our editing software, we may not even be conscious of this alpha layer.
To oversimplify what we are talking about, an alpha channel is 100 percent transparent. Your image can be fully opaque or partially transparent, have feathered or gradient transparencies and/ or many other variations, adding to the complexity of your composite. Any of this making sense? Perhaps some examples will make it clearer.
Lower Thirds and Bugs
We call graphics living in the lower area of the screen—usually identifying an on-camera speaker—a lower third. If you’re over 40, you may know them as Chyrons, Vidifonts or superbars (or Astons or name straps, if you speak with a British accent).
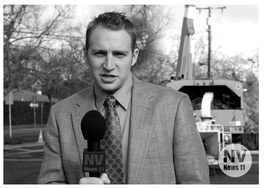
Figure 57-3 A sample of a bug generally (but not always) found in the lower right-hand corner of the screen. Most bugs have some transparency, but others use solid colors instead.
Today’s lower thirds, at least in broadcast news and sporting events, are usually fancy, quickly-moving motion graphics, often accompanied by sound effects. Most editing software programs have nice-looking lower-third templates or ways to make custom lower thirds, built right in their titlers. Adobe’s Premiere Pro has a robust titler with many lower-third options. Some quite robust third-party titlers that make industry-quality lower thirds include Boris FX, Ulead COOL 3D and Apple’s Motion. Adobe’s Photoshop and After Effects are 2D and 3D still and motion graphic favorites.
A bug or watermark is usually a semitransparent graphic icon or logo that you use to tag a video. The broadcast networks, such as NBC and ABC, first used them, but now you find them on most cable channels as well. If you watch YouTube videos embedded in a non-YouTube website or blog, you’ll see a YouTube bug in the lower right corner of the video.
Green/Blue screen and Special Effects
Thanks to the behind-the-scenes, extra footage found on many blockbuster Hollywood DVDs, we know the wonders of green- and blue-screen work on movies such as The Lord of the Rings trilogy, 300, Sky Captain and the World of Tomorrow, the Star Wars prequel trilogy, etc. Many of the scenes in these movies have layer upon layer of composites, such as painted backgrounds, live action footage and many layers of special effects— laser beams, explosions, robots, etc. But this is not only the domain of Hollywood studios with billion-dollar bank accounts. Robert Rodriguez is proud of the fact that he made many of the special effects in the Spy Kids series in his garage.
Wipes and Split Screen
You know that typical split-screen/wipe when a character on screen calls another person? Viewers see the footage of a person answering their phone slide into the footage of the caller, usually from the right. This is compositing. Most such wipes are. There are many pre-made wipe transitions in editing programs, but you can also make your own by using your knowledge of compositing.
Special Effects
Remember that holographic SOS message sent by Princess Leia via R2D2 in Star Wars, Episode IV: A New Hope (1977)? We can easily do that today with compositing. Want ghosts in your story? No problem. All of these types of special effects can be done easily with compositing. How about an image of yourself talking to yourself? You could now be a triplet even.
But How!?!?
We’ve arrived at the end of the chapter, and we haven’t even talked about how to composite. The concept is fairly simple, but you can get as complex with it as your imagination allows. The main concept involves layers. You will need to work with two or more video layers on your timeline. Put some kind of static or
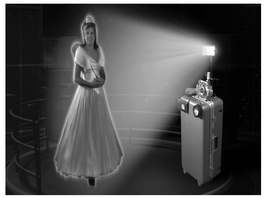
Figure 57-4 A studio light for an “eye,” a camcorder for a “body” and various other video accessories become our version of R2-D2’s holographic feed of our fairy godmother watching over the Videomaker staff.
moving image on video track 2 with some sort of transparency, and you will be able to see through to video layer 1. That is it, really.
There are all sorts of ways to do this. We have already mentioned alpha channels. Put a bug of your station’s name, “Video Wizard Television,” in the lower right corner of your frame by placing the logo with invisible alpha channel on video track 2 and this half-transparent gray logo will appear over any video you have on video track 1. Shoot an actor walking toward a camera against a green-screen and “key out” or digitally erase the green background, drop the walking actor on video track 2 over footage of an exploding building on video track 1 and you have a giant Hollywood effect (where you get the footage of the exploding building is your real challenge—be careful). Cropping is also a useful tool, especially for the two-people-talking-on-the-phone example above. All the big editing programs allow you to crop a moving image.
See-Through Layers
This really is not as difficult as it seems. Figure out how your particular editing program handles alpha channels, key effects and cropping, and start making your own Hollywood effects or network television graphics.