
43
Green Screen Directing
Marshal M. Rosenthal
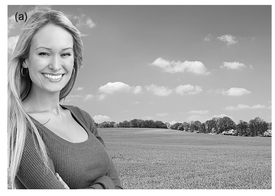
Figure 43-1
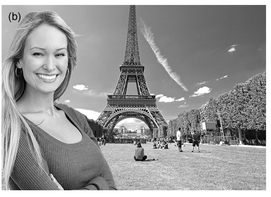
With the advent of YouTube and inexpensive HD camcorders, pretty much anyone who wants to be a movie director can be one. But for the aspiring Spielberg or Cameron producers who wish to beef up their vids, well, using a green screen is hard to discount. The idea of being able to create a background of your choosing—be that a pastoral scene, the Eiffel Tower or an asteroid in outer space—is hard to beat. And, surprisingly, easier to do today than ever before.
A “green screen” at its most basic is a surface wide enough to replace the background of your video. The color green, which is used for the simple reason that it is the least likely to appear in human skin tones, gets “stripped out” in digital post-production (assuming it is human beings that will appear before the screen). Once an expensive process, it is now almost commonplace to do on pretty much any desktop or laptop computer that has video editing software running with a green screen component. The desired background is then placed into position and voilà—you’re in France—or walking on the surface of the moon.
Interestingly enough, there was a time when the green screen work was many times more complicated than the shooting process. Due to digital computer technology, the roles have been reversed. If you are going to direct a movie which will be using green screen, the time spent properly executing the shooting can be much more involved than at the digital end. Not to mention it being a lot easier to avoid problems while shooting that otherwise will involve ridiculously long post-production sessions to fix—if they can be fixed at all. “Directing for green screen” might as well be a category rather than just “directing,” because it does require a different mindset that would be the case where the background is real. What must be considered and applied in order to direct for green screen are staring right at you and involve more than just knowing what the background is going to be once the video editing program takes over.
Lighting
Those who think you just set up a few lights and you’re done need to think again: in a real sense you must “direct” the lighting so it will apply correctly to the green screen environment. Lighting plays a major part in how well lit a scene will be of course, but it also can provide touchstones that blow the green screen “effect” you are trying to create right out
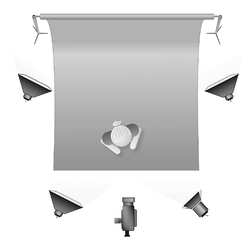
Figure 43-2 Light the green screen and subject separately to avoid spill from the green screen. Then light the subject properly to match the desired background. This ensures the green screen will be lit evenly in order to pull a great key.
of the water (or computer, in this case). Classic lighting schemes, such as applying a main light from one side towards the actors at a 45 degree angle while a much weaker one is at the other side, can cause shadows to fall on the green screen. While these shadows may be able to be eliminated in post-production, a simpler and less time-intensive solution is to manage the actors far enough away from the green screen so that the shadows are too weak to register.
By this same token, you can also more acutely angle the lighting—throwing the shadows away from the green screen. Of course the more acute the angle, the more shadow there will be on the actor. This can be used to good effect in a scene but, as a general rule, should be avoided (unless the actor’s faces aren’t worth seeing all that much).
The color temperature of the lighting can also negatively impact your “green screening.” Fluorescent lights have a tinge to them that must be corrected in postproduction, adding another layer of time to the production. Daylight attuned fluorescent bulbs are the way to go if fluorescent lighting can not be avoided; daylight-attuned incandescent bulbs being the best solution due to their being less costly and easier to handle. Regardless, using lighting which is not balanced for daylight will only add to your problems—and avoiding those problems is always good advice.
One thing to remember is that there are different types of lighting schemes, each having their own unique advantages and disadvantages, But whether you are a proponent of full frontal lighting, side lighting, edge lighting or any other variant (including that of illuminating the top of the actor’s head for greater separation from the background), don’t lose sight of what the lighting on the background you will add later will look like. Sure computer programs can do amazing things when necessary, but it’s much easier to light the shadows on an actor’s face to match the shadows on the background that is already being readied in the computer rather than having to do it the other way around. And obviously if you’re shooting a night scene, you must match the general ambience the viewer expects in such a situation while still balancing the need to provide a discernible image.
Screen Light
In all of this, we’ve yet to address the issues of lighting the green screen itself: which you must do. Thinking of the screen as an actor doesn’t hurt because most of the rules applying to actors being lit, such as intensity of the light and color temperature, apply to the green screen. Where it differs is that you must strive for a uniform lighting scheme to illuminate the green screen—avoiding hot spots by having more light on one side than the other. The idea is to light the surface of the green screen so that there is no sheen—just an overall, well-lit surface. This will provide the best route for post-production work.
Color vs. Green Screen
It should be evident that a color that is similar to that of the green screen (which, by
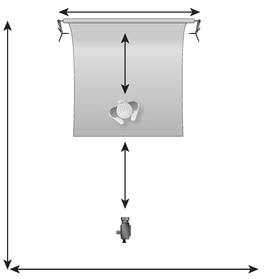
Figure 43-3 One of the tricks to getting great results with a green screen is separating your subject from the background. Allow yourself plenty of room to position your subject 6–9 feet from the green screen.
the way and horror-of-horrors, doesn’t actually have to be green) will behave exactly the same as the green screen does, be it a prop, piece of clothing, jewelry or whatnot. While this can be problematic—and in the case of Popeye the Sailor, even catastrophic if Bluto should appear and Popeye has to pull out his green can of spinach— all that is required here is some careful planning to avoid it becoming an issue. Of course testing everything that goes in front of the green screen goes without saying: a few minutes performing a video recording that can then be used in the video editing/ green screen program that is going to handle the post production will alleviate your fears—or provide a needed early warning.
Blocking
Proper positioning, or “blocking” of the “actors” who will be performing in front
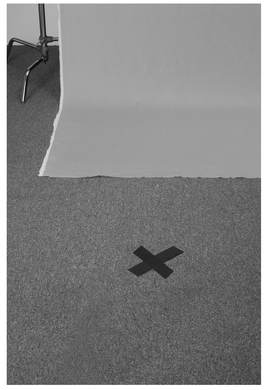
Figure 43-4 Be sure to mark off areas where the talent should stand to avoid falling off the green screen. A simple piece of tape or chalk will do the job.
of the green screen is vital; important as regards their position relative to the green screen, but even more vital should they not be “static” but moving during the shooting. The most vital necessities for effective blocking can be condensed into the following:
Being Aware of the Green Screen
The actor needs to be aware of the physical limits of the green screen behind him/ her. While this should be less problematic when not moving, even simple hand movements can break the boundaries of the green screen and cause disconcertion in the image being shot. A simple marking on the floor (chalk or strip of tape) can be used to line up with one of the legs of the actor, keeping him/her in a proper position relative to and safely within the confines of the green screen.
Hitting the Marks
Movement can occur in front of a green screen, providing that the actor has a firm understanding of his/her position relative to the green screen’s spatial confines— which isn’t confined to just side-to-side movements, but also front to back. In simple terms, this means that there are lateral boundaries on both sides of the actor’s “space” in which he/she must not exit so as to remain with the green screen’s confines as well as front/back boundaries the actor must also be aware of.
Actor Versus Green Screen Perspective
The perspective between the actor and the “background” that will be added later must be considered also. These front-to-back boundaries can be a bit tricky since, unlike moving from side to side, moving forward, away from, or backwards towards the green screen can betray the fact that the perspective does not change as it does in real life. Careful planning (and pre-testing) is the best solution here.
We Don't Need No Stinkin' Green Screen
Who says it has to be a “screen” anyway? Maybe you want to use one of those fluid stabilizers that let you move fluidly during shooting (can you believe they’re being made for iPhones, even?). Doing a 360-degree spin around an actor becomes easier—but then you’d lose the green screen, right? Wrong—as a director it’s your job to think outside the green screen box—or panel in this case—so what’s to stop you from wrapping green screen— like material around the person and having the video shot from inside? Or creating oddly shaped green screens that suit your purpose? Nothing!
Green screen shooting—like any good video idea—is limited only by your imagination.