35
Applying Three-Point Lighting
Robert G. Nulph
Some folks consider it a tired cliché, but it’s important to know how to set three-point lighting, so you can work within or without this classic lighting style.
We are often told, “you have to know the rules before you can break them!” In the case of lighting, the rule for good lighting involves the use of three-point lighting. In this chapter, we will provide pictures and diagrams that will give you the rules you need to produce good lighting in simple situations. Once you master three-point lighting, you will be ready to move on to creating realistic quality lighting for your video productions.
Key, Fill, and Back
The key light is the main source of light in a scene. You place the key light in front or to the side of the subject, depending on the situation. The more dramatic the light needs to be, the further to the side you should place the light. Usually you place the key light at a 45-degree angle above the subject and 45-degrees to her side (see Figure 35-1 ). If the light is correctly placed, it will create a shadow that pleasantly slants down the side of the subject’s neck as well as the side of her nose, giving her a three-dimensional look.
The role of the fill light is to fill in the shadows created by the key light. The fill light also gives the image a sense of time, place, mood and drama. The fill tells the viewer the brightness of the location where you are shooting. To prevent secondary shadows, it is best to place the fill

Figure 35-1 This is a classic three-point lighting setup with the key light being a high, hard light. A high hard key will give you a more dramatic, high-contrast look.
light in front of the subject and closer to the camera lens than the key. This light should always be some degree less bright than the key and, as described below, is best if it is a soft light.
The back light is essential to three-point lighting in that it separates the subject from the background. To set up a good back light, place the light behind the subject and opposite the main light source (key light). The back light should be set 45-degrees above the subject so that its light falls on the back of the subject’s head and the top of the shoulders. Use more back light for black, brunettes and less for blondes.
When you put all three lights together, it should create a very pleasant and natural looking three-dimensional image.
High Key Versus Low Key
If the fill light approaches the intensity of the key light, the contrast is reduced and is often called high key lighting. You would use this type of lighting if you did not need to create a dramatic mood or just wanted a low contrast scene.
If the fill is a great deal less intense than the key light, the lighting is called low key lighting. You would use this type of lighting for dramatic scenes, scenes shot to look like night time or dramatic interviews. To set up this type of lighting, place the key light further to the side of the subject to reduce the intensity or eliminate the fill light (see Figure 35-3 ).
Hard Versus Soft Light
The quality of light can be either hard or soft. Hard lighting comes from small lighting instruments that create hardedged shadows. You can create soft light by making your lights bigger by diffusing their light with large silks, umbrellas, or softboxes. You would use hard light to create intense dramatic lighting with sharp-edged shadows. However, if you want your subject to look soft and smooth, use a soft light setup.
You can also use soft lighting for both high and low key lighting. You will find a lot of high key soft lighting used in interviews and news shows. You place the


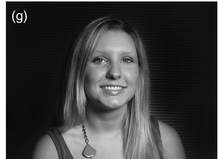


Figure 35-2 Lighting helps create the mood of the scene.
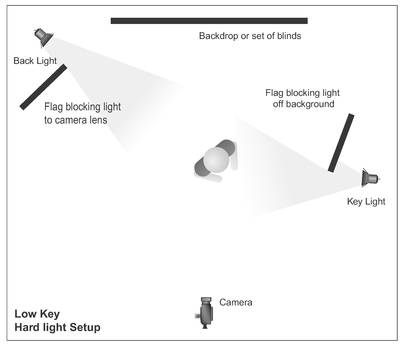
Figure 35-3 Without a fill light, a hard key light can cast a high contrast and harsh shadows. Keeping the light low and directly in front of your talent will minimize the effect.
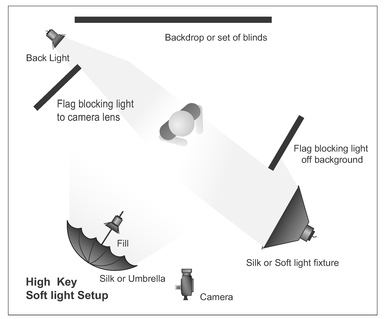
Figure 35-4 High key soft lights will cast soft, even light on your subject. Soft boxes or umbrellas are a perfect tool for this effect.
lights in basically the same places as the hard light high key setup in Figure 35-1. However, it can also be used to create soft and dramatic shots using a low key setup by eliminating the fill light and moving the soft light more to the side of the subject.
Mastering It All
Whatever your lighting situation, always ask yourself, “What are the quality and position of the main light source?” Place your key light so that it best approximates the look of that major light source. The fill determines the level of the ambient light in the scene and the back light, which is as intense as the key light, completes the setup.
Now you know the rules . . . you are ready to break them.