51
Easy Tricks to Edit Quickly
Mark Montgomery
Figure 51-1
Editing shortcuts are essential for a productive editing workflow. Beginning video editors should begin training their editing behaviors around these shortcuts before adopting any inefficient habits. Let’s take a look at the most common editing shortcuts to help you learn new ways to save yourself time and energy on your editing projects.
The Shot List
When we talk about editing shortcuts, we often think of keyboard shortcuts. Well, we’ll get there, but the first and by far one of the most magical of shortcuts is a good, old fashioned shot list. Although a lot of the difficult work is done while shooting, a detailed shot list is really for the benefit of making the editor’s chore easier.
In the early days of filmmaking, clapboards were used to mark the beginning of a shot so that the editor of the film strip could visually identify different
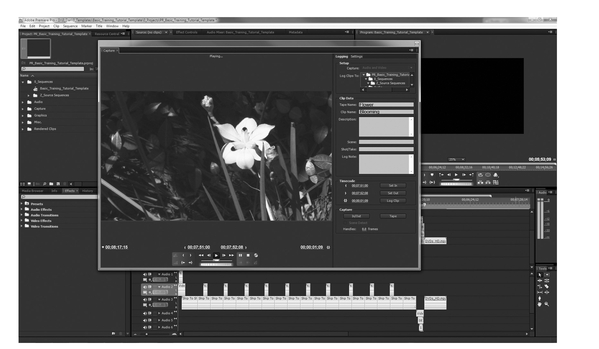
Figure 51-2 Keeping a shot list will save you lots of time when capturing your footage. Most software allows you to enter in timecodes that will go directly to desired shots for capturing.
shots, even different takes. To this day it's still used and in digital filmmaking, a clapboard can also keep record of the timecode.
Timecode is a data stream that synchronizes each frame of the digital signal so that computers can refer to frames of video in the proper order. When you edit video, each clip has its own timecode and most clips from video cameras have continuous time code. This means that if you record 60 minutes of video, even as you stop and start recording, the timecode is recorded without starting over at the beginning value (00:00:00:00, hours: minutes: seconds: frames). All this data is especially handy to an editor if the camera operator or an assistant keeps record of the starting and stopping timecode for every shot and records notes regarding scene, shot, take and the resulting quality of the particular take. In this way, the editor receives a list of shots, the corresponding timecode and whether or not the take was a good or bad take. Lucky you, the video has already been edited, at least on paper.
Not everyone can make shot lists on the field, especially if you’re the only crew member or the content of your video does not allow you to start and stop the camera. Even then, you may be able to find a few seconds here and there to jot down timecode at key moments. For example, when shooting a wedding video, I’d often memorize a few good moments and write them down later when I had a second to stop. Let’s say you’re shooting the photo session of a wedding and the cute 4-year-old nephew of the bride tugs at her dress to tell her she looks like a princess. Money shot. Make a quick mental note of the timecode. You’ll write that down when you move onto the next scene of the event.
Shot lists are much more practical in controlled environments where multiple takes of varying quality are recorded to the camera. In some cases, as you get better with your filmmaking eye, you might find yourself only taking the shots marked as “good” to your workstation and leaving the others on tape (or whatever media you shoot with).
With the shot list handy at your workstation, you can go to your Log and Capture tool in your editing software and enter the timecode for the shots you want to import from your tape (for other recording media, your technique may differ). With all the numbers punched in and logged, (it’s really just a data entry job at this point), you can tell your computer to go fetch just the shots you’ve logged into your software. Now go grab a sandwich, finish that movie you fell asleep watching last night and when you get back to your workstation, all your clips will be imported and ready for you to edit. How’s that for a shortcut?
There will be no more wading through hours and hours of footage looking for that one shot that’s stuck in your head but lost somewhere in the day’s events. Use shots lists, as much as you can. It might even be wise to have an assistant who will take care of it for you. And, keep the shot list with your tape; you’ll never know when you’ll need it again, or when a good take was as good as you thought in the first place.
Tapeless Made Easy
Now, for those of you using SDHC cards, P2 cards and other memory-based media, your workflow is little different from tape in regards to the capturing process. Since the video data is stored already as a file (in fact, you likely have a bunch of different files from when you stopped and started the camera), capturing video isn’t necessary, but you can still log your shots and use the timecode to organize these shots for you before you start laying out your edit on the timeline. Often times, you’ll also need to do some transcoding with this type of media, so it nearly takes the computer as much time minute-per-minute as tape media. But, so long as the computer is doing the heavy lifting, you can wander away from the computer and find something else to do. Another nice thing to do with these cameras, since the files are already broken into start/ stop points, is to use an old-fashioned clapboard with scene/shot/take information on it. That way you can visually check the shot and take numbers and compare to your shot list quickly.
Keyboard Shortcuts Worth More Than a Dime a Dozen
Most editing software suites have keyboard shortcuts and the most common functions are usually standard shortcuts across all types of editing software. These are the shortcuts we’re going to cover as you’ll use them time and time again.
More in and out (Not the Hamburger)
Once you’ve got your media into your bin and ready for editing (you used your shot list, right?), usually your first major task is to trim the “fat” of the clips. The extra seconds you recorded before and after the action actually took place need to be deleted before the clip can run in your program. As you preview your clip, you get to specify the “In” point and “Out” point of each clip. The “In” point is the “Start Here” point for the video clip. When specified, your software remembers that you marked this point on that frame of the clip, and that’s where it should start playing. The “Out” point as you can imagine, is the “End Here” point where the editing software will tell itself to stop playing the video of that clip at that exact frame.
As you play back video in your preview monitor (usually, you can just double click any video from your bin to play it back) you can press the ‘I’ key on your keyboard to mark the frame the playback head is at as the “In” point. Then, when playback head moves further down the clip and it’s time that the clip ends for the program, press the ‘O’ key and the video clip now has an “Out” point. These points are usually visible on the playback timeline for each video clip as little markers. You can usually click and drag the markers back and forth to set the markers to

Figure 51-3 Setting in and out points is crucial when editing. Knowing the right key commands will dramatically speed up your workflow.
different points of your video clip. Many times your clips will need some fine tuning to get the “In” and “Out” points just where you want them and that’s where these next shortcuts come into handy.
Traveling through Time
The next most common editing shortcuts are the space bar and the ‘J’, ‘K’, and ‘L’ keys. These four work together as a team to move the playhead in your preview monitor in forward (realtime), fast-forward, reverse, fast-reverse and pause position. Go ahead and load up a video in your preview monitor and press the space bar. The video plays in realtime. Now, press the ‘K’ key. The ‘K’ key will pause the playhead whenever it’s moving (forward or backward). Press the ‘K’ key again and the video is un-paused and playing again. With the video playing, press the ‘J’ key. Now the video moves in reverse. Press the ‘K’ key to pause, then the ‘L’ key to move it forward. That’s the basics of moving the playhead forward and backwards and pausing. These keys allow you to cue up video to the important sections, but you’ll also want to use the Right Arrow and Left Arrow keys to move the playhead one frame at a time for real precision.
Now, if your main goal is to trim the fat from your clips, you can easily navigate to the “In” and “Out” points without having to cumbersomely click and drag these points to their ideal locations. By the way, these points can be set multiple times. For example, if you set an out point then discover that the clip doesn’t end until two seconds later, simply play the video and hit the ‘O’ key once again. You’ll see the “Out” point snap into its new location.
On Your Marks
Another great tool that will save you a good deal of “where did that go” time is markers. Most professional video editing suites have this tool that allows you to place a marker anywhere on the program timeline. In fact, you can set as many markers as you’d like or need. For example, after you’ve completed your rough cut, you may want to run through the program quickly and set markers wherever you need a lower third for your talent. Any time you need to make a note, the marker places a visual reminder locked at a specific time on the timeline so that you don’t have to scrub your timeline for five minutes looking for that one spot. The actual shortcut keys may differ between software suites. For Final Cut Pro, it’s the ‘M’ key.
More to Explore
These are the most fundamental shortcuts for beginning video editors that will allow you to simplify some of the most repetitive tasks, whether you’re importing your media or trimming up a clip. Make sure to also spend time learning more shortcuts. Just about every common task has a keyboard shortcut and if you learn them early on you’ll naturally adopt these techniques. Getting in the habit of using these will save you a great deal of time, not to mention that you’ll also impress your clients as you wield your video edits with a few clicks of a button. Happy editing!