36
Get Real with Practicals
Terry O’Rourke
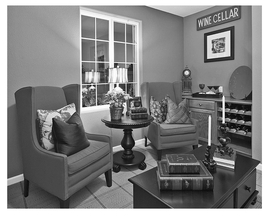
Figure 36-1
I’m kind of a control freak when it comes to production. I don’t like to be late and I don’t usually allow the existing lighting in any environment control how I will shoot. I arrive at all of my assignments early and with lots of equipment. It’s nice to be early so I can scope out the situation and decide how I want things to look. This strategy gives me plenty of time to plan for compromises because it’s inevitable that something or someone will not work out. It also allows for time to lay out all my gear: the lights and stands, the extension cords, the sandbags, the tripods and so on. I have several production carts, each of which is designed to compliment each other. One cart is self contained and can carry several lights and all the ancillary grip equipment they require as well as the computer, a note pad, my phone and a place to put several cups of coffee. I can do most shoots with just this cart. Another cart is designed to carry more lights and stands, booms, sand bags and lots of “other stuff.” When I have both of these carts out I have a feeling of control, or you might even say “power” because there’s nothing I can’t do with all this stuff, given enough muscle, time and room to put it all out.
As a videographer, I usually look at a room and try to figure out the easiest way to light the set while maintaining a natural look. That usually means working with the ambient light and supplementing it with lights from a kit.
Cart-full of Goodies
Sometimes things don’t work out as you would hope. Perhaps a room you are working in has a nice big north-facing window and your vision is to use that window as your key light and fill in the shadows with your light. Your director, however, has this wonderful vintage table lamp and decides to go with an evening living-room look with the table lamp as your key light and as a focal point of the set. Welcome to the world of practicals and the art of integrating existing light fixtures and windows into your set.
This is where all that equipment comes in handy because frequently what looks great to a director looks hideous to your camcorder. The only way to correct this discrepancy is to match the ambient light of your set plus the light output of practicals to the dynamic range of your camera while making everything look like the practicals are doing all the work!
Shade It
In the scenario described above we have a large window providing lots of light and a small table lamp providing very little light and a cart full of goodies. The director wants the room to appear as an evening scene with your subject sitting at the table and the lamp is part of the scene. That window can become your master if you allow it to, so the first thing to do is knock that light down to match the output of the table lamp. If your director is agreeable, the easiest way to do this is to close the drapes, shutters, shades or whatever window covering the room may have.
If your director is determined to leave the window exposed for a dark blue early
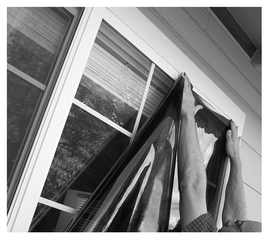
Figure 36-2 A wide variety of gels, neutral density filters and fabrics are available for controlling light from outside windows. Gels may be preferred because once applied, they are invisible, plus they can be stacked for increased ND value.
evening look, or if you’re really ambitious, you can place a neutral density window filter on the glass. You can get 60-inch wide rolls of plastic filter material in daylight balance or 3200k balance. It’s available in several densities so you can choose which one is best for your lighting situation. Rosco supplies products called Cinegel. The Cinegel Rosco N.3 material is daylight balanced and has a 1-stop value. The N.6 has a 2-stop value and the N.9 has a 3-stop value. They also have similar products in the Roscosun Cinegel line that correct daylight to 3200k which are perfect for integrating tungsten practicals such as the above mentioned table lamp into your production. This is by far the best way to handle any window lighting situation and as such gives the most predictable results.
There are alternatives to plastic gels that include fabrics such as Rosco Black Scrim, which is also available in wide rolls. This fabric material has a 2-stop value. This material is easier to handle but isn’t always invisible and can move in the wind as you tape, which will show up in your video as blurry motion. Unlike plastic gels, which can be stacked for more neutral density value, fabrics can not be stacked or they will create moiré, which will also show up in your video.
Lighting the Light
Now that we have the window brought down to reasonable levels, we can light the room. We have decided that the lamp is an integral part of our set so it must look properly exposed and the set must appear as though this lamp is the only light in the room.
The next step would be to light the room with the correct exposure to match the exposure in the window, which in this case would be dark, blue evening exposure. What you are doing is setting the camcorder to a proper setting that will allow the window to be exposed for a dark, blue window and bringing up the light in the room to give you the correct overall exposure. The reason we put the NDs (neutral density) in is to reduce the overall exposure of the window to more closely match the output of the lamp. But, if you put the lamp where you want it without lighting the room, the rest of your set will be under exposed because table lamps don’t have enough light output to light a room for video. Your subject might be properly exposed because they are close to the lamp but the light fall-off will be too drastic to reach much beyond your subject. We will get to the lamp a bit later but for right now it’s best to forget the exposure of the lamp and light the room so it looks properly exposed relative to the window.
Bouncing off the Walls
Remember the room is an evening set, so it would be a bit dark but not so much that there are no details. There are a lot of ways to do this, but the easiest way is to put up several light heads and bounce them off the walls and ceiling. Be sure they are behind your camcorder with no spill-over into your set because if any direct light from them is in your view, it

Figure 36-3 To bring up the overall light values in a room, try bouncing light off the walls and ceiling, taking care to avoid spill onto the set.
will look staged. You can experiment by moving them around and you can try different power settings until you get the look you want. This is where barn-doors in your kit are absolutely necessary.
You can also add other practicals to your set if your bounce lights are too harsh or bright. Try turning down the bounce lights and turning up your practicals. The best way to “turn up” practicals is to bring several extra light bulbs ranging from 25 watts to 250 watts. You can also use dimmer switches on lamps that plug directly into standard wall plugs. You plug the dimmer into the wall and plug the lamp into the dimmer. I find these at the local hardware store and carry a lot of them.
Now that the room matches the window it’s time to bring in the star of the show . . . that vintage table lamp that needed all the attention! Put it on the table and take a look. If it’s too dark or too light, use one of your extra bulbs or adjust the output with your wall dimmer to match the set and start taping!
Setting Up the "Spill"
But wait! You didn’t think we were really done did you? All we did was light
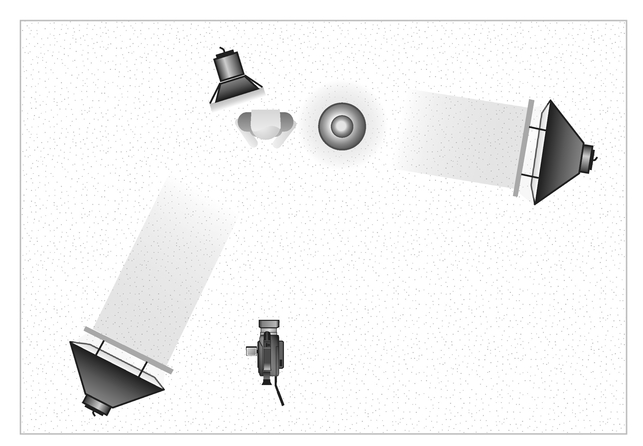
Figure 36-4 Once the overall room exposure is correct, complete the illusion of a nice soft evening look with a blue rim light overhead and a warmly gelled fill and key lights.
the set and that lamp. Unless the real star is the lamp you still have the subject to light. If you did everything right, that should be pretty easy because the room lighting has been set up to closely match the level that your kit provides, so all you have to do is light your subject the way you normally would, but with a few subtle differences. Since the room set has an evening look and the subject is near a dark blue window you might try a blue rim light just above and behind your subject. And if you rely on the table lamp for light on your subject, it might be a bit harsh so try a medium soft box with a warming gel for a key light. Put it just behind the table lamp so it doesn’t show and it will soften the light from the table lamp. This is where dimmable lighting comes in handy because you need to adjust all these lights to match each other. Throw in a fill from just behind the camera and you have a nice soft evening look that was created in broad daylight.
The techniques discussed here will separate you from the rest of the pack and once you truly master these strategies there is no stopping you or your creativity, so don’t be afraid to experiment, fail and try again because integrating practicals in your production can be daunting. It takes practice and experience but it’s well worth the effort!