
74
Authoring Blu-ray Discs
John Joyner

Figure 74-1
We are living in a revolutionary time. Blu-ray Disc technology has taken its place as the vessel for viewing High Definition (HD) media. More excitingly, Blu-ray Disc creation is available to anyone who wishes to use it, whether you’re creating an experience for major distribution or for viewing on your family room’s new digital wide screen.
If you don’t know what you’re doing, HD output can prove a frustrating task. To give some perspective, a minute of uncompressed HD video equals a gigabyte of memory! The answer to this problem is compression. The time has come to empower yourself! By understanding HD compression you will minimize your problems when outputting to Blu-ray. This will save on time and aspirin. In this chapter, we’ll walk you through the process of compressing video for Blu-ray distribution.
The following examples will draw from Adobe Premiere and Adobe Encore, as these are the systems the author has worked most extensively with.
Getting Started
Compressing for Blu-ray is a two-step process.
- Creating the HD media file (encoding and formatting)
- Putting it on a Blu-ray disc (building and burning)
The first step can be approached in two ways. You can use your editing platform, Adobe Premiere in this case, or you can use your disc authoring system, Adobe Encore.
For step number one, I recommend using your editing platform (Adobe Premiere in this case) to compress your masterpiece. There are a couple of reasons for this. The editing platform gives more options for output, while encoding within it allows the system to focus all its energy on creating a crisp media file for you. I find the overall quality tends to be better.
If you choose to export your video via the DVD authoring system (Encore), it will be pulling double duty as an encoder and a Blu-ray burner. Remember, you’re dealing with HD here. While the encode step happens before the burning takes place, the entire operation puts tremendous pressure on the authoring system. As such the entire process takes a long time (at most a few days,) and that’s if the congestion of data doesn’t crash the platform. We recommend saving often, and we’ve experienced greater overall stability when we manually transcode clips before beginning the build process.
Step 1: Codecs
In Adobe Premiere click File and then Export, where the drag down will display a series of options. Choose Adobe Media Encoder, as shown (Figure 74-2)
This will open the Encoder’s export settings sub-screen (Figure 74-3).
This is where the encoding process will take place.
Adobe Media Encoder is very straightforward and the options are all very accessible.

Figure 74-2 Adobe Media Encoder.
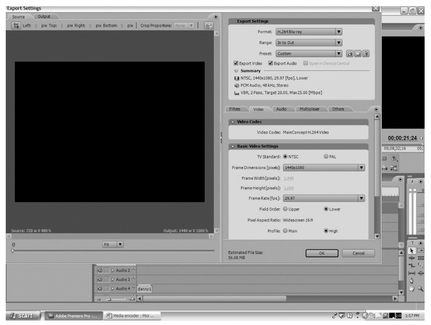
Figure 74-3 Encoder’s export setting subscreen.
First you want to choose a codec. The primary video codecs that support Blu-ray are as follows: (Figure 74-4)
- MPEG-2 (Blu-ray)
- H.264 Blu-ray (MPEG-4 AVC)
- SMPTE VC-1
MPEG-2 (Blu-ray) is the first-generation HD codec and is more akin to the limited 4.7GB DVD format. As such, the quality is compromised.
H.264 Blu-ray or MPEG-4 is newer and much stronger in both quality and efficiency in use of the available bits on the Blu-ray Disc.
SMPTE VC-1 is Microsoft’s answer to H.264 (MPEG-4). Due to its reliance on the Windows Media architecture, this codec is only available on Windows-based outputting platforms.
As part of the spec, all Blu-ray players will support any one of these codecs, but for the sake of this example, we will choose H.264 Blu-ray (MPEG-4).
Below the format options you will see the range options (shown in Figure 74-3).
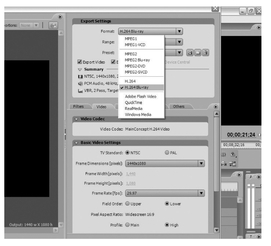
Figure 74-4 Video codecs that support Blu-ray.
This refers to the exporting of your entire video or just a part, as marked on the Premiere timeline by in and out points.
Step 2: Resolution
As seen in the example (Figure 74-5).
There are many choices for pixel resolution. Most of your choices are similar.
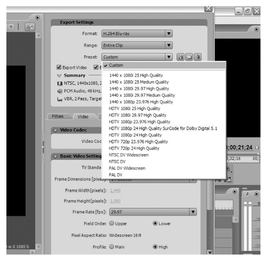
Figure 74-5 Pixel resolution choices.

Figure 74-6 1440 × 1080i.
If you’re exporting for a movie or home video, 1440 × 1080 is usually the way to go. You’ll notice a small i or p next to the 1080.
The standard HD video mode is 1080i. The 1080 is the vertical resolution of the image, while the i means interlaced scan. Up till recently, most digital video was shown interlaced. The newer format is 1080p. The p stands for progressive scan.
In this case we’ll choose 1440 ×1080i (Figure 74-6).
Here I chose 1080i because the video was originally shot interlaced.

Figure 74-7 Deinterlace.
You’ll notice the 29.97 next to the 1080i. 29.97 is the rate of frames per second of playback, or simply frame rate. The frame rate affects how the motion of your video is perceived.
When video is shot, the presets of a camera will provide you with frame rate options. The vast majority of video in North America is shot at 29.97 frames/sec. Film is usually shot at 24 frames/sec. It’s important to know what frame rate your project requires, because if it is heavily altered from its original settings the quality of the finished product may suffer.
Note: Progressive vs. Interlaced
Progressive is newer and cleaner, but it can only be viewed in all its glory on a progressive scan monitor. Digital TV broadcasting has already made the shift to progressive, though most affordable TVs have not yet. The smaller 720p has a number of monitors available to it. 1080p still commands a premium price, but the equipment is getting more reasonably-priced all the time.
If it is your wish to go progressive (maybe you are in broadcasting) you will want to choose a progressive format that suits your needs. You will then need to make your interlaced video compatible with it. So you must deinterlace! To deinterlace, go to the left-hand corner of the export settings subscreen. That option waits above the viewer, under the Output tab (Figure 74-7).
If you shot in 1080i and choose to deinterlace it to go progressive, that shuffling of image data may affect quality. This is not necessarily true on every system, though.
When you are ready to export, make sure you have enough room on your hard drive. Avoid exporting to external USB or FireWire drives (though eSATA is OK). That simple degree of separation will usually crash the program and maybe the whole computer. When exporting HD, close all other programs and take a break. It’s a process that could take several hours.
Step 3: Building and Burning
Once the video is compressed in Premiere all you have to do is transfer it into the Adobe Encore disc authoring system. Open up Adobe Encore and make certain its settings match the ones you chose when compressing in the Media Encoder. Be sure to specify the project is Blu-ray Format in the authoring mode (Figure 74-8).
Authoring the disc is a process unto itself, but for the purposes of this chapter we will focus on the compression. Go to File and import your video and audio as assets and drop into the Encore timeline at the bottom. Author the Blu-ray as you see fit. This includes menus, chapters, and extras, etc. Photoshop is a strong companion with Encore. Just be aware of how much space you are using (Figure 74-9).
Note: Burning—many computers do not yet have Blu-ray burners. As this is the case, you may need to purchase an external burner to finish the job (Figure 74-10).
When you are ready to finish you will go to the build tab. Here are the pitfalls to look out for (see Figure 74-9).
Make certain you set your format and output to Blu-ray.
Make sure your disc info does not exceed the allotted amount of memory There are two types of Blu-ray Discs, 25GB (single-layer) and 50GB (dual-layer). Some burners (and some software) only support 25GB discs for burning.
Fix any authoring issues that may arise in Encore. The computer will prompt you if you need to correct something that has been neglected.

Figure 74-8 Blu-ray Format.
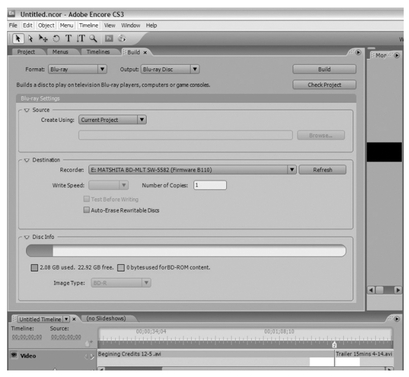
Figure 74-9 Disc info.
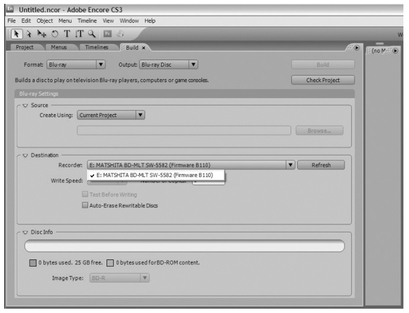
Figure 74-10 Recorder.
Press build. Depending on the complexity of your project, e.g. whether there’s a lot of recompression involved, it could take as long as a day for your disc to be ready; but it might only take a few minutes.
Note: Duplicating
While Blu-ray Disc burners have already gotten reasonably fast in their short history, sometimes you need to make more than a few discs. If you want to make many copies, I recommend purchasing a Blu-ray duplicator to free up your computer. They’re easy to find on the internet (generally not in stores) and fairly reasonably priced, considering the time they’ll save you.
A Final Thought
The most up-to-date editing platforms, (AVID, Adobe Premiere, etc.) and their DVD authoring counterparts, (Adobe Encore, etc.) all provide functions for creating Blu-ray Discs. As separate systems they each have merits and flaws in how they approach HD output. What makes them all accessible is that each platform follows a similar set of rules. Bottom line: choose a platform you like and learn to navigate it. It’s all about troubleshooting, my friends. Good luck!