Every document, program, folder, and disk on your Mac is represented by an icon: a colorful little picture that you can move, copy, or double-click to open. In Mac OS X, icons look more like photos than cartoons, and you can scale them to practically any size.
This chapter is all about manipulating those icons—that is, your files, folders, and disks. It’s all about naming them, copying them, deleting them, labeling them—and then, maybe most important of all, finding them, using the Mac’s famous Spotlight instant-search feature.
A Mac OS X icon’s name can have up to 255 letters and spaces. If you’re accustomed to the 31-character or even 8-character limits of older computers, that’s quite a luxurious ceiling.
As a Windows veteran, futhermore, you may be delighted to discover that in Mac OS X, you can name your files using letters, numbers, punctuation—in fact, any symbol except for the colon (:), which the Mac uses behind the scenes for its own folder-hierarchy designation purposes. And you can’t use a period to begin a file’s name.
To rename a file, click its name or icon (to highlight it) and then press Return or Enter. (Or, if you have time to kill, click once on the name, wait a moment, and then click a second time.)
In any case, a rectangle now appears around the name (Figure 3-1). At this point, the existing name is highlighted; just begin typing to replace it. If you type a very long name, the rectangle grows vertically to accommodate new lines of text.
Tip
If you simply want to add letters to the beginning or end of the file’s existing name, press the left or right arrow key immediately after pressing Return or Enter. The insertion point jumps to the corresponding end of the file name.
When you’re finished typing, press Return, Enter, or Tab—or just click somewhere else—to make the renaming rectangle disappear.
As you edit a file’s name, remember that you can use the Cut, Copy, and Paste commands in the Edit menu to move selected bits of text around, just as though you’re word processing. The Paste command can be useful when, for instance, you’re renaming many icons in sequence (Quarterly Estimate 1, Quarterly Estimate 2, and so on).
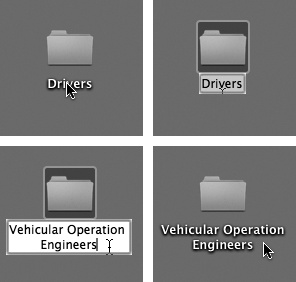
Figure 3-1. Click an icon’s name (top left) to produce the renaming rectangle (top right), in which you can edit the file’s name. Leopard is kind enough to highlight only the existing name, and not the suffix (like .jpg or .doc). Now just begin typing to replace the existing name (bottom left). When you’re finished typing, press Return, Enter, or Tab to seal the deal, or just click somewhere else.
And now, a few tips about renaming icons:
When the Finder sorts files, a space is considered alphabetically before the letter A. To force a particular folder to appear at the top of a list view window, insert a space before its name.
Older operating systems sort files so that 10 and 100 come before 2, the numbers 30 and 300 come before 4, and so on. You wind up with alphabetically sorted files like this: “1. Big Day,” “10. Long Song,” “2. Floppy Hat,” “20. Dog Bone,” “3. Weird Sort,” and so on. Generations of computer users have learned to put zeros in front of their single-digit numbers just to make the sorting look right.
In Mac OS X, though, you get exactly the numerical list you’d hope for: “1. Big Day,” “2. Floppy Hat,” “3. Weird Sort,” “10. Long Song,” and “20. Dog Bone.” At long last, you can get out of the habit of putting zeros in front of file names to make them sort properly.
To highlight a single icon in preparation for printing, opening, duplicating, or deleting, click the icon once. Both the icon and the name darken in a uniquely Leopardish way.
Tip
You can change the color of the oval highlighting that appears
around the name of a selected icon. Choose ![]() →System Preferences, click Appearance, and use
the Highlight Color pop-up menu.)
→System Preferences, click Appearance, and use
the Highlight Color pop-up menu.)
That much may seem obvious. But lots of people have no idea how to manipulate more than one icon at a time—an essential survival skill. These techniques are essentially the same as in Windows, except that the keys you hold down are different.
To highlight multiple files in preparation for moving or copying, use one of these techniques:
To highlight all the icons. To select all the icons in a window, press
 -A (the equivalent of the Edit→Select All
command).
-A (the equivalent of the Edit→Select All
command).To highlight several icons by dragging. You can drag diagonally to highlight a group of nearby icons, as shown in Figure 3-2. In a list view, in fact, you don’t even have to drag over the icons themselves—your cursor can touch any part of any file’s row, like its modification date or file size.
Tip
If you include a particular icon in your diagonally dragged group by mistake,
-click it to remove it from the selected
cluster.Figure 3-2. You can highlight several icons simultaneously by dragging a box around them. To do so, drag from outside of the target icons diagonally across them (right), creating a translucent gray rectangle as you go. Any icons or icon names touched by this rectangle are selected when you release the mouse. If you press the Shift or
key as you do this, any previously
highlighted icons remain selected.Start dragging here
To highlight consecutive icons in a list. If you’re looking at the contents of a window in list view or column view, you can drag vertically over the file and folder names to highlight a group of consecutive icons, as described above. (Begin the drag in a blank spot.)
There’s a faster way to do the same thing: Click the first icon you want to highlight, and then Shift-click the last file, just as in Windows. All the files in between are automatically selected, along with the two icons you clicked.
To highlight random icons. If you want to highlight only the first, third, and seventh icons in a window, for example, start by clicking icon No. 1. Then
-click each of the others (or
-drag new rectangles around them). Each
icon darkens to show that you’ve selected it.If you’re highlighting a long string of icons and click one by mistake, you don’t have to start over. Instead, just
-click it again, so that the dark
highlighting disappears. (If you do want to start over, you can
deselect all selected icons by clicking any empty part of the
window—or by pressing the Esc key.)The
key trick is especially handy if you want
to select almost all the icons in a window.
Press -A to select everything in the folder,
then -click any unwanted icons to deselect
them.
Once you’ve highlighted multiple icons, you can manipulate them all at once. For example, you can drag them en masse to another folder or disk by dragging any one of the highlighted icons. All other highlighted icons go along for the ride. This technique is especially useful when you want to back up a bunch of files by dragging them onto a different disk, delete them all by dragging them to the Trash, and so on.
When multiple icons are selected, the commands in the File and Edit menus—such as Duplicate, Open, and Make Alias—apply to all of them simultaneously.
For the speed fanatic, using the mouse to click an icon is a hopeless waste of time. For tunately, you can also select an icon by typing the first couple letters of its name.
When looking at your Home window, for example, you can type M to highlight the Movies folder. And if you actually intended to highlight the Music folder instead, press the Tab key to highlight the next icon in the window alphabetically. Shift-Tab highlights the previous icon alphabetically. Or use the arrow keys to highlight a neighboring icon.
(The Tab-key trick works only in icon, list, and Cover Flow
views—not column view, alas. You can always use the
![]() and
and ![]() keys to highlight adjacent columns,
however.)
keys to highlight adjacent columns,
however.)
After highlighting an icon this way, you can manipulate it
using the commands in the File menu or their keyboard equivalents:
open (![]() -O), put it into the Trash (
-O), put it into the Trash (![]() -Delete), Get Info (
-Delete), Get Info (![]() -I), duplicate (
-I), duplicate (![]() -D), or make an alias, as described later in
this chapter (
-D), or make an alias, as described later in
this chapter (![]() -L). By turning on the special disability
features described in Writing Messages, you can
even move the highlighted icon using only the
keyboard.
-L). By turning on the special disability
features described in Writing Messages, you can
even move the highlighted icon using only the
keyboard.
In Mac OS X, there are two ways to move or copy icons from one place to another: by dragging them, or by using the Copy and Paste commands.
You can drag icons from one folder to another, from one drive
to another, from a drive to a folder on another drive, and so on.
(When you’ve selected several icons, drag any
one of them; the others tag along.) While the
Mac is copying, you can tell that the process is still under way
even if the progress bar is hidden behind a window, because the icon
of the copied material shows up dimmed in its
new home, darkening only when the copying process is over. (You can
also tell because Leopard’s progress box is a lot clearer and
prettier than it used to be.) You can cancel the process by pressing
either ![]() -period or the Esc key.
-period or the Esc key.
Tip
If you’re copying files into a disk or folder that already contains items with the same names, Mac OS- X asks you individually about each one. (“An older item named ‘Fiddlesticks’ with extension ‘.doc’ already exists in this location.”) Note that, thank heaven, Mac OS X tells you whether the version you’re replacing is older or newer than the one you’re moving.
Turn on “Apply to all” if all of the incoming icons should (or should not) replace the old ones of the same names. Then click Replace or Don’t Replace, as you see fit, or Stop to halt the whole copying business.
Understanding when the Mac copies a dragged icon and when it moves it bewilders many a beginner. However, the scheme is fairly simple when you consider the following:
Dragging from one folder to another on the same disk moves the icon.
UP TO SPEED: The Wacky Keystrokes of Leopard
Mac OS X offers a glorious assortment of predefined keystrokes for jumping to the most important locations on your Mac: your Home folder, the Applications folder, the Utilities folder, the Computer window, your iDisk, the Network window, and so on.
Better yet, the keystrokes are incredibly simple to memorize: Just press Shift-
and the first letter of the location
you want. Shift--H opens your Home folder,
Shift--A opens the Applications folder, and so
on. You learn one, you’ve learned ‘em all.The point here is that Shift-
, in Leopard, means
places.The other system-wide key combo, Option-
, means functions.
For example, Option--D hides or shows the Dock,
Option--H is the Hide Others command,
Option--+magnifies the screen (if you’ve turned
on this feature), Option--Esc brings up the Force Quit dialog
box, and so on. Consistency is always nice.Dragging from one disk (or disk partition) to another copies the folder or file. (You can drag icons either into an open window or directly onto a disk or folder icon.)
If you press the Option key as you release an icon you’ve dragged, you copy the icon instead of moving it. Doing so within a single folder produces a duplicate of the file called “[Whatever its name was] copy.”
If you press the
key as you release an icon you’ve dragged
from one disk to another, you move the file
or folder, in the process deleting it from the original
disk.
Tip
This business of pressing Option or ![]() after you begin
dragging is a tad awkward, but it has its charms. For example, it
means that you can change your mind about the purpose of your drag
in mid-movement, without having to drag back and start
over.
after you begin
dragging is a tad awkward, but it has its charms. For example, it
means that you can change your mind about the purpose of your drag
in mid-movement, without having to drag back and start
over.
And if it turns out you just dragged something into the wrong
window or folder, a quick ![]() -Z (the shortcut for Edit→Undo) puts it right
back where it came from.
-Z (the shortcut for Edit→Undo) puts it right
back where it came from.
Dragging icons to copy or move them probably feels good because it’s so direct: You actually see your arrow cursor pushing the icons into the new location.
But you pay a price for this satisfying illusion. You may have to spend a moment or two fiddling with your windows to create a clear “line of drag” between the icon to be moved and the destination folder. (A background window will courteously pop to the foreground to accept your drag. But if it wasn’t even open to begin with, you’re out of luck.)
There’s a better way. Use the Copy and Paste commands to move icons from one window into another (just as you can in Windows—except you can only copy, not cut, Mac icons). The routine goes like this:
Highlight the icon or icons you want to move.
Use any of the techniques described in Selecting by Clicking.
Choose Edit→Copy.
Open the window where you want to put the icons. Choose Edit→Paste.
Once again, you may prefer to use the keyboard equivalent:
-V. And once again, you can also
right-click inside the window and then choose Paste from the
shortcut menu that appears, or you can use the
 menu.
menu.
A progress bar may appear as Mac OS X copies the files or
folders; press Esc or ![]() -period to interrupt the process. When the
progress bar goes away, it means you’ve successfully transferred the
icons, which now appear in the new window.
-period to interrupt the process. When the
progress bar goes away, it means you’ve successfully transferred the
icons, which now appear in the new window.
Here’s a common dilemma: You want to drag an icon not just into a folder, but into a folder nested inside that folder. This awkward challenge would ordinarily require you to open the folder, open the inner folder, drag the icon in, and then close both of the windows you opened. As you can imagine, the process is even messier if you want to drag an icon into a sub-subfolder or even a sub-sub-subfolder.
Fortunately, there’s a better waky: spring-loaded folders feature (Figure 3-3).
With a single drag, drag the icon onto the first folder—but keep your mouse button pressed. After a second, the window opens automatically, centered on your cursor.
Still keeping the button down, drag onto the inner folder; its window opens, too. Now drag onto the inner inner folder—and so on. (If the inner folder you intend to open isn’t visible in the window, you can scroll by dragging your cursor close to any edge of the window.)
Tip
You can even drag icons onto disks or folders whose icons appear in the Sidebar (Chapter 1). When you do so, the main part of the window flashes to reveal the contents of the disk or folder you’ve dragged onto. When you let go of the mouse, the main window changes back to reveal the contents of the disk or folder where you started dragging.
In short, Sidebar combined with spring-loaded folders make a terrific drag-and-drop way to file a desktop icon from anywhere to anywhere—without having to open or close any windows at all.
When you finally release the mouse, you’re left facing the final window. All the previous windows closed on the way. You’ve neatly placed the icon into the core of the nested folders.
That spring-loaded folder technique sounds good in theory, but can be disconcerting in practice. For most people, the long wait before the first folder opens is almost enough wasted time to negate the value of the feature altogether. Furthermore, when the first window finally does open, you’re often caught by surprise. Suddenly your cursor—mouse button still down—is inside a window, sometimes directly on top of another folder you never intended to open. But before you can react, its window, too, has opened, and you find yourself out of control.
Figure 3-3. Top: To make spring-loaded folders work, start by dragging an icon onto a folder or disk icon. Don’t release the mouse button. Wait for the window to open automatically around your cursor. Bottom: Now you can either let go of the mouse button to release the file in its new window or drag it onto yet another, inner folder. It, too, will open. As long as you don’t release the mouse button, you can continue until you’ve reached your folder-within-a-folder destination.
Fortunately, you can regain control of spring-loaded folders using these tricks:
Choose Finder→Preferences. On the General pane, adjust the “Spring-loaded folders and windows” Delay slider to a setting that drives you less crazy. For example, if you find yourself waiting too long before the first folder opens, drag the slider toward the Short setting.
You can turn off this feature entirely by choosing Finder→Preferences and turning off the “Spring-loaded folders and windows” checkbox.
Tap the Space bar to make the folder spring open at your command. That is, even with the Finder→Preferences slider set to the Long delay setting, you can force each folder to spring open when you are ready by tapping the Space bar as you hold down the mouse button. True, you need two hands to master this one, but the control you regain is immeasurable.
Tip
The Space bar trick works even when “Spring-loaded folders and windows” checkbox (in Finder→Preferences) is turned off. That’s a handy arrangement, because it means that folder windows never pop open accidentally.
Whenever a folder springs open into a window, twitch your mouse up to the newly opened window’s title bar or down to its information strip. Doing so ensures that your cursor won’t wind up hovering on, and accidentally opening up, an inner folder. With the cursor parked on the gradient gray, you can take your time to survey the newly opened window’s contents, and plunge into an inner folder only after gaining your bearings.
Tip
Email programs like Entourage and Mail have spring-loaded folders, too. You can drag a message out of the list and into one of your filing folders, wait for the folder to spring open and reveal its subfolders, and then drag it directly into one of them.
Highlighting an icon and then choosing File→Make Alias (or
pressing ![]() -L), generates an alias, a
specially branded duplicate of the original icon (Figure 3-4). It’s not a
duplicate of the file—just of the
icon; therefore it requires negligible storage
space. When you double-click the alias, the original file opens. A
Macintosh alias, in other words, is essentially
the same as a Windows shortcut.
-L), generates an alias, a
specially branded duplicate of the original icon (Figure 3-4). It’s not a
duplicate of the file—just of the
icon; therefore it requires negligible storage
space. When you double-click the alias, the original file opens. A
Macintosh alias, in other words, is essentially
the same as a Windows shortcut.
Because you can create as many aliases as you want of a single file, aliases let you, in effect, stash that file in many different folder locations simultaneously. Double-click any one of them, and you open the original icon, wherever it may be on your system.
Tip
You can also create an alias of an icon by
Option-![]() -dragging it out of its window. (Aliases you
create this way lack the word alias on the file
name—a distinct delight to those who find the suffix redundant and
annoying.) You can also create an alias by right-clicking a normal
icon and choosing Make Alias from the shortcut menu that appears, or
by highlighting an icon and then choosing Make Alias from the
-dragging it out of its window. (Aliases you
create this way lack the word alias on the file
name—a distinct delight to those who find the suffix redundant and
annoying.) You can also create an alias by right-clicking a normal
icon and choosing Make Alias from the shortcut menu that appears, or
by highlighting an icon and then choosing Make Alias from the
![]() menu.
menu.
Figure 3-4. Top: You can identify an alias by the tiny arrow badge on the lower-left corner. (Longtime Mac fans should note that the name no longer appears in italics.) Bottom: If the alias can’t find the original file, you’re offered the chance to hook it up to a different file.
An alias takes up almost no disk space, even if the original file is enormous. Aliases are smart, too: even if you rename the alias, rename the original file, move the alias, and move the original around on the disk, double-clicking the alias still opens the original icon.
Here are a few ways you can put aliases to work:
You may want to file a document you’re working on in several different folders, or place a particular folder in several different locations.
You can use the alias feature to save you some of the steps required to access another hard drive on the network. (Details on this trick in Chapter 13.)
Tip
Mac OS X makes it easy to find the file to which an alias
“points” without actually having to open it. Just highlight the
alias and then choose File→Show Original (![]() -R), or choose Show Original from the
-R), or choose Show Original from the
![]() menu. Mac OS X immediately displays the
actual, original file, sitting patiently in its folder, wherever
that may be.
menu. Mac OS X immediately displays the
actual, original file, sitting patiently in its folder, wherever
that may be.
An alias doesn’t contain any of the information you’ve typed or composed in the original. Don’t email an alias to the Tokyo office and then depart for the airport, hoping to give the presentation upon your arrival in Japan. When you double-click the alias, now separated from its original, you’ll be shown the dialog box at bottom in Figure 3-4.
If you’re on a plane 3,000 miles away from the hard drive on which the original file resides, click Delete Alias (to delete the orphan alias you just double-clicked) or OK (to do nothing, leaving the orphaned alias where it is).
In certain circumstances, however, the third button—Fix Alias—is the most useful. Click it to summon the Fix Alias dialog box, which you can use to navigate your entire Mac. When you click a new icon and then click Choose, you associate the orphaned alias with a different original icon.
Such techniques become handy when, for example, you click your book manuscript’s alias on the desktop, forgetting that you recently saved it under a new name and deleted the older draft. Instead of simply showing you an error message that says “‘Enron Corporate Ethics Handbook’ can’t be found,” the Mac displays the box that contains the Fix Alias button. By clicking it, thus reassociating it with the new document, you can save yourself the trouble of creating a new alias. From now on, double-clicking your manuscript’s alias on the desktop opens the new draft.
Tip
You don’t have to wait until the original file no longer exists before choosing a new original for an alias. You can perform alias reassignment surgery any time you like. Just highlight the alias icon and then choose File→Get Info. In the Get Info dialog box, click Select New Original. In the resulting window, find and double-click the file you’d now like to open whenever you double-click the alias.
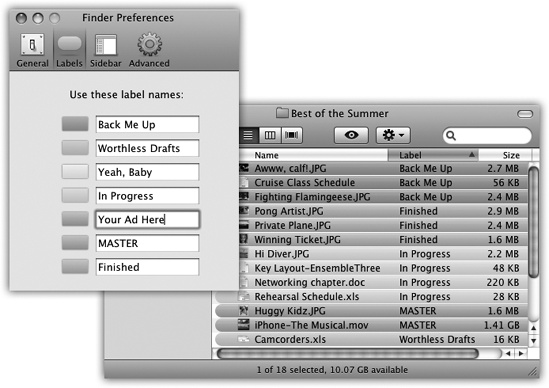
This feature lets you tag selected icons with one of seven different labels, each of which has both a text label and a color associated with it.
To do so, highlight the icons. Open the File menu (or the
![]() menu, or the shortcut menu that appears when
you right-click the icons). There, under the heading Label, you’ll see
seven colored dots, which represent the seven different labels you can
use. Figure 3-5 shows
the routine.
menu, or the shortcut menu that appears when
you right-click the icons). There, under the heading Label, you’ll see
seven colored dots, which represent the seven different labels you can
use. Figure 3-5 shows
the routine.
After you’ve applied labels to icons, you can perform some unique file-management tasks—in some cases, on all of them simultaneously, even if they’re scattered across multiple hard drives. For example:
Figure 3-5. Use the File menu, ![]() menu, or shortcut menu to apply label tags
to highlighted icons. Instantly, the icon’s name takes on the
selected shade. In a list or column view, the entire
row takes on that shade, as shown in Figure 3-6. (If you choose
the little X, you’re removing any labels that
you may have applied.)
menu, or shortcut menu to apply label tags
to highlighted icons. Instantly, the icon’s name takes on the
selected shade. In a list or column view, the entire
row takes on that shade, as shown in Figure 3-6. (If you choose
the little X, you’re removing any labels that
you may have applied.)
UP TO SPEED: Compressing, Zipping, and Archiving
Mac OS X comes with a built-in command that compresses a file or folder down to a single, smaller icon—an archive—suitable for storing or emailing.
It’s just like using StuffIt in previous Mac OS versions, except for two big changes. First, Mac OS X creates .zip files, the same compression format used in Windows. That means that you can now send .zip files back and forth to PC owners without worrying that they won’t be able to open them. In Leopard, these files open even more reliably in Windows. (Pre-Panther/Tiger/Leopard Mac owners can open .zip files, too. They just use the free StuffIt Expander as usual.)
Second, the software that does the compressing is built
right in. Right-click a file or folder, and choose “Compress [the
icon’s name]” from the shortcut menu. (Of course, you can use the
File menu or ![]() menu instead.)
menu instead.)
Mac OS X thoughtfully creates a .zip archive, but leaves the original behind so you can continue working with it.
Opening a .zip file somebody sends you is equally easy: Just double-click it. Zip!—it opens.
On the other hand, Leopard does not come with StuffIt Expander, the free unstuffing program that recognizes .zip files, .sit files, and just about any other form of compressed files.
If you don’t already have a copy of Expander from a previous Mac OS version, you can download and install it yourself, which is worth doing. You can get it from, for example, this book’s “Missing CD” page at www.missingmanuals.com.
Round up files with Find. Using the Find command described in Chapter 3, you can round up all icons with a particular label. Thereafter, moving these icons at once is a piece of cake—choose Edit→Select All, and then drag any one of the highlighted icons out of the results window and into the target folder or disk.
Using labels in conjunction with Find this way is one of the most useful and inexpensive backup schemes ever devised—whenever you finish working on a document that you’d like to back up, right-click it and apply a label called, for example, Backup. At the end of each day, use the Find command to round up all files with the Backup label—and then drag them as a group onto your backup disk.
Sort a list view by label. No other Mac sorting method lets you create an arbitrary order for the icons in a window. When you sort by label, the Mac creates alphabetical clusters within each label grouping, as shown in Figure 3-6.
Figure 3-6. Sorting by label lets you create several different alphabetical groups within a single window. In Leopard, in fact, you can sort by labels in any view (icon, column, whatever), using the View→Show View Options palette. In a list view, the quickest way to sort by label is to first make the label column visible. Do so by choosing View→Show View Options and turning on the Label checkbox.
This technique might be useful when, for example, your job is to process several different folders of documents; for each folder, you’re supposed to convert graphics files, throw out old files, or whatever. As soon as you finish working your way through one folder, flag it with a label called Done. The folder jumps to the top (or bottom) of the window, safely marked for your reference pleasure, leaving the next unprocessed folder at your fingertips, ready to go.
Track progress. Use different color labels to track the status of files in a certain project. The first drafts have no labels at all. Once they’ve been edited and approved, make them blue. Once they’ve been sent to the home office, they turn purple. (Heck, you could have all kinds of fun with this: Money-losing projects get red tints; profitable ones get green; things that make you sad are blue. Or maybe not.)
When you first install Mac OS X, the seven labels in the File menu are named for the colors they show: Red, Orange, Yellow, and so on. Clearly, the label feature would be much more useful if you could rewrite these labels, tailoring them to your purposes.
Doing so is easy. Choose Finder→Preferences. Click the Labels button. Now you see the dialog box shown in Figure 3-7, where you can edit the text of each label.
No single element of the Macintosh interface is as recognizable or famous as the Trash can, which now appears at the end of the Dock. It is, of course, the inspiration for Windows’s own Recycle Bin.
You can discard almost any icon by dragging it onto the Trash icon (actually a wastebasket, not a trash can, but let’s not quibble). When the tip of your arrow cursor touches the Trash icon, the little wastebasket turns black. When you release the mouse, you’re well on your way to discarding whatever it was you dragged. As a convenience, Mac OS X even replaces the empty-wastebasket icon with a wastebasket-filled-with-crumpled-up-papers icon, to let you know there’s something in there.
Tip
Learn the keyboard alternative to dragging something to the
Trash: Highlight the icon, and then press ![]() -Delete. This technique is not only far faster
than dragging, but requires far less precision, especially if you
have a large screen. Mac OS X does all the Trash-targeting for
you.
-Delete. This technique is not only far faster
than dragging, but requires far less precision, especially if you
have a large screen. Mac OS X does all the Trash-targeting for
you.
File and folder icons sit in the Trash forever—or until you choose Finder→Empty Trash, whichever comes first.
If you haven’t yet emptied the Trash, you can open its window by clicking the wastebasket icon once. Now you can review its contents: icons that you’ve placed on the waiting list for extinction. If you change your mind, you can rescue any of these items by dragging them out of the Trash window.
If you’re confident that the items in the Trash window are worth deleting, use any of these three options:
Tip
This last method has two advantages. First, the Mac doesn’t bother asking “Are you sure?” (If you’re clicking right on the Trash and choosing Empty Trash from the pop-up menu, it’s pretty darned obvious you are sure.) Second, this method nukes any locked files without making you unlock them first.
If you use either of the first two methods, the Macintosh asks you to confirm your decision. Click OK. (Figure 3-8 shows both this message and the secret for turning it off forever.)
Either way, Mac OS X now deletes those files from your hard drive.
When you empty the Trash as described above, each Trashed icon sure looks like it disappears. The truth is, though, that the data in each file is still on the hard drive. Yes, the space occupied by the dearly departed is now marked with an internal “This space available” message, and in time, new files that you save may overwrite that spot. But in the meantime, some future eBay buyer of your Mac—or, more imminently, a savvy family member or office mate—could use a program like Norton Utilities to resurrect those deleted files. (In more dire cases, companies like DriveSavers.com can use sophisticated clean-room techniques to recover crucial information—for several hundred dollars, of course.)
That notion doesn’t sit well with certain groups, like government agencies, international spies, and the paranoid. As far as they’re concerned, deleting a file should really, really delete it, irrevocably, irretrievably, and forever.
Mac OS X has a command, therefore, called Secure Empty Trash. When you choose this command from the Finder menu, the Mac doesn’t just obliterate the parking spaces around the dead file. It actually records new information over the old—random 0’s and 1’s. Pure static gibberish.
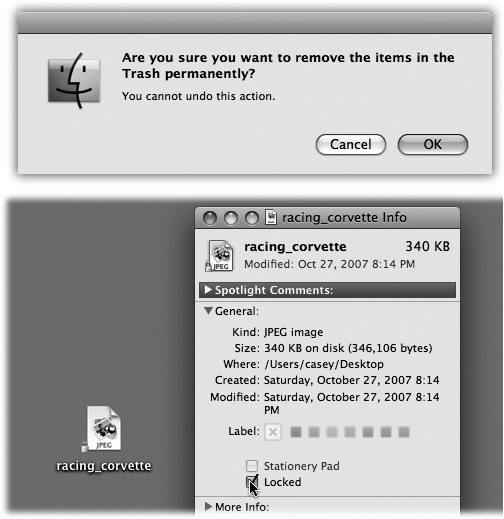
Figure 3-8. Top: Your last warning. Mac OS X doesn’t tell you how many items are in the Trash or how much disk space they take up. If you’d rather not be interrupted for confirmation every time you empty the Trash, you can suppress this message permanently. To do that, choose Finder→Preferences, click Advanced, and turn off “Show warning before emptying the Trash.” Bottom: The Get Info window for a locked file. Locking a file in this way isn’t military-level security by any stretch—any passing evildoer can unlock the file in the same way. But it does trigger an “operation cannot be completed” warning when you try to put it into the Trash—or indeed when you try to drag it into any other folder—providing at least one layer of protection against mistakes.
The process takes longer than the normal Empty Trash command, of course. But when it absolutely, positively has to be gone from this earth for good (and you’re absolutely, positively sure you’ll never need that file again), Secure Empty Trash is secure indeed.
By highlighting a file or folder, choosing File→Get Info, and turning on the Locked checkbox, you protect that file or folder from accidental deletion (see Figure 3-8 at bottom). A little padlock icon appears on the corner of the full-size icon, also shown in Figure 3-8.
Mac OS X doesn’t even let you put a locked icon into the Trash—or any other folder. You can’t put the icon of an open program into the Trash, either.
If something that’s already in the Trash turns out to be locked, click and hold on the Trash itself. Now, when you choose Empty Trash from its shortcut menu, Mac OS X empties the Trash without warnings, locked files and all.
Of course, the other alternative is to unlock what’s in the Trash. Fortunately, there’s a quick way to do so. Click the Trash icon to open its window, then highlight the icons you want to unlock (or choose Edit→Select All).
Now press Option-![]() -I (or press Option as you choose File→Show
Inspector). Turn off the Locked checkbox in the resulting Info
window. (Yes, you can lock or unlock a mass of files at once.) Now
you can send the newly unprotected files to data heaven without any
fancy tricks.
-I (or press Option as you choose File→Show
Inspector). Turn off the Locked checkbox in the resulting Info
window. (Yes, you can lock or unlock a mass of files at once.) Now
you can send the newly unprotected files to data heaven without any
fancy tricks.
By clicking an icon and then choosing File→Get Info, you open an important window like the one shown in Figure 3-9. It’s a collapsible, multipanel screen that provides a wealth of information about a highlighted icon. In essence, this is the Properties window for the icon. For example:
For a document icon, you see when it was created and modified, and what programs it “belongs” to.
For an alias, you learn the location of the actual icon it refers to.
For a program, you see whether or not it’s been updated to run on Intel-based Macs. If so, the Get Info window says Kind: Universal. If not, it says Kind: PowerPC, and will probably run slower than you’d like because it must be translated by Rosetta (Universal Apps (Intel Macs)).
For a disk icon, you get statistics about its capacity and how much of it is full.
If you open the Get Info window when nothing is selected, you get information about the desktop itself (or the open window), including the amount of disk space consumed by everything sitting on or in it.
If you highlight 11 icons or more simultaneously, the Get Info window shows you how many you highlighted, breaks it down by type (“23 documents, 3 folders,” for example), and adds up the total of their file sizes. That’s a great opportunity to change certain file characteristics on numerous files simultaneously, such as locking or unlocking them, hiding or showing their filename extensions (How Documents Know Their Parents), changing their ownership or permissions (Setup: Sharing Any Folder), and so on.
If you highlight fewer than 11 icons, Mac OS X opens up individual Get Info windows for each one.
Apple built the Get Info window out of a series of collapsed “flippy triangles,” as shown in Figure 3-9. Click a triangle to expand a corresponding information panel.
Depending on whether you clicked a document, program, disk, alias, or whatever, the various panels may include the following:
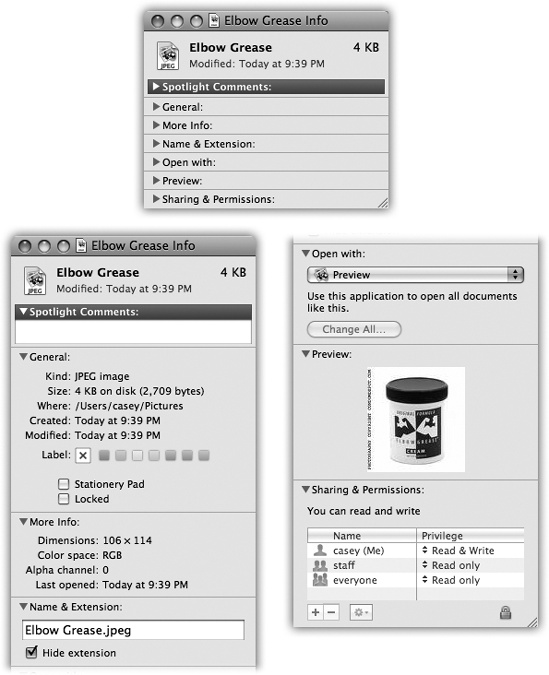
Figure 3-9. Top: The Get Info window can be as small as this, with all
of its information panes collapsed. Bottom: Or it can be as huge
as this—it’s shown here split in two because the book isn’t tall
enough to show the whole thing—if you click each flippy triangle
to open its corresponding panel of information. The resulting
dialog box can easily grow taller than your screen, which is a
good argument for either (a) closing the panels you don’t need at
any given moment or (b) running out to buy a really gigantic
monitor. And as long as you’re taking the trouble to read this
caption, here’s a tasty bonus: There’s a new, secret command in
Leopard called Get Summary Info. Highlight a group of icons, press
Control-![]() -I, and marvel at the special Get Info box
that tallies up their sizes and other characteristics.
-I, and marvel at the special Get Info box
that tallies up their sizes and other characteristics.
Spotlight Comments. Here, you can type in random comments for your own reference. Later, you can view these remarks in any list view, if you display the Comments column (in Flippy Triangles)—and find them when you conduct Spotlight searches.
General. Here’s where you can view (and edit) the name of the icon, and also see its size, creation date, most recent change date, locked status, and so on.
If you click a disk, this info window shows you its capacity and how full it is. If you click the Trash, you see how much stuff is in it. If you click an alias, this panel shows you a Select New Original button and reveals where the original file is. The General panel always opens the first time you summon the Get Info window.
More Info. Just as the name implies, here you’ll find more info, most often the dimensions and color format (graphics only) and when the icon was last opened. These morsels are also easily Spotlight-searchable.
Name & Extension. On this panel, you can read and edit the name of the icon in question. The “Hide extension” checkbox refers to the suffix on Mac OS X file names (the last three letters of Letter to Congress.doc, for example).
Many Mac OS X documents, behind the scenes, have filename extensions of this kind—but Mac OS X comes factory-set to hide them. By turning off this checkbox, you can make the suffix reappear for an individual file. (Conversely, if you’ve elected to have Mac OS X show all file name suffixes, this checkbox lets you hide filename extensions on individual icons.)
Open with. This section is available for documents only. Use the controls on this screen to specify which program will open when you double-click this document, or all documents of its type. (Details in Reassigning Documents to Programs.)
Preview. When you’re examining pictures, text files, PDF files, Microsoft Office files, sounds, clippings, and movies, you see a magnified thumbnail version of what’s actually in that document. This Preview is like a tiny version of Quick Look (Quick Look). A controller lets you play sounds and movies, where appropriate.
Languages. The menus and dialog boxes of well-written Mac OS X programs (iMovie and iPhoto, for example) appear by magic in whatever language you choose. The trouble is, your hard drive carries a lot of baggage as a result; it must store the wording for every menu and dialog box in every language.
If you’re pretty sure you do most of your computing in just one language, expand the Languages tab, select all of the languages you don’t speak, and click Remove. You can reclaim a lot of hard-drive space this way.
Sharing & Permissions. This is available for all kinds of icons. If other people have access to your Mac (either from across the network or when logging in, in person), this panel lets you specify who is allowed to open or change this particular icon. See Chapter 14 for a discussion of this hairy topic.
Here and there, you may even see other panels in the Get Info window, especially when you get info on application icons. For example, iPhoto and iDVD each offer a Plugins panel that lets you manage add-on software modules.
Tip
The title-bar hierarchical menu described Window Controls works in the Get Info dialog box,
too. That is, ![]() -click the Get Info window’s title bar to
reveal where this icon is in your folder hierarchy.
-click the Get Info window’s title bar to
reveal where this icon is in your folder hierarchy.
Every computer offers a way to find files. And every system offers several different ways to open them. But Spotlight, a star feature of Mac OS X, combines these two functions in a way that’s so fast, so efficient, so spectacular, it reduces much of what you’ve read in the previous chapters to irrelevance.
That may sound like breathless hype, but wait till you try it. You’ll see.
See the little magnifying-glass icon in your menu bar? That’s the mouse-driven way to open the Spotlight search box.
The other way is to press ![]() -Space bar. If you can memorize only one
keystroke on your Mac, that’s the one to learn. It works both at the
desktop and in other programs.
-Space bar. If you can memorize only one
keystroke on your Mac, that’s the one to learn. It works both at the
desktop and in other programs.
In any case, the Spotlight text box appears just below your menu bar (Figure 3-10).
Begin typing to identify what you want to find and open. For example, if you’re trying to find a file called Pokémon Fantasy League.doc, typing just pok or leag would probably suffice. (Spotlight doesn’t find text in the middles of words, though; it searches from the beginnings of words.)
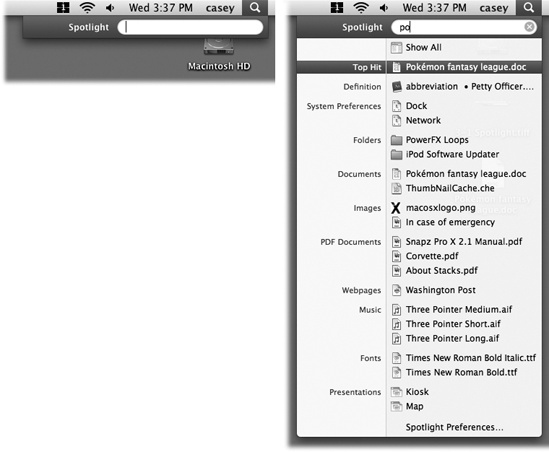
Figure 3-10. Left: Press ![]() -Space, or click the magnifying-glass icon, to
make the search bar appear. Right: As you type, Spotlight builds the
list of every match it can find, neatly organized by type: programs,
documents, folders, images, PDF documents, and so on.
-Space, or click the magnifying-glass icon, to
make the search bar appear. Right: As you type, Spotlight builds the
list of every match it can find, neatly organized by type: programs,
documents, folders, images, PDF documents, and so on.
A menu immediately appears below the search box, listing everything Spotlight can find containing what you’ve typed so far. (This is a live, interactive search; that is, Spotlight modifies the menu of search results as you type.) The menu lists every file, folder, program, email message, address book entry, calendar appointment, picture, movie, PDF document, music file, Web bookmark, Microsoft Office (Word, PowerPoint, Excel, Entourage) document, System Preferences panel, To Do item, chat transcript, Web site in your History list, and even font that contains what you typed, regardless of its name or folder location.
If you see the icon you were hoping to dig up, just click it to open it. Or use the arrow keys to “walk down” the menu, and then press Return or Enter to open it.
If you click an application, it pops onto the screen. If you select a System Preferences panel, System Preferences opens and presents that panel. If you choose an appointment, the iCal program opens, already set to the appropriate day and time. Selecting an email message opens that message in Mail or Entourage. And so on.
Spotlight is so fast, it eliminates a lot of the folders-in-folders business that’s a side effect of modern computing. Why burrow around in folders when you can open any file or program with a couple of keystrokes?
It should be no surprise that a feature as important as Spotlight comes loaded with options, tips, and tricks. Here it is—the official, unexpurgated Spotlight Tip-O-Rama:
If the very first item—labeled Top Hit—is the icon you were looking for, just press Return or Enter to open it. This is a huge deal, because it means that in most cases, you can perform the entire operation without ever taking your hands off the keyboard.
To open Safari in a hurry, for example, press
-Space bar (to open the Spotlight bar),
type safa, and hit Enter, all in rapid-fire
sequence, without even looking. Presto: Safari is before
you.And what, exactly, is the Top Hit? Mac OS X chooses it based on its relevance (the importance of your search term inside that item) and timeliness (when you last opened it).
Tip
Spotlight makes a spectacular application launcher. That’s because Job #1 for Spotlight is to display the names of matching programs in the results menu. Their names appear in the list nearly instantly—long before Spotlight has built the rest of the menu of search results.
If some program on your hard drive doesn’t have a Dock icon, for example—or even if it does—there’s no faster way to open it than to use Spotlight.
To jump to a search result’s Finder icon instead of opening it,
-click its name.Spotlight’s menu shows you only 20 of the most likely suspects, evenly divided among the categories (Documents, Applications, and so on). The downside: To see the complete list, you have to open the Spotlight window (The Spotlight Window).
The upside: It’s fairly easy to open something in this menu from the keyboard. Just press
-down arrow (or -up arrow) to jump from category to
category. Once you’ve highlighted the first result in a
category, you can walk through the remaining four by pressing
the arrow key by itself. Then, once you’ve highlighted what you
want, press Return or Enter to open it.In other words, you can get to anything in the Spotlight menu with only a few keystrokes.
The Esc key (top-left corner of your keyboard) offers a two-stage “back out of this” method. Tap it once to close the Spotlight menu and erase what you’ve typed, so that you’re all ready to type in something different. Tap Esc a second time to close the Spotlight text box entirely, having given up on the whole idea of searching.
(If you just want to cancel the whole thing in one step, press
-Space bar again, or -period, or -Esc.)Think of Spotlight as your little black book. When you need to look up a number in Address Book, don’t bother opening Address Book; it’s faster to use Spotlight. You can type somebody’s name or even part of someone’s phone number.
Spotlight is also a quick way to adjust one of your Mac’s preference settings. Instead of opening up the System Preferences program, type the first few letters of, say, volume or network or clock into Spotlight. The Spotlight menu lists the appropriate System Preferences panel, so you can jump directly to it.
If you point to an item in the Spotlight menu without clicking, a tooltip balloon appears. It tells you the item’s actual name—which is useful if Spotlight listed something because of text that appears inside the file, not its name—and its folder path (that is, where it is on your hard drive).
The Spotlight menu lists 20 found items. In the following pages, you’ll learn about how to see the rest of the stuff. But for now, note that you can eliminate some of the categories that show up here (like PDF Documents or Bookmarks), and even rearrange them, to permit more of the other kinds of things to enjoy those 20 seats of honor. Details in Customizing Spotlight.
Spotlight shows you only the matches from your account and the public areas of the Mac (like the System, Application, and Developer folders)—but not what’s in anyone else’s Home folder. If you were hoping to search your spouse’s email for phrases like “meet you at midnight,” forget it.
If Spotlight finds a different version of something on each of two hard drives, it lets you know by displaying a faint gray hard drive name after each such item in the menu.
Spotlight works by storing an index, a private, multimegabyte Dewey Decimal system, on each hard drive, disk partition, or USB flash (memory) drive. If you have some oddball type of disk, like a hard drive that’s been formatted for Windows, Spotlight doesn’t ordinarily index it—but you can turn on indexing by using the File→Get Info command on that drive’s icon.
If you point to something in the results list without clicking, you can press
-I to open the Get Info window for that
item.
Most people just type the words they’re looking for into the Spotlight box. But if that’s all you type, you’re missing a lot of the fun.
If you type more than one word, Spotlight works just the way Google does. That is, it finds things that contain both words somewhere inside.
But if you’re searching for a phrase where the words really belong together, put quotes around them. You’ll save yourself from having to wade through hundreds of results where the words appear separately.
For example, searching for military intelligence rounds up documents that contain those two words, but not necessarily side-by-side. Searching for “military intelligence” finds documents that contain that exact phrase. (Insert your own political joke here.)
You can confine your search to certain categories using a simple code. For example, to find all photos, type kind:image. If you’re looking for a presentation document, but you’re not sure whether you used Keynote, iWork, or PowerPoint to create it, type kind:presentation into the box. And so on.
Here’s the complete list of kinds. Remember to precede each keyword type with kind and a colon.
To find this: | Use one of these keywords: |
|---|---|
A program | app, application, applications |
Someone in your address book | contact, contacts |
A folder | folder, folders |
A message in Mail | email, emails, mail message, mail messages |
An iCal appointment | event, events |
An iCal task | to do, to dos, todo, todos |
A graphic | image, images |
A movie | movie, movies |
A music file | music |
An audio file | audio |
A PDF file | pdf, pdfs |
A System Preferences control | preferences, system preferences |
A Safari bookmark | bookmark, bookmarks |
A font | font, fonts |
A presentation (PowerPoint, etc.) | presentation, presentations |
You can combine these codes with the text you’re seeking, too. For example, if you’re pretty sure you had a photo called “Naked Mole-Rat,” you could cut directly to it by typing mole kind:images or kind:images mole. (The order doesn’t matter.)
You can use a similar code to restrict the search by chronology. If you type date: yesterday, Spotlight limits its hunt to items that you last opened yesterday.
Here’s the complete list of date keywords you can use: this week, this month, this year; today, yesterday, tomorrow; next week, next month, next year. (The last four items are useful only for finding upcoming iCal appointments. Even Spotlight can’t show you files you haven’t created yet.)
If your brain is already on the verge of exploding, now might be a good time to take a break.
In Leopard, you can limit Spotlight searches by any of the 125 different info-morsels that may be stored as part of the files on your Mac: Author, Audio bit rate, City, Composer, Camera model, Pixel width, and so on. Here are a few examples:
GEM IN THE ROUGH: Sweet Spotlight Serendipity: Equations and Definitions
In Mac OS X 10.5, Spotlight has been given two quiet enhancements that turn it into a different beast altogether.
First, it’s a tiny pocket calculator, always at the ready. Click in the Search box, type or paste 38*48.2−7+55, and marvel at the first result in the Spotlight menu: 1879.6. There’s your answer—and you didn’t even have to fire up the Calculator.
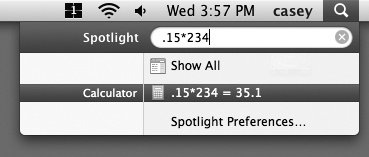

(For shorter equations—only a few characters long—the first result in the Spotlight menu shows the entire equation, like .15*234=35.1.)
And it’s not just a four-function calculator, either. It works with square roots: Type sqrt(25), and you’ll get the answer 5. It also works with powers: Type pow(6,6)—that is, 6 to the power of 6—and you’ll get 46656. You can even type pi to represent—you know, pi.
Second, the Spotlight menu is now a full-blown English dictionary. Or, more specifically, it’s wired directly into Mac OS X’s own dictionary, which sits in your Applications folder.
So if you type, for example, schadenfreude into the Spotlight box, you’ll see, to your amazement, the beginning of the actual definition right there in the menu. Click it to open Dictionary and read the full-blown entry. (In this example, that would be: “noun: pleasure derived by someone from another person’s misfortune.”)
author:casey. Finds all documents with “casey” in the Author field. (This presumes that you’ve actually entered the name Casey into the document’s Author box. Microsoft Word, for example, has a place to store this information.)
width:800. Finds all graphics that are 800 pixels wide.
flash:1. Finds all photos that were taken with the camera’s flash on. (To find photos with the flash off, you’d type flash:0. A number of the yes/no criteria work this way: Use 1 for yes, 0 for no.)
modified:3/7/08-3/10/08. Finds all documents modified between March 7 and March 10.
You can also type created:= 6/1/08 to find all the files you created on June 1, 2008. Type modified:<= 3/9/08 to find all documents you edited on or before March 9, 2008.
As you can see, three range-finding symbols are available for your queries: <, >, and -. The < means “before” or “less than,” the > means “after” or “greater than,” and the hyphen indicates a range (of dates, size, or whatever you’re looking for).
Tip
Here again, you can string words together. To find all PDFs you opened today, use date:today kind:PDF. And if you’re looking for a PDF document that you created on July 4, 2008 containing the word wombat, you can type created:=7/4/08 kind:pdf wombat, although at this point, you’re not saving all that much time.
Now, those examples are just a few representative searches out of the dozens that Leopard makes available.
It turns out that the search criteria codes that you can type into the Spotlight box (author:casey, width:800, and so on) correspond to the master list that appears when you choose Other in the Spotlight window, as described in The Spotlight Window. In other words, there are 125 different search criteria.
Mac OS X 10.5 adds another layer of sophistication to Spotlight searches by permitting what Comp Sci professors call Boolean searches. These are search terms that round up results containing either of two search terms, or both search terms, or one term but not another.
To go Boolean, you’re supposed to incorporate terms like AND, OR, or NOT into your search queries.
For example, you can round up a list of files that match two terms by typing, say, vacation AND kids. (That’s also how you’d find documents coauthored by two specific people—you and a pal, for example. You’d search for author:Casey AND author:Chris. Yes, you have to type Boolean terms in all capitals.)
Tip
You can use parentheses instead of AND, if you like. That is, typing (vacation kids) finds documents that contain both words, not necessarily together.
If you use OR, you can find icons that match either of two search criteria. Typing kind:jpeg OR kind:pdf turns up photos and PDF files in a single list.
The minus sign (hyphen) works, too. If you did a search for dolphins, hoping to turn up sea-mammal documents, but instead find your results contaminated by football-team listings, by all means repeat the search with dolphins -miami. Mac OS X eliminates all documents containing “Miami.”
Tip
The word NOT works the same way. You could type dolphins NOT miami to achieve the same effect. But the hyphen is faster to type.
As you may have noticed, the Spotlight menu doesn’t list every match on your hard drive. Unless you own one of those extremely rare 60-inch Apple Skyscraper Displays, there just isn’t room.
Instead, Spotlight uses some fancy behind-the-scenes analysis to calculate and display the 20 most likely matches for what you typed. But at the top of the menu, you usually see that there are many other possible matches; it says something like “Show All,” meaning that there are other candidates. (Mac OS X no longer tells you how many other results there are.)
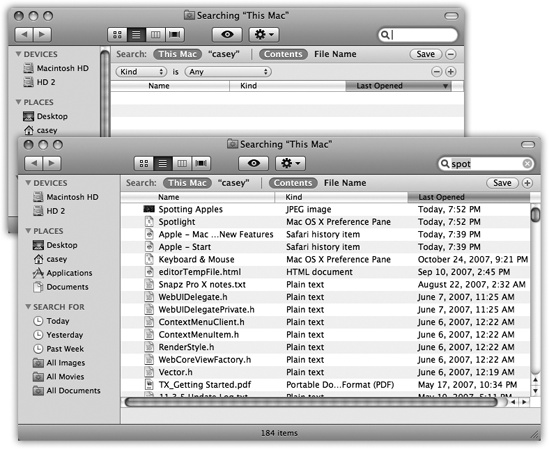
There is, however, a second, more powerful way into the Spotlight labyrinth. And that’s to use the Spotlight window, shown in Figure 3-11.
If the Spotlight menu—its Most Likely to Succeed list—doesn’t include what you’re looking for, click Show All. You’ve just opened the Spotlight window.
Now you have access to the complete list of matches, neatly listed in what appears to be a standard Finder window.
When you’re in the Finder, you can also open the Spotlight window directly, without using the Spotlight menu as a trigger.
Actually, there are three ways to get to the Spotlight window (Figure 3-11):
- -F (for
Find, get it?). When you choose File→Find
(or press -F), you get an empty
Spotlight window, ready to fill in for your search.
Option-
-Space
bar. This keystroke opens the same window. But
instead of starting empty and filling up, this window starts
with a list of every single thing on your
Mac and winnows down as you type a search query.Open any desktop window, and type something into the Search box at upper-right. Presto—the mild-mannered folder window turns into the Spotlight window, complete with search results.
Once you type something to search for, the results are identical.
When the Spotlight window opens, you can start typing whatever you’re looking for into the Search box at the upper right.
As you type—or, more realistically, a second or two after you type each letter—the window changes to reveal a list of the files and folders whose names contain what you typed. It’s just like the Spotlight menu, but in a window with no 20-item results limit (Figure 3-11, bottom).
While the searching is going on, a sprocket icon whirls away
in the lower-right corner. To cancel the search in progress, click
the ![]() button next to the phrase you typed. That
button also clears the box so you can type a different word or
phrase.
button next to the phrase you typed. That
button also clears the box so you can type a different word or
phrase.
The real beauty of the Spotlight window, though, is that it can hunt down icons using extremely specific criteria; it’s much more powerful (and complex) than the Spotlight menu. If you spent enough time setting up the search, you could use this feature to find a document whose name begins with the letters Cro, is over one megabyte in size, was created after 10/1/07 but before the end of the year, was changed within the last week, has the file name suffix .doc, and contains the phrase “attitude adjustment.” (Of course, if you knew that much about a file, you’d probably know where it is without having to use the Search window. But you get the picture.)
To use the Search window, you need to feed it two pieces of information: where you want it to search, and what to look for. You can make both of these criteria as simple or complex as you like.
The three phrases at the top of the window—This Mac, “Folder Name,” and Shared—are buttons. Click one of these to tell Spotlight where to search:
This Mac means your entire computer, including secondary disks attached to it (or installed inside).
“Letters to Congress” (or whatever the current window is) limits the search to whatever window was open when you called up the Spotlight window. So, for example, if you want to search your Pictures folder, open it first and then hit
-F. You’ll see the “Pictures” button at
the top of the window, and you can click it to restrict the
search to that folder.Shared. Click this button to expand the search to your entire network and all the computers on it. (This assumes, of course, that you’ve brought their icons to your screen as described in Chapter 14. If there aren’t any shared folders or disks, this button doesn’t appear at all.)
If the other computers are Macs running Leopard, Spotlight can even search their files just the way it does on your own Mac—finding words inside the files, for example. If they’re any other kind of computer, Spotlight can only search for files by name.
Tip
If the object of your quest doesn’t show up, you can adjust the scope of the search with one quick click on another button at the top of the window, like This Mac or Shared. Spotlight updates the results list.
The two other buttons at the top of the Spotlight window are also very powerful:
Contents. This button, the factory setting, works just the way Spotlight usually does. It’s prepared to search for the words inside your files, along with all the metadata attached to them.
File Name. All of this searching-inside-files business is well and good. But there’s no denying that sometimes, you already know a file’s name—you just don’t know where it is. In this case, it’s far faster to search by name, just as people did before Spotlight came along. The list of results will be far shorter, and you’ll spot what you want much faster. That’s why this button is so welcome.
If all you want to do is search your entire computer for files containing certain text, you may as well use the Spotlight menu described at the beginning of this chapter.
The power of the Spotlight window, though, is that it lets you design much more specific searches, using over 125 different search criteria: date modified, file size, the “last opened” date, color label, copyright holder’s name, shutter speed (of a digital photo), tempo (of a music file), and so on. Figure 3-12 illustrates how detailed this kind of search can be.
To set up a complex search like this, you’ll use the second row of controls at the top of the window.
And third, and fourth, and fifth. Each time you click one of the + buttons at the right end of the window, a new criterion row appears, whose pop-up menus you can use to specify what date, what file size, and so on. Figure 3-12 shows how you might build, for example, a search for all photo files that you’ve opened within the last week that contain a Photoshop layer named Freckle Removal.

Figure 3-12. By repeatedly clicking the + button, you can turn on as many criteria as you’d like; each additional row further narrows the search.
To delete a row, click the - button at its right end.
Here’s a rundown of the ways you can restrict your search, according to the options you find in the first pop-up menu of a row. Note that after you choose from that first pop-up menu (Last Opened, for example), you’re supposed to use the additional pop-up menus to narrow the choice (“within last,” “2,” and “weeks,” for example).
When the first pop-up menu says Kind, you can use the second pop-up menu to indicate what kind of file you’re looking for: Applications, Documents, Folders, Images, Movies, Music, PDF files, Presentations, Text files, or Other.
For example, when you’re trying to free up some space on your drive, you could round up all your movie files, which tend to be huge. Choosing one of these file types makes the window begin to fill with matches automatically and instantly.
When you choose one of these options from the first pop-up menu, the second pop-up menu lets you isolate files, programs, and folders according to the last time you opened them, the last time you changed them, or when they were created.
Tip
You’re allowed to add two Date rows—a great trick that lets you round up files that you created or edited between two dates. Set up the first Date row to say “is after,” and the second one to say “is before.”
In fact, if it doesn’t hurt your brain to think about it, how about this? You can even have more than two Date rows. Use one pair to specify a range of dates for the file’s creation date, for example, and two other rows to limit when it was modified.
Science!
The beauty of Spotlight is that it finds text anywhere in your files, no matter what their names are. That’s why Apple demoted this option—the icon’s name—to such a low position in the pop-up menu.
Anyway, when you want to search for an icon by the text that’s only in its name, this is your ticket. Capitalization doesn’t matter.
Of course, if all you want to do is find files whose names include Sales, you may as well save yourself all of this reading and use the Spotlight menu (or click the File Name button at the top of the window). But using the Search window offers you far more control, thanks to the second pop-up menu that offers you options like Contains, Starts with, Ends with, and so on.
You can think of this option as the opposite of Name. It finds only the text that’s inside your files, and completely ignores their icon names.
That’s a handy function when, for example, a document’s name doesn’t match its contents. Maybe a marauding toddler pressed the keys while playing KidPix, inadvertently renaming your doctoral thesis “xggrjpO#$5%////.” Or maybe you just can’t remember what you called something.
If this were a math equation, it might look like this: options x options=overwhelming.
Choosing Other from the first pop-up menu opens a special dialog box containing at least 125 other criteria. Not just the big kahunas like Name, Size, and Kind, but far more targeted (and obscure) criteria like “Bits per sample” (so you can round up MP3 music files of a certain quality), “Device make” (so you can round up all digital photos taken with, say, a Canon camera), “Key signature” (so you can find all the GarageBand songs you wrote in the key of F sharp), “Pages” (so you can find all Word documents that are really long), and so on. As you can see in Figure 3-13, each one comes with a short description.
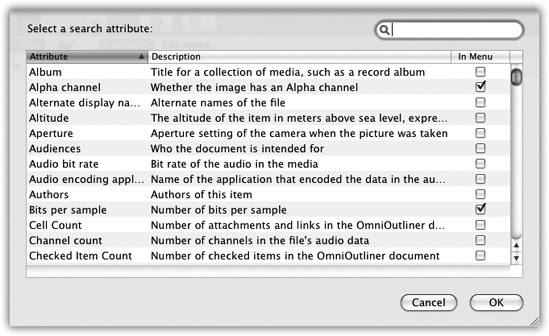
Figure 3-13. Here’s the master list of search criteria. Turn on the “In menu” checkboxes of the ones you’ll want to re-use often, as described in the box on the previous page. Once you’ve added some of these search criteria to the menu, you’ll get an appropriate set of “find what?” controls (“Greater than"/"Less than” pop-up menus, for example).
You may think that Spotlight is offering you a staggering array of file-type criteria. In fact, though, big bunches of information categories (technically called metadata) are all hooks for a relatively small number of document types. For example:
Digital photos and other graphics files account for the metadata types alpha channel, aperture, color space, device make, device model, EXIF version, exposure mode, exposure program, exposure time, flash, FNumber, focal length, ISO speed, max aperture, metering mode, orientation, pixel height, pixel width, red eye, resolution height, resolution width, and white balance.
Digital music files have searchable metadata categories like album, audio bit rate, bits per sample, channel count, composer, duration, General MIDI sequence, key signature, lyricist, musical genre, recording date, sample rate, tempo, time signature, track number, and year recorded. There’s even a special set of parameters for GarageBand and Soundtrack documents, including instrument category, instrument name, loop descriptors, loop file type, loop original key, and loop scale type.
Microsoft Office documents can contain info bits like authors, contributors, fonts, languages, pages, publishers, and contact information (name, phone number, and so on).
This massive list also harbors a few criteria you may use more often, like Size, Label, and Visibility (which lets you see all the invisible files on your hard drive).
Now, you could argue that in the time it takes you to set up a search for such a specific kind of data, you could have just rooted through your files and found what you wanted manually. But hey—you never know. Someday, you may remember nothing about a photo you’re looking for except that you used the flash and an F-stop of 1.8.
The Spotlight window is a regular old Finder window, with all the familiar views and controls (Figure 3-14).
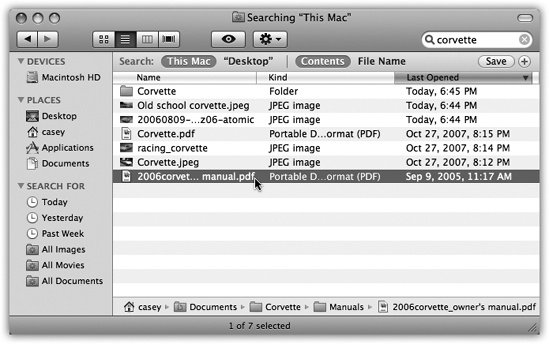
Figure 3-14. Click a result once to see where it sits on your hard drive (very bottom). If the window is too narrow to reveal the full folder path, run your cursor over them without clicking. As your mouse moves from one folder to another, Leopard briefly reveals its name, compressing other folders as necessary to make room. (Sub-tip: You can drag icons into these folders, too.
You can work with anything in the results window exactly as
though it’s a regular Finder window: Drag something to the Trash,
rename something, drag something to the desktop to move it there,
drag something onto a Dock icon to open it with a certain program,
Option-![]() -drag it to the desktop to create an alias,
and so on.
-drag it to the desktop to create an alias,
and so on.
You can move up or down the list by pressing the arrow keys,
scroll a “page” at a time with the Page Up and Page Down keys, and
so on. You can also highlight multiple icons simultaneously, the
same way you would in a Finder list view: Highlight all of them by
choosing Edit→Select All; highlight individual items by
![]() -clicking them; drag diagonally to enclose a
cluster of found items; and so on.
-clicking them; drag diagonally to enclose a
cluster of found items; and so on.
Or you can proceed in any of these ways:
Change the view by clicking one of the View icons or choosing from the View menu. You can switch between icon, list, or Cover Flow views (see Chapter 2). Actually, Cover Flow is a great view for search results; since this list is culled from folders all over the computer, you otherwise have very little sense of context as you examine the file names.
Sort the results by clicking the column headings (not available in icon view). It can be especially useful to sort by Kind, so that similar file types are clustered together (Documents, Images, Messages, and so on).
Get a Quick Look at one result by clicking it and then hitting the Space bar. If it’s a document type that Mac OS X understands, you get the big, bold Quick Look preview window.
Find out where it is. It’s nice to see all the search results in one list, but you’re not actually seeing them in their native habitats: in the Finder folder windows where they physically reside.
If you click once on an icon in the results, the bottom edge of the window becomes a folder map that shows you where that item is.
Open the file (or open one of the folders it’s in). If one of the found files is the one you were looking for, double-click it to open it (or highlight it and press either
-O or -down arrow). In many cases, you’ll never
even know or care where the file was—you just want to get into
it.Move or delete the file. You can drag an item directly out of the found-files list and into a different folder, window, or disk—or straight to the Dock or the Trash.
Give up. If none of these avenues suits your fancy, you can close the window as you would any other (
-W).
You’ve just read about how Spotlight works fresh out of the box. But you can tailor its behavior, both for security reasons and to fit it to the kinds of work you do.
Here are three ways to open the Spotlight preferences center:
In any case, you wind up face-to-face with the dialog box shown in Figure 3-15. You can tweak Spotlight in three ways here, all very useful:
Turn off categories. The list of checkboxes identifies all the kinds of things that Spotlight tracks. If you find that Spotlight uses up valuable menu space listing, say, Web bookmarks or fonts—stuff you don’t need to find very often—turn off their checkboxes. Now the Spotlight menu’s precious 20 slots are allotted to icon types you care more about.
Prioritize the categories. This dialog box also lets you change the order of the category results; just drag an individual list item up or down to change where it appears in the Spotlight menu.
Change the keystroke. Ordinarily, pressing
-Space bar highlights the Spotlight search
box in your menu bar, and Option--Space bar opens the Spotlight window
described above. If these keystrokes clash with some other key
assignment in your software, though, you can reassign them to
almost any other keystroke you like.Click inside the white box that lists the keystroke and then press any key combination—Control-S, for example—to choose something different. Whatever keystroke you choose must include at least one of the modifier keys (Option, Control, or
or one of the F-keys (such as F4).
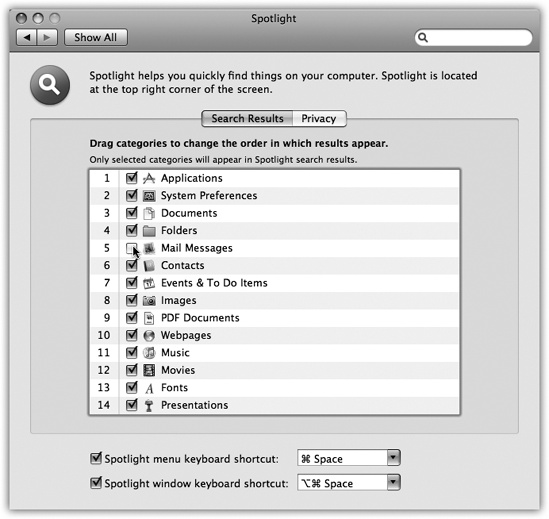
Figure 3-15. Here’s where you can specify what categories of icons you want Spotlight to search, which order you want them listed in the Spotlight menu, and what keystroke you want to use for highlighting the Spotlight bar.
Note
Apple assumes no responsibility for your choosing a keystroke
that messes up some other function on your Mac. ![]() -S, for example, would not be a good
choice.
-S, for example, would not be a good
choice.
Ordinarily, Spotlight doesn’t consider any corner of your hard drive off-limits. It looks for matches wherever it can except in other people’s Home folders. (That is, you can’t search through other people’s stuff).
But even within your own Mac world, you can hide certain folders from Spotlight searches. Maybe you have privacy concerns—for example, you don’t want your spouse Spotlighting your stuff while you’re away from your desk. Maybe you just want to create more focused Spotlight searches, removing a lot of old, extraneous junk from its database.
Either way, the steps are simple. Open the Spotlight panel of System Preferences, as described above. Click the Privacy tab. Figure 3-16 explains the remaining steps.
Once you’ve built up the list of private disks and folders, close System Preferences. Spotlight now pretends the private items don’t even exist.
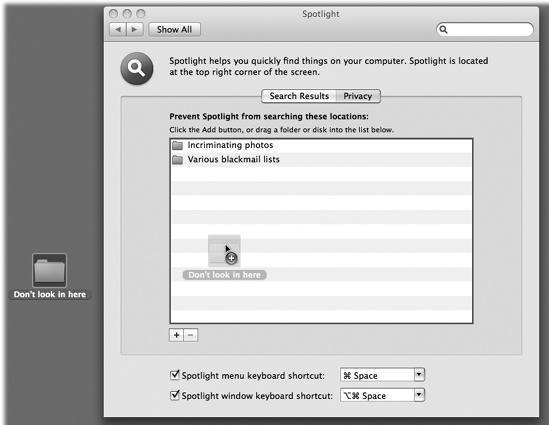
Figure 3-16. You can add disks, partitions, or folders to the list of non-searchable items just by dragging them from the desktop into this window. Or, if the private items aren’t visible at the moment, you can click the + button, navigate your hard drive, select the item, and click Choose. To remove something from this list, click it and then press the Delete key or click the - button.
You may remember from Chapter 1 (or from staring at your own computer) that the Sidebar at the left side of every Leopard desktop window contains a set of little folders under the Searches heading. Each is actually a smart folder—a self-updating folder that, in essence, performs a continual, 24/7 search for the criteria you specify. (Smart folders are a lot like smart albums in iPhoto and iTunes, smart mailboxes in Mail, and so on.)
Note
In truth, the smart folder performs a search for the specified criteria at the moment you open it. But because it’s so fast, and because it’s always up to date, it feels as though it’s been quietly searching all along.
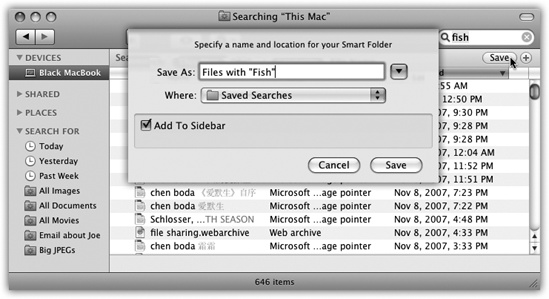
As it turns out, the ones installed there by Apple are meant to serve as inspiration for you to create your own smart folders. The key, as it turns out, is the little Save button in the upper-right corner of the Spotlight window.
Here’s a common example of how you might use it. You choose File→Find. You set up the pop-up menus to say “last opened date” and “this week.” You click Save. You name the smart folder something like Current Crises, and you turn on “Add to Sidebar” (Figure 3-17).
From now on, whenever you click that smart folder, it reveals all of the files you’ve worked on in the last week or so. The great part is that these items’ real locations may be all over the map, scattered in folders all over your Mac and your network. But through the magic of the smart folder, they appear as though they’re all in one neat folder.
Tip
If you decide your original search criteria need a little fine-tuning, click the smart folder. From the Action menu, choose Show Search Criteria. You’re back on the original setting-up-the-search window. Use the pop-up menus and other controls to tweak your search setup, and then click the Save button once again.
To delete a smart folder, just drag its icon out of the Sidebar. (Or if it’s anywhere else, like on your desktop, drag it to the Trash like any other folder.)