Eliminating blur in your nighttime photos
Taking a clear photo at night without a flash or tripod
Understanding film speed for nighttime shooting
Shooting nighttime flash photos
Identifying the modes and settings for nighttime photography
Reading night light for spectacular shots
Picture the light of a lantern under an arch, stone tombstones lit by the moon, or the streaming red lights of a police car slicing the night sky. Images of the night have mystified and intrigued artists throughout time, especially with the advent of photography. After all, you have to have light to create a photograph, and nighttime is well, dark. However, with the tricks and techniques I show you in this chapter, you can tame the night and capture the denizens of the dark — at least in a photo. Not only can you capture what the night truly holds, but you can also use low-light situations to your creative advantage to craft shots that are fantasy-like, just like the magic of the night itself.
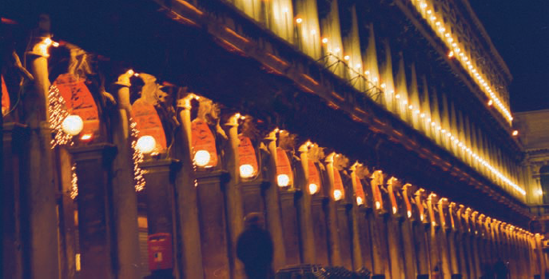
Understandably, shooting at night has inherent problems — namely, the lack of available light. Without adequate light, color tones shift, becoming overly muted and neutral, as shown in Figure 10-1. To compensate for the low light, you can tweak the following settings by themselves or in combination, but each can introduce more problems:
Use a wider aperture. This reduces your depth of field but allows more light to reach your camera's sensor.
Use a slower shutter speed. Subjects are more easily blurred (unless you use a tripod or otherwise support the camera), but, again, more light reaches the sensor.
Use flash. This can create uneven illumination and washed-out areas in your shot, but it provides the light necessary to capture the image.
Use a higher ISO/ASA. This results in more noise/grain. Most of the time, you'll want to resist the urge to use an ISO setting higher than 400, even at night.
The art photographer that you are, however, will not be thwarted by such limitations. Right? Take all these tethers and turn them into creative advantages. The night is full of too many wonderful events and views to avoid simply because not much light is available.
Here's how to take a con of nighttime shooting and turn it into a pro, just like you (pun intended):
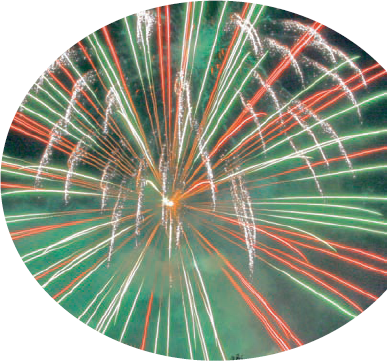
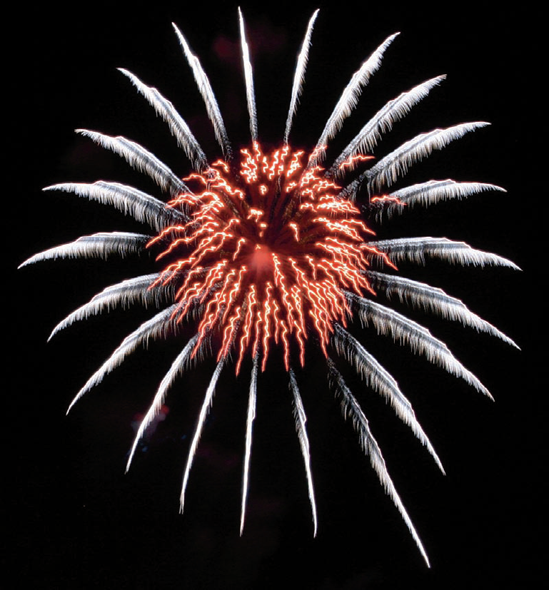
Use a slightly longer exposure time to show action. A long exposure (longer shutter speed) captures "marching ants," neon lights, or a kid with a sparkler or fireworks drawing crazy scribbles of color in the night, as shown in Figure 10-2.
Note
When your camera must remain steady during a long exposure time, a tripod or other support is necessary. And tripods don't have to be giant, cumbersome beasts, either. Look for small, inexpensive collapsible ones that are very portable. Bonus: Small tripods are great for placing your camera near ground level so that you can shoot upward and with a long exposure, like the image shown in Figure 10-3. This shot, which I took in Manual mode, wouldn't be possible handheld because you'd get blur from camera shake. Read more about tripods in the later section, "Seek nighttime landscapes," and about Manual mode in "Creating a blur-free, flashless night photo."
Tripods aren't always necessary in night shooting, however. In the next section, "Creating a blur-free, flashless night photo," I discuss ways to shoot at night without a tripod.
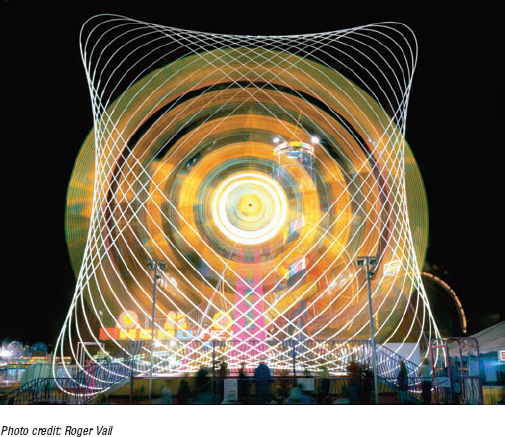
Use a much longer exposure time to show motion. A long exposure turns car lights or lighted amusement park rides into ribbons of color, as shown in Figure 10-4.
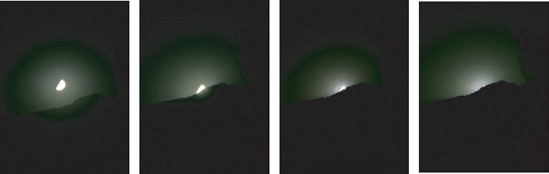
Use a series of shorter exposures over time to show progression. A series of shots like this can show the moon dancing across the night sky, as shown in Figure 10-5. See the sidebar, "Putting the moon to bed," later in this chapter, for more about this technique.
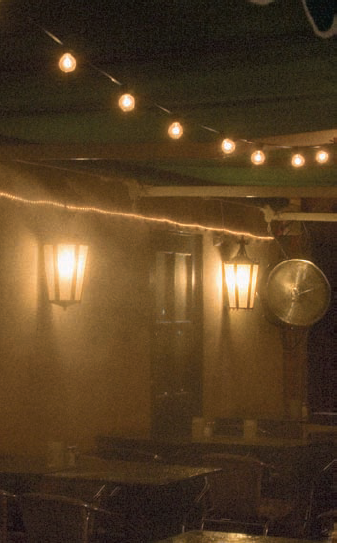
Take advantage of soft, ambient lighting: Look around for natural night lighting — streetlights, the moon and stars, or a lamp's soft glow, as in Figure 10-6.
Tip
When you can find the perfect ambient night lighting, your camera's flash will ruin the effect. Don't use flash unless absolutely necessary. You might have to override your camera's default setting to disable the flash when shooting in the dark.
Once upon a time, taking pictures at night meant that you absolutely had to have a flash; if you didn't use a flash, you definitely needed a tripod. Back then (oh, sometime in the last millennium), the standard film speed was ISO 100. Fast black-and-white (B&W) film (400 ASA) appeared on the scene in the 1950s, and 400-speed film hit the market in the mid-1970s. Those faster films certainly helped with low-light and night photography exposure needs, as did even faster films that followed.
To photograph at night with a film camera and then scan the negatives, positives, or prints later, you should use film with an ISO rating of 400 or higher. If you set your camera to a low film speed (say ISO 100) or load it with 100 B&W/color film, you will get handheld blur when shooting at night, no matter how steady you are.
Note
The higher the ISO speed, the noisier (digital) or grainier (film) an image will be. Using ISO 400 film gives you far less grain and more clarity with night pictures than ISO 800 film. When shooting digitally, the difference in noise between an ISO setting of 400 and ISO 800 is even greater for most cameras.
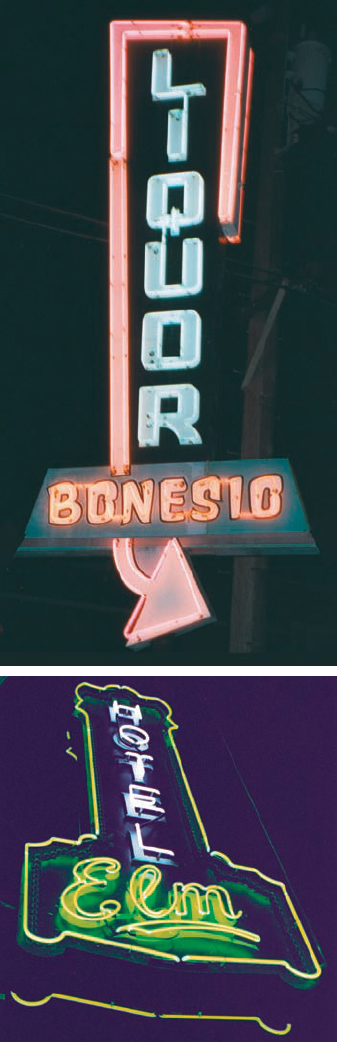
Figure 10-7 shows a pair of neon signs. The top image was taken with ISO 200 film. Because of the longer shutter speed required by the slow film, the image is somewhat blurry — an error that would put off many potential buyers. In comparison, the neon sign on the bottom was shot with a faster film — ISO 400 — resulting in a clearer shot.
Note
Blur in nighttime photos has to have a specific focus, such as to show motion. If not, blur looks like (is) a technical error. When shooting neon signs as historical photos (and these images are marketable, by the way), you should have no blur because it would have no purpose. Blur serves a purpose only when it's indicating movement or time or when giving photos a mysterious quality.
Note
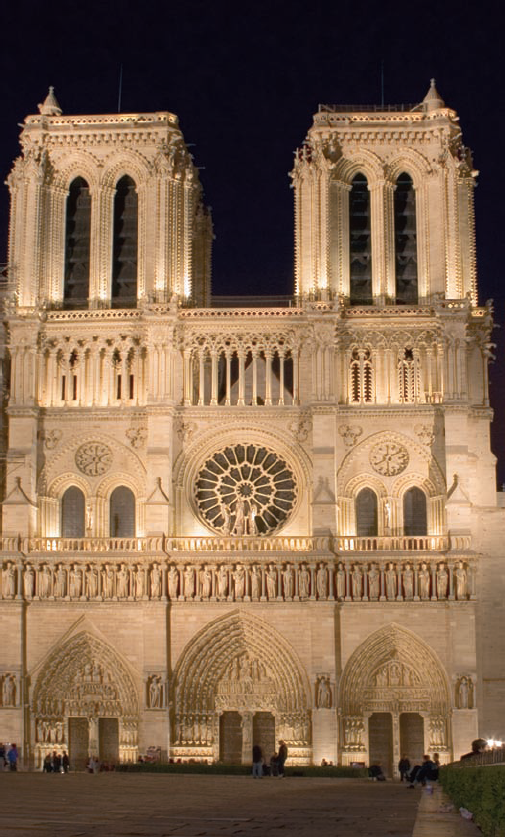
If flashless night photos are your goal, you can achieve them without blur. The first thing to do in order to take a good night photo without a flash (and maybe without a tripod) is to scout out areas with enough light. After you find a good location with abundant streetlights and well-lit buildings, you're ready to practice. For example, shooting architecture and cityscapes at night gives you some pretty remarkable shots using only the light that's available.
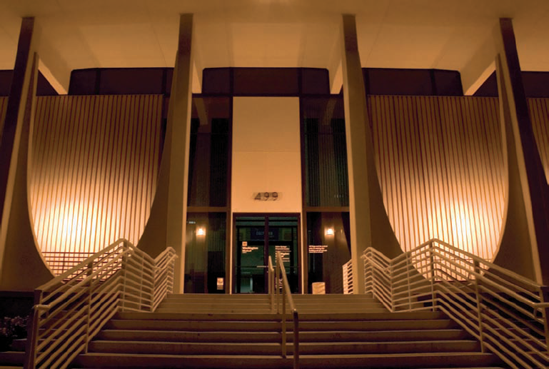
Because buildings, gates, and bridges are usually well lit (and dramatically lit, too), they offer some great opportunities to shoot without a flash, as you can see from Figure 10-8.
Set your camera for the available light.
ISO
Load a film camera with ISO 400 film; set your digital camera to ISO 400.
Exposure control
Set your SLR or dSLR camera to Av mode, the manual mode in which you can set your f-stop and your flash won't go off automatically.
Tip
If you're using a point-and-shoot digital camera, turn off the flash first.
Choose an f-stop of 8.
Look for an object that has sufficient light around it.
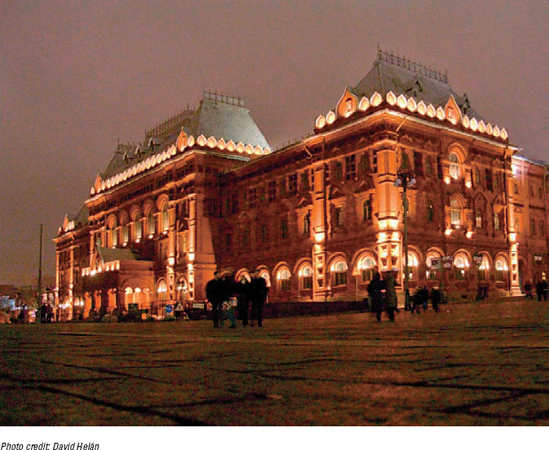
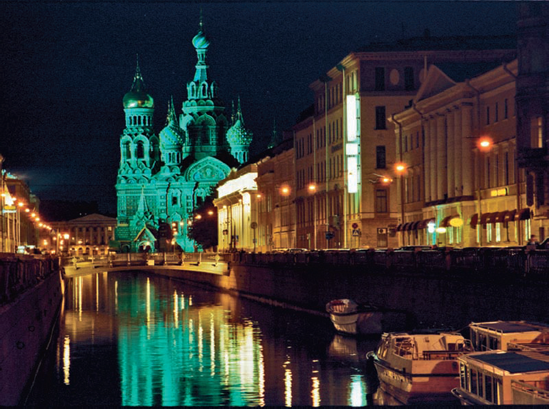
Figure 10-9 shows St. Petersburg, Russia, at night, which is lit by ample amounts of ambient nighttime light. This image is scanned from an ISO 400 film negative.
Press your camera's shutter release halfway to let your camera perform its autofocus chore.
As dusk approaches nightfall and you find yourself losing light quickly, you'll have to reset your camera at some point because the auto modes don't do all that well with variable light, like the light you get at night. You also need to watch out for surrounding light sources — flood lights, street lights, and car lights.
Here are the basic exposure controls on your camera that can help you successfully shoot at night:
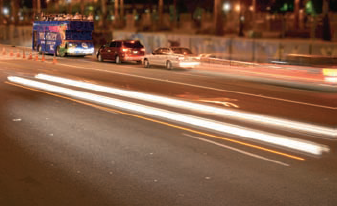
Shutter priority (Tv on most cameras): This is an exposure mode that lets you control the time that the shutter of your camera remains open, while your camera automatically sets how wide the aperture opens to let just enough light in to give you a good picture. You can experiment at many different shutter speeds to get a different effect. If you want to turn car lights into ribbons of color, as in Figure 10-10, you would set shutter priority to a longer exposure time.
Warning
Don't be confused by what your camera's LCD screen or viewer is reading in terms of shutter speeds. 1/250 is displayed as 250 on most cameras, whereas 1/60, a smaller number but longer exposure, is displayed as 60.
Aperture priority (Av on most cameras): This exposure mode lets you control the size of the aperture in your lens, while your camera automatically sets how long the shutter remains open to give your picture adequate light (exposure). When photographing at night, you don't want your lens open too wide because you'll get white out (when too much light hits your sensor or film causing a blazing white shadow to sweep across your frame), especially if your shutter is open a long time. This mode's great for close-ups of neon signs, but Tv is a better mode for everything else that dances in the night with less light.
Tip
Your camera's indicator light can help you get your light right. Don't shoot if it's red or blinking red. Wait for the green light as you look through the viewfinder and press your shutter halfway down. Then, press the shutter button all the way down to take your picture.
Manual mode (M on most cameras): This mode lets you control both the aperture and the shutter speed, giving you nearly complete control over your exposure. After setting up the camera and switching to Manual mode, press the shutter button halfway down to autofocus and let the camera evaluate the existing light. In the viewfinder, you'll see (on most digital cameras that offer a true Manual mode) the small exposure scale, indicating whether your selected f-stop and shutter speed will produce an underexposed, normally exposed, or overexposed image.
Remember that under and over are relative terms when shooting at night. Some midrange digital cameras offer a Manual mode that doesn't let you set specific values for the aperture (f-stop) and shutter speed, but rather presents you with the exposure scale and lets you choose to underexpose or overexpose the shot.
Metering: This is when your camera measures how much light is available in a portion of the frame of your picture. On some cameras, you'll get a green light indicating your shot is a go when you've got your settings set and have your finger pushing halfway down on the shutter release. The light meter of your camera works the same, whether it's day or night. But if you're using long shutter speeds and not using the shutter priority mode (which is all you can do on some point-and-shoots), your exposures will vary widely from too dark to too light to just right. But, hey, you've got a digital camera and you can keep trying until you get it right. Your camera should have a choice of metering zones.
Tip
When you set both your camera's aperture and shutter speed manually, bracket your shots — that is, take shots at progressive shutter speeds — until you get the exposure you want. Your camera might offer exposure bracketing as a setting. You can, for example, set the bracketing to take three shots at predetermined exposure intervals; then press the shutter release three times.
Night dreaming
Folks like art that takes them to a different place and time. Night photos can change a viewer's mood, perhaps even transport the viewer to an anywhere-but-here mentality. Okay, so it's not nighttime in Paris everywhere in the world, but when people look at a picture of nighttime in Paris, their thoughts can drift to being somewhere else, perhaps sipping coffee in a café in Paris at night. If Paris isn't someone's idea of a nice place to be, try Rome, New York City, or a late-night stroll in a plaza in Venice, as shown here.
Note
To be able to exploit wider aperture settings when shooting at night, pull out the fast film or set your digital camera to a fast ISO speed. Fast film and/or high ISO settings on your digital camera let you take night pictures without using your flash, which means you get more of the natural light from the surroundings in your picture.
Note
If you have a dSLR, select the Av mode and choose an f-stop of f/6.7 or f/8. (For more about Av, see Chapter 9.) If you're using a digital point-and-shoot, set your camera to night mode or auto mode and set the ISO speed to 800. If you're using film, load it with ISO 400 or 800 film. In Figure 10-11, you can see the difference between shooting at ISO 80 and ISO 3200 on a dSLR.

For a cool, grainy, mysterious effect, choose a setting above ISO 800 on your digital camera. Anything grainy, smoky, and/or empty (like empty chairs or shots with no subjects or one subject alone) will create a feeling of isolation, long considered a mainstay of humanity in many works in the art world. (For more about ideas for interesting photos, see Chapter 4.) As of this writing, Canon has a dSLR that you can crank the ISO up to 3200 (wow). See in Figure 10-12 how using a high ISO (1600 for this shot) introduces some artsy noise, which makes the picture more grainy and adds to the isolated effect.
Tip
Photoshop offers a variety of filters that you can use to reduce unwanted noise or grain in your image — and others that you can use to add noise or grain. Photoshop CS2 includes the powerful Reduce Noise filter, which works wonders on both luminance noise (light colored specks in your shadows and areas of solid color) and digital noise (specks of red, green, and blue scattered throughout the image). Of course, if you don't like digital noise in your images, it's generally easier and more effective to simply use a tripod and a lower ISO (perhaps 200) when shooting at night.
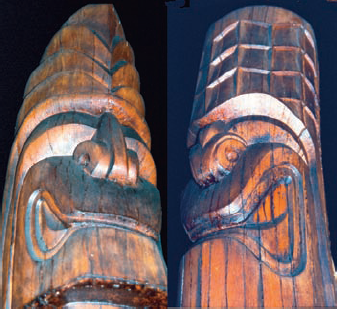
So when's the right time to use your flash at night for art photos? My advice: Take advantage of your flash only when you are capturing objects close-up.
Figure 10-13 shows that a flash was used to take pictures (really portraits) of Tikis in Honolulu. There was little light around for this shot so the flash provided almost all the Tikis' illumination. Sure, it's harsh light — bright and concentrated — but it can be a helpful art photo creation tool, creating a pretty cool effect, especially on the Tikis, which are made to look a little sinister in this instance.
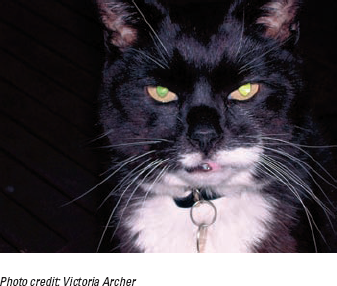
Here's another great way to be creative when shooting at night with a flash. You know those wretched red and green demon eyes you get when shooting people and animals with a flash? Take advantage of those night eyes and be aware of opportunities to capture animals of the night, like owls, frogs, or a cat on the prowl, as shown in Figure 10-14. (If your backyard is a bit short of wildlife, check out your local zoo.)
Note
Your camera's flash is a blessing when you're shooting in almost total darkness. Don't be afraid to use it if you need to, but keep in mind its limitations. (It reaches out only about 10 feet in front of you.)
After you get a little practice (and confidence) shooting at night, here are some other great ways to think about photography in the dark.
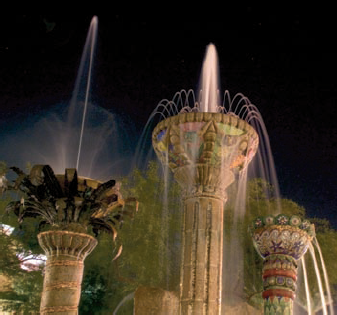
Anything lit from beneath shows drama. If motion is involved, so much the better because your longer shutter speeds will exaggerate the motion to create some nifty other-worldly effects. Look for fountains as good examples of this, as in Figure 10-15. And don't forget how well lighted fountains photograph in B&W, too; read about B&W photography in Chapter 9.
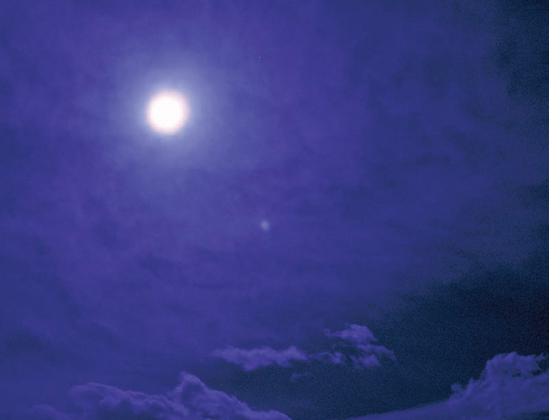
Here's a subject that's available most nights: the moon. Sure, it might hide beneath a cloud or change size, but photographing the moon — especially when it plays with the tiny droplets of water vapor illuminated by the clouds, as in Figure 10-16 — can provide you with some pretty stellar shots. (Get it, stellar?) If you can capture the moon reflecting off water or turn it slightly blue in Photoshop (more about that in Chapter 15) or by attaching a color filter to your camera (more about that in Chapter 11), you're on your way to a money shot.
How much light does a full moon give? Not a lot. A handheld digital camera exposure when shooting the moon will have blur unless
The moon is on the horizon, big and full, and you're zooming directly into it so that it fills most of the frame.
Other lights are around — bright ones — and a lot of them.
You use a tripod.
You use very fast film (above ISO 800) or set your digital camera to that ISO equivalent or higher.
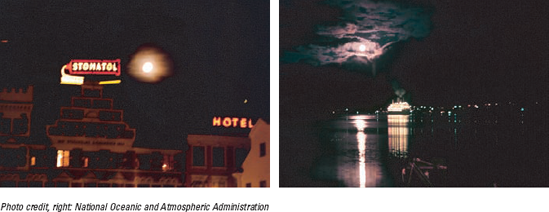
Figure 10-17 shows two shots of the moon — one at ISO 400, which is a fairly fast film speed but still not fast enough to eliminate the blur from the moon high in the sky with minimal ambient lighting from a few neon signs. The second shot shows the moon captured with better sharpness (photo courtesy of NOAA).
Note
Be quick when shooting the moon:
When the moon is at that perfect place — the horizon — it doesn't stick around all that long.
The amount of light from the moon decreases rapidly as it rises from the horizon to the sky.
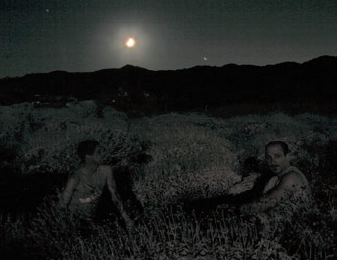
Landscapes at night offer a different take on a standard shot, as shown in Figure 10-18. For sharp nighttime landscapes, experiment with the higher aperture range that your digital camera offers: that is, f/16 or f/22. Don't forget to make the moon your ally when shooting at night, too, both for the light it provides as well as being an important element when composing your shot.
If you want a clear shot without graininess in your image, bring along a small tripod when you're shooting at night. Think of this three-legged beast as your assistant who holds your camera steady so you get no blur.
Note
Set your camera on either a tripod or another surface that's steady (like a ledge or a rock).
Make sure your tripod is stable and relatively level. Double-check through the viewfinder that your image is level and adjust the tripod accordingly the best you can.
Take your shot via the camera's timer or use a cable release so that you don't shake the camera when pushing the shutter-release button.
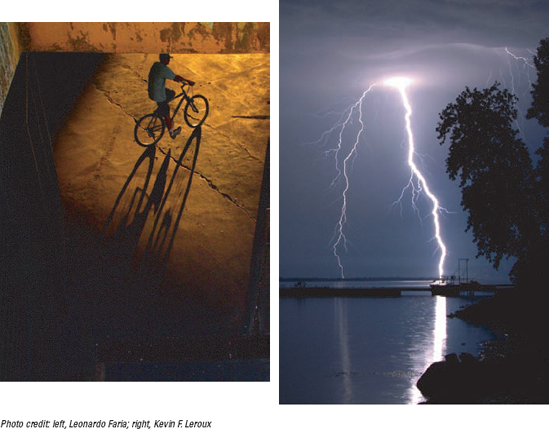
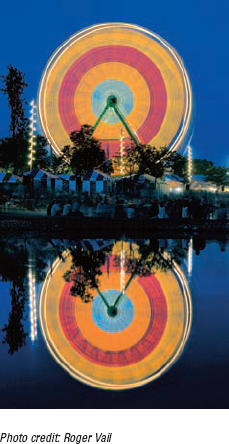
Always look for water where there are lights. Water, with its inherent reflectivity, gives you a double chance to show off the beauty of the night, as in Figure 10-19. This amusement park ride delights twice over: once with its bright neon lights and again with its water reflection.
Shadows at night can be harsh and egregious, making for a good opportunity to create a study in lines and patterns. Look for lit wrought iron gates and fences or heavily backlit scenes like in the left image of Figure 10-20. Look for weather nighttime opportunities, too. For example, get out and shoot at night (with ambient light, like from a streetlamp) when it's snowing — you'll get some great blur, especially when using slower shutter speeds. Lightning at night is very dramatic (see the right image of Figure 10-20), but I'm not encouraging you to put yourself in harm's way.