
CHAPTER 3
Working with Files, Importing, and Exporting
Saving, opening, merging, and archiving files
Setting file preferences
Configuring paths
Exporting objects and scenes
Importing objects from external packages
Working with file utilities
Accessing scene files’ information
Complex scenes can end up being a collection of hundreds of files, and misplacing any of them will affect the final output, so learning to work with files is critical. This chapter focuses on working with files, whether they are object files, texture images, or background images. Files enable you to move scene pieces into and out of Max. You also can export and import files to and from other packages.
This chapter also includes perhaps the most important feature in Max, the Save feature, which I suggest you use often. Remember the mantra: Save Early, Save Often.
Working with Max Scene Files
Of all the different file types and formats, you probably will work with one type of file more than any other—the Max format. Max has its own proprietary format for its scene files. These files have the .max extension and allow you to save your work as a file and return to it at a later time. Max also supports files saved with the .chr extension used for character files.
Using the Application Button
All the various file commands are located by clicking the 3ds Max logo in the upper-left corner. This logo is called the Application Button. The Application Button menu, shown in Figure 3.1, presents its menu options as icons. Several shortcuts also are presented on the Quick Access toolbar located to the right of the Application Button.
FIGURE 3.1 The Application Button holds all the various file commands.

The right half of the Application Button menu displays an extensive list of recently opened Max files. This list fills the given space with the most recently accessed files, but clicking the pushpin icon to the right of the filename causes the selected file to remain on the list.
The icon button at the top of the list lets you change the size of the display icons. The options include Small Icons, Large Icons, Small Images, and Large Images.
Tip
The image options display a thumbnail of the Max file.
To the right of the Application Button is the Quick Access toolbar, shown in Figure 3.2. This bar contains icons for the following commands: New, Open, Save, Undo, Redo, and Set Project Folder. The arrows to the right of the Undo and Redo icons present a list of buffered commands, and you can select one to undo or redo all commands up to the selected one. Clicking the small arrow icon at the right end of the toolbar presents a menu where you can toggle the visibility of each icon. Additional options allow you to hide the menu bar and to move the Quick Access toolbar below the Ribbon.
FIGURE 3.2 The Quick Access toolbar offers quick access for opening and saving files. It also holds the Undo and Redo buttons.

Using the Welcome Screen
When Max first starts, the Welcome Screen appears, as shown in Figure 3.3. The Welcome Screen includes Essential Skill Movies that show the basics of Max. It also includes buttons to create a new scene, open an existing scene, and open a recently opened scene.
New Feature
The options to create a new scene, open a file, and open a recent file are all new to the Welcome Screen in 3ds Max 2012.
FIGURE 3.3 The Welcome Screen includes buttons for opening files and creating new scene files.

If the Show This Welcome Screen at Startup option is disabled, the Welcome Screen won't appear when Max starts, but you can access it at any time using the Help ![]() Essential Skills Movies menu command.
Essential Skills Movies menu command.
Starting new
When Max starts, a new scene opens. You can start a new scene at any time with the button on the Quick Access toolbar or with the Application Button ![]() New (Ctrl+N) command. Although each instance of Max can have only one scene open at a time, you can open multiple copies of Max, each with its own scene instance, if you have enough memory.
New (Ctrl+N) command. Although each instance of Max can have only one scene open at a time, you can open multiple copies of Max, each with its own scene instance, if you have enough memory.
Starting a new scene deletes the current scene, but Max gives you options to keep the objects and hierarchy, keep the objects, or make everything new. These options are available as submenu options if you use the Application Button or as a dialog box, shown in Figure 3.4, if the Quick Access toolbar icon or the keyboard shortcut is used.
FIGURE 3.4 When creating a new scene, you can keep the current objects or select New All.

Starting a new scene maintains all the current interface settings, including the viewport configurations, any interface changes, viewport backgrounds, and any changes to the Command Panel. To reset the interface, choose Application Button ![]() Reset. When reset, all interface settings return to their default states, but interface changes aren't affected.
Reset. When reset, all interface settings return to their default states, but interface changes aren't affected.
Saving files
After you start up Max, the first thing you should learn is how to save your work. After a scene has changed, you can save it as a file. Before a file is saved, the word “Untitled” appears in the title bar; after you save the file, its filename appears in the title bar. Choose the Save icon on the Quick Access toolbar or Application Button ![]() Save (Ctrl+S) to save the scene. If the scene hasn't been saved yet, then a Save File As dialog box appears, as shown in Figure 3.5. You also can make this dialog box appear using the Application Button
Save (Ctrl+S) to save the scene. If the scene hasn't been saved yet, then a Save File As dialog box appears, as shown in Figure 3.5. You also can make this dialog box appear using the Application Button ![]() Save As command. After a file has been saved, using the Save command saves the file without opening the File dialog box. Pretty simple—just don't forget to do it often.
Save As command. After a file has been saved, using the Save command saves the file without opening the File dialog box. Pretty simple—just don't forget to do it often.
Within the Save File As dialog box is an option in the Save as Type field to save the file as a 3ds Max file, a 3ds Max 2010 file, or a 3ds Max 2011 file. Files saved using a format for a previous version of Max can be opened only within the designated version or any version newer than that version. Be aware that any new features included in Max 2012 are not included in the saved file using an older format. For example, if the current file uses a newer feature, and you save the file to an older format, then support for the new feature is lost.
Caution
Be aware that Max files beyond 3ds Max 2010 are not backward-compatible. A .max file saved using 3ds Max 2012 cannot be opened in an earlier version of 3ds Max. The solution to compatibility issues is to export the file using the FBX format and then import it in the older version of Max.
FIGURE 3.5 Use the Save File As dialog box to save a scene as a file.
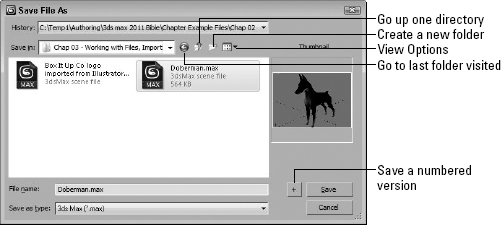
The Application Button ![]() Save As submenu includes options to Save As, Save Copy As, Save Selected, and Archive. The Save File As dialog box keeps a history list of the last several directories that you've opened. You can select these directories from the History drop-down list at the top of the dialog box. The buttons in this dialog box are the standard Windows file dialog box buttons used to go to the last folder visited, go up one directory, create a new folder, and to view a pop-up menu of file view options.
Save As submenu includes options to Save As, Save Copy As, Save Selected, and Archive. The Save File As dialog box keeps a history list of the last several directories that you've opened. You can select these directories from the History drop-down list at the top of the dialog box. The buttons in this dialog box are the standard Windows file dialog box buttons used to go to the last folder visited, go up one directory, create a new folder, and to view a pop-up menu of file view options.
Note
If you try to save a scene over the top of an existing scene, Max presents a dialog box confirming this action.
![]() Clicking the button with a plus sign to the right of the Save button automatically appends a number onto the end of the current filename and saves the file. For example, if you select the myScene.max file and click the plus button, a file named myScene01.max is saved.
Clicking the button with a plus sign to the right of the Save button automatically appends a number onto the end of the current filename and saves the file. For example, if you select the myScene.max file and click the plus button, a file named myScene01.max is saved.
Tip
Use the auto increment file number and Save button to save progressive versions of a scene. This is an easy version control system. If you need to backtrack to an earlier version, you can.
The Application Button ![]() Save As
Save As ![]() Save Copy As menu command lets you save the current scene to a different name without changing its current name. The Application Button
Save Copy As menu command lets you save the current scene to a different name without changing its current name. The Application Button ![]() Save As
Save As ![]() Save Selected option saves the current selected objects to a separate scene file. If you create a single object that you might use again, select the object and use the Save Selected option to save it to a directory of models.
Save Selected option saves the current selected objects to a separate scene file. If you create a single object that you might use again, select the object and use the Save Selected option to save it to a directory of models.
Tip
Another useful feature for saving files is to enable the Auto Backup feature in the Files panel of the Preference Settings dialog box. This dialog box can be accessed with the Customize ![]() Preferences menu command, which is covered later in this chapter.
Preferences menu command, which is covered later in this chapter.
Archiving files
By archiving a Max scene along with its reference bitmaps, you can ensure that the file includes all the necessary files. This is especially useful if you need to send the project to your cousin to show off or to your boss and you don't want to miss any ancillary files. Choose Application Button ![]() Save As
Save As ![]() Archive to save all scene files as a compressed archive. The default archive format is .zip (but you can change it in the Files panel of the Preference Settings dialog box to use whatever archive format you want).
Archive to save all scene files as a compressed archive. The default archive format is .zip (but you can change it in the Files panel of the Preference Settings dialog box to use whatever archive format you want).
Saving an archive as a ZIP file compiles all external files, such as bitmaps, into a single compressed file. Along with all the scene files, a text file is automatically created that lists all the files and their paths.
Opening files
When you want to open a file you've saved, you may do so by choosing the Open icon on the Quick Access toolbar or Application Button ![]() Open (Ctrl+O), which opens a file dialog box that is similar to the one used to save files. Max can open files saved with the .max and .chr extensions. Max also can open VIZ Render files that have the .drf extension. Selecting a file and clicking the plus button opens a copy of the selected file with a new version number appended to its name.
Open (Ctrl+O), which opens a file dialog box that is similar to the one used to save files. Max can open files saved with the .max and .chr extensions. Max also can open VIZ Render files that have the .drf extension. Selecting a file and clicking the plus button opens a copy of the selected file with a new version number appended to its name.
Cross-Reference
The Application Button ![]() Open menu also includes commands for opening files from Vault. Vault is a version control system for Max resources. It is covered in more detail in Bonus Chapter 4, “Using Asset Tracking”.
Open menu also includes commands for opening files from Vault. Vault is a version control system for Max resources. It is covered in more detail in Bonus Chapter 4, “Using Asset Tracking”.
If Max cannot locate resources used within a scene (such as maps) when you open a Max file, then the Missing External Files dialog box, shown in Figure 3.6, appears, enabling you to Continue without the file or to Browse for the missing files. If you click the Browse button, the Configure External File Paths dialog box opens, where you can add a path to the missing files.
FIGURE 3.6 The Missing External Files dialog box identifies files for the current scene that are missing.

If Max cannot locate missing files, a similar warning dialog box also appears when you try to render the scene with missing files.
If you open a file saved using a previous version of Max that includes features that have changed since the previous version, then Max presents an obsolete data format warning statement. Resaving the file can fix this problem. However, if you save a file created with a previous version of Max as a Max 2012 scene file, then you won't be able to open the file again in the previous versions of Max.
Tip
You can disable the Obsolete File Message in the Files panel of the Preference Settings dialog box.
Note
You can also open files from the command line by placing the filename after the executable name, as in 3dsmax.exe myFile.max. You can also use the –L switch after the executable name to open the last file that was opened.
Setting a Project Folder
By default, Max's Open File dialog box opens to the Scenes directory where Max is installed, but you can set a Project Folder that may be located anywhere on your local hard drive or on the network. All file dialog boxes will then open to the new project folder automatically. The Set Project Folder icon on the Quick Access toolbar or the Application Button ![]() Manage
Manage ![]() Set Project Folder menu opens a dialog box where you can select a project folder. After a project folder is selected, the folder is automatically populated with a series of resource folders.
Set Project Folder menu opens a dialog box where you can select a project folder. After a project folder is selected, the folder is automatically populated with a series of resource folders.
Within the project folder's root is a file with the .mxp extension named the same as the project folder. This file is a simple text file that can be opened within a text editor. Editing this file lets you define which subfolders are created within the project folder. The defined project folder also is visible within the title bar.
Merging and replacing objects
If you happen to create the perfect prop in one scene and want to integrate the prop into another scene, you can use the Merge menu command. Choose Application Button ![]() Import
Import ![]() Merge to load objects from another scene into the current scene. Using this menu command opens a file dialog box that is exactly like the Open File dialog box, but after you select a scene and click the Open button, the Merge dialog box, shown in Figure 3.7, appears. This dialog box displays all the objects found in the selected scene file. It also has options for sorting the objects and filtering certain types of objects. Selecting an object and clicking OK loads the object into the current scene.
Merge to load objects from another scene into the current scene. Using this menu command opens a file dialog box that is exactly like the Open File dialog box, but after you select a scene and click the Open button, the Merge dialog box, shown in Figure 3.7, appears. This dialog box displays all the objects found in the selected scene file. It also has options for sorting the objects and filtering certain types of objects. Selecting an object and clicking OK loads the object into the current scene.
If you ever get involved in a modeling duel, then you'll probably be using the Application Buttons ![]() Import
Import ![]() Replace menu command at some time. A modeling duel is when two modelers work on the same rough model of named objects and the animator (or boss) gets to choose which object to use. With the Replace command, you can replace a named object with an object of the same name in a different scene. The objects are selected using the same dialog box, but only the objects with identical names in both scene files display. If no objects with the same name appear in both scene files, a warning box is displayed.
Replace menu command at some time. A modeling duel is when two modelers work on the same rough model of named objects and the animator (or boss) gets to choose which object to use. With the Replace command, you can replace a named object with an object of the same name in a different scene. The objects are selected using the same dialog box, but only the objects with identical names in both scene files display. If no objects with the same name appear in both scene files, a warning box is displayed.
FIGURE 3.7 The Merge dialog box lists all the objects from a merging scene.

Tip
When working with a team, one person, such as an environment modeler, can add a dummy object to the scene that shares the name of a more detailed model, such as “furniture.” When the detailed model is completed, the Replace command adds the detailed model to the scene. This lets the environment modeler work, even though the detailed models aren't completed yet.
Getting out
As you can probably guess, you use the Application Button ![]() Exit 3ds Max command in the lower-right corner to exit the program, but only after it gives you a chance to save your work. Clicking the window icon with an X on it in the upper right has the same effect (but I'm sure you knew that).
Exit 3ds Max command in the lower-right corner to exit the program, but only after it gives you a chance to save your work. Clicking the window icon with an X on it in the upper right has the same effect (but I'm sure you knew that).
Setting File Preferences
The Files panel of the Preference Settings dialog box holds the controls for backing up, archiving, and logging Max files. You can open this dialog box using the Options button in the lower-right corner of the Application Button panel or with the Customize ![]() Preferences menu command. Figure 3.8 shows this panel.
Preferences menu command. Figure 3.8 shows this panel.
Handling files
The Files panel includes several options that define how to handle files. The first option is to Convert file paths to UNC (Universal Naming Convention). This option displays file paths using the UNC for any files accessed over a mapped drive. The Convert local file paths to Relative option causes all paths to be saved internally as relative paths to the project folder. This is useful if all files you access are in the same folder, but if you use files such as bitmaps from a different folder, then be sure to disable this option.
FIGURE 3.8 The Files panel includes an Auto Backup feature.

The next option is Backup on Save. When you save a file using the Application Button ![]() Save (Ctrl+S) menu command, the existing file is overwritten. The Backup on Save option causes the current scene file to be saved as a backup (with the name MaxBack.bak in the 3dsmaxautobak directory) before saving the new file. If the changes you made were a mistake, you can recover the file before the last changes by renaming the MaxBack.bak file to MaxBack.max and reopening it in Max.
Save (Ctrl+S) menu command, the existing file is overwritten. The Backup on Save option causes the current scene file to be saved as a backup (with the name MaxBack.bak in the 3dsmaxautobak directory) before saving the new file. If the changes you made were a mistake, you can recover the file before the last changes by renaming the MaxBack.bak file to MaxBack.max and reopening it in Max.
Another option to prevent overwriting your changes is the Increment on Save option. This option adds an incremented number to the end of the existing filename every time it is saved (the same as when clicking the plus button in the Save As dialog box). This retains multiple copies of the file and is an easy version-control method for your scene files. This way, you can always go back to an earlier file when the client changes his mind. With this option enabled, the MaxBack.bak file isn't used.
The Compress on Save option compresses the file automatically when it is saved. Compressed files require less file space but take longer to load. If you're running low on hard drive space, then you'll want to enable this option.
Tip
Another reason to enable the Compress on Save option is that large files (100MB or greater) load into the Network Queue Manager much more quickly when compressed for network rendering.
The Save Viewport Thumbnail Image option saves a 64 × 64-pixel thumbnail of the active viewport along with the file. This thumbnail is displayed in the Open dialog box and can also be seen from Windows Explorer on Windows XP, as shown in Figure 3.9. Saving a thumbnail with a scene adds about 9K to the file size.
Caution
Although thumbnails appear when viewed from within Windows XP, they do not appear in Windows Vista or Windows 7.
Tip
The Save Viewport Thumbnail Image option is another good option to keep enabled. Thumbnails help you to find scene files later, and nothing is more frustrating than seeing a scene's filename without a thumbnail.
FIGURE 3.9 Max files with thumbnails show up in Windows Explorer on Windows XP.

In addition to a thumbnail, Max also offers an option to save the Schematic View with the file. Although Max can generate a new Schematic View from an existing file, saving the Schematic View with the file is quicker if you work with this view often. Saving File Properties with the file is also helpful, but be warned that saving this extra info with the file increases its file size slightly. Still, doing so is worth the effort because you can easily locate and understand the scene file later on.
Cross-Reference
More details on using Schematic View are covered in Chapter 25, “Building Complex Scenes with Containers, XRefs, and the Schematic View”.
When a Max file created in a previous version of Max is opened, a warning dialog box appears that says, “Obsolete data format found—Please resave file.” To eliminate this warning, disable the Display Obsolete File Message option. The warning dialog box also includes an option to Don't Display Again that enables this option when selected.
When textures are updated, the Reload textures on change option forces the textures to be reloaded when they are altered. This slows your system while Max waits for the textures to reload but offers the latest look immediately.
The Recent Files in File Menu option determines the number of recently opened files that appear in the Application Button ![]() Recent Documents menu. The maximum value is 50.
Recent Documents menu. The maximum value is 50.
Backing up files
The Auto Backup feature in Max can save you from the nightmare of losing all your work because of a system crash. With Auto Backup enabled, you can select the number of Autobak files to keep around and how often the files are backed up. The backup files are saved to the directory specified by the Configure Paths dialog box. The default is to save these backups to the 3dsmaxautoback directory. You can also select a name for the backup files.
Note
Even if you have this feature enabled, you should still save your file often.
This is how it works: If you've set the number of backup files to two, the interval to five minutes, and the backup name to MyBackup, then after five minutes the current file is saved as MyBackup1.max. After another five minutes, another file named MyBackup2.max is saved, and then after another five minutes, the MyBackup1.max file is overwritten with the latest changes.
If you lose your work as a result of a power failure or by having your toddler accidentally pull out the plug, you can recover your work by locating the Autobak file with the latest date and reloading it into Max. This file won't include all the latest changes; it updates only to the last backup save.
Tip
I highly recommend that you keep the Auto Backup option enabled. This feature has saved my bacon more than once. Also, if you enter a different autoback name for different projects, then you won't accidentally overwrite a backed-up project.
Tutorial: Setting up Auto Backup
Now that I have stressed that setting up Auto Backup is an important step to do, here's exactly how to set it up.
To set up the Auto Backup feature, follow these steps:
- Open the Preference Settings dialog box by choosing Customize
 Preferences, and click the Files panel.
 - Turn on Auto Backup by selecting the Enable option in the Auto Backup section.
- Set the number of Autobak files to 5.
Note
To maintain version control of your Max scenes, use the Increment on Save feature instead of increasing the Number of Autobak Files.
- Set the Backup Interval to the amount of time to wait between backups.
The Backup Interval should be set to the maximum amount of work that you are willing to redo. (I keep my settings at 15 minutes.) You can also give the Auto Backup file a name.
- Auto Backup saves the files in the directory specified by the Auto Backup path. To view where this path is located, choose Customize Configure User Paths.
Maintaining log files
You can also use the Files panel to control log files. Log files keep track of any errors and warnings, general command info, and any debugging information. You can set log files to never be deleted, expire after so many days, or keep a specified file size with the latest information. If your system is having trouble, checking the error log gives you some idea as to what the problem is. Logs are essential if you plan on developing any custom scripts or plug-ins. You can select that the log contain all Errors, Warnings, Info, and Debug statements.
Each entry in the log file includes a date-time stamp and a three-letter designation of the type of message with DBG for debug, INF for info, WRN for warning, and ERR for error messages, followed by the message. The name of the log file is Max.log.
Configuring Paths
When strolling through a park, chances are good that you'll see several different paths. One might take you to the lake and another to the playground. Knowing where the various paths lead can help you as you navigate around the park. Paths in Max lead, or point, to various resources, either locally or across the network.
All paths can be configured using two distinct Configure Paths dialog boxes found in the Customize menu: Configure User Paths and Configure System Paths. The Configure User Paths dialog box is used to specify where to look for scene resource files such as scenes, animations, and textures. The Configure System Paths dialog box is used to specify where the system looks to load files that Max uses, such as fonts, scripts, and plug-ins.
Configuring user paths
The Configure User Paths dialog box, shown in Figure 3.10, holds the path definitions to all the various resource folders. The dialog box includes three panels: File I/O, External Files, and XRefs.
FIGURE 3.10 The Configure User Paths dialog box specifies where to look for various resources.

The main panel in the Configure User Paths dialog box is the File I/O panel. The Project Folder is listed at the top of the dialog box and can be changed in this dialog box or with the Application Button ![]() Manage
Manage ![]() Set Project Folder menu. This panel includes entries for Animations, Archives, Auto Backup, Bitmap Proxies, Downloads, Export, Expressions, Images, Import, Materials, Max Start, Photometric, Previews, Render Assets, Render Output, Render Presets, Scenes, Sounds, and Video Post. If you select any of these entries, you can click the Modify button to change its path. All paths are set by default to folders contained within the designated Project Folder, but you can change them to whatever you want. The Make Relative and Make Absolute buttons cause the selected entry to be displayed as a relative path based on the Project Folder or an absolute path.
Set Project Folder menu. This panel includes entries for Animations, Archives, Auto Backup, Bitmap Proxies, Downloads, Export, Expressions, Images, Import, Materials, Max Start, Photometric, Previews, Render Assets, Render Output, Render Presets, Scenes, Sounds, and Video Post. If you select any of these entries, you can click the Modify button to change its path. All paths are set by default to folders contained within the designated Project Folder, but you can change them to whatever you want. The Make Relative and Make Absolute buttons cause the selected entry to be displayed as a relative path based on the Project Folder or an absolute path.
Tip
Personally, I like to keep all my content in a separate directory from where the application is installed. That way, new installs or upgrades don't risk overwriting my files. To do this, simply change the Project Folder to a location separate from the 3ds Max installation directory.
Under the External Files and XRefs panels, you can add and delete paths that specify where Max looks to find specific files. All paths specified in both these panels are searched in the order they are listed when you're looking for resources such as plug-ins, but file dialog boxes open only to the first path. Use the Move Up and Move Down buttons to realign path entries.
Caution
Using the Customize ![]() Revert to Startup UI Layout command does not reset path configuration changes.
Revert to Startup UI Layout command does not reset path configuration changes.
At the bottom of the Configure User Paths dialog box are buttons for saving, loading, and merging the defined configuration paths into a separate file. These files are saved using the .mxp format. This file can be found in the root of the Project Folder.
Setting up a Project Folder on the network gives every team member access to all the project files and synchronizes all the paths for a project.
Configuring system paths
Max default paths are listed in the Configure System Paths dialog box, shown in Figure 3.11. When Max is installed, all the paths are set to point to the default subdirectories where Max was installed. To modify a path, select the path and click the Modify button. A file dialog box lets you locate the new directory.
The Configure System Paths dialog box also includes the 3rd Party Plug-Ins panel where you can add directories for Max to search when looking for plug-ins.
FIGURE 3.11 The Configure System Paths dialog box specifies additional paths.

Importing and Exporting
If you haven't noticed, Max isn't the only game in town. A number of different 3D packages exist, and exchanging files between them is where the importing and exporting menu commands come in. You can find both of these commands in the Application Button menu.
Importing supported formats
Choose Application Button ![]() Import
Import ![]() Import to open the Import dialog box. This dialog box looks like a typical Windows file dialog box. The real power comes with the various Import Settings dialog boxes that are available for each format. These dialog boxes appear after you select a file to import. The settings in the Import Settings dialog box are different for the various format types.
Import to open the Import dialog box. This dialog box looks like a typical Windows file dialog box. The real power comes with the various Import Settings dialog boxes that are available for each format. These dialog boxes appear after you select a file to import. The settings in the Import Settings dialog box are different for the various format types.
Max can import several different formats. All acceptable files are automatically displayed in the file dialog box, or you can filter for a specific format using the Files of Type drop-down list at the bottom of the file dialog box. The available import formats include the following:
- Autodesk (FBX)
- 3D Studio Mesh, Projects, and Shapes (3DS, PRJ, SHP)
- Adobe Illustrator (AI)
- Autodesk Alias/Showcase (APF, WIRE)
- Collada (DAE)
- LandXML/DEM/DDF
- AutoCAD and Legacy AutoCAD (DWG, DXF)
- Flight Studio OpenFlight (FLT)
- Motion Analysis (HTR, TRC)
- Initial Graphics Exchange Standard (IGE, IGS, IGES)
- Autodesk Inventor (IPT, IAM)
- Lightscape (LS, VW, LP)
- OBJ Material and Object (OBJ)
- ACIS SAT (SAT)
- Google SketchUp (SKP)
- StereoLitho (STL)
- VIZ Material XML Import (XML)
New Feature
The ability to import and work with Alias Wire files is new to 3ds Max 2012.
Cross-Reference
More on import and export SAT files is covered in Chapter 28, “Working with Solids and Body Objects”.
Note
Be aware that these formats are used for different types of data. For example, Adobe Illustrator files typically hold only 2D data, and Motion Analysis files hold motion capture data for animations.
Import preference
The Files panel of the Preference Settings dialog box has a single option dealing with importing—Zoom Extents on Import. When this option is enabled, it automatically zooms all viewports to the extent of the imported objects. Imported objects can often be scaled so small that they aren't even visible. This option helps you to locate an object when imported.
Exporting supported formats
In addition to importing, you'll sometimes want to export Max objects for use in other programs. You access the Export command by choosing Application Button ![]() Export
Export ![]() Export. You also have the option to Export Selected (available only if an object is selected) and Export to DWF.
Export. You also have the option to Export Selected (available only if an object is selected) and Export to DWF.
Max can export to several different formats, including the following:
- Autodesk (FBX)
- 3D Studio (3DS)
- Adobe Illustrator (AI)
- ASCII Scene Export (ASE)
- AutoCAD (DWG, DXF)
- Collada (DAE)
- Initial Graphics Exchange Standard (IGS)
- Flight Studio OpenFlight (FLT)
- JSR-184 (M3G)
- Lightscape Material, Blocks, Parameters, Layers, Preparations, and Views (ATR, BLK, DF, LAY, LP, VW)
- Motion Analysis (HTR)
- Publish to DWF (DWF)
- OBJ Material and Object (OBJ)
- ACIS SAT (SAT)
- StereoLithography (STL)
- VRML97 (WRL)
Moving files to Softimage, MotionBuilder, and Mudbox
3ds Max is available as a standalone product, but it also ships within a Creative Suite of applications offered by Autodesk. These suites can include Softimage, MotionBuilder, and Mudbox, and you can easily move the current Max scene file to one of these other applications using the Application Button ![]() Send To menu. For each application, you can choose to send the scene as a New Scene, Update the Current Scene, Add to the Current Scene, or Select the Previously Sent Objects.
Send To menu. For each application, you can choose to send the scene as a New Scene, Update the Current Scene, Add to the Current Scene, or Select the Previously Sent Objects.
New Feature
The ability to move the current Max scene to Softimage, MotionBuilder, or Mudbox is new to 3ds Max 2012.
Moving files to and from Maya
Maya is Autodesk's sister to Max, so you may find yourself having to move scene files between Max and Maya at some time. The best format to transport files between Max and Maya is the FBX format. Autodesk controls this format and has endowed it with the ability to seamlessly transport files among these packages.
Tip
The FBX format also is the format to choose when transferring files back and forth with Max files in older versions of 3ds Max.
The FBX format includes support for all the scene constructs, including animation, bone systems, morph targets, and animation cache files. It has an option to embed textures with the export file or to convert them to the TIF format. Other import and export settings deal with the system units and world coordinate orientation. You also have the ability to filter specific objects. The FBX Export dialog box is shown in Figure 3.12.
FIGURE 3.12 The FBX Export dialog box provides the best way of transferring among Max, Maya, and MotionBuilder.

The FBX import and export dialog boxes include the ability to save and load configuration presets. This is helpful because once you figure out the correct settings to get models in and out of Max, you can save the preset and instantly select it the next time you need to move a file. The Web updates button lets you check for updates to the FBX format online.
Tip
When exporting a file for use in Maya, be sure to set the Up Axis to Y-up, or the models will show up rotated.
When exporting the file to FBX format, you have a Type option that you can use to export the file as an ASCII text file or as a Binary file. Binary files are typically smaller, but ASCII files can be edited in a text editor.
The FBX format is being continually updated, but the FBX Export dialog box lets you select which FBX version to use. If you need to export a Max file for use on an older version of Max, be sure to select an older FBX version in the FBX Version drop-down list.
Using the OBJ format
The OBJ format is a text-based format that has been around since the early days of Wavefront, an early 3D package. It is a common format and used to exchange 3D data with a variety of programs, including Poser and ZBrush.
One aspect of the OBJ format is that it separates the model data and the texture data into two different files. The OBJ file holds the geometry data, and the MTL file holds the texture data. Previous versions of Max required that you import each of these data files separately, but the latest OBJ workflow imports these two data files together. The new OBJ workflow is a plug-in developed by GuruWare.
The new OBJ import and export workflow is much smoother and automatically gets the right materials and textures for the object. The dialog box for importing OBJ files is shown in Figure 3.13. Notice how each of the individual objects is recognized and displayed in a list. This gives you the option of importing only specific objects. You also have control over how normals are handled, the ability to convert units, and several options for dealing with materials. The small green and red lights to the left of some options indicate whether the option is in the OBJ file. Green indicates that it exists, and red means it doesn't exist.
FIGURE 3.13 The OBJ Import dialog box provides another excellent choice for transporting files from other packages.

A similar dialog box of settings appears when exporting a scene to the OBJ format, as shown in Figure 3.14.
FIGURE 3.14 The OBJ Export dialog box lets you export Max scenes to other packages.

The OBJ Export dialog box includes presets for most common 3D apps including Amapi Pro, Blender, Bryce, Carrara, Cinema-4D, DAZ Studio, Deep Paint, Hexagon, Lightwave, Maya, Modo, Motion Builder, Mudbox, Poser, Realflow, Rhino, Silo, Softimage XSI, UV Mapper, VUE, Worldbuilder, and ZBrush.
Clicking the Map Export button lets you specify the export map path where the textures for the scene are saved. You also can automatically convert the maps to a specific size or format. For each map format, you can configure the bits per pixel and any compression settings.
If you click the Presets button in the OBJ Export dialog box, then the export options for each format are shown in a table, like the one in Figure 3.15. Each of these settings can be quickly altered using this dialog box.
FIGURE 3.15 The Edit OBJ-Export Presets dialog box lets you change the settings for multiple formats quickly.

Exporting to the JSR-184 (M3G) format
The JSR-184 export option lets you save a scene to a format that can be viewed on mobile devices that support the Java 2 Micro Edition standard interface, such as mobile phones and PDA devices.
Because wireless devices have such a limited bandwidth, the JSR-184 Exporter dialog box, shown in Figure 3.16, includes several options for optimizing the exported scene. This dialog box lists the Max scene hierarchy, the JSR-184 scene hierarchy, and the parameters for the selected scene object. Using the toolbar buttons at the top of the dialog box, you can change the hierarchy that is to be exported.
FIGURE 3.16 The JSR-184 Export dialog box lets you choose which resources to export.

Before a scene can be exported, the Max scene must include a camera, and you must specify an Active Camera in the JSR-184 Exported dialog box. When a material map is selected from the JSR-184 hierarchy list, the Texture Tool icon on the toolbar becomes active. Clicking this button opens the Texture Tool dialog box, shown in Figure 3.17, where you can precisely control the size and format of the exported maps.
FIGURE 3.17 The Texture Tool lets you specify the exact size of texture maps to be exported for mobile devices.

To view the exported M3G files, the default installation of Max includes an M3G Player, which can be found along with the other Max programs in Start ![]() Programs
Programs ![]() Autodesk
Autodesk ![]() 3ds Max 2012
3ds Max 2012 ![]() JSR Viewer. To use this player, the Java Runtime Environment needs to be installed. You can install it from the Max setup disc.
JSR Viewer. To use this player, the Java Runtime Environment needs to be installed. You can install it from the Max setup disc.
Note
The JSR Viewer application is built using Java. If you're having trouble with the viewer, try installing the latest Java version from the installation DVD.
Exporting to the DWF format
The Design Web Format (DWF) is an ideal format for displaying your textured models to others via the Web. It creates relatively small files that can be attached easily to an e-mail. You can use the Application Button ![]() Export
Export ![]() Export to DWF menu command to export the current scene to this format. This command opens a dialog box of options, shown in Figure 3.18, that specify to Group by Object or Group by Layer. You also can choose to publish the Object Properties, Materials, Selected Objects Only, or Hidden Objects. Another option is to Rescale Bitmaps to a size entered in pixels.
Export to DWF menu command to export the current scene to this format. This command opens a dialog box of options, shown in Figure 3.18, that specify to Group by Object or Group by Layer. You also can choose to publish the Object Properties, Materials, Selected Objects Only, or Hidden Objects. Another option is to Rescale Bitmaps to a size entered in pixels.
Saved files can be viewed in the Autodesk DWF Viewer, shown in Figure 3.19. The Autodesk DWF Viewer can be downloaded for free from the Autodesk website. This provides a way for users without Max installed to view models.
If you want to view the exported files in the viewer, simply enable the Show DWF in Viewer option in the DWF Publish Options dialog box. The viewer includes controls for transforming the model, changing its shading and view, and printing the current view.
FIGURE 3.18 The DWF Publish Options dialog box lets you set the options for the exported DWF file.

FIGURE 3.19 The Autodesk DWF Viewer is used to view files exported using the DWF format.

Exporting utilities
In addition to the menu commands found in the File menu, Max includes a couple of utilities that export specific information: the Lighting Data Export Utility and the Material XML Exporter Utility. You can access these utilities from the Utilities panel in the Command Panel by clicking the More button and selecting them from the pop-up list that appears.
Lighting Data Export Utility
The Lighting Data Export Utility exports exposure control data for a scene's Illuminance and Luminance values. These files can be saved as PIC or TIF files, which you can select in the 2D Lighting Data Exporter rollout. You also can set an image's Width and Height dimensions.
Caution
Exposure Control must be enabled for this utility to be enabled. You can learn about exposure control in Chapter 46, “Using Atmospheric and Render Effects”.
Material XML Exporter Utility
The Material XML Exporter Utility exports a selected material to an XML file format, where it can be easily shared with other users. After you select this utility, the Parameters rollout offers four options for selecting the material to export: the Material/Map Browser, the Object List, Pick Object in Scene, and All Objects in Scene.
The utility also offers several export options including Native XML, export to an Autodesk Tool Catalog, and using an XSLT template. You also can select to export the material with a thumbnail and along with its mapping modifiers.
Panorama Exporter Utility
The Panorama Exporter Utility exports a scene into a format that allows all 360 degrees of the scene to be viewed. Using this utility, you can open the Render parameters for rendering a panoramic scene or accessing a viewer for viewing rendered panoramic scenes.
Cross-Reference
More on creating panoramic scenes is covered in Chapter 23, “Rendering a Scene and Enabling Quicksilver”.
Tutorial: Importing vector drawings from Illustrator
Before leaving this section, let's look at an example of importing a file for use in Max.
In most companies, a professional creative team uses an advanced vector drawing tool such as Illustrator to design the company logo. If you need to work with such a logo, learning how to import the externally created file gives you a jumpstart on your project.
Note
When importing vector-based files into Max, only the lines are imported. Max cannot import fills, blends, or other specialized vector effects. All imported lines are automatically converted to Bézier splines in Max.
Although Max can draw and work with splines, Max's spline features take a backseat to the vector functions available in Adobe Illustrator. If you have an Illustrator (AI) file, you can import it directly into Max.
To import Adobe Illustrator files into Max, follow these steps:
- Within Illustrator, save your file as Box It Up Co logo using the .ai file format by choosing Application Button Save As. This file is also saved on the book's CD if you don't have Illustrator.
When saving the Illustrator file, don't use the latest file format. For this example, I've saved the file using the Illustrator 8 format instead of one of the latest Illustrator CS formats.
Figure 3.20 shows a logo created using Illustrator.
FIGURE 3.20 A company logo created in Illustrator and ready to save and import into Max

- Open Max, and choose Application Button Import Import.
A file dialog box opens.
- Select Adobe Illustrator (AI) as the File Type. Locate the file to import, and click OK.
The AI Import dialog box asks whether you want to merge the objects with the current scene or replace the current scene.
- For your purposes, select the replace the current scene option and click OK.
- The Shape Import dialog box asks whether you want to import the shapes as single or multiple objects. Select multiple, and click OK.
Figure 3.21 shows the logo after it has been imported into Max. Notice that all the fills are missing.
FIGURE 3.21 A company logo created in Illustrator and imported into Max

Cross-Reference
Spline objects that are imported from Illustrator appear in Max as Editable Spline objects. You can learn more about Editable Splines in Chapter 12, “Drawing and Editing 2D Splines and Shapes”.
Using the File Utilities
With all these various files floating around, Max has included several utilities that make working with them easier. The Utilities panel of the Command Panel includes several useful utilities for working with files. You can access these utilities by opening the Utilities panel and clicking the More button to see a list of available utilities.
Using the Asset Browser utility
The Asset Browser utility is the first default button in the Utility panel. Clicking this button opens the Asset Browser window. The Asset Browser resembles Windows Explorer, except that it displays thumbnail images of all the supported formats contained within the current directory. Using this window, shown in Figure 3.22, you can browse through directory files and see thumbnails of images and scenes.
Even though thumbnails aren't visible in Windows Explorer on Vista or Windows 7, thumbnails are visible when you use Asset Browser.
FIGURE 3.22 The Asset Browser window displays thumbnails of the files in the current directory.

The supported file types include AVI, BMP, CIN, CEL, DDS, GIF, HDRI, IFL, IPP, JPEG, MPEG, PNG, PSD, MOV, RGB, RLA, RPF, VST, TIF, and YUV. These types are the same ones that the Application Button ![]() View Image File command can open. All files with these extensions are viewable within the Asset Browser. You can select to view only a certain type of file using the Filter menu. You also can view and filter MAXScript and AutoCAD DWG files.
View Image File command can open. All files with these extensions are viewable within the Asset Browser. You can select to view only a certain type of file using the Filter menu. You also can view and filter MAXScript and AutoCAD DWG files.
Tip
Open and display the Asset Manager within a viewport by right-clicking the viewport Point-of-View label and choosing Extended ![]() Asset Manager from the pop-up menu.
Asset Manager from the pop-up menu.
You also can drag and drop files from the Asset Browser window to Max. Drag a scene file, and drop it on Max's title bar to open the scene file within Max. You can drop image files onto the map buttons in the Material Editor window or drop an image file onto a viewport to make a dialog box appear, which lets you apply the image as an Environment Map or as a Viewport Background, respectively.
The Asset Browser window is modeless, so you can work with the Max interface while the Asset Browser window is open. Double-clicking an image opens it full size in the Rendered Frame window.
The Asset Browser also can act as a Web browser to look at content online. When the Asset Browser first opens, a dialog box reminds you that online content may be copyrighted and cannot be used without consent from the owner.
The Display menu includes three panes that you can select. The Thumbnail pane shows the files as thumbnails. You can change the size of these thumbnails using the Thumbnails menu. The Explorer pane displays the files as icons the same as you would see in Windows Explorer. The Web pane displays the web page for the site listed in the Address field.
To view websites, you need to be connected to the Internet. The Asset Browser can remember your favorite websites using the Favorites menu. The Asset Browser window also includes the standard web browser navigation buttons, such as Back, Forward, Home, Refresh, and Stop. You also can find these commands in the Browse menu.
Max keeps thumbnails of all the images you access in its cache. The cache is a directory that holds thumbnails of all the recently accessed images. Each thumbnail image points to the actual directory where the image is located. Choose Application Button ![]() Preferences to open the Preferences dialog box, in which you can specify where you want the cache directory to be located. To view the cached files, choose Filter
Preferences to open the Preferences dialog box, in which you can specify where you want the cache directory to be located. To view the cached files, choose Filter ![]() All in Cache. The Preferences dialog box also includes options to define how to handle dropped files. The options include Always Merge or Import, Always XRef, or Ask Each Time.
All in Cache. The Preferences dialog box also includes options to define how to handle dropped files. The options include Always Merge or Import, Always XRef, or Ask Each Time.
Choose File ![]() Print to print the file view or web window.
Print to print the file view or web window.
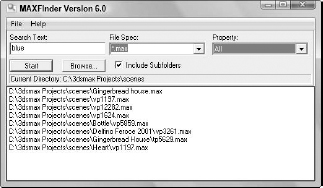
Finding files with the Max File Finder utility
Another useful utility for locating files is the Max File Finder utility, which you get to by using the More button in the Utilities panel of the Command Panel. When you select this utility, a rollout with a Start button appears in the Utilities panel. Clicking this button opens the MAXFinder dialog box. Using MAXFinder, you can search for scene files by any of the information listed in the File Properties dialog box.
Tip
You also can access the MAXFinder dialog box using the MaxFind icon located in the same folder where 3ds Max is installed.
You can use the Browse button to specify the root directory to search. You can select to have the search also examine any subfolders. Figure 3.23 shows the MAXFinder dialog box locating all the scene files that include the word blue.
FIGURE 3.23 You can use the MAXFinder utility to search for scene files by property.
Collecting files with the Resource Collector utility
When a scene is created, image and object files can be pulled from several different locations. The Resource Collector utility helps you consolidate all these files into one location. The settings for this utility appear in the Parameters rollout in the Utility panel of the Command Panel, as shown in Figure 3.24. The Output Path is the location where the files are collected. You can change this location using the Browse button.
FIGURE 3.24 The Resource Collector utility can compile all referenced files into a single location.

The utility includes options to Collect Bitmaps, to include the Max scene file, and to compress the files into a compressed WinZip file. The Copy option makes copies of the files, and the Move option moves the actual file into the directory specified in the Output Path field. The Update Materials option updates all material paths in the Material Editor. When you're comfortable with the settings, click the Begin button to start the collecting.
Using the File Link Manager utility
The File Link Manager utility (which also can be accessed using the Application Button ![]() References
References ![]() File Link Manager menu) lets you use external AutoCAD and Revit files in the same way that you use Max's XRef features. By creating links between the current Max scene and an external AutoCAD or Revit file, you can reload the linked file when the external AutoCAD or Revit file has been updated and see the updates within Max.
File Link Manager menu) lets you use external AutoCAD and Revit files in the same way that you use Max's XRef features. By creating links between the current Max scene and an external AutoCAD or Revit file, you can reload the linked file when the external AutoCAD or Revit file has been updated and see the updates within Max.
Cross-Reference
XRefs are covered in Chapter 25, “Building Complex Scenes with Containers, XRefs, and the Schematic View”.
This utility is divided into three panels: Attach, Files, and Presets. The Attach panel includes a File button to select and open a DWG or DXF file. The Attach panel also includes options to rescale the file units, a button to select which layers to include, and a button to attach the file. The Files panel displays each linked AutoCAD file along with icons to show if the linked file has changed. A Reload button allows you to click to reload the linked file within Max. The Preset panel lets you define file linking presets.
Using i-drop
To make accessing needed files from the Web even easier, Autodesk has created a technology known as i-drop that lets you drag files from i-drop–supported web pages and drop them directly into Max. With i-drop, you can drag and drop Max-created light fixture models, textures, or any other Max-supported file from a light manufacturer's website into your scene without importing and positioning a file. This format allows you to add geometry, photometric data, and materials.
Accessing File Information
As you work with files, several dialog boxes in Max supply you with extra information about your scene. You can use this information to keep track of files and record valuable statistics about a scene.
Displaying scene information
If you like to keep statistics on your files (to see whether you've broken the company record for the model with the greatest number of faces), you'll find the Summary Info dialog box useful. Use the Application Button ![]() Properties
Properties ![]() Summary Info menu command to open a dialog box that displays all the relevant details about the current scene, such as the number of objects, lights, and cameras; the total number of vertices and faces; and various model settings, as well as a Description field where you can describe the scene. Figure 3.25 shows the Summary Info dialog box.
Summary Info menu command to open a dialog box that displays all the relevant details about the current scene, such as the number of objects, lights, and cameras; the total number of vertices and faces; and various model settings, as well as a Description field where you can describe the scene. Figure 3.25 shows the Summary Info dialog box.
The Plug-In Info button on the Summary Info dialog box displays a list of all the plug-ins currently installed on your system. Even without any external plug-ins installed, the list is fairly long because many of the core features in Max are implemented as plug-ins. The Summary Info dialog box also includes a Save to File button for saving the scene summary information as a text file.
FIGURE 3.25 The Summary Info dialog box shows all the basic information about the current scene.

Viewing file properties
As the number of files on your system increases, you'll be wishing you had a card catalog to keep track of them all. Max has an interface that you can use to attach keywords and other descriptive information about the scene to the file. The Application Button ![]() Properties
Properties ![]() File Properties menu command opens the File Properties dialog box. This dialog box, shown in Figure 3.23, includes three panels: Summary, Contents, and Custom. The Summary panel holds information such as the Title, Subject, and Author of the Max file and can be useful for managing a collaborative project. The Contents panel holds information about the scene, such as the total number of objects and much more. Much of this information also is found in the Summary Info dialog box. The Custom panel, also shown in Figure 3.26, includes a way to enter a custom list of properties such as client information, language, and so on.
File Properties menu command opens the File Properties dialog box. This dialog box, shown in Figure 3.23, includes three panels: Summary, Contents, and Custom. The Summary panel holds information such as the Title, Subject, and Author of the Max file and can be useful for managing a collaborative project. The Contents panel holds information about the scene, such as the total number of objects and much more. Much of this information also is found in the Summary Info dialog box. The Custom panel, also shown in Figure 3.26, includes a way to enter a custom list of properties such as client information, language, and so on.
Note
You also can view the File Properties dialog box information while working in Windows Explorer by right clicking the file and selecting Properties. Three unique tabs are visible: Summary, Contents, and Custom. The Summary tab holds the file identification information, including the Title, Subject, Author, Category, Keywords, and Comments.
Viewing files
Sometimes looking at the thumbnail of an image isn't enough to help you decide whether you have the right image. For these cases, you can quickly load the image in question into a viewer to look at it closely. The Rendering ![]() View Image File menu command opens the View File dialog box shown in Figure 3.27. This dialog box lets you load and view graphic and animation files using the Rendered Frame Window or the default Media Player for your system.
View Image File menu command opens the View File dialog box shown in Figure 3.27. This dialog box lets you load and view graphic and animation files using the Rendered Frame Window or the default Media Player for your system.
FIGURE 3.26 The File Properties dialog box contains workflow information such as the scene author, comments, and revision dates.

FIGURE 3.27 The View File dialog box can open an assortment of image and animation formats.

Cross-Reference
The Rendered Frame Window is discussed in more detail in Chapter 23, “Rendering a Scene and Enabling Quicksilver”.
The View File dialog box includes several controls for viewing files. The Devices and Setup buttons let you set up and view a file using external devices such as video recorders. The Info button lets you view detailed information about the selected file. The View button opens the file for viewing while leaving the View File dialog box open. The Open button opens the selected file and closes the dialog box. At the bottom of the View File dialog box, the statistics and path of the current file are displayed.
The View File dialog box can open many types of files, including Microsoft videos (AVI), MPEG files, bitmap images (BMP), Kodak Cineon images (CIN), Combustion files (CWS), Graphics Image Format images (GIF), Radiance HDRI image files (HDR), Image File List files (IFL), JPEG images (JPG), OpenEXR image files (EXR), Portable Network Graphics images (PNG), Adobe Photoshop images (PSD), QuickTime movies (MOV), SGI images (RGB), RLA images, RPF images, Targa images (TGA, VST), Tagged Image File Format images (TIF), Abekas Digital Disk images (YUV), and DirectDraw Surface (DDS) images.
You use the Gamma area on the View File dialog box to specify whether an image uses its own gamma settings or the system's default setting, or whether an override value should be used.
Summary
Working with files lets you save your work, share it with others, and reload it for more work. This chapter covered the following topics:
- Creating, saving, opening, merging, and archiving files
- Changing file preferences and configuring paths
- Understanding the various import and export types
- Importing models from other programs, such as Illustrator, Maya, and MotionBuilder
- Working with the file utilities, such as the Asset Browser
- Using the Summary Info and File Properties dialog boxes to keep track of scene files
By now, you should be feeling more comfortable with the user interface and using files, but if you want to make some changes to the interface, the next chapter covers how to customize it. It also covers the available preference settings.