
CHAPTER 15
Using the Slate Material Editor
Understanding Material properties
Working with the Material Editor
Using the Material/Map Browser
Working with libraries of materials
Using the Material Explorer
Materials are used to dress, color, and paint objects. Just as materials in real life can be described as scaly, soft, smooth, opaque, or blue, materials applied to 3D objects can mimic properties such as color, texture, transparency, shininess, and so on. In this chapter, you learn the basics of working with materials and all the features of the Slate Material Editor and the Material Explorer.
Understanding Material Properties
Before jumping into the Material Editor, let's take a close look at the type of material properties that you will deal with. Understanding these properties will help you as you begin to create new materials.
Up until now, the only material property that has been applied to an object has been the default object color, randomly assigned by Max. The Material Editor can add a whole new level of realism using materials that simulate many different types of physical properties.
Note
Many of these material properties are not visible until the scene is rendered.
Colors
Color is probably the simplest material property and the easiest to identify. However, unlike the object color defined in the Create and Modify panels, there isn't a single color swatch that controls an object's color.
Consider a basket of shiny, red apples. When you shine a bright blue spotlight on them, all the apples turn purple because the blue highlights from the light mix with the red of the apple's surface. So, even if the apples are assigned a red material, the final color in the image might be very different because the light makes the color change.
Within the Material Editor are several different color swatches that control different aspects of the object's color. The following list describes the types of color swatches that are available for various materials:
- Ambient: Defines an overall background lighting that affects all objects in the scene, including the color of the object when it is in the shadows. This color is locked to the Diffuse color by default so that they are changed together.
- Diffuse: The surface color of the object in normal, full, white light. The normal color of an object is typically defined by its Diffuse color.
- Specular: The color of the highlights where the light is focused on the surface of a shiny material.
- Self-Illumination: The color that the object glows from within. This color takes over any shadows on the object.
- Filter: The transmitted color caused by light shining through a transparent object.
- Reflect: The color reflected by a raytrace material to other objects in the scene.
- Luminosity: Causes an object to glow with the defined color. It is similar to Self-Illumination color but can be independent of the Diffuse color.
Note
Standard materials don't have Reflectivity and Luminosity color swatches, but these swatches are part of the raytrace material.
If you ask someone the color of an object, he or she would respond by identifying the Diffuse color, but all these properties play an important part in bringing a sense of realism to the material. Try applying very different, bright materials to each of these color swatches and notice the results. This gives a sense of the contribution of each color.
Tip
For realistic materials, your choice of colors depends greatly on the scene lights. Indoor lights have a result different from an outdoor light like the sun. You can simulate objects in direct sunlight by giving their Specular color a yellow tint and their Ambient color a complementary, dark, almost black or purple color. For indoor objects, make the Specular color bright white and use an Ambient color that is the same as the Diffuse color, only much darker. Another option is to change the light colors instead of changing the specular colors.
Opacity and transparency
Opaque objects are objects that you cannot see through, such as rocks and trees. Transparent objects, on the other hand, are objects that you can see through, such as glass and clear plastic. Max's materials include several controls for adjusting these properties, including Opacity and several Transparency controls.
Opacity is the amount that an object refuses to allow light to pass through it. It is the opposite of transparency and is typically measured as a percentage. An object with 0 percent opacity is completely transparent, and an object with 100 percent opacity doesn't let any light through.
Transparency is the amount of light that is allowed to pass through an object. Because this is the opposite of opacity, transparency can be defined by the opacity value. Several options enable you to control transparency, including Falloff, Amount, and Type. These options are discussed later in this chapter.
Reflection and refraction
A reflection is what you see when you look in the mirror. Shiny objects reflect their surroundings. By defining a material's reflection values, you can control how much it reflects its surroundings. A mirror, for example, reflects everything, but a rock won't reflect at all.
Reflection Dimming controls how much of the original reflection is lost as the surroundings are reflected within the scene.
Refraction is the bending of light as it moves through a transparent material. The amount of refraction that a material produces is expressed as a value called the Index of Refraction. The Index of Refraction is the amount that light bends as it goes through a transparent object. For example, a diamond bends light more than a glass of water, so it has a higher Index of Refraction value. The default Index of Refraction value is 1.0 for objects that don't bend light at all. Water has a value of 1.3, glass a value of around 1.5, and solid crystal a value of around 2.0.
Shininess and specular highlights
Shiny objects, such as polished metal or clean windows, include highlights where the lights reflect off their surfaces. These highlights are called specular highlights and are determined by the Specular settings. These settings include Specular Level, Glossiness, and Soften values.
The Specular Level is a setting for the intensity of the highlight. The Glossiness determines the size of the highlight: Higher Glossiness values result in a smaller highlight. The Soften value thins the highlight by lowering its intensity and increasing its size.
A rough material has the opposite properties of a shiny material and almost no highlights. The Roughness property sets how quickly the Diffuse color blends with the Ambient color. Cloth and fabric materials have a high Roughness value; plastic and metal Roughness values are low.
Note
Specularity is one of the most important properties that we sense to determine what kind of material the object is made from. For example, metallic objects have a specular color that is the same as their diffuse color. If the colors are different, then the objects look like plastic instead of metal.
Other properties
Max uses several miscellaneous properties to help define standard materials, including Diffuse Level and Metalness.
The Diffuse Level property controls the brightness of the Diffuse color. Decreasing this value darkens the material without affecting the specular highlights. The Metalness property controls the metallic look of the material. Some properties are available only for certain material types.
Before proceeding, you need to understand the difference between a material and a map. A material is an effect that permeates the 3D object, but most maps are 2D images (although procedural 3D maps also exist) that can be wrapped on top of the object. Materials can contain maps, and maps can be made up of several materials. In the Material Editor, materials appear as blue nodes, and maps appear as green nodes in the View pane. Usually, you can tell whether you're working with a material or a map by looking at the default name. Maps show up in the name drop-down list as Map and a number (Map #1), and materials are named a number and Default (7- Default).
Working with the Slate Material Editor
The Material Editor is the interface with which you define, create, and apply materials. You can access the Material Editor by choosing Rendering ![]() Material Editor
Material Editor ![]() Slate Material Editor, clicking the Material Editor button on the main toolbar, or using the M keyboard shortcut.
Slate Material Editor, clicking the Material Editor button on the main toolbar, or using the M keyboard shortcut.
The Material Editor comes in two flavors: regular and extra strength. The Material Editor from previous versions of Max is still there, but now it is called the Compact Material Editor, and the new Material Editor interface is called the Slate interface. You can choose either from the Rendering ![]() Material Editor menu or switch between them using the Modes menu in the Material Editor.
Material Editor menu or switch between them using the Modes menu in the Material Editor.
Note
Although the Slate Editor and the Compact Material Editor share most controls, the Slate Material Editor has more features and is the focus of our discussion. The Compact Material Editor is maintained for backward compatibility and is easier to use for existing users.
Note
You can find coverage of the Compact Material Editor as a bonus chapter on the book's CD.
Using the Slate Material Editor controls
The Slate Material Editor, shown in Figure 15.1, consists of four panels: the Material/Map Browser panel, the Material Node View panel, the Navigator panel, and the Parameter Editor panel. Of these panels, only the Material View panel is open at all times. The others can be closed and reopened using the Tools menu. If you drag the panel title away from the interface, the panel floats independently. If you drag a floating panel over the interface, several arrow icons appear. Dropping a panel on one of these arrows positions the floating panel to the side of the panel in the direction of the arrow. This interface gives you the power to set up the Slate Material Editor just as you want.
Tip
You also can use a keyboard shortcut to show or hide the various panels: O for the Material/Map Browser, P for the Parameter Editor, and N for the Navigator panel.
At the top of the default Slate Material Editor window is a menu of options. The menu commands found in these menus offer most of the same functionality as the toolbar buttons, but the menus are often easier to find than the buttons with which you are unfamiliar.
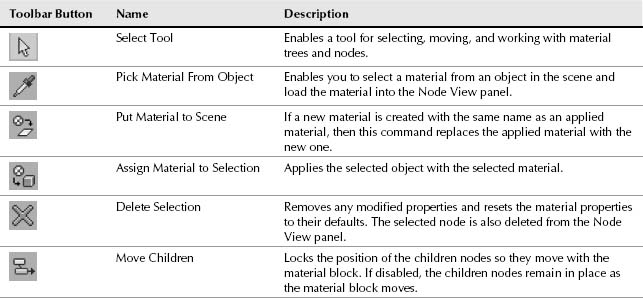
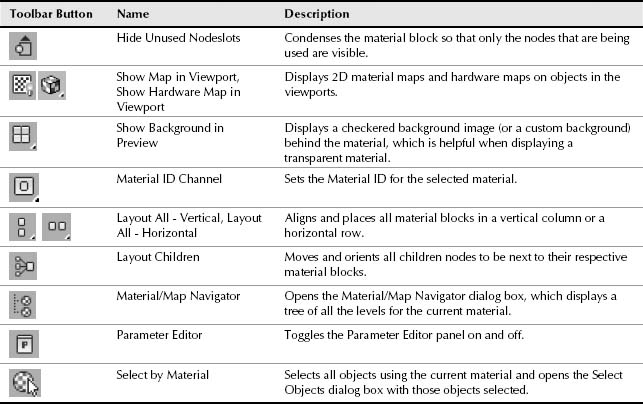
Below the menus are several toolbar buttons. These buttons are defined in Table 15.1.
FIGURE 15.1 The Slate Material Editor has four unique panels.
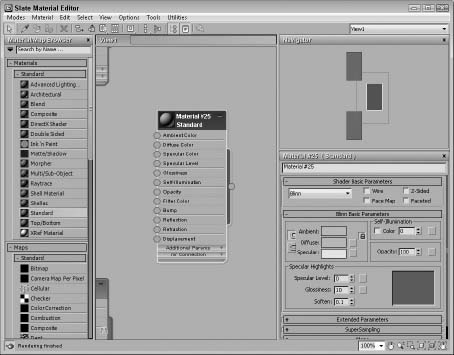
TABLE 15.1 Slate Material Editor Buttons
Loading the Material Node View panel
When the Slate Material Editor is first opened, the Node View panel is blank. You can add material nodes to the node view by double-clicking them in the Material/Map Browser or by dragging them from the Material/Map Browser onto the Node View panel. This loads the selected node into the Node View.
If your scene has some objects with materials already applied, you can use the Material ![]() Pick from Object menu or select the eyedropper tool on the toolbar and click an object in the viewport. The applied material for that object is loaded in the Node View. If the selected object doesn't have an applied material, then nothing is loaded.
Pick from Object menu or select the eyedropper tool on the toolbar and click an object in the viewport. The applied material for that object is loaded in the Node View. If the selected object doesn't have an applied material, then nothing is loaded.
You can also get all the applied materials in the current scene using the Material ![]() Get All Scene Materials menu. This loads all applied materials. If all the scene materials make it tough to find what you are looking for, you can use the Edit
Get All Scene Materials menu. This loads all applied materials. If all the scene materials make it tough to find what you are looking for, you can use the Edit ![]() Clear View menu to clear the Node View panel. This doesn't remove any assigned materials; it only clears the Node View panel.
Clear View menu to clear the Node View panel. This doesn't remove any assigned materials; it only clears the Node View panel.
Navigating the Material Node View panel
All current materials for the open scene are displayed as material node blocks in the Material Node View panel of the Slate Material Editor. At the top of each material node block are the material name and type. You can change the material name using the Name field at the top of the Parameter Editor or by right-clicking the material name and selecting Rename from the pop-up menu. Beneath the material name are all the parameters that are available for this material. Each of these parameters has a corresponding parameter in the Parameter Editor panel.
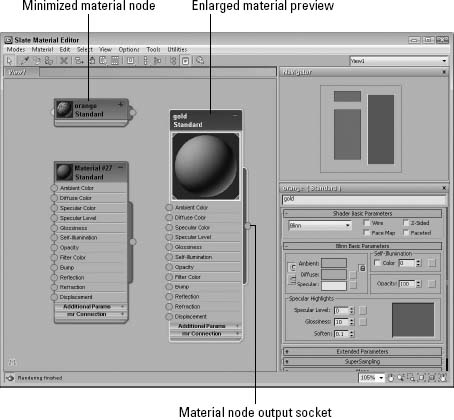
If you drag the material title (where the name is located), you can move the material node block around. You also can reduce the size of the material block by clicking the Hide Unused Nodeslots button. If multiple material blocks are present, you can use the Layout All buttons to align them in a column or a row. Figure 15.2 shows some material node blocks.
FIGURE 15.2 The Material View panel can hold multiple material blocks.
The Navigator panel shows all the material blocks and provides a way to quickly drag to view other sets of nodes. The red outline corresponds to the viewable area in the Material Node View panel. Navigating the Material Node View panel is accomplished using the navigation tools at the lower-right corner of the Slate Material Editor. These tools include a Zoom value list, and Pan, Zoom, Zoom Region, Zoom Extents, Zoom Extents Selected, and Pan to Selected tools.
Tip
You also can pan the view by dragging with the middle mouse button and zoom by scrubbing the mouse scroll wheel, just like you can in the viewports.
In addition to the navigation tools in the lower-right corner of the Material Editor, the View menu includes several options for navigating the Material Node View panel, including options to Show/Hide the Grid (G), show scrollbars, and options to lay out all nodes (L).
If you right-click the Node View tab, you can access a menu to rename or delete the current view. You can also create a new view. This new view appears as another tab at the top of the Material Editor. The new view is navigated independently of the other views and can hold a completely different set of materials. With several views created, you can drag the tabs to reorder the panels as desired.
Selecting and applying materials
A material node block can be selected by simply clicking its title. When selected, the title bar turns dark blue in both the Material Node View and Navigator panels. Selected materials are applied to the object selected in the viewport using the Assign Material to Selection button in the Material Editor toolbar, using the Material ![]() Assign Material to Selection (A) menu or by using the right-click pop-up menu. You can also apply a material to a scene object by dragging on the material node's output socket and dropping the material on a viewport object whether it is selected or not.
Assign Material to Selection (A) menu or by using the right-click pop-up menu. You can also apply a material to a scene object by dragging on the material node's output socket and dropping the material on a viewport object whether it is selected or not.
Tip
Although they aren't listed in the menu options, you can use the Undo (Ctrl+Z) and Redo (Ctrl+Y) commands to undo and redo actions done in the Slate Material Editor.
Holding down the Ctrl key while clicking material node blocks lets you select multiple nodes at once. Pressing the Delete key deletes the selected material node.
The Material Node View panel is a temporary placeholder for materials and maps. An actual scene can have hundreds of materials. By loading a material into a material node, you can change its parameters, apply it to other objects, or save it to a library for use in other scenes. When a file is saved, all materials in the Material Editor are saved with the file.
Changing the material preview
Next to the material name is a preview of the material. If you double-click the preview, the preview is enlarged to show more detail. You can change the Sample Type object displayed in the material block to be a sphere, cylinder, or box using the Preview Object Type menu in the right-click pop-up menu.
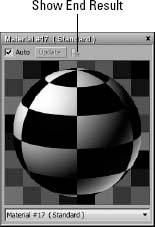
The right-click pop-up menu also includes options to show the background in the preview, to show a backlight, and to change the preview tiling for applied maps. The Open Preview Window option opens the material preview in a separate window, as shown in Figure 15.3. Within this floating window, you can resize the preview to be larger, revealing more details. The Show End Result button shows the material with all materials and maps applied.
Tip
The Material Preview panel also can be docked to the Material Editor.
When you assign a material to an object in the scene, the material becomes “hot.” A hot material is automatically updated in the scene when the material parameters change. Hot materials have white corner brackets displayed around their material preview. You can “cool” a material by making a copy of its material block. To copy a material block, simply drag it with the Shift key held down. This detaches the material node from the object in the scene to which it is applied, so that any changes to the material aren't applied to the object.
FIGURE 15.3 Material previews can be opened in a floating window.
Whenever a material is applied to an object in the scene, the material is added to a special library of materials that get saved with the scene. Materials do not need to be seen in the Material Node View panel to be in the scene library. You can see all the materials included in the scene library in the Material/Map Browser by selecting the Scene Materials rollout.
Selecting objects by material
If you want to select all the objects in your scene with a specific material applied (like the shiny, gold material), then select the material in the View pane and click on the Select by Material button in the toolbar or use the Utilities ![]() Select Objects by Material menu. This command opens the Select Objects dialog box with all the objects that have the selected material applied. Clicking the Select button selects these objects in the viewport.
Select Objects by Material menu. This command opens the Select Objects dialog box with all the objects that have the selected material applied. Clicking the Select button selects these objects in the viewport.
Setting Slate Material Editor preferences
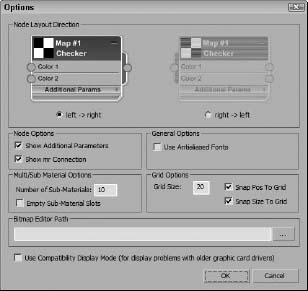
You open the Slate Material Editor Options dialog box, shown in Figure 15.4, by selecting the Options ![]() Preferences menu. The top option lets you choose how the nodes are oriented. You also can select to hide the Additional Parameters and mr Connection set of parameters, use anti-aliased fonts, and set the number of default materials in a multi-subobject material and the grid spacing. The Bitmap Path Editor lets you set where to look for maps. By default, this is set to the maps directory where Max is installed, but you can change it to your current project folder.
Preferences menu. The top option lets you choose how the nodes are oriented. You also can select to hide the Additional Parameters and mr Connection set of parameters, use anti-aliased fonts, and set the number of default materials in a multi-subobject material and the grid spacing. The Bitmap Path Editor lets you set where to look for maps. By default, this is set to the maps directory where Max is installed, but you can change it to your current project folder.
FIGURE 15.4 The Slate Material Editor Options dialog box offers many options for controlling the Slate Material Editor window.
Removing materials and maps
If you accidentally apply an unwanted material to an object, you can replace the material with another material by applying a new material onto the object. If you want to view the object color within the viewport, then open the Display panel, and in the Display Color rollout, select the Object color option for Wireframe and Shaded. The Material Color options display the material color in the viewports.
If you apply a material or map to an object that doesn't look just right and tweaking it won't help, you can always return to square one by removing the material or any mappings that have been applied to the object. The tool to remove materials and maps is the UVW Remove utility. You can access this utility by clicking the More button in the Utility panel and selecting UVW Remove from the list of utilities.
This utility includes a single rollout that lists the number of objects selected. It also includes two buttons. The UVW button removes any mapping coordinates from the selected objects, and the Materials button removes any materials from the selected objects. This button restores the original object color to the selected objects. Alternatively, you can select the Set Gray option, which makes the selected object gray when the materials are removed.
Using utilities
Within the Utilities menu are several additional commands. The Render Map command lets you render out the selected map node. Once rendered, you can save the results to a file. The Render Map dialog box also lets you render out animated maps.
The Utilities menu was previously only available in the Compact Material Editor, but in 3ds Max 2012, it is also in the Slate Material Editor.
The Clean MultiMaterial utility removes any unused maps from the material tree and the Instance Duplicate Map identifies and uses instances of duplicate maps throughout the scene.
Cross-Reference
More information on using the Clean MultiMaterial utility is covered in Chapter 18, “Creating Compound Materials and Using Material Modifiers.” The Instance Duplicate Map utility is presented in Chapter 17, “Adding Material Details with Maps.”
Using the Fix Ambient utility
Standard material types always have their Ambient and Diffuse colors locked together. If you have older files with unlocked Diffuse and Ambient colors, the Fix Ambient utility can be used to locate and fix all materials in the scene with this condition. To access this utility, open the Utilities panel, click the More button, and select the Fix Ambient utility. Clicking the Find All button opens a dialog box that lists all materials in the scene with unlocked Diffuse and Ambient colors.
Tutorial: Coloring Easter eggs
Everyone loves spring with its bright colors and newness of life. One of the highlights of the season is the tradition of coloring Easter eggs. In this tutorial, you use virtual eggs—no messy dyes and no egg salad sandwiches for the next two weeks.
To create your virtual Easter eggs and apply different colors to them, follow these steps:
- Open the Easter eggs.max file from the Chap 15 directory on the CD.
This file contains several egg-shaped objects.
- Open the Slate Material Editor by choosing Rendering
 Material Editor Slate Material Editor (or press the M key).
 - Double-click the Standard material in the Material/Map Browser. Select the material node in the Node View, and click the Diffuse color swatch in the Parameter Editor panel. From the Color Selector that appears, drag the cursor around the color palette until you find the color you want and then click Close.
- In any viewport, select an egg and then click the Assign Material to Selection button in the Material Editor, or you can simply drag from the material node's output socket to the viewport object.
- Repeat Steps 4 and 5 for all the eggs.
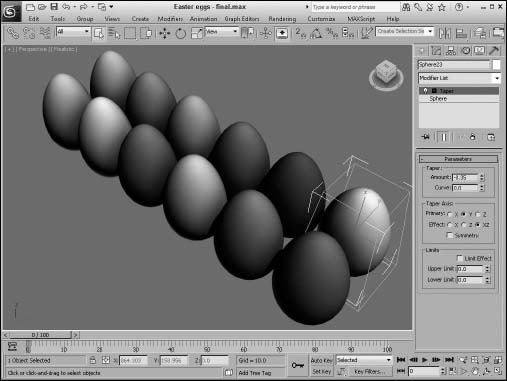
Figure 15.5 shows the assortment of eggs that we just created.
FIGURE 15.5 These eggs have been assigned materials with different Diffuse colors.
Using the Material/Map Browser
Now that you know how to apply materials to objects, the easiest way to get materials is from the Material/Map Browser. Max ships with several libraries of materials that you can access. If you open the Material/Map Browser with the Tools ![]() Material/Map Browser menu, the Material/Map Browser panel appears, as shown in Figure 15.6.
Material/Map Browser menu, the Material/Map Browser panel appears, as shown in Figure 15.6.
Note
The Material/Map Browser can be docked to the left edge of the Slate Material Editor or pulled away from the interface as a floating dialog box. Double-click the title bar to re-dock it back to the interface.
The Material/Map Browser is the place where all your materials are stored. They are stored in sets called libraries. These libraries are saved along with the scene file or they can be saved as a separate file if you want to load and access them within a different scene. Within the Material/Map Browser, each library is contained with a separate rollout. These rollouts, called groups, hold any loaded material libraries, the available default Material and Map types, Controllers, Scene Materials, and Sample Slots, which hold the temporary material slots used by the Compact Material Editor.
FIGURE 15.6 The Material/Map Browser lets you select new materials from a library of materials.
The text field directly above the material sample slot in the Material/Map Browser is a Search by Name field. By typing a name in this field, you can search and select materials.
Tip
When browsing materials in the Material/Map Browser, you can use the keyboard to move up and down the material list. The left and right keyboard keys are used to open and close rollouts and the Enter key adds the selected material to the View pane.
Working with libraries
Any time you adjust a material or a map parameter, a new material is created and the material's sample slot is updated. Although newly created materials are saved along with the scene file, you can make them available for reuse by including them in a library.
As more and more libraries get added to the Material/Map Browser, it can be difficult to locate the specific library that you want to use. To help with this problem, you can right-click the library title and choose the Edit Color Group option. This opens a Color Selector where you can pick a color for the library rollout. There are also options for changing how the materials in the library are displayed. The options include Small, Medium and Large Icons, Icons and Text, or just Text.
The right-click pop-up menu also offers an option to create a new library. New Libraries can be saved and loaded also using the right-click pop-up menu.
Max ships with several different material libraries and several architecture material sets. You can find all these libraries in the matlibs directory. Some libraries are only available when the mental ray renderer is enabled.
Save a layout with the current materials using the Material/Map Browser Options ![]() Additional Options
Additional Options ![]() Save Layout As. These files are saved as files with the .mpl extension.
Save Layout As. These files are saved as files with the .mpl extension.
Tip
Although materials can be saved out as libraries, perhaps the easiest ways to share materials between applications are using the Material XML Export utility or the Material ![]() Export As XMSL File command.
Export As XMSL File command.
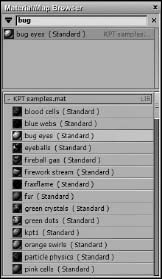
Tutorial: Loading a custom material library
To practice loading a material library, I've created a custom library of materials using various textures created with Kai's Power Tools.
To load a custom material library into the Slate Material Editor, follow these steps:
- Choose Rendering Material Editor (or press the M key) to open the Material Editor. Then make sure the Material/Map Browser is active or select the Tools Material/Map Browser menu to open the Material/Map Browser.
- Click the small down arrow icon to the left of the Search field at the top of the Material/Map Browser and select Open Material Library from the pop-up menu.
- Select and open the KPT samples.mat file from the Chap 15 directory on the CD.
The library loads into the Material/Map Browser.
- In the Search field (above the sample slot), type Bug to locate and select the bug eyes material.
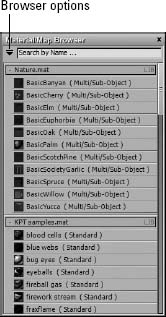
Figure 15.7 shows the Material/Map Browser with the custom material library open.
FIGURE 15.7 The Material/Map Browser also lets you work with saved custom material libraries.
Using the Material Explorer
The Scene Explorer has been well received and has made working with scene objects much easier. So easy in fact that the Max team has looked for other places where a similar interface can be used, and the first stop is with materials. The result is the Material Explorer.
The Material Explorer, shown in Figure 15.8, lets you quickly view all the scene materials along with their hierarchies and all their properties in a single interface. It also lets you sort the materials by their various properties and even make changes to multiple materials at once. You can access the Material Explorer with the Rendering ![]() Material Explorer command.
Material Explorer command.
FIGURE 15.8 The Material Explorer shows the layered material as a hierarchy.
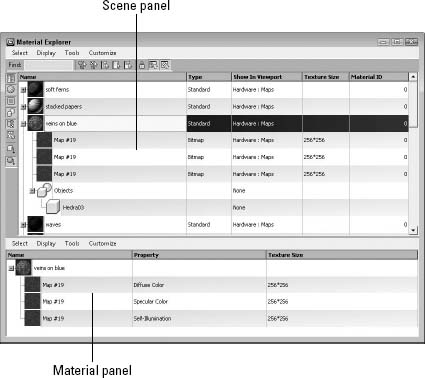
The Material Explorer works exactly like the Scene Explorer and has configurable columns. It is divided into two panels. The top panel shows all the materials in the current scene; the bottom panel shows the hierarchy of the selected material or submaterial.
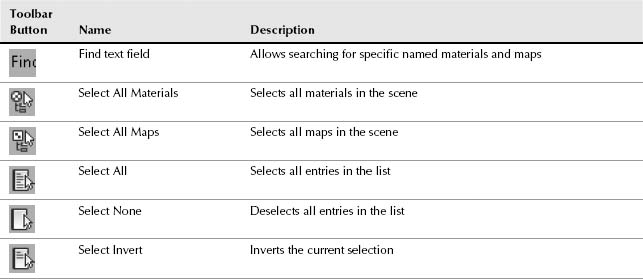
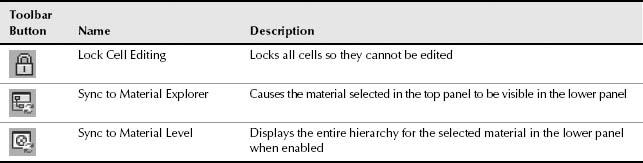
In addition to the menus, several toolbar buttons run horizontally under the menus and several display buttons run vertically down the left side of the interface. These buttons are described in Tables 15.2 and 15.3.
Cross-Reference
To learn more about the Scene Explorer interface, see Chapter 6, “Selecting Objects and Setting Object Properties.”
TABLE 15.2 Material Explorer Display Buttons—Vertical
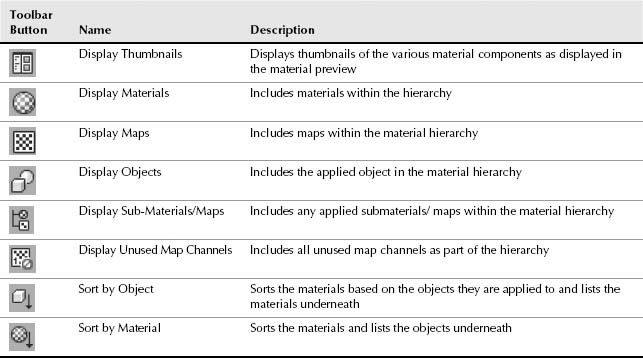
TABLE 15.3 Material Explorer Toolbar Buttons—Horizontal
The Material Explorer lets you apply materials directly to scene objects by simply dragging and dropping the material thumbnail onto the object. You also can drag and drop maps onto other materials and channels. The Material Explorer also works with the Material Browser; for example, you can drag the material type and drop it on the Type column in the Material Explorer to change a material type.
Summary
Materials can add much to the realism of your models. Learning to use the Material Editor, the Material/Map Browser, and the Material/Map Navigator enables you to work with materials. This chapter covered the following topics:
- Understanding various material properties
- Working with the Material Editor buttons and material nodes
- Using the Material/Map Browser and material libraries
- Using the Material Explorer to quickly see all materials in a scene
The next chapter delves more into the topic of material, including the standard material and all its settings.