
CHAPTER 47
Rendering with mental ray and iray
Enabling the mental ray renderer
Working with mental ray lights
Creating caustic and global illumination lighting
Added mental ray proxy
Max includes a plug-in architecture that lets you replace or extend any part of the software including the rendering engine. Mental ray is a plug-in rendering engine that offers many advanced features. This engine takes the rendering in Max to a new level, enabling you to render your scenes with amazing accuracy. It also includes a host of advanced rendering features including caustics and global illumination that are physically realistic.
Although the mental ray renderer is awesome, it can take lots of tweaking to get results to look just right. This is where iray comes in. iray lets you start a render, and it automatically adjusts the settings to give you great results based on the amount of time you give it. In other words, iray is mental ray for dummies.
Enabling mental ray and iray
If you're accustomed to using the Default Scanline Renderer and you're wondering if the mental ray or iray rendering engines are worth using, the answer is yes. Actually, you should try a couple of test renderings first and play with the different settings, but in working with mental ray I've been amazed at its results. One of the chief benefits of mental ray is its speed. It can render a fully raytraced scene in a fraction of the time without sacrificing quality.
Note
If you need even more speed and don't mind sacrificing a little quality, then try the Quicksilver Hardware renderer. It works with most of the mental ray materials, lights, and settings.
mental ray is an external rendering engine that plugs into 3ds Max. It was developed by a company named mental images, so its development is separate from Max. Versions of the mental ray rendering engine also can be found in Maya and Softimage as well as a stand-alone version.
mental ray and iray also include support for global illumination without your having to enable the Advanced Lighting settings. In addition, mental ray can use all of Max's existing materials without having to use a limited specialized material like the raytrace material. Each material has a new rollout that lets you specialize mental ray settings. However, iray requires that you use only a specific set of materials, including the Arch & Design and those materials in the Autodesk Material Library.
Note
mental ray can't use the Advanced Lighting settings. mental ray has its own lighting solution that is independent of Advance Lighting.
Cross-Reference
Many of the available mental ray materials are covered in Chapter 30, “Using Specialized Material Types.”
mental ray also includes native support for Area Lights, Shaders, Depth of Field, and Motion Blur. It also includes some specialized lights that offer functionality, such as caustics, that are unavailable in the Scanline Renderer.
To choose mental ray or iray as the renderer for your scene, simply select it from the list of available renderers in the Assign Renderer rollout of the Common panel of the Render Scene dialog box. You can set a different renderer for Production, the Material Editor, and the ActiveShade viewer. To make mental ray your default renderer, click the Save as Defaults button in this rollout.
Once selected as your Production renderer, you don't need to modify any other settings for the renderer to work. The mental ray settings in the Material Editor, Lights category, and Object Properties dialog box enable additional features that mental ray can take advantage of, but they aren't required to render the scene. The current mental ray version is 3.9.
Note
You may have noticed the Raytracer rollout in the Render Setup dialog box when the Scanline Renderer is enabled. There is also a Raytrace material in the Standard set of the materials. These settings and materials are used to enable and configure raytracing in the Default Scanline Renderer, but the mental ray results are much better than these raytrace options, so the focus is to learn mental ray instead of the older raytrace options.
Working with iray
After iray is enabled, you'll notice that the number of panels for configuring it in the Render Setup dialog box has been greatly reduced. The whole idea behind iray is to make the process of configuring the renderer easier. The single configuration panel for iray is the Renderer panel, shown in Figure 47.1.
FIGURE 47.1 The iray renderer has only a single panel of options in the Render Setup dialog box.

Within iray's Renderer panel, you can set the time for the render to take, choose the number of iterations, or make simply set enable the Unlimited option. The iray renderer then renders and continually refines the given scene. As it renders, the results are shown in the Rendered Frame Window, and the render can be stopped and saved at any time.
The Advanced Parameters rollout includes options for limiting the number of light bounces, options for picking the anti-aliasing filter to use (Box, Gauss, or Triangle), and global settings for handling displacement maps. The Material Override option lets you replace all applied materials with a single designated material that is selected using the button to the right. This lets you see the lighting and shadow effects quickly or get a result if unsupported materials are used in the scene.
One “gotcha” when working with iray is that if a material or map is used that it doesn't support, the object is rendered as flat gray. The supported iray materials are those that have information on how the light interacts with it. For Max, the Arch & Design materials, the Autodesk Material Library (except for the Metallic Paint material, which isn't supported), Bitmaps, Mix, Noise, Normal Bump, RGB Multiply, and mr Physical Sky are supported. Also, iray supports only Photometric lights.
Figure 47.2 shows a sample scene rendered with iray. The image on the left shows the scene after only a few seconds, and the one on the right shows the scene after a longer render time.
FIGURE 47.2 The iray renderer progressively refines the image for as long as you let it run.

Tutorial: Starting iray
Once you get the hang of using iray, you'll find it is great to start the renderer with the unlimited setting before running off to lunch and check out the results when you get back.
To use the iray renderer to render a scene, follow these steps:
- Open the Plant in corner.max file from the Chap 47 directory on the CD.
This file includes several simple objects and a plant. The scene already has materials applied from the Autodesk Material Library.
- Open the Render Scene dialog box (F10), and switch the Production Renderer in the Assign Renderer rollout of the Common panel to the iray renderer.
- In the Renderer panel of the Render Setup dialog box, enable the Unlimited option and click the Render button.
- Let the scene render for a while and when it looks good enough, click the Cancel button in the Rendering dialog box. The rendered results are displayed in the Rendered Frame Window where you can save the image if you desire.
Figure 47.3 shows the scene rendered with iray.
FIGURE 47.3 Using the Unlimited option lets the iray renderer keep running as long as it can.

Accessing mental ray Preferences
In the Preference Settings dialog box is a panel of global mental ray settings, shown in Figure 47.4. In this panel, you can select to Enable mental ray Extensions. These extensions add some additional controls to several of the various mental ray panels.
When the Scanline Renderer renders a scene, it progresses one line of pixels at a time down the image, but mental ray renders the image by breaking it up into blocks and rendering a block at a time. The Show Brackets on Current Buckets option displays white brackets around the current block as the image renders.
FIGURE 47.4 The Preference Settings dialog box includes a panel of mental ray settings.

Note
Multiple white brackets may be visible if you're rendering across a network or using a computer with multiple processors.
The Show Visual Final Gather Progress option displays a rough approximation of the render scene as it is being rendered before waiting for a Final Gather solution. This gives you a quick look at the scene before it computes a Final Gather solution. You can also select to clear the frame before rendering.
The Messages section lets you specify which messages are displayed as the file renders. Options include Errors, Log Information, Log Progress, Debug Messages, and whether to write this information to a file.
Using mental ray Lights and Shadows
If you look in the Lights category of the Create ![]() Lights
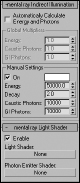
Lights ![]() Standard Lights menu, you'll see two mental ray specific lights: mental ray Area Omni and mental ray Area Spot. These area lights spread light from a defined area in the Area Light Parameters rollout. By default, all mental lights use the Global Settings for their illumination values, but by using the mental ray Indirect Illumination rollout, shown in Figure 47.5, found in the Modify panel, you can override the global settings for the selected light.
Standard Lights menu, you'll see two mental ray specific lights: mental ray Area Omni and mental ray Area Spot. These area lights spread light from a defined area in the Area Light Parameters rollout. By default, all mental lights use the Global Settings for their illumination values, but by using the mental ray Indirect Illumination rollout, shown in Figure 47.5, found in the Modify panel, you can override the global settings for the selected light.
FIGURE 47.5 The mental ray Indirect Illumination rollout lets you define the light settings for individual lights.
Enabling mental ray Shadow Maps
In the Shadows drop-down list of the Shadow Parameters rollout is an option to enable mental ray Shadow Maps. These shadow maps are more accurate than normal shadow maps.
Using mental ray Sun & Sky
If you want to quickly create an outdoor scene and render it using mental ray, then the Daylight system that uses the mr Sun and Sky is an easy quality solution. Before adding the Daylight system to your scene, switch the renderer to mental ray in the Render Setup dialog box. Then add the Daylight system to the scene, and in the Modify panel, select mr Sun in the Sunlight drop-down list and mr Sky in the Skylight drop-down list. When you first select the Daylight system, a dialog box appears recommending that you use the mr Photographic Exposure Control. Click the Yes button to enable this control. When you select the mr Sky option, another dialog box appears, asking if you want to enable the mr Physical Sky environment map. Click Yes to this also.
If you look in the Environment panel, you can see the mr Physical Sky material applied. This material defines how the sky and ground planes look. The default settings look pretty good.
The Daylight system includes controls for positioning the sun in the sky based on a physical location, day of the year, and time of the day. By changing these controls, you can manipulate the sun's position in the sky relative to the scene objects. If the sun appears in the viewport, it is rendered with lens flares, as shown in Figure 47.6.
FIGURE 47.6 The Daylight can be endowed with mr Sun and mr Sky.

When a Sky & Sun system is in place, you can ensure that it displays within the viewport if you open the Views ![]() Viewport Background
Viewport Background ![]() Viewport Background dialog box (Alt+B) and enable the Use Environment Background settings. Make sure also that the Display Background option is set. Using this method makes the Sun & Sky system visible even if the Viewport Shading option is set to Off.
Viewport Background dialog box (Alt+B) and enable the Use Environment Background settings. Make sure also that the Display Background option is set. Using this method makes the Sun & Sky system visible even if the Viewport Shading option is set to Off.
Selecting the sun light object and moving it about the scene or changing the Time and Date parameters automatically updates the background and the scene. This provides a good way to precisely position the sun where you want it, as shown in Figure 47.7. For best results, select the Enable Hardware Shading option in the Lighting and Shadows menu for the viewport shading label.
Using mental ray Sky Portal
If you look closely at the Photometric light category, you'll notice another light type sandwiched between the mr Sky and mr Sun lights. The mr Sky Portal provides a way to focus light streaming into an interior space from an external source using a designated portal. This can be thought of as a sky light that causes all Final Gather light rays to be focused on a specific area. It results in a better Final Gather result with fewer light rays. The Sky Portal is direct light giving you one bounce for free if Final Gather is disabled.
To use a Sky Portal, you must have mental ray enabled, include a skylight or a Sun & Sky system, and have Final Gather turned on. Then simply drag over the area where the window is located, and all light rays entering the interior space are focused on those areas defined by the Sky Portal. The gizmo for the Sky Portal is a simple rectangular box with an arrow pointing in the direction of the light rays. If the light rays are pointing outward, you can use the Flip Light Flux Direction option to change their direction.
FIGURE 47.7 The Sun & Sky system can be viewed and interactively updated in the viewport.

Tip
For better results for interior scenes using exterior lighting, enable the mr Photographic Exposure Control and use the Physically Based Lighting, Indoor Daylight preset.
Within the mr Skylight Portal Parameters rollout, you can enable or disable the Sky Portal. A Multiplier value and a Filter Color work just like other lights. If the image appears grainy, you can increase the Shadow Samples value to remove any splotchy effect on the walls, but this increases the render time. Within the Advanced Parameters rollout, the Visible to Renderer makes the Sky Portal visible in the rendered image, causing exterior objects to be blotted out.
You also can set the Color Source to Use the Scene Environment if you want light to be pulled from the environment map. Sky Portals also support HDRI maps as lighting sources. Figure 47.8 shows a house interior lighted using mental ray, Final Gather, and two Sky Portals.
FIGURE 47.8 Sky Portals can focus all rays coming from an external light source to speed up Final Gather passes.

Understanding Caustics and Photons
Light properties for the mental ray renderer include four unique properties: Energy, Decay, Caustic Photons, and Global Illumination (GI) Photons. You can find the settings for these properties in the mental ray Indirect Illumination rollout. Before learning about these properties, you need to understand what caustics and photons are.
Caustics are those strange glowing lines that you see at the bottom of an indoor swimming pool caused by the light refracting through the water. Caustics are common in nature, and now with mental ray you can add these effects to your scenes. Photons are small bundles of light energy, and like the raytracing rays, they are emitted from a light source with a given amount of energy. This energy is lost as the photon travels and as it hits objects in the scene.
The Energy value is the amount of light energy that each photon starts out with, and the Decay value specifies how quickly that energy dissipates. The number of Caustic and GI Photons determines the resulting accuracy of the lighting. More photons yield a better solution, but the greater number also increases the render time substantially. The Multiplier and color swatch lets you set the intensity and color of the caustics.
Figure 47.9 shows a swimming pool with caustics glowing on the side of the wall. The left image shows the pool scene with caustics disabled, and the right image shows them enabled.
To get caustics to work in your scene, you need to add a Raytrace, Flat Mirror, or Reflect/Refract map to the Reflection map channel for the material that you want to generate caustics.
FIGURE 47.9 This indoor swimming pool scene is rendered without caustics (left) and with caustics (right).

Tutorial: Using Caustic Photons to create a disco ball
When using the mental ray renderer, you can see the caustic photons as they are reflected around the room to help you determine the correct settings you need, but these photons themselves can be used to make a good disco ball effect.
Tip
A common way to get a good, crisp caustic effect is to use significantly more photons than you would need for global illumination—on the order of millions of photons—for good results.
To create a disco ball effect using caustic photons, follow these steps:
- Open the Disco ball.max file from the Chap 47 directory on the CD.
This file includes a simple room.
- Open the Render Scene dialog box (F10), and switch the Production Renderer in the Assign Renderer rollout of the Common panel to the mental ray renderer.
- Select Create
 Standard Primitives Sphere, and click in the Top viewport to create a sphere positioned toward the top of the room.
 - Press the M key to open the Slate Material Editor, double-click on the Standard material in the Material/Map Browser, and then double-click on the Raytrace map type in the Material/Map Browser. Then drag on the output socket for the Raytrace map and drop on the Reflection parameter. Then double-click the Standard material node to make its parameters appear, enable the Faceted option in the Shader Basic Parameters rollout; set the Opacity to 50, the Specular Level to 95, and the Glossiness to 30; and drag the standard material's output socket to the sphere object.
- Select Create Lights Standard Lights mr Area Omni, and click in the Top viewport to create four lights that surround the sphere object. From the main menu, select the Tools Light Lister option where you can quickly change the Multiplier value for each of the lights to 0.3. Then, using the Move tool, offset each light vertically from the others.
- Select and right-click on each of the lights and open the Object Properties dialog box from the pop-up quadmenu. Open the mental ray panel in the Object Properties dialog box and enable the Generate Caustics option for each light.
- Open the Render Scene dialog box (F10). In the Indirect Illumination panel, locate the Caustics section. Enable the Caustics option, set the Multiplier to 10, enable the Maximum Sampling Radius option, and set the Maximum Sampling Radius value to 1.0. At the bottom or the Caustics and Global Illumination (GI) rollout, enable the All Objects Generate and Receive GI & Caustics option. Then click the Render button.
Note
If the caustics aren't visible, make sure the Use Advanced Lighting option in the Render Setup dialog box is enabled.
Figure 47.10 shows the resulting disco scene with thousands of lights visible on the walls.
FIGURE 47.10 This disco ball simply reflects the caustic photons around the room.

Enabling caustics and global illumination for objects
Another “gotcha” when dealing with caustics and global illumination is that each object can be specified to generate and/or receive caustics and global illumination. These settings are found in the mental ray panel of the Object Properties dialog box, shown in Figure 47.11. This dialog box can be opened using the Edit ![]() Properties menu command. If your scene isn't generating caustics and you can't figure out why, check this dialog box, because the Generate Caustics option is disabled by default. There is also an option to exclude the object from caustics and from GI.
Properties menu command. If your scene isn't generating caustics and you can't figure out why, check this dialog box, because the Generate Caustics option is disabled by default. There is also an option to exclude the object from caustics and from GI.
The mental ray panel in the Object Properties dialog box also includes settings so that you can configure how the object is treated during the Final Gather pass. Using the Return Black or Pass Through options, you can make the object unshaded or invisible to the final gather.
FIGURE 47.11 The Object Properties dialog box includes options for generating and receiving caustics and global illumination.

Tip
The Indirect Illumination panel of the Render Scene dialog box includes an option that can be used to cause All Objects to Generate and Receive Caustics and GI. Enabling this option enables these options for all objects regardless of their Object Properties settings.
Controlling Indirect Illumination
In addition to the light settings, you can set many of the properties that control how caustics, global illumination, and Final Gather are computed in two rollouts of the Indirect Illumination panel of the Render Scene dialog box, shown in Figure 47.12. These two rollouts are the Final Gather rollout and the Caustics and Global Illumination (GI) rollout.
FIGURE 47.12 The Indirect Illumination panel includes settings for caustics, GI, and Final Gather.

The Final Gather rollout is split into two parts. The top part features a set of Basic settings with several Presets that take the guesswork out of the settings. Simply choose one of the presets from the drop-down list, and all the key settings are automatically made for you. The preset options include Draft, Low, Medium, High, and Very High. The Multiplier and color swatch changes the intensity and color of the indirect light. The Weight value sets how much indirect light affects the Final Gather solution.
For caustics and for global illumination, the Maximum Number of Photons per Sample value determines how the caustic photons are blended. A higher value results in more blending and softer edges. The Maximum Sampling Radius value sets the size of each photon. This value is set automatically depending on the size of the scene. However, you can enable the Radius value and enter a new value manually.
The Volumes setting is used by Volume material shaders to set the photon's size. The Trace Depth settings determine the maximum number of reflections and refractions that a photon can take before it is ignored.
Photon and Final Gather maps can take a while to generate for a complicated scene, but once computed, they can be saved and reloaded. These files are saved using the .pmap and .fgm extensions. To generate a photon map, click the Generate Photon Map Now, or to generate a final gather map, click the Generate Final Gather Map Now button.
Final Gather sends out rays to a scene that has computed caustics and global illumination already and computes the light at that location. All these rays are then combined to produce a total lighting picture of the scene and then blended to help fix any lighting abnormalities that may exist in the scene. The Samples value determines how many rays are cast into the scene. The Final Gather lighting pass can then be saved to a file after it is computed.
Rendering control
The core rendering settings for the mental ray renderer are contained within the Renderer panel of the Render Scene dialog box, shown in Figure 47.13. Using these settings, you can increase the speed of the renderer (at the expense of image quality).
FIGURE 47.13 The Renderer panel includes several rollouts of settings for controlling the mental ray renderer.

The Sampling settings are used to apply an anti-aliasing pass to the rendered image. These samples can be filtered, and you can control the details of the contrast between the samples. The Bucket Width is the size of the blocks that are identified and rendered. Smaller buckets do not take as long to render and provide quicker feedback in the Render window.
The mental ray renderer uses several different algorithms, and you can specify which ones to ignore in order to speed up the rendering cycle in the Rendering Algorithms rollout. If a needed algorithm is disabled, the features that rely on that algorithm are skipped. You can also set the Trace Depth for Reflections and Refractions and control the Raytrace Acceleration values.
When a preview render is rendered in the Rendered Frame Window while mental ray is enabled, an additional panel of options appears below the window as shown in Figure 47.14. The options on this panel let you quickly adjust the precision value for the Antialiasing, Soft Shadows, Final Gather Precision, Reflection, and Refraction settings. You also can speed the re-render by reusing the Geometry and Final Gather solutions if they haven't changed. The Render button lets you re-render the scene immediately.
Advanced mental ray
The mental ray renderer also includes many additional features that you can take advantage of, including Depth of Field, Motion Blur, Contours, Displacement, and Camera Shaders. The settings for these additional features are located in rollouts at the bottom of the Renderer panel. For example, if you add the Glare map to the Output map in the Camera Shader section, then you can get a strong glare from light in the scene, as shown for the house interior in Figure 47.15.
FIGURE 47.14 When mental ray is rendered in the Render Frame Window, a panel of options appears below for tweaking the image.

FIGURE 47.15 Placing the Glare map in the Output Camera Shader, you can get a strong glare from the light in the window.

Using mental ray proxies
Complex scenes can have hundreds of objects and when rendered in mental ray, single frames can take several hours to render. This can make it tough to get previews to test lighting and atmospheric effects. If you know that the objects look fine, then you can use the mental ray proxy object to replace multiple objects or a single high-resolution object with a proxy.
To use a mental ray proxy object, add a mr proxy object to the scene using the Create ![]() mental ray
mental ray ![]() mr Proxy menu command. Select the Modify panel and click on the Source Object button, then select the object that you want to replace with the proxy.
mr Proxy menu command. Select the Modify panel and click on the Source Object button, then select the object that you want to replace with the proxy.
Note
You can only select the source object in the Modify panel.
When the source object is selected, you can save the object to a file. Source objects are saved as .mib files. The object is then displayed within the scene as a point cloud or as a bounding box, and a preview of the source object is displayed in the Parameters rollout. You also can change the number of vertices that are displayed in the viewports.
When the scene is rendered, the source object file is read in and used for the render.
Summary
If you're looking for a rendering option that perfectly calculates reflections, refractions, and transparencies, then the mental ray renderer is what you need. iray is another option for rendering when you aren't sure how to configure mental ray.
In this chapter, you accomplished the following:
- Learned to enable the mental ray and iray renderers
- Used the iray renderer to progressively render complex scenes
- Created mental ray lights
- Worked with caustics and photons
- Used mental ray proxies
Now that I've told you how to overload the rendering engine, the next chapter offers a way to get some help by batch rendering and rendering over the network.