Chapter 6: Upgrading WordPress
In This Chapter
![]() Finding upgrades notifications
Finding upgrades notifications
![]() Backing up your database before upgrading
Backing up your database before upgrading
![]() Deactivating plugins
Deactivating plugins
![]() Upgrading from the dashboard
Upgrading from the dashboard
![]() Upgrading manually
Upgrading manually
In Book I, Chapter 3, the schedule of WordPress development and release cycles shows you that WordPress releases a new version (upgrade) of its platform roughly once every 120 days (or every 4 months). That chapter also explains why you need to keep your WordPress software up-to-date by using the most recent version for security purposes, mostly, but also to make sure you’re taking advantage of all the latest features the WordPress developers pack within every major new release.
In this chapter, you discover the WordPress upgrade notification system and find out what to do when WordPress notifies you that a new version is available. This chapter also covers the best practices to upgrade the WordPress platform on your site to ensure the best possible outcome (that is, how not to break your website after a WordPress upgrade).
 The upgrade process occurs on a regular basis, at least three or four times per year. For some users, this is a frustrating reality of using WordPress. However, this active development environment is part of what makes WordPress the most popular platform available. Because WordPress is always adding great new features and functions to the platform, upgrading always ensures that you’re on top of the game and using the latest tools and features.
Getting Notified of an Available Upgrade
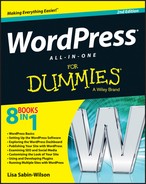
After you install WordPress and log in for the first time, you can see the version number on the WordPress Dashboard, as shown in Figure 6-1. (Note that I’ve scrolled down in the figure.) Therefore, if anyone asks what version you’re using, you know exactly where to look to find out.
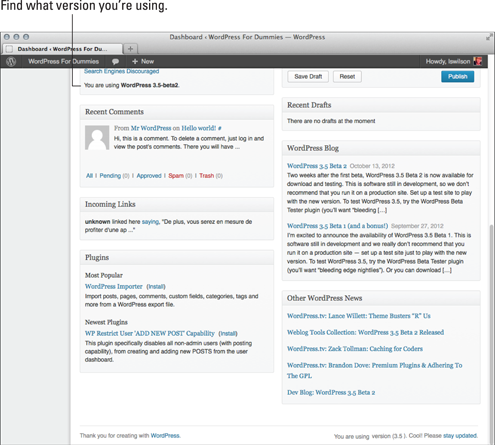
Figure 6-1: The WordPress version displayed in the Dashboard.
Say you have WordPress installed and you’ve been happily publishing content to your website with it for several weeks, maybe even months, and then one day you log in to your Dashboard and see a message at the top of your screen you’ve never seen before that reads, “WordPress X.X.X is available! Please update now.” (Figure 6-2 shows the message and a small black circle, or notification bubble, on the left side of the page.)
Both the message at the top of the page and the notification bubble on the Dashboard menu are visual indicators that you’re using an outdated version of WordPress and that you can (and need to) upgrade the software.
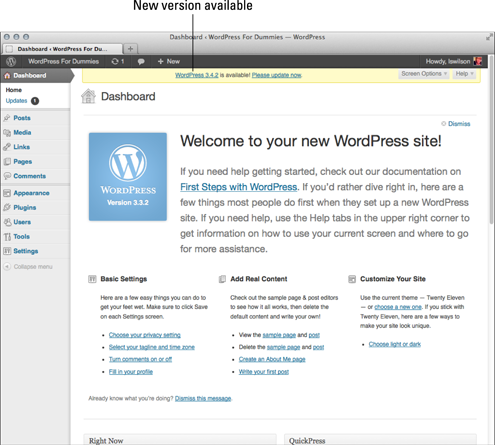
Figure 6-2: A Dash- board notification of an available WordPress upgrade.
The message at the top of your Dashboard includes two links that you can click for more information. (See Figure 6-2.) The first is a link called WordPress 3.x. Clicking this link takes you to the WordPress Codex page titled Version 3.x, which is filled with information about the version upgrade, including
![]() Installation/upgrade information
Installation/upgrade information
![]() Summary of the development cycle for this version
Summary of the development cycle for this version
![]() List of files that have been revised
List of files that have been revised
The second link, Please Update Now, takes you to another page in the WordPress Dashboard — the WordPress Updates page, as shown in Figure 6-3.
Figure 6-3: The WordPress Updates page.
At the very top of the WordPress Updates page is another important message for you:
Important: before updating, please backup your database and files. For help with updates, visit the Updating WordPress Codex page.
Both links in the message take you to pages in the WordPress Codex that contain helpful information on creating backups and updating WordPress.
 Book II, Chapter 7 has extensive information on how to back up your WordPress website, content, and files.
The WordPress Updates page tells you that an updated version of WordPress is available. You can update two ways:
![]() Automatically, by using the built-in WordPress updater
Automatically, by using the built-in WordPress updater
![]() Manually, by downloading the files and installing them on your server
Manually, by downloading the files and installing them on your server
These ways to update are discussed later in the chapter.
Backing Up Your Database
Before upgrading your WordPress software installation, make sure you back up your database. This step isn’t required, of course, but it’s a smart step to take to safeguard your website and ensure you have a complete copy of your website data in the event that your upgrade goes wrong.
The best way to back up your database is to use the MySQL administration interface provided to you by your web hosting provider. (Book II, Chapter 4 takes you through the steps of creating a new database by using the phpMyAdmin interface.)
cPanel is a web hosting interface provided by many web hosts as a web hosting account management tool that contains phpMyAdmin as the preferred tool to use to manage and administer databases. Not all web hosts use cPanel or phpMyAdmin, however, so if yours doesn’t, you need to consult the user documentation for the tools that your web host provides. The instructions in this chapter use cPanel and phpMyAdmin.
The following takes you through the steps of creating a database backup, using the phpMyAdmin interface:
1. Log in to the cPanel for your hosting account.
Typically, browse to http://yourdomain.com/cpanel to bring up the login screen for your cPanel. Enter your specific hosting account username and password in the login fields and click OK to log in.
2. Click the phpMyAdmin icon.
The phpMyAdmin interface opens and displays your database.
3. Click the name of the database that you want to back up.
If you have more than one database in your account, the left-side menu in phpMyAdmin displays the names of all of them. Click the one you want to back up; the database loads in the main interface window.
4. Click the Export tab at the top of the screen.
The page refreshes and displays the backup utility page.
5. Select the Save as File check box.
6. Select the option labeled zipped.
This compiles the database backup file in a .zip file and prepares it for download.
7. Click the Go button.
A pop-up window appears, allowing you to select a location on your computer to store the database backup file.
8. Click the Save button to download it and save it to your computer.
Book II, Chapter 7 contains in-depth information on making a complete backup of your website, including all your files, plugins, themes, and images. For the purposes of upgrading, a database backup is sufficient, but be sure to check out that chapter for valuable information on extensive backups, including how to restore a database backup in case you ever need to go through that process.
Upgrading WordPress Automatically
WordPress provides you with an easy, quick, and reliable method to update the core software from within your Dashboard. I recommend using this option whenever possible to make sure you are accurately updating the WordPress software. To update WordPress automatically, follow these steps:
1. Back up your WordPress website.
Backing up your website before updating is an important step in case something goes wrong with the upgrade. Give yourself some peace of mind knowing that you have a full copy of your website that can be restored, if needed. My advice is not to skip this step under any circumstances. If you’re not sure how to back up, back up (pun intended!) to the previous section.
2. Deactivate all plugins.
This step prevents any plugin conflicts caused by the upgraded version of WordPress from affecting the upgrade process, and it ensures that your website won’t break after the upgrade is completed. More information on working with and managing plugins can be found in Book VII; for the purposes of this step, you can deactivate plugins by following these steps:
a. On the Dashboard, hover your pointer over Plugins on the navigation menu and click the Installed Plugins link.
The Plugins page appears.
b. Select all plugins by selecting the check box to the left of the plugin names listed on that page. (See Figure 6-4.)
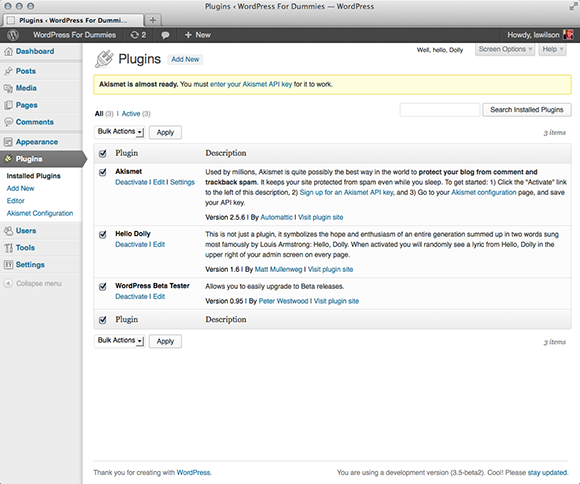
Figure 6-4: The Plugins page with all plugins selected, ready to deactivate.
c. In the drop-down list at the top, select Deactivate.
d. Click the Apply button.
3. Choose Dashboard⇒Updates.
The WordPress Updates page appears.
4. Click the Update Automatically button.
The Update WordPress page appears with a series of messages (as shown in Figure 6-5).
5. Click the Go to Dashboard link.
The Dashboard page appears in your web browser. Notice that both the update alert message at the top of the site and the notification bubble on the Dashboard menu are no longer visible. Your WordPress installation is now using the latest version of WordPress.
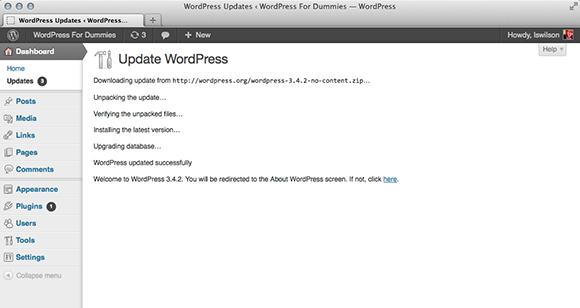
Figure 6-5: WordPress update messages.
After you complete the WordPress software upgrade, you can revisit the Plugins page and reactivate the plugins you deactivated in Step 2 (Figure 6-4) in the above list.
Upgrading WordPress Manually
The second and least used method of upgrading WordPress is the manual method. The method is least used mainly because the automatic method, discussed in the preceding section, is so quick and easy to accomplish. However, certain circumstances — probably related to the inability of your hosting environment to accommodate the automatic method — exist where you have to manually upgrade WordPress.
To upgrade WordPress manually, take these steps:
1. Back up your WordPress website and deactivate all plugins.
Refer to Steps 1 and 2 in the preceding “Upgrading WordPress Automatically” section.
2. Navigate to the WordPress Updates page by clicking the Please Update Now link.
3. Click the Download button.
A dialog box opens that allows you to save the .zip file of the latest WordPress download package to your local computer, as shown in Figure 6-6.
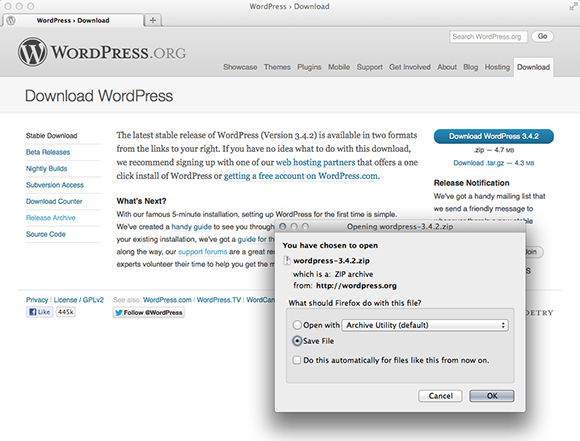
Figure 6-6: Downloading the WordPress files to your local computer.
4. Select a location to store the download package and click Save.
The .zip file downloads to your selected location on your computer.
5. Browse to the .zip file on your computer.
6. Unzip the file.
Use a program like WinZip (www.winzip.com).
7. Connect to your web server via FTP.
See Book II, Chapter 2 for a refresher on how to use FTP.
8. Delete all the files and folders in your existing WordPress installation directory except the following:
• /wp-content folder
• .htaccess
• wp-config.php
9. Upload the contents of the /wordpress folder to your web server — not the folder itself.
Most FTP client software lets you select all the files to drag and drop them to your web server. Other programs have you highlight the files and click a Transfer button.
10. Navigate to the following URL on your website: http://yourdomain.com/wp-admin.
Don’t panic — your database still needs to be upgraded to the latest version; so instead of seeing your website on your domain, you see a message telling you that a database upgrade is required, as shown in Figure 6-7.
11. Click the Upgrade WordPress Database button.
WordPress initiates the upgrade of the MySQL database associated with your website. When the database upgrade is complete, the page refreshes and displays a message that the process has finished.
12. Click the Continue button.
Your browser loads the WordPress login page. The upgrade is complete, and you can continue using WordPress with the newly upgraded features.
If you’re uncomfortable with performing administrative tasks, such as upgrading and creating database backups, you can hire someone to perform these tasks for you — either a member of your company (if you are a business) or a WordPress consultant skilled in the practice of performing these tasks. Book I, Chapter 4 includes a listing of experienced consultants who can lend a hand.
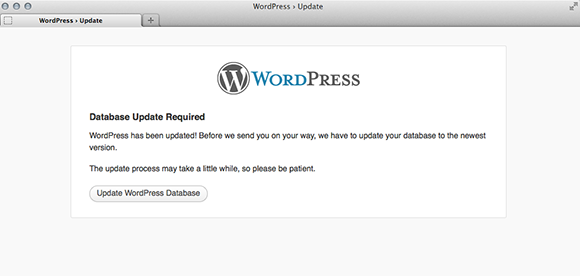
Figure 6-7: Click the button to upgrade your WordPress database.