Chapter 4: Modifying Existing Plugin Code
In This Chapter
![]() Avoiding problems with plugin modifications
Avoiding problems with plugin modifications
![]() Removing plugin features
Removing plugin features
![]() Modifying plugin output
Modifying plugin output
![]() Changing shortcode names
Changing shortcode names
WordPress has more than 22,000 plugins on the Plugin Directory, so you would think that you could find a plugin to do everything you could possibly need on your WordPress website. However, not even the best plugins can meet the needs of every user.
This chapter explores the idea of taking an existing plugin and tweaking it to meet your specific needs. With a little bit of programming knowledge and some determination, modifying existing plugin code is very possible. Although you won’t become a full-fledged developer overnight, making changes to existing plugins can definitely get the mental gears spinning on how you can do more and more with your programming knowledge.
The examples in this chapter are simple, offering a basic introduction to modifying plugins. The next chapter goes into much more depth with regards to plugin development.
Setting the Foundation for Modifying Plugins
Before you start modifying plugins, you should do the following:
![]() Set up a development site. That way, if you accidentally break your site, no harm is done.
Set up a development site. That way, if you accidentally break your site, no harm is done.
![]() Display error messages. By default, most WordPress sites hide error messages. However, you want to see those messages when developing plugins because they can provide you valuable feedback.
Display error messages. By default, most WordPress sites hide error messages. However, you want to see those messages when developing plugins because they can provide you valuable feedback.
Find the wp-config.php file (it's in the main WordPress installation on your web server) and change WP_DEBUG define (scroll to the bottom of the file) from false to true. Your error message information will now display.
 For more details about
 WP_DEBUG, see the WordPress Codex page on the topic: http://codex.wordpress.org/WP_DEBUG.
![]() Set up a non-WordPress editor. You don’t want to use the editors built into WordPress. Although they’re convenient, they can introduce bugs in the PHP code that can cause your entire site to break, including the ability to edit the PHP file. Thus, you should use an editor on your own computer or on the server to modify the files so that problems can be quickly fixed without requiring large amounts of work.
Set up a non-WordPress editor. You don’t want to use the editors built into WordPress. Although they’re convenient, they can introduce bugs in the PHP code that can cause your entire site to break, including the ability to edit the PHP file. Thus, you should use an editor on your own computer or on the server to modify the files so that problems can be quickly fixed without requiring large amounts of work.
 All code is covered by copyright. For a plugin to be added to the Plugin Directory, the code needs to use the GPLv2 license or above. Any code in the Plugin Directory is available for you to use, modify, and even redistribute with the only limitation being that your modified code must also use the same licensing as the original code. Book I, Chapter 2 covers licensing and the GPL.
It is important to know that when you start making changes, you’re on your own. You can no longer just update the plugin to gain access to bug fixes or new features. To update to a newer version of the plugin, you would have to download the latest version of the code and modify it again to have your desired changes.
Because WordPress supports updating plugins automatically, you want to ensure that you don’t accidentally update a modified plugin and lose your modifications. To prevent such a situation from happening, do the following:
![]() Change the name of the plugin’s directory. The directory name is used as the basis for determining what to sync the plugin to for update purposes. By changing the directory name to something different, the plugin will no longer be a candidate for automatic updates. Make sure that you pick a name that doesn’t exist in the Plugin Directory. You can verify that you have a unique name by trying to go to
Change the name of the plugin’s directory. The directory name is used as the basis for determining what to sync the plugin to for update purposes. By changing the directory name to something different, the plugin will no longer be a candidate for automatic updates. Make sure that you pick a name that doesn’t exist in the Plugin Directory. You can verify that you have a unique name by trying to go to
http://wordpress.org/extend/plugins/new-directory-name
where new-directory-name is replaced by the name you want to use for your directory. Note that after you change the name of the directory, the plugin needs to be activated again.
![]() Modify the name of the plugin. Although this isn’t strictly necessary, it does help ensure that the plugin stands out on its own. Even simply adding “(modified)” to the name helps ensure that the modified version is kept separate from the normal version of the plugin. It also serves as a reminder to you that the plugin is modified and shouldn’t be treated as a normal plugin. In other words, it’s a reminder to take care when deciding to update or delete the plugin.
Modify the name of the plugin. Although this isn’t strictly necessary, it does help ensure that the plugin stands out on its own. Even simply adding “(modified)” to the name helps ensure that the modified version is kept separate from the normal version of the plugin. It also serves as a reminder to you that the plugin is modified and shouldn’t be treated as a normal plugin. In other words, it’s a reminder to take care when deciding to update or delete the plugin.
![]() Add your name to the listing of plugin authors. This helps people know where to send questions about the plugin. This is especially important if the modified plugin is redistributed or the plugin is used in an environment with many users.
Add your name to the listing of plugin authors. This helps people know where to send questions about the plugin. This is especially important if the modified plugin is redistributed or the plugin is used in an environment with many users.
Removing Part of a Form
One of the easiest modifications to make is removing something from an existing plugin.
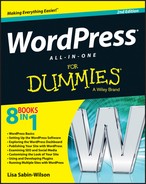
The All in One SEO Pack plugin, available at http://wordpress.org/extend/plugins/all-in-one-seo-pack, provides a large number of settings to control the SEO features for each post and page. Imagine that you manage this site and a number of editors and authors frequently ask questions about how to use the keywords input found on all post and page editors (as shown in Figure 4-1). You've decided that the keywords aren't important to the site and would like to avoid all the questions from the editors and authors. So, you want to remove the input that shows on the page editors.
Figure 4-1: The All in One SEO Pack post/page-specific settings before making any modifications.
Follow these steps:
1. Search through the plugin’s files for a match for the word: Keywords (comma separated).
I searched for "Keywords (comma separated)" because this is a unique string to find inside the plugin's code. After digging around in the files, I found the section responsible for this form in the plugin's aioseop_functions.php file.
2. Remove the necessary lines.
In the section of code that adds that setting, you can find a portion of an HTML table, which looks like this:
<tr>
<th scope="row" style="text-align:right;"><?php _e('Keywords (comma separated):', 'all_in_one_seo_pack') ?></th>
<td><input value="<?php echo $keywords ?>" type="text" name="aiosp_keywords" size="62"/></td>
</tr>
To properly make the modification, all four of those lines must be removed.
3. Save the modification and upload the change to the server.
The editor page now looks like Figure 4-2.

Figure 4-2: The All in One SEO Pack post/page-specific settings after the removal of the Keywords setting.
After making this change, load your website in your browser to make sure your site still loads with no error messages displayed to ensure that nothing is now broken due to this modification. Save a variety of settings for the SEO feature and ensure that the modifications still take effect after the settings are saved.
Modifying the Hello Dolly Lyrics
The Hello Dolly plugin is included with WordPress and is an easy plugin to modify. If you don’t have this plugin installed on your site, you can find it in the Plugin Directory at
http://wordpress.org/extend/plugins/hello-dolly
In the hello.php file of the plugin is a variable named $lyrics that stores the lyric lines of the Hello Dolly song. By replacing this text with your own text, you can change the random selection of a Hello Dolly lyric line to anything you desire.
For example, the $lyrics variable can be replaced in its entirety with new text, such as this:
$lyrics = "I love WordPress All In One.
There's a plugin for that.";
When changing the lyrics, ensure that all the lyrics text is replaced; otherwise, you can accidentally introduce an error to the code.
After the modification is in place, the Hello Dolly plugin will now say either “I love WordPress AIO” or “There’s a plugin for that.” Figure 4-3 shows the end result of this modification. Notice the message toward the top right of the screen.
When a string (a portion of code that is contained inside quotes) is used just for output, it is typically safe to modify the text without creating any bugs or other issues with the plugin. By changing a string’s text, you can change the output of the plugin without much effort.
WordPress has a built-in mechanism to replace strings in code with new strings. This feature is called localization and is typically used to change text into another language. As long as the plugin properly uses the localization functions for all its output strings, you can use this feature to change specific strings as desired, even if you simply change the words used rather than the language. This feature is discussed in Chapter 6 of this minibook.

Figure 4-3: The modified Hello Dolly plugin now declares that it loves WordPress All In One.
Changing a Shortcode’s Name
Sometimes shortcodes have hard-to-remember names. This problem typically comes up because the plugin author is trying to avoid creating conflicts with other plugins by using the same shortcode name. Although this is a good practice because it helps avoid code conflicts, it can be annoying to look up a shortcode’s name each time you want to use it.
The Posts in Page plugin (available at http://wordpress.org/extend/plugins/posts-in-page/installation) provides an example of how shortcodes can be hard to remember. It comes with two shortcodes: ic_add_post and ic_add_posts. From a developer standpoint, these names make sense because the plugin author is IvyCat. Thus, the initials ic are used to prefix each shortcode name, helping ensure that the shortcode names are unique. From a user standpoint, it just causes frustration.
A nice feature of shortcodes is that the code that handles the shortcode can be connected to multiple names. This means that you can add extra names for a shortcode rather than simply changing the old name to a new name. Adding a second name is helpful because it prevents any existing uses of the old shortcode name from breaking after the change.
Searching through the plugin's files for add_shortcode — the function that creates new shortcodes — shows that the shortcodes are created in the posts_in_page.php file. The two lines of code that create the current shortcodes are as follows:
add_shortcode( 'ic_add_posts', array( &$this, 'posts_in_page' ) );
add_shortcode( 'ic_add_post', array( &$this, 'post_in_page' ) );
The new name for ic_add_posts will be show-posts. The new name for ic_add_post will be show-post. To add these shortcodes, simply copy and paste the original two add_shortcode function calls and then modify each shortcode name to be the new name. After making the changes, the section of code now looks like the following:
add_shortcode( 'ic_add_posts', array( &$this, 'posts_in_page' ) );
add_shortcode( 'show-posts', array( &$this, 'posts_in_page' ) );
add_shortcode( 'ic_add_post', array( &$this, 'post_in_page' ) );
add_shortcode( 'show-post', array( &$this, 'post_in_page' ) );
The functionality is exactly the same as the ic_add_posts shortcode; it simply has a name that you can more easily remember.
It is possible to register additional names for a specific shortcode without having to modify the shortcode's plugin code. You can accomplish this registration by creating a custom plugin that simply has the add_shortcode function call that connects the new shortcode name with the callback function name (the second argument of the function). Creating new plugins is discussed in the next chapter.