Chapter 7: Plugin Tips and Tricks
In This Chapter
![]() Using a plugin template
Using a plugin template
![]() Making your plugin pluggable
Making your plugin pluggable
![]() Enhancing plugins with CSS and JavaScript
Enhancing plugins with CSS and JavaScript
![]() Custom post types
Custom post types
![]() Exploring little-known useful hooks
Exploring little-known useful hooks
![]() Using custom shortcodes
Using custom shortcodes
When you have a WordPress plugin or two under your belt, you’ll discover that you want to interact with many more parts of WordPress. WordPress is constantly coming out with new functionality and, with it, new API (Application Programming Interface) hooks, known as action and filter hooks, covered in Chapter 5 of this minibook. This chapter discusses some of this functionality and offers you some ways to extend your use of WordPress plugins. Because this functionality involves some simple programming skills, I assume (for the purposes of this chapter) that you have some basic PHP and WordPress plugin development knowledge.
Using a Plugin Template
When you start writing WordPress plugins, you find that you spend a significant amount of time rewriting the same things. Typically, most plugins have the same basic structure and are set up the same way, meaning that they all deal with settings pages, storing options, and interacting with particular plugins, among other things. You can save hours of work each time you start a new plugin if you create a template.
Such a template varies from person to person, depending on programming styles, preferences, and the types of plugins you want to include. For instance, if you often write plugins that use your own database tables, you should include tables in your template. Similarly, if your plugins almost never require options pages, leave those out of your template.
To create your own template, determine what functionality and structure your plugins usually contain. Follow these steps:
1. Create your file structure.
As you write more plugins, you find yourself repeating the same general filenames. If you find that you’re including enough JavaScript and CSS in your plugins to necessitate their own files or directories, include these in your template. For example, if you’re using a lot of JavaScript or CSS, you could modify the file structure of your plugin template to look something like the one shown in Figure 7-1.

Figure 7-1: The recommended file structure for a plugin.
2. Determine what functionality you generally have in your plugins.
If you usually contain masses of code in a class, you can set up a basic class for your plugin template. Likewise, if your plugins typically have a single options page or a system of top-level and submenu pages, you can set up a general template.
3. Create your primary plugin PHP file.
Usually, this file just contains some general add_action calls, file includes, and other general initializations. (Check out Chapter 5 of this minibook for information on add_action calls and other plugin functions.) If you always call certain actions, set them up in your primary plugin PHP file template. For instance, if you always register a plugin function to be run when the plugin is activated (register_activation_hook) and add a menu item for the plugin in the Dashboard (admin_menu), add those calls to your primary template.
<?php
$myInstance = new myPlugin();
add_action('register_activation_hook','my_activation_plugin'),
add_action('admin_menu',array($myInstance, 'admin_menu'));
?>
4. Set up the functions you use most often in the body of your primary plugin PHP file, after you add them in Step 3.
The line of code used here — function my_activation_plugin — was added in Step 3 through the use of the add_action hook. In your plugin template, you define any scripts your plugin uses by adding this function, which then fires when a user activates the plugin:
<?php
function my_activation_plugin(){
//plugin activation scripts here
}
?>
5. (Optional) Create your basic class structure.
To do this, you might add a few lines of code that resemble the following:
<?php
class myPlugin {
var $options = ;
var $db_version = '1';
function myPlugin() {
add_action('admin_init',array($this,'admin_init'),
}
function admin_init(){
//admin initializations
}
function process_options($args,$data){
//process our options here
}
function admin_menu(){
//code for admin menu
}
function __construct(){
//PHP 5 Constructor here
}
} //end class
?>
Obviously, your class template may be more detailed than that, depending on your particular coding styles and the types of plugins you like to write.
In addition to these steps, you might want to set up a basic plugin options page along with plugin options management scripts. Everyone uses different techniques for such things as processing plugin options, and after you determine your particular type, include the basic format in your template.
 As your programming style, WordPress, or your interest in different types of plugins changes over time, you will find that your template needs change, too. Make sure that you update your template.
Making Your Plugin Pluggable
The WordPress API provides a great solution for hooking in and extending or modifying its functionality. Sometimes, however, you may find that it would be useful to hook into another plugin, rather than WordPress itself, and extend or modify its functionality instead.
Here's an example of making your plugin pluggable: an issue about interaction (or lack of) between WP e-Commerce (http://getshopped.org) and the All in One SEO Pack plugin. All in One SEO Pack, among other things, adds a custom document title, description, keywords, and canonical URL to each page on a WordPress site. People often ask how to have their plugin modify this information before it displays onscreen. Forum plugins and shopping cart plugins particularly have this need, which All in One SEO Pack could easily satisfy if it would just provide a method of accessing its functionality, which it has — read on.
WP e-Commerce (and other plugins with similar functionality) creates its own virtual pages for product listings, and so on, all contained on a single WordPress page. For example, if you define http://mywebstore.com/shop as the WordPress page WP e-Commerce uses, then http://mywebstore.com/shop/product-name and all other product pages are dynamically created by the WP e-Commerce plugin and are outside the reach of other WordPress plugins. So, WordPress and the All in One SEO Pack plugin don't know about them. You can see the problem that this would create for SEO purposes; WordPress and All in One SEO Pack would think that all these product pages are really the same page as the shop page, with the same titles, canonical URL, and so on. Code could have been written into the plugin to compensate for the needs of the WP e-Commerce, but that would be never ending because there are infinite possibilities for other plugins that may need to hook into the All in One SEO Pack functions. So, the All in One SEO Pack API was born.
The WP e-Commerce plugin has an important need to hook into the document title, meta description, meta keywords, and canonical URL that the All in One SEO Pack plugin produces. Because WordPress and All in One SEO Pack weren't aware of the generated product pages, they all had the same canonical URL, which is detrimental for SEO purposes. The fix was simple. In the All in One SEO Pack plugin, after the canonical URL is generated, and immediately before printing it to the screen, the apply_filters function is used on the variable. This allows WP e-Commerce to use add_filter to hook in and filter the canonical URL, returning the appropriate URL for that page. That is, in the All in One SEO Pack plugin, they added the following:
function prepare_canonical_url(){
$canonical_url = my_determine_canonical_url_function();
$new_canonical_url = apply_filters( 'aioseop_canonical_url',$canonical_url);
return $new_canonical_url;
}
This returns the value of the canonical URL and lets another plugin filter it, if desired, prior to returning the final value.
The part you can now add in the primary WP e-Commerce plugin file (at the end of the file before the closing ?>) is just as simple, and it works the same way add_filter does for hooking into the WordPress API.
add_filter('aioseop_canonical_url','wpec_change_canonical_url'),
function wpec_change_canonical_url($old_url){
$new_url = determine_current_product_page_url($old_url);
return $new_url;
}
This filter provides a simple solution to allow other plugins (and themes) to hook into a plugin, without the need to add code specific to any one plugin.
Enhancing Plugins with CSS and JavaScript
You can add functionality to a plugin in many ways. The following sections look at two methods: CSS styling and JavaScript. You may never develop a plugin that uses either, but it’s still useful to understand how to include them. Chances are good that you, as a budding plugin developer, may need this information at some point.
Calling stylesheets within a plugin
Controlling how your plugin's output looks onscreen (whether in the WordPress Dashboard or on the front end of the website or blog) is best done through a stylesheet. If you've been around web design and HTML, you're probably familiar with CSS (cascading style sheets). Nearly every styling aspect for a website is controlled by a stylesheet, and WordPress is no exception. If you want to read the authoritative guide to stylesheets, visit the W3C.org website at www.w3.org/Style/CSS. (For more on CSS, see Book VI.)
You can use a single stylesheet to control how your Plugin Options page looks on the Dashboard, how your plugin widget looks on the Dashboard, or how your plugin displays information on the front-end website.
 Create and use a separate stylesheet for the plugin within the Dashboard and the plugin’s display on the front end because the stylesheets are called at different times. The back-end stylesheet is called when you’re administering your site on the WordPress Dashboard, whereas the front-end stylesheet is called when a user visits the website. Additionally, it makes management of styling easier and cleaner.
The best practice for adding stylesheets within your plugin is to create a /styles directory — for example, /my-plugin/styles. Place your stylesheets for the back end and front end inside this directory, as shown in Figure 7-2.

Figure 7-2: The file structure for a plugin showing stylesheets.
To call a stylesheet from your plugin, you should use the built-in WordPress wp_enqueue_style function because it creates a queuing system in WordPress for loading stylesheets only when they're needed, instead of on every page. Additionally, it has support for dependencies so you can specify whether your stylesheet depends on another that should be called first. This queuing system is used for scripts, too. Moreover, the wp_enqueue_scripts function does the same for scripts which I discuss a little later in this section.
Say you're creating a gallery plugin to display images on your website. You want your gallery to look nice, so you want to create a stylesheet that controls how the images display. Here's how to call that stylesheet in your plugin using a simple function and action hook (these lines of code get added to your primary plugin PHP file at the end, just before the closing ?> tag):
1. Create a function in your primary plugin PHP file to register your stylesheet and invoke wp_enqueue_style.
function add_my_plugin_stylesheet() {
wp_register_style('mypluginstylesheet', '/wp-content/plugins/my-plugin/styles/site-style.css'),
wp_enqueue_style('mypluginstylesheet'),
}
2. Use the wp_print_styles action hook and call your function.
add_action( 'wp_print_styles', 'add_my_plugin_stylesheet' );
Here’s a breakdown of the hooks in the function:
![]() The
The wp_register_style function registers your stylesheet for later use by wp_enqueue_style.
wp_register_style( $handle, $src, $deps, $ver, $media )
The function has a number of parameters; the first is $handle, which is the name of your stylesheet.

$handle must be unique. You can't have more than one stylesheet with the same name in the same directory.
The second parameter is $src, the path to your stylesheet from the root of WordPress. In this case, it's the full path to the file within the plugin's styles directory.
The remaining parameters are optional. To find out more about them, read the WordPress documentation on this function at http://codex.wordpress.org/Function_Reference/wp_register_style.
![]() The
The wp_enqueue_style function queues the stylesheet.
wp_enqueue_style( $handle, $src, $deps, $ver, $media )
The $handle parameter is the name of your stylesheet as registered with wp_register_style. The $src parameter is the path, but you don't need this parameter because you registered the stylesheet path already. The remaining parameters are optional and explained in the WordPress documentation on this function at http://codex.wordpress.org/Function_Reference/wp_enqueue_style.
![]() The action hook that calls the function uses
The action hook that calls the function uses wp_print_styles to output the stylesheet to the browser.
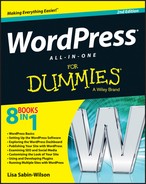
Figure 7-3 shows the plugin stylesheet being called in the <HEAD> section of the site source code.
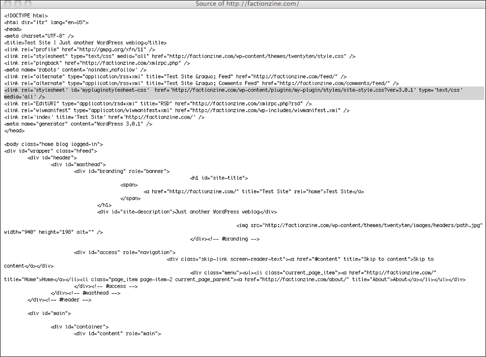
Figure 7-3: The source code of a website showing the plugin stylesheet being called.
Another example uses a stylesheet for the plugin's admin interface, which controls how your plugin option page within the Dashboard will appear. These lines of code also get added to your plugin's primary PHP file (just prior to the closing ?> tag):
add_action('admin_init', 'myplugin_admin_init'),
function myplugin_admin_init() {
wp_register_style('mypluginadminstylesheet', '/wp-content/plugins/my-plugin/admin-styles.css'),
add_action('admin_print_styles' 'myplugin_admin_style'),
function myplugin_admin_style() {
wp_enqueue_style('mypluginadminstylesheet'),
}
}
This example uses some hooks that are specific to the WordPress Dashboard:
![]() The action hook calls
The action hook calls admin_init. This makes sure that the function is called when the Dashboard is accessed. The callback function is myplugin_admin_init.
![]() The function registers the stylesheet, using
The function registers the stylesheet, using wp_register_style.
![]() An action hook calls the
An action hook calls the myplugin_admin_style function. The admin_print_styles hook is used because it's specific to the WordPress Dashboard display.
![]() The function then queues the stylesheet, using
The function then queues the stylesheet, using wp_enqueue_style.
Figure 7-4 shows the plugin stylesheet being called in the source code of the Plugin Options page on the Dashboard.
Calling JavaScript within a plugin
After using the wp_register_style and wp_enqueue_style functions to call stylesheets within a plugin, you can see how similar functions can call JavaScript, which has many uses within a plugin.
JavaScript can control functionality within a form or display something with an effect. WordPress comes with some JavaScript in the core that you can call in your plugin or you can write your own. Like stylesheets, it's best to store JavaScript in a separate subdirectory within your plugin: for example, /my-plugin/javascript.

Figure 7-4: The source code of the Plugin Options page on the Dashboard showing the plugin stylesheet being called.
Instead of using wp_register_style and wp_enqueue_style to register and queue JavaScript, you must use wp_register_script and wp_enqueue_script. They work in much the same way and have much the same parameters. Here's an example to be added to your plugins primary PHP file, near the end before the closing ?> tag:
if ( !is_admin() ) {
wp_register_script('custom_script','/wp-content/plugins/my-plugin/javascript/custom-script.js',);
wp_enqueue_script('custom_script'),
}
Immediately, you notice that the wp_enqueue_script function loads scripts in the front end of your website and on the Dashboard. Because this can cause conflicts with other scripts used by WordPress on the Dashboard display, the "if is not" (!is_admin) instruction tells the plugin to load JavaScript only if it's not being loaded on the Dashboard. This code loads custom-script.js only on the front end of the website (that is, what your site visitors see). You could add a more specific conditional if instruction to load JavaScript only on a certain page.
If you want to load the JavaScript in wp-admin, the action hook admin_init loads your callback function when wp-admin is accessed and the admin_print_script function outputs the script to the browser, just like the stylesheet example.
Custom Post Types
One of the most confusing features of WordPress is custom post types. It is also a useful, powerful, and easy feature to implement and use after you understand how it works. WordPress has five default post types:
![]() Post: The most commonly used post type. Content appears in a blog in reverse sequential time order.
Post: The most commonly used post type. Content appears in a blog in reverse sequential time order.
![]() Page: Similar to a post, but pages don’t use the time-based structure of posts. Pages can be organized in a hierarchy and have their own URLs off the main site URL.
Page: Similar to a post, but pages don’t use the time-based structure of posts. Pages can be organized in a hierarchy and have their own URLs off the main site URL.
![]() Attachment: This special post type holds information about files uploaded through the WordPress Media upload system.
Attachment: This special post type holds information about files uploaded through the WordPress Media upload system.
![]() Revisions: This post type holds past revisions of posts and pages as well as drafts.
Revisions: This post type holds past revisions of posts and pages as well as drafts.
![]() Nav Menus: This post type holds information about each item in a navigation menu.
Nav Menus: This post type holds information about each item in a navigation menu.
A post type is really a type of content stored in the wp_posts table in the WordPress database. The post type is stored in the wp_posts table in the post_type column. The information in the post_type column differentiates each type of content so that WordPress, a theme, or a plugin can treat the specific content types differently.
When you understand that a post type is just a method to distinguish how different content types are used, you can investigate custom post types.
Say you have a website about movies. Movies have common attributes — actors, directors, writers, and producers. But say you don't want to store your movie information in a post or a page because it doesn't fit either content type. This is where custom post types become useful. You can create a custom post type for movies and apply the common attributes of actors, directors, and so on. A theme can handle movies differently than a post or a page by having a custom template for the movies post type and create different styling attributes and templates for the movies post type. You can search and archive movies differently than you can with posts and pages.
Here's how to create a simple custom post type in WordPress by adding these lines of code into the Theme Functions template file (located in the theme file and called functions.php):
add_action('init','create_post_type'), →1
function create_post_type() {
register_post_type( 'movies', →3
array( →4
'labels' => array( →5
'name' => ('Movies'),
'singular_name' => ('Movie'),
'rewrite' => array('slug' => 'movies'),
),
'public' => true,
) →11
);
}
Here’s what’s going on in the code:
→1 The first line is the action hook. This uses 'init' so that it's called on the front end and on the Dashboard to display the custom post type in both.
→3 The callback function starts with the register_post_type function and the custom post type name. This is what creates the custom post type and gives it properties.
→4 Next is an array of arguments that are the custom post type properties.
→5 The 'labels' arguments include the name that displays on the Dashboard menu, the name that will be used (Movies), and what is used for the slug in the URL to the posts (http://yourdomain.com/movies, for example) in this custom post type.
→11 The 'public' argument controls whether the custom post type displays on the Dashboard.
Figure 7-5 shows how the Custom Post Type page and menu item look on the Dashboard. Figure 7-6 shows a custom post type on a website.
Many other arguments associated with register_post_type give this function its real power. For full documentation on all the arguments and the use of this function, check out
http://codex.wordpress.org/Function_Reference/register_post_type
Custom post types are also discussed in detail in Book VI, Chapter 6.

Figure 7-5: A custom post type on the WordPress Dashboard.

Figure 7-6: A custom post type shown on a website.
Using Custom Shortcodes
One of the most common inefficiencies with plugins is when a plugin wants to add information within the body of a post or page. The plugin developer manually creates a bloated filtering function, hooks into the_content (the function tag that calls the body of the content from the database and delivers it to your website), and filters it in an attempt to find the appropriate spot to display the information. Fortunately, WordPress has a built-in solution for this. Using the shortcode API, your users can easily choose where in a given post to display the information your plugin is providing them.
The basic premise is that you have a string of data that your plugin dynamically generates, and you want your users to determine where in each post and page it displays. From your users’ perspective, they will type a shortcode like this within the body of their content in order to display information from a plugin:
[myshortcode]
On the developer side, you just use the add_shortcode function and add it to your primary plugin PHP file:
<?php add_shortcode($tag, $func); ?>
The add_shortcode function accepts two parameters:
![]() The
The $tag parameter is the string that users will type within the body of their content to make a call to the plugin shortcode. (From the previous example, [myshortcode] is what the users type, so your $tag parameter would be myshortcode.)
![]() The
The $func parameter is your callback function (a function that you still need to define in the body of your primary plugin PHP file, covered in the next section) that returns the output of the called shortcode.
The shortcode function gets added to your primary plugin PHP code, near the bottom, before the closing ?> tag:
add_shortcode('myshortcode','my_shortcode'),
function my_shortcode(){
return "this is the text displayed by the shortcode";
}
In this example, you added the shortcode hook add_shortcode('myshortcode','my_shortcode'), and then gave definition to the function ($func) called my_shortcode by telling WordPress to output the text: this is the text displayed by the shortcode.
All your user has to do is type [myshortcode] somewhere in the body of his post/page editor (on the Dashboard, hover your pointer over Post and then click the Add New link), as shown in Figure 7-7. When users view the site, the shortcode the user entered in the body of her post is now translated by WordPress and displays the returned value, or output, of the shortcode function, as shown in Figure 7-8.

Figure 7-7: The post editor showing a simple shortcode.

Figure 7-8: The shortcode is replaced by the returned value of the shortcode function.
Shortcode names must be unique to your own plugin, so you may want to give it a name that is specific to your plugin. For example, if your plugin is called "Super SEO Plugin," you could name your shortcode: [superseoplugincode] in an attempt to make sure that no other plugin uses your shortcode. Another plugin using a shortcode with the same name will cause a conflict.
Shortcodes can include arguments to be passed into the shortcode function.
<?php
add shortcode('myshortcode','my_shortcode'),
function my_shortcode($attr, $content){
return 'My name is ' . $attr['first'] . $attr['last'];
}
Calling this with
[myshortcode first="John" last="Smith"]
outputs My name is John Smith.
Adding Functionality to Profile Filters
WordPress provides four contact methods by default: AIM, Yahoo! IM, and Jabber/Google Talk. These are, of course, extensible, meaning that you can easily add new contact methods through the use of filters. It’s painless to add more, and you can even add on a little extra functionality while you’re at it.
Users fill out their profile data on the WordPress Dashboard by hovering the pointer over Users and then clicking the Your Profile link. (See Book III, Chapter 1.) User profile fields are stored in the WordPress database in the user_metadata table, and you can easily fetch them by using get_the_author_meta('aim') and print them with the_author_meta('aim'). If you add a Twitter Contact Info field, it appears in profiles, and you can use the_author_meta('twitter') template tags in your theme to print the account name.
Figure 7-9 shows the Twitter Contact Info field in a profile within the WordPress Dashboard.
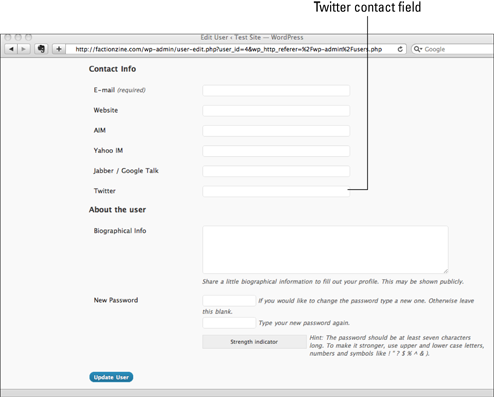
Figure 7-9: Custom Twitter profile field, as shown on the Dashboard.
the_author_meta() template tag has a hook called the_author_{$field}, where the PHP variable $field is the requested meta field assigned to each contact type in the user profile files, such as aim in the previous example. These dynamic hooks are powerful because they allow you to narrow your target.
In this example, I use the dynamic the_author_twitter hook to change the result from "lisasabinwilson" to <a href="http://twitter.com/lisasabinwilson">@lisasabinwilson</a>. When you call the_author_meta('twitter') in your theme, you get a clickable link to my Twitter profile. Start by entering the following lines of code in your Theme Functions file (functions.php) in your active theme folder (add this code toward the bottom of the file before the closing ?> tag):
/**
* Add Twitter to the list of contact methods captured via profiles.
*/
function my_add_twitter_author_meta( $contact_methods ) {
$contact_methods['twitter'] = 'Twitter';
return $contact_methods;
}
add_filter( 'user_contactmethods', 'my_add_twitter_author_meta' );
/**
* Convert staff Twitter accounts to links to twitter.com.
*/
function my_link_author_twitter_accounts( $value ) {
if ( strlen( $value ) ) {
$url = esc_url( 'http://twitter.com/' . $value );
$value = '<a href="' . $url . '">@' . esc_html( $value ) . '</a>';
}
return $value;
}
add_filter( 'the_author_twitter', 'my_link_author_twitter_accounts' );
Correcting Hyperlink Problems
Most websites use underline to style hyperlinks. When producing content in WordPress, highlighting words and phrases quickly to add hyperlinks can lead to hyperlinking (and underlining) the spaces before and after your anchor text.
For some people, this is enough to convince them to hide underlines for hyperlinks, even though that may not be desired.
Here's a snippet that filters through blog post content and ensures that you don't have any spaces on the wrong side of the tag or between a closing tag and punctuation. Add this in your Theme Functions (functions.php) file:
/**
* Prevents underlined spaces to the left and right of links.
*
* @param string $content Content
* @return string Content
*/
function my_anchor_text_trim_spaces( $content ) {
// Remove spaces immediately after an <a> tag.
$content = preg_replace( '#<a([^>]+)>s+#', ' <a$1>', $content );
// Remove spaces immediately before an </a> tag.
$content = preg_replace( '#s+</a>#', '</a> ', $content );
// Remove single spaces between an </a> tag and punctuation.
$content = preg_replace( '#</a>s([.,!?;])#', '</a>$1', $content );
return $content;
}
add_filter( 'the_content', 'my_anchor_text_trim_spaces' );
HTML ignores more than one space in a row (also more than one tab character and line break) unless you're using the pre element or nonbreaking space entities ( ). Therefore, even if your converted text contains two consecutive spaces, the browser won't show it any differently.