
Chapter 3: Configuring and Using Plugins
In This Chapter
![]() Exploring activate-and-go plugins
Exploring activate-and-go plugins
![]() Discovering settings pages
Discovering settings pages
![]() Using widgets and shortcodes
Using widgets and shortcodes
The types of features offered by WordPress plugins are extremely diverse. Similarly, the ways of interacting with plugins are also extremely diverse. Some plugins don’t have an interface and can be activated or deactivated only, while others provide one or more settings screens to control how the plugins behaves. Other plugins offer widgets and shortcodes (short, easy-to-remember codes used to execute PHP functions) used to add new features to sidebars and content.
This chapter digs into the topic of how to interact with plugins. Although this is a big topic, the examples in this chapter prepare you for the different ways of interacting with plugins.
Exploring Activate-and-Go Plugins
Certain plugins are easy to use because they don’t have any settings or features to interact with — I call them activate-and-go plugins. You simply activate them, and they do what they are intended to do.
As with WordPress plugins as a whole, activate-and-go plugins offer a wide variety of features. The following list offers a sampling of activate-and-go plugins that you’ll find useful on your website:
![]() AJAX Comment Loading (
AJAX Comment Loading (http://wordpress.org/extend/plugins/ajax-comment-loading): When pages and posts get large numbers of comments, they sometimes load more slowly, making the site seem sluggish. The AJAX Comment Loading plugin makes such pages and posts load much more quickly by having the content load first without the comments and then quietly pulling down the comments separately.
![]() BBQ: Block Bad Queries (
BBQ: Block Bad Queries (http://wordpress.org/extend/plugins/block-bad-queries): The BBQ plugin helps protect your site against attackers trying to exploit specific security vulnerabilities. This plugin doesn't require any configuration — it automatically scans all requests coming into the site and protects against bad ones.
![]() Disable WordPress Core Updates (
Disable WordPress Core Updates (http://wordpress.org/extend/plugins/disable-wordpress-core-update): The ability for WordPress to automatically update itself has been a tremendous help to WordPress users. Keeping WordPress updated not only offers new features and enhancements, but it also helps keep your site safe from attackers. For some users, the notification to update WordPress can become a distraction, especially if the site is run by many people but a single person is responsible for handling the site updates. The Disable WordPress Core Updates plugin disables the automatic checks for new WordPress versions while also disabling any notifications that a new version is available. WordPress can still be updated from the Dashboard (as described in Book II, Chapter 6), but the notifications are no longer shown.
![]() Hotfix (
Hotfix (http://wordpress.org/extend/plugins/hotfix): Every day, new updates are created for WordPress. Some of these updates add new features, and others fix bugs (defects in the software). Some updates may not be released in a WordPress version for weeks or months. The Hotfix plugin provides some of these new fixes automatically so that sites can avoid known issues while waiting for the new WordPress version.
To use any of these plugins, simply install and activate them as discussed in Chapter 2 of this minibook. When the plugin is activated, it starts doing its job.
 For some plugins, such as the BBQ or Hotfix plugins, seeing the results of activating the plugin may be underwhelming as they simply do their work behind the scenes and don’t really change anything that is visible to you. However, just because you don’t see any immediate change, that doesn’t mean that the plugins aren’t doing their job.
Discovering Settings Pages
Many popular plugins have settings pages where you tweak the functionality of the plugin and tailor it for the specific needs of your site. Often, these settings need to be configured once and then need updating only when the plugin changes.
The following sections explore a selection of the most popular WordPress plugins, show you how to access settings pages, and describe what you can expect from them.
Typically, you access settings pages from submenus of the Dashboard’s Settings page. Another common place to access plugin settings pages, especially for plugins that provide advanced features such as site caching, is from the Dashboard’s Tools menu.
 If you have a hard time finding the settings page for a plugin, check the plugin’s page for details on how to access the settings page. For plugins in the Plugin Directory, check the installation and FAQ tabs. If the Plugin Directory page has a screenshots tab, one of the screenshots usually shows the settings page.
Akismet
Akismet is bundled in with WordPress and likely already installed on your WordPress site. (See Book III, Chapter 5 if you still need to install this essential plugin.)
After you activate Akismet, a notice appears saying that the plugin requires additional configuration before it will function. See Figure 3-1.
Check for an activation notice after you install any plugin. Although most plugins don’t offer such a notice, if one is available, it lets you know how to get started with the plugin. The Akismet plugin always has an activation notice after installation.

Figure 3-1: Akismet provides a notice after activation indicating that it requires configuration before it will function.
The link in the Akismet notice goes directly to the settings page for Akismet, as shown in Figure 3-2.

Figure 3-2: The Settings page for Akismet.
As indicated by the Akismet is almost ready message in the notice, even though Akismet is activated, it won't function until an Akismet API key is added to the settings page. (See Book III, Chapter 5 to find out how to get your API key.)
After you activate the plugin, Akismet creates an Akismet Configuration submenu entry under the Dashboard’s Plugins menu. Select this entry to get to the settings page.
Akismet’s settings page has three settings:
![]() The Akismet API Key setting is required for the plugin to function.
The Akismet API Key setting is required for the plugin to function.
![]() The other two — automatic spam deletion and showing the number of approved comments for an author — are both optional and disabled by default.
The other two — automatic spam deletion and showing the number of approved comments for an author — are both optional and disabled by default.
Google XML Sitemaps
The Google XML Sitemaps plugin is a good next step for diving into plugin settings pages. Google XML Sitemaps has a number of options and shows just how intricate settings pages can get.
Google XML Sitemaps is one of WordPress’s most popular plugins, with more than nine million downloads. You can find it in the Plugin Directory at
http://wordpress.org/extend/plugins/google-sitemap-generator
Google XML Sitemaps makes it easy to automatically add support for sitemaps to your WordPress site. Although most WordPress sites can be scanned easily by search engines, adding sitemaps adds a level of safety to ensure that all the content on the site can be found.
With default settings, the plugin automatically generates sitemaps as content is added or modified on the site. In addition, it notifies Google and Bing of these updates so that it can update the search engine cache with this new data. (Book V, Chapter 5 covers Google XML Sitemaps in more depth.)
The Google XML Sitemaps plugin settings page is available from the XML-Sitemap submenu of the Dashboard’s Settings menu. Notice that the menu name is different from the plugin name.
Submenu names are limited in length, which means that longer plugin names are shortened to fit properly.
A portion of the Google XML Sitemaps plugin’s settings page is shown in Figure 3-3.
Like the Akismet plugin, Google XML Sitemaps requires an additional step for it to be fully functional. Unlike Akismet, Google XML Sitemaps is very quiet about how to get set up — it doesn’t provide that Dashboard-wide notification message. This is why it is very important to carefully read settings pages and plugin documentation. It can be very easy to miss something extremely important.
Below the information box used to generate and regenerate sitemaps are the settings for the plugin. Along the right side are resources about the plugin and about sitemaps. This type of format is not uncommon for plugin settings pages.
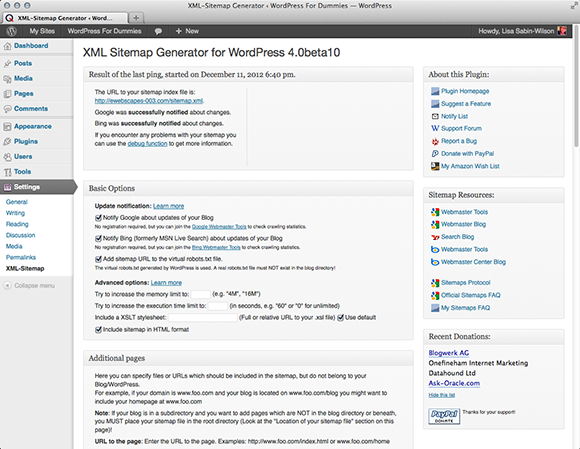
Figure 3-3: The settings page for Google XML Sitemaps.
Scrolling through the page reveals just how exhaustive the available settings are. The settings range from basic options such enabling or disabling automatic sitemap generation when the site’s content is changed to options that control the information in the generated sitemap to advanced options that control how many server resources the plugin can consume when generating the sitemap. Nearly every aspect of the plugin’s functionality is represented as an option on the settings screen, offering a large amount of flexibility in how the plugin functions on the site.
This type of settings page setup is present in many popular plugins. Although the settings can be excessive for some users, most users can get very good results by simply using the default settings. In plugins such as Google XML Sitemaps, the settings are available for people who desire extra control over the plugin’s functionality. I recommend reading through the settings to get an idea of what options are available.
If you don’t understand a setting, leave it in its default state.
All in One SEO Pack
The All in One SEO Pack plugin, also known as AIOSEOP or AIO SEO, focuses on improving the SEO (search engine optimization) of your WordPress site. If you’re unfamiliar with SEO, see Book V, Chapter 4.
With more than 13 million downloads, All in One SEO Pack is one of the most-downloaded plugins on the WordPress Plugin Directory. You can find it in the Plugin Directory at
http://wordpress.org/extend/plugins/all-in-one-seo-pack
As with the plugins in the preceding sections, All in One SEO requires some additional configuration to function. As shown in Figure 3-4, the All in One SEO plugin notifies you that additional configuration is required after it is activated.

Figure 3-4: All in One SEO notifies you when it needs additional configuration in order to function.
The link in the notification leads directly to the settings page for All in One SEO, which is shown in Figure 3-5.

Figure 3-5: The settings page for All in One SEO.
As shown in Figure 3-5, the Plugin Status setting is set to Disabled by default. To activate the plugin’s features, change the status to Enabled and click the Update Options button at the bottom of the settings page.
The settings page for All in One SEO has a variety of settings to control many features of the plugin. The portion of the settings page shown in Figure 3-5 includes a large number of settings to control the titles on the site. Typically, titles are controlled by the theme and are modifiable only through code changes. Opening control over titles without requiring code modifications is one of the primary reasons why SEO plugins such as All in One SEO are so popular.
Many other settings go beyond control over titles. Some of the most often used settings on this page are the ones that control the automatic generation of keywords and description metadata, integrate the site with Google+ and Google Analytics, and determine what content is marked as noindex.
 When you mark a specific page with
 noindex, search engines will ignore the content of the page and won't return search results that link to it.
As with the settings for Akismet and Google XML Sitemaps, the settings on the All in One SEO Pack plugin’s settings page affect the site as a whole. Although some of the settings apply only to specific parts of the site, the settings page as a whole focuses on the entire site. This is true of most plugin settings pages. If the plugin creates a standalone settings page, the settings on that page typically apply to the whole site unless the setting specifies otherwise.
Being able to customize the title, description, and keywords on each page or post is very helpful. Because managing such customizations for the site’s content would be difficult to control in one settings page, All in One SEO Pack provides additional settings in the editors for posts and pages. Figure 3-6 shows the settings box added to the editor by All in One SEO Pack.
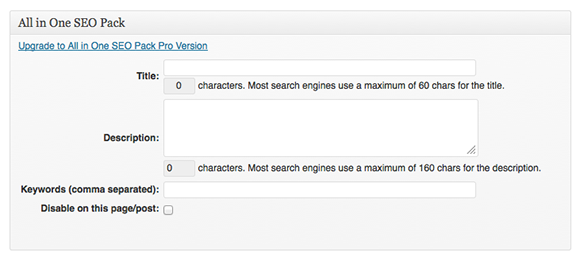
Figure 3-6: All in One SEO Pack settings to control SEO features for a specific post.
Using Widgets
Widgets offer a very powerful and flexible way of adding specific kinds of content to your site’s sidebars. WordPress comes with a number of built-in widgets, such as a calendar, a listing of pages on the site, a listing of recent comments, and a tool to search the site. Plugins can expand this set of default widgets by adding their own. The following sections visit plugins that add their own widgets to show you how plugin-provided widgets offer new options to enhance your site.
You manage your widget management on the Widgets page on the Dashboard. After logging in to your site’s Dashboard, hover your mouse over the Appearance menu and click the Widgets link to access the Widgets page.
Akismet
After activating and setting up a valid API key for the Akismet widget (you can find more on the API key in Book III, Chapter 5), a new widget named Akismet Widget appears on your Widgets page, as shown in Figure 3-7.

Figure 3-7: The Widgets page showing the addition of the Akismet Widget.
To make use of the Akismet Widget, simply drag it from the Available Widgets section and drop it into one of the sidebars listed on the right of the Widgets page. As shown in Figure 3-7, after dropping the widget into a sidebar, the settings for the widget become available. The settings are quite simple because only the title of the widget can be modified. At a minimum, most widgets offer a title setting. Although there are some exceptions, most widgets treat the title as optional and simply don’t show a title if the setting is empty.
Now the Akismet Widget appears on your site, displaying a counter that shows how many spam comments the Akismet plugin has blocked on the site; Figure 3-8 shows the widget has blocked no comments.

Figure 3-8: The Akismet Widget running on the site.
Twitter Widget Pro
The Twitter Widget Pro plugin serves a single purpose: Make it easy to add a Twitter stream to your site. This feature takes the form of a widget, meaning that you can add the Twitter stream to any sidebar on your site. Twitter Widget Pro is available from the Plugin Directory at
http://wordpress.org/extend/plugins/twitter-widget-pro
As shown in Figure 3-9, the Twitter Widget Pro widget provides a large number of settings to control the widget’s output.

Figure 3-9: The settings for the Twitter Widget Pro plugin’s widget.
The most important setting is Twitter Username. Without a valid Twitter username, the widget won’t produce any output. If the widget fails to render anything on your site, double-check the username to ensure that it is a valid Twitter username.
The What to Display When Twitter Is Shown setting is interesting because it allows you to show a message when the Twitter stream can’t be accessed. If this setting is left blank, nothing is shown when data from Twitter cannot be retrieved. If visitors to the site expect to see the Twitter feed, adding a simple message indicating that the feed is temporarily unavailable could help reduce visitor confusion.
Figure 3-10 shows the end results of setting up the widget.
If you’re active on Twitter, using the Twitter Widget Pro plugin is an easy way to inform or remind your visitors that you can be found on Twitter.

Figure 3-10: The Twitter Widget Pro widget showing the latest from a Twitter feed.
Additional widgets to try
Akismet and Twitter Widget Pro just scratch the surface of what is possible with widgets offered by plugins. The following list shows additional plugin examples that help fill in your sidebars:
![]() Facebook: Facebook offers an official plugin in the Plugin Directory at
Facebook: Facebook offers an official plugin in the Plugin Directory at http://wordpress.org/extend/plugins/facebook. The Facebook plugin provides a variety of features for integrating Facebook into your WordPress site, including a number of widgets. Some of the new widgets allow visitors to your site to subscribe to future updates, give a Like to a specific page on your site, or send the page's content to a Facebook friend. The other widgets focus on integrating your Facebook account with the site by displaying recent activity or recommendations.
![]() Image Widget: Sometimes you just want to add an image to a sidebar. Although the built-in Text widget and some HTML can provide this functionality, some users don't know how to create the HTML for the image or want a simpler solution for adding images. The Image Widget plugin provides a widget that allows you to easily upload an image and have it show on the site without requiring any involvement with writing or copying and pasting of HTML markup. You can find the plugin in the Plugin Directory at
Image Widget: Sometimes you just want to add an image to a sidebar. Although the built-in Text widget and some HTML can provide this functionality, some users don't know how to create the HTML for the image or want a simpler solution for adding images. The Image Widget plugin provides a widget that allows you to easily upload an image and have it show on the site without requiring any involvement with writing or copying and pasting of HTML markup. You can find the plugin in the Plugin Directory at http://wordpress.org/extend/plugins/image-widget.
![]() Yet Another Related Posts Plugin: This plugin, also known as YARPP, is available in the Plugin Directory at
Yet Another Related Posts Plugin: This plugin, also known as YARPP, is available in the Plugin Directory at http://wordpress.org/extend/plugins/yet-another-related-posts-plugin. It provides a variety of methods to show links to content on the site that is similar to the current page, post, or other type of content that is being viewed. One of these methods is by using the provided widget. Thus, you can easily see a listing of links to similar content in your site's sidebar. Because these lists are automatically generated and updated, the site's related content starts to cross-link with other related content without requiring any manual management of those lists.
With more than 3,000 plugins currently listed with the widget tag on the Plugin Directory (http://wordpress.org/extend/plugins/tags/widget), a wealth of new widgets for use in your sidebars is at your fingertips. One of those plugins may offer the perfect widget for adding value to your sidebar areas.
Enhancing Content with Shortcodes
Widgets can add functionality, navigational aids, and other useful bits of information to your sidebars. What if you want to add dynamic elements (such as automatically generated lists of related content or embed videos) without having to switch to the HTML editor and dealing with complex embed codes? Such situations are where shortcodes come to the rescue.
Just as widgets allow code to generate content for use inside a sidebar, shortcodes allow code to generate additional content inside a post, page, or other content type. In the following sections, you find out about a few useful shortcodes.
Gallery shortcode
One of the shortcodes built into WordPress is the gallery shortcode. (See Book IV, Chapter 3 for more about the gallery shortcode.)
The most basic gallery shortcode is [gallery]. In this form, all the default arguments are used. (Shortcodes can also support optional arguments that allow for customization.) By default, a gallery is arranged into three columns and uses thumbnail-sized images. The following shortcode would display the gallery in two columns and use medium-sized images:
[gallery columns="2" size="medium"]
In many ways, shortcodes look similar to HTML tags. The gallery shortcode looks like an opening HTML tag that swapped the < and > characters for [ and ].
Embed shortcode
Shortcodes also have the capability to surround text by using an opening and closing shortcode. The embed shortcode, another shortcode provided by WordPress, is one.
WordPress can automatically change links to videos on a specific set of sites to an embedded video player. (See Book IV, Chapter 4 for details on which sites are supported.) Although this happens when supported video links are left on a line on their own, supported video links can be surrounded by the embed shortcode to explicitly indicate that the link is to be changed into an embedded video. For example:
[embed]http://wordpress.tv/2012/08/06/matt-mullenweg-state-of-the-word-2012/[/embed]
By adding this to your post or page content, Matt Mullenweg’s 2012 State of the Word video displays in place of the shortcode, as shown in Figure 3-11.

Figure 3-11: The embedded video replacing the embed shortcode.
You may wonder why you would want to use the embed shortcode instead of simply putting the link on its own line. The reason is that, like the gallery shortcode, the embed shortcode supports arguments that allow you to customize the display of the video. The supported arguments are width and height. The following shortcode modifies the embedded video to have a width of 400 pixels:
[embed width="400"]http://wordpress.tv/2012/08/06/matt-mullenweg-state-of-the-word-2012/[/embed]
Figure 3-12 shows the results of this change. Notice how the entire video is smaller. This is because reducing the width to 400 pixels automatically scaled down the height as well.

Figure 3-12: The embedded video with the width reduced to 400 pixels.
If both the width and height arguments are used, the video is scaled down to fit inside a box of those dimensions, so you won’t be able to distort the aspect ratio of the video if you don’t get the dimensions exactly right. In practice, it’s often easiest to simply supply the width argument and not the height argument.
Twitter Widget Pro
The Twitter Widget Pro plugin provides more than just a widget; it also adds support for the twitter-widget shortcode. This shortcode provides the same functionality as the widget except that it can be added to content and uses the shortcode method of controlling arguments rather than a widget editor.
At its most basic, the twitter-widget shortcode looks like the following:
[twitter-widget username="lisasabinwilson"]
Note the username argument is set to my Twitter username, lisasabinwilson. When using this shortcode, replace the lisasabinwilson username with the Twitter username that you want to use.
The FAQ page in the Plugin Directory for Twitter Widgets Pro includes a listing of the arguments that are available for the shortcode. Using the same settings for the shortcode results in the following shortcode:
[twitter-widget username="lisasabinwilson" title="Twitter Feed" hidereplies="true"]
The title is modified and replies are hiddenThis means that you can easily produce the same results whether you decide to use Twitter Widget Pro’s widget or the shortcode feature.
Comprehensive Google Map Plugin
The Comprehensive Google Map Plugin offers both a widget and a shortcode that allow for easily adding a Google map to your site. You can find the plugin in the Plugin Directory at
http://wordpress.org/extend/plugins/comprehensive-google-map-plugin
The feature of the Comprehensive Google Map Plugin that makes it noteworthy is that shortcodes for it can quickly become very complex and long. For example, consider the following shortcode that displays a map of the White House in the United States:
[google-map-v3 width="350" height="350" zoom="12" maptype="roadmap" mapalign="center" directionhint="false" language="default" poweredby="false" maptypecontrol="true" pancontrol="true" zoomcontrol="true" scalecontrol="true" streetviewcontrol="true" scrollwheelcontrol="false" draggable="true" tiltfourtyfive="false" addmarkermashupbubble="false" addmarkermashupbubble="false" addmarkerlist="1600 Pennsylvania Avenue Northwest Washington, DC 20500{}1-default.png{}The White House" bubbleautopan="true" showbike="false" showtraffic="false" showpanoramio="false"]
That would be quite difficult to manually type without any errors. Fortunately, the Comprehensive Google Map Plugin provides a shortcode-generator tool that makes it easy to have the code generate such complex shortcodes.
After activating the plugin, follow these steps to use shortcode.
1. Click the Shortcode Builder link under the Google Map Dashboard menu to load the tool to generate new map shortcodes. (See Figure 3-13.)

Figure 3-13: The Shortcode Builder for the Comprehensive Google Map Plugin.
2. In the Location setting in the Map Markers section, fill in your location details and then click the Add button for the Location setting.
3. Click the Generate Shortcode button at the bottom of the page to get the generated shortcode.
4. Copy the supplied shortcode and paste it into a post or page.
5. Click the Save Changes button and then view the updated content.
As shown in Figure 3-14, the shortcode produces an interactive map that visitors can easily navigate through. By clicking the marker, visitors can access options to get directions to or from the location. Although you should always give an address, the map gives visitors a much better understanding of where a location is, which means they won’t have to leave the site to look up the address elsewhere.

Figure 3-14: The map generated by the Comprehensive Google Map Plugin shortcode.