Chapter 4: Customizing Your Theme
In This Chapter
![]() Personalizing your header and background graphics
Personalizing your header and background graphics
![]() Customizing your site with CSS
Customizing your site with CSS
![]() Modifying your theme with CSS and HTML
Modifying your theme with CSS and HTML
![]() Customizing basic elements for uniqueness
Customizing basic elements for uniqueness
![]() Exploring additional resources
Exploring additional resources
Customizing your WordPress theme’s overall look with unique graphics and colors is one of the most fun and exciting aspects of using WordPress themes. You can take one of your favorite, easily customizable themes and personalize it with some simple changes to make it unique. (For more information on finding an existing theme, read Book VI, Chapter 2.)
After you find an existing free (or premium) WordPress theme that suits your needs, the next step is personalizing the theme through some of the following techniques:
![]() Plugging in your own graphics: The easiest way to make a theme your own is through a graphical header that includes your logo and matching background graphics.
Plugging in your own graphics: The easiest way to make a theme your own is through a graphical header that includes your logo and matching background graphics.
![]() Adjusting colors: You might like the structure and design of your theme but want to adjust the colors to match your own tastes or brand look. You can do this in the CSS, too.
Adjusting colors: You might like the structure and design of your theme but want to adjust the colors to match your own tastes or brand look. You can do this in the CSS, too.
![]() Adding/changing fonts: You may want to change the font, or typography, on your site by using different font types, sizes, or colors. You can edit these display properties in the CSS.
Adding/changing fonts: You may want to change the font, or typography, on your site by using different font types, sizes, or colors. You can edit these display properties in the CSS.
Often, the customization process is one of trial and error. You have to mix and match different elements, tweaking and tinkering with graphics and CSS until you achieve design perfection. In this chapter, you explore the easiest ways to customize your WordPress theme through graphics and CSS.
Changing Your Background Graphic
Using background graphics is an easy way to set your site apart from others that use the same theme. Finding a background graphic for your site is much like finding just the right desktop background for your computer. You can choose from a variety of background graphics for your site, such as photography, abstract art, and repeatable patterns.
You can find ideas for new and different background graphics by checking out some of the CSS galleries on the web, such as http://cssdrive.com and http://csselite.com. Sites like these should be used for inspiration only, not theft. Be careful when using images from outside sources. You want to use only graphics and images that you have been given the right (through express permission or licenses that allow you to reuse) to use on your sites. For this reason, always purchase graphics from reputable sources, such as these three online graphic sites:
![]() iStockphoto (
iStockphoto (http://istockphoto.com): An extensive library of stock photography, vector illustrations, video and audio clips, and Flash media. You can sign up for an account and search through libraries of image files to find the one that suits you, or your client, best. The files that you use from iStockphoto aren't free; you do have to pay for them — and be sure that you read the license for each image you use. The site has several different licenses. The cheapest one is the Standard License, which has some limitations. For example, you can use an illustration from iStockphoto in one website design, but you cannot use that same illustration in a theme design that you intend to sell multiple times (say in a premium theme marketplace). Be sure to read the fine print!
![]() Dreamstime (
Dreamstime (http://dreamstime.com): Dreamstime is a major supplier of stock photography and digital images. Sign up for an account and search through the huge library of digital image offerings. Dreamstime does offer free images at times, so keep your eyes out for those! Also, Dreamstime has different licenses for their image files that you need to pay close attention to, but one nice feature is the Royalty Free licensing option. This option allows you to pay for the image one time and then use the image as many times as you like; however, you can't redistribute the image in the same website theme repeatedly, such as in a template that's sold to the public.
![]() Graphic River (
Graphic River (www.graphicriver.net): Graphic River offers stock graphic files from Photoshop images, design templates, textures, vector graphics, and icons, to name just a few. The selection is vast, and the cost to download and use the graphic files is minimal. As with all graphic and image libraries, be sure to read the terms of use or any licensing attached to each of the files to make sure you're legally abiding by the terms.
 Another great resource for finding free graphics and more is Smashing Magazine at
 www.smashingmagazine.com. You can find hundreds of links and resources to free and, often, reusable graphics, such as textures and wallpapers for your site.
To best use background graphics, you must answer a few simple questions:
![]() What type of background graphic do you want to use? For example, do you want a repeatable pattern or texture or an image like a black-and-white photograph of something in your business?
What type of background graphic do you want to use? For example, do you want a repeatable pattern or texture or an image like a black-and-white photograph of something in your business?
![]() How do you want the background graphic to display in your browser? Do you want to tile or repeat your background image in the browser window or pin it to a certain position no matter what size your guest’s browser is?
How do you want the background graphic to display in your browser? Do you want to tile or repeat your background image in the browser window or pin it to a certain position no matter what size your guest’s browser is?
The answers to those questions determine how you install a background graphic in your theme design.
 When working with graphics on the web, use GIF, JPG, or PNG image formats. For images with a small number of colors (such as charts, line art, logos, and so on), GIF format works best. For other image types (screenshots with text and images, blended transparency, and so on), use JPG or PNG.
For web design, the characteristics of each image file format can help you decide which file format you need to use for your site. The most common image file formats and characteristics include:
![]()
.jpg: Suited for use with photographs and smaller images used in your web design projects. Although the .jpg format compresses with lossy compression, you can adjust compression when you save a file in a .jpg format. That is, you can choose the degree, or amount, of compression that will occur from 1 to 100. Usually, you won't see a great deal of image quality loss with compression levels 1 through 20.
![]()
.png: Suited for larger graphics used in web design, such as the logo or main header graphic that helps brand the overall look of the website. A .png file uses lossless image compression; therefore, no data loss occurs during compression, so you get a cleaner, sharper image. You can also create and save a .png file on a transparent canvas; .jpg files must have a white canvas or some other color that you designate.
![]()
.gif: Compression of a .gif file is lossless; therefore, the image renders exactly the way you design it, without loss of quality. However, .gif files compress with lossless quality when the image uses 256 colors or fewer. For images that use more colors (higher quality), .gif isn't the greatest format to use. For images with a lot of colors, go with the .png format instead.
Uploading an image for background use
If you want to change the background graphic in your theme, follow these steps:
1. Upload your new background graphic via FTP to the images folder in your theme directory.
Typically, the images folder can be found at wp-content/themes/themename/images.
2. On the WordPress Dashboard, click the Editor link on the Appearance menu.
The Theme Editor page displays.
3. Click the Stylesheet (style.css) link on the right side of the page.
The style.css template opens in the text editor box on the left side of the Theme Editor page.
4. Scroll down to find the body CSS selector.
I discuss CSS selectors later in this chapter, but the following code segment is a sample CSS snippet from the Twenty Twelve theme. (How the body selector is defined differs from theme to theme.)
body {
background: #f1f1f1;
}
5. Edit the background property values.
Change this:
background: #f1f1f1;
To this:
background #FFFFFF url('images/newbackground.gif'),
With this example, you added a new background image (newbackground.gif) to the existing code and changed the color code to white (#FFFFFF).
6. Click the Update File button to save the stylesheet changes you made.
Your changes are saved and applied to your theme. Figure 4-1 shows a preview of the new background without any positioning.

Figure 4-1: A new background image on a blog.
Positioning, repeating, and attaching images
After you upload a background graphic, you can use CSS background properties to position it how you want it. The main CSS properties — background-position, background-repeat, and background-attachment — help you achieve the desired effect. Table 4-1 describes the CSS background properties and the available values for changing them in your theme stylesheet. If you're a visual person, you'll enjoy testing and tweaking values to see the effects on your site.


Say your goal is to tile, or repeat, the background image (see Figure 4-2) so that it scales with the width of the browser on any computer. To achieve this, open the stylesheet again and change
background: #f1f1f1;
to
background: #FFFFFF;
background-image: url(images/newbackground.gif);
background-repeat: repeat;
If your goal is to display a fixed image that does not scroll or move when your site visitor moves the browser, you can use the background-position, background-repeat, and background-attachment properties to display it exactly how you want it to appear.

Figure 4-2: A back-ground image that repeats.
In Figure 4-2, the image is tiled, or it repeats, so it covers the entire background space no matter how wide or long the website display is. To achieve the look, change background: #f1f1f1 in your stylesheet to
background: #FFFFFF;
background-image: url(images/newbackground.gif);
background-position: top left;
background-repeat: repeat;
As you become more comfortable with CSS properties, you can start using shortening methods to make your CSS coding practice more efficient. For example, the previous block of code looks like this in with CSS shortcode practice:
background: #fff url(images/newbackground.gif) repeat top left;
As you can see from these examples, changing the background graphic by using CSS has a number of options that depend on your creativity and design style more than anything else. But properly leveraged, you can use this to take your design to the next level for you and your clients.
Changing Your Header Graphic
Creating unique header graphics is one of the fastest ways to personalize a site and make it unique. The header graphic is typically the strongest graphic design element. Positioned at the top of your theme, a header graphic often includes a logo or other information about your site or business.
Here are some elements you might include in your header graphic:
![]() Business name or logo: This sounds obvious, but the header graphic is the prime way to identify the site. If you don’t have a logo, you can simply stylize your business name for your header graphic, but your brand identity needs to be prominent and polished in the header graphic.
Business name or logo: This sounds obvious, but the header graphic is the prime way to identify the site. If you don’t have a logo, you can simply stylize your business name for your header graphic, but your brand identity needs to be prominent and polished in the header graphic.
![]() Profile photos: If it’s for a blog or an independent professional’s site (say, for a real estate agent), you might want to include a studio-quality profile photo of the person to help your site guests know who they’re dealing with and to add a touch of warmth.
Profile photos: If it’s for a blog or an independent professional’s site (say, for a real estate agent), you might want to include a studio-quality profile photo of the person to help your site guests know who they’re dealing with and to add a touch of warmth.
![]() Taglines, important slogans, and keywords: Use the header area to tell your visitors something about your site or business.
Taglines, important slogans, and keywords: Use the header area to tell your visitors something about your site or business.
![]() Contact information: If you’re doing a small business website, including phone and address information is vital.
Contact information: If you’re doing a small business website, including phone and address information is vital.
![]() Background images: Be creative with the header image behind all this information. Use a pattern or graphic that matches your brand colors and doesn’t distract attention from the vital information you want to communicate.
Background images: Be creative with the header image behind all this information. Use a pattern or graphic that matches your brand colors and doesn’t distract attention from the vital information you want to communicate.
Most new WordPress themes, particularly premium themes, allow you to upload new header graphics over existing ones easily from the WordPress Dashboard. Sometimes this is called a Custom Header Uploader script or feature. This feature allows you to turn off HTML overlay text and use only graphics for your header, too.
You can personalize your header graphic the following ways:
![]() Replace or overwrite the theme’s existing header image with an appropriate image of your choosing.
Replace or overwrite the theme’s existing header image with an appropriate image of your choosing.
![]() Use a repeating graphic pattern.
Use a repeating graphic pattern.
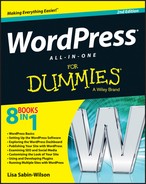
Using a repeating graphic pattern is similar to using a repeating background image, which I discuss in the earlier “Positioning, repeating, and attaching images” section. In the following sections, you replace your existing header image (in the free Quick-Vid theme from iThemes) by using the Custom Header feature found in many WordPress themes. Figure 4-3 shows the Quick-Vid theme’s default header image.

Figure 4-3: The default header of the free Quick-Vid theme from iThemes.
Considering the image dimensions
Generally, you want to replace the existing header image with an image that has the exact width and height dimensions. To determine the dimensions of the existing image, find the default header graphic and open it in an image-editing program, such as Adobe Photoshop. Create (or crop) your new header graphic to the same dimensions (in pixels) to minimize problems when adding the image to your theme.
Photoshop Elements is a handy design software tool for basic image editing. It has significantly fewer features than its bigger and older brother, Photoshop, but for most image editing jobs it does great for a fraction of the price.
Uploading a header image
Depending on your theme, replacing an existing header image is a fast and efficient way of making changes — you simply upload the graphic and refresh your site.
The WordPress Custom Header feature is included in many of the popular themes. To add a new header graphic in your theme with the Custom Header feature, follow these steps:
1. On the WordPress Dashboard, click the Custom Header link on the Appearance menu.
The Custom Header page appears, as shown in Figure 4-4. Here you can adjust your header area, add or remove text, and upload new graphics.
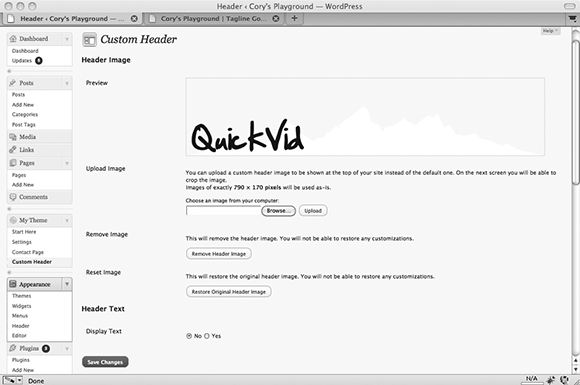
Figure 4-4: The Word-Press Custom Header feature.
2. Select No on the Display Text option and then click Save Changes.
Because you’re uploading only a header graphic, you don’t want the default HTML text to show.
3. Upload your new header graphic by clicking the Browse button in the Upload Image section.
If your image isn’t sized to the specifications given, you’ll be asked to crop it to fit.
4. Refresh your site and see how your new header graphic looks.
Figure 4-5 shows a photo, site name, and tagline in the new header graphic.

Figure 4-5: The Quick-Vid theme with a new header image.
Personalizing Your Theme with CSS
Cascading Style Sheets (CSS) are part of every WordPress theme. The primary way of personalizing your theme with CSS is through your theme's default stylesheet (style.css). Through a comment block (shown in Figure 4-6), your theme's style.css file tells WordPress the theme name, the version number, and the author, along with other information.

Figure 4-6: The comment block of a typical WordPress stylesheet.
With CSS changes to your theme’s stylesheet you can apply unique styling (such as different fonts, sizes, and colors) to headlines, text, links, and borders, and adjust the spacing between them, too. With all the CSS options available, you can fine-tune the look and feel of different elements with simple tweaks.
To explore your theme's stylesheet, click the Editor link on the Appearance menu on the WordPress Dashboard. By default, your theme's main stylesheet (style.css) should appear. If not, look at the far right side of the WordPress Dashboard under the Templates heading, scroll down to find the Styles heading, and click the Stylesheet file, as shown in Figure 4-7.
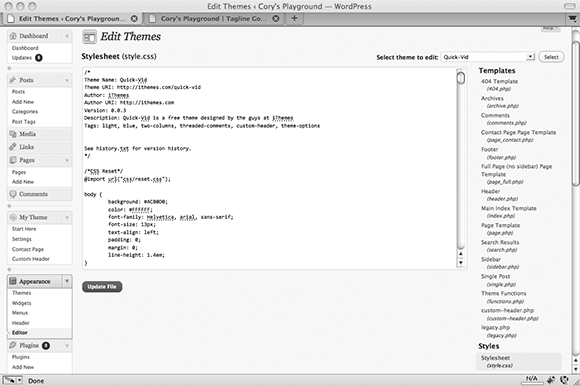
Figure 4-7: Shows the list of files contained in the Quick-Vid theme, separated by Templates and Styles.
 Making changes to the stylesheet or any other theme file can cause your site to load the theme improperly. Be careful what you change here. When you make changes, ensure that you’re on a playground or sandbox site so that you can easily restore your original file and don’t permanently affect a “live” or important site. Always save an original copy of the stylesheet in a text program, such as Notepad (for the PC) or TextMate (for the Mac), so you can find the original CSS and copy and paste it back into your stylesheet if necessary.
Knowing some key CSS concepts can help you personalize your theme’s stylesheet. CSS is simply a set of commands that allows you to customize the look and feel of your HTML markup. Some common commands and tools are selectors, IDs and classes, properties and values, and more. You use these commands to customize HTML to display your design customizations.
CSS selectors
Typically, CSS selectors are named for the corresponding HTML elements, IDs, and classes that you want to style with CSS properties and values. Selectors are very important in CSS because they are used to “select” elements on an HTML/PHP page so that they can be appropriately styled.
With CSS, you can provide style (such as size, color, and placement) to the display of elements on your blog (such as text links, header images, font size and colors, paragraph margins, and line spacing). CSS selectors contain names, properties, and values to define which HTML elements in the templates you will style with CSS. Table 4-2 lists some basic global CSS selectors.

If you were to assign a style to the h1 selector, it will affect all <h1> tags in your HTML. Sometimes you want this, but sometimes you want to affect only a smaller subset of elements.
CSS IDs and classes
With CSS IDs and classes, you can define more elements to style. Generally, IDs are used to style one broader specific element (such as your header section) on your page. Classes style, define, and categorize more specifically grouped items (such as images and text alignment, widgets, or links to posts).
![]() CSS IDs are identified with the hash mark (
CSS IDs are identified with the hash mark (#). For example, #header indicates the header ID. There can be only one element identified with an ID.
![]() CSS classes are identified with a period (
CSS classes are identified with a period (.). For example, .alignleft indicates aligning an element to the left.
Table 4-3 lists some CSS IDs and classes.

CSS properties and values
CSS properties are assigned to the CSS selector name. You also need to provide values for the CSS properties to define the style elements for the particular CSS selector you’re working with.
For example, the body selector that follows defines the overall look of your web page; background is a property and #DDDDDD is the value, and color is a property and #222222 is the value.
body {
background: #DDDDDD;
color: #222222;
}
Every CSS property needs to be followed by a colon (:), and each CSS value needs to be followed by a semicolon (;).
Understanding that properties are assigned to selectors, as well as your options for the values, makes CSS a fun playground for personalizing your site. You can experiment with colors, fonts, font sizes, and more to tweak the look of your theme.
Understanding Basic HTML Techniques
HTML can help you customize and organize your theme. To understand how HTML and CSS work together, think of it this way: If a website were a building, HTML would be the structure (the studs and foundation), and CSS would be the paint.
HTML contains the elements that CSS provides the styles for. All you have to do to apply a CSS style is use the right HTML element. Here’s a very basic block of HTML:
<body>
<div id="content">
<h1>Headline Goes Here</h1>
<p>This is a sample sentence of body text. <blockquote>The journey
of a thousand miles starts with the first step.</blockquote> I'm
going to continue on this sentence and end it here. </p>
<p>Click <a href="http://corymiller.com">here</a> to visit my
website.</p>
</div>
</body>
All HTML elements must have opening and closing tags. Opening tags are contained in less-than (<) and greater-than (>) symbols. Closing tags are the same, except they are preceded by a forward slash (/).
For example:
<h1>Headline Goes Here</h1>
Note that the HTML elements must be properly nested. In line four of this example, a paragraph tag is opened (<p>). Later in that line, a block quote is opened (<blockquote>) and nesting inside the paragraph tag. When editing this line, you could not end the paragraph (</p>) before you ended the block quote (</blockquote>). Nested elements must close before the elements they are nested within close.
Proper tabbing, or indenting, is important when writing HTML, mainly for readability so you can quickly scan through code to find what you’re looking for. A good rule is that if you didn’t close a tag in the preceding line, indent one tab over. This allows you to see where each element begins and ends. It can also be very helpful when diagnosing problems.
For more in-depth tutorials on HTML, see the HTML section of w3schools.com at www.w3schools.com/html/default.asp.
Changing Basic Elements for a Unique Look
When you understand the basic concepts about personalizing your site with graphics and CSS, you begin to see how easy changing the look and feel of your site is with these tools. The next few sections explore some ways to accomplish an interesting design presentation or a unique and creative look.
Background colors and images
Changing the background image can completely change the feel of your site. However, you can also use background colors and images for other elements in your theme.
Background techniques include using solid colors and repeating gradients or patterns to achieve a subtle yet polished effect. (Note: Use colors that accent the colors of your logo and don’t hamper text readability.)
You can add CSS background colors and image effects to the following areas of your theme:
![]() Post and page content sections
Post and page content sections
![]() Sidebar widgets
Sidebar widgets
![]() Comment blocks
Comment blocks
![]() Footer area
Footer area
Font family, color, and size
You can change the fonts in your theme for style or for readability purposes. Typographic (or font) design experts use simple font variations to achieve amazing design results. You can use fonts to separate headlines from body text (or widget headlines and text from the main content) to be less distracting. Table 4-4 lists some examples of often-used font properties.
Table 4-4 Fonts
|
Font Properties |
Common Values |
CSS Examples |
|
|
|
|
|
|
|
|
|
|
|
|
|
|
|
|
The web is actually kind of picky about how it displays fonts, as well as what kind of fonts you can use in the font-family property. Not all fonts display correctly. To be safe, here are some commonly used font families that display correctly in most browsers:
![]() Serif fonts: Times New Roman, Georgia, Garamond, Bookman Old Style
Serif fonts: Times New Roman, Georgia, Garamond, Bookman Old Style
![]() Sans-serif fonts: Verdana, Arial, Tahoma, Trebuchet MS
Sans-serif fonts: Verdana, Arial, Tahoma, Trebuchet MS
Serif fonts have little tails, or curlicues, at the edges of letters. (This book’s text is in a serif font.) Sans-serif fonts have straight edges and no fancy styling. (The heading in Table 4-4 uses a sans-serif font — look ma, no tails!)
Font color
With more than 16 million HTML color combinations available, you can find just the right shade of color for your project. After some time, you’ll memorize your favorite color codes. Knowing codes for different shades of gray can help you quickly add an extra design touch. For example, you can use the shades of gray listed in Table 4-5 for backgrounds, borders on design elements, and widget headers.
Table 4-5 My Favorite CSS Colors
|
Color |
Value |
|
White |
|
|
Black |
|
|
Gray |
|
You can easily change the color of your font by changing the color property of the CSS selector you want to tweak. You can use hexadecimal codes to define the colors.
You can define the overall font color in your site by defining it in the body CSS selector like this:
body {
color: #333;
}
Font size
To tweak the size of your font, change the font-size property of the CSS selector you want to tweak. Generally, the following units of measurement determine font sizes:
![]()
px (pixel): Increasing or decreasing the number of pixels increases or decreases the font size — 12px is larger than 10px.
![]()
pt (point): As with pixels, increasing or decreasing the number of points affects the font size — 12pt is larger than 10pt.
![]()
% (percentage): Increasing or decreasing the percentage number affects the font size — 50% is equivalent to 7 pixels, and 100% is equivalent to 17 pixels.
In the default template CSS, the font size is defined in the <body> tag in pixels, like this:
font-size: 12px;
Putting all three elements (font-family, color, and font-size) together in the <body> tag styles the font for the entire body of your site. Here's how the elements work together in the <body> tag of the default template CSS:
body {
font-size: 12px;
font-family: Georgia, "Bitstream Charter", serif;
color: #666;
}
When you want to change a font family in your CSS, open the stylesheet (style.css), search for property: font-family, change the values for that property, and then save your changes.
In the default template CSS, the font is defined in the <body> tag like this:
font-family: Georgia, "Bitstream Charter", serif;
Borders
Using CSS borders can add an interesting and unique flair to elements of your theme design. (See Figure 4-8.) Table 4-6 illustrates common properties and CSS examples for borders in your theme design.

Figure 4-8: A dashed 15px black border.
Table 4-6 Common Border Properties
|
Border Properties |
Common Values |
CSS Examples |
|
|
|
|
|
|
|
|
|
|
Hexadecimal values |
|
Finding Additional Resources
There may come a time when you want to explore customizing your theme further. Here are some recommended resources:
![]() WordPress Codex (
WordPress Codex (http://codex.wordpress.org): Official WordPress documentation
![]() W3Schools (
W3Schools (http://w3schools.com): A free and comprehensive online HTML and CSS reference
![]() WebDesign.com (
WebDesign.com (http://webdesign.com): A premium library of WordPress video tutorials and training
![]() Smashing Magazine (
Smashing Magazine (www.smashingmagazine.com): Numerous tips and tricks for customizing a WordPress theme