Chapter 6: Using WordPress as a Content Management System
In This Chapter
![]() Defining a content management system
Defining a content management system
![]() Creating a template for each static page, post category, and sidebar
Creating a template for each static page, post category, and sidebar
![]() Custom styles for sticky posts, categories, and tags
Custom styles for sticky posts, categories, and tags
![]() Using Custom Post Types
Using Custom Post Types
![]() Optimizing for search engine success
Optimizing for search engine success
If you’ve avoided using WordPress as a solution for building your own website because you think it’s only a blogging platform and you don’t want to have a blog (not every website owner does, after all), it’s time to rethink your position. WordPress is a powerful content management system that’s flexible and extensible enough to run an entire website — with no blog at all, if you prefer.
A content management system (CMS) is a system used to create and maintain your entire site. It includes tools for publishing and editing, as well as for searching and retrieving information and content. A CMS lets you maintain your website with little or no knowledge of HTML. You can create, modify, retrieve, and update your content without ever having to touch the code required to perform those tasks.
This chapter shows you a few ways that you can use the WordPress platform to power your entire website, with or without a blog. It covers different template configurations that you can use to create separate sections of your site. This chapter also dips into a feature in WordPress called Custom Post Types, which lets you control how content is displayed on your website.
 This chapter dips into working with WordPress templates and themes, a concept that is covered in depth in Book VI. If you find templates and themes intimidating, check out Book VI first.
You can do multiple things with WordPress to extend it beyond the blog. I use the default Twenty Twelve theme to show you how to use WordPress to create a fully functional website that has a CMS platform — anything from the smallest personal site to a large business site.
Creating Different Page ViewsUsing WordPress Templates
As I explain in Book IV, Chapter 2, a static page contains content that doesn’t appear on the blog page, but as a separate page within your site. You can have numerous static pages on your site, and each page can have a different design, based on the template you create. (Flip to Book VI to find out all about choosing and using templates on your site.) You can create several static-page templates and assign them to specific pages within your site by adding code to the top of the static-page templates.
Here's the code that appears at the top of the static-page template I use for my About Us and Our Blog Designers page at www.ewebscapes.com/about:
<?php
/*
Template Name: About
*/
?>
Using a template on a static page is a two-step process: Upload the template and then tell WordPress to use the template by tweaking the page’s code.
In Book VI, you can discover information about Custom Menus, including how to create different navigation menus for your website. You can create a menu of links that includes all the pages you created on your WordPress Dashboard. You can display that menu on your website by using the Custom Menus feature.
Uploading the template
To use a page template, you have to create one. You can create this file in a text-editor program, such as Notepad. (To see how to create a template, flip over to Book VI, which gives you extensive information on WordPress templates and themes.) To create an About page, for example, you can save the template with the name about.php.
When you have your template created, follow these steps to make it part of WordPress:
1. Upload the template file to your WordPress theme folder.
You can find that folder on your web server in /wp-content/themes. (See Book II, Chapter 2 for more information about FTP.)
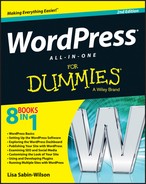
2. Log in to your WordPress Dashboard and click the Editor link on the Appearance menu.
The Edit Themes page opens.
3. Click the about.php template link located on the right side of the page.
4. Type the Template Name tag directly above the get_header() template tag.
The header tag looks like this: <?php get_header(); ?>.
If you’re creating an About Page, the code to create the Template Name looks like this:
<?php
/*
Template Name: About
*/
?>
5. Click the Update File button.
The file is saved, and the page refreshes. If you created an About page template, the about.php template is now called About Page in the template list on the right side of the page.
Figure 6-1 shows the Page template and displays the code needed to define a specific name for the template.
Figure 6-1: Naming a static-page template.
Assigning the template to a static page
After you create the template and name it the way you want, assign that template to a page by following these steps:
1. Click the Add New link on the Pages menu on the Dashboard.
The Add New Page page opens, and you can write a new post to your WordPress blog.
2. Type the title in the Title text box and the page content in the large text box.
3. Select the page template from the Template drop-down list.
By default, the Template drop-down list in the Page Attributes module appears on the right side of the page. You can reposition the modules on this page; see Book III, Chapter 1 for more information.
4. Click the Publish button to save and publish the page to your site.
Figure 6-2 shows the layout of my home page on my business site at www.ewebscapes.com and the information it contains, whereas Figure 6-3 shows the layout and information provided on the About page at www.ewebscapes.com/about. Both pages are on the same site, in the same WordPress installation, with different page templates to provide different looks, layouts, and sets of information.

Figure 6-2: Lisa’s home page at E.Webscapes.

Figure 6-3: The About page at E.Web-scapes.
Creating a Template for Each Post Category
You don’t have to limit yourself to creating a static-page template for your site. You can use specific templates for the categories you’ve created on your blog (which I talk about in Book III, Chapter 5) and create unique sections for your site.
Figure 6-4 shows my design portfolio. Design Portfolio is the name of a category that I created on the WordPress Dashboard. Instead of using a static page for the display of my portfolio, I’m using a category template to handle the display of all posts made to the Design Portfolio category.
You can create category templates for all categories in your blog simply by creating template files that have filenames that correspond to the category slug and then upload those templates to your WordPress themes directory via FTP. (See Book II, Chapter 2.) Here's the logic to creating category templates:
![]() A template that has the filename
A template that has the filename category.php is a catchall for the display of categories.
![]() Add a dash and the category slug to the end of the filename (shown in Table 6-1) to specify a template for an individual category.
Add a dash and the category slug to the end of the filename (shown in Table 6-1) to specify a template for an individual category.

Figure 6-4: The Design Portfolio page, which uses a category template.
![]() If you don't have a
If you don't have a category.php or category-slug.php file, the category display gets defined from the Main Index template (index.php).
Table 6-1 shows three examples of the category template naming requirements.
Table 6-1 WordPress Category Template Naming Conventions
|
If the Category Slug Is . . . |
The Category Template Filename Is . . . |
|
design-portfolio |
|
|
books |
|
|
music-i-like |
|
Pulling in Content from a Single Category
WordPress makes it possible to pull in very specific types of content on your website through the use of the WP_Query class. If you include WP_Query before The Loop (see Book VI, Chapter 3), it lets you specify which category you want to pull information from. If you have a category called WordPress and you want to display the last three posts from that category — on your front page, in your blog sidebar, or somewhere else on your site — you can use this template tag.
The WP_Query class accepts several parameters that let you display different types of content, such as posts in specific categories and content from specific pages/posts or dates in your blog archives. The WP_Query class lets you pass so many variables and parameters that I just can't list all the possibilities. Instead, you can visit the WordPress Codex and read about the options available with this tag: http://codex.wordpress.org/Class_Reference/WP_Query#Parameters.
Here are two parameters that you can use with WP_Query:
![]()
posts_per_page=X: This parameter tells WordPress how many posts you want to display. If you want to display only three posts, enter posts_per_page=3.
![]()
category_name=slug: This parameter tells WordPress that you want to pull posts from the category with a specific slug. If you want to display posts from the WordPress category, this would be category_name=wordpress.
Follow these steps to filter posts by category using WP_Query:
1. Click the Editor link on the Appearance menu on the Dashboard.
The Edit Themes page opens.
2. Click the template in which you want to display the content.
If you want to display content in a sidebar, for example, choose the Sidebar template: sidebar.php.
3. Locate the ending </div> tag at the bottom of the template for the theme you're using.
Using the Twenty Twelve theme, the ending </div> tag is the second-to-last line.
4. Type the following code directly above the ending </ul> tag:
<?php $the_query = new WP_Query( posts_per_page=3&category_name=wordpress); ?>
<h2>Type Your Desired Title Here</h2>
<?php while ( $the_query->have_posts() ) : $the_query->the_post(); ?>
<strong><a href="<?php the_permalink() ?>" rel="bookmark" title="Permanent Link to <?php the_title_attribute(); ?>"><?php the_title(); ?></a></strong>
<?php the_excerpt(); endwhile; wp_reset_postdata(); ?>
In the first line, you indicate the following: posts_per_page=3&category_name=wordpress. You can change these numbers to suit your specific needs. Just change 3 to whatever number of posts you want to display (there's no limit!) and change wordpress to the specific category slug that you want to use.
5. Click the Update File button.
The changes you just made are saved to the sidebar.php template.
 In past versions of WordPress, you used the
 query_posts(); tag to pull content from a specific category, but the WP_Query class is more efficient. Although the query_posts(); tag provides the same result, it increases the number of calls to the database and increases page load and server resources.
Using Sidebar Templates
You can create separate sidebar templates for different pages of your site by using a simple include statement. When you write an include statement, you're simply telling WordPress that you want it to include a specific file on a specific page.
The code that pulls the usual Sidebar template (sidebar.php) into all the other templates, such as the Main Index template (index.php), looks like this:
<?php get_sidebar(); ?>
What if you create a page and want to use a sidebar that has different information from what you have in the Sidebar template (sidebar.php)? Follow these steps:
1. Create a new sidebar template in a text editor such as Notepad.
See Book VI for information on template tags and themes.
2. Save the file as sidebar2.php.
In Notepad, choose File⇒Save. When you’re asked to name the file, type sidebar2.php and then click Save.
3. Upload sidebar2.php to your Themes folder on your web server.
See Book II, Chapter 2 for FTP information and review Book VI, Chapter 2 for information on how to locate the Themes folder.
The template is now in your list of theme files on the Edit Themes page. (Log in to your WordPress Dashboard and click the Editor link on the Appearance drop-down menu.)
4. To include the sidebar2.php template in one of your page templates, replace <?php get_sidebar(); /> with this code:
<?php get_template_part('sidebar2'), ?>
This code calls in a template you’ve created within your theme.
By using that get_template_part function, you can include virtually any file in any of your WordPress templates. You can use this method to create footer templates for pages on your site, for example. First, create a new template that has the filename footer2.php. Then locate the following code in your template:
<?php get_footer(); ?>
and replace it with this code:
<?php get_template_part('footer2'), ?>
Creating Custom Styles for Sticky, Category, and Tag Posts
In Book VI, you can find the method for putting a very basic WordPress theme together, which includes a Main Index template that uses the WordPress Loop. You can use a custom tag to display custom styles for sticky posts, categories, and tags on your blog. That special tag looks like this:
<div <?php post_class() ?> id="post-<?php the_ID(); ?>">
The post_class() section is the coolest part of the template. This template tag tells WordPress to insert specific HTML markup in your template that allows you to use CSS to make custom styles for sticky posts, categories, and tags.
 In Book IV, Chapter 1, I tell you all about how to publish new posts to your blog, including the different options you can set for your blog posts, such as categories, tags, and publishing settings. One of the settings is the Stick This Post to the Front Page setting. In this chapter, I show you how to custom-style those sticky posts. It’s not as messy as it sounds!
For example, say that you publish a post that has the following options set:
![]() Stick this post to the front page.
Stick this post to the front page.
![]() Filed in a category called WordPress.
Filed in a category called WordPress.
![]() Tagged with News.
Tagged with News.
By having the post_class() tag in the template, WordPress inserts HTML markup that allows you to use CSS to style sticky posts, or posts assigned to specific tags or categories, with different styling than the rest of your posts. WordPress inserts the following HTML markup for your post:
<div class="post sticky category-wordpress tag-news">
In Book VI, you can discover CSS selectors and HTML markup and how they work together to create style and format for your WordPress theme. With the post_class() tag in place, you can go to your CSS file and define styles for the following CSS selectors:
![]()
.post: Use this as the generic style for all posts on your blog. The CSS for this tag is
.post {background: #ffffff; border: 1px solid silver; padding: 10px;}
A style is created for all posts that have a white background with a thin silver border and 10 pixels of padding space between the post text and the border of the post.
![]()
.sticky: You stick a post to your front page to call attention to that post, so you may want to use different CSS styling to make it stand out from the rest of the posts on your blog:
.sticky {background: #ffffff; border: 4px solid red; padding: 10px;}
This code creates a style for all posts that have been designated as sticky in the post options on the Write Post page to appear on your site with a white background, a thick red border, and 10 pixels of padding space between the post text and border of the post.
![]()
.category-wordpress: Because I blog a lot about WordPress, my readers may appreciate it if I gave them a visual cue as to which posts on my blog are about that topic. I can do that through CSS by telling WordPress to display a small WordPress icon on the top-right corner of all my posts in the WordPress category:
.category-wordpress {background: url(wordpress-icon.jpg) top right no-repeat; height: 100px; width: 100px;}
This code inserts a graphic — wordpress-icon.jpg — that's 100 pixels in height and 100 pixels in width at the top-right corner of every post I assign to the WordPress category on my blog.
![]()
.tag-news: I can style all posts tagged with News the same way I style the WordPress category:
.tag-news {background: #f2f2f2; border: 1px solid black; padding: 10px;}
This CSS styles all posts tagged with News with a light gray background and a thin black border with 10 pixels of padding between the post text and border of the post.
You can easily use the post-class() tag, combined with CSS, to create dynamic styles for the posts on your blog!
Working with Custom Post Types
A nice feature in WordPress (as of version 3.0) is a feature called Custom Post Types. This feature allows you, the site owner, to create different content types for your WordPress site that give you more creative control over how different types of content are entered, published, and displayed on your WordPress website.
Personally, I wish WordPress had called this feature Custom Content Types so that people didn’t incorrectly think that Custom Post Types pertain to posts only. Custom Post Types aren’t really the posts that you know as blog posts. Custom Post Types are a way of managing your blog content by defining what type of content it is, how it is displayed on your site, and how it operates — but they’re not necessarily posts.
By default, WordPress already has different post types built into the software, ready for you to use. These default post types include
![]() Blog posts
Blog posts
![]() Pages
Pages
![]() Navigation menus (see Book VI, Chapter 6)
Navigation menus (see Book VI, Chapter 6)
![]() Attachments
Attachments
![]() Revisions
Revisions
Custom Post Types give you the ability to create new and useful types of content on your website, including a smart and easy way to publish those content types to your site.
You really have endless possibilities for how to use Custom Post Types, but here are a few ideas that can kick-start your imagination (they’re some of the most popular and useful ideas that others have implemented on their sites):
![]() Photo gallery
Photo gallery
![]() Podcast or video
Podcast or video
![]() Book reviews
Book reviews
![]() Coupons and special offers
Coupons and special offers
![]() Events calendar
Events calendar
To create and use Custom Post Types on your site, you need to be sure that your WordPress theme contains the correct code and functions. In the following steps, I create a very basic Custom Post Type called Generic Content. Follow these steps to create the Generic Content basic Custom Post Type:
1. Click the Editor link on the Appearance menu on the Dashboard to open the Theme Editor page.
2. Click the Theme Functions template link to open the functions.php file in the text editor on the left side of the page.
3. Add the Custom Post Types code to the bottom of the Theme Functions template file.
Scroll down to the bottom of the functions.php file and include the following code to add a Generic Content Custom Post Type to your site:
add_action( 'init', 'create_my_post_types' );
function create_my_post_types() {
register_post_type( 'generic_content', array(
'label' => __( 'Generic Content' ),
'singular_label' => __( 'Generic Content' ),
'description' => __( 'Description of the Generic Content type' ),
'public' => true,
)
);
}
4. Click the Update File button to save the changes made to the functions.php file.
The function register_post_type can accept several different arguments and parameters, which are detailed in Table 6-2. You can use a variety and combination of different arguments and parameters to create a specific post type. You can find more information on Custom Post Types and using the register_post_type function in the official WordPress Codex at http://codex.wordpress.org/Function_Reference/register_post_type.
After you complete the preceding steps to add the Generic Content Custom Post Type to your site, a new post type labeled Generic appears on the left navigation menu of the Dashboard.
You can add and publish new content by using the new Custom Post Type, just like when you write and publish blog posts. (See Book IV, Chapter 1.) The published content isn’t added to the chronological listing of blog posts, but rather, it’s treated like separate content from your blog (just like static pages).
View the permalink for it and you see that it adopts the post type name Generic Content and uses it as part of the permalink structure, creating a permalink that looks like http://yourdomain.com/generic-content/new-article.


Two very helpful plugins for building Custom Post Types pretty quickly in WordPress are
![]() Custom Post Type UI: Written by the folks at WebDevStudios (
Custom Post Type UI: Written by the folks at WebDevStudios (http://wordpress.org/extend/plugins/custom-post-type-ui), this plugin gives you a clean interface within your WordPress Dashboard that can help you easily and quickly build Custom Post Types on your website. It eliminates the need to add the code to your functions.php file by giving you options and settings so that you can configure and build the Custom Post Type that you want. Figure 6-5 shows the Custom Post Type UI options page on the Dashboard.
![]() Betta Boxes CMS: Available in the WordPress Plugin Directory (
Betta Boxes CMS: Available in the WordPress Plugin Directory (http://wordpress.org/extend/plugins/betta-boxes-cms), this plugin provides an interface in your Dashboard that you can use to create meta boxes, or special Custom Fields (see Book IV, Chapter 5) for the Custom Post Types that you build. As an example, Figure 6-6 shows some custom meta boxes built by using this plugin. This website features theater productions and the Custom Post Types for those shows. On the right side of Figure 6-6, the Purchase Link box were created by using custom meta boxes and give the website owner a quick and easy field to fill out so that he or she can include information on where to purchase show tickets in every show post published.

Figure 6-5: The Custom Post Type UI plugin options page.

Figure 6-6: Purchase Link meta box created for this Custom Post Type.
Optimizing Your WordPress Blog
Search engine optimization (SEO) is the practice of preparing your site to make it as easy as possible for the major search engines to crawl and cache your data in their systems so that your site appears as high as possible in the search returns. Book V contains more information on search engine optimization, as well as marketing your blog and tracking its presence in search engines and social media by using analytics. This section gives you a brief introduction to SEO practices with WordPress, and from here, you can move on to Book V to take a hard look at some of the things you can do to improve and increase traffic to your website.
If you search for the keywords WordPress themes made to order on Google, my business site at E.Webscapes is in the top-ten search results for those keywords. (At least, it is while I’m writing this chapter.) Those results can change from day to day, so by the time you read this book, someone else may very well have taken over that coveted position. The reality of chasing those high-ranking search engine positions is that they’re here today, gone tomorrow. The goal of search engine optimization is to make sure that your site ranks as high as possible for the keywords that you think people will use to find your site. After you attain those high-ranking positions, the next goal is to keep them.
WordPress is equipped to create an environment that’s friendly to search engines, giving them easy navigation through your archives, categories, and pages. WordPress provides this environment with a clean code base, content that’s easily updated through the WordPress interface, and a solid navigation structure.
To extend search engine optimization even further, you can tweak five elements of your WordPress posts, pages, and templates:
![]() Custom permalinks: Use custom permalinks, rather than the default WordPress permalinks, to fill your post and page URLs with valuable keywords. Check out Book III, Chapter 2 for information on WordPress permalinks.
Custom permalinks: Use custom permalinks, rather than the default WordPress permalinks, to fill your post and page URLs with valuable keywords. Check out Book III, Chapter 2 for information on WordPress permalinks.
![]() Posts and page titles: Create descriptive titles for your blog posts and pages to provide rich keywords in your site.
Posts and page titles: Create descriptive titles for your blog posts and pages to provide rich keywords in your site.
![]() Text: Fill your blog posts and pages with keywords for search engines to find and index. Keeping your site updated with descriptive text and phrases helps the search engines find keywords to associate with your site.
Text: Fill your blog posts and pages with keywords for search engines to find and index. Keeping your site updated with descriptive text and phrases helps the search engines find keywords to associate with your site.
![]() Category names: Use descriptive names for the categories you create in WordPress to place great keywords right in the URL for those category pages, if you use custom permalinks.
Category names: Use descriptive names for the categories you create in WordPress to place great keywords right in the URL for those category pages, if you use custom permalinks.
![]() Images and
Images and <ALT> tags: Place <ALT> tags in your images to further define and describe the images on your site. You can accomplish this task easily by using the description field in the WordPress image uploader.
Planting keywords in your website
If you're interested in a higher ranking for your site, use custom permalinks. By using custom permalinks, you're automatically inserting keywords into the URLs of your posts and pages, letting search engines include those posts and pages in their databases of information on those topics. If a provider that has the Apache mod_rewrite module enabled hosts your site, you can use the custom permalink structure for your WordPress-powered site.
Keywords are the first step on your journey toward great search engine results. Search engines depend on keywords, and people use keywords to look for content.
The default permalink structure in WordPress is pretty ugly. When you’re looking at the default permalink for any post, you see a URL something like this:
http://yourdomain.com/p?=105
This URL contains no keywords of worth. If you change to a custom permalink structure, your post URLs automatically include the titles of your posts to provide keywords, which search engines absolutely love. A custom permalink may appear in this format:
http://yourdomain.com/2013/02/01/your-post-title
I explain setting up and using custom permalinks in full detail in Book III, Chapter 2.
Optimizing your post titles for search engine success
Search engine optimization doesn’t completely depend on how you set up your site. It also depends on you, the site owner, and how you present your content.
You can present your content in a way that lets search engines catalog your site easily by giving your blog posts and pages titles that make sense and coordinate with the actual content being presented. If you’re doing a post on a certain topic, make sure that the title of the post contains at least one or two keywords about that particular topic. This practice gives the search engines even more ammunition to list your site in searches relevant to the topic of your post.
As your site’s presence in the search engines grows, more people will find your site, and your readership will increase as a result.
A blog post with the title A Book I’m Reading doesn’t tell anyone what book you’re reading, making it difficult for people searching for information on that particular book to find the post.
If you give the post the title WordPress All-in-One For Dummies: My Review, you provide keywords in the title, and (if you’re using custom permalinks) WordPress automatically inserts those keywords into the URL, giving the search engines a triple keyword play:
![]() Keywords exist in your blog post title.
Keywords exist in your blog post title.
![]() Keywords exist in your blog post URL.
Keywords exist in your blog post URL.
![]() Keywords exist in the content of your post.
Keywords exist in the content of your post.
Writing content with readers in mind
When you write your posts and pages and want to make sure that your content appears in the first page of search results so that people will find your site, you need to keep those people in mind when you’re composing the content.
When search engines visit your site to crawl through your content, they don’t see how nicely you’ve designed your site. They’re looking for words to include in their databases. You, the site owner, want to make sure that your posts and pages use the words and phrases that you want to include in search engines.
If your post is about a recipe for fried green tomatoes, for example, you need to add a keyword or phrase that you think people will use when they search for the topic. If you think people would use the phrase recipe for fried green tomatoes as a search term, you may want to include that phrase in the content and title of your post.
A title such as A Recipe I Like isn’t as effective as a title such as A Recipe for Fried Green Tomatoes. Including a clear, specific title in your post or page content gives the search engines a double-keyword whammy.
Here’s another example: I once wrote a post about a rash that I developed on my finger, under my ring. I wrote that post six years ago, not really meaning to attract a bunch of people to that particular post. However, it seems that many women around the world suffer from the same rash because, six years later, that post still gets at least one comment a week. When people do a Google search by using the keywords rash under my wedding ring, out of a possible 128,000 results returned, my blog post appears in the top five slots.
This is how great blogs are! I was actually able to solve my problem with the rash under my finger because one woman from Australia found my blog through Google, visited my blog post, and left a comment with a solution that worked. Who says blogs aren’t useful?
Creating categories that attract search engines
One little-known SEO tip for WordPress users: The names you give the categories you create for your blog provide rich keywords that attract search engines like honey attracts bees. A few services — Technorati (http://technorati.com) being one of the biggest — treat categories in WordPress like tags. These services use those categories to classify recent blog posts on any given topic. The names you give your categories in WordPress can serve as topic tags for Technorati and similar services.
Search engines also see your categories as keywords that are relevant to the content on your site. So, make sure that you’re giving your categories names that are relevant to the content you’re providing.
If you sometimes blog about your favorite recipes, you can make it easier for search engines to find your recipes if you create categories specific to the recipes you’re blogging about. Instead of having one Favorite Recipes category, you can create multiple category names that correspond to the types of recipes you blog about — Casserole Recipes, Dessert Recipes, Beef Recipes, and Chicken Recipes, for example.
Creating specific category titles not only helps search engines, but it also helps your readers discover content that is related to topics they’re interested in.
You can also consider having one category called Favorite Recipes and creating subcategories (also known as child categories) that give a few more details on the types of recipes you’ve written about. (See Book III, Chapter 5, for information on creating Categories and child categories.)
Categories use the custom permalink structure, just like posts do. So, links to your WordPress categories also become keyword tools within your site to help the search engines — and, ultimately, search engine users — find the content. Using custom permalinks creates category page URLs that look something like this:
http://yourdomain.com/category/category_name
The category_name portion of that URL puts the keywords right into the hands of search engines.
Using the <ALT> tag for images
When you use the WordPress media uploader to include an image in your post or page, a Description text box appears, and in it you can enter a description of the image. (I cover using the WordPress image uploader in detail in Book IV, Chapter 3.) This text automatically becomes what's referred to as the <ALT> tag, or alternative text.
The <ALT> tag's real purpose is to provide a description of the image for people who, for some reason or another, can't actually see the image. In a text-based browser that doesn't display images, for example, visitors see the description, or <ALT> text, telling them what image would be there if they could see it. Also, the tag helps people who have impaired vision and rely on screen-reading technology because the screen reader reads the <ALT> text from the image. You can read more about website accessibility for people with disabilities at www.w3.org/WAI/intro/people-use-web/Overview.html.
An extra benefit of <ALT> tags is that search engines gather data from them to further classify the content of your site. The following code inserts an image with the <ALT> tag of the code in bold to demonstrate what I'm talking about:
<img src="http://yourdomain.com/image.jpg" alt="This is an ALT tag within an image" />
Search engines harvest those <ALT> tags as keywords. The WordPress image uploader gives you an easy way to include those <ALT> tags without having to worry about inserting them into the image code yourself. Just fill out the Description text box before you upload and add the image to your post. Book IV, Chapter 3 covers in-depth information on adding images to your site content, including how to add descriptive text for the <ALT> tag and keywords.