Chapter 4: Exploring Podcasting and Video Blogging
In This Chapter
![]() Uploading and embedding videos in posts
Uploading and embedding videos in posts
![]() Adding audio files to posts
Adding audio files to posts
![]() Exploring podcasting and vlogging
Exploring podcasting and vlogging
![]() Using the Media Library
Using the Media Library
Many website owners want to go beyond just offering written content for the consumption of their visitors by offering different types of media, including audio and video files. WordPress makes it pretty easy to include these different types of media files in your posts and pages by using the built-in file-upload feature.
The audio files you add to your site can include music or voice in formats such as .mp3, .midi, or .wav (to name just a few). Some website owners produce their own audio files in regular episodes, called podcasts, to create an Internet radio show. Often you can find these audio files available for syndication through RSS and can subscribe to them in a variety of audio programs, such as iTunes.
You can include videos in blog posts or pages by embedding code offered by popular third-party video providers such as YouTube (www.youtube.com) or Vimeo (www.vimeo.com). Website owners can also produce and upload their own video shows, an activity known as vlogging (video blogging).
This chapter takes you through the steps to upload and embed audio and video files within your content, and it provides you with some tools that can help you more easily embed those files without having to use elaborate coding techniques.
 When dealing with video and audio files on your site, remember to upload and use only media that you own or have permission to use. Copyright violation is a very serious offense, especially on the Internet, and using media that you do not have permission to use can have serious consequences, such as having your website taken down, facing heavy fines, and even going to jail. I would really hate to see that happen to you — so play it safe and use only those media files that you have permission to use.
Inserting Video Files into Your Blog Posts
Whether you’re producing your own videos for publication or embedding other people’s videos, placing a video file in a blog post has never been easier with WordPress.
 Check out a good example of a video blog at
 www.tmz.com/videos. TMZ is a popular celebrity news website that produces and displays videos for the web and for mobile devices.
Several video galleries on the web today allow you to add videos to blog posts — Google's YouTube service (www.youtube.com) is a good example of a third-party video service that allows you to share its videos.
Adding a link to a video from the web
Adding a video from the web, in these steps, adds only a hyperlink to the video. Use these steps if all you want to do is link to a page that has the video on it, rather than embedding the video in your blog post or page (covered in the Adding Video with Auto-Embed section later in this chapter).
To add a link to a video from the web, follow these steps:
1. Click the Add Media button on the Add New Post page to open the Insert Media window.
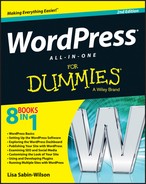
2. Click the Insert from URL link on the left.
The Insert from URL page appears, as shown in Figure 4-1.
3. Type the URL (Internet address) of the video in the Insert from URL text box.
Type the full URL, including the http:// and www portion of the address. Video providers, such as YouTube, usually list the direct links for the video files on their sites; you can copy and paste one of those links into the Video URL text box.
4. (Optional) Type the title of the video in the Title text box.
Giving a title to the video allows you to provide a bit of a description of the video. Provide a title if you can so that your readers know what the video is about.
5. Click the Insert into Post button.
A link to the video is inserted into your post. WordPress doesn’t embed the actual video in the post; it inserts only a link to the video. Your blog visitors click the link to load another page in which the video plays.
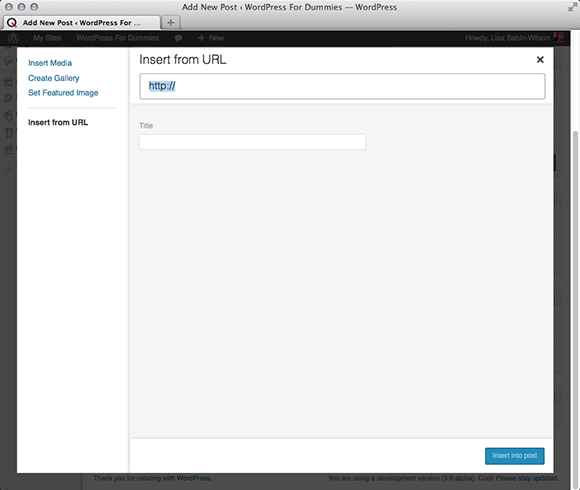
Figure 4-1: Add a video by linking to a URL.
Adding video with Auto-Embed
The preceding steps give you the ability to insert a hyperlink that your readers can click to view the video on another website (such as YouTube). However, if you use WordPress’s nifty Auto-Embed feature, WordPress will automatically embed many of these videos within your posts and pages.
With this feature, WordPress automatically detects that a URL you typed in your post is a video (from YouTube, for example) and wraps the correct HTML embed code around that URL to make sure that the video player appears in your post (in a standard, XHTML-compliant way). The Auto-Embed feature is automatically enabled on your WordPress site; all you need to do is type the video URL within the content of your post or page.
Currently, WordPress automatically embeds videos from YouTube, Vimeo, Dailymotion, Blip, Flickr, Hulu, Viddler, Qik, Revision3, Photobucket, and Google Video, as well as VideoPress-type videos from WordPress.tv.
Adding video from your computer
To upload and post to your blog a video from your computer, follow these steps:
1. Click the Add Media button on the Edit Post or Add New Post page.
The Insert Media window appears.
2. Click the Upload Files tab at the top and then click the Select Files button.
3. Select the video file you want to upload and then click Open.
The video is uploaded from your computer to your web server, and the Insert Media window displays your uploaded video selected and ready for editing.
4. In the Attachment Details section, type a title for the file in the Title text box, a caption in the Caption text box, and a description in the Description text box.
5. Still in the Attachment Details section, select the Link To option.
You can link to a custom URL, the attachment page, or the media file, or you can link to nothing at all.
6. Click the Insert into Post button.
WordPress doesn’t embed a video player in the post; it inserts only a link to the video. However, if you have the Auto-Embed feature activated, WordPress attempts to embed the video within a video player. If WordPress cannot embed a video player, it displays the link that your visitors can click to open the video in a new window.
Inserting Audio Files into Your Blog Posts
Audio files can be music files or voice recordings, such as recordings of you speaking to your readers. These files add a nice personal touch to your blog. You can easily share audio files on your blog by using the Add Media feature in WordPress. After you insert an audio file in a blog post, your readers can listen to it on their computers or download it onto an MP3 player and listen to it while driving to work, if they want.
To upload an audio file to your site, follow the same steps outlined in the preceding section for uploading a video.
 WordPress doesn’t automatically include an audio player interface for playing your file. Instead, WordPress inserts a link your readers can click to listen to the audio file.
Some great WordPress plugins for handling audio can enhance the functionality of the file uploader and help you manage audio files in your blog posts. Check out Book VII for information on how to install and use WordPress plugins in your blog.
Podcasting with WordPress
When you provide regular episodes of an audio show that visitors can download to a computer and listen to on an audio player, you’re podcasting. Think of podcasting as a weekly radio show that you tune into, except that it’s hosted on the Internet, rather than on a radio station.
In the sidebar “WordPress video and audio plugins” in this chapter, you can find a few plugins that allow you to easily insert audio files in your WordPress posts and pages — however, a few plugins are dedicated to podcasting, and they provide features to podcasters that go beyond just embedding audio files in a website. Some of the more important of these features include
![]() Archives: Create an archive of your audio podcast files so that your listeners can catch up on your show by listening to past episodes.
Archives: Create an archive of your audio podcast files so that your listeners can catch up on your show by listening to past episodes.
![]() RSS Feed: An RSS feed of your podcast show gives visitors the opportunity to subscribe to your syndicated content so that they can be notified when you publish future episodes.
RSS Feed: An RSS feed of your podcast show gives visitors the opportunity to subscribe to your syndicated content so that they can be notified when you publish future episodes.
![]() Promotion: A podcast isn't successful without listeners, right? You can upload your podcast to iTunes (
Promotion: A podcast isn't successful without listeners, right? You can upload your podcast to iTunes (www.apple.com/itunes) so that when people search iTunes for podcasts by subject, they find your podcast.
These three plugins go beyond just audio-file management. They’re dedicated to podcasting and all the features you need:
![]() PowerPress (
PowerPress (http://wordpress.org/extend/plugins/powerpress): PowerPress includes full iTunes support; audio players; multiple file-format support (.mp3, .m4a, .ogg, .wma, .ra, .mp4a, .m4v, .mp4v, .mpg, .asf, .avi, .wmv, .flv, .swf, .mov, .divx, .3gp, .midi, .wav, .aa, .pdf, .torrent, .m4b, .m4r); statistics to track the popularity of your different podcast offerings; and tagging, categorizing, and archiving of podcast files.
![]() Podcast Channels (
Podcast Channels (http://wordpress.org/extend/plugins/podcast-channels): WordPress provides some of the basic stuff needed for podcasting, such as media-file embedding, archiving, and RSS feed handling. The Podcast Channels plugin gives you iTunes metadata that enables you to specify channels for your podcast files and include them in the iTunes library.
![]() Podcasting Plugin (
Podcasting Plugin (http://wordpress.org/extend/plugins/podcasting): Enhances the built-in WordPress audio-management features by adding iTunes support, compatible RSS feeds, and media players. This plugin also allows you to have multiple podcasting feeds, in case you have different podcast shows that cover a range of topics.
I discuss web hosting requirements in Book II. If you’re a podcaster and intend to store audio files on your web hosting account, you may need to increase the storage and bandwidth for your account so that you don’t run out of space or incur higher fees from your web hosting provider. Discuss these issues with your web hosting provider to find out upfront what you have to pay for increased disk space and bandwidth needs.
Keeping Media Files Organized
If you’ve been running your blog for any length of time, you can easily forget what files you’ve uploaded by using the WordPress uploader. The WordPress Media Library allows you to conveniently and easily discover which files are in your Uploads folder.
WordPress video and audio plugins
You can find some great WordPress plugins for audio and video handling. Check out Book VII for information on how to install and use WordPress plugins.
Here are a few great plugins for audio:
![]() Audio Player by Martin Laine (
Audio Player by Martin Laine (http://wordpress.org/extend/plugins/audio-player): Embeds a Flash MP3 player in your blog posts without any special HTML
![]() 1 Bit Audio Player by Mark Wheeler (
1 Bit Audio Player by Mark Wheeler (http://wordpress.org/extend/plugins/1-bit-audio-player): Autodetects MP3 files on your site and inserts a stylish player
![]() Podcasting Plugin by TSG (
Podcasting Plugin by TSG (http://wordpress.org/extend/plugins/podcasting): Supports several media formats and automatically creates a podcast RSS feed
Here are a few great plugins for video:
![]() wordTube by Alex Rabe (
wordTube by Alex Rabe (http://wordpress.org/extend/plugins/wordtube): Creates a YouTube-like player when you insert video files within your posts without any special HTML
![]() Smart YouTube by Vladimir Prelovac (
Smart YouTube by Vladimir Prelovac (http://wordpress.org/extend/plugins/smart-youtube): Inserts YouTube videos into blog posts, comments, and RSS feeds
![]() WP-Vidavee by Vidavee Labs (
WP-Vidavee by Vidavee Labs (http://wordpress.org/extend/plugins/wp-vidavee-film-manager): Uploads, manages, organizes, and displays video in your blog
![]() Video Embedder by Kristoffer Forsgren (
Video Embedder by Kristoffer Forsgren (http://wordpress.org/extend/plugins/video-embedder): Embeds video from various sources
To find an image, a video, or an audio file you’ve already uploaded by using the file uploader and to use that file in a new post, follow these steps:
1. Click the Add Media icon on the Add New Post page to open the Insert Media window.
2. Click the Media Library tab at the top of the window.
All the files you’ve ever uploaded to your blog appear because of the File Uploader feature. (See Figure 4-2.) Files you uploaded through other methods, such as FTP, don’t appear in the Media Library.
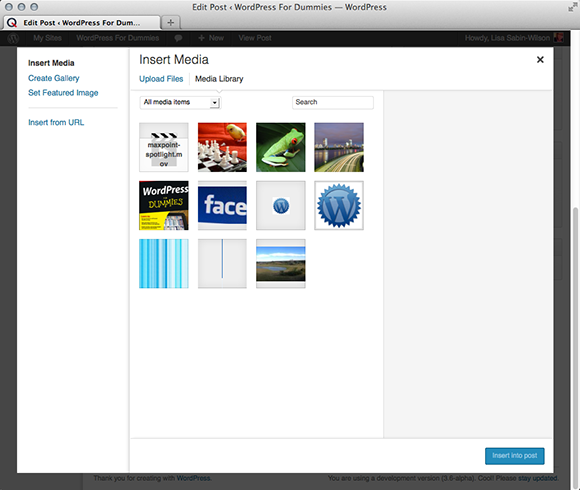
Figure 4-2: The Media Library shows all the files you’ve ever uploaded to your blog.
3. Select the file that you want to reuse.
4. In the settings menu that appears, set the options for that file: Title, Caption, Description, Link URL, Order, Alignment, and Size.
5. Click the Insert into Post button.
The correct HTML code is inserted into the Post text box.
If you want to view only the files you’ve uploaded, click the Library link on the Media menu (found on the left navigation menu of the Dashboard), which opens the Media Library page.
The Media Library page lists all the files you’ve ever uploaded to your WordPress blog. By default, the page displays all types of files, but you can click the Images, Audio, or Video link to specify which file type you want to see (as shown in Figure 4-3).
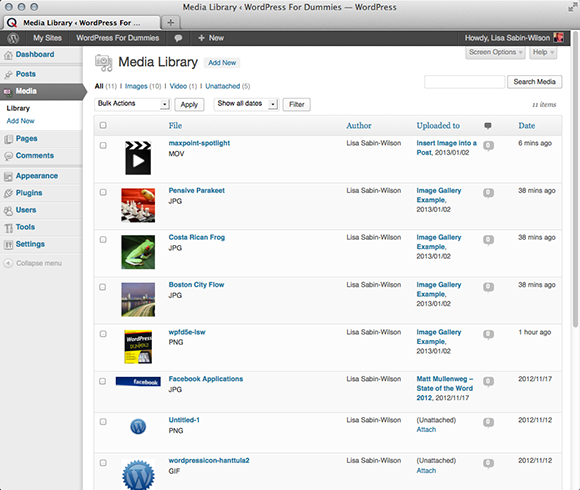
Figure 4-3: The WordPress Media Library, displaying only audio files.
You can do the following tasks on the Media Library page:
![]() Filter media files by date. If you want to view all media files that were uploaded in July of 2010, select that date from the drop-down list and click the Filter button; the page reloads and displays only the media files uploaded in the month of July, 2010.
Filter media files by date. If you want to view all media files that were uploaded in July of 2010, select that date from the drop-down list and click the Filter button; the page reloads and displays only the media files uploaded in the month of July, 2010.
![]() Search media files by using a specific keyword. If you want to search your Media Library for all files that reference kittens, type the word kittens in the Search box in the upper-right corner of the Media Library page. Then click the Search Media button; the page reloads and displays only media files that contain the keyword or tag kittens.
Search media files by using a specific keyword. If you want to search your Media Library for all files that reference kittens, type the word kittens in the Search box in the upper-right corner of the Media Library page. Then click the Search Media button; the page reloads and displays only media files that contain the keyword or tag kittens.
![]() Delete media files. To delete files, click the small white box that appears to the left of the file’s thumbnail on the Media Library page (on the Dashboard, hover your pointer over Media and click the Library link); then select the Delete Permanently option in the Bulk Actions drop-down list, which appears at the top left of the page, and then click the Apply button. The page reloads, and the media file you just deleted is now gone.
Delete media files. To delete files, click the small white box that appears to the left of the file’s thumbnail on the Media Library page (on the Dashboard, hover your pointer over Media and click the Library link); then select the Delete Permanently option in the Bulk Actions drop-down list, which appears at the top left of the page, and then click the Apply button. The page reloads, and the media file you just deleted is now gone.
![]() View media files. On the Manage Media page, click the thumbnail of the file you want to view. The Edit Media page opens in your web browser. If you need the URL of the file, you can copy the permalink of the file from the File URL field found in the top right side of the Edit Media page.
View media files. On the Manage Media page, click the thumbnail of the file you want to view. The Edit Media page opens in your web browser. If you need the URL of the file, you can copy the permalink of the file from the File URL field found in the top right side of the Edit Media page.