Chapter 1: Examining the Default Theme: Twenty Twelve
In This Chapter
![]() Discovering Twenty Twelve’s layout features
Discovering Twenty Twelve’s layout features
![]() Tweaking your header and background colors
Tweaking your header and background colors
![]() Installing custom navigation menus
Installing custom navigation menus
![]() Exploring widgets on your website
Exploring widgets on your website
Bundled with the release of WordPress 3.5 in December 2012 is the new default theme, Twenty Twelve. The goal of the core development team for WordPress is to release a new default theme every year, which is why, with every new installation of WordPress, you find themes called Twenty Ten, Twenty Eleven, and Twenty Twelve (named to correspond with the year it was created).
With the release of WordPress version 3.5 in 2012, the resulting community effort was Twenty Twelve, a powerful theme with drop-down menu navigation, header and background image uploaders, multiple-page templates, widget-ready areas, parent-child theme support, and built-in mobile and tablet support. These features make Twenty Twelve an excellent base for many of your theme customization projects. This chapter shows you how to manage all the features of the default Twenty Twelve theme, such as handling layouts, editing the header graphic and background colors, installing and using custom navigation menus, and using widgets on your site to add some great features.
Exploring the Layout and Structure
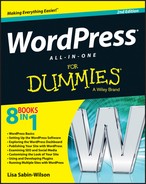
If you just want a simple look for your site, look no further than Twenty Twelve. This theme offers a clean design style that is highly customizable. As such, the font treatments are sharp and easy to read. Many of the new built-in theme features allow you to make simple yet elegant tweaks to the theme, including uploading new feature images and adjusting the background colors. Figure 1-1 shows the Twenty Twelve WordPress default theme.
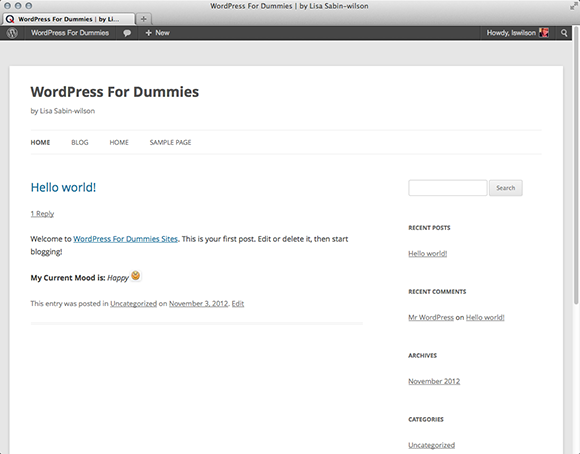
Figure 1-1: The default theme for WordPress, Twenty Twelve.
The Twenty Twelve theme’s distinctive layout features include
![]() Two column default layout: The two-column layout — one of the most common layouts for blogs and used more and more on general websites — is the default in Twenty Twelve and includes a content area on the left, a widget-ready sidebar on the right, and a footer area with four widget-ready spaces. Figure 1-1 shows the standard two-column layout.
Two column default layout: The two-column layout — one of the most common layouts for blogs and used more and more on general websites — is the default in Twenty Twelve and includes a content area on the left, a widget-ready sidebar on the right, and a footer area with four widget-ready spaces. Figure 1-1 shows the standard two-column layout.
![]() One-column page layout: Twenty Twelve’s one-column layout can be applied to WordPress Pages via the page template feature. This one-column layout, shown in Figure 1-2, comes in very handy for such pages as product sales pages, e-mail subscription form pages, photography or portfolio pages, and other content that you don’t want bothered by distractions on the sidebar.
One-column page layout: Twenty Twelve’s one-column layout can be applied to WordPress Pages via the page template feature. This one-column layout, shown in Figure 1-2, comes in very handy for such pages as product sales pages, e-mail subscription form pages, photography or portfolio pages, and other content that you don’t want bothered by distractions on the sidebar.
![]() Color adjustment: By default, the header text (site title) in the Twenty Twelve theme is a dark grey, almost black, color, and the background color of the site is light grey. You can easily change the colors of the header text and site background by using the theme customizer. (Steps to accomplish this are provided later in this chapter in the section titled “Customizing the Background Color.”) Figure 1-3 shows the Twenty Twelve theme with red header text and a dark background color.
Color adjustment: By default, the header text (site title) in the Twenty Twelve theme is a dark grey, almost black, color, and the background color of the site is light grey. You can easily change the colors of the header text and site background by using the theme customizer. (Steps to accomplish this are provided later in this chapter in the section titled “Customizing the Background Color.”) Figure 1-3 shows the Twenty Twelve theme with red header text and a dark background color.
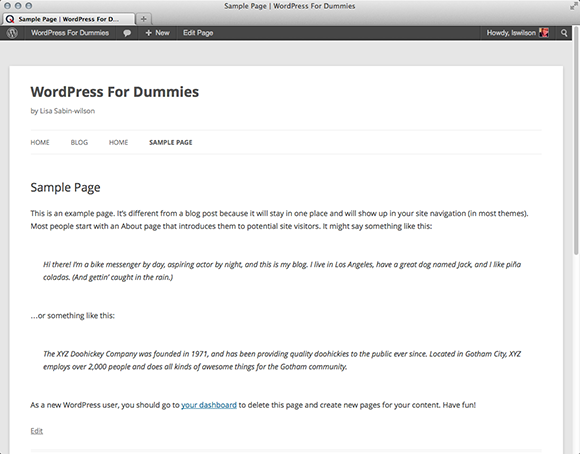
Figure 1-2: The Twenty Twelve theme’s one-column layout.
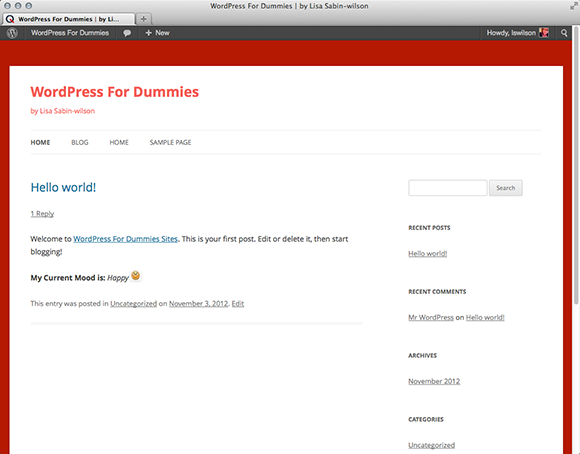
Figure 1-3: The Twenty Twelve theme with custom colors.
To apply Twenty Twelve’s one-column layout to a new WordPress page, follow these steps:
1. On the WordPress Dashboard, click the Add New link on the Pages menu.
You can also edit an existing Page and apply the one-column page layout by using these steps.
2. Add your page title and content into the corresponding areas.
Book IV, Chapter 1 takes you through the steps of writing and publishing a post or a page in WordPress.
3. From the Template drop-down list, select Full-Width Page Template, No Sidebar.
The Template drop-down menu is located under the Page Attributes heading on the right side of the Add New Page screen.
 The Twenty Twelve theme has two page templates. Other themes may have multiple page template options on this menu.
4. Click the Publish button.
This step saves your new page and publishes it to your site with the Full-Width Page Template, No Sidebar page template assigned to it. (Refer to Figure 1-2.)
Customizing the Header Image
Another great feature in Twenty Twelve is the header uploader, which allows you to upload new and unique custom header graphics for your WordPress site.
The dimensions for your customized header are at least 960 pixels in width and 250 pixels in height. If your photo is larger than that, you can crop it after you’ve uploaded it to WordPress, although cropping the image with a graphics program (like Photoshop) is the best way to get exact results.
Twenty Twelve comes preloaded with eight default header images, but WordPress allows you to upload one of your own. To install a custom header graphic, follow these steps:
1. On the WordPress Dashboard, click the Header link on the Appearance menu.
On the Custom Header page, the settings for the header image feature appear.
2. Click the Browse button in the Select Image section and select your chosen photo in the dialog box (shown in Figure 1-4).
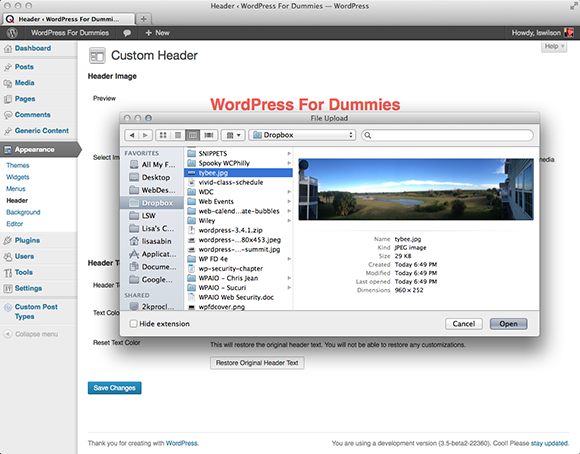
Figure 1-4: Selecting an image from your computer’s hard drive.
3. Click the Open button.
This step transfers the image from your computers hard drive to your WordPress installation directory and loads the Crop Header page, shown in Figure 1-5.
4. (Optional) Crop the image to your liking.
To resize and crop your image, drag one of the eight boxes located at the corners and the middle of each side of the image. You can also click within the image and move the entire image up or down to get the optimal placement and cropping effect that you want.
5. Click the Crop and Publish button if you cropped your header. Or click the Skip Cropping, Publish Image as Is button.
Figure 1-6 shows the Twenty Twelve theme with a custom header image.
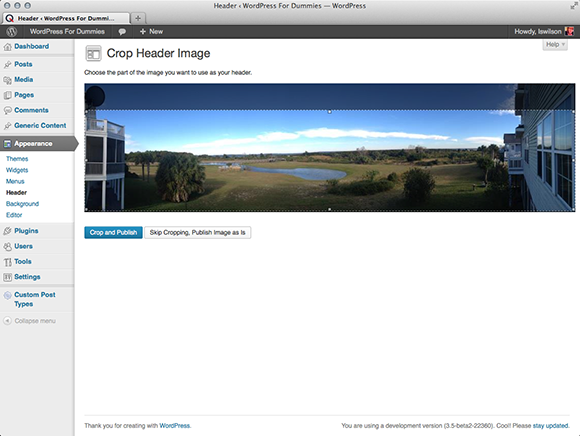
Figure 1-5: Using the crop tool.
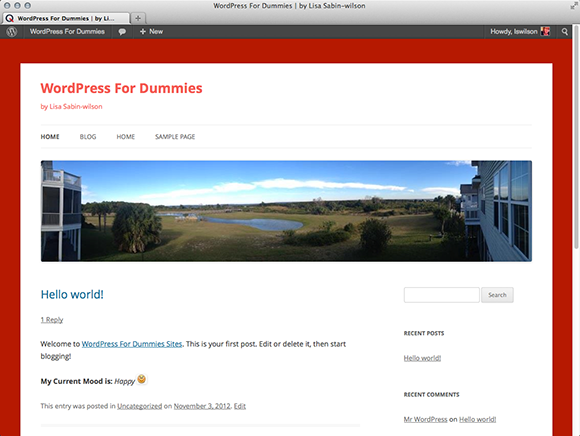
Figure 1-6: The Twenty Twelve theme with new header image.
Customizing the Background Color
After you explore the header image settings, you may want to pick a background color or image that complements your header. The default background color in the Twenty Twelve theme is white; however, with the Background options in the Twenty Twelve theme, you can change the color. Here’s how:
1. On the WordPress Dashboard, click the Background link on the Appearance menu.
The Custom Background page opens on your Dashboard, displaying all the options for the custom background feature.
2. In the Display Options section, click the Select Color button.
The Select Color button changes to Current Color after you click it to set the color value. Color values are defined in HTML and CSS by six-digit hexadecimal codes starting with the # sign, such as #000000 for black or #FFFFFF for white. (As noted in Book VI, Chapter 4, adjusting hexadecimal colors is one of the easiest ways to tweak the colors in your theme for a new look.)
3. Enter the desired hexadecimal code for your selected color.
Alternatively, you can click inside the color picker and select just the right color you want, as shown in Figure 1-7. The color picker automatically inserts the six-digit hexadecimal code for your color choice.
4. Click the Save Changes button.
Your changes are saved and applied to your site.
If you want something a little more substantial for your background than just a simple color, you can also upload an image to use as a background on your website. A background image adds some flair to your site. To upload a new background graphic, simply follow these steps:
1. On the WordPress Dashboard, click the Background link on the Appearance menu.
The Custom Background page loads on your Dashboard. Refer to Figure 1-7.
2. In the Select Image section, click the Browse button.
A window pops up, asking you to select an image from your computer’s hard drive.
3. Click the Upload button.
The Custom Background page reloads with your selected image in the preview area of the page.
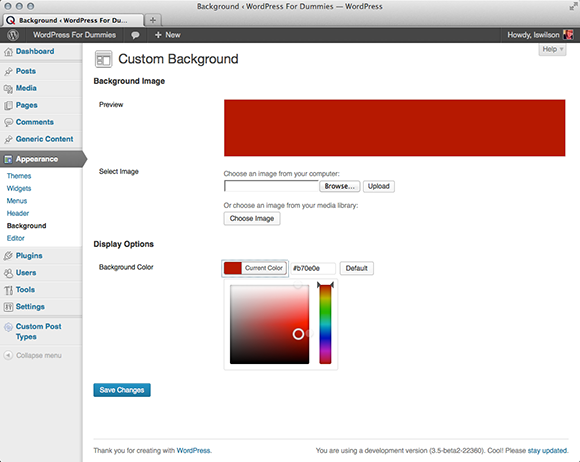
Figure 1-7: The Twenty Twelve theme’s background options.
After you upload a background image, the new display options that appear (see Figure 1-8) allow you to place your image exactly as you desire. Select any of these features, and the Preview window shows you how your background image will display:
![]() Position: This is where you want the image placed or pinned with options for image to start at the left side, center, or right side of the theme background.
Position: This is where you want the image placed or pinned with options for image to start at the left side, center, or right side of the theme background.
![]() Repeat: This sets how you want the image to tile or repeat across the page. If you want one image without tiling, set Repeat to No Repeat. You can also set it to tile vertically (up and down the page) or tile horizontally (left and right, across the page).
Repeat: This sets how you want the image to tile or repeat across the page. If you want one image without tiling, set Repeat to No Repeat. You can also set it to tile vertically (up and down the page) or tile horizontally (left and right, across the page).
![]() Attachment: This sets whether the background image scrolls with the page in the browser or is fixed in one place no matter where the page is in the browser.
Attachment: This sets whether the background image scrolls with the page in the browser or is fixed in one place no matter where the page is in the browser.
![]() Background Color: This sets the solid color that displays behind your background image.
Background Color: This sets the solid color that displays behind your background image.
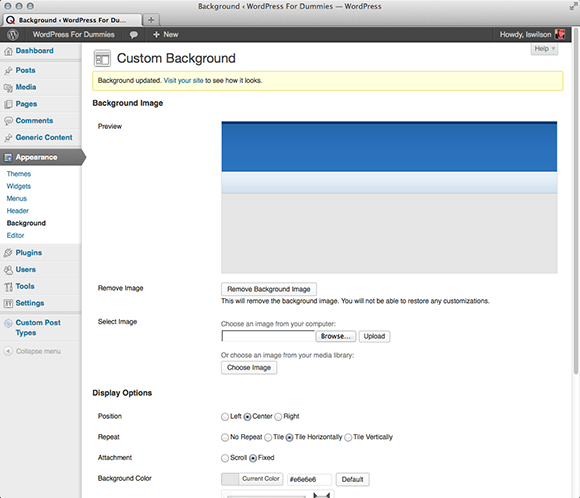
Figure 1-8: Twenty Twelve’s background uploader.
After you finalize your selections, click the Save Changes button and view your site for the exact look.
 If you upload the wrong image from your computer or the image doesn’t look the way you hoped, there’s a convenient Remove Background Image button on the Custom Background page. Clicking this button completely removes the image from the Custom Background settings and allows you to start over with a different image.
Including Custom Navigation Menus
Navigational menus are vital parts of your site’s design. They tell your site visitors where to go and how to access important information or areas on your site. The Menus feature released in WordPress 3.0 is an extremely significant addition to the already powerful software that allowed greater control over the navigational areas.
Similar to the WordPress Widgets feature, which lets you drag and drop widgets, the Menus feature offers an easy way to add and reorder a variety of navigational links to your site, as well as create secondary menu bars (if your theme offers multiple menu areas).
Additionally, the Menus feature improves WordPress further by allowing you to easily create more traditional websites, which sometimes need multiple and more diverse navigational areas than a typical blog layout uses or needs.
Twenty Twelve comes with the appropriate code in the navigation menus that make use of this robust feature. (By default, Twenty Twelve offers only one menu navigation area to include a custom menu.)
To create a new navigation menu in Twenty Twelve, follow these steps:
1. On the WordPress Dashboard, click the Menus link on the Appearance menu.
The Menus page loads on your Dashboard, as shown in Figure 1-9.
2. Enter a menu name in the Menu Name field and then click Create Menu.
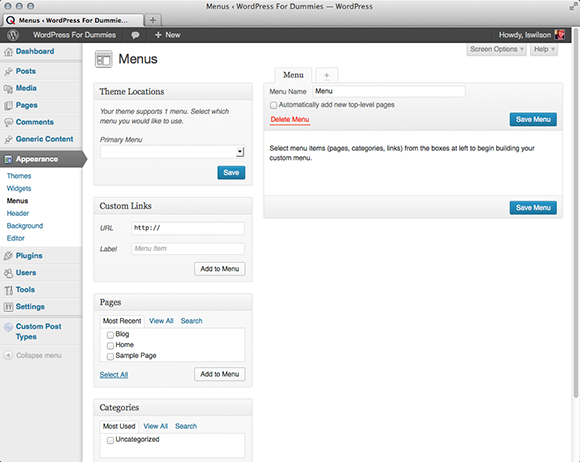
Figure 1-9: The WordPress Menus page.
After you create your new custom menu, the gray modules to the left become active for you to add new links to your custom menu.
3. In the Theme Locations module, select your new menu from the Primary Menu drop-down list and click Save.
Your new menu in the theme is activated for display on your site. As noted in the Theme Locations module, the Twenty Twelve theme supports only one custom menu, defined as Primary Menu.
4. Add menu items, such as custom links, pages, and categories, to your new menu.
Items you can add to your menu include the following:
• Pages: To include existing pages in your menu, locate the Pages module (shown in Figure 1-10) and click the pages you want to include. After you do that, click the Add to Menu button and then click the Save Menu button.
• Categories: To include existing categories on your menu, scroll to the Categories module (shown in Figure 1-10) and click the categories you want to include. After you do that, click the Add to Menu button and then click the Save Menu button.
• Custom Links: You can add links to sites that exist outside your website, such as your Twitter or Facebook profile pages. Scroll to the Custom Links module (shown in Figure 1-11). In the URL field, type the web address you want to direct people to. In the Label field, add the word or phrase the menu displays for people to click. Then click the Save Menu button.

Figure 1-10: Selecting categories to add to the custom menu.
If you’re using custom post types (covered in Chapter 6 of this minibook), click the Screen Options tab at the top right of the Dashboard screen and select Custom Post Types under Show onscreen. This option makes custom post type links available for addition to the menu.
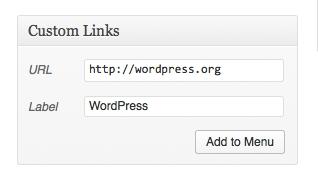
Figure 1-11: Adding links to a custom menu.
5. Click Save Menu to add your custom menu to your theme.
Click Save Menu after you make any significant change to your custom menu, such as reordering or adding new menu items so they are reflected on your site.
After you save your navigation menu, you can use the drag-and-drop interface to rearrange it, as shown in Figure 1-12. Additionally, you can create submenus under top-level menu items by moving menu items slightly to the right beneath the top-level items.

Figure 1-12: The drag-and-drop interface of the WordPress Menus feature.
Make use of the submenu feature to avoid cluttering up the navigation bar. By organizing content logically, you can help readers find what they want faster even if you have lots of content for them to look through.
You can also create multiple custom menus and add them to your theme through widget areas by using the Custom Menu widget, navigation areas if your theme supports multiple menu areas, or additional menu areas by inserting the WordPress template tag directly into your theme’s template files.
Enhancing Your Website with Widgets
WordPress widgets are very helpful tools built in to the WordPress application. They allow you to arrange the display of content in your blog sidebar, such as recent posts, and monthly and category archive lists. With widgets, arrange and display the content in the sidebar of your blog without having to know a single bit of PHP or HTML.
In this case, Widget areas are the regions in your theme that allow you to insert and arrange content (such as a list of your recent blog posts or links to your favorite sites) or custom menus, by dragging and dropping (and editing) available widgets (shown on the Dashboard’s Widget page) into those corresponding areas.
Many widgets offered by WordPress (and those added sometimes by WordPress themes and plugins) provide drag-and-drop installation of more advanced functions normally available only if you write code directly into your theme files.
Click the Widgets link on the Appearance menu on the Dashboard. The Widgets page displays the available widgets. This feature is a big draw because it lets you control what features you use and where you place them without having to know a lick of code.
To explore the Twenty Twelve theme’s widget-ready areas, click the Widgets link on the Appearance menu on the Dashboard. The Widgets page displays modules labeled Main Sidebar, First Front Page Widget Area, and Second Front Page Widget Area, as shown in Figure 1-13. The widget areas that can be edited in the Twenty Twelve theme through the WordPress Dashboard are shown in Figure 1-13.
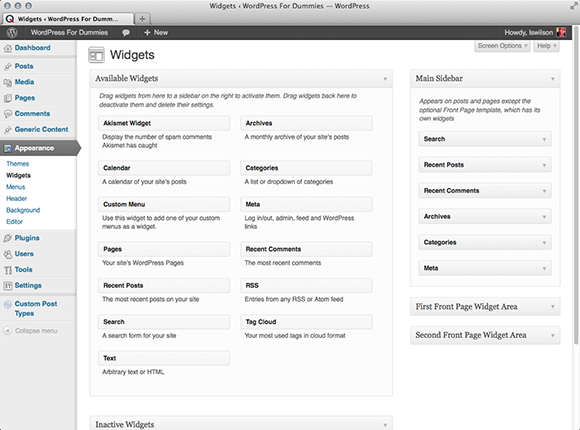
Figure 1-13: This page displays available widgets and widget-ready areas.
Adding widgets to your sidebar
The Widgets page lists all the widgets that are available for your WordPress site. On the right side of the Widgets page is the sidebar area designated in your theme. You drag your selected widget from the Available Widgets section into your chosen widget area on the right. For example, to add a Search box to the right sidebar of the default layout, drag the Search widget from the Available Widgets section to the Main Sidebar Widget Area.
To add a new widget to your sidebar, follow these steps:
1. Find the widget you want to use.
The widgets are listed in the Available Widgets section. For the purpose of these steps, choose the Recent Posts widget. (See Figure 1-14.)
2. Drag and drop the widget into the Main Sidebar Widget Area section on the right side of the page.
The widget is now located in the Main Sidebar Widget Area section, and the content of the widget now appears on your site in the sidebar.
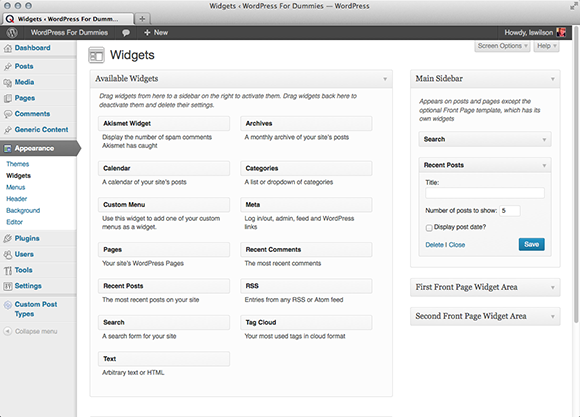
Figure 1-14: Editing the Recent Posts widget.
3. Click the arrow to the right of the widget title.
Options for the widget appear. Each widget has different options that you can configure. The Recent Posts widget, for example, lets you configure the title and the number of recent posts you want to display. (See Figure 1-14.) The default is set to 5; the maximum allowed is 15.
4. Select your options and click the Save button.
The options you’ve set are saved.
5. Click the Close link.
6. Arrange your widgets in the order you want them to appear on your site by clicking a widget and dragging it above or below another widget.
Repeat this step until your widgets are arranged the way you want them.
To remove a widget from your sidebar, click the arrow to the right of the widget title and then click the Delete link. WordPress removes the widget from the right side of the page and places it back in the Available Widgets list. If you want to remove a widget but want WordPress to remember the settings that you configured for it, instead of clicking the Delete link, simply drag the widget into the Inactive Widgets area on the right side of the Widgets page, at the bottom of the page. The widget and all the settings are stored for future use.
After you select and configure your widgets, click the Visit Site button at the top of your WordPress Dashboard (to the right of your site name), and your blog’s sidebar matches the content (and order of the content) of the Widgets page sidebar. How cool is that? You can go back to the Widgets page and rearrange the items, as well as add and remove items, to your heart’s content.
The number of options available for editing a widget depends on the widget. Some have a number of editable options; others simply let you write a title for the widget area. As shown in Figure 1-14, the Recent Posts widget has two options: one for editing the title of the widget and one to determine how many recent posts to display.
Using the Text widget
The Text widget is one of the most popular and useful WordPress widgets because it allows you to add text and even HTML code into widget areas without editing the theme’s template files. Therefore, you can designate several types of information on your site by including your desired text within it.
Here are some examples of how you can use the Text widget and why it’s such an important feature:
![]() Add an e-mail newsletter subscription form. Add a form that allows your site visitors to sign up for your e-mail newsletter. Because this often involves HTML, the Text widget is especially helpful.
Add an e-mail newsletter subscription form. Add a form that allows your site visitors to sign up for your e-mail newsletter. Because this often involves HTML, the Text widget is especially helpful.
![]() Display business hours of operation. Display the days and hours of your business operation where everyone can easily see them.
Display business hours of operation. Display the days and hours of your business operation where everyone can easily see them.
![]() Post your updates from social networks. Many social networking sites, such as Twitter and Facebook, offer embed codes to display your updates on those sites directly on your website. They often include JavaScript, HTML, and CSS, which you can easily embed with the Text widget.
Post your updates from social networks. Many social networking sites, such as Twitter and Facebook, offer embed codes to display your updates on those sites directly on your website. They often include JavaScript, HTML, and CSS, which you can easily embed with the Text widget.
![]() Announce special events and notices. If your organization has a special sale, an announcement about a new staff member, or an important notice about inclement weather closings, you can use the Text widget to post this information to your site in just a few seconds.
Announce special events and notices. If your organization has a special sale, an announcement about a new staff member, or an important notice about inclement weather closings, you can use the Text widget to post this information to your site in just a few seconds.
 The WordPress Text widget doesn't allow you to include PHP code of any kind. Because of the nature of this widget, it doesn't execute PHP code, such as special WordPress template tags or functions (like the ones you find in Book VI, Chapter 3). There is, however, a great plugin called the Advanced Text Widget that does allow you to insert PHP code within it. You can download the Advanced Text Widget from the WordPress Plugin Directory at
 http://wordpress.org/extend/plugins/advanced-text-widget. (You can find more information about using and installing WordPress plugins in Book VII.)
To add the Text widget, follow these steps:
1. On the WordPress Dashboard, click the Widgets link on the Appearance menu.
2. Find the Text widget in the Available Widgets section.
3. Drag and drop the Text widget to the desired widget area.
The Text widget opens, as shown in Figure 1-15.
4. Add a widget headline in the Title field and any desired text in the text area.
5. After you finish, click Save and then click the Close link.
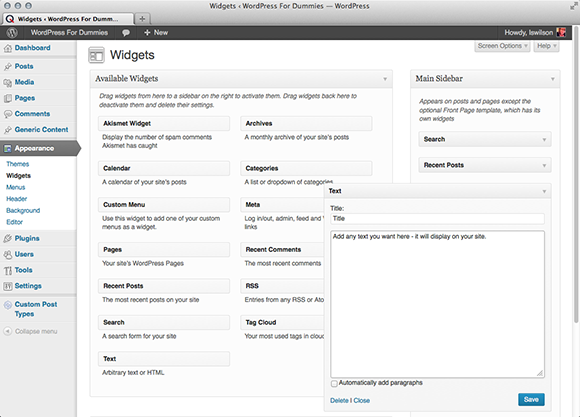
Figure 1-15: The Text widget.
Using the RSS widget
The RSS widget allows you to pull headlines from almost any RSS feed, including recent headlines from your other WordPress blogs or sites. You can also use it to pull in headlines from news sites or other sources that offer RSS feeds. This is commonly referred to as aggregation, which means that you’re gathering information from a syndicated RSS feed source to display on your site.
After you drag and drop the RSS widget to the appropriate widget area, the widget opens and you can enter the RSS Feed URL you want to display. Additionally, you can easily tweak other settings, as shown in Figure 1-16, to add information into the widget area for your reader.
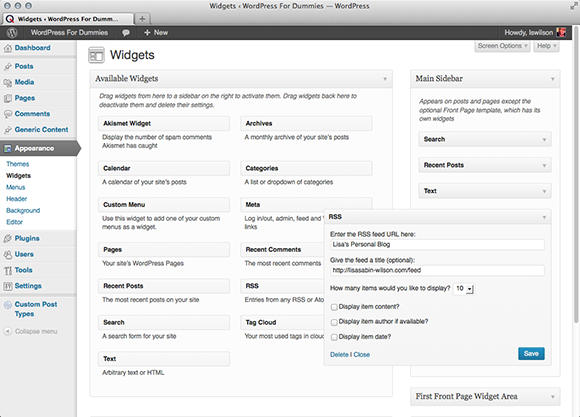
Figure 1-16: The RSS widget.
Follow these steps to add the RSS widget to your blog:
1. Add the RSS widget to your sidebar on the Widgets page.
Follow the steps in the “Adding widgets to your sidebar” section, earlier in this chapter, to add the widget.
2. Click the arrow to the right of the RSS widget’s name.
The widget opens, displaying options you can configure.
3. In the Enter the RSS URL Here text box, type the RSS URL of the blog you want to add.
You can usually find the RSS Feed URL of a blog listed in the sidebar.
4. Type the title of the RSS widget.
This title is what will appear in your blog above the links from this blog. If I wanted to add the RSS feed from my personal blog, for example, I’d type Lisa Sabin-Wilson’s blog.
5. Select the number of items to display.
The drop-down list gives you a choice of 1–20. Select the number of items from the RSS feed that you want to display on your site.
6. (Optional) Select the Display the Item Content check box.
Selecting this check box tells WordPress that you also want to display the content of the feed (usually, the content of the blog post from the feed URL). If you want to display only the title, leave the check box deselected.
7. (Optional) Select the Display Item Author, If Available check box.
Select this option if you want to display the author’s name with the item’s title.
8. (Optional) Select the Display Item Date check box.
Select this option if you want to display the date the item was published with the item’s title.
9. Click the Save Changes button.
WordPress saves all the options and reloads the Widgets page with your RSS widget intact.