
Chapter 33. Active Directory
In every technology effort, there is a baseline of knowledge that is required to support a learning effort. It is virtually impossible to be an expert in all areas of a technology space. In the SharePoint space, one of the most overlooked supporting technologies that provides for the core of the Windows Networking Infrastructure is Active Directory Domain Services (AD DS). Many technologists simply take the core of the AD DS for granted. It is generally recommended that SharePoint 2010 be run on servers in an Active Directory domain (and future versions actually require it). For components such as the User Profile Service to operate properly, a working knowledge of delegated permissions is required to ensure proper configuration in addition to other configurations such as the Service Connection Point to track installations of SharePoint within an Enterprise AD environment. All too many of us just never think about what is required to run Active Directory.
In this chapter, we discuss what it takes to set up, minimally configure, and operate Active Directory so that you as a SharePoint ITPro or developer can find the true value of your SharePoint BI experience through this book. We also help you understand the difference between Active Directory Managed Service Accounts and SharePoint Managed Service Accounts.
Before Setting Up Active Directory
Before you begin, make sure that your local administrator account has a password that meets Microsoft’s password complexity requirements. You must log out and back in after changing the password before you will be able to configure Active Directory. The password cannot contain the sAMAccountName or the DisplayName and must contain three of the following five categories:
An uppercase letter
A lowercase letter
A number
A non-alphanumeric character
Any Unicode character that is categorized as an alphabetic character but is not uppercase or lowercase
The full password complexity requirements policy can be found on TechNet.
You should have a fully qualified domain name (FQDN) in mind for your development domain at this point. You will be prompted for this during the wizard. We will be using a local address for our purposes to alleviate confusion between a public domain and this development environment.
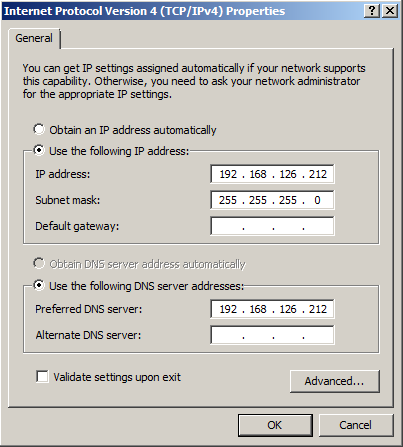
We recommend that you assign a static IP address to your network interface card (NIC). This VM will become the DNS server for the development environment, and will need to be specifically set in the NIC settings of each subsequent box. When setting the static IP address, leave the gateway empty and specify the new static IP address as the preferred DNS server as seen in Figure 33-1. This will speed up the DNS search process in a few steps.
Once booted into the operating system with the computer name set as desired, the DCPromo.exe command is executed. The Active Directory Domain Services Role is scanned for and then installed automatically.
When the Active Directory Installation wizard comes up, there is a checkbox option presented for you to “Use advanced mode installation.” For this installation, we are going to leave this box empty and click next to advance with a standard Active Directory installation. One advantage that the advanced mode install gives you is to be able to set the NetBIOS name of the domain to something other than the first part of the FQDN.
Creating the Active Directory
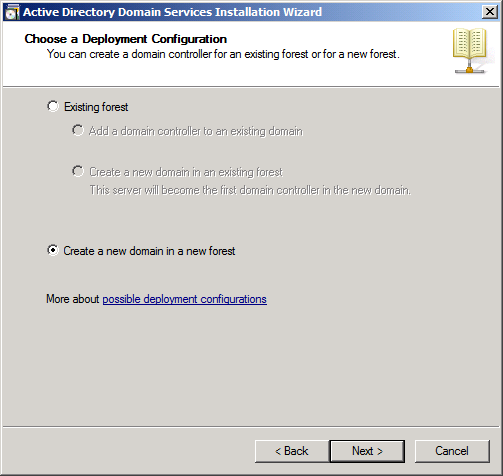
Choose “Create a new domain in a new forest” as this is the first computer in the environment, as seen in Figure 33-2.
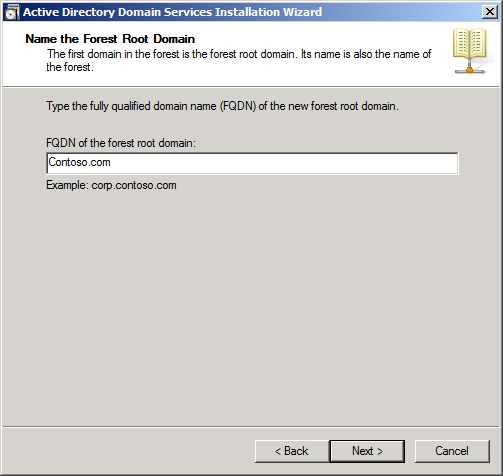
You will be prompted to enter a fully qualified domain name at this point. For this example, we have chosen to use “Contoso.com,” as seen in Figure 33-3.
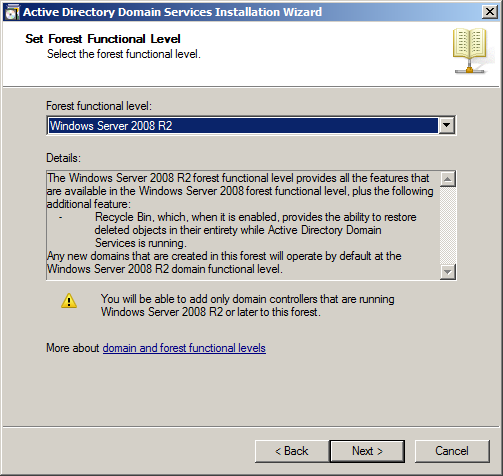
After the FQDN is validated and NetBIOS name has been checked within the environment, you will set the forest functional level to Windows 2008 R2, as seen in Figure 33-4.
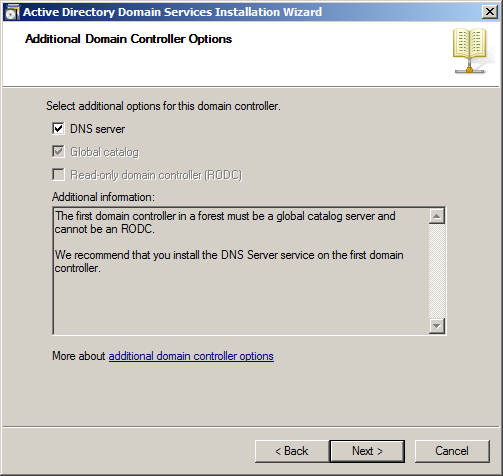
The next step the configuration software will attempt to do is reach out and look for a DNS server. When it does not find one, it will give you the option of installing one as a part of the domain installation. DCPromo will correctly identify that as the first domain controller in the forest it must install the global catalog role, as seen in Figure 33-5.
When you attempt to advance the wizard, if you opted not to configure a static IP, you will be prompted with a dialog that informs you that it is recommended that you configure a static IP to have reliable DNS operations.
After you acknowledge the static IP dialog, you will get another dialog informing you about DNS delegation. Since this is not a concern for this development environment, simply click Yes to continue.
In production environments where you store your Active Directory database, logs and SYSVOL are very important design decisions. As we are following the simplest set of options due to the nature of this environment, as well as the single dynamic growth disk model, we choose to take the default locations for these items.
Next you will be prompted to provide a Directory Services Restore Mode administrator password. This is a critical password that should be long and complex and stored in a place for safe keeping, never to be seen unless there is an absolute need to restore the Global Catalogs and Active Directory in a catastrophe. This password will enable a domain controller to be started in Directory Services Restore Mode.
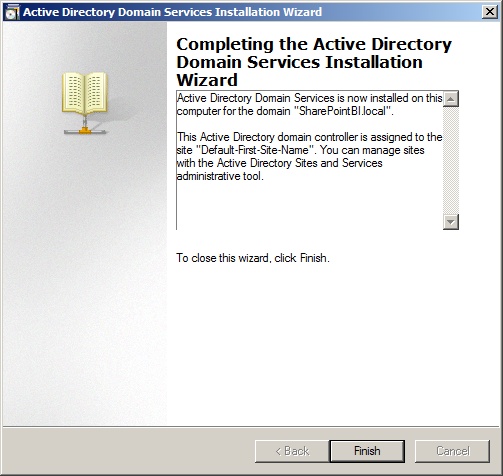
Lastly, you are given a summary screen that allows you to review all of the settings that you have made along the way. Once completed, the wizard will give you a Finish option and will then require a reboot. The installation of the Active Directory Domain Services depends on the hardware available and can take anywhere from 5 to 30 minutes to complete as seen in Figure 33-6.
Managing Service Accounts
As we begin to dig into configuration of our environment for performing SharePoint BI work, there are a number of concerns that get raised about best practices and the “correct” way to set things up. Each piece of the larger puzzle has to be rotated and moved into place correctly in order to make the solutions work optimally long term.
One of the dilemmas that we are faced with when working with a software company as diverse in its product line as Microsoft is that communication is not always clear between teams. When one team at Microsoft comes up with something that they believe is a great idea such as the concept of having a simplified use of service accounts, it is highly likely that another team will have the same idea.
Service Accounts Management
Service account management can be one of the more time-consuming aspects of administration. In large organizations, or in organizations where security concerns are high, password changes can be required for service accounts. Not all services are resilient to this form of disruption and so the teams at Microsoft set out to lend us all a hand and attempt to solve the issue for us. Sadly, the communication of this idea and how to implement it is not always clean and clear between the Microsoft teams and even seasoned veterans have been known to be tripped up as a result.
In this example case, specifically the Windows Server team and the SharePoint team both heard the pain from their users in this area and decided to each implement solutions to assist with this concept.
The issue arises in that both teams refer to these methods as “Managed Service Accounts.” This can be confusing in a world where the management of SQL and SharePoint are done by different teams of people who are required to interact in order to sustain a true working environment.
Managed Service Accounts: Windows Server Version
The Windows Server team took the position that managed service accounts should never have to be looked at again after initial setup; and if they do, it should be rather cumbersome to deal with in order to belabor the point that they should not be tinkered with. In Windows Server 2008, they created a method that alleviated the requirement of a SQL administrator having to worry about managing passwords called Managed Service Accounts.
In Windows Server 2008, Managed Service Accounts (MSA) is a domain account created and managed in Active Directory. It is assigned to a single member computer (host computer) for the specific use of running a service. The password is managed automatically by Active Directory. You cannot use an MSA to log in to a computer, but a computer can use an MSA to start a Windows service and an MSA has the rights to register Service Principal Names (SPN) with the Active Directory.
An SPN is the unique name that a client can identify for an instance of a service. The Kerberos authentication service can then use that SPN to authenticate the service. When a client wants to connect to the service, it locates an instance of the service, composes an SPN for that instance, connects to the service, and presents the SPN for the service to authenticate.
Configuring SQL using Managed Service Accounts
To configure SQL using MSAs, a domain administrator must first construct the accounts using PowerShell with at minimum the following:
New-ADServiceAccount S1_MSSQLServer
New-ADServiceAccount S1_SQLServerAgt
New-ADServiceAccount S1_OLAPService
New-ADServiceAccount S1_ReportServer
New-ADServiceAccount S1_MSDtsServer
Note
A critical note about MSAs is that they cannot be longer than 15 characters. The PowerShell cmdlet will allow them to be created, but when you go to install them on the server that will use them, you will get an error that says “Cannot install service account. Error Message: ‘Unknown error (0xc0000017).’”
These new MSAs will show up in Active Directory, as shown in Figure 33-7.

The next step is to install the MSAs on the server that will be using them to run the service account. For this example, we will be using the host server named S1. The Active Directory module for Windows PowerShell, which is a Remote Server Administration Toolkit feature that is built in to Windows Server 2008 and higher, must be enabled on the host server so that the following PowerShell command can be run:
Install-ADServiceAccount -identity S1_MSSQLServer
Install-ADServiceAccount -identity S1_SQLServerAgt
Install-ADServiceAccount -identity S1_OLAPService
Install-ADServiceAccount -identity S1_ReportServer
Install-ADServiceAccount -identity S1_MSDtsServer
Once this is completed, the only way you can validate the
association is via PowerShell using Get-ADServiceAccount for any of the accounts
and receiving a return similar to what you see in Figure 33-8.
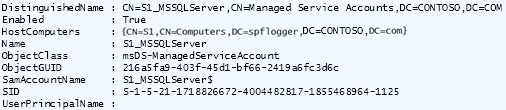
Notice that the HostComputers line now contains the LDAP address of our host server, S1. Also notice that the SamAccountName of this account is S1_MSSQLServer$ instead of S1_MSSQLServer. When installing SQL Server using MSAs, the account name must be appended with a “$” at the end or they will not be found in Active Directory.
The end result of the Windows Server Team’s effort is a fully functional method of implementing service accounts that requires little ongoing maintenance. The cumbersome and sometimes painful parts of this particular implementation come during setup and if the SQL Service is being moved to a new server and you are trying to reuse the implemented accounts.
It is also important to note that Managed Service Accounts cannot be used in Windows Clustering or SharePoint because an MSA can only be associated with a single-host server.
The Windows Server Team’s Virtual Accounts
With the release of Windows Server 2008 R2, the Windows Server Team gave us another method of managing service accounts called Virtual Accounts. Virtual Accounts in Windows Server 2008 R2 are managed local accounts. The virtual account is system managed, and the virtual account can access the network in a domain environment. If the default values are used for the service accounts during SQL Server setup on Windows Server 2008 R2, a virtual account will be created for each of the services using the instance name and the service name.
When chosen during SQL Server setup, the implementation of Virtual Accounts appears as in Figure 33-9.
This makes it so that the local account is created without needing intervention by the Domain Admins and the service is run under a separate account for tracking purposes. The downside of this approach is that when the service account needs to interact with network resources it leaves the server as the “%Computer Name%$” account in Active Directory. This limits the ability to trace issues back to their true source.
The positive side of implementing a virtual account is that there is zero management overhead and no intervention by domain admins is needed. This form of service account management is ideal in scenarios where interaction with network resources is low or the server is being used for development only.
For more on account management in Windows Server 2008 / 2008 R2, TechNet provides information on this topic at: http://technet.microsoft.com/en-us/library/hh831782.aspx.
Managed Service Accounts: SharePoint Team Edition
In SharePoint 2007, the pain that resulted from changing passwords is still something that causes those who lived through it to grimace when forced to talk about it. It was not uncommon for organizations to be forced to schedule hours of downtime to account for the varying degree of success that could be expected when making the changes.
The SharePoint product group received significant feedback from system administrators and ITPros regarding password change issues and sought to assist administrators by investing in the 2010 platform.
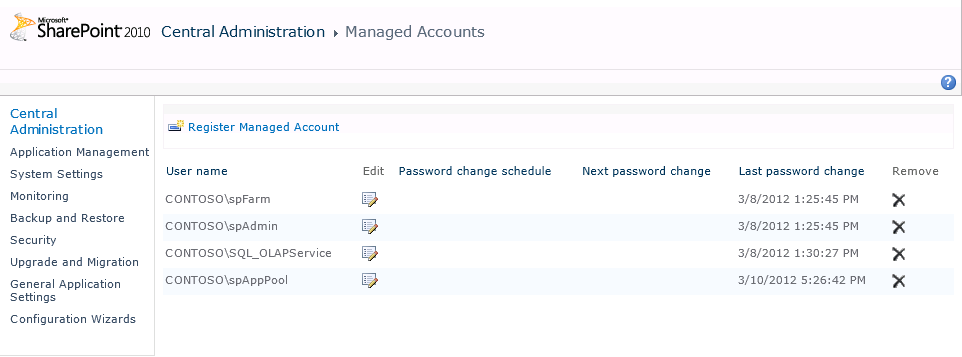
Their response was to create a method by which, using the SharePoint 2010 Central Administration web user interface (UI) (see Figure 33-10) or through PowerShell command-lets, a farm administrator can easily change the password for an account registered with the system.
SharePoint undertook a significant task in the creation of the Managed Accounts and the Secure Store Service. SharePoint never had a repository for username and password information in the past and this was a dramatic shift for the product. Rather than simply accepting the credentials that were passed to it, SharePoint took ownership of the credentials and gained the ability to issue requests on their behalf to Active Directory.
In SharePoint 2010, the Secure Store Service (SSS) replaced the Microsoft Office SharePoint Server 2007 Single Sign On feature. The SSS is a service application that allows you to store and map credentials such as account names and passwords in a controlled and secured manner. This enables you to programmatically provide credentials required for connecting to external systems and associating those credentials to a specific identity or group of identities. Each stored credential is given a Secure Store Application ID (SSAID) that can be called programmatically. Permissions are then set on the SSAID for an individual or group to access the stored credential.
These breakthroughs allowed SharePoint to maintain and schedule updates to passwords. Encrypted using a hash from the farm passphrase, the passwords are stored in the SharePoint configuration database. The issue arises when SharePoint believes that it has the correct password and someone makes a change to the password outside of SharePoint, throwing the entire system off.
The reality is that in most cases where SQL is being run properly, local accounts are not going to be used to implement SQL, but instead domain accounts will be used so that true traceability will be able to be done in addition to accessing other network resources for backup and disk storage purposes. The fact remains that little Easter eggs such as this are found throughout the Microsoft ecosystem and it is important to be aware of these pitfalls as they can cause communication breakdowns between teams.
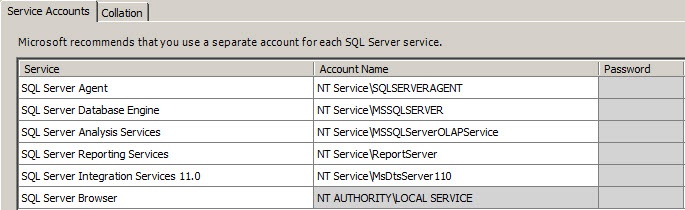
It is our recommendation that five domain service accounts be created to run SQL Server so that this situation can be avoided. Each of the service accounts will be the context with which to run one of the five service accounts that SQL looks to use in order to properly operate.
The five accounts are:
SQL_Server will be used to run the SQL Relational Database Engine.
SQL_ServerAgent will be used to execute jobs, issue alerts, and run scheduled tasks that are created using the SQL Server Agent.
SQL_OLAPService will be used to run SQL Server Analysis Services.
SQL_ReportServer will be used to run SQL Server Reporting Services.
SQL_DtsServer will be used to to run SQL Server Integration Services.
The services that they will be used to run are as they appear in Figure 33-11.

Security in Active Directory
No matter your industry, the frightening reality of cyber security is something that we all must consider when planning any implementation of a new technology. With that in mind, this section presents concepts that can be implemented to secure your SharePoint BI solution without impacting the usability of the tools.
To ensure that security is tight around these critical service accounts they should be put into a SharePoint Managed Service Accounts Organizational Unit (OU) in Active Directory so that a Group Policy enforcing security can be applied to all service accounts across the domain.
Group Policy for Service Accounts can be a touchy subject for some organizations. From how to best secure your environment to how to lower the management overhead, the discussion can be all over the map. Our recommendation is to keep it simple and only make changes that are going to benefit the security and manageability of the environment in a significant way. Trying to make a change to every setting will lead you down a deep dark hole from which you may never escape.
Setting Group Policy
The one setting that can be critical is the “Deny log on locally.” This setting will prohibit user accounts from being able to log on interactively to any computer or server to which the Group Policy Object (GPO) is linked. This will lower the threat vector that a compromised service account could attack, thereby lowering the security risk.
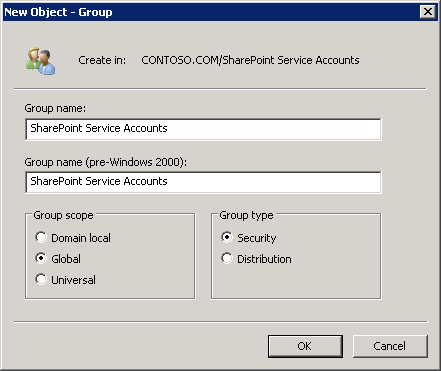
A few steps must be taken in order to implement this security lockdown. First, create a security group in Active Directory that will contain all of your Managed Service Accounts. For our purposes, we created a Global Security Group called “SharePoint Service Accounts” in Figure 33-12.
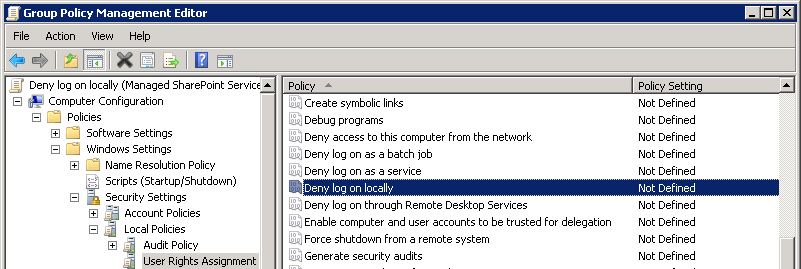
Best practice regarding Group Policy tells us that we should never edit the Default Domain Policy, but instead should create a new GPO for any changes and link this policy to a specified organization unit. In this scenario, we created a GPO called “Deny log on locally (SharePoint Service Accounts)” to house this specific policy, using the Group Policy Management Feature that is built in to Windows Server 2008 R2, and stored it at the OU where the service accounts will line in the Active Directory forest. This will allow us to affect all computers in the domain and keep the service accounts from being able to log in to them from one central place.
Once the new GPO is created, edit the policy and navigate to Computer ConfigurationWindows → SettingsSecurity → SettingsLocal → PoliciesUser Rights Assignment and select “Deny log on locally,” as seen in Figure 33-13.
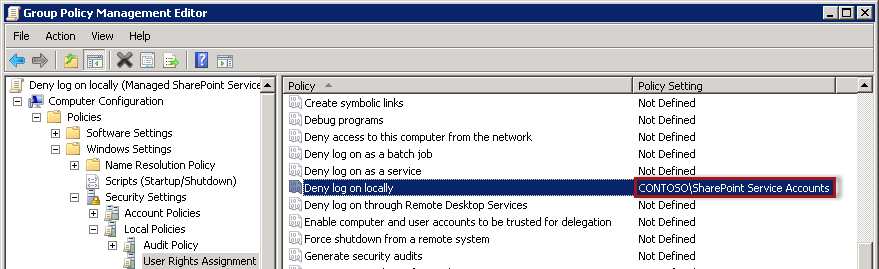
When you open the settings, click on the box for “Define these policy settings:” and then browse to add the Managed Service Accounts group to the setting and click OK. You will then see that the group name shows up in the policy setting, as seen in Figure 33-14.
Sadly, there is no reliable query-based security group capability that can make this function dynamically so a manual or a scheduled and scripted update of the group will be required anytime a new Service Account is created. At this point, we will add the Service Accounts that we use throughout the book to this security group. The Group Policy will refresh across the domain and the Managed Service Accounts will no longer be able to log on locally to any machine.
The key things to note at this point are:
Any account that is already logged in will not be forcibly logged out. If they are in, this will not stop them until they log out.
The default Group Policy refresh interval is 90 minutes for the computer policy, so the change can take up to 90 minutes to propagate once the policy has been replicated to the computer’s primary domain controller.
Utilizing this method of locking down domain accounts and allowing SharePoint to hand the changes required by policy to the Managed Service Accounts, the risks are significantly lowered.
There are no services within either SharePoint or SQL Server that require the ability to log on interactively to any server. The point that is often in dispute with regard to SharePoint is when administrators point at documentation that says that they must run Service Packs, cumulative updates, and other life cycle events as the Farm Service Account. While it is true that these need to be run in the context of the Farm Service Account, you do not need to be logged on locally to accomplish the task.
The following PowerShell code can be run to execute PowerShell ISE as another user, while retaining RunAs administrator rights:
Add-PSSnapin Microsoft.SharePoint.Powershell -EA o

# Farm account name
$farmAccountname = "domainservice-account"

# Load the Farm Account Creds
$cred = Get-Credential $farmAccountname

# Create a new process with UAC elevation
Start-Process $PsHomepowershell.exe
-Credential $cred -ArqumentList "-Command Start-Process
    $PSHOMEpowershell_ise.exe -Verb Runas" - Wait
Using this method, an administrator can be logged in to the server using a privileged account and execute as needed under the farm account credentials.
Upon execution of the script, you will be prompted with a standard input dialog box for the farm account credential information.
Summary
In this chapter, we discussed what it takes to set up, minimally configure, and operate Active Directory so that you as a SharePoint ITPro or developer can find the true value of your SharePoint BI experience through this book. We also helped you understand the difference between Active Directory Managed Service Accounts and SharePoint Managed Service Accounts.