Chapter 5. Installing Azure AD Connect
The custom and express installation experience
Selecting your authentication method
Connecting to your directories
The UserPrincipalName and SourceAnchor attributes
Uniquely identifying your users
The installation of Azure Active Directory Connect (AAD Connect), like other configuration milestones when deploying Office 365, is not a trivial event. The initial installation requires not only planning for service accounts, directory hierarchy, filtering, and permissions, but also for features such as password synchronization, hybrid writeback, Azure Active Directory (Azure AD) application, and attribute filtering as well as several features related to authentication.
Many of the features selected during the installation can be enabled or disabled later with the Azure Active Directory Connect Wizard; however, a few key decisions must be made during initial installation that cannot be undone and would subsequently require a re-installation of the tool if they needed to be changed.
The custom and express installation experience
The latest version of the AAD Connect installation can be downloaded from http://aka.ms/aad-connect. Save the installation MSI file to the server where AAD Connect will be installed and launch the installer as a local administrator.
After the typical license agreement and welcome pages, the first thing you must decide is whether you want to do an express or custom installation.
The express installation is intended for configurations that have only one Active Directory forest in your environment (although it can contain multiple child domains), and you intend to enable password synchronization.
Express mode installation is the best method for getting your Office 365 synchronization up and running quickly and provides a limited number of questions regarding your intended configuration; however, if you intend to scope your synchronization to specific organizational units (OUs) or want to enable features such as group writeback or attribute filtering, you cannot select those settings during initial setup in an express mode installation.
You can customize the installation further, however, after the wizard has finished.
In addition, the use of express mode enables the auto-upgrade process, which enables AAD Connect to upgrade its binaries automatically to the latest version of the software as it is released, without any intervention on your part. Auto-upgrade is not an option when using the customized installation method.
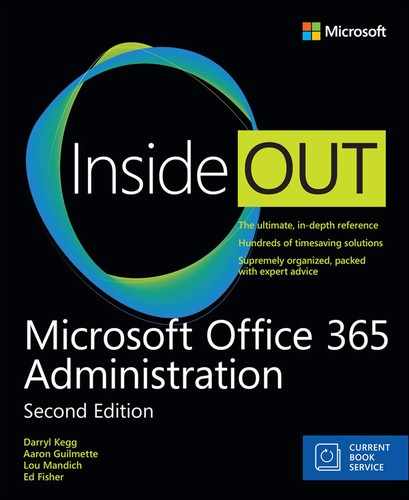
The express option is not available if your AAD Connect server is not joined to an Active Directory domain. Figure 5-1 shows the Express Settings details during the installation process.
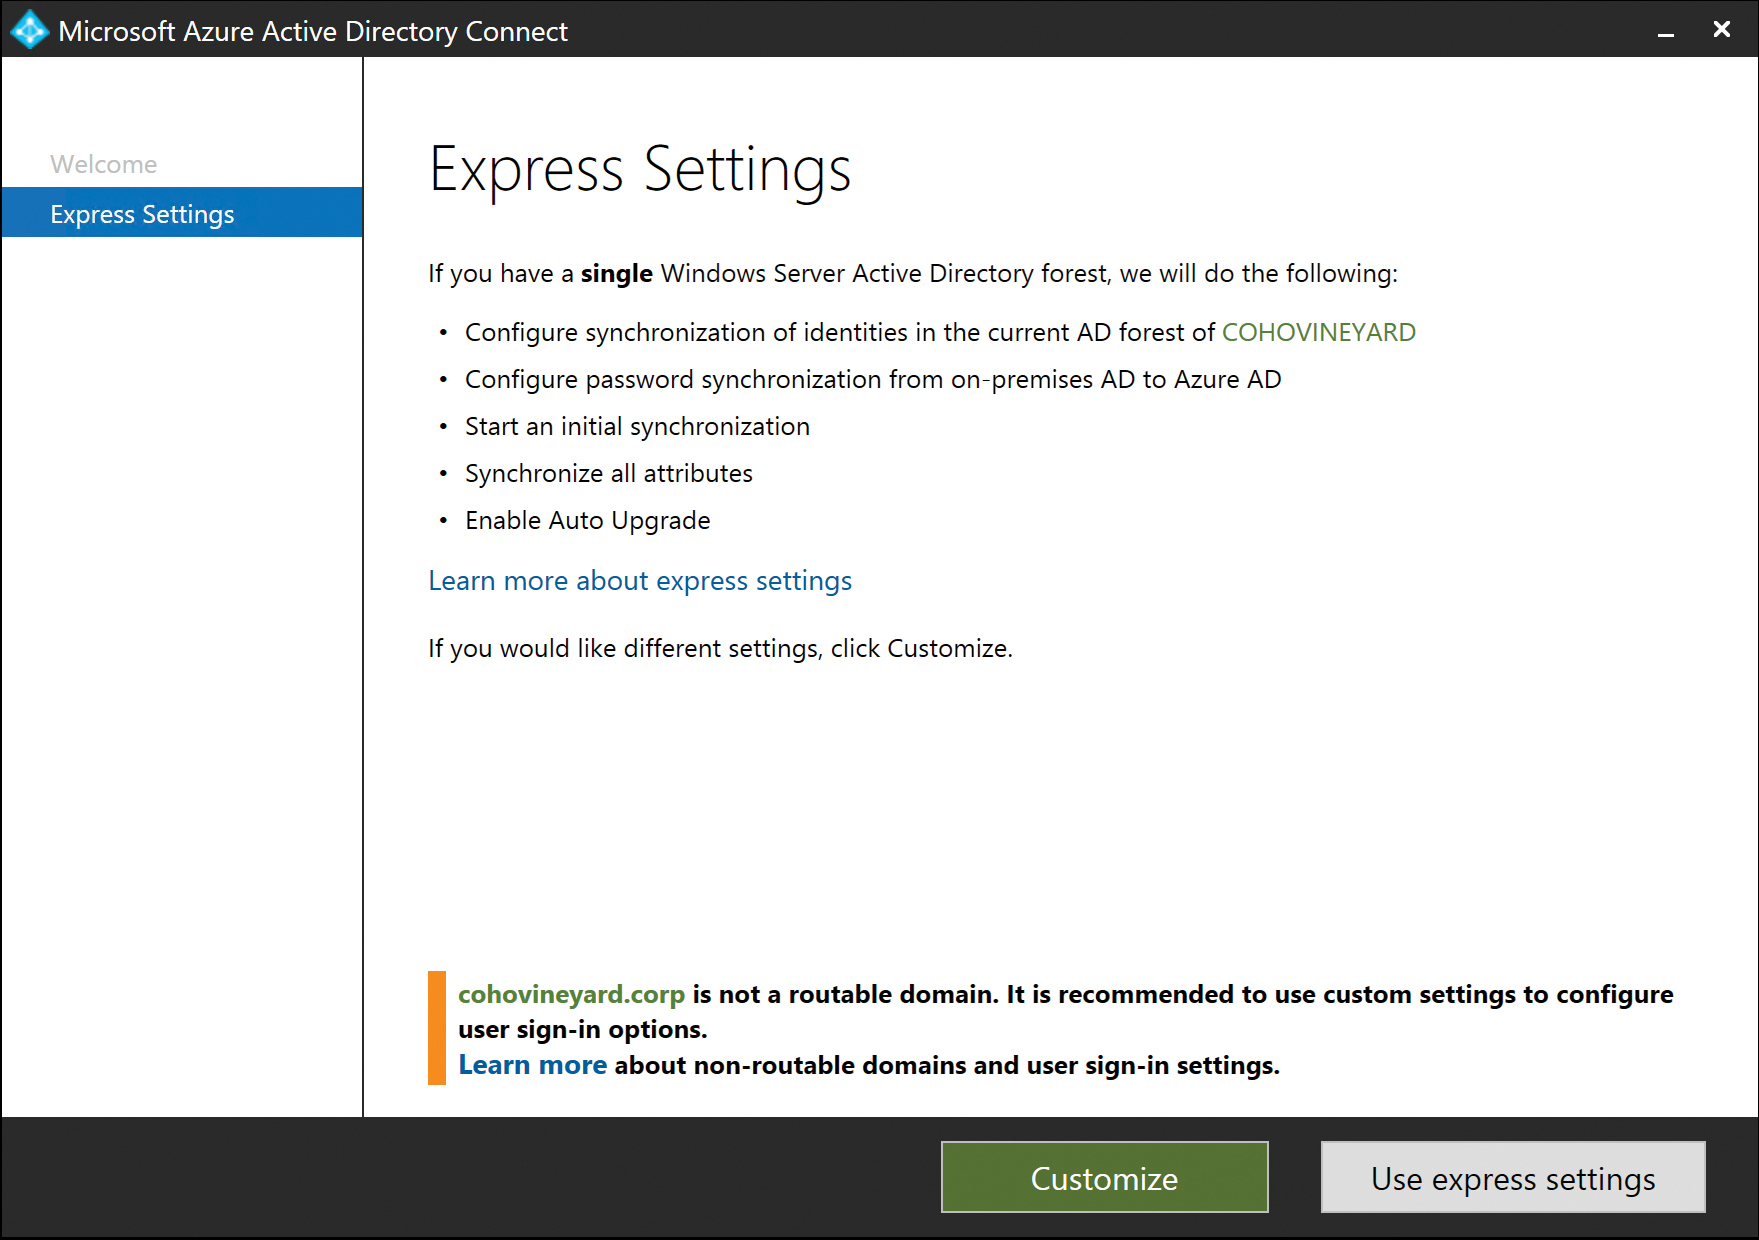
Figure 5-1 Express Settings or Customize wizard page
As part of the express settings setup, the wizard examines the UserPrincipalName suffixes configured for your forest. If your forest is not configured to use any suffixes that represent a routable domain, a warning appears, suggesting a customized deployment because AAD Connect uses the default UserPrincipalName value when synchronizing users to your Office 365 tenant. A non-routable UPN suffix such as .local or .corp would result in a UPN in the tenant of @yourtenant.onmicrosoft.com. This onmicrosoft.com UPN means that your users would be unable to log on to Office 365 by using their UPN or email address, and it would be impossible to use an Identity Provider such as Active Directory Federation Services (AD FS) to authenticate logons.
Refer to Chapter 1, “Office 365 Deployment Milestones” for more details about UserPrincipalName considerations and Chapter 3, “Federation Services and Authentication,” for more information about federated logon options.
Express installation
After you have selected express installation, you are prompted for credentials for your Office 365 tenant, as shown in Figure 5-2.
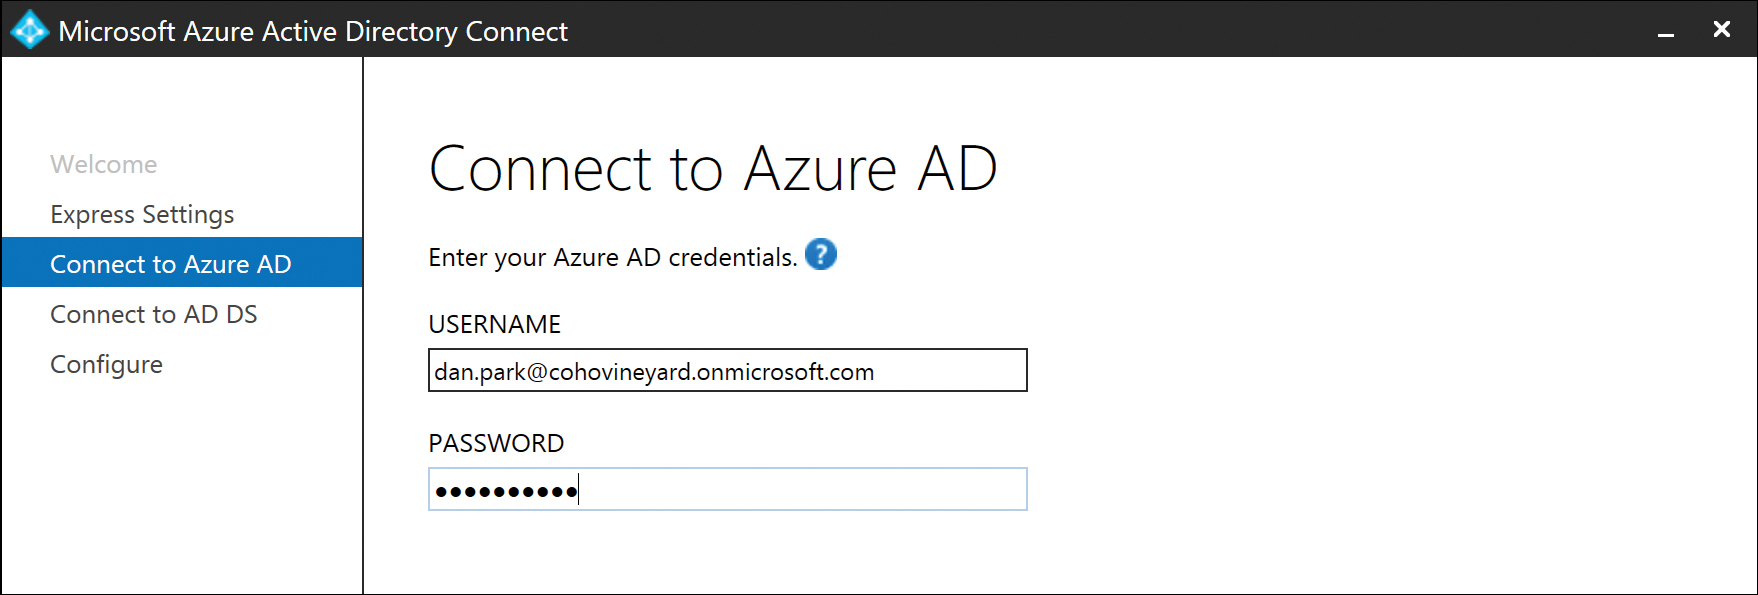
Figure 5-2 Azure AD credential page
The credentials provided here are not used permanently as part of the synchronization process; they simply ensure that you have the Global Administrator privilege in your Office 365 tenant.
The installation credentials used here must be for a Global Administrator so that the installation wizard can automatically create a directory synchronization account in your Azure AD tenant, as seen in Figure 5-3.
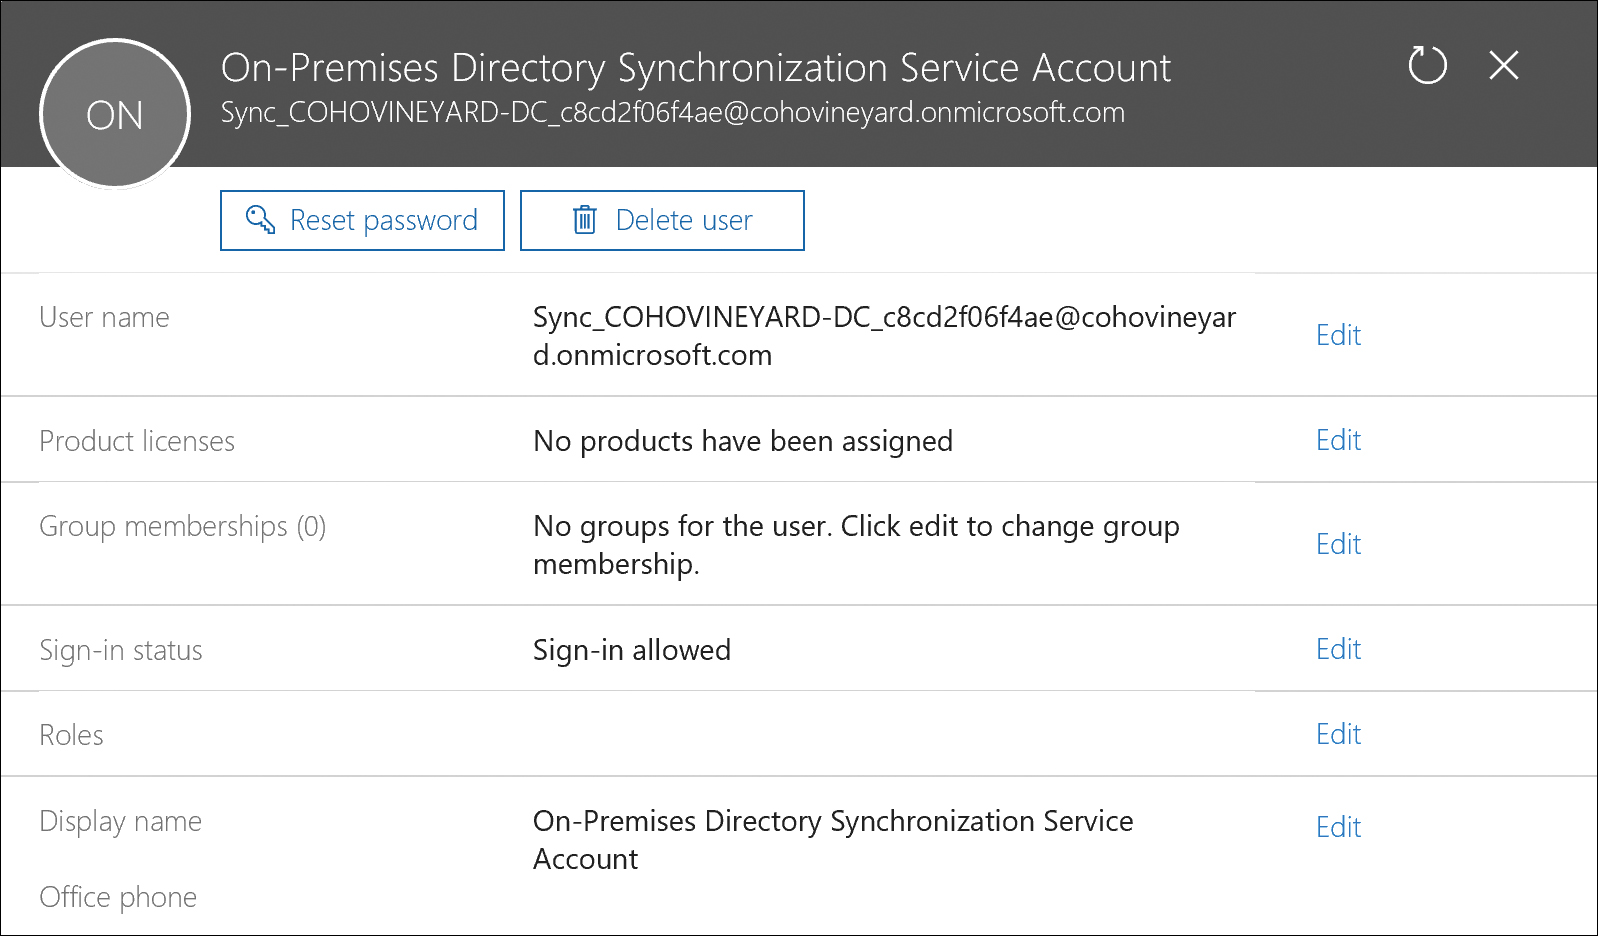
Figure 5-3 Automatically created directory synchronization account
The On-Premises Directory Synchronization Service Account installer, shown in Figure 5-4, is named [email protected] and is a standard user account, not a Global Administrator account.
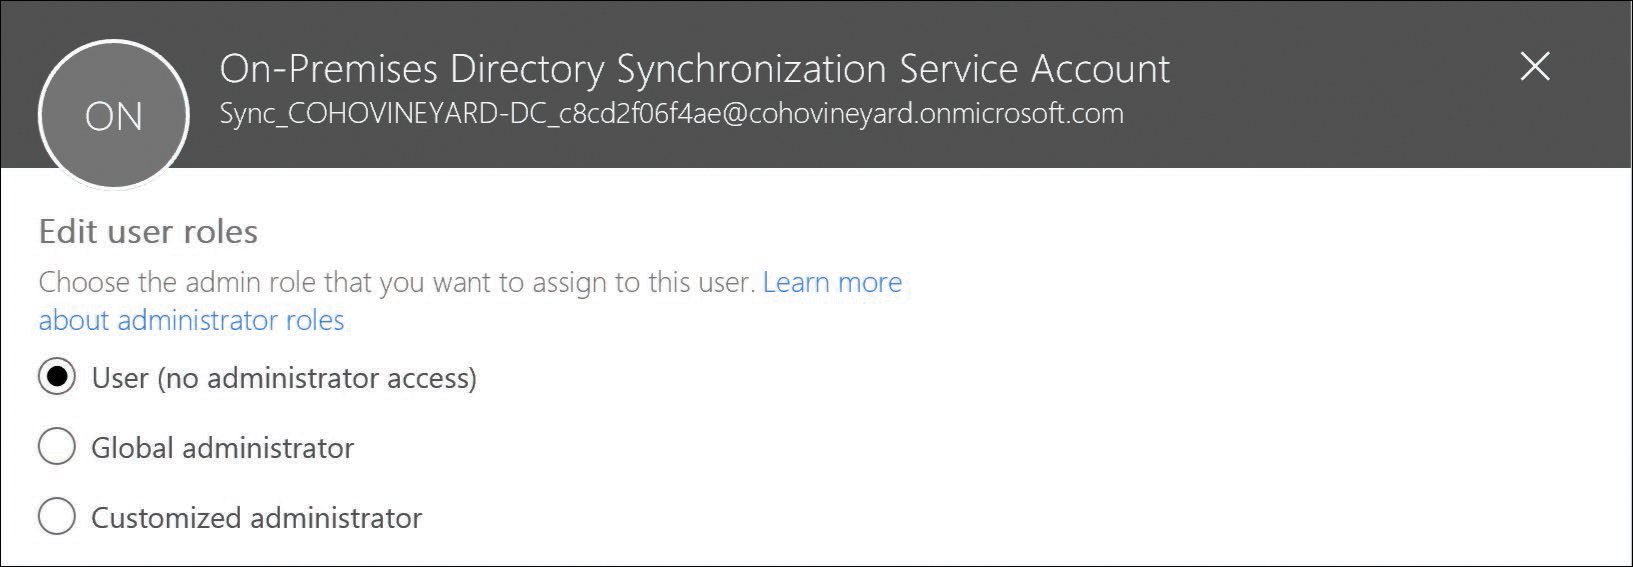
Figure 5-4 On-Premises Directory Synchronization Service Account tenant permissions
After supplying credentials to connect to Office 365, you must provide credentials for your on-premises Active Directory forest, as shown in Figure 5-5.
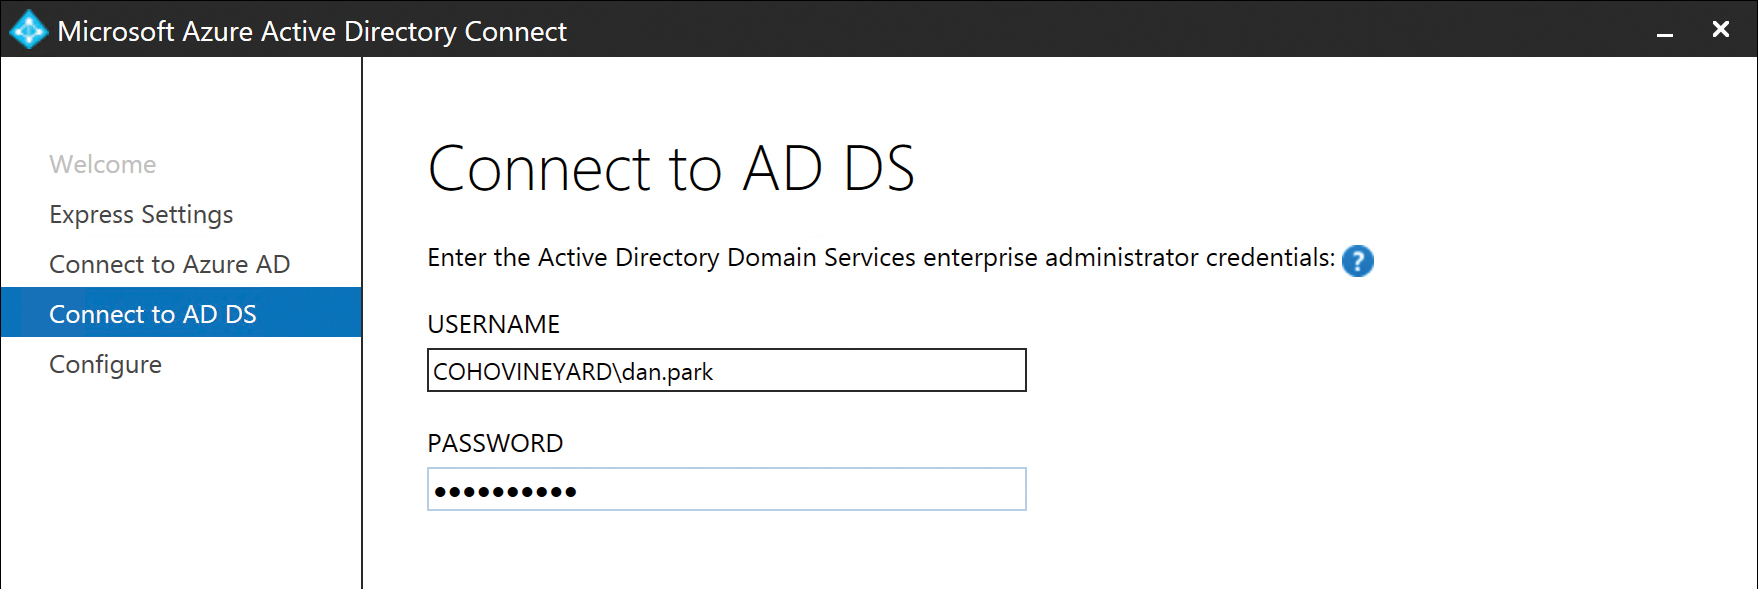
Figure 5-5 Connection to Active Directory
The on-premises Active Directory account that you provide must be a member of the Enterprise Administrators group in Active Directory because the account provided is not used for the permanent synchronization process but, rather, to create a service account in on-premises Active Directory that will be used for the permanent synchronization process.
If the Active Directory account provided is not a member of the Enterprise Administrators group, a warning appears at the bottom of the page, as shown in Figure 5-6, and installation will not continue.
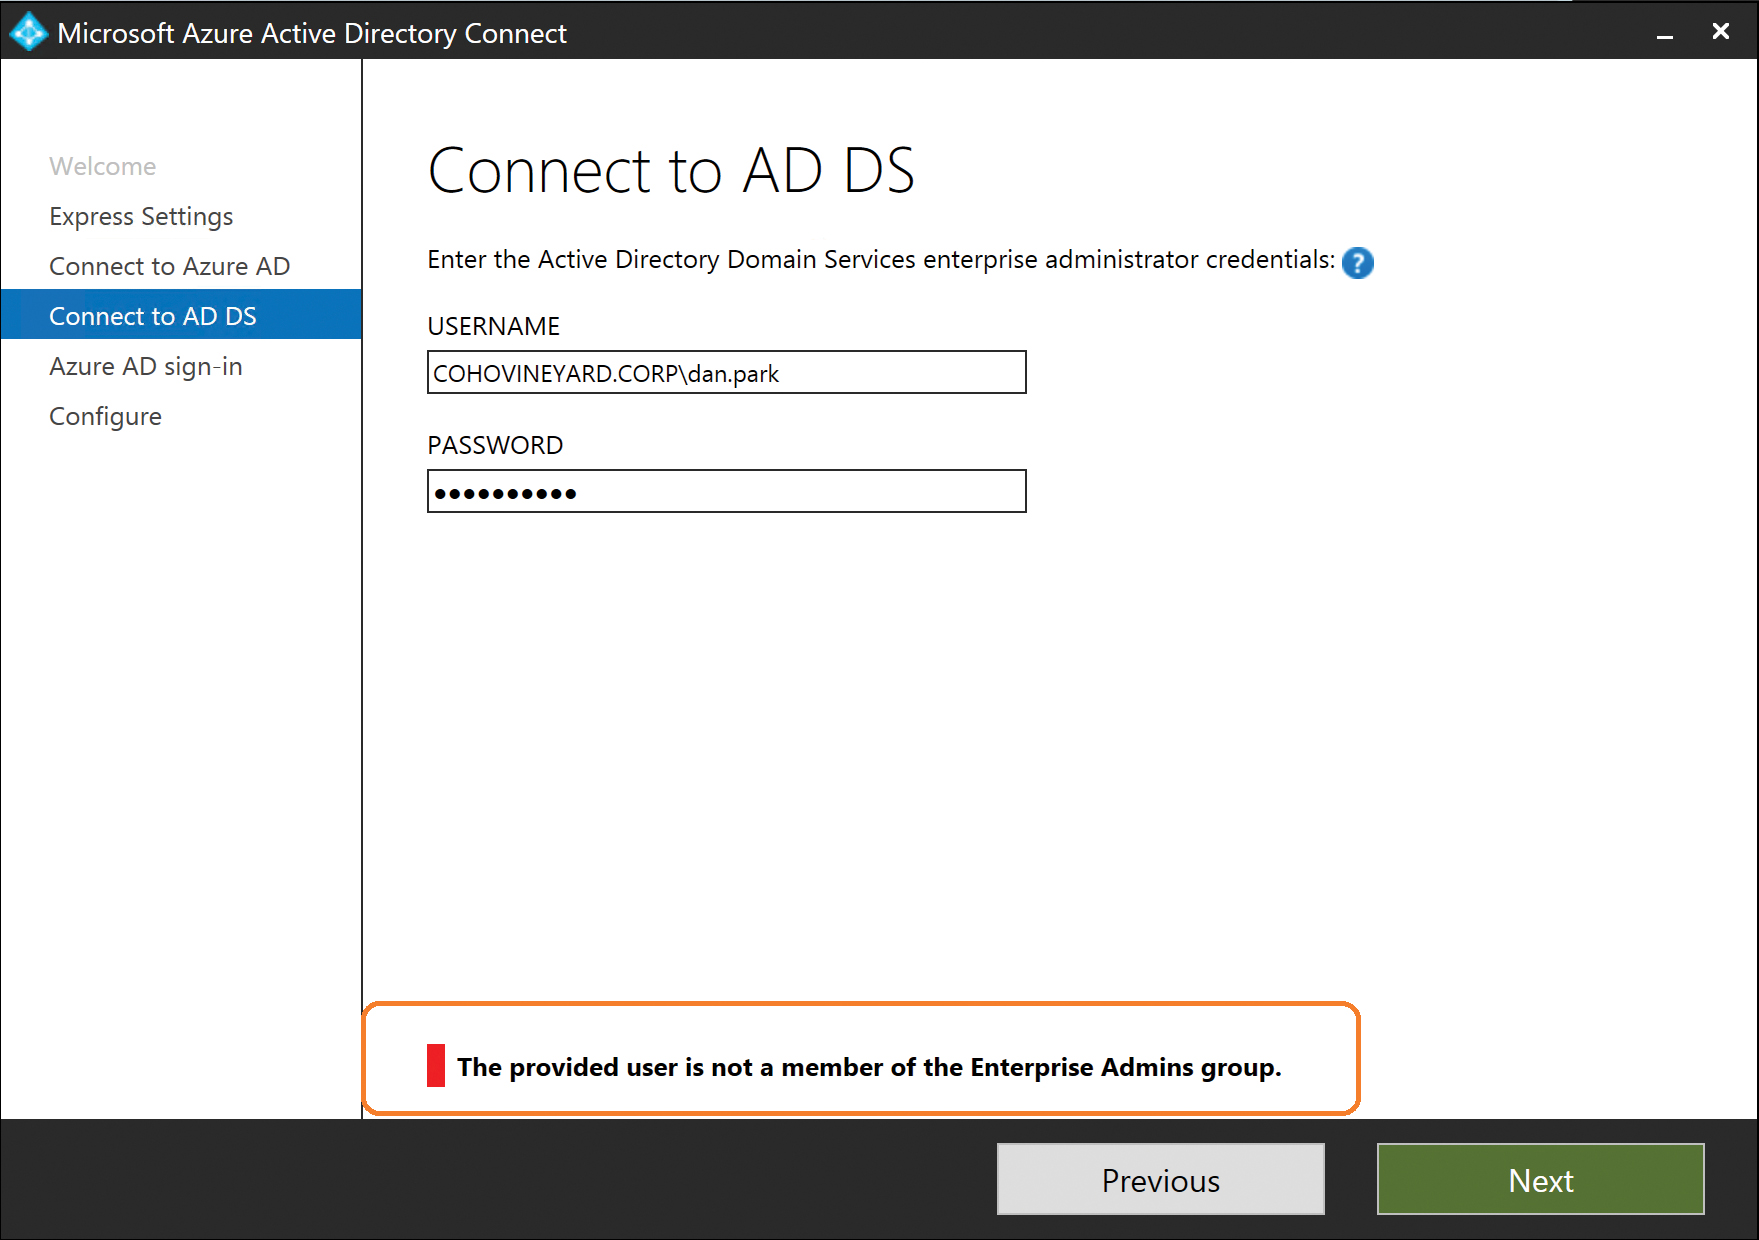
Figure 5-6 Error showing account is not a member of the Enterprise Admins group
After the installation wizard has successfully confirmed that the account provided is a member of the Enterprise Administrators group in on-premises Active Directory, the installer automatically creates a service account, which begins with MSOL_ and a random GUID value, in the Users OU in Active Directory, as shown in Figure 5-7.
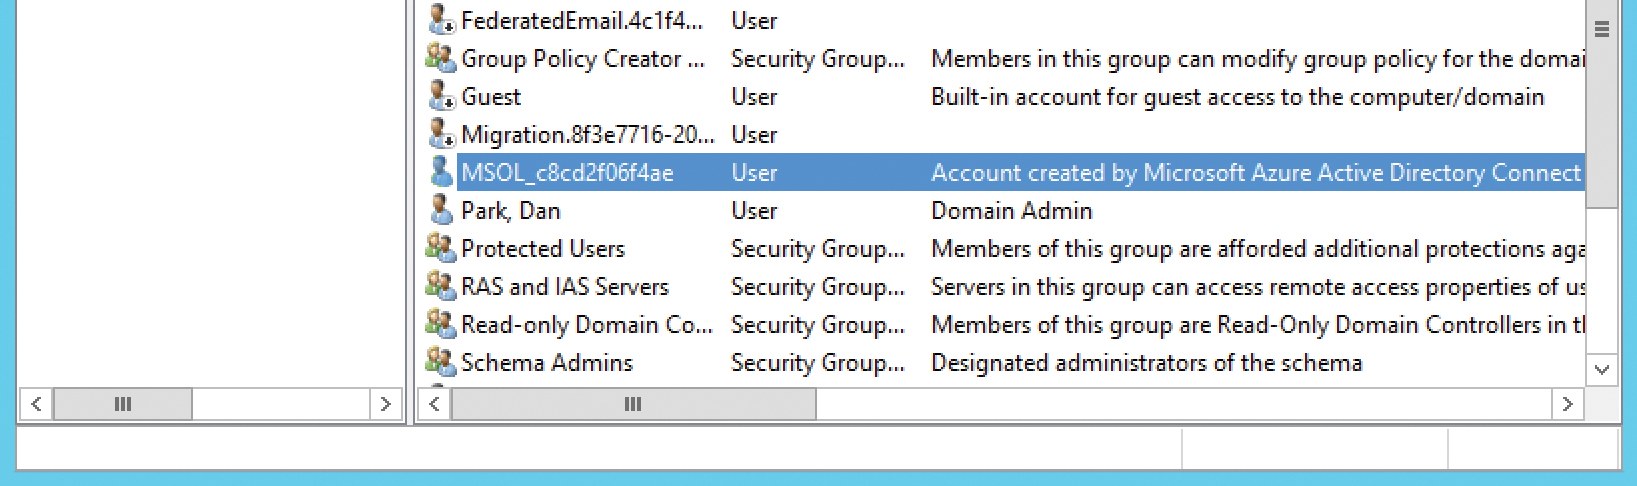
Figure 5-7 Automatically created service account in Active Directory
This automatically generated service account is set with a password that never expires, and the password will not be provided to you.
In addition, the service account is granted the Replicating Directory Changes and Replicating Directory Changes All permissions at the top level of the forest, as shown in Figure 5-8. These permissions are necessary to support password synchronization.
After the express installation has completed, you can move this account out of the Users OU to another OU if desired.
Next, the forest UserPrincipalName suffixes are checked to confirm whether any can be used for authentication with Office 365. Each Active Directory UPN suffix appears (see Figure 5-9), along with confirmation, if the suffix is a valid Azure AD domain registered in your tenant.
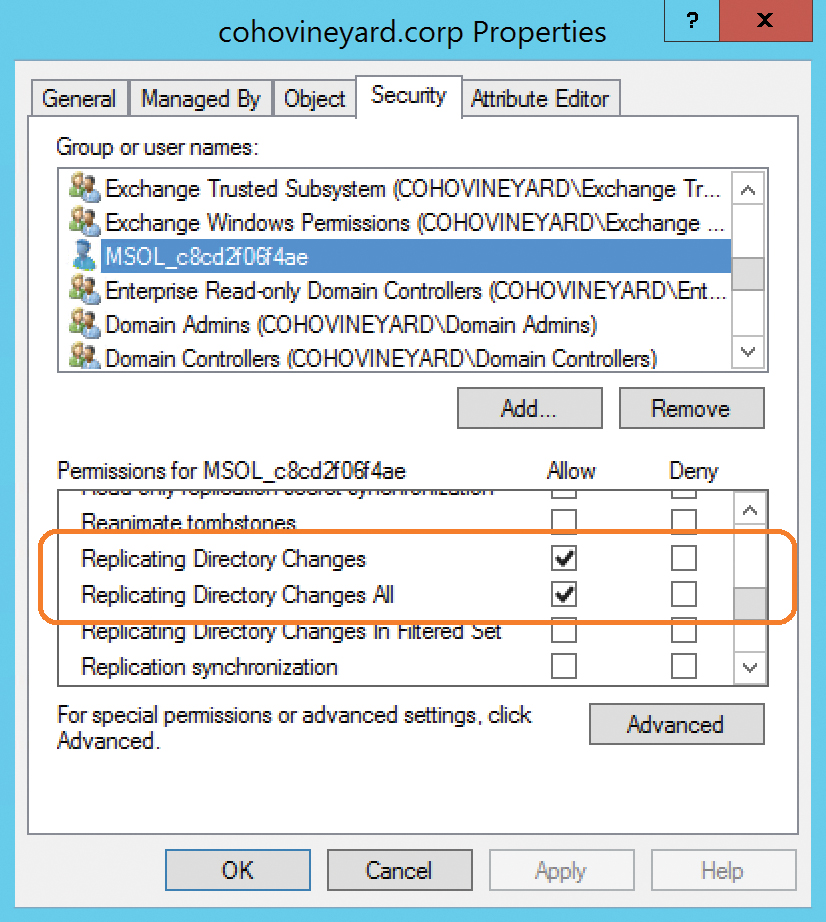
Figure 5-8 Permissions required for password synchronization
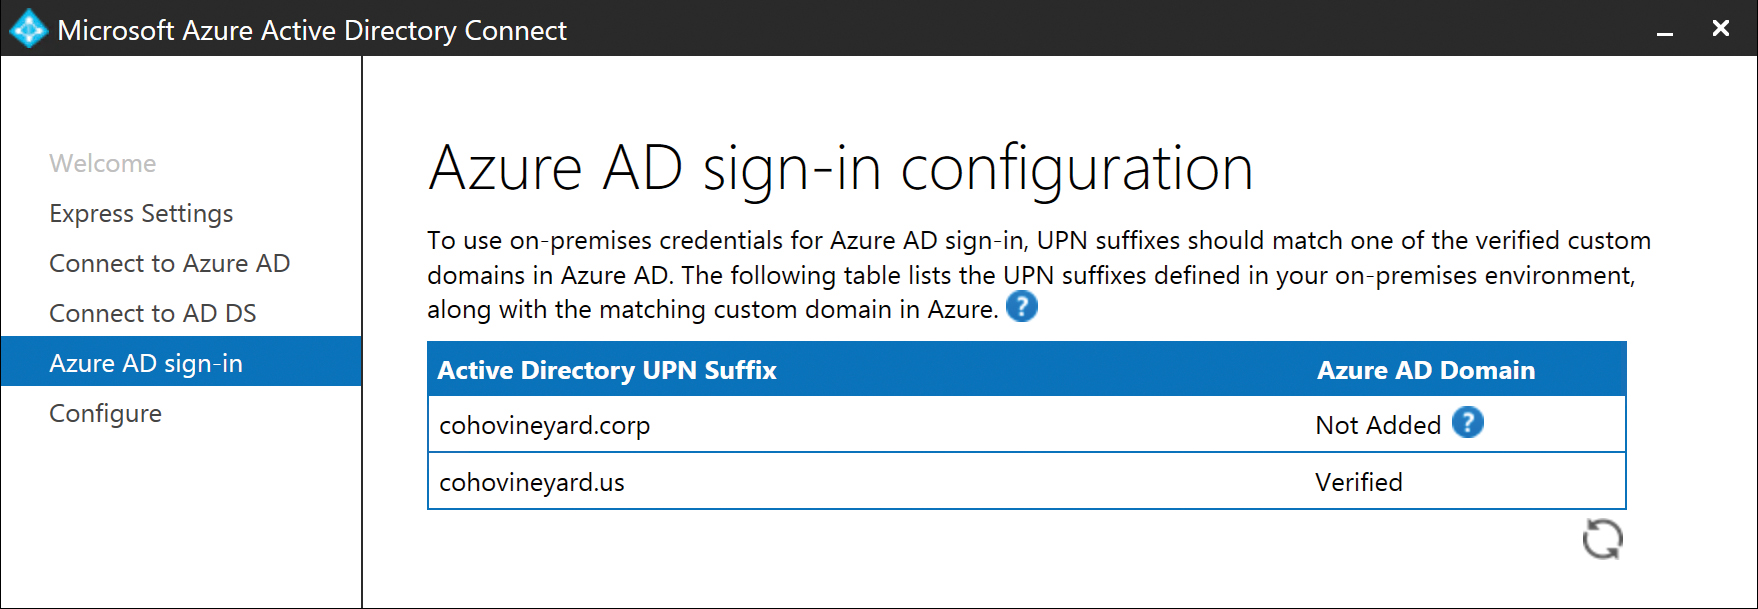
Figure 5-9 Active Directory UPN suffix verification
If any of your domains are marked Not Added, a warning appears, stating that your users will not be able to sign in to Azure AD by using their on-premises credentials.
This is only a warning because the wizard cannot confirm whether any of your users are using the unverified UPN suffixes that it found. If your users are already using a verified UPN suffix, or if you plan to change user UPN suffixes later, you can ignore this warning, and no further action regarding UPN suffix and Azure AD logon is required.
For more information, refer to Chapter 2, “Preparing Your Environment for the Cloud,” for details about the IDFix tool and user account preparation for synchronization to Office 365.
Finally, the express installation wizard provides a summary of the actions that the installer will take to enable directory synchronization with your Office 365 tenant, as Figure 5-10 shows. The final two options available during the express installation are the ability to defer synchronization until later and enable Exchange hybrid deployment.
It is at this point in the process that you might want to clear the Start The Synchronization Process When Configuration Completes check box so that you can make changes to the automatically selected OUs, add additional UPN suffixes to your forest, update your users’ UPN values, or simply wait to synchronize your users until you’re ready.
Selecting the Exchange Hybrid Deployment check box adds additional rules to the configuration that enable writeback of select Exchange-related Active Directory attributes from Azure Active Directory to on-premises Active Directory.
The version of Exchange installed in your forest determines which attributes are written back, and if you do not have Exchange installed, this option does not appear. See Figure 5-10.

Figure 5-10 Ready to configure AAD Connect
After you click Install, the wizard begins by installing SQL Server Express and creating the SQL database files in the C:Program FilesMicrosoft Azure AD SyncData directory. It then installs the Synchronization service, the connectors for Azure Active Directory, and on-premises Active Directory; creates the custom Sync account in the tenant; and installs the Azure AD Connect Health service.
It is now safe to click Exit, and if you selected Start The Synchronization Process on the summary page, your AAD Connect installation is already busy synchronizing your users to Office 365. See Figure 5-11.

Figure 5-11 The Configuration Complete page
Custom installation
The custom installation process differs significantly from the express installation. In the express installation, you are presented with a minimum of installation choices, quite literally three to four pages, and the installer makes certain assumptions about your preferred configuration options so that you can complete the installation quickly and easily.
The custom installation, however, enables you to customize every aspect of the AAD Connect installation, and it is in the custom installation mode that you are presented with a few options that cannot be changed after you complete the installation, without a complete re-installation of the tool.
Selecting Customize on the initial installation page provides you with the first of many configuration pages on which you can specify your own custom installation options. See Figure 5-12.

Figure 5-12 The Install Required Components page
Installation location
At this point, you can specify a custom installation for the AAD Connect binaries. The default location is C:Program FilesMicrosoft Azure AD Sync and cannot be changed during express installations; however, in custom mode, you can specify an alternate drive and or file path for the installation.
Selecting Specify A Custom Installation Location enables manual entry of the installation location, or you can use the Browse button to navigate the file system to find a suitable directory, as shown in Figure 5-13.

Figure 5-13 Specifying a custom installation location
It is important to note that although you can select an alternate installation location for the AAD Connect product binaries, a separate directory named Microsoft Azure Active Directory Connect in the C:Program Files directory is installed automatically when the AAD Connect installation is launched, because of the installation MSI file you downloaded, automatically extracting its contents. This installation option does not allow you to move that directory, and it should not be deleted after installation has concluded, or the AAD Connect customization wizard will not successfully launch if you want to make changes to an existing configuration.
Using SQL Server
AAD Connect, in both express and custom modes, can support up to 100,000 Active Directory objects, using the included Microsoft SQL Server Express edition that is installed as part of the AAD Connect setup process. If your environment has more than 100,000 objects, or if it is close to that number, the AAD Connect tool must be installed using a full version of Microsoft SQL Server.
AAD Connect does not count objects or tell you whether you need to use full SQL Server versus SQL Server Express. It is up to you to review your directory or directories to determine whether you can proceed with SQL Server Express or require the full version of SQL Server.
When using a full version of SQL Server, it is not necessary to implement any of the SQL Server high-availability technologies such as log shipping or clustering; however, those technologies are supported. Typically, it is recommended that in lieu of high-availability configurations like those mentioned, you should install a second AAD Connect server in staging mode to eliminate the need for a more complex back-end SQL Server implementation. More about staging mode appears at the end of this chapter.
Selecting Use An Existing SQL Server enables you to provide the name of a SQL Server and instance for the AAD Connect database. The SQL server can be located on a remote server or on the AAD Connect server itself; both scenarios are supported. If you are using the default MSSQLSERVER instance on the SQL server, you can leave the Instance Name text box blank, as shown in Figure 5-14; otherwise, the Instance Name must be provided. If you are using an alternate port for the SQL server, you must provide the Instance Name, followed by a comma (,), and the port number, even if the Instance Name is the default MSSQLSERVER name.
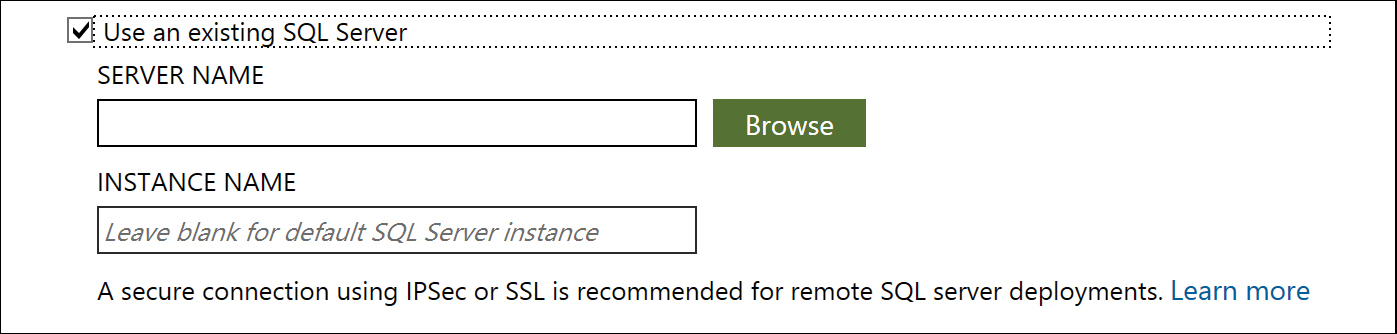
Figure 5-14 Using an existing SQL server
The installation of SQL Server creates a database named ADSync on the server, along with the associated stored procedures.
Selecting a service account
Selecting Use An Existing Service Account (see Figure 5-15) enables you to select a domain service account that will be used for the Azure AD Sync Windows service when the AAD Connect installation concludes. This service account is also automatically granted DB Owner and Public rights on the ADSync database as part of the installation process.
If the SQL server is local to the AAD Connect server, a service account does not need to be specified. Instead, a local account is created on the server automatically; this account is used for the Windows service and is granted DB Owner and Public rights on the ADSync database.
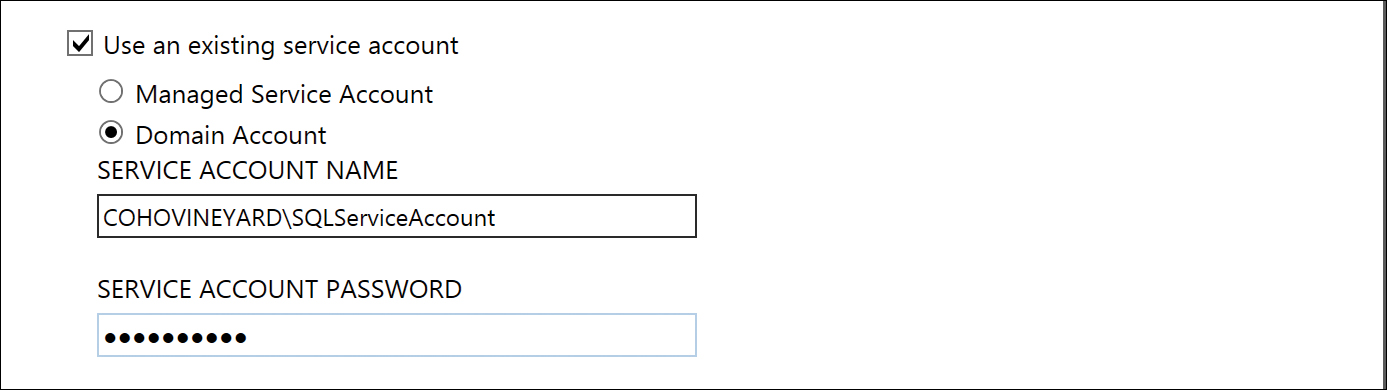
Figure 5-15 Selecting a service account
Finally, selecting Specify Custom Sync Groups enables you to specify alternate group names for the four groups, shown in Figure 5-16, that delegate rights to the AAD Connect implementation.
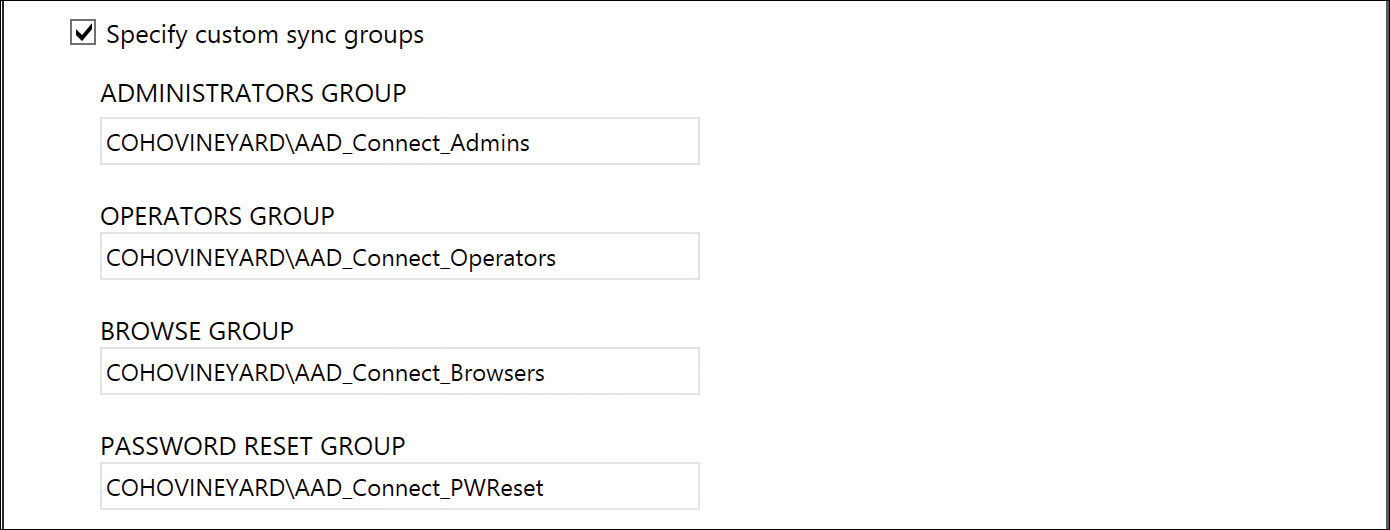
Figure 5-16 Specifying custom sync groups
These four groups can be domain groups if you are installing AAD Connect on a domain controller (as shown in Figure 5-16) or group names that are local to the AAD Connect server; however, in either case, if you specify custom sync groups, you need to create them prior to beginning the installation. Failure to create the groups prior to installation causes the installer to fail and an entry to be logged in the Application event log, indicating that the groups could not be found.
If you do not provide custom sync groups, the installer automatically creates the following four groups, which are used to secure AAD Connect and are granted the following permissions.
Permissions |
|
ADSyncAdmins |
Full rights to the AAD Connect tool |
ADSyncOperators |
Able to view operations run history; cannot view connectors or objects; able to view sync rules but unable to edit or delete |
ADSyncBrowse |
No access to the Sync service console and cannot view Synchronization rules |
ADSyncPasswordSet |
No access to the Sync service console and cannot view Synchronization rules |
The only group that is populated at the time of installation is the ADSyncAdmins group. The user account used to perform the AAD Connect installation is placed in this group automatically when the installation completes.
Selecting your authentication method
Another critical milestone when installing and configuring AAD Connect is the selection of the authentication method your users will use to access Office 365. Several options are available during the installation of the AAD Connect tool in custom mode on the User Sign-In page.
Although the selection of an authentication method is important in the overall design and deployment of Office 365 and your directory synchronization, you can run the configuration wizard on the desktop at any time to change these settings. As a result, you might want to choose Do Not Configure and bypass the authentication configuration steps during initial installation and return to change them later.
Password synchronization
Selecting Password Synchronization on the User Sign-In page, shown in Figure 5-17, configures the AAD Connect tool to synchronize user passwords automatically from on-premises Active Directory to Azure Active Directory. This synchronization process occurs independently of the regularly scheduled 30-minute synchronization cycle the AAD Connect server uses to synchronize on-premises Active Directory object properties (for example, Name, eMail address, and so on), so that password changes in on-premises Active Directory are replicated to Office 365 every 1 to 2 minutes.

Figure 5-17 The User Sign-In page
Scope
When you enable the password synchronization feature as part of the AAD Connect installation, there is an initial synchronization of all passwords to Office 365 for any users configured within the scope of the solution.
In an express mode configuration, all user objects are automatically within the scope of the solution; however, when performing a custom installation, the organizational unit configuration selected, and any enabled group filtering, define the users who fall within the scope of the configuration and, subsequently, what passwords are initially synchronized.
Permissions
When password synchronization is automatically enabled as part of express mode, the service account (for example, MSOL_xxxxxxx) that is generated in on-premises Active Directory is automatically delegated the Replicating Directory Changes and Replicating Directory Changes All permissions at the top level of the forest.
When performing a custom installation, however, there is no automatic account creation, and therefore no rights are delegated automatically. The service account that you create for the Active Directory forest connector must be delegated the rights manually to the top level of each domain in the forest.
Pass-through authentication
Pass-through authentication can be selected during the AAD Connect installation, as shown in Figure 5-18. Optionally, after installation has concluded, it may be added by running the AAD Connect Wizard located on the desktop.
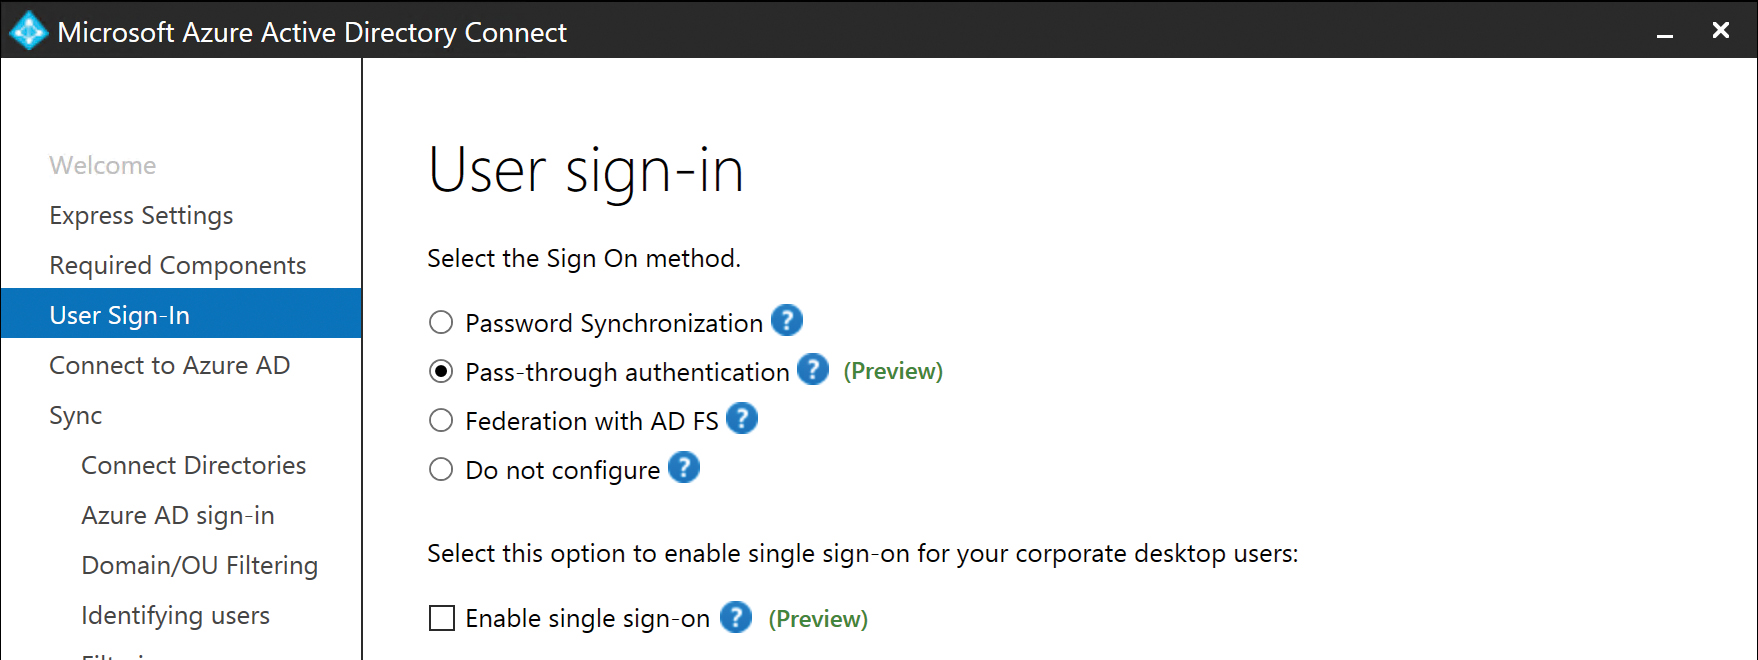
Figure 5-18 Selecting Pass-Through Authentication
Overview
Pass-through authentication is an alternative to password synchronization if your company policies prohibit the transmission of passwords, even in encrypted format, over the public Internet. Instead of syncing user passwords to the cloud and relying on Office 365 to process logons, pass-through authentication allows the on-premises Active Directory infrastructure to process authentication requests, without the need to transmit passwords or deploy identity providers such as AD FS.
The implementation of pass-through authentication requires the deployment of a processing agent, added to the AAD Connect server automatically when you select this option, which operates using outbound-only communication. The agent can be deployed on more than one server for the purposes of high availability, provided the server is joined to the domain where the users being authenticated reside and the server is running Windows Server 2012R2 or later.
Pass-through authentication behaves similarly to AD FS, although instead of redirecting authentication requests back to an on-premises server, the request is placed in a queue in Microsoft Azure and then picked up by a regularly scheduled process initiated by the processing agent running on-premises. The processing agent sends the request to an Active Directory domain controller, it is processed by the domain controller, and the results are returned to the processing agent to be sent back to Azure. Upon receipt, Azure issues a token to the user, who can then access Office 365 services.
Requirements
Although Azure AD pass-through authentication eliminates the need to synchronize passwords to Office 365 and simplifies the authentication process when compared to the implementation of AD FS or other identity providers, pass-through authentication does have several key requirements that must be met to ensure that it operates properly.
- The AAD Connect server and underlying pass-through processing agent must be installed and joined to a domain within the forest where the authentication requests are directed. All servers running the processing agent must also be running Windows Server 2012R2 or later.
- Pass-through authentication is supported in a multi-forest configuration, but a forest trust is required.
- The UserPrincipalName value used for synchronization to Office 365 must be the value from the UserPrincipalName attribute in on-premises Active Directory and must be a routable UPN suffix. Alternate Login ID is not supported with pass-through authentication.
- The AAD Connect server, and any servers running the processing agent, must be able to reach Azure Active Directory on several additional TCP/IP ports and should not be located behind a proxy server or network devices that perform SSL inspection or URL filtering.
You can find the list of prerequisites for pass-through authentication at https://docs.microsoft.com/en-us/azure/active-directory/connect/active-directory-aadconnect-pass-through-authentication#azure-ad-pass-through-prerequisites.
Selecting pass-through authentication deploys the processing agent as part of the AAD Connect Custom installation. Any additional installations of the processing agent require download of the processing agent from https://go.microsoft.com/fwlink/?linkid=837580.
Federation with AD FS
Selecting Federation With AD FS on the User Sign-In page adds several additional pages to the installation wizard, as shown in Figure 5-19. These additional pages enable you to perform the installation of the AD FS and Web Application Proxy server roles in your organization.
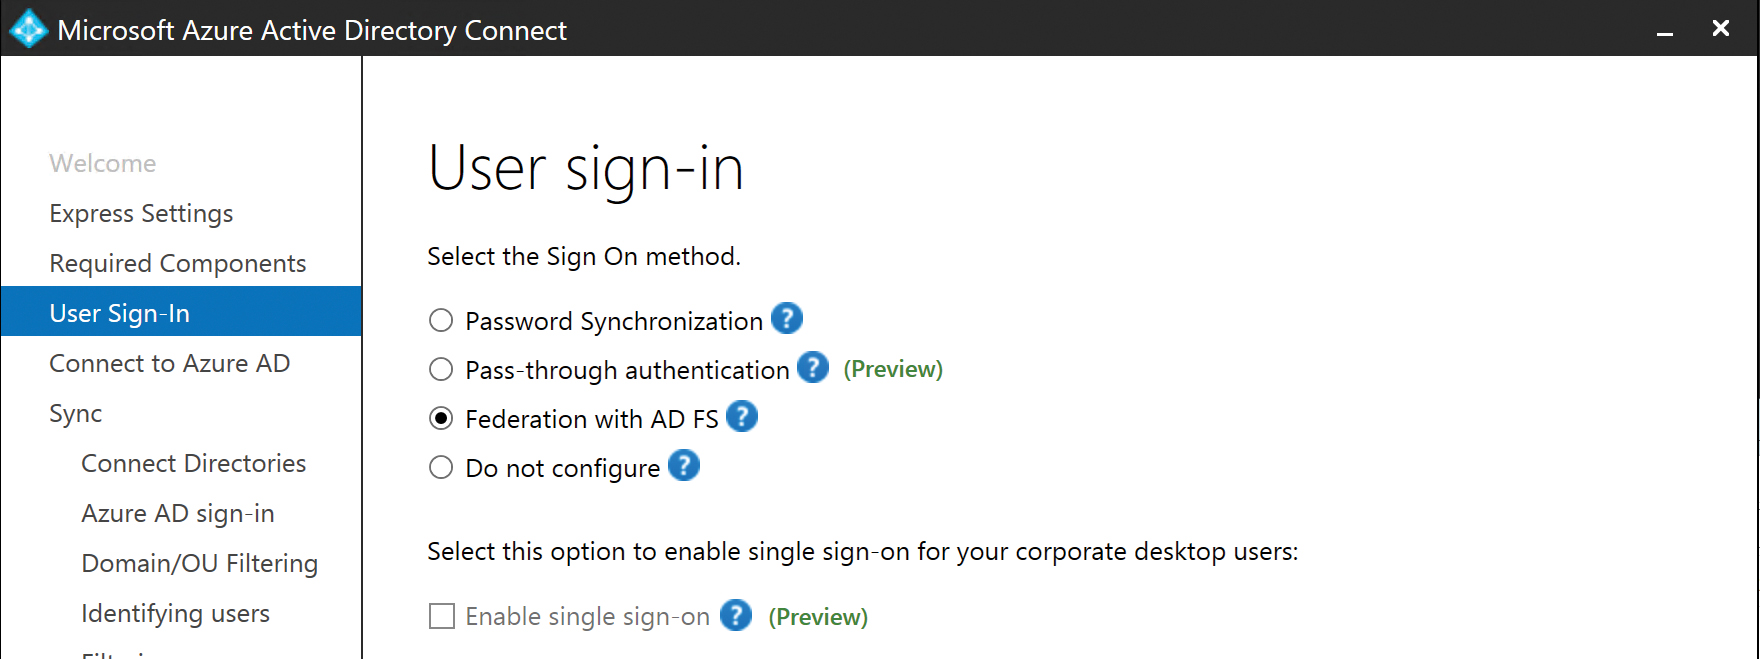
Figure 5-19 Federation with AD FS
The AD FS installation is executed by the AAD Connect Wizard; however, the installation of AD FS does not occur on the AAD Connect server. You must have at least two additional servers ready for the AD FS Federation server role and the Web Application Proxy server role. The AD FS federation server should be joined to the domain; the Web Application Proxy server can be a member of either the domain or a workgroup, based on your company’s requirements. Both servers should be running Windows Server 2012R2 or later.
In addition to the two servers required for AD FS, you also need an SSL certificate with your Federation Service name defined (for example, adfs.cohovineyard.us) or a wildcard certificate that can be used to secure the Web Application Proxy server role.
On the AD FS Farm page, shown in Figure 5-20, you can choose to configure a new AD FS farm, or you can select an existing AD FS farm already configured in your environment.
When selecting Configure A New AD FS Farm, you must provide a PFX certificate file that secures the Web Application Proxy.

Figure 5-20 AD FS Farm page
Clicking the Browse button returns a File Explorer window, from which you can navigate to the PFX file you intend to use for the Web Application Proxy server. After you have selected the PFX file, you are prompted to supply the password for the certificate file before you can proceed.
In the Subject Name drop-down list, select the certificate subject name that you wish to use for the Federation Service name, as shown in Figure 5-21. If your certificate is a wildcard certificate, you must instead provide a subject name prefix for the federation endpoint. The resulting Federation Service name appears at the bottom of the page. This should be the name that you use for the communication between the Web Application proxy servers and the federation servers as well as the name that you configure in your public DNS and inbound firewall rules for the Web Application Proxy server.
See Chapter 2 for more details about the networking requirements for the AD FS Web Application Proxy server role.
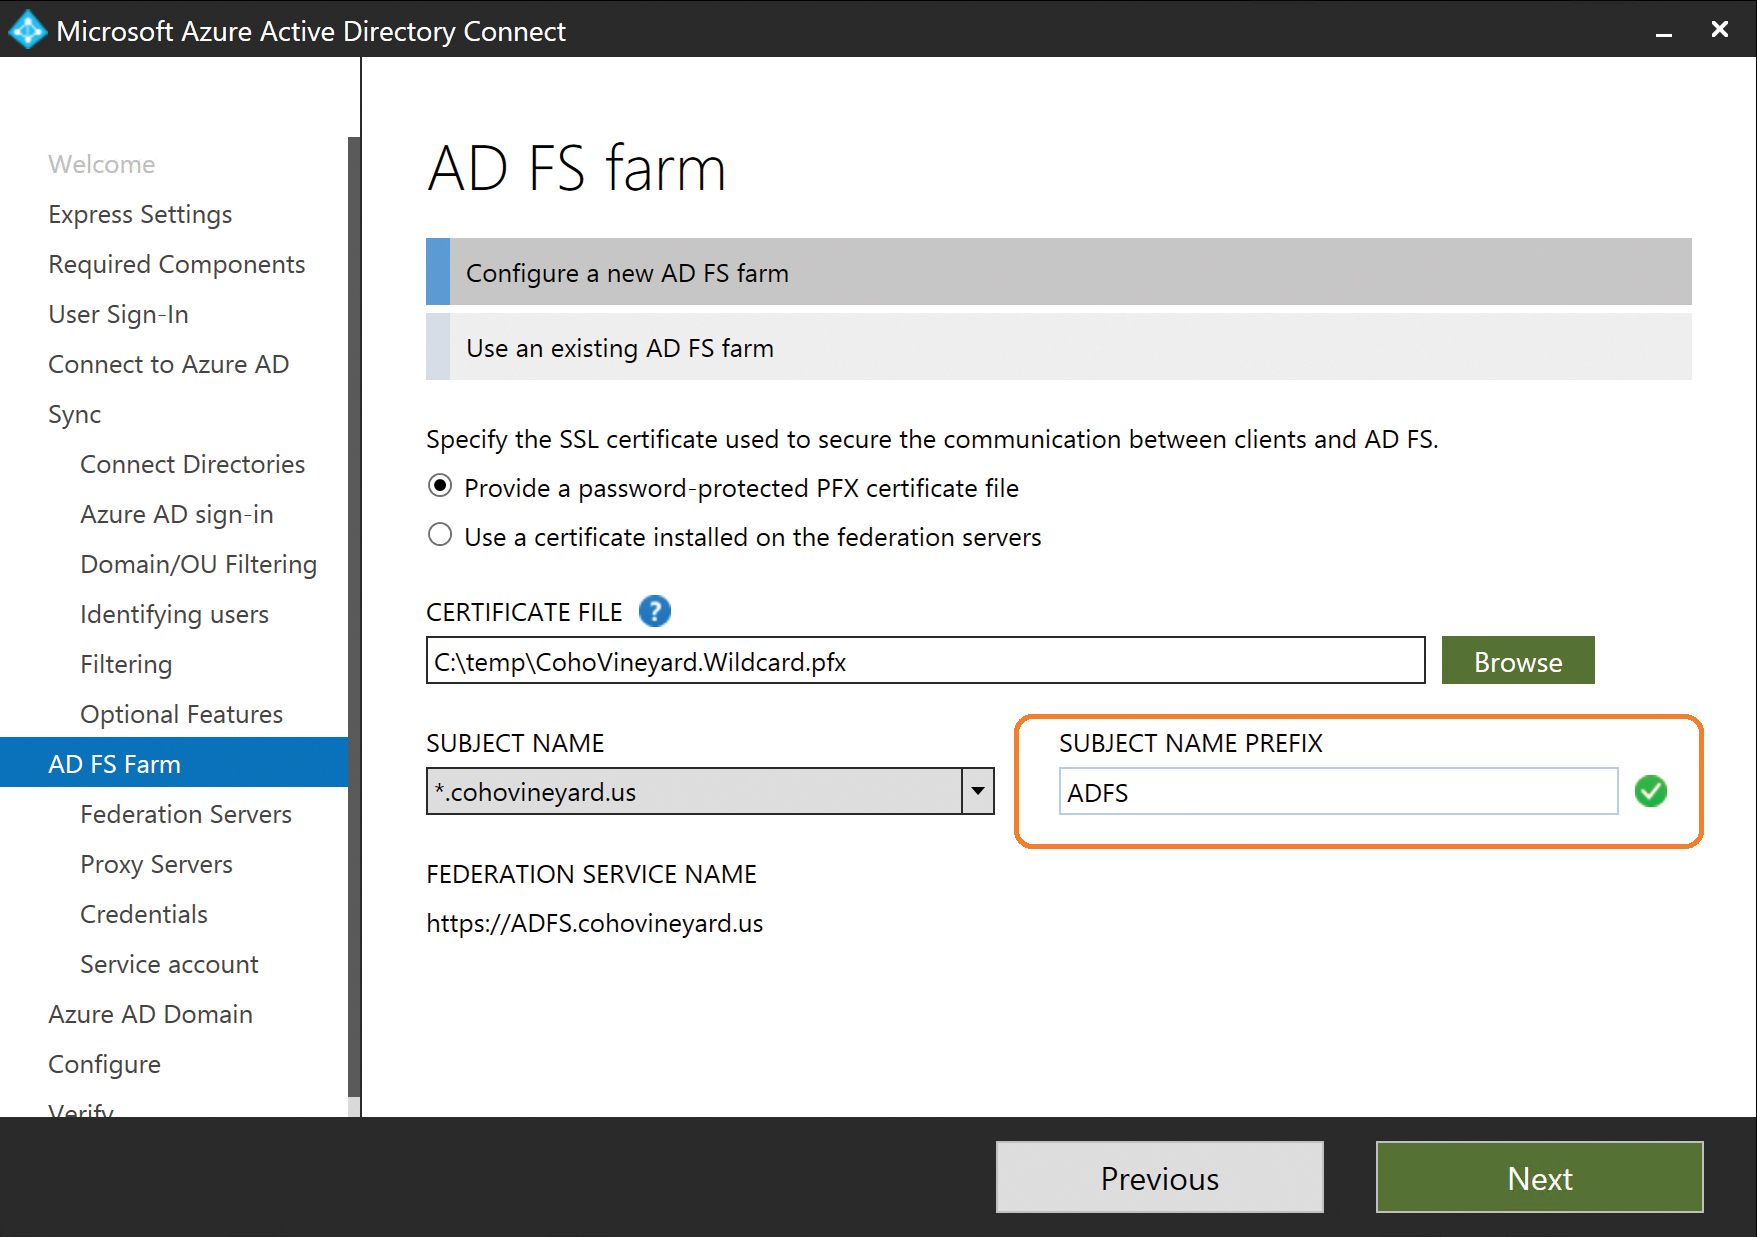
Figure 5-21 Selecting a subject name prefix
After supplying the certificate information, you are prompted to provide the name of the server where the AD FS service should be installed. This is the federation server and should be joined to a domain within the Active Directory forest where authentication takes place.
You can provide a server name or IP address, or you can use the Browse button to search Active Directory for a server by using its name or IP address.
After you have selected the server name and entered the credentials for a domain administrator, your AD FS federation server appears in the Selected Servers list, as shown in Figure 5-22. Repeat this for each AD FS federation server you want the installer to configure for you.
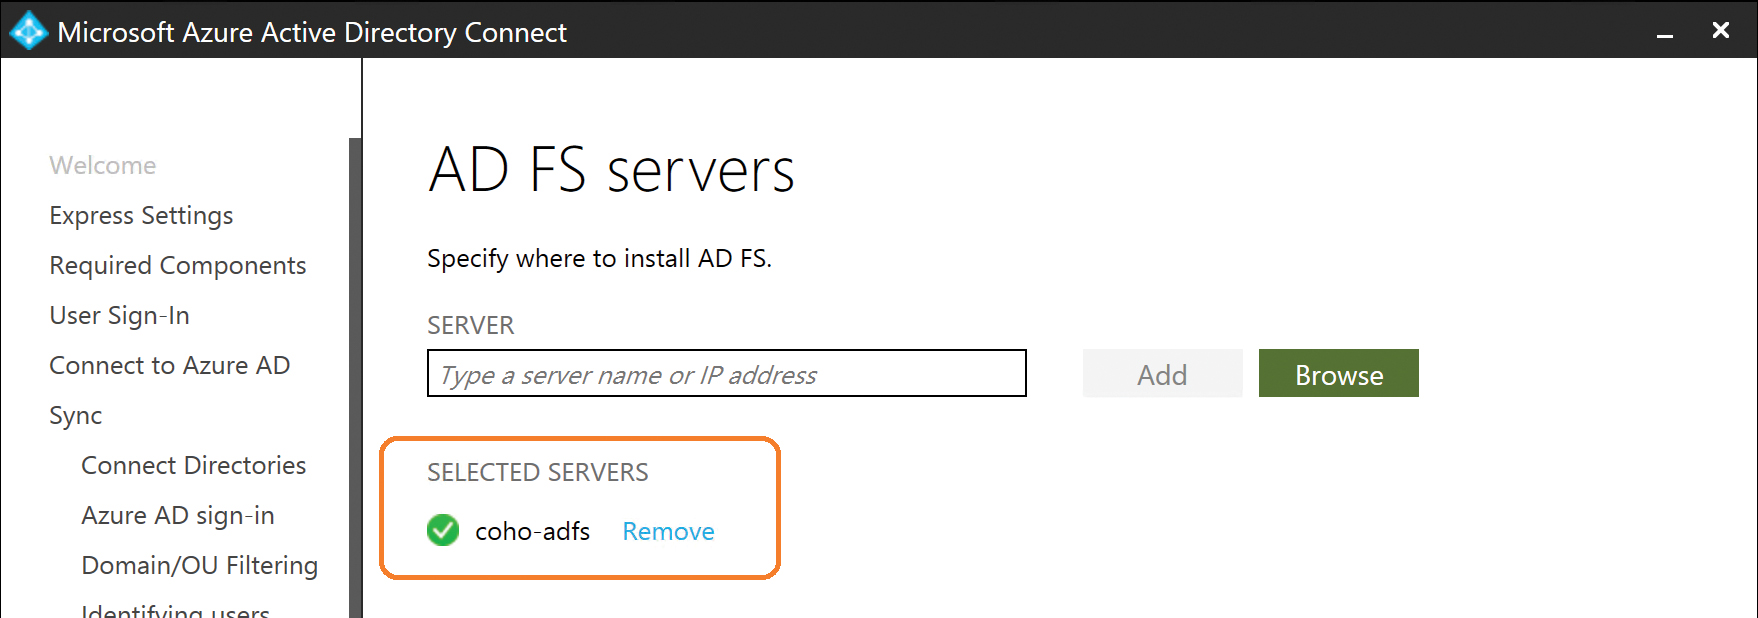
Figure 5-22 Selected AD FS server
You are then prompted to enter the name or IP address of the Web Application Proxy server. Like the AD FS Federation server selection page, you can enter the name or IP address directly or click the Browse button to search Active Directory for the server.
You are prompted for credentials, but unless the Web Application Proxy server is joined to the domain, you must provide credentials for a local administrator on the server. Your Web Application Proxy server name appears in the Selected Servers list after you select it, as shown in Figure 5-23.
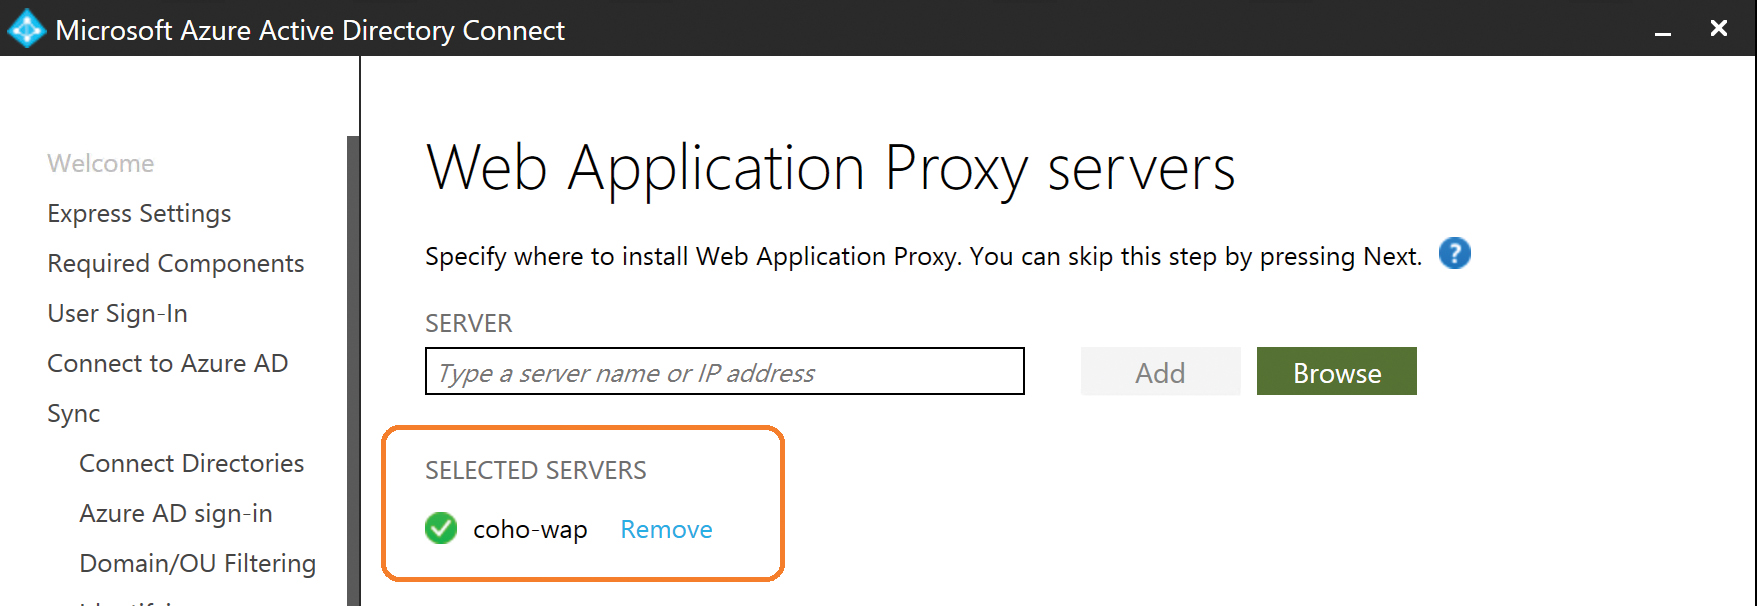
Figure 5-23 Selected Web Application Proxy server
Enter the credentials for a domain administrator account as shown in Figure 5-24; this enables the AAD Connect installation wizard to complete the AD FS configuration on the remote servers.
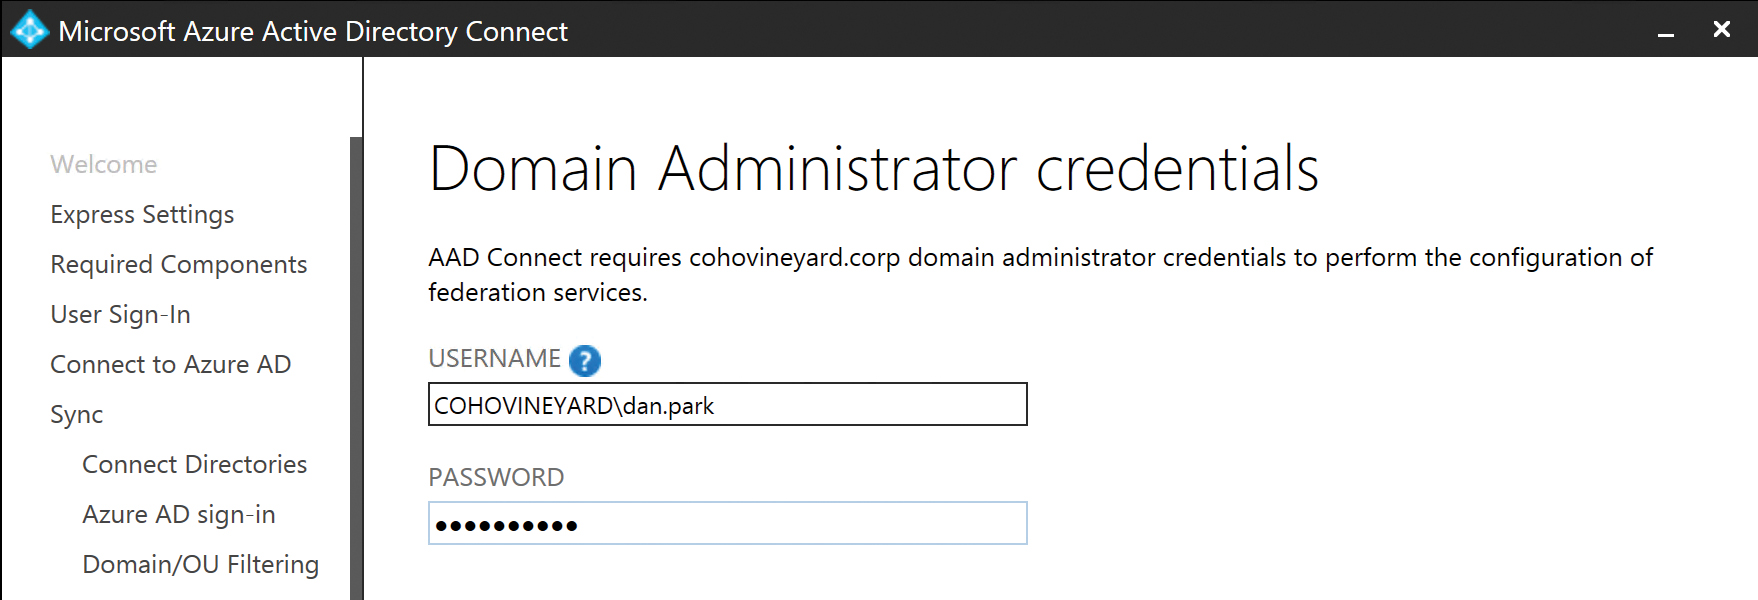
Figure 5-24 Entering domain administrator credentials
Provide a service account for the AD FS service. This service account can be either a standard domain user account or a group Managed Service Account (gMSA).
The group Managed Service Account options are not available if your domain is not running Windows Server 2012 or later.
The wizard can be used to create a group Managed Service Account, you can provide an existing gMSA, or you can provide an existing domain user account.
The service account provided must be a member of the Enterprise Admins group if you are selecting an existing domain user account. See Figure 5-25.
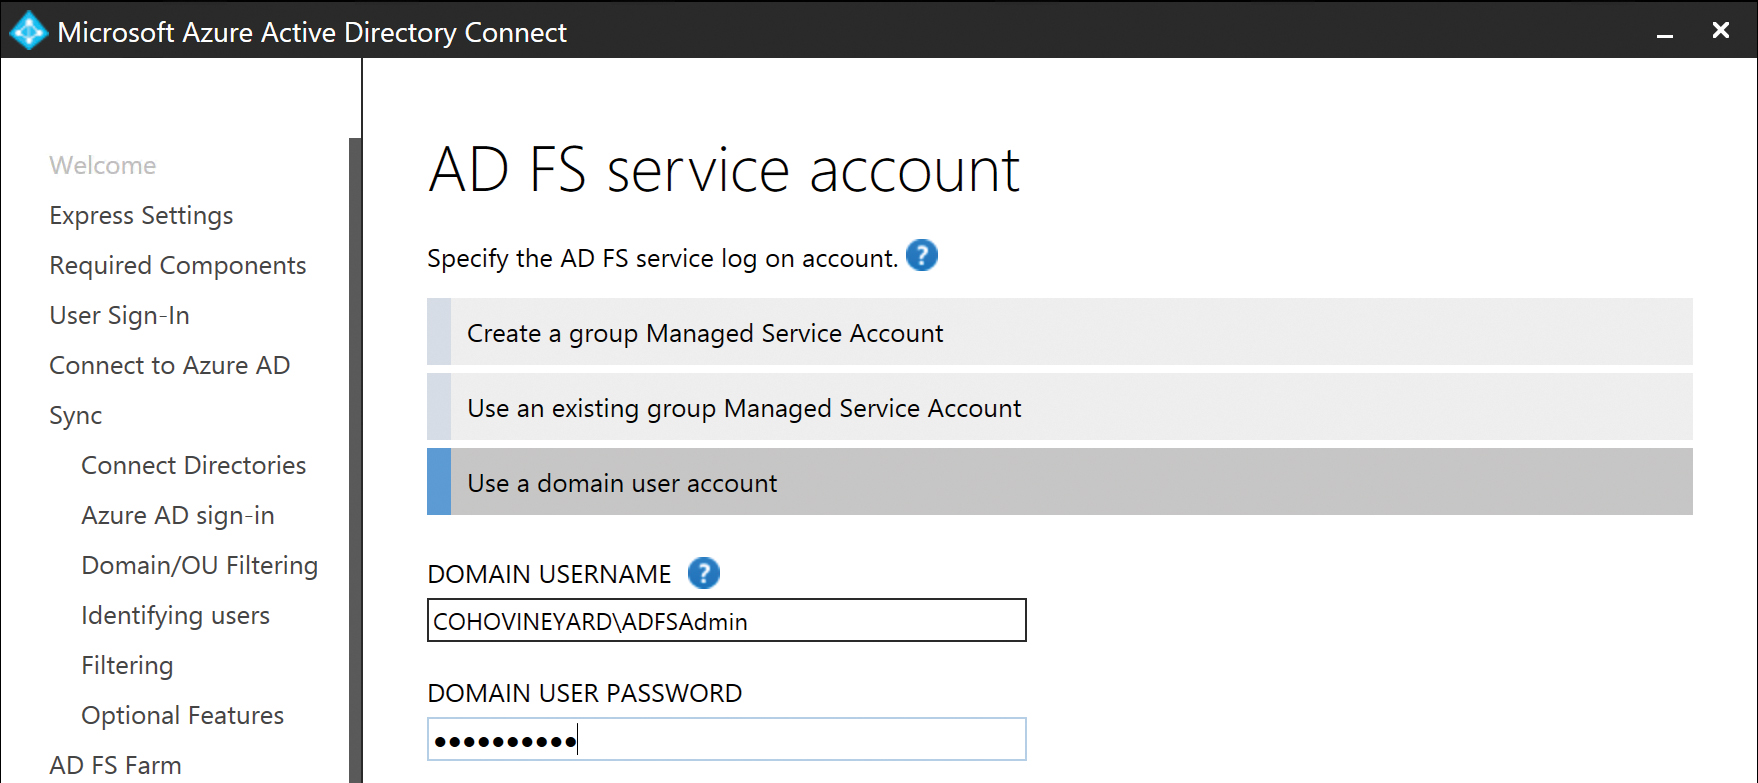
Figure 5-25 AD FS service account selection
You are prompted to select the domain that should be used for the federation process, and a list of all the domains that have been registered in your Office 365 tenant appears.
After you have selected a domain, that domain is converted to a federated domain in your tenant. Afterward, any time a user logon ending in that UPN suffix is presented during logon to Office 365, the authentication request is redirected to the Web Application Proxy server, using the Federation Service Name that you selected when adding the certificate, as shown in Figure 5-26.
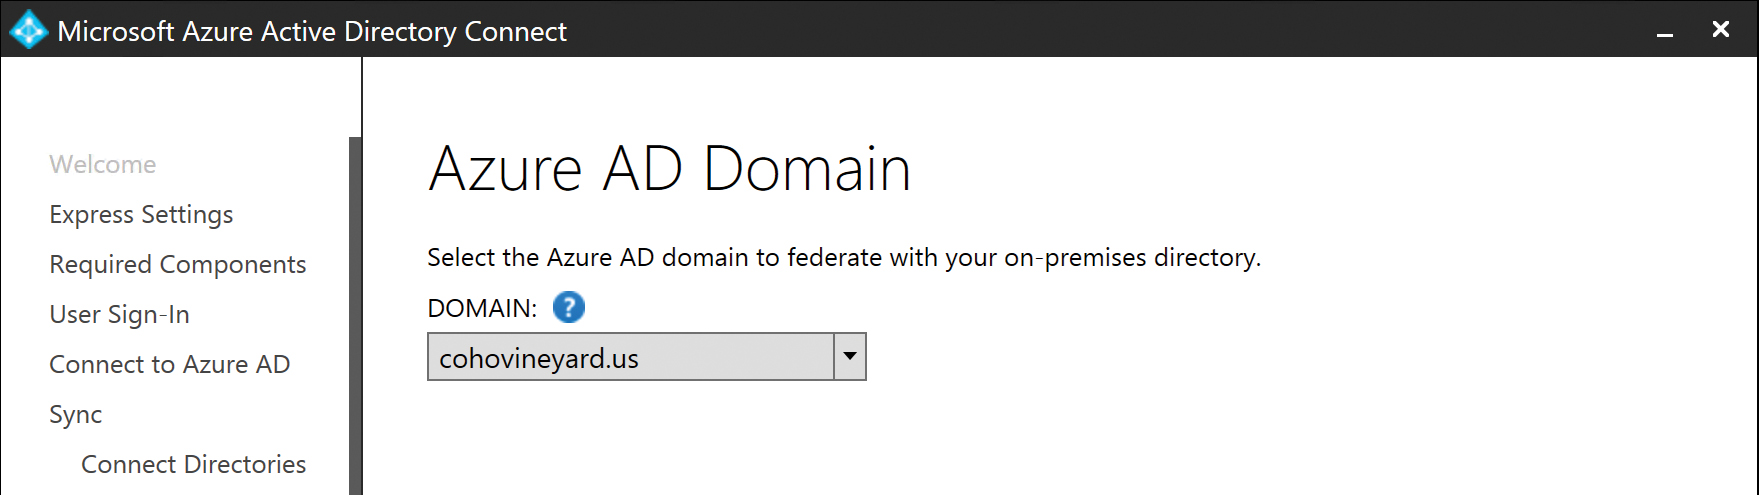
Figure 5-26 Azure AD domain selection
Clicking Next opens the final configuration page, where you can review your selected installation options and then click Next to proceed.
When enabling either password synchronization or pass-through authentication, you can enable Single Sign-On (SSO) as well. Single Sign-On forces the authentication process with Azure AD to behave like integrated Windows authentication, using the on-premises Active Directory domain controllers to create tokens automatically for authenticated users who are accessing Azure resources.
The beauty of Single Sign-On is that the user is never challenged for credentials. Their authentication request is presented to Azure AD and redirected to an on-premises domain controller; a token is generated and then automatically provided to Azure AD to authorize access, all without any user intervention.
After you have selected the appropriate authentication method for your environment, click Next to proceed.
Connecting to your directories
During the AAD Connect custom installation process, after you have selected your authentication method, you are prompted for credentials for your Azure AD tenant.
These credentials ensure that you are a global administrator in your tenant and retrieve a list of domains registered in your tenant. The installation wizard uses these details in later installation pages.
The credentials you provide in this step are not stored, however, nor are they used for the ongoing synchronization process. If necessary, you can remove the global administrator role from this account, following successful installation of the AAD Connect tool. See Figure 5-27.
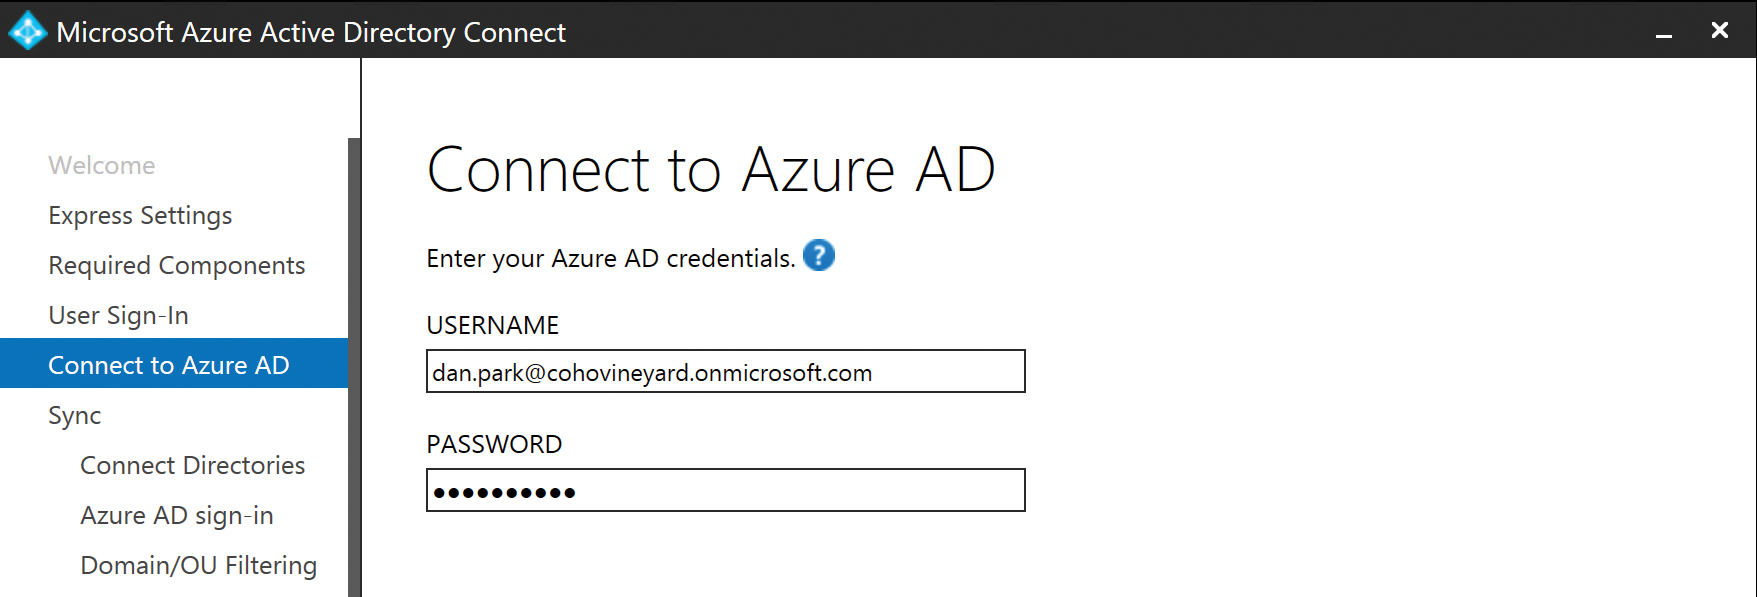
Figure 5-27 Connecting to Azure AD
The next step in the custom installation process is the selection of all the directories that contain objects (users, groups, contacts, devices) that you plan to synchronize to your Office 365 tenant.
Currently, the AAD Connect installation wizard offers only one option in the Directory Type drop-down list: Active Directory. In future versions, the wizard will be updated to include options such as Active Directory Lightweight Directory Services (AD LDS), which uses the Lightweight Directory Access Protocol (LDAP), and other identity sources.
The forest drop-down list displays the name of the forest to which the AAD Connect server is currently joined. You must provide credentials to connect to that forest in the form of DOMAINUserName.
If the AAD Connect server is not a member of a domain, you must manually enter the forest name because it will not be automatically populated.
After you have entered the user name and password for the service account, click the Add Directory button. AAD Connect examines the forest, using the service account credentials provided, to ensure that it can reach the forest and the provided service account is valid. In addition, the wizard examines the forest schema to determine whether additional options for features (for example, Exchange hybrid) can be added as part of the installation process.
The credentials entered in this step are stored in the AAD Connect configuration and will be the permanent service account used to connect to the forest for the ongoing synchronization process.
You can add additional forests or directories to the configuration by manually typing the name of the forest in the Forest text box, providing service account credentials in that forest with the necessary permissions, and clicking Add Directory. See Figure 5-28.
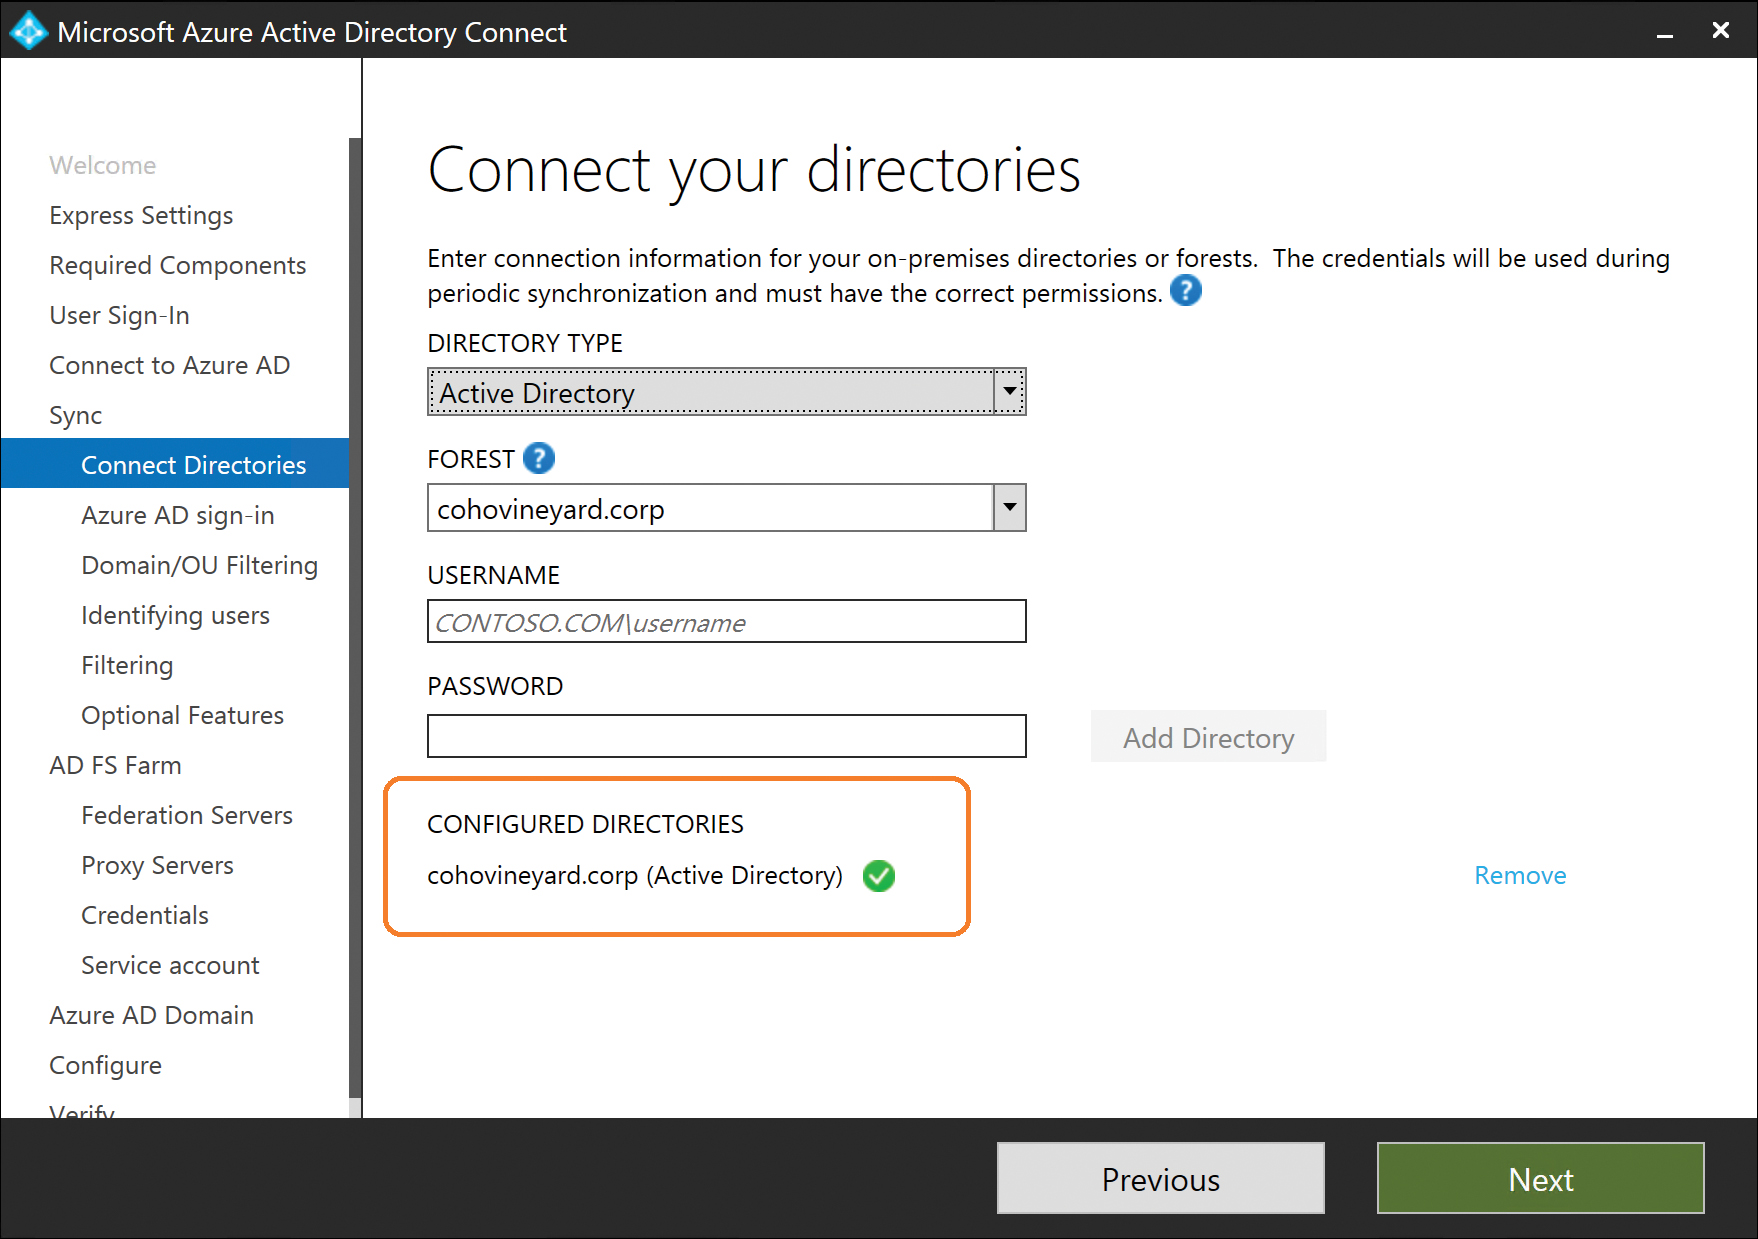
Figure 5-28 Connect Your Directories page
After you have successfully added all the directories to your configuration, click the Next button to proceed.
The UserPrincipalName and SourceAnchor attributes
The next page of the custom installation wizard provides a list of all UPN suffixes that exist across the forest or forests you entered on the Connect Your Directories page.
Each UPN suffix is compared against the domains that are currently verified in your Office 365 tenant, and if any UPN suffixes do not exist as a verified domain, you see a warning at the bottom of the screen, stating that users might not be able to log on to Office 365 if they are configured to use an unverified domain.
This warning is meant to serve as a reminder that additional work might be required in either your tenant, such as the registration of additional domains, or in your on-premises Active Directory, such as changing your users’ UPN values to match verified domains, before authentication will work properly during user logon.
It is safe to proceed, even with unverified domain suffixes, because they can be added later, and it will not affect the installation process or require you to run the wizard again.
The other option on this page, the User Principal Name selection drop-down list, represents yet another of the critical installation milestones that cannot be undone after the installation has concluded.
The User Principal Name drop-down list enables you to choose the value to use as the UserPrincipalName value for logon and authentication with Azure AD. In most cases, you accept the default value of UserPrincipalName from the on-premises Active Directory schema; however, it is possible that in some environments an alternate value is used.
In some environments, the UserPrincipalName value might already be used by older applications and prevent you from changing the value to use a UPN domain suffix registered in Office 365. In other environments, company or security policy might prohibit the use of this value for the purposes of authentication.
In those cases, the most common alternate attribute used for UserPrincipalName is the Mail attribute because the Mail value and UserPrincipalName value both use the commonly accepted format of name@domain.
Use great care when deciding to use an alternate attribute for the UserPrincipalName value. This process is typically referred to as Alternate Login ID and not only does it require additional changes to the AD FS implementation, but it might also render other applications incapable of authenticating with Office 365 because they expect the UserPrincipalName value to be used (as, for example, in pass-through authentication). See Figure 5-29.
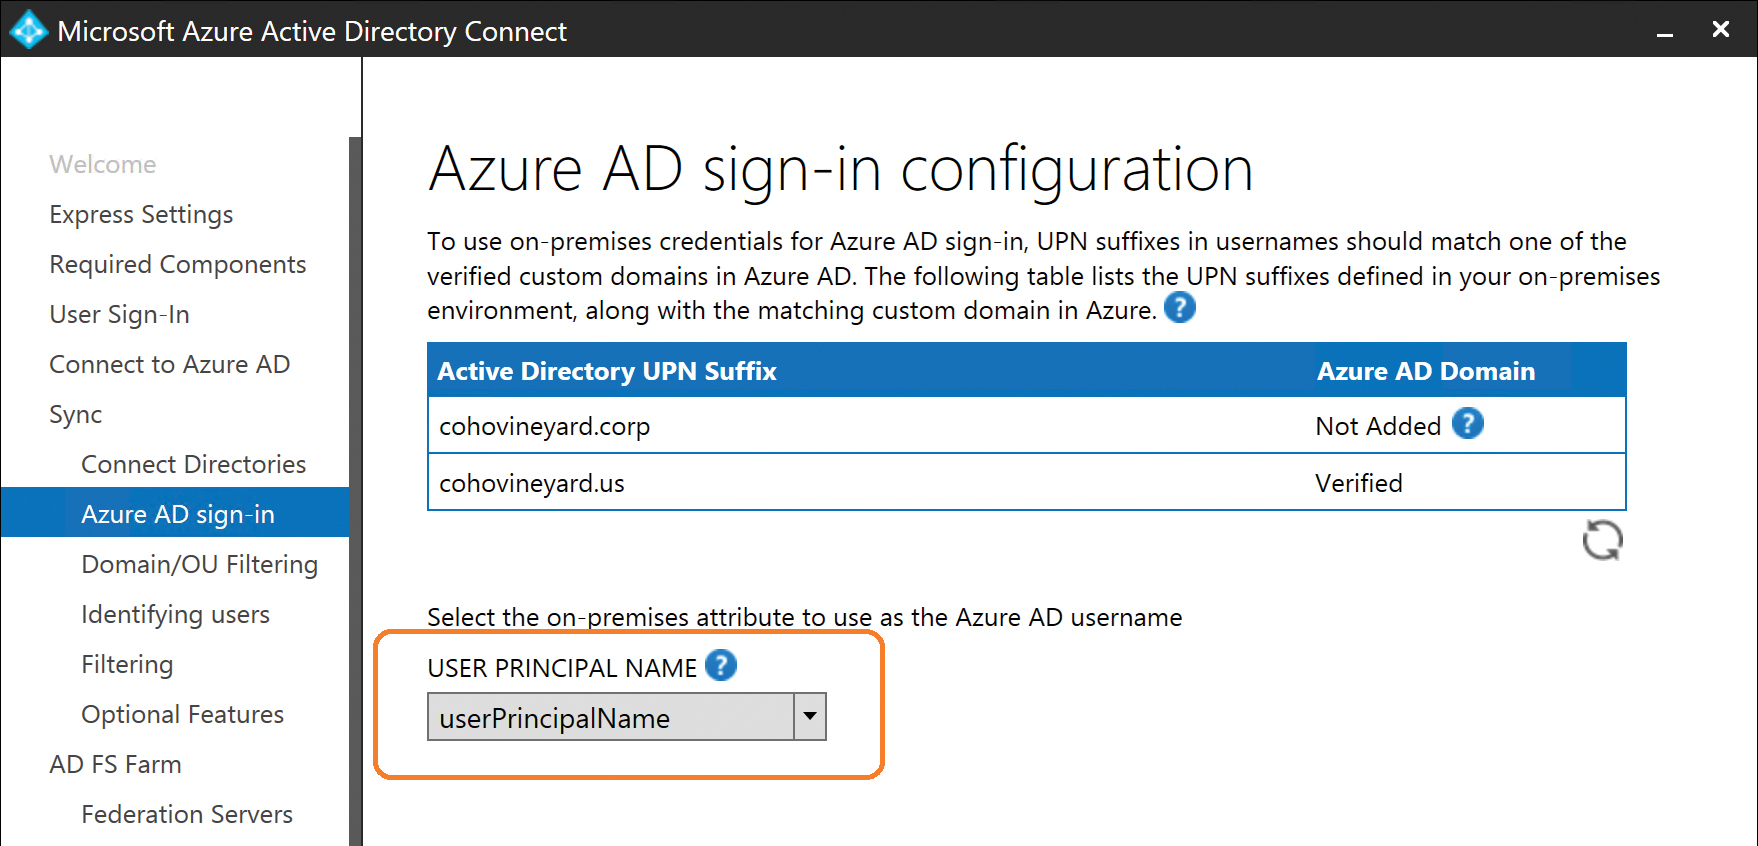
Figure 5-29 Azure AD Sign-in Configuration and UserPrincipalName page
You can find additional details regarding Alternate Login ID and supportability at https://docs.microsoft.com/en-us/azure/active-directory/connect/active-directory-aadconnect-accounts-permissions#custom-settings-installation.
After you have confirmed the attribute that should be used for UserPrincipalName and have reviewed the list of domain suffixes, click Next to proceed.
The Domain and OU filtering page enables you, on a per-directory basis, to select or clear the domain partitions and organizational units (OUs) that you want in the scope of the solution.
Any OU that you select automatically includes all objects in that OU and any sub-OU in the scope of the synchronization. In the case of multiple forests, the Directory drop-down list enables you to choose OUs for each, as shown in Figure 5-30.
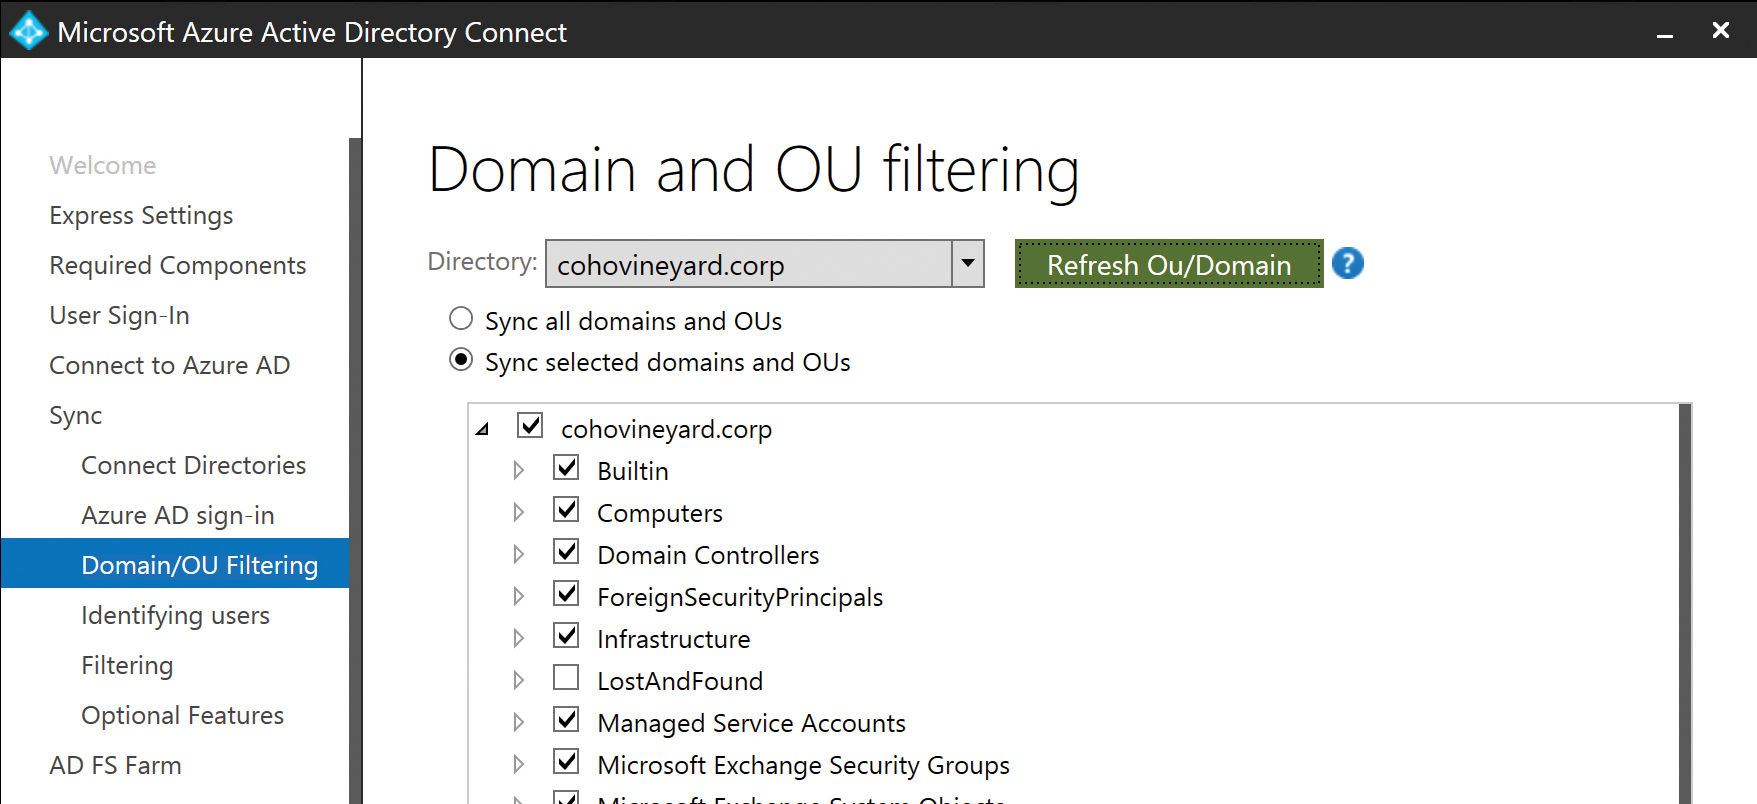
Figure 5-30 Domain and OU filtering
The status of each check box is important because it provides detail about whether the OU and any sub-OUs beneath it will be included or excluded from the scope of the synchronization.
An empty check box indicates that the OU is excluded from the scope of the synchronization, and a check box with a check mark indicates that the OU is included in the scope of the synchronization.
Any selected OU that contains sub-OUs automatically includes those sub-OUs, as shown in Figure 5-31.
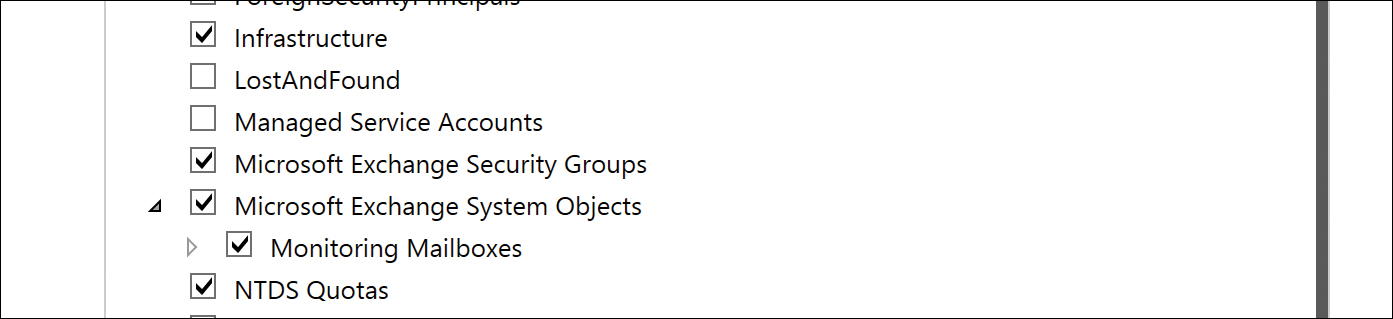
Figure 5-31 Selected boxes and empty boxes for OUs
Although the presence or absence of a check mark might seem obvious, there are two additional states that are distinctly different and affect how changes to the OU structure post-installation affect synchronization.
A check box with a gray background and a check mark indicates that one or more sub-OUs beneath that OU have not been selected. It also means that following deployment of the AAD Connect tool, any new OUs added beneath that OU in the future are automatically included in the scope of the synchronization. No changes are required in the AAD Connect configuration to accommodate these new OUs.
A check box with only a gray background indicates that one or more sub-OUs beneath that OU have not been selected but also means that, following deployment, any added new OUs beneath that OU will not be included in the scope of the synchronization.
It would require an update to the AAD Connect configuration, using the wizard or changes to the connector properties, to include the new OU. See Figure 5-32.

Figure 5-32 Gray selected and gray empty OU boxes
If you prefer not to make changes to the domain and OU filtering for your directories during the AAD Connect Custom installation, leave this page unchanged. You can rerun the wizard or manually edit the properties of the connector at any time.
After you have selected your OU filtering preferences, click Next to proceed.
Uniquely identifying your users
The final set of configuration options that irrevocably affect your AAD Connect installation, requiring reinstallation if you get them wrong, are on the Uniquely Identifying Your Users page, shown in Figure 5-33.
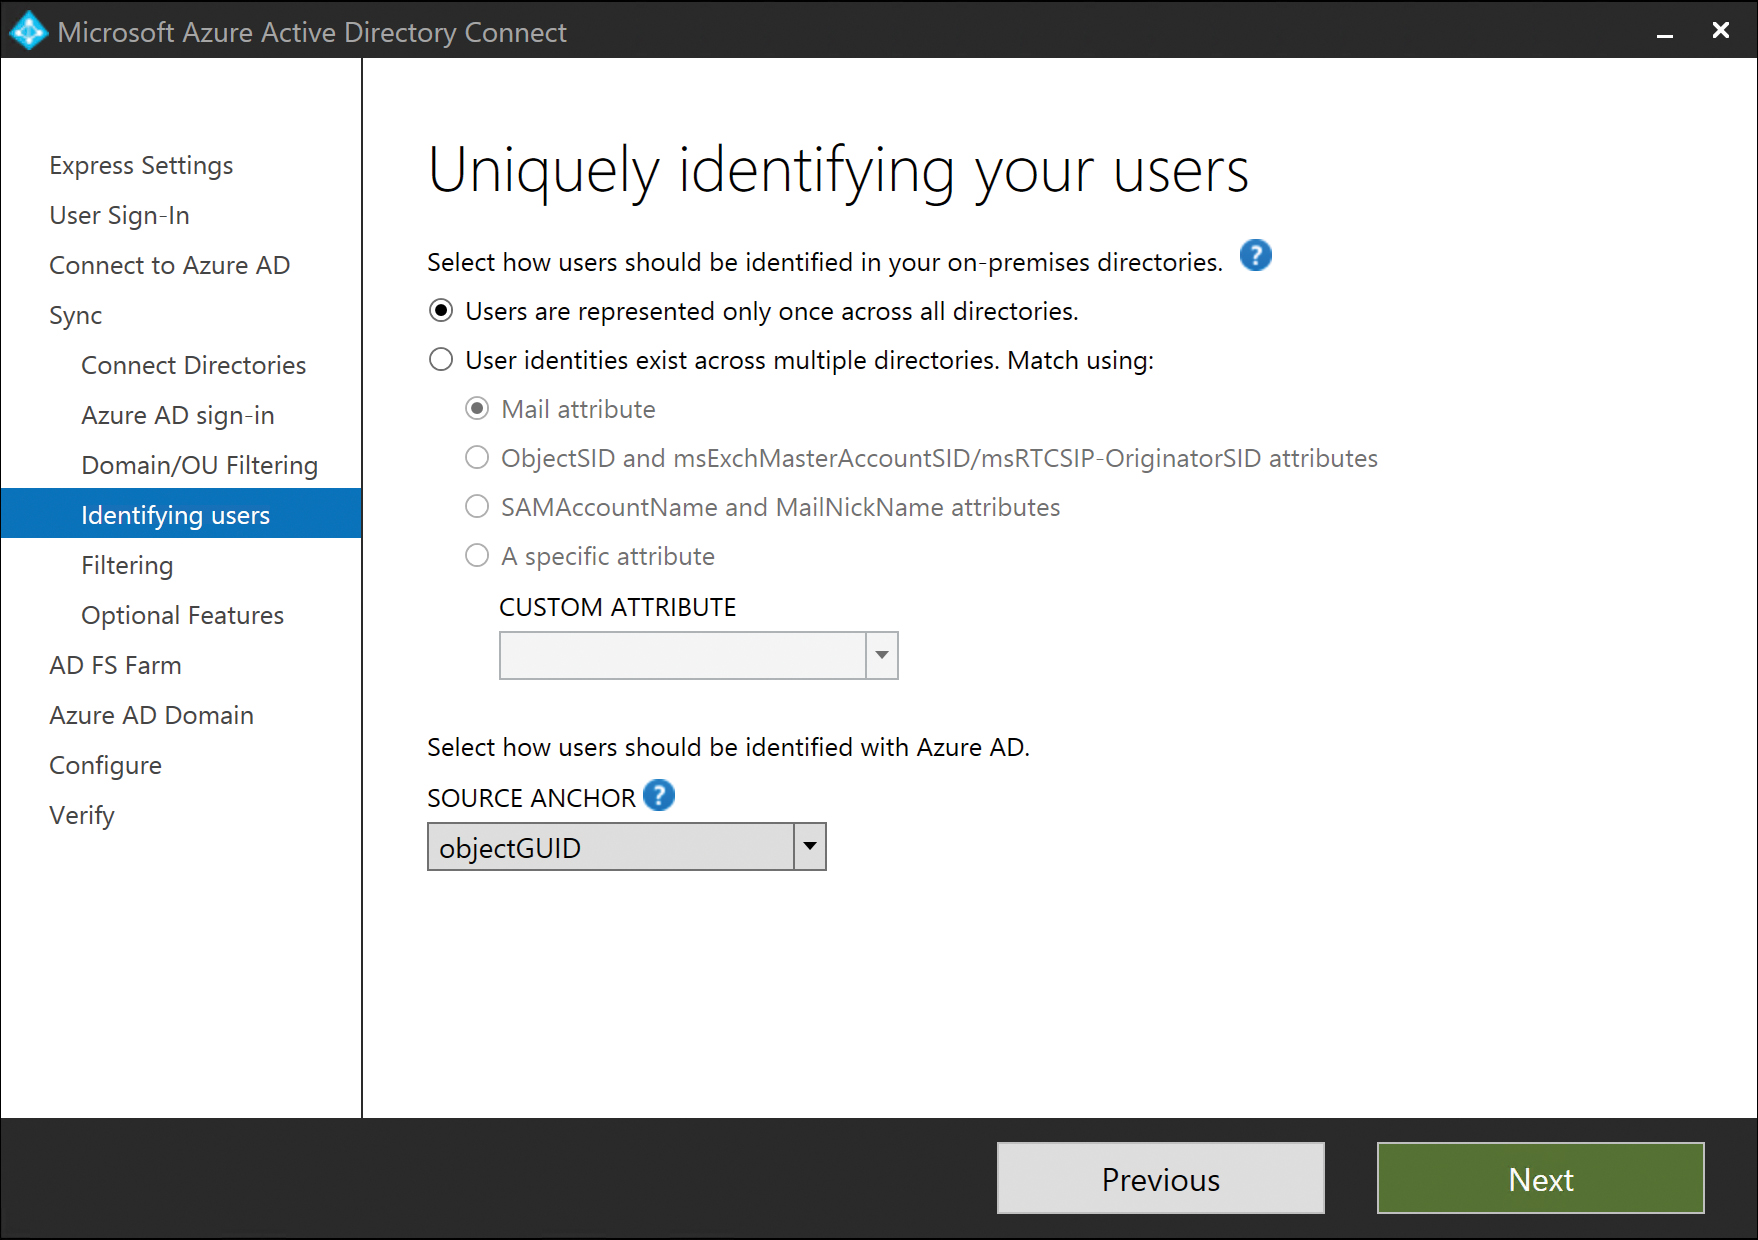
Figure 5-33 Uniquely Identifying Your Users page
User matching
On the Uniquely Identifying Your Users page, select the method that AAD Connect uses to join your users together. If you have a single directory, your best option is the Users Are Represented Once Across All Directories button. This setting tells AAD Connect that user objects should not be joined in any way, resulting in a one-for-one mapping of users to Azure AD user objects after successful synchronization with your tenant.
If, however, you have more than one forest in your enterprise, give careful consideration to the user-matching options offered here. Failure to choose the correct option not only requires a reinstallation of the AAD Connect tool, but might also result in objects synchronized to your tenant that you would also need to delete. If you discover this error too late, and have already migrated mailboxes to your tenant or started creating Microsoft SharePoint content, you not only need to reinstall AAD Connect, you might also need to migrate mailboxes back to on-premises and even risk loss of SharePoint Online and One Drive for Business content.
When reviewing the user-matching options available on this page, consider how your users appear across your on-premises directories. If user joins are required, you must then select the appropriate user-matching configuration.
ObjectSID/msExchMasterAccountSID
The ObjectSID/msExchMasterAccountSID user-matching option is designed for use in Exchange resource forest deployments.
In a standard Exchange resource forest scenario, there are typically two forests. It is possible to have a resource forest linked to more than one account forest, but at a minimum, two forests are required for a linked mailbox scenario.
One forest contains the security principals (user objects) and is referred to as the user forest; the other forest contains linked mailboxes and is called the resource forest. When linked mailboxes are created, Exchange automatically populates the value of an Active Directory attribute called msExchMasterAccountSID on the linked mailbox object. The msExchMasterAccountSID attribute contains the security identifier (or ObjectSID) of the user account from the account forest that the mailbox is linked to and is populated automatically when the Exchange admin tools create the linked mailbox.
The AAD Connect user-matching dialog box automatically includes an option for Exchange-linked mailbox scenarios by the ObjectSID And msExchMasterAccountSID button, as shown in Figure 5-34.
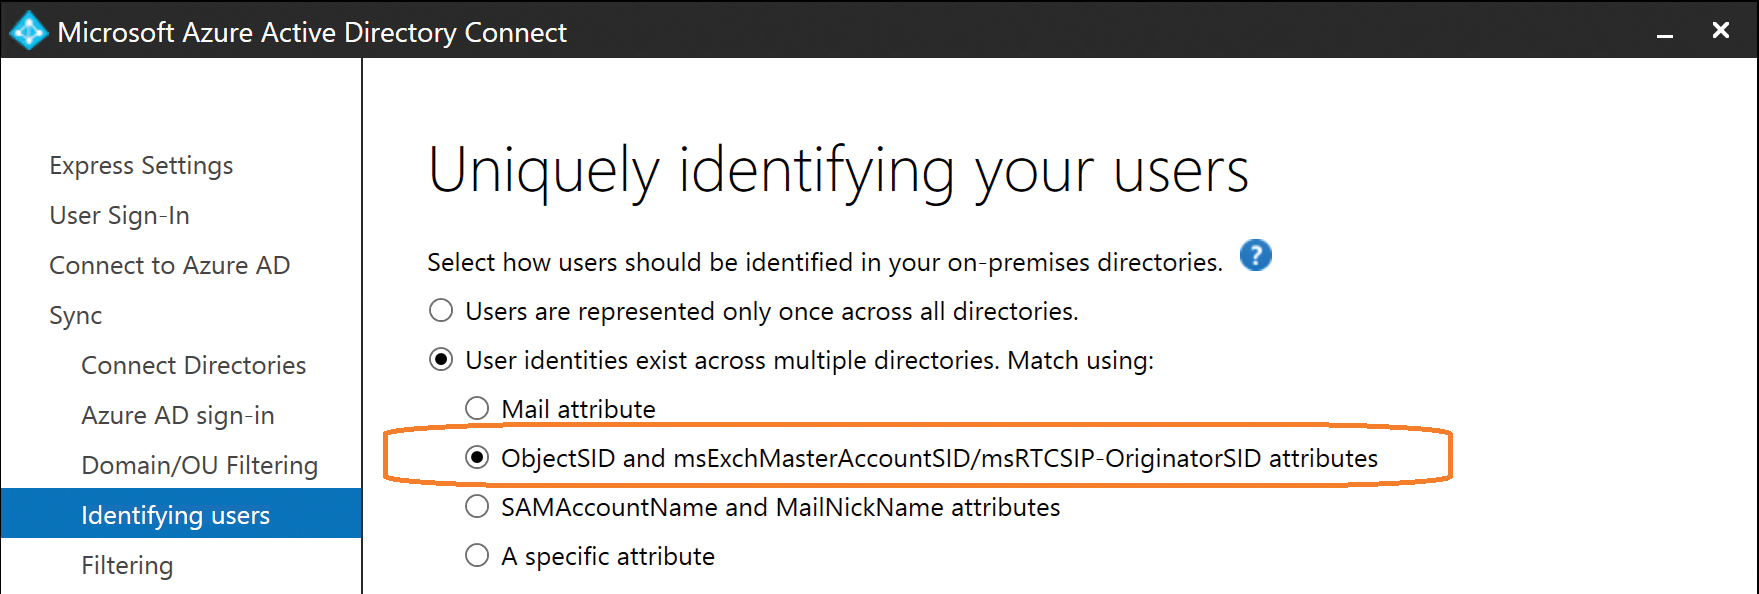
Figure 5-34 Joining linked Exchange mailboxes
This option configures AAD Connect to join objects based on their ObjectSID value in the account forest with the object containing the associated msExchMasterAccountSID value in the resource forest.
There is no need to identify which forest is which in your configuration; the presence of the msExchMasterAccountSID value identifies which forest is the resource forest, and the joins happen automatically during the synchronization process.
It is important to note a few assumptions related to the Exchange resource forest, primarily related to the linked mailbox objects’ configuration.
First, in Exchange Server 2007 and later, when a mailbox is created as a linked mailbox, the resulting user object associated with that mailbox in the Exchange Server resource forest is disabled in Active Directory, whereas the user object in the account forest is left enabled and used for logon to the mailbox cross-forest.
AAD Connect assumes, as a result, that any linked mailbox objects it synchronizes consist of two user objects that it must join. The user account is enabled and used for logon; the second mailbox account is disabled. This assumption is reflected in the synchronization rules (discussed later in this chapter) created during the installation that apply to enabled and disabled objects.
If the Exchange-linked mailbox account is enabled in Active Directory, an unsupported but all-too-common occurrence, the synchronization rule behavior might be effected.
Second, when a linked mailbox is created in Exchange, the msExchRecipientTypeDetails value in Active Directory for that account is set to a value of 2. If for any reason this value is changed to a value other than 2, the synchronization rules related to the SourceAnchor for the object will behave differently and likely result in the wrong data being synchronized to Azure AD for the linked mailbox pair.
If the wrong SourceAnchor is synchronized to Azure, not only must the object be deleted from Azure, but the msExchRecipientTypeDetails value must be corrected in on-premises Active Directory and the mailbox object then removed from the scope of the AAD Connect server and re-added so that the proper synchronization rules apply to that object.
When no traditional Exchange resource forest/account forest model is in use, but the Mail attribute is populated with the same information in both forests, you can use Mail Attribute as shown in Figure 5-35 to configure AAD Connect to perform joins between objects using the Mail attribute.
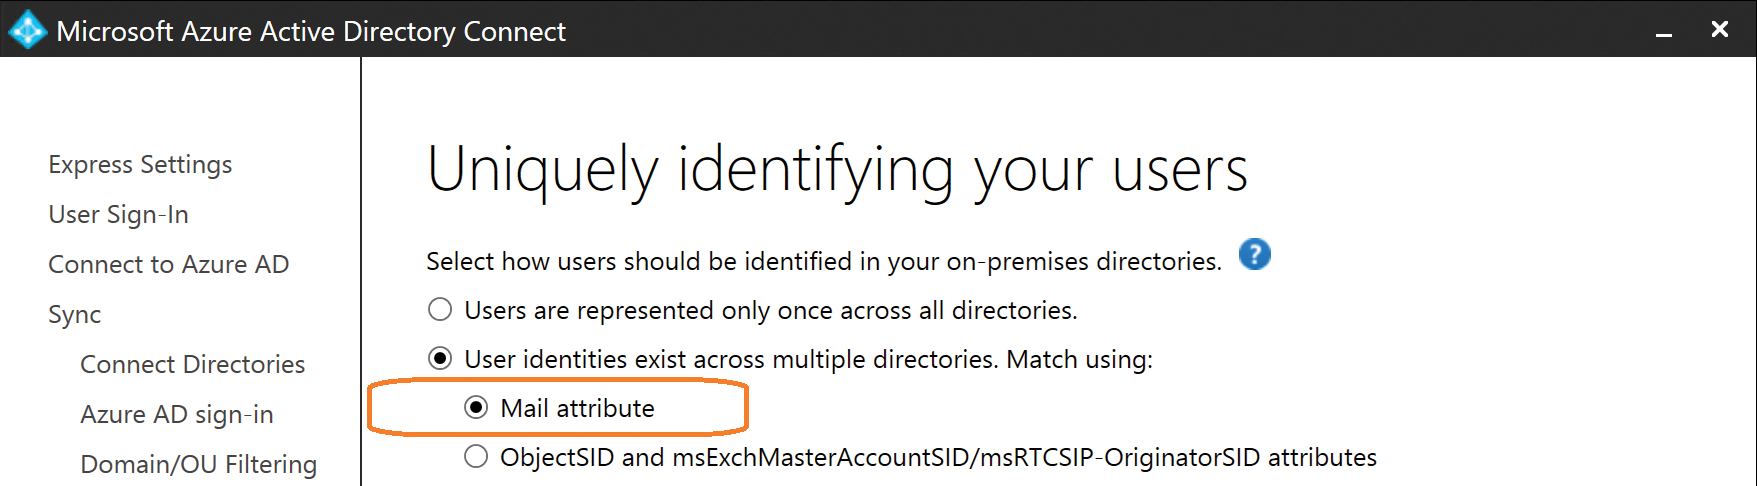
Figure 5-35 Joining using Mail Attribute
The Mail Attribute user join configuration is most commonly used when two or more directories contain Exchange mailboxes, and they are configured to use the Microsoft Identity Manager or Forefront Identity Manager product to perform global address list synchronization (GalSync) between those forests.
sAMAccountName and mailNickname
An alternate method for joining user objects is using the sAMAccountName and mailNickname attributes. When you use this option, AAD Connect attempts to join user accounts cross-forest using the sAMAccountName first, followed by the mailNickname, as shown in Figure 5-36, in the In From AD – User Join rule’s join criteria.

Figure 5-36 User join rules when selecting sAMAccountName or mailNickname
The purpose of this configuration is to accommodate those organizations where the mail value is not unique or not populated cross-forest; however, the customer has created objects that share an sAMAccountName, a mailNickname, or both.
It’s important to note that the sAMAccountName and mailNickname values are expected to be unique in their own forests.
Custom Join attribute selection
The final option available during the user matching configuration is the selection of a custom attribute for user joins, using the A Specific Attribute option, shown in Figure 5-37.
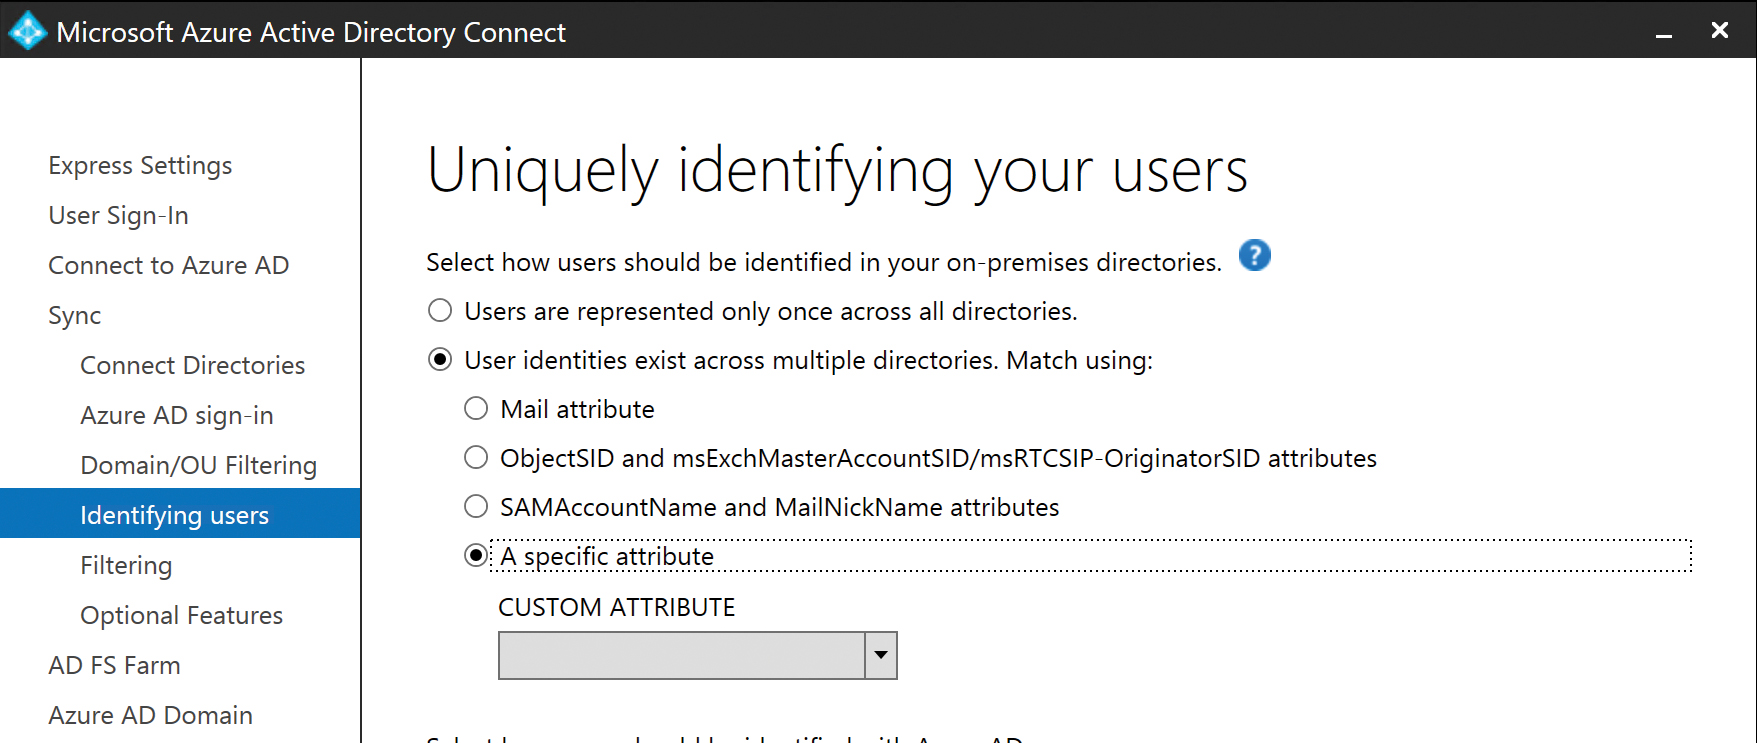
Figure 5-37 Selecting the A Specific Attribute option
After selecting A Specific Attribute, the Custom Attribute drop-down list presents a list of all available on-premises Active Directory attributes. It’s important to note that most Active Directory attributes represented in this list, which is taken directly from the Active Directory schema it read when adding your directories, are also available in the metaverse.
Several restrictions are important to note when manually selecting an attribute to use for joins between objects.
First, if you wish to use the sAMAccountName attribute, be sure to click the sAMAccountName and mailNickname options and not sAMAccountName from the drop-down list.
The pre-built selection for sAMAccountName and mailNickname ensures that the joins use the AccountName attribute in the database, which is where the AAD Connect configuration synchronizes the sAMAccountName value. If you choose sAMAccountName manually, you will receive an error, shown in Figure 5-38, because there is no sAMAccountName attribute in the AAD Connect metaverse.
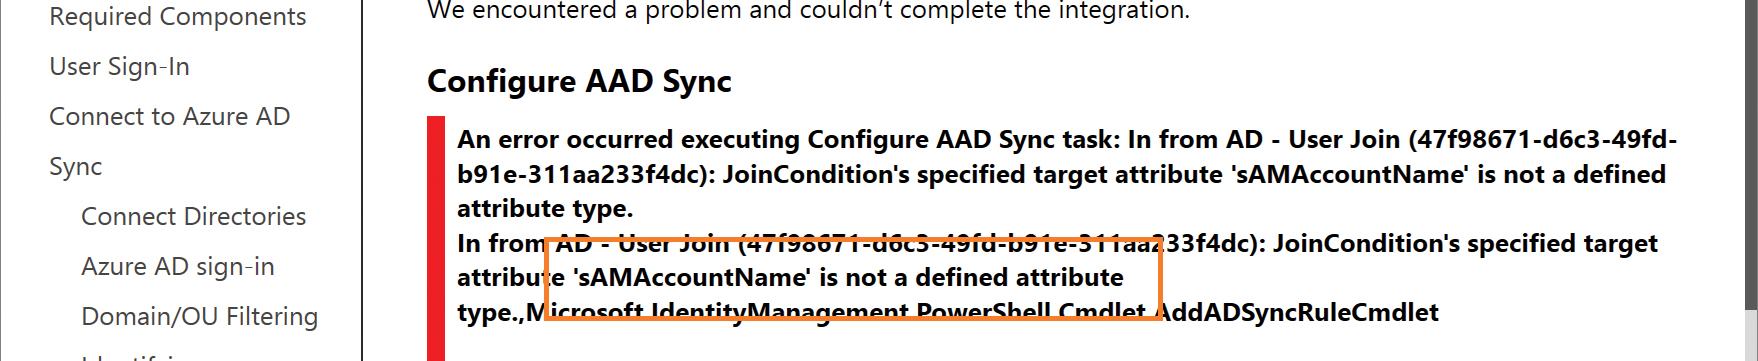
Figure 5-38 Error when selecting sAMAccountName manually
The drop-down list does not allow the use of any multi-valued attributes in Active Directory (for example, ProxyAddresses), because the join condition only works for single-valued attributes. It is not capable of performing joins using a multi-valued attribute because it cannot enumerate the individual values.
Furthermore, if you have extended your Active Directory schema with custom attributes, you should not select any of these custom attributes. They behave similarly to the selection of sAMAccountName in Figure 5-39 and return an error stating that the attribute is not a defined attribute and the installation will fail.
Last, any time you select a custom join criterion on the Uniquely Identifying Your Users page, the value in the SourceAnchor drop-down list, typically ObjectGUID, is cleared and must be re-selected before you can proceed.
In fact, the Next button remains inactive until you select a value for SourceAnchor.
SourceAnchor
The SourceAnchor attribute selection is the last setting that you are prompted for as part of the installation that cannot be changed after you have completed the setup process. Like the other critical decision milestones mentioned previously, if you select the wrong value during this step, AAD Connect must be uninstalled and reinstalled to correct the error.
More important, if you have already synchronized objects to Azure AD by using the wrong SourceAnchor attribute, you will most likely need to delete those objects from Azure as well.
The selection of the SourceAnchor value is extremely important because the value represents a key component of each object’s life cycle and its synchronization to Azure AD.
Other key values, such as UserPrincipalName and eMail address, which are used for critical services such as authentication or mail routing, can be changed during the life of a user, and AAD Connect flows those updated values to Azure.
SourceAnchor, however, is permanent because it uniquely identifies the object and anchors it to the source object that it represents in the on-premises directories.
The SourceAnchor attribute in AAD Connect, by default, is derived from the ObjectGUID value in on-premises Active Directory because the ObjectGUID value for an object in Active Directory is unique for the lifetime of that object. It cannot be changed, either programmatically or from the GUI, and if the object is deleted and subsequently recovered from the Active Directory recycle bin, the ObjectGUID is preserved.
The ObjectGUID value is a binary value, and like the security identifier or ObjectSID, it is generated at the time of creation. The GUID, or globally unique identifier, is generated on an Active Directory domain controller, is unique within the forest, and never changes for the lifetime of that object.
As part of the synchronization process, AAD Connect uses an object’s ObjectGUID, converted from a binary object to a base64 encoded string, to populate the SourceAnchor value in the metaverse. The SourceAnchor value is then synchronized to Azure AD and represented as the ImmutableID value of the object, as Figure 5-39 shows.
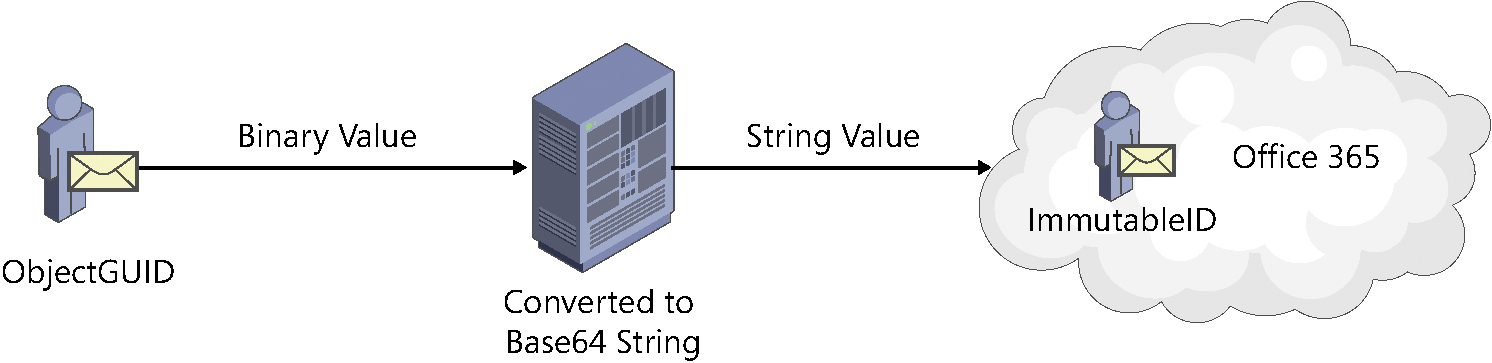
Figure 5-39 ObjectGUID to SourceAnchor to ImmutableID transition
Selection of the ObjectGUID as the origin of the SourceAnchor value in AAD Connect was done to ensure that objects remain unique, and although you have the option to select an alternate Active Directory attribute to represent the SourceAnchor for your objects, great care should be given to the selection process.
When selecting an alternate attribute, consider the following factors.
- Select an attribute that will never change. Changing the value in Active Directory, either purposely or accidentally, breaks the synchronization of the object.
Some examples of possible attributes might be EmployeeID or Badge Number.
EmployeeID number or other unique company identifiers, provided you have a mature Identity Management system that prevents any duplication and prohibits reuse, are good candidates for SourceAnchor.
- Select an attribute that will be unique for every object everywhere. Duplication of the value on two or more objects breaks the synchronization of all but the first object synchronized to Azure with that value.
Most organizations select an alternate SourceAnchor because they are multi-forest in nature or involved in frequent merger, acquisition, or divestiture activities and expect to move objects across forests regularly, or at least once during an object’s life cycle. Consideration must be given to such values as EmployeeID or other potentially unique alphanumeric or numeric values that are sequential in nature, because although they are unique within your organization, it’s possible that an acquisition or merger with another Office 365 customer can result in duplication of values that were thought to be unique.
As you can see, using an attribute other than ObjectGUID for the SourceAnchor carries with it some design considerations that are likely to involve several groups within your organization and might not result in a quick decision. Waiting to decide whether you should use an alternate attribute and which attribute to use is something that should be done well in advance of the AAD Connect implementation.
Filtering users and devices
During the installation of the AAD Connect tool, you can select one group from each forest that can be used to filter users, groups, contacts, or devices for synchronization to Azure AD.
By default, all users present in the OUs you selected earlier in the installation process are synchronized to Azure AD. This group is meant to serve as a method for piloting your deployment to Office 365, so only the objects in the group are synchronized to your tenant. It further limits the number of objects that are synchronized to Office 365. See Figure 5-40.
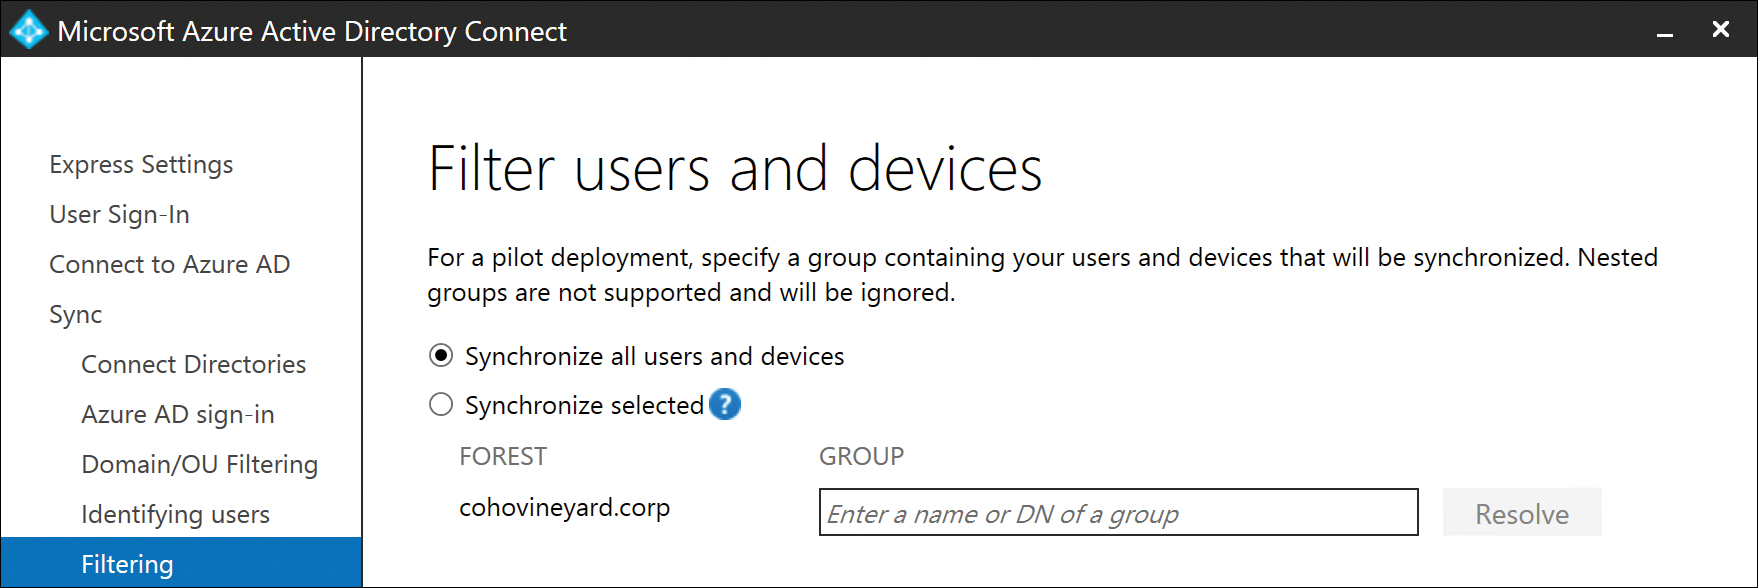
Figure 5-40 Filtering users and devices
Selecting Synchronize Selected enables you to type the name of a group in on-premises Active Directory in the GROUP box.
If the group name can be located in Active Directory, clicking the Resolve button displays the complete distinguished name of the group and a green check mark to indicate success, as shown in Figure 5-41.
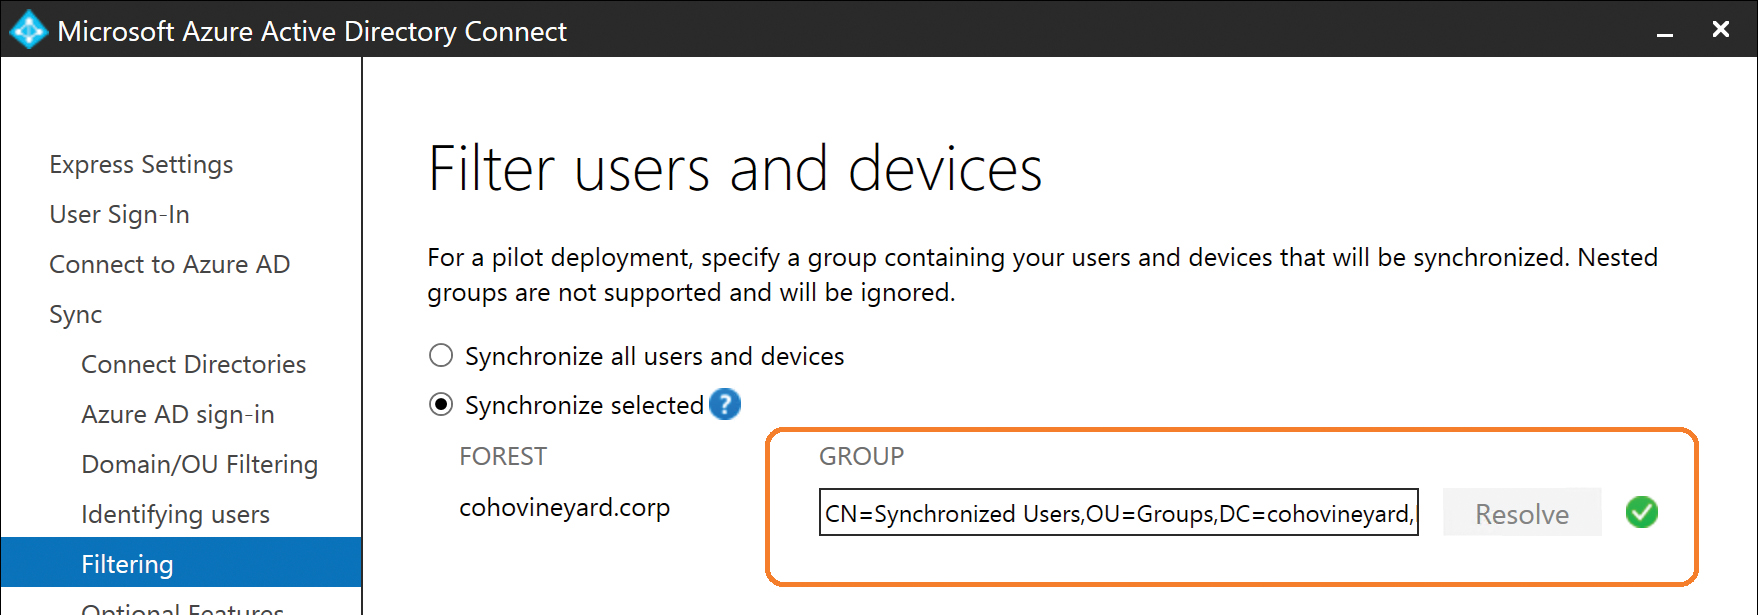
Figure 5-41 Successfully resolving a group
The group filtering option does not support nested groups; it is intended to be used for piloting only and removed when the solution is placed in production use.
In addition, the associated rules that the selection of this option created cannot be removed by rerunning the AAD Connect wizard post-pilot, so you must either delete or manually disable the rules in the Synchronization Rules Editor to go live with the solution. See Figure 5-42.
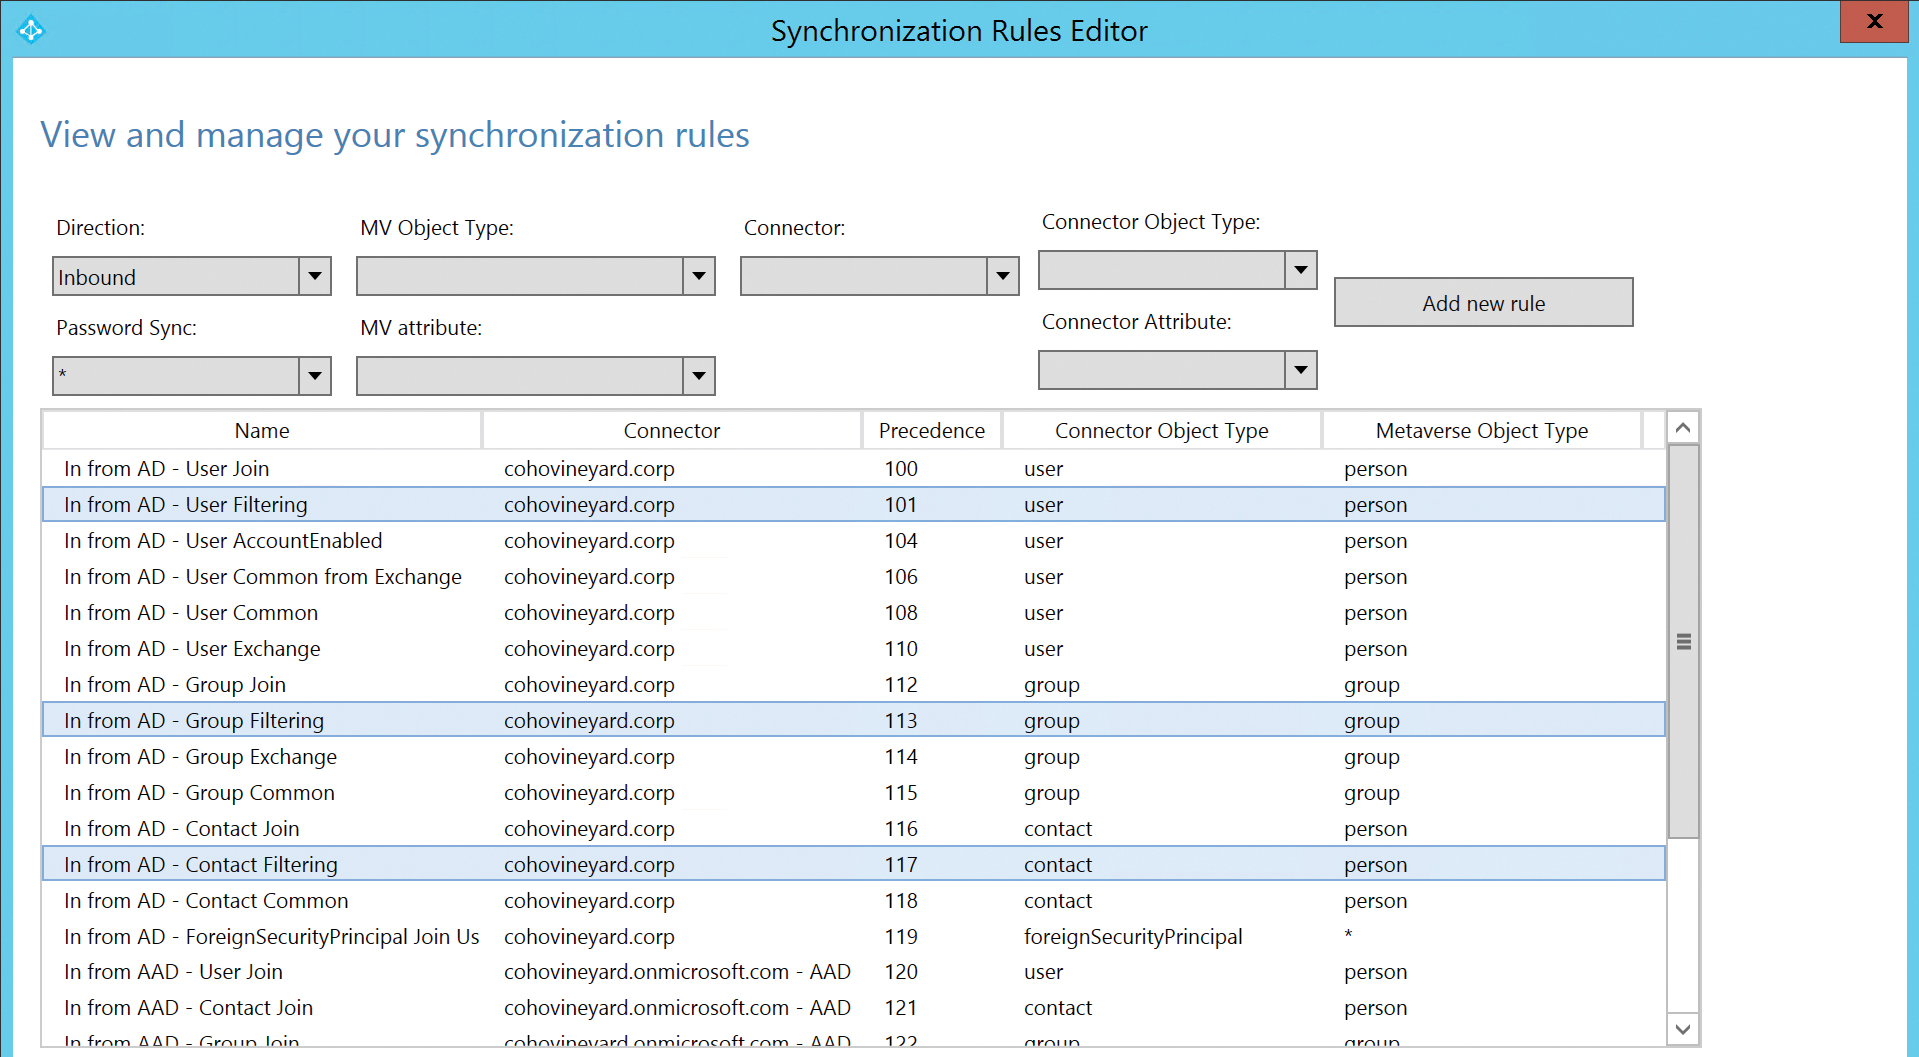
Figure 5-42 Synchronization rules related to filtering
Optional features
On the Optional Features page, you can enable enhanced functionality as part of the AAD Connect installation process. These features range from hybrid writeback, discussed earlier, to password synchronization and attribute filtering.
The options presented on the Optional Features page can be changed at any time, using the AAD Connect wizard located on the desktop after installation has completed, and this list of enhanced features grows with each release of the AAD Connect tool.
Any features that are flagged as (Preview) indicate that they are not finalized features and might change between versions.
It’s also important to note that some features require additional subscriptions (such as Azure AD Premium licensing) for you to use them.
As each version of AAD Connect is released, you can find further information about the optional features at http://go.microsoft.com/fwlink/?LinkId=532861.
Exchange hybrid deployment
Exchange hybrid, discussed earlier in this chapter because it has a direct impact on user matching and subsequent GAL synchronization in multi-forest scenarios, is a feature that enables the AAD Connect tool to write back into on-premises Active Directory a select number of attributes. These attributes are determined by the version of Exchange installed in the target forest and include, but are not limited to the following ones.
- Proxy Addresses The cloudLegacyExchangeDN value from Exchange Online is written back into the Proxy Addresses array of User, Group, and Contact objects as an x500 address. This writeback occurs so that if mailboxes are migrated out of Office 365 back to on-premises, any messages sent internally while in Office 365 can be replied to without risking delivery errors after migration.
- Safe Senders, Blocked Senders, Safe Recipients These values are hash values stored in Active Directory and updated whenever a user makes changes to these settings in their Outlook client. After a user’s mailbox has been migrated to Office 365, these values are then managed in Azure AD and written back to on-premises Active Directory so that if the mailbox is ever migrated out of Office 365, those on-premises values will be up to date.
- VoiceMail settings Like the safe and blocked senders lists, these values are updated in Azure AD when a user enabled for Skype for Business Online makes changes to their settings and then their account is migrated back to on-premises.
- Archive status Although a mailbox resides in Exchange Online, it is possible for the mailbox not to have had an archive prior to migration and was only activated afterward. This attribute tells on-premises Exchange whether an archive exists.
The Proxy Addresses writeback is automatically configured for groups, users, and contacts, whereas the remainder of the attributes applies only to user objects.
These rules are created as part of the installation process but can be modified or disabled manually afterward, as discussed earlier in the chapter. However, subsequent upgrades of the AAD Connect tool might modify the rules or restore them to their original state, so it is important to review all rule modifications prior to upgrade, and it is always recommended to clone existing rules instead of modifying them directly, so that their settings are maintained during upgrade.
Azure AD app and attribute filtering
Selection of the Azure AD App And Attribute Filtering feature provides an additional set of wizard pages that enable you to tailor your installation to either a specific Office 365 workload (such as Exchange Online only) or set of workloads, or to exclude one or more attributes specifically from the synchronization to Azure AD.
The first of these additional pages is Azure AD Apps filtering, shown in Figure 5-43.
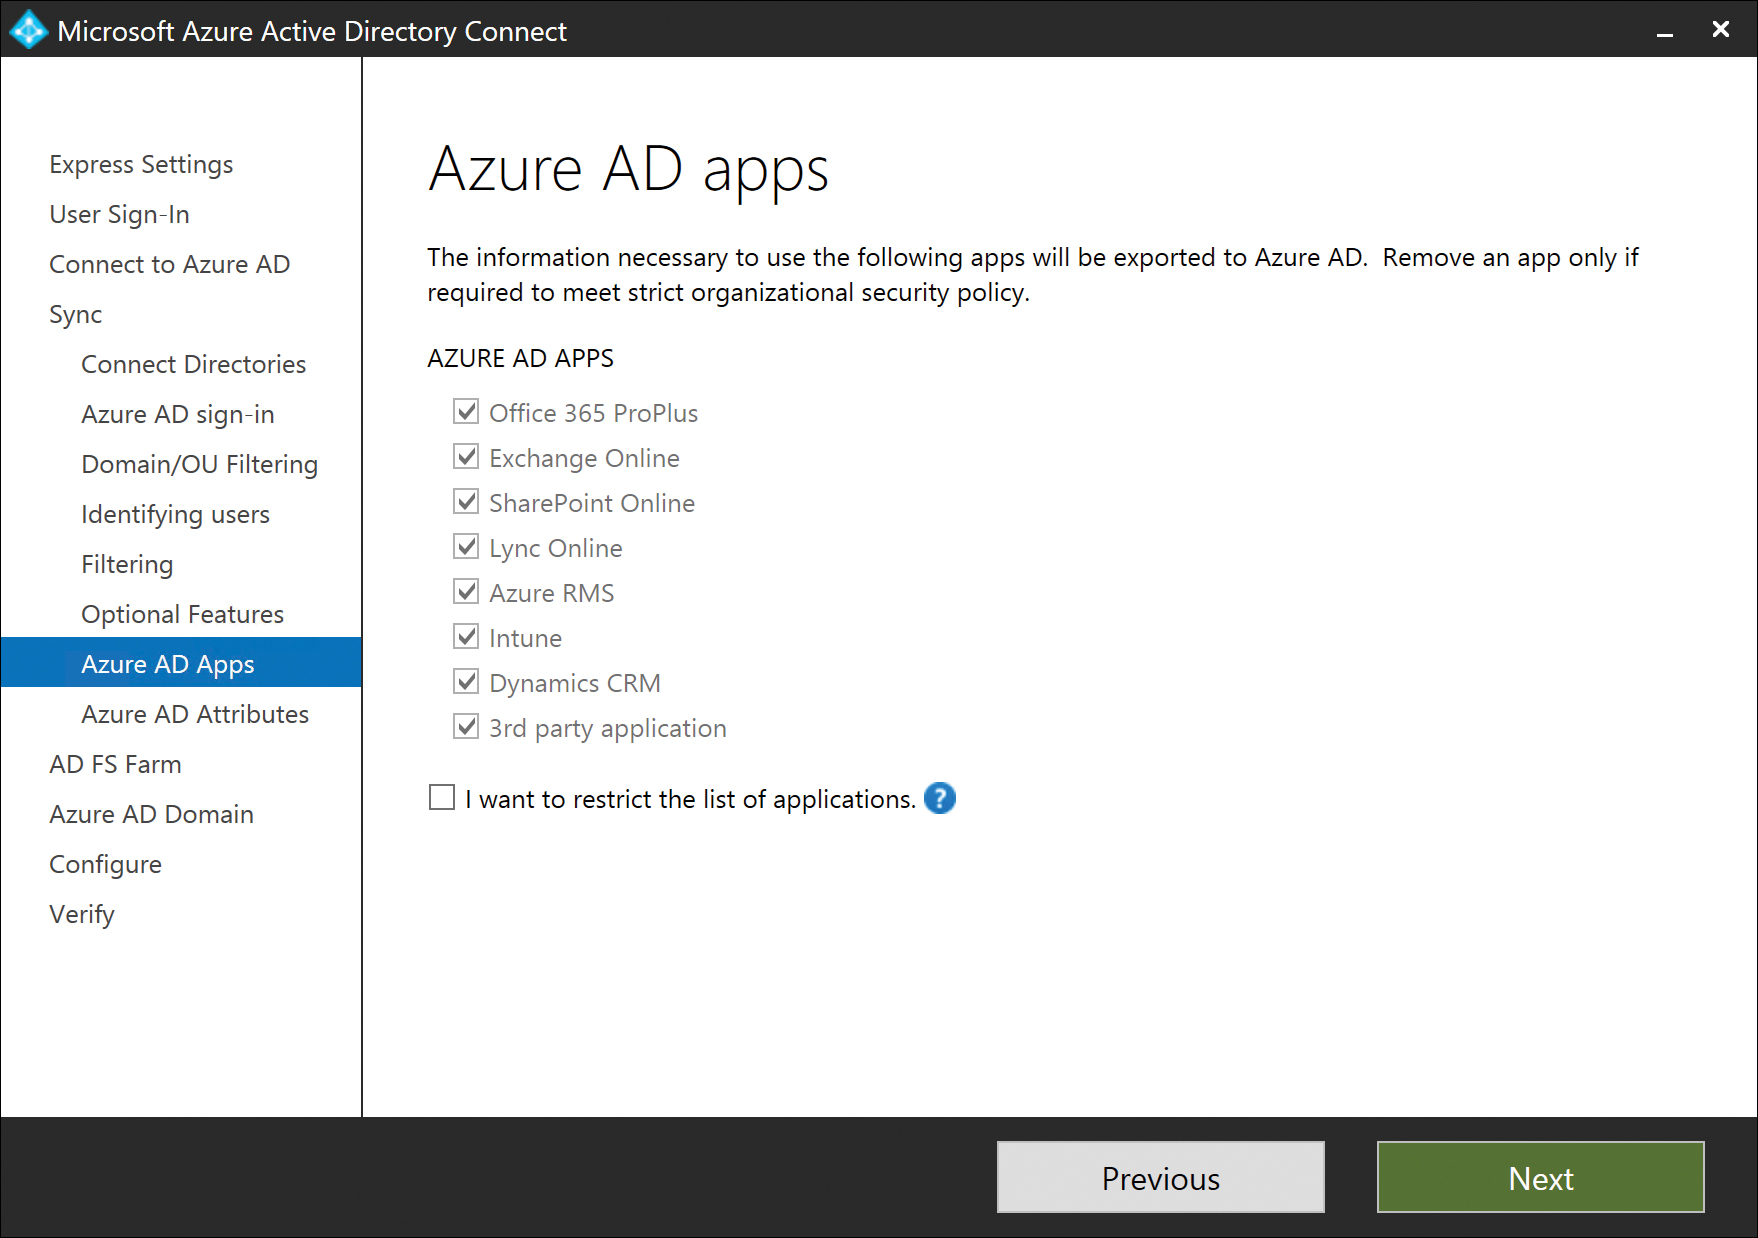
Figure 5-43 Azure AD Apps filtering
Azure AD apps filtering enables you to identify the Azure AD applications for which you wish to synchronize relevant attributes to Office 365. Clearing an application check box removes all the outbound rules from the configuration related to that Azure AD application, preventing the attributes in on-premises Active Directory from reaching Office 365.
As Figure 5-44 shows, a default installation of AAD Connect with no Azure app filtering enables outbound synchronization rules for Exchange Online, Dynamics, Lync Online, SharePoint Online, Intune, AzureRMS, and the common attribute sets.
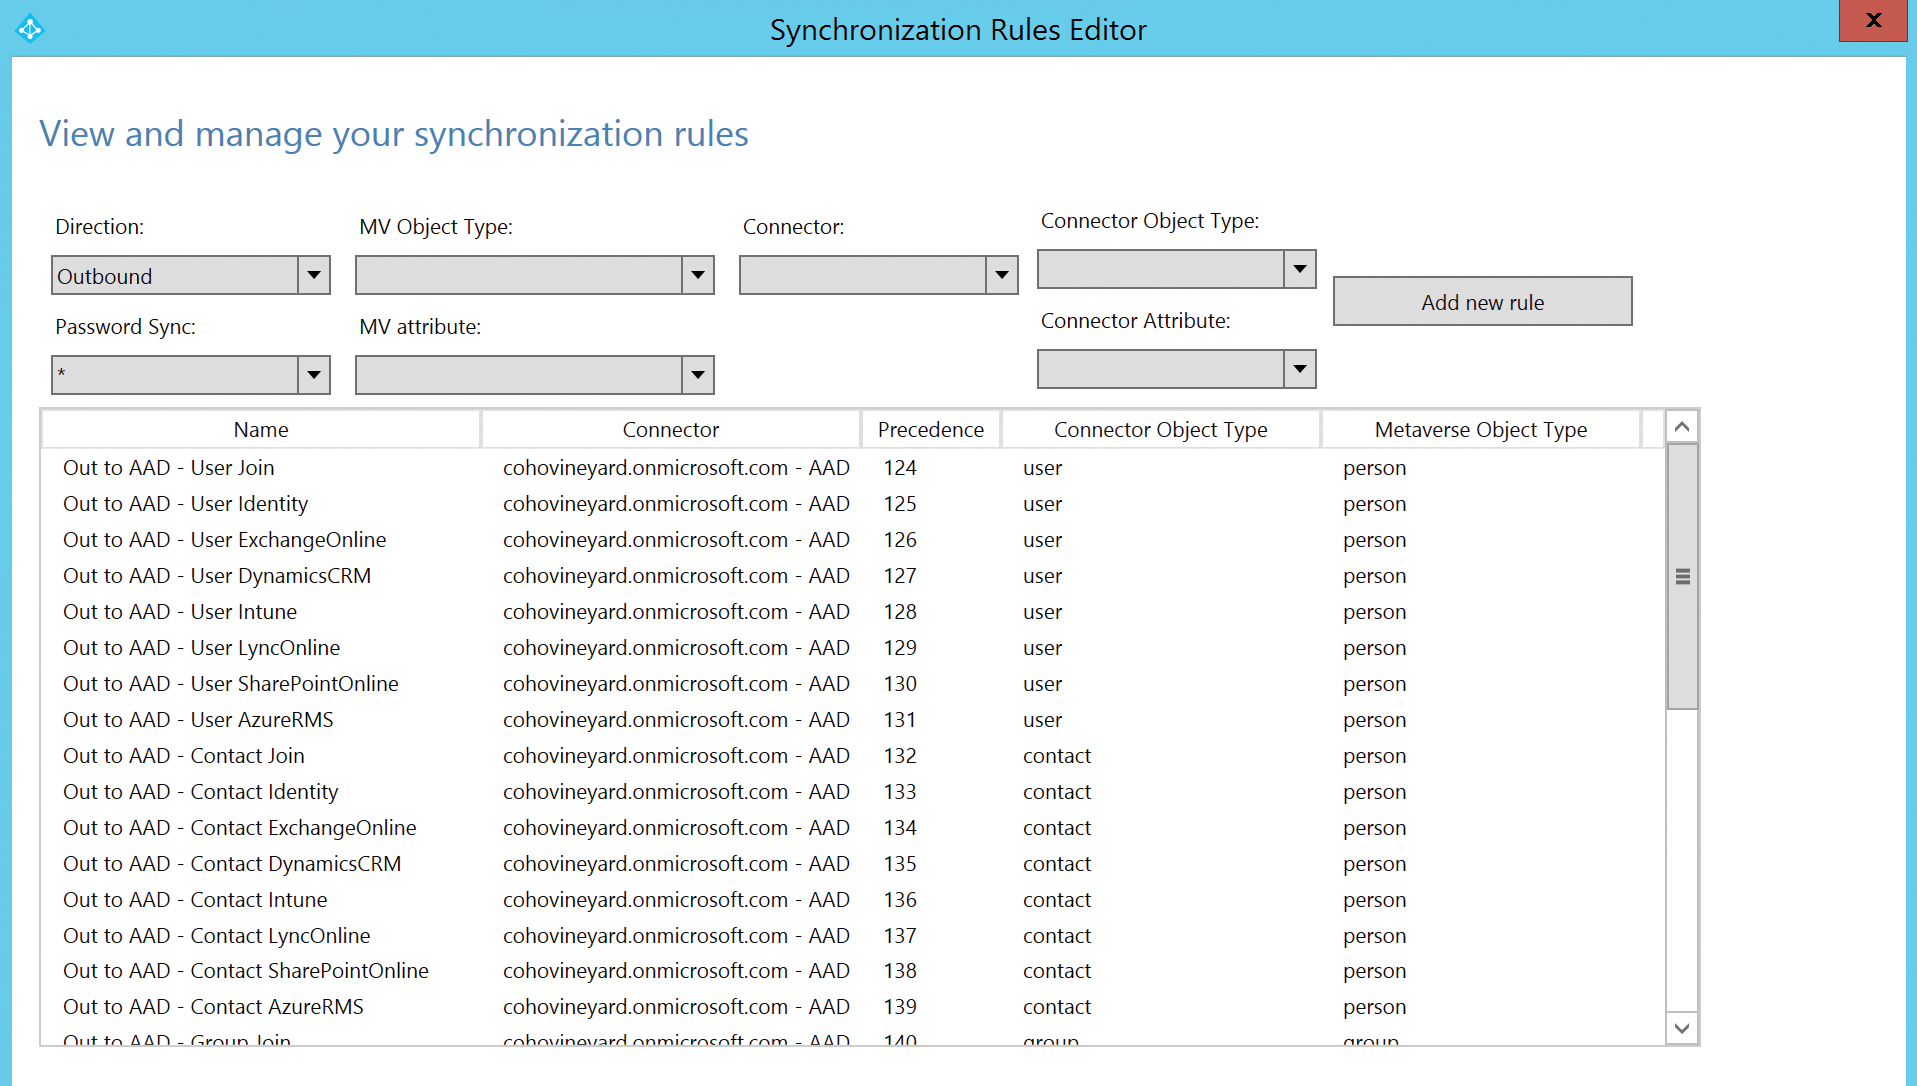
Figure 5-44 Default outbound sync rules with no Azure AD app filtering
However, Figure 5-45 shows that with Azure app filtering enabled to allow only Exchange Online, all other applications are now absent from the synchronization to Azure AD.
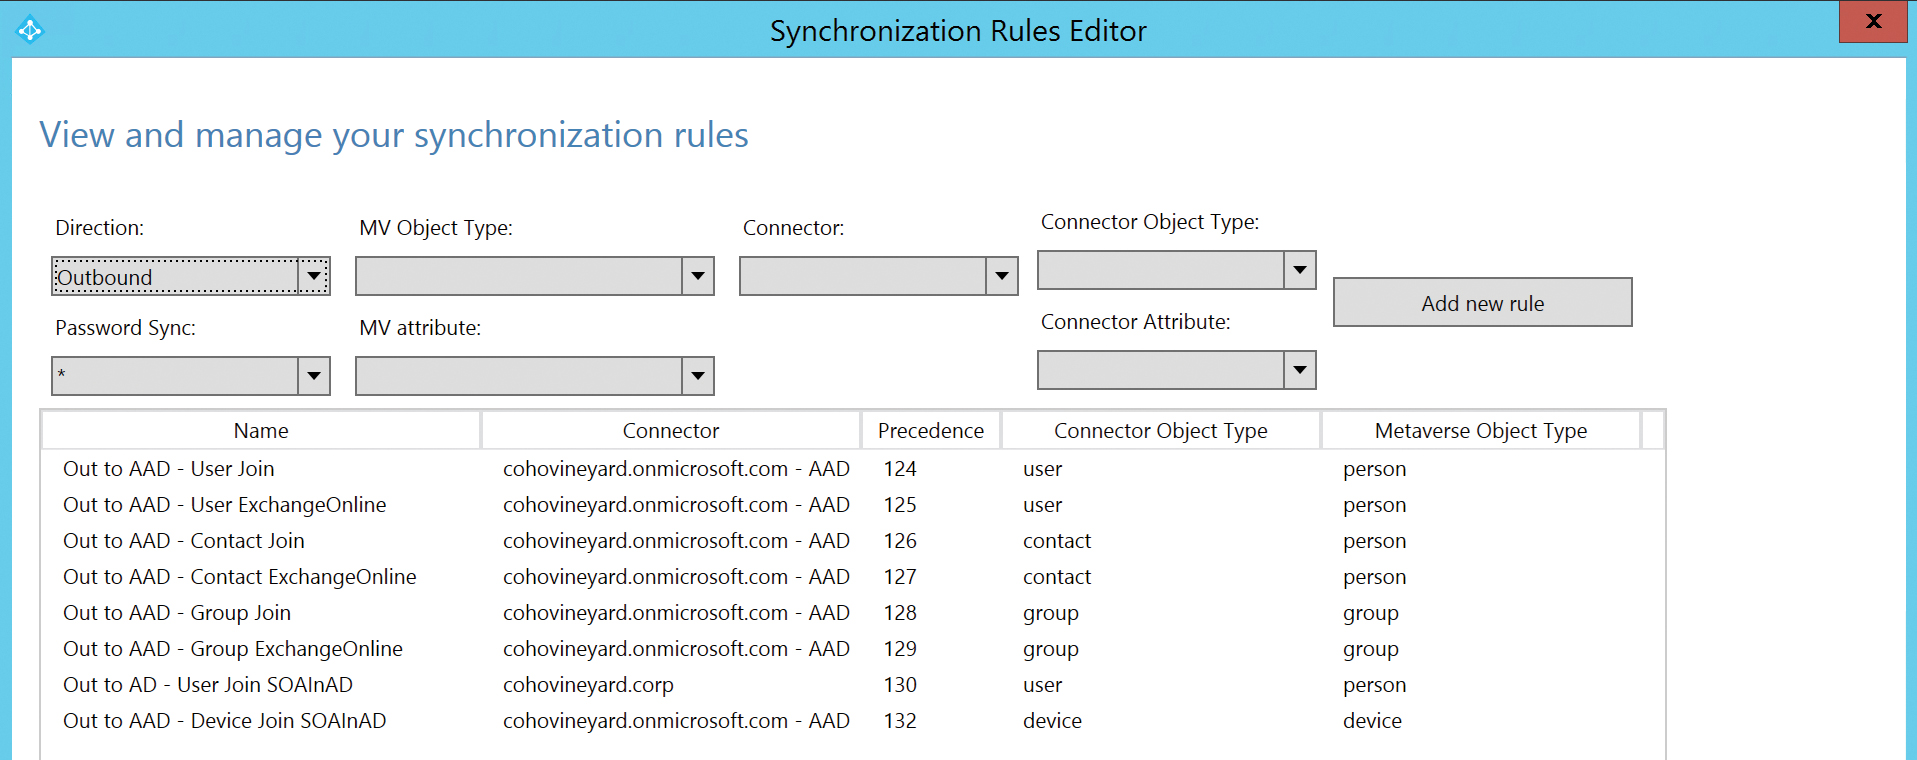
Figure 5-45 Outbound sync rules with Azure App filtering
As an alternative, if you don’t wish to eliminate a particular Azure app from the synchronization to Office 365 but, instead, wish to prevent the synchronization of one or more attributes, you can select the Azure AD Attributes filtering page, shown in Figure 5-46.
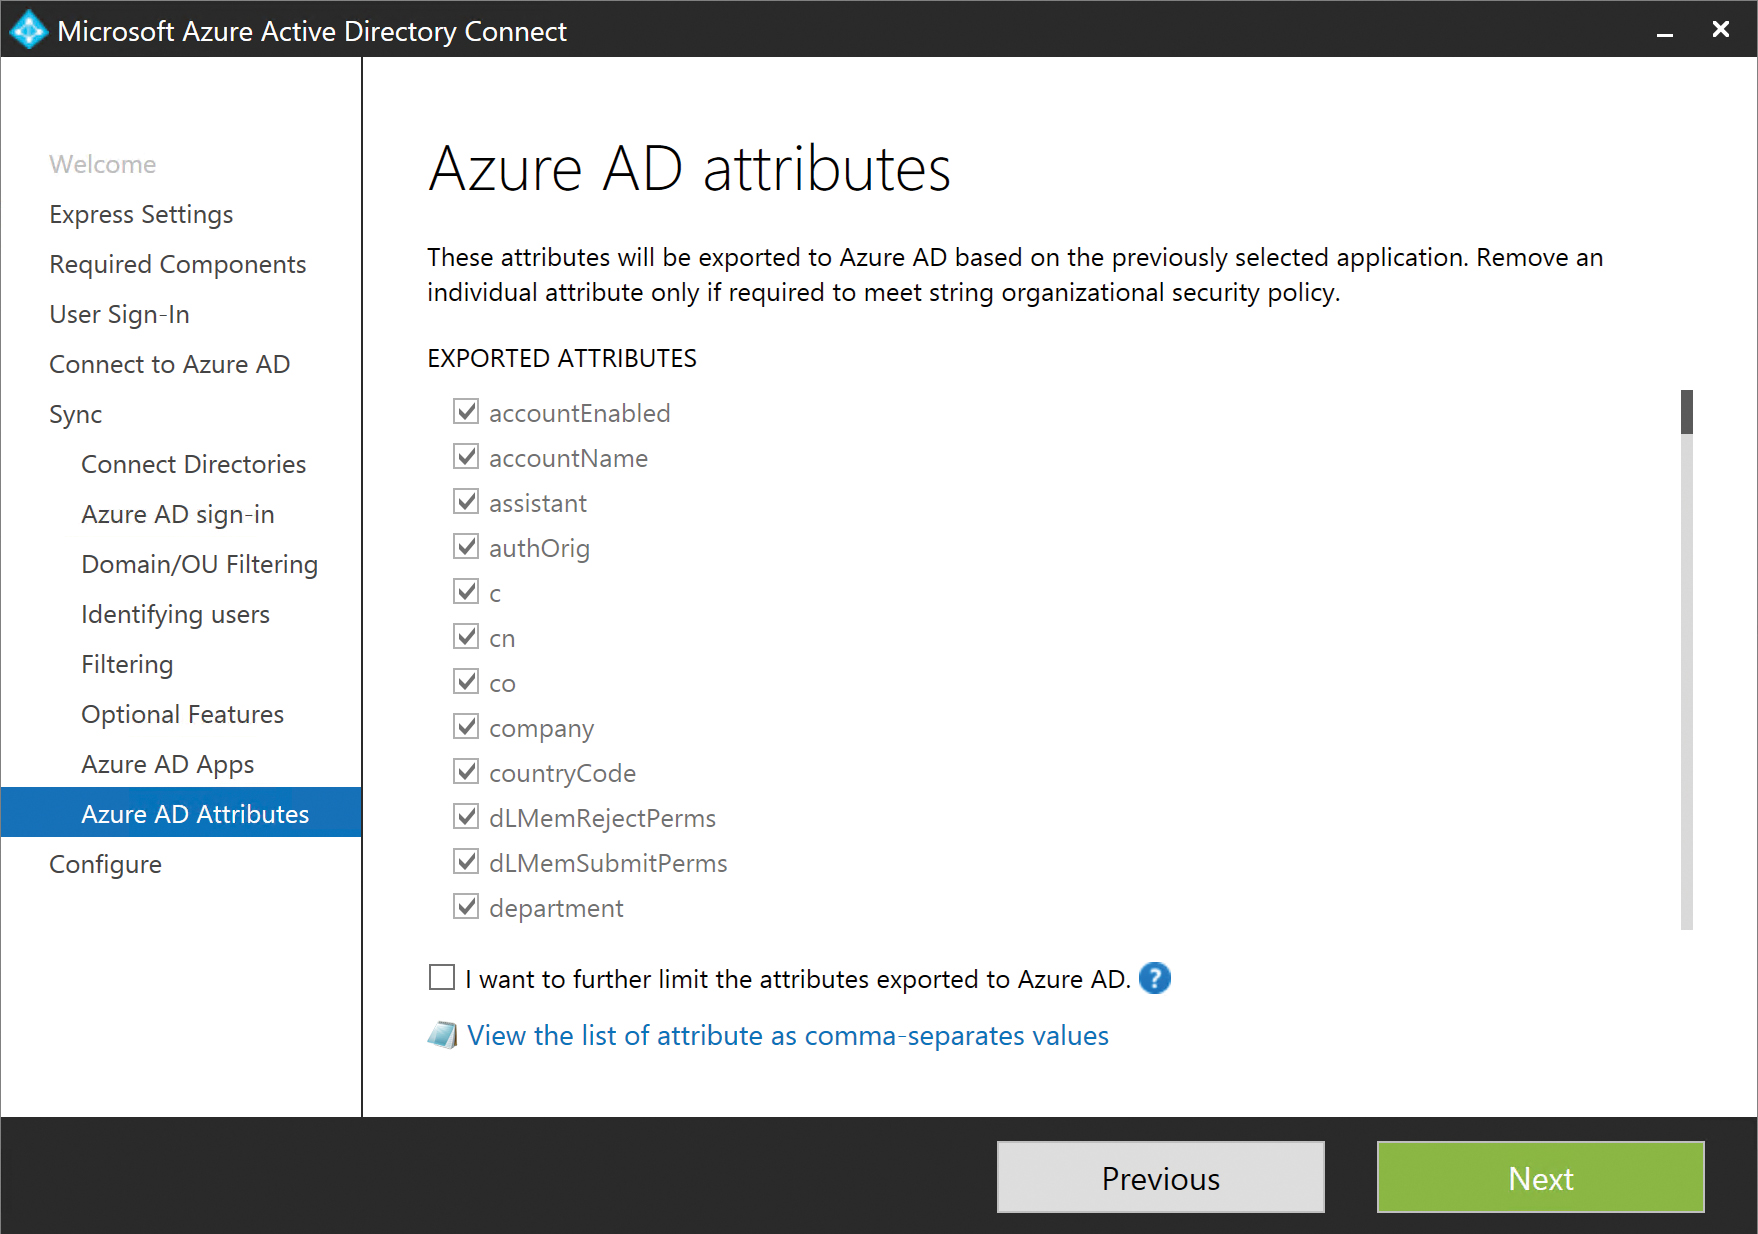
Figure 5-46 Azure AD Attributes filtering page
Azure AD attribute filtering is provided because it might be necessary to filter some attributes your organization uses that are included in the default set of attributes for a particular workload (such as Exchange Online) but contain data that you might not want synchronized to Azure AD.
Those individual attributes’ check boxes can be cleared, and any synchronization rules the installation creates that normally contain those attributes will be modified so they are not included, as shown in Figure 5-47.
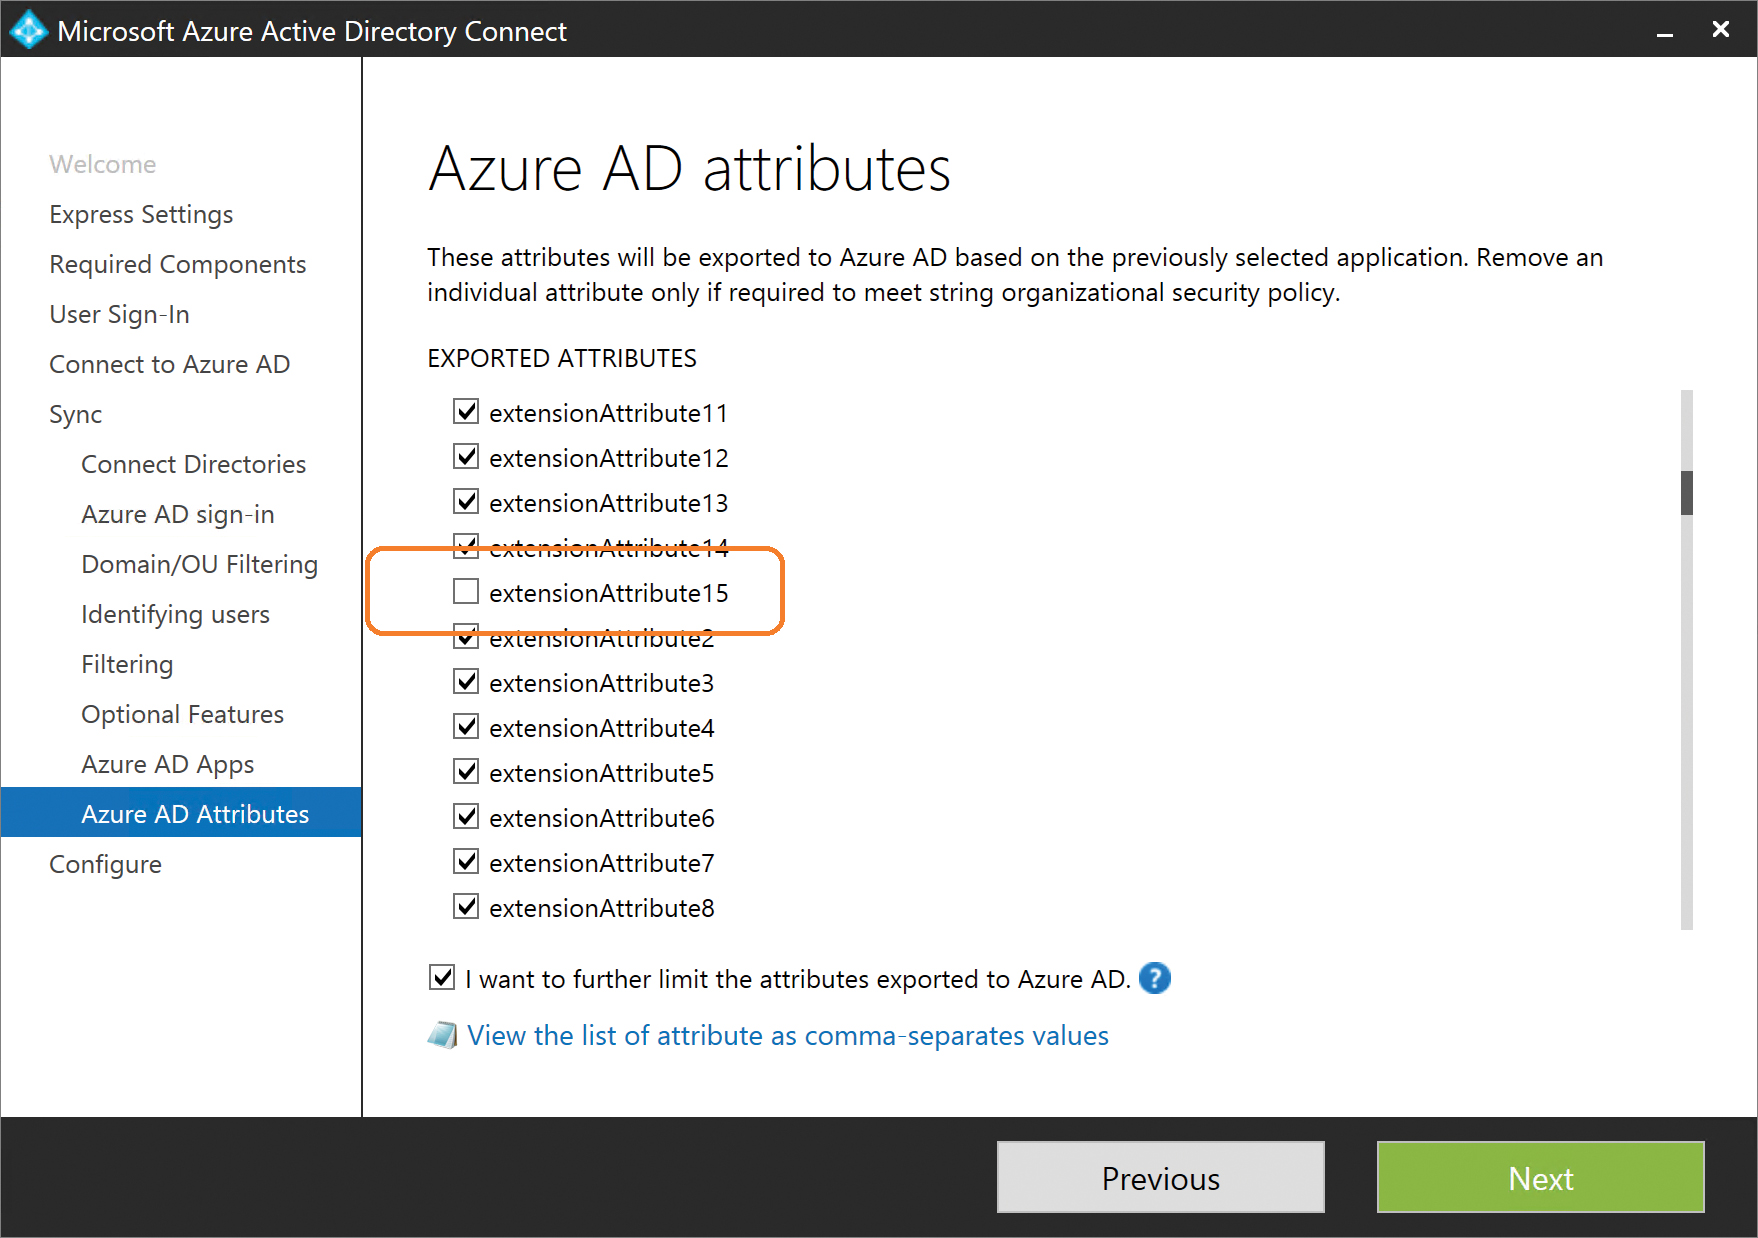
Figure 5-47 Clearing the extensionAttribute15 check box
Note in Figure 5-48 that extensionAttribute15 was excluded from the configuration by the Azure AD Attributes filtering page. As a result, the Out To AAD – User Exchange Online synchronization rule pictured in Figure 5-48 has no attribute flow for extensionAttribute15.
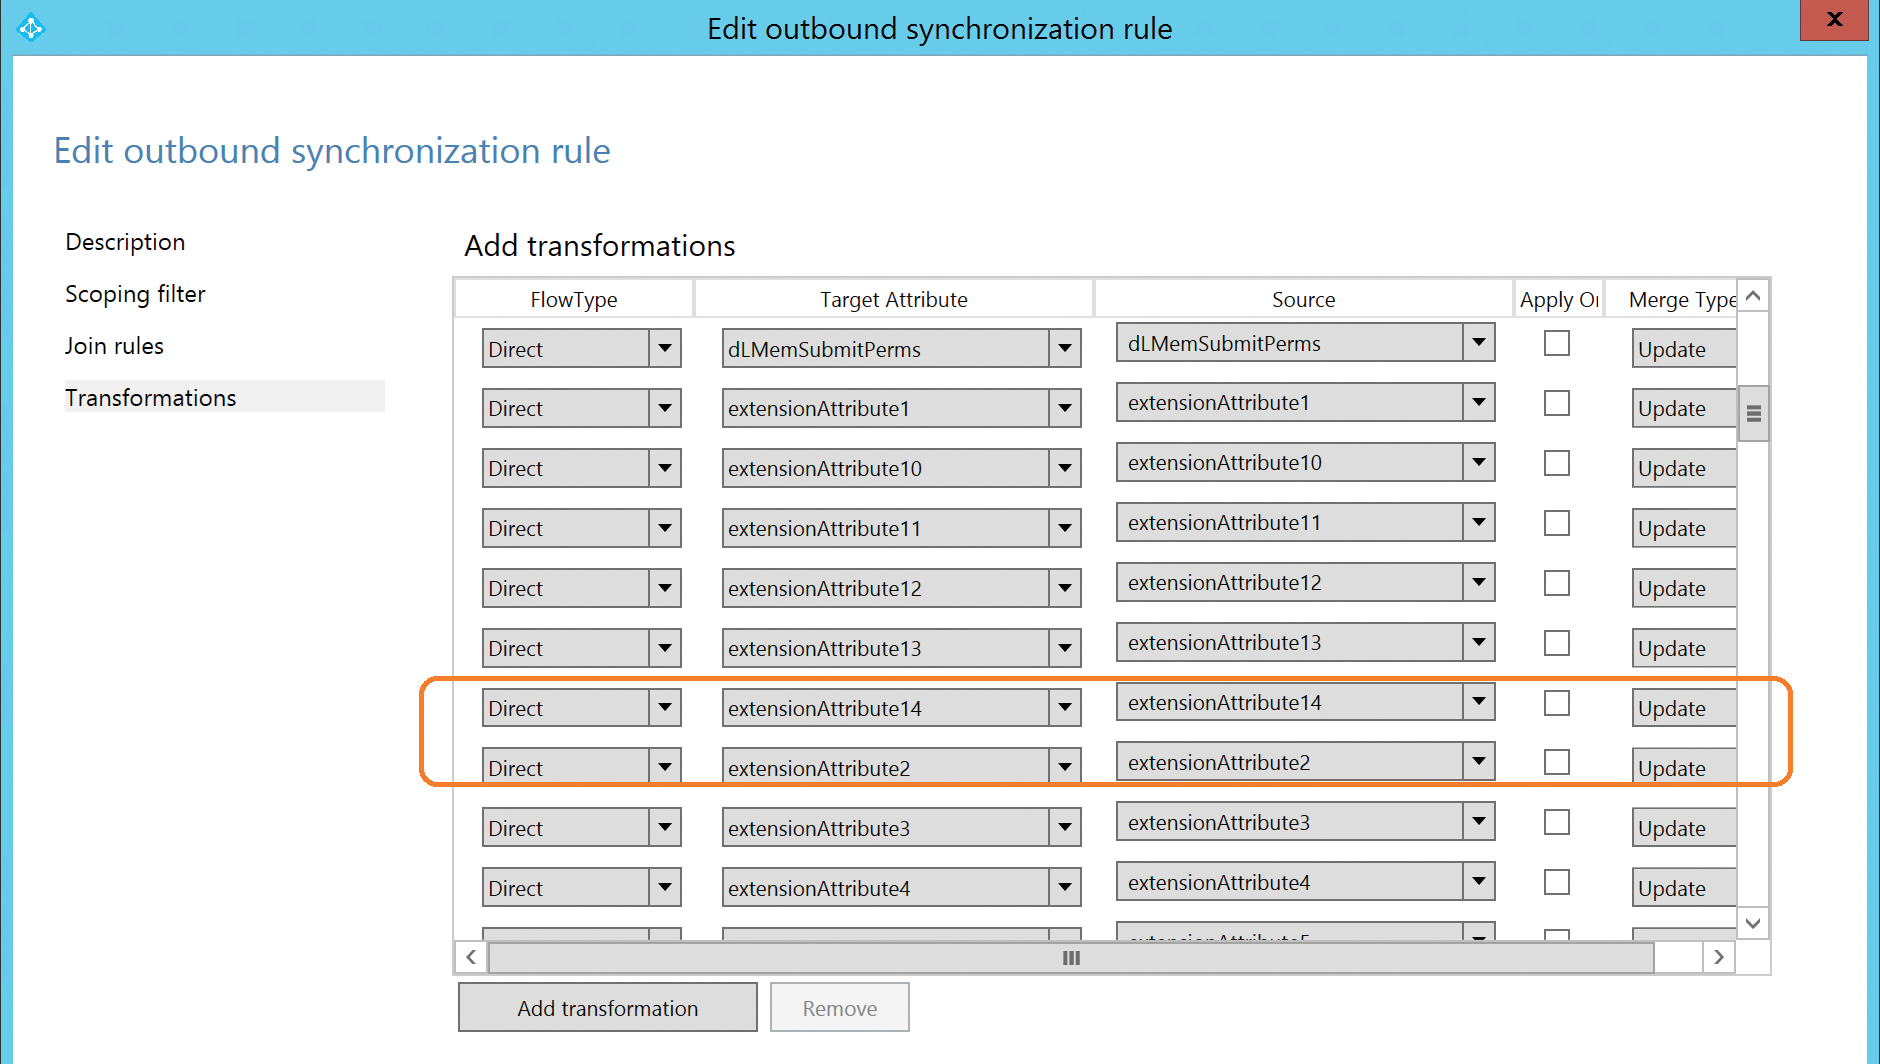
Figure 5-48 Out To AAD – User Exchange Online rule missing extensionAttribute15
Any customizations made on the Azure AD app and attribute filtering wizard pages can be changed at any time by using the AAD Connect Wizard on the desktop after installation has completed.
Password synchronization
Even though the Password Synchronization option appears earlier in the configuration process, on the User Sign-In page, it also appears on the Optional Features page.
If you selected Password Synchronization previously, it is selected for you automatically, and its check box cannot be cleared, as shown in Figure 5-49.
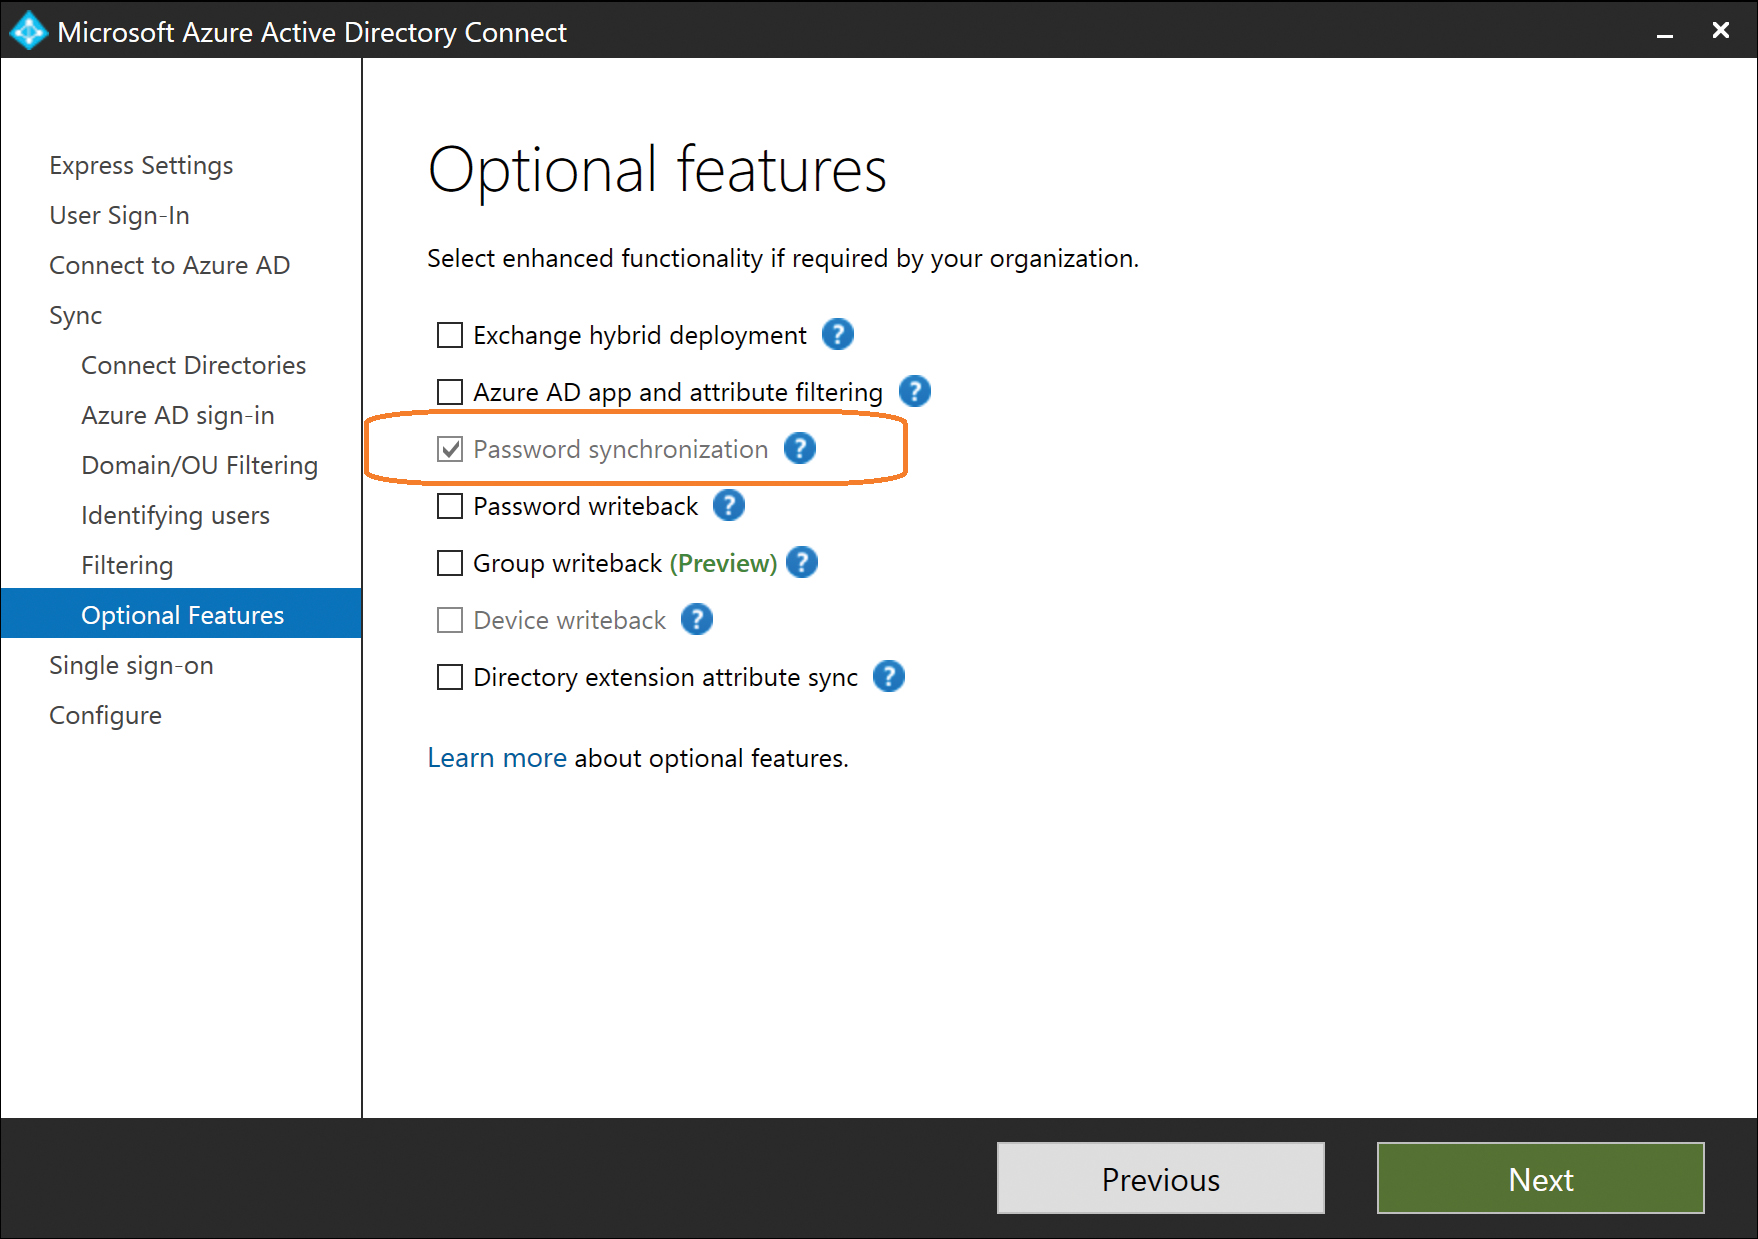
Figure 5-49 Password Synchronization selected automatically
If, however, you chose another option on the User Sign-In page, such as pass-through authentication or AD FS, it is possible to add Password Synchronization here as an additional option.
Password synchronization, in conjunction with alternate user sign-on options, is a supported scenario and provides for a fail-safe configuration in the event that your primary user sign-in option is not working. You can find additional information about the use of password synchronization as a backup for AD FS at https://docs.microsoft.com/en-us/azure/active-directory/connect/active-directory-aadconnectsync-implement-password-synchronization#what-is-password-synchronization.
As discussed previously in this chapter, implementing password synchronization by using the Customize AAD Connect implementation requires the service account selected during the Connect Your Directories process to be delegated Replicating Directory Permissions and Replicating Directory Permissions All at the top level of the forest.
Password writeback
Another feature related to passwords that can be enabled on the Optional Features page is Password Writeback, which enables your users to change their password in Azure Active Directory by using the portal, and that password automatically is updated in on-premises Active Directory.
This writeback feature has several limitations and requirements, however, for it to be deployed in an enterprise.
Requirements
First, the use of the Password Writeback feature requires the user to be licensed for Azure AD Premium. An Azure AD Premium P1 or P2 license, or the Enterprise Mobility Suite (EMS) license qualifies for this feature and enables your user to use the Password Writeback feature.
Second, password writeback is supported for synchronized users, with or without Password Sync enabled, as well as for federated users using AD FS and users configured to use pass-through authentication. Cloud-only accounts do not qualify for password writeback.
Finally, any users wishing to use password writeback and the password reset portal must have the Password Writeback feature enabled for their account, and they must have the challenge data required for the organization populated on their account.
Enabling password writeback
Enabling password writeback consists of the following high-level steps.
- Enable password reset for the Azure AD tenant.
- Configure the password reset policy for the Azure AD tenant.
- Type the registration data for each user.
To enable password reset for the Azure AD tenant, follow these steps.
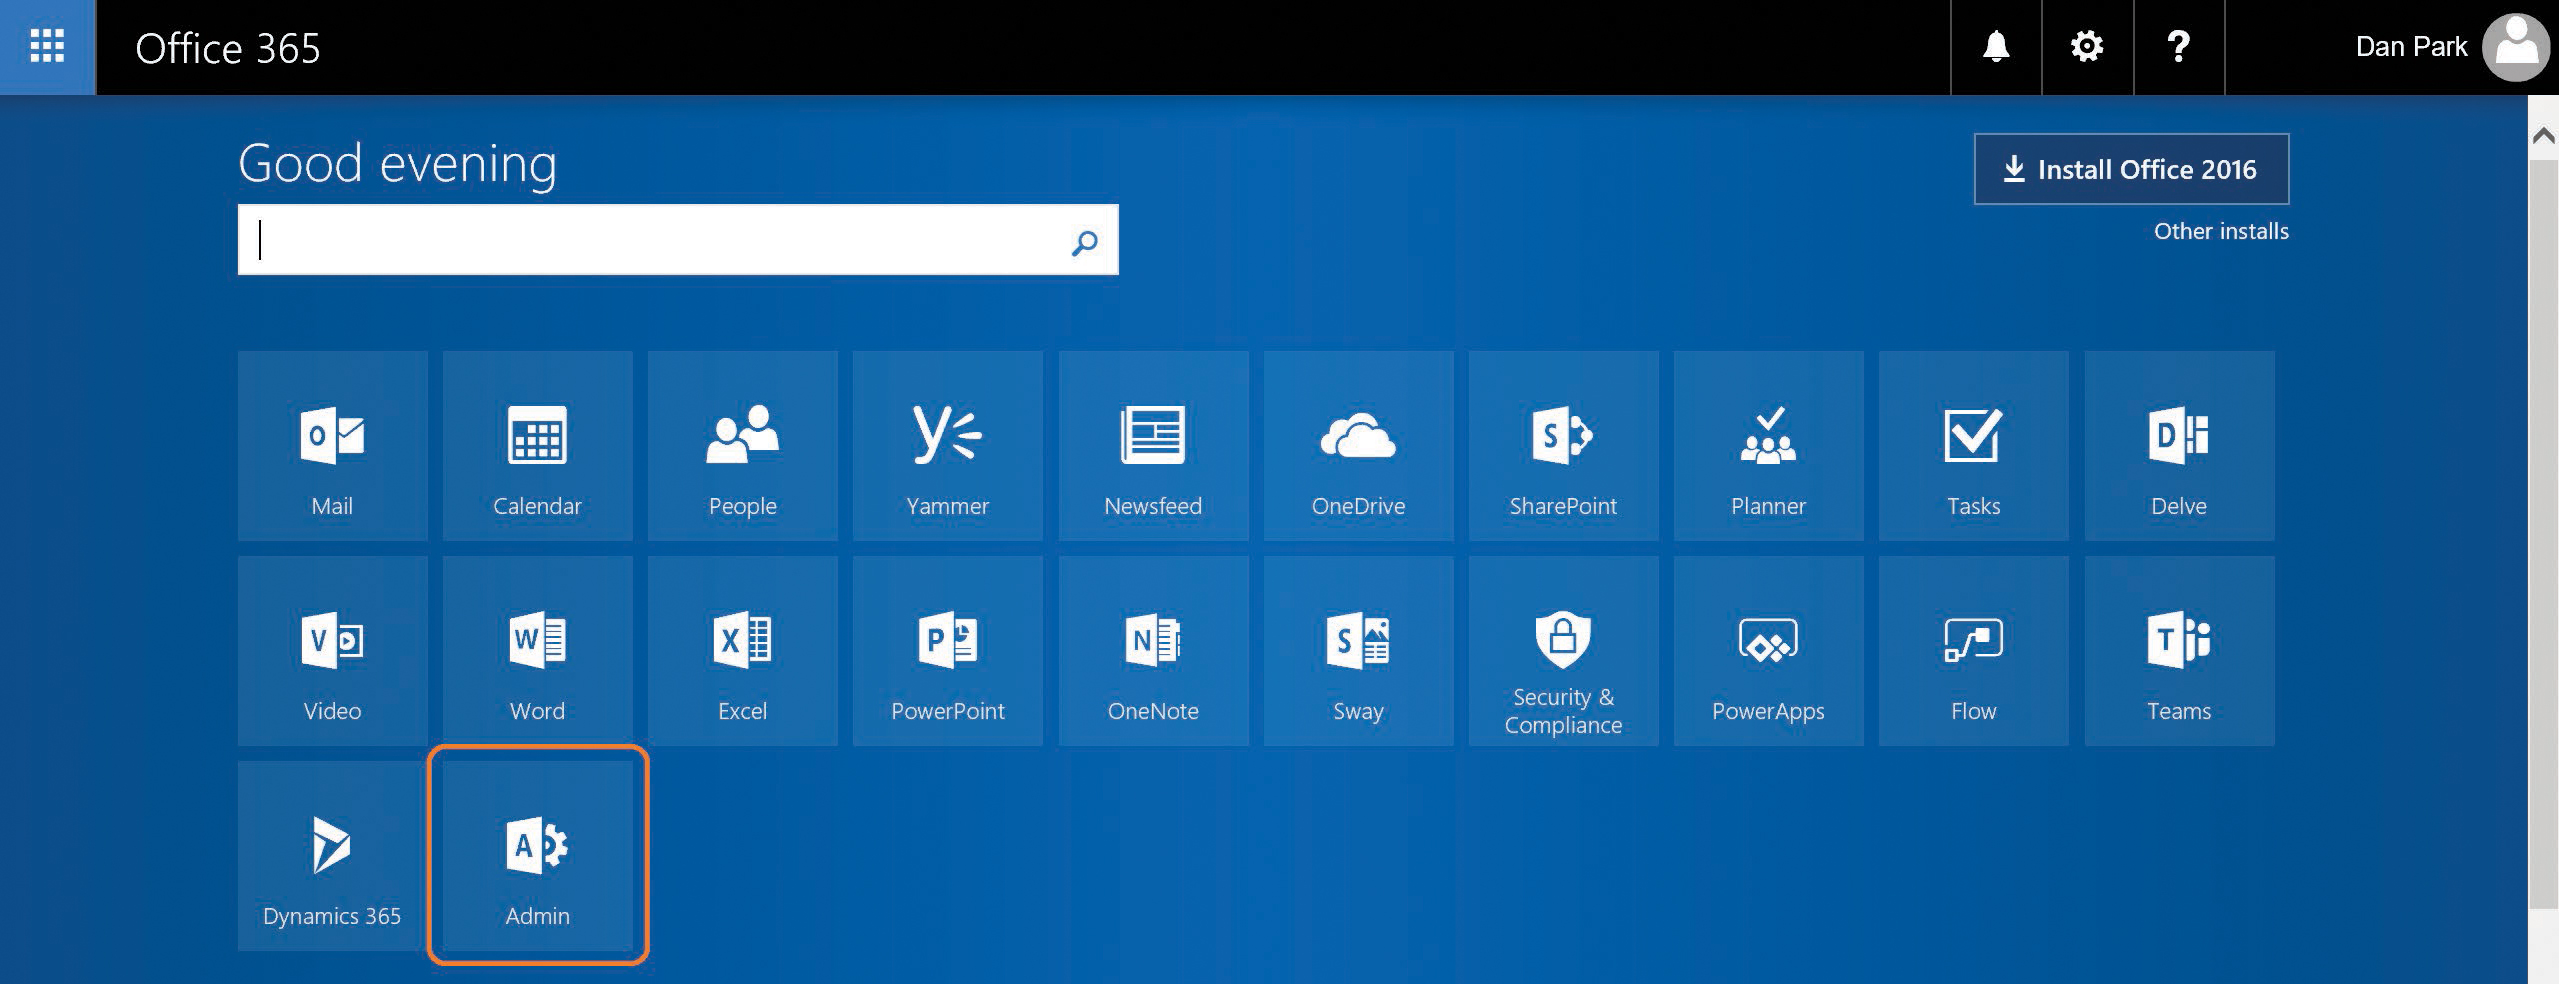
- Log on to the Office 365 portal by navigating to https://portal.microsoftonline.com and select the Admin tile from the Office 365 app launcher as shown in Figure 5-50.
Figure 5-50 Office 365 Admin tile
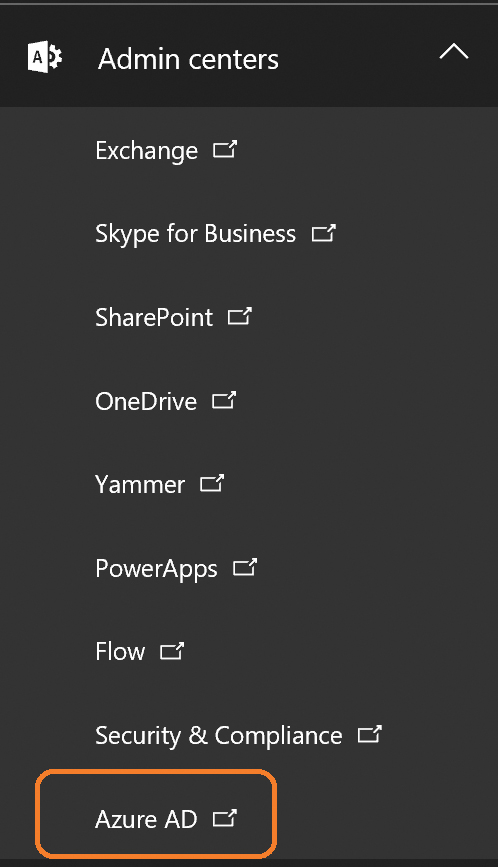
- On the lower left side of the Admin page, expand Admin Centers and select Azure AD to open the Azure portal, shown in Figure 5-51.
Figure 5-51 Azure AD Admin Center
- Choose Azure Active Directory from the menu on the left side of the Azure portal and then choose Password Reset, as shown in Figure 5-52.
You are prompted to enable password reset for Everybody or for a specific group.
If you select the group option, you are prompted to select a group that has been synchronized to your tenant. If you have not yet synchronized any groups from your on-premises Active Directory, you can select Everybody and return to the portal later to change to a specific synchronized group.
Figure 5-52 Azure AD admin portal dashboard
- Click the Save button at the top of the screen to save your changes.

To configure the password reset policy for the Azure AD tenant, follow these steps.
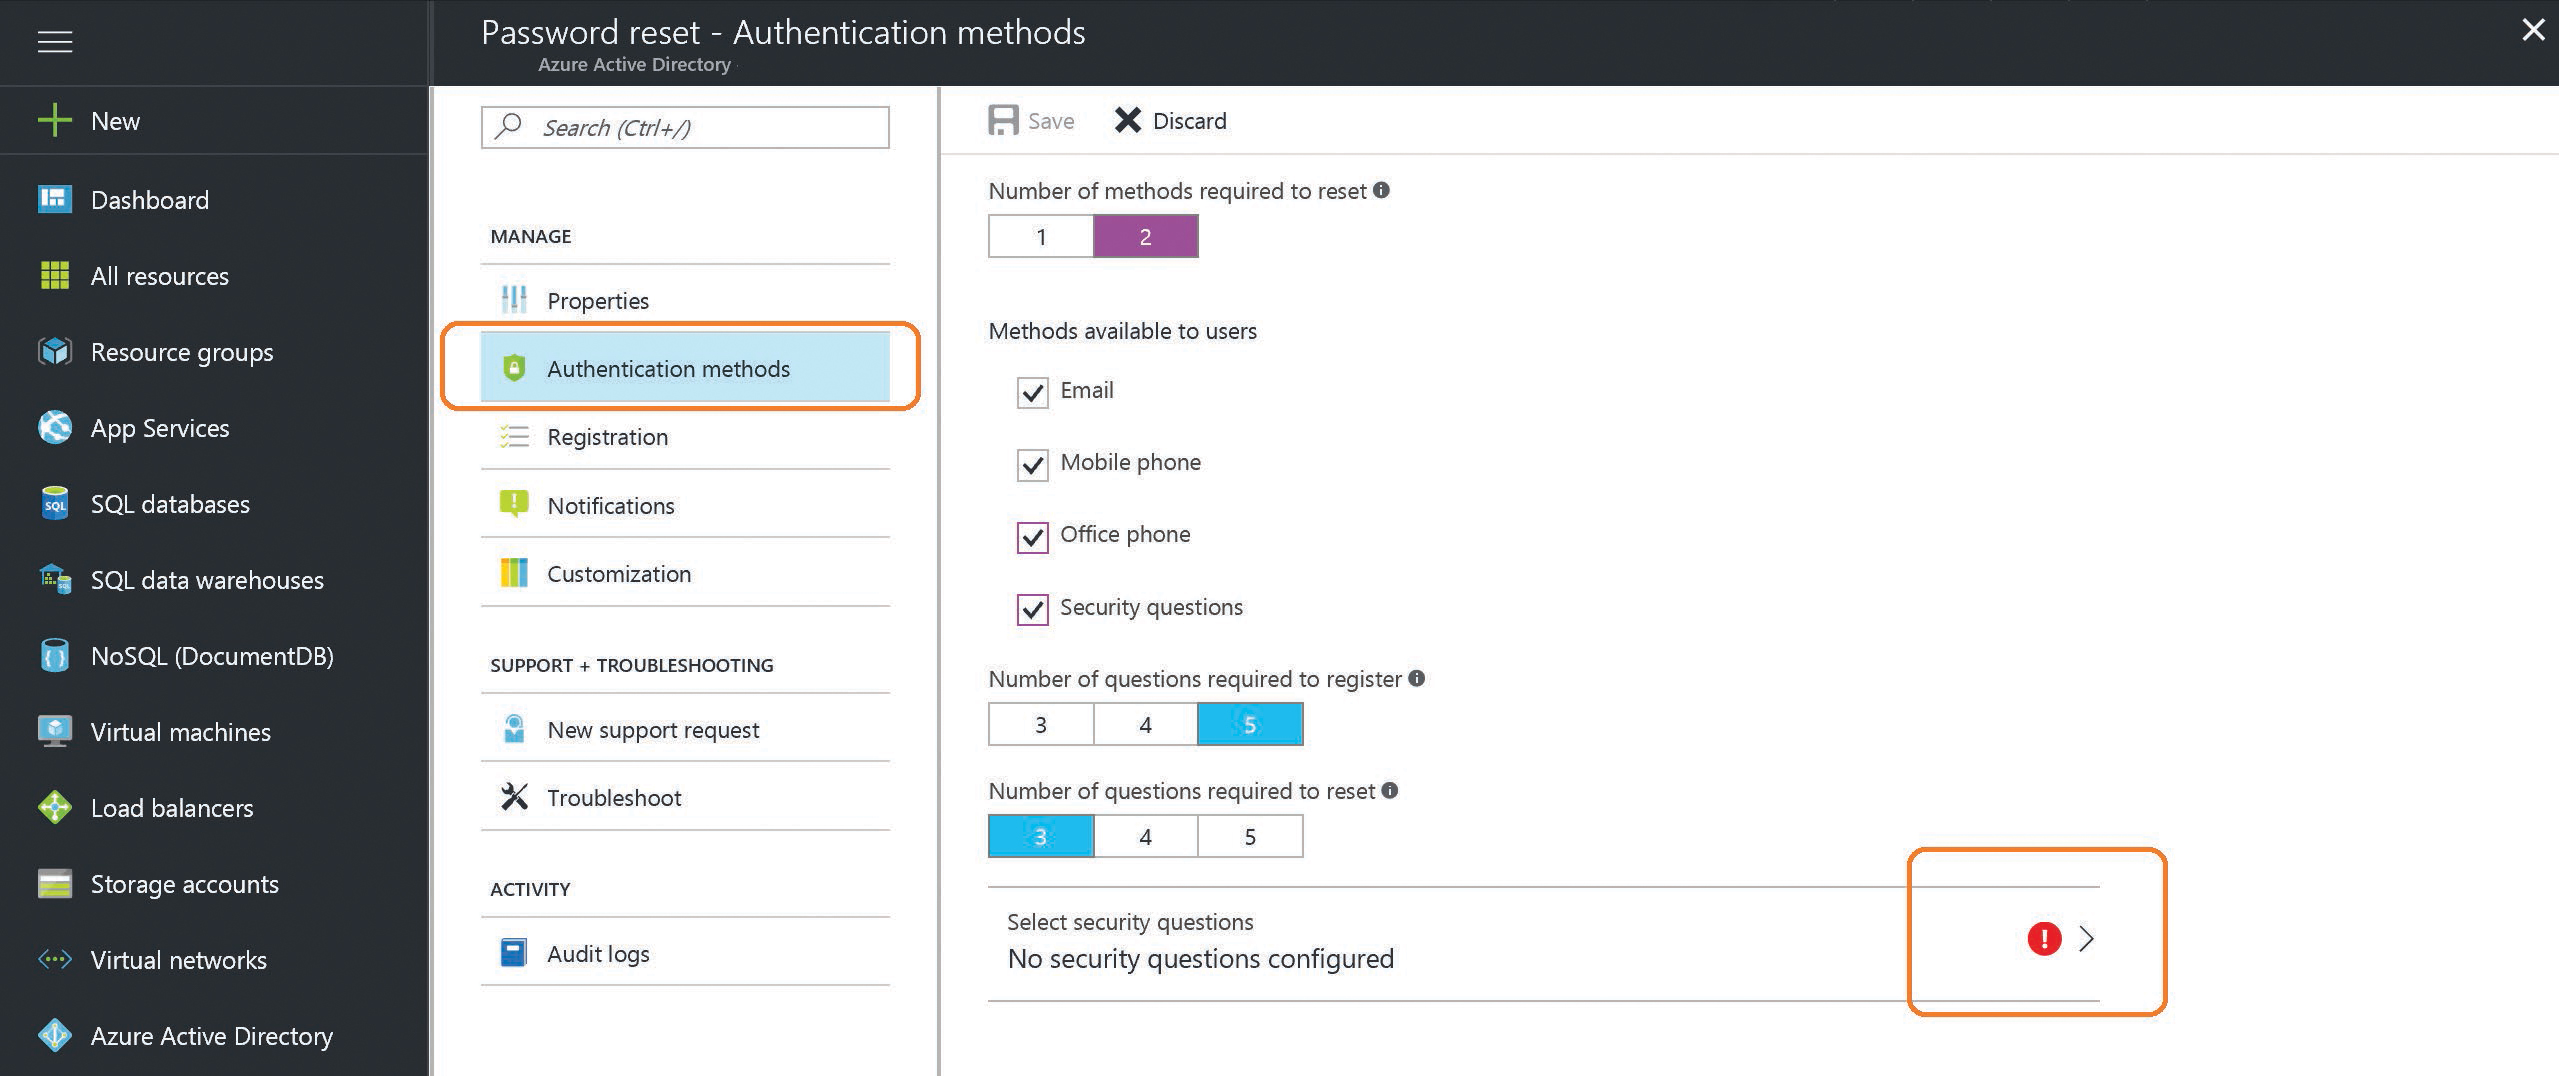
- Select Authentication Methods on the left side of the admin portal to select the number of methods required to reset a password.
- Below the selection for number of methods, select the box for each method type that you want to allow and, if you are enabling password reset for the first time, click the red exclamation point to configure the security questions, as shown in Figure 5-53.
Figure 5-53 Configuration of password reset policy authentication methods
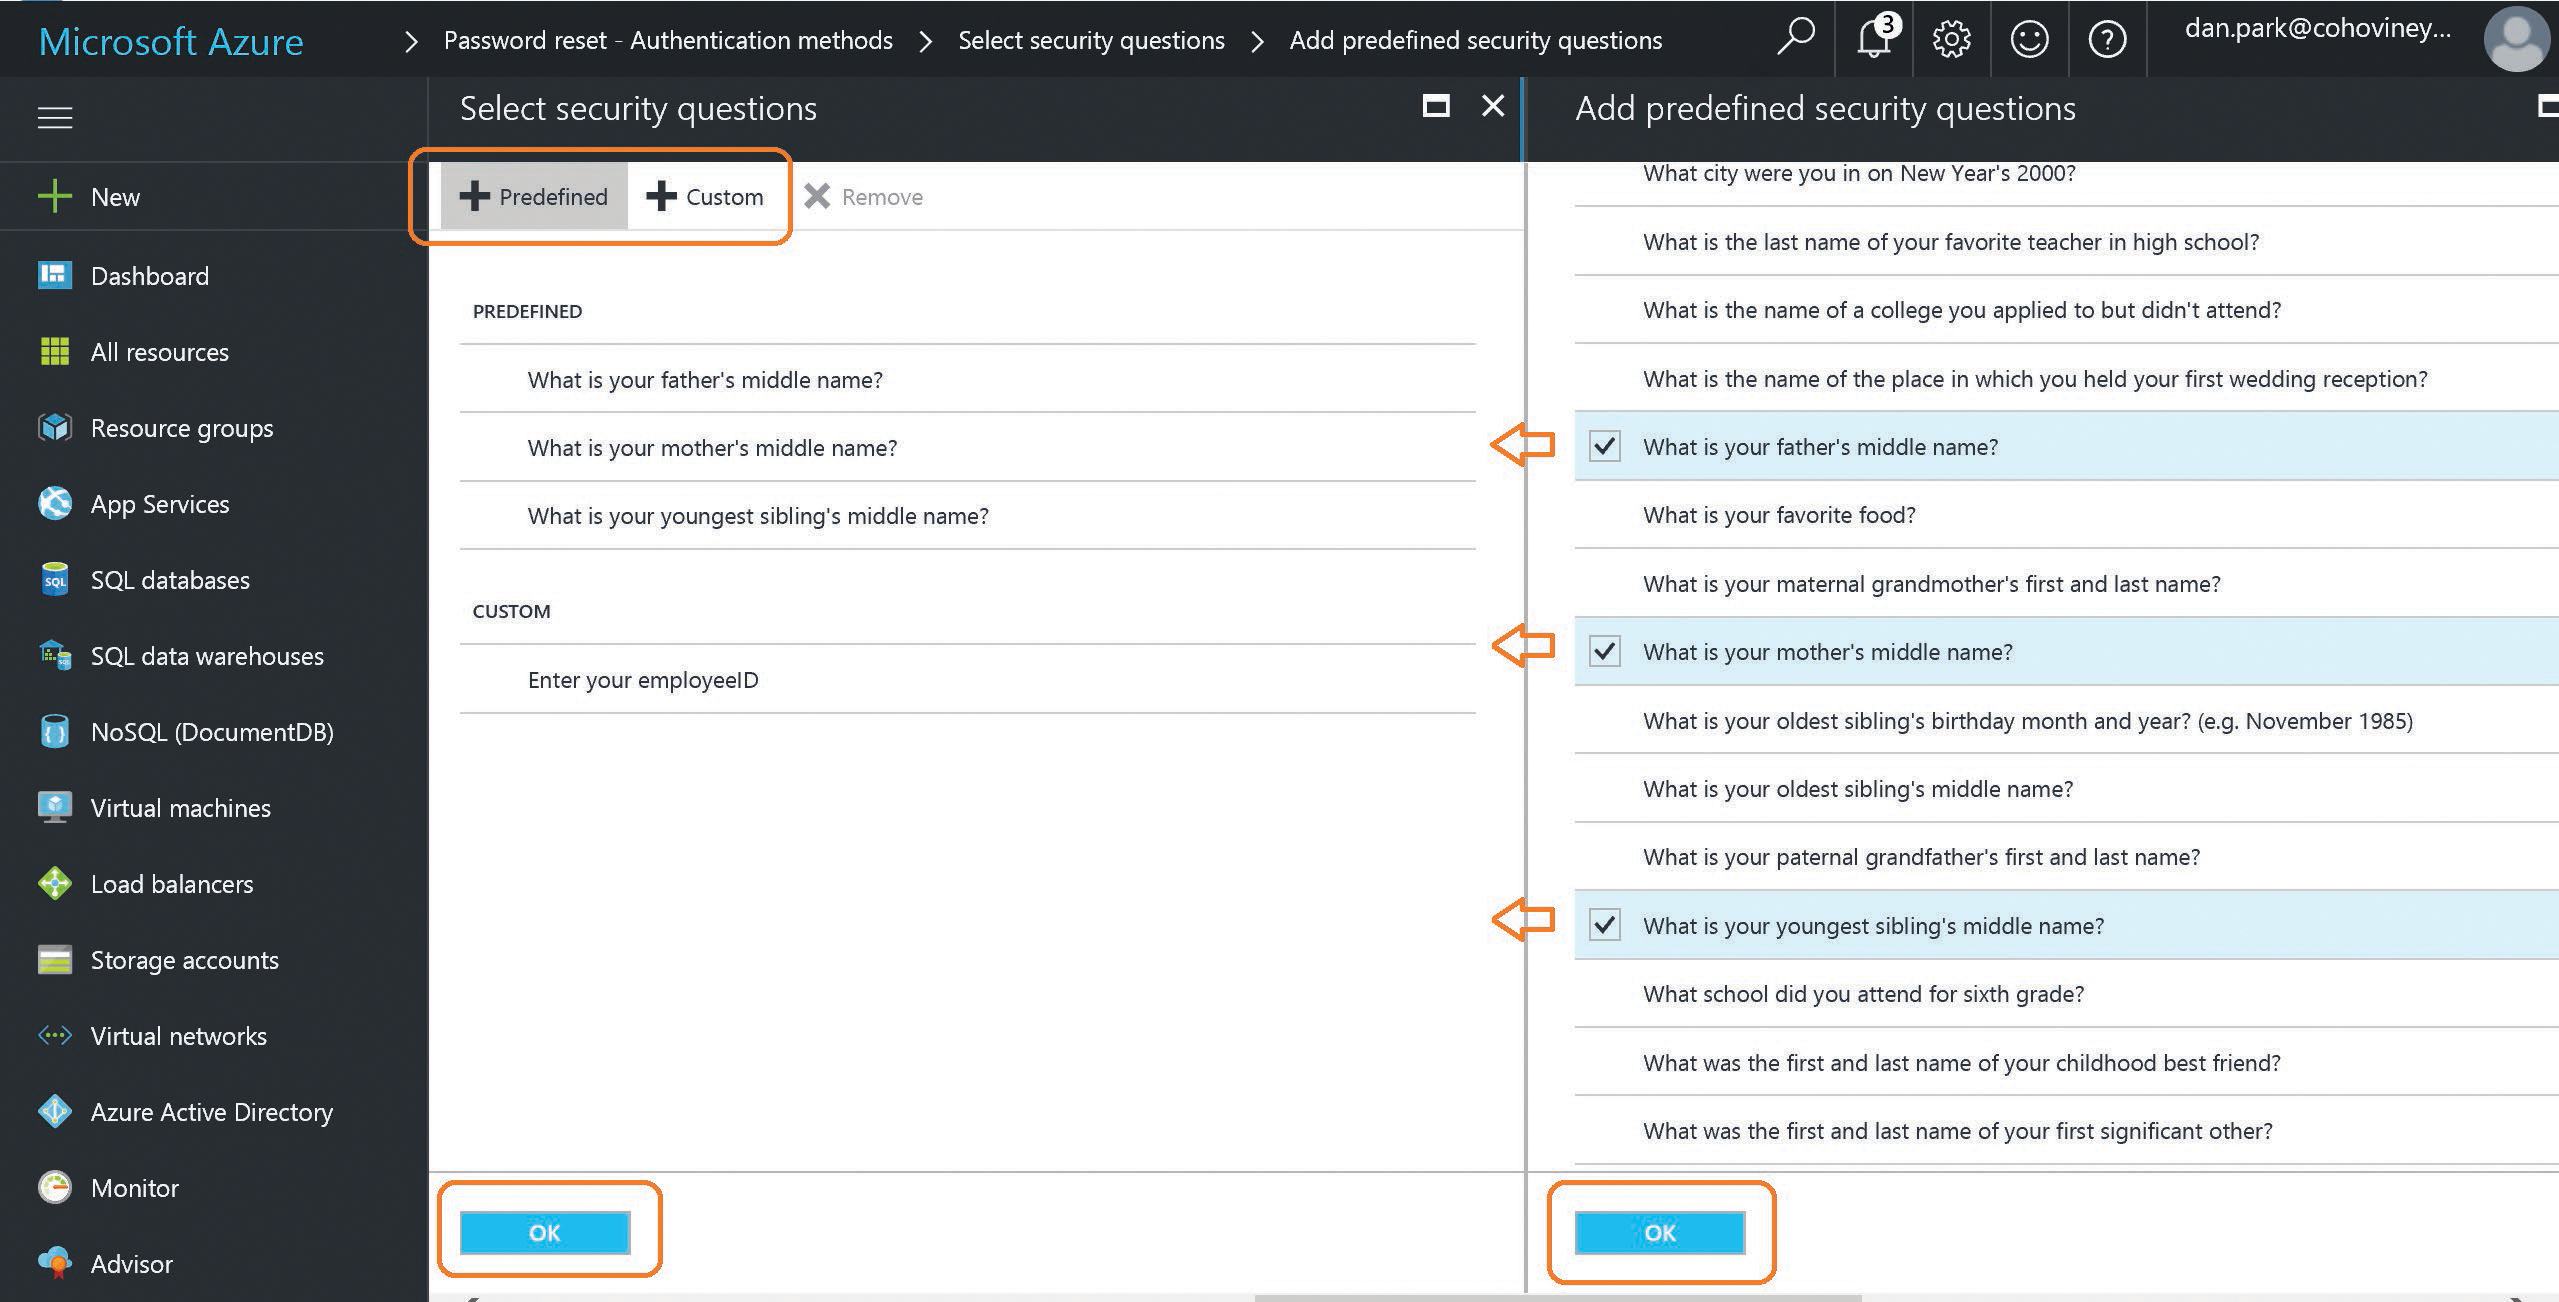
If you select Security Questions, additional options appear that enable you to identify the number of questions required to register versus the number required to reset a password, and the current list of configured security questions appears, as shown in Figure 5-54.
Figure 5-54 Selection of password reset security questions
On the top of the page, you are prompted to select from a list of predefined questions or to enable your own custom questions.
Clicking either option displays additional options on the right side of the screen, and you can select from the predefined list of questions or enter your own custom questions.
- After you have completed the selection, click OK.
You are returned to the authentication methods screen, and the number of security questions you selected appears at the bottom of the screen.
- Click Save.
After you have enabled the password reset options in the tenant, you must ensure that the data selected for registration (for example, email, mobile phone, office phone) has been populated in your on-premises Active Directory so that it synchronizes to Azure AD. Do this with the AAD Connect tool, using on-premises Active Directory as the source for this data. It is important, therefore, for the data populated in Active Directory to be accurate, or the password reset process will not work properly.
As an alternative, you can direct your users to https://aka.ms.ssprsetup to register their authentication methods manually. See Figure 5-55.
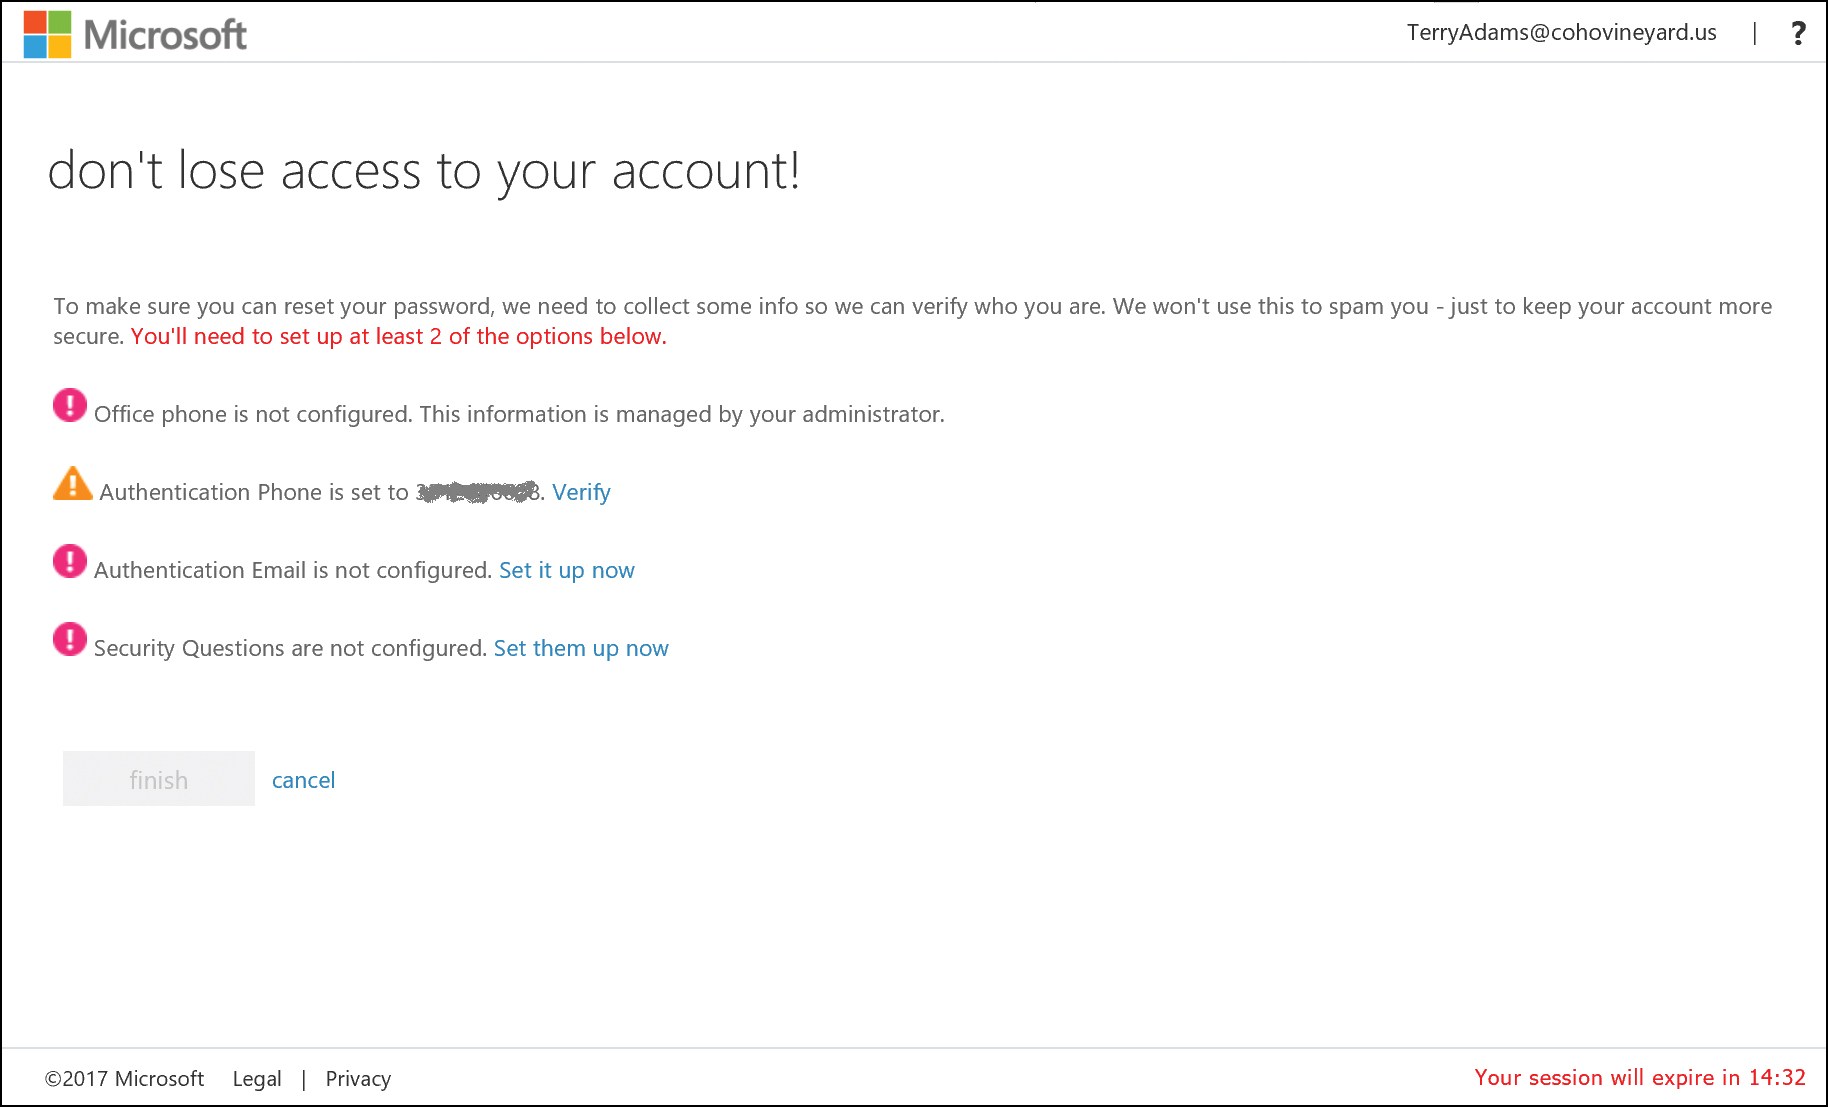
Figure 5-55 Entry of authentication detail for password reset
Any authentication methods registered manually through the Self Service Password Reset portal are maintained in Azure AD only; they are not written back to on-premises Active Directory.
After all the appropriate authentication methods have been successfully configured, users can reset their password through the Office 365 portal by selecting Can’t Access Your Account on the sign-in page, shown in Figure 5-56.
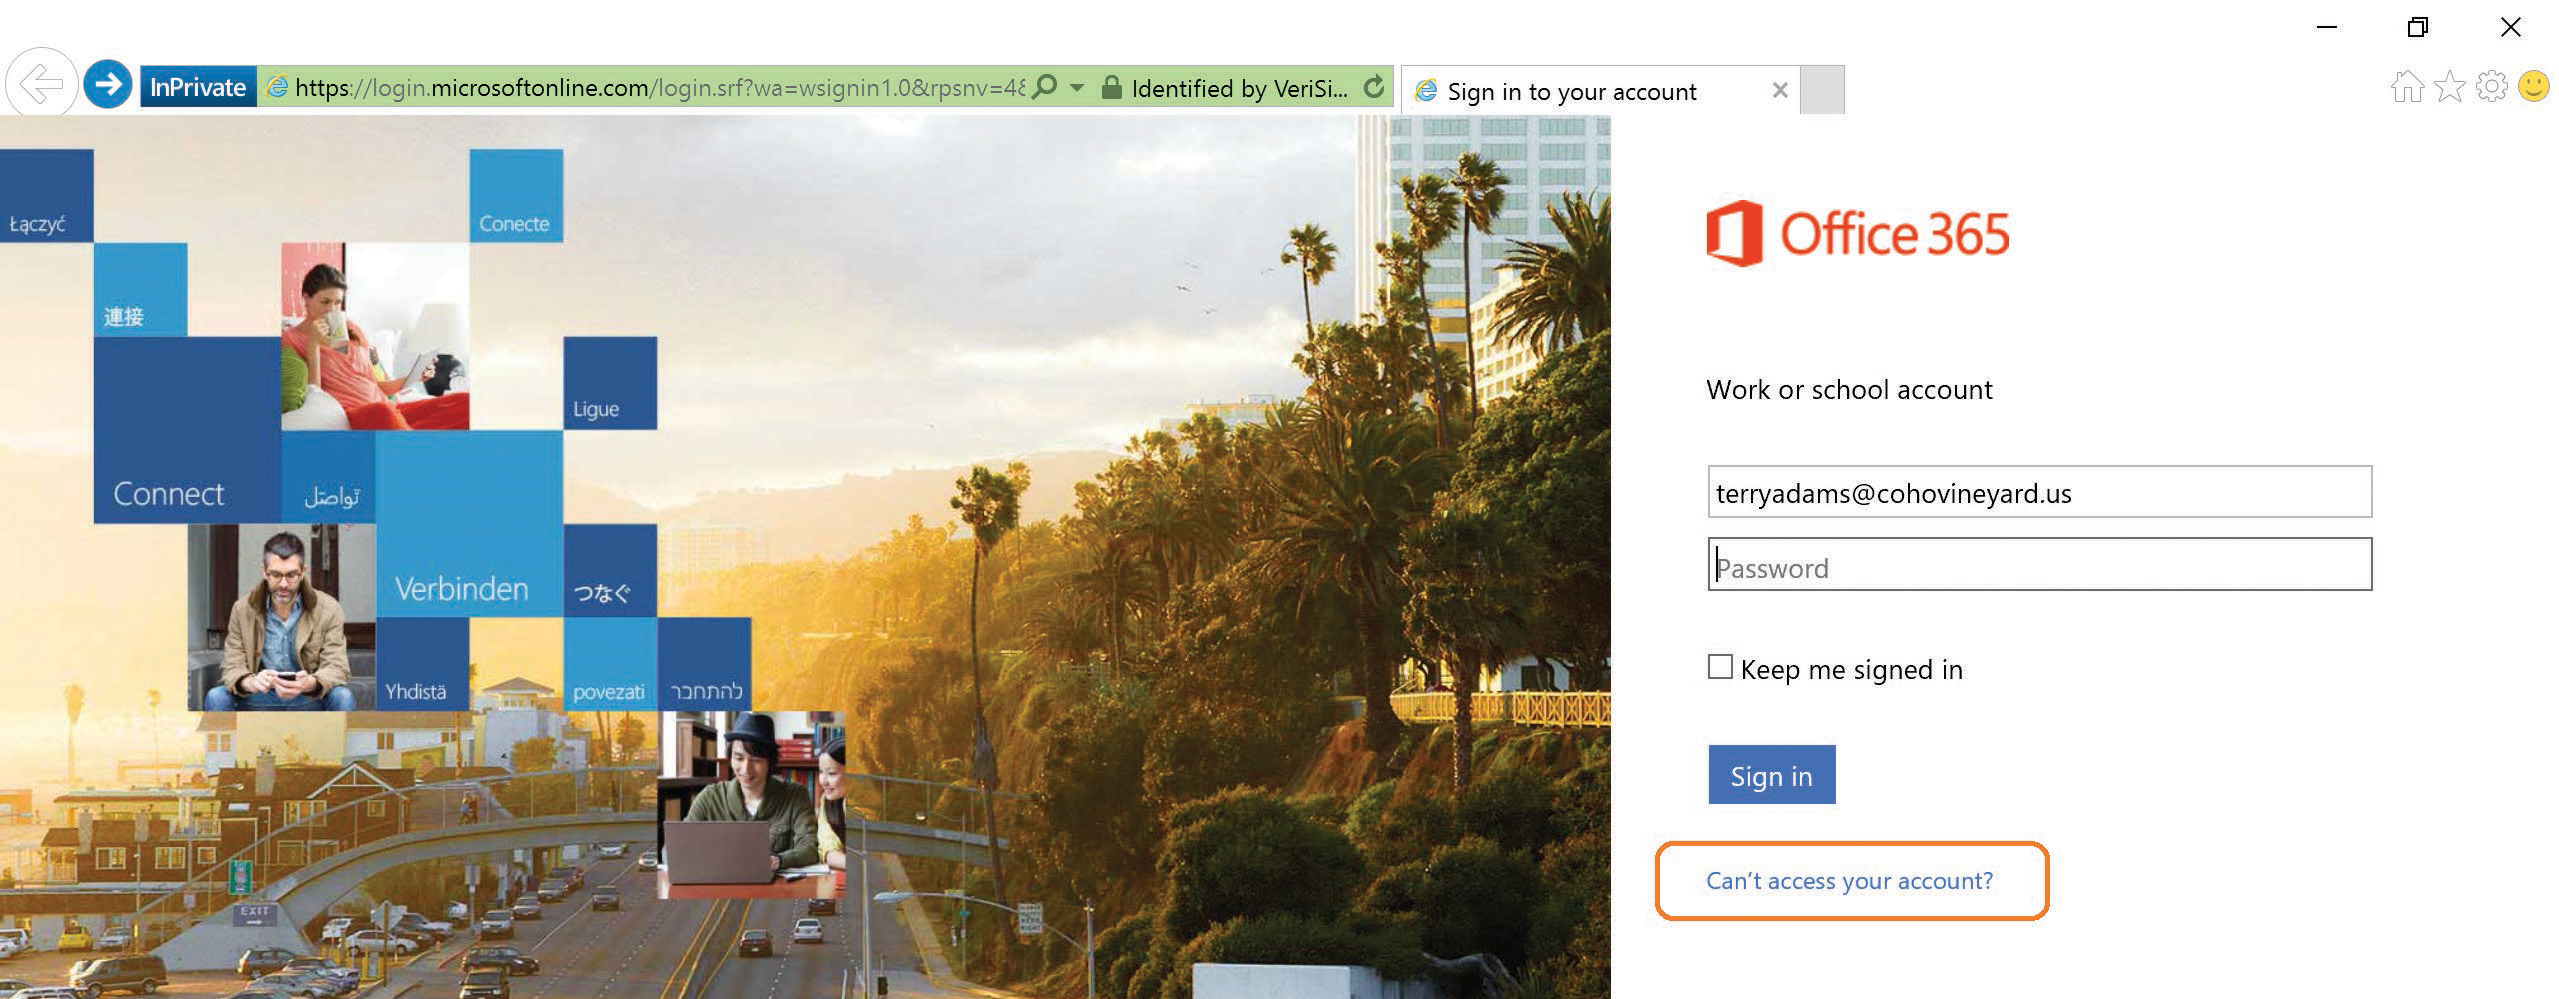
Figure 5-56 Selecting Can’t Access Your Account on the sign-in page
They are then redirected to the password reset portal, where they are prompted for their User ID and asked to provide Captcha information.
After that has been successfully confirmed, they are prompted for their challenge information, as shown in Figure 5-57.
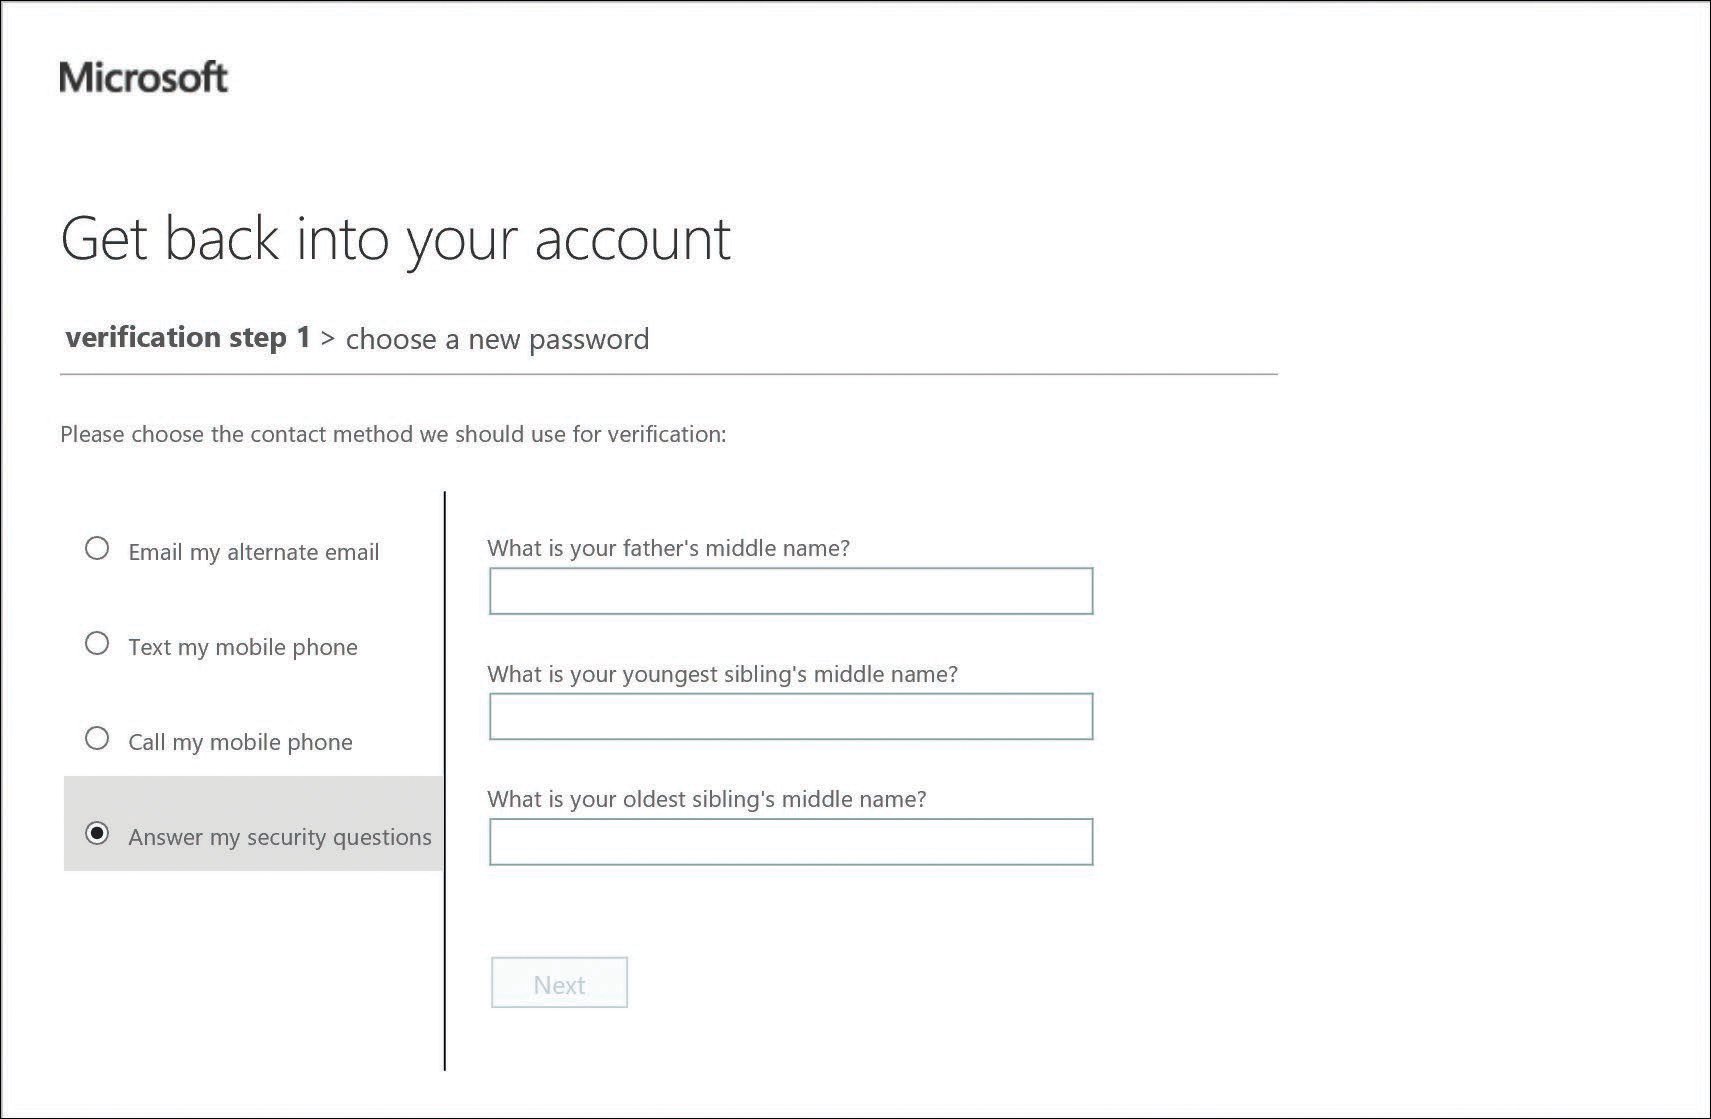
Figure 5-57 Password reset portal options
Successful entry of your challenge information enables you to reset your password in the portal, and that password change is written back to on-premises Active Directory.
Group writeback
The Group Writeback option, available on the Optional Features page, enables you to configure AAD Connect to write back Office 365 groups that are created in the portal into on-premises Active Directory.
Selecting Group Writeback enables Office 365 groups to be written back to on-premises Active Directory as Exchange distribution groups so that on-premises mailboxes can send and receive email from the group.
Group writeback has the following requirements and limitations.
- The Group Writeback feature requires Azure AD Premium licenses to be available in your Azure AD subscription.
- Group writeback requires the on-premises Exchange organization to be a minimum of Exchange 2013 CU8 or later.
- Groups written back into on-premises Active Directory are not visible in the on-premises Exchange global address list (GAL) unless the objects are manually updated using the Update-Recipient Exchange Windows PowerShell cmdlet.
- Group writeback is only supported for single Exchange forest deployments.
- The Group Writeback feature is for Office 365 groups only; security and distribution groups are not supported.
It is important also to note that if none of your on-premises Active Directory forests contain the Exchange schema, this option will not be available on the AAD Connect Optional Features page.
Selecting Group Writeback displays an additional wizard page that enables selection of the organizational unit in on-premises Active Directory that should be used for any Office 365 groups written back, as shown in Figure 5-58.
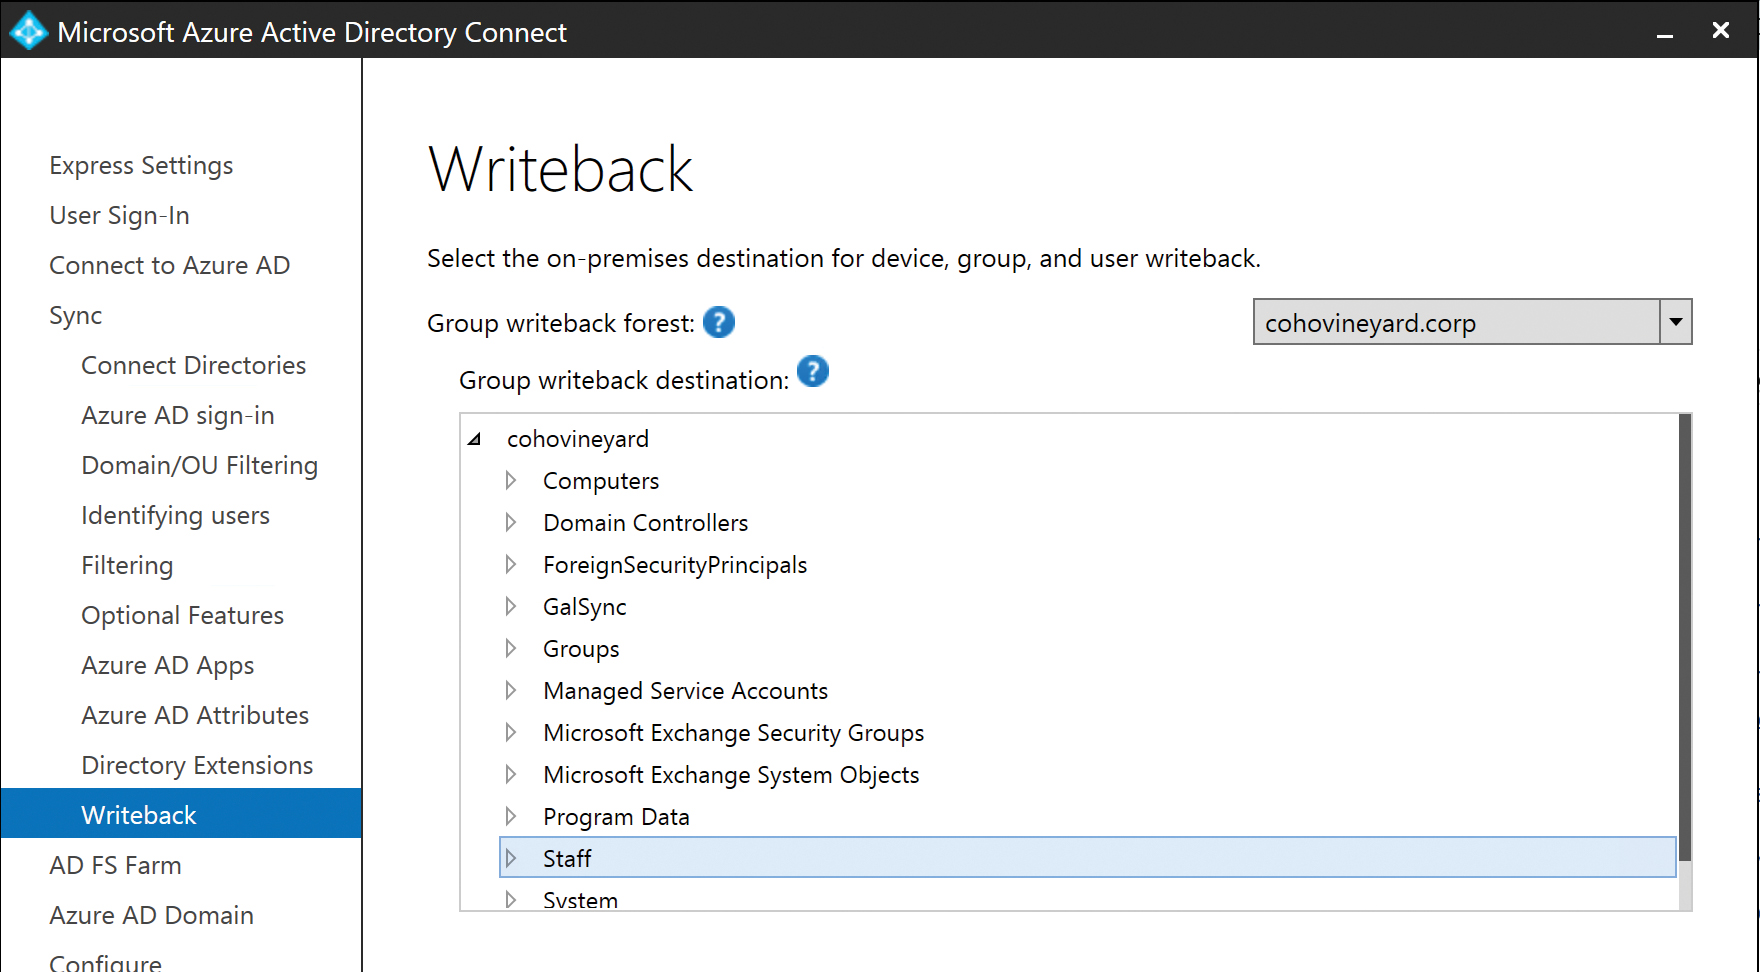
Figure 5-58 Selecting the group writeback location
Only one organizational unit can be selected for the writeback of groups, and if that OU was not selected in the Domain/OU filtering page earlier in the installation process, an error appears, stating that the OU selected is currently excluded.
You can select an alternate OU, or you can click the Previous button to return to the Domain/OU filtering wizard page and the OU included in the scope of the synchronization.
Device writeback
Device Writeback, located on the Optional Features page, enables you to configure AAD Connect to perform a writeback of devices that have been joined to your Azure AD tenant.
This writeback is provided so that conditional access to AD FS can be configured to secure applications by allowing access only from trusted devices you have successfully registered in Azure AD. These devices, however, must exist in on-premises Active Directory so that the AD FS on-premises infrastructure can use them for conditional access.
Selecting Device Writeback displays an additional wizard page that enables selection of the on-premises forest that should be used for any devices written back, as shown in Figure 5-59.
In a multi-forest configuration, only one forest can be selected as a target for device writeback. Using device writeback to more than one Active Directory forest is not supported.
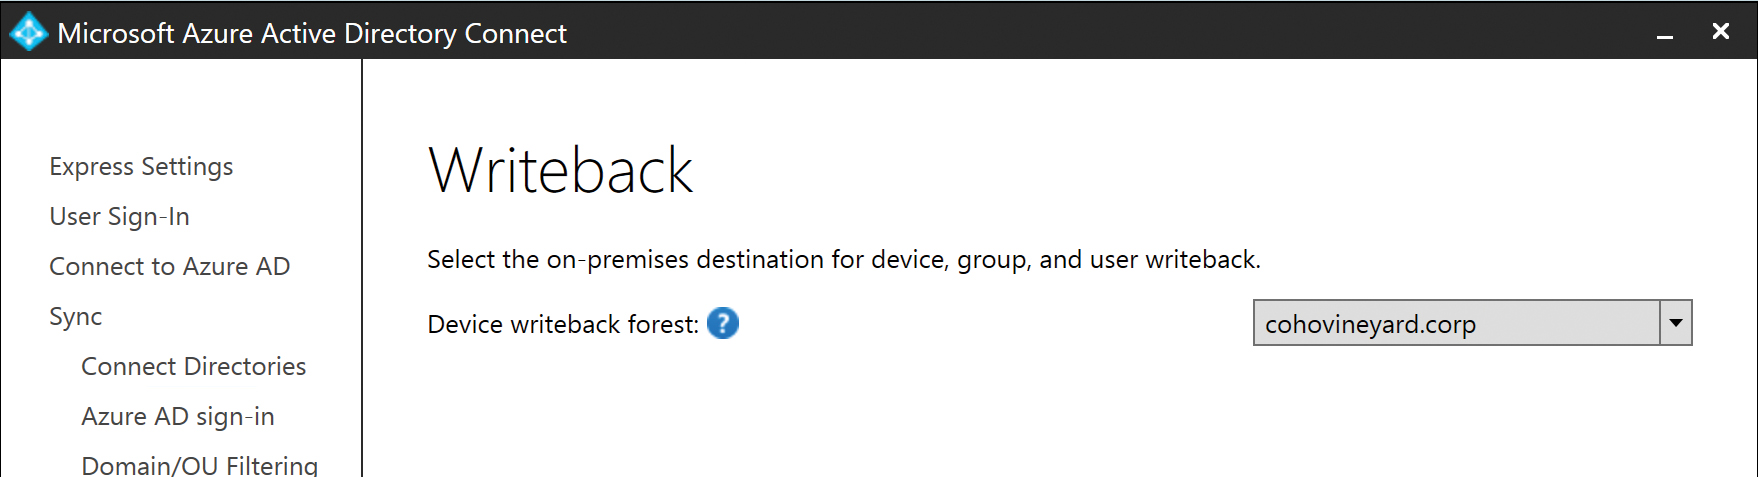
Figure 5-59 Device Writeback forest selection page
Device writeback has the following requirements and limitations.
- The Device Writeback feature requires Azure AD Premium licenses to be available in your Azure AD subscription.
- Device writeback does not support a multi-forest implementation of AAD Connect.
- The devices written back to on-premises Active Directory must be in the same Active Directory forest as the users.
- Conditional access to AD FS requires AD FS 2012R2 or later.
- Device writeback can take up to 3 hours to write back newly registered devices successfully to on-premises Active Directory.
- At least one Windows Server 2012 R2 must be joined to Active Directory.
- It is necessary to use the MSOnline Windows PowerShell module to enable device writeback in Active Directory.
- Enabling device writeback in Active Directory creates an OU named RegisteredDevices at the top level of the forest.
After you have enabled device writeback, you must configure additional conditional access policies in your AD FS infrastructure before the devices can be used to secure applications, and issuance rules for your applications must be modified to support the IsRegisteredUser claim type.
Refer to the following link for a step-by-step guide to enabling conditional access in AD FS 2.0 with device writeback: https://docs.microsoft.com/en-us/azure/active-directory/active-directory-device-registration-on-premises-setup.
Directory Extensions attribute sync
The Directory Extensions attribute sync option on the Optional Features page, shown in Figure 5-60, enables you to synchronize additional attributes to Azure AD that are not part of the default attributes the AAD Connect installation synchronizes.
Selecting the Directory Extension attribute sync displays an additional wizard page that enables selection of attributes from the on-premises forest that should be included in the sync.
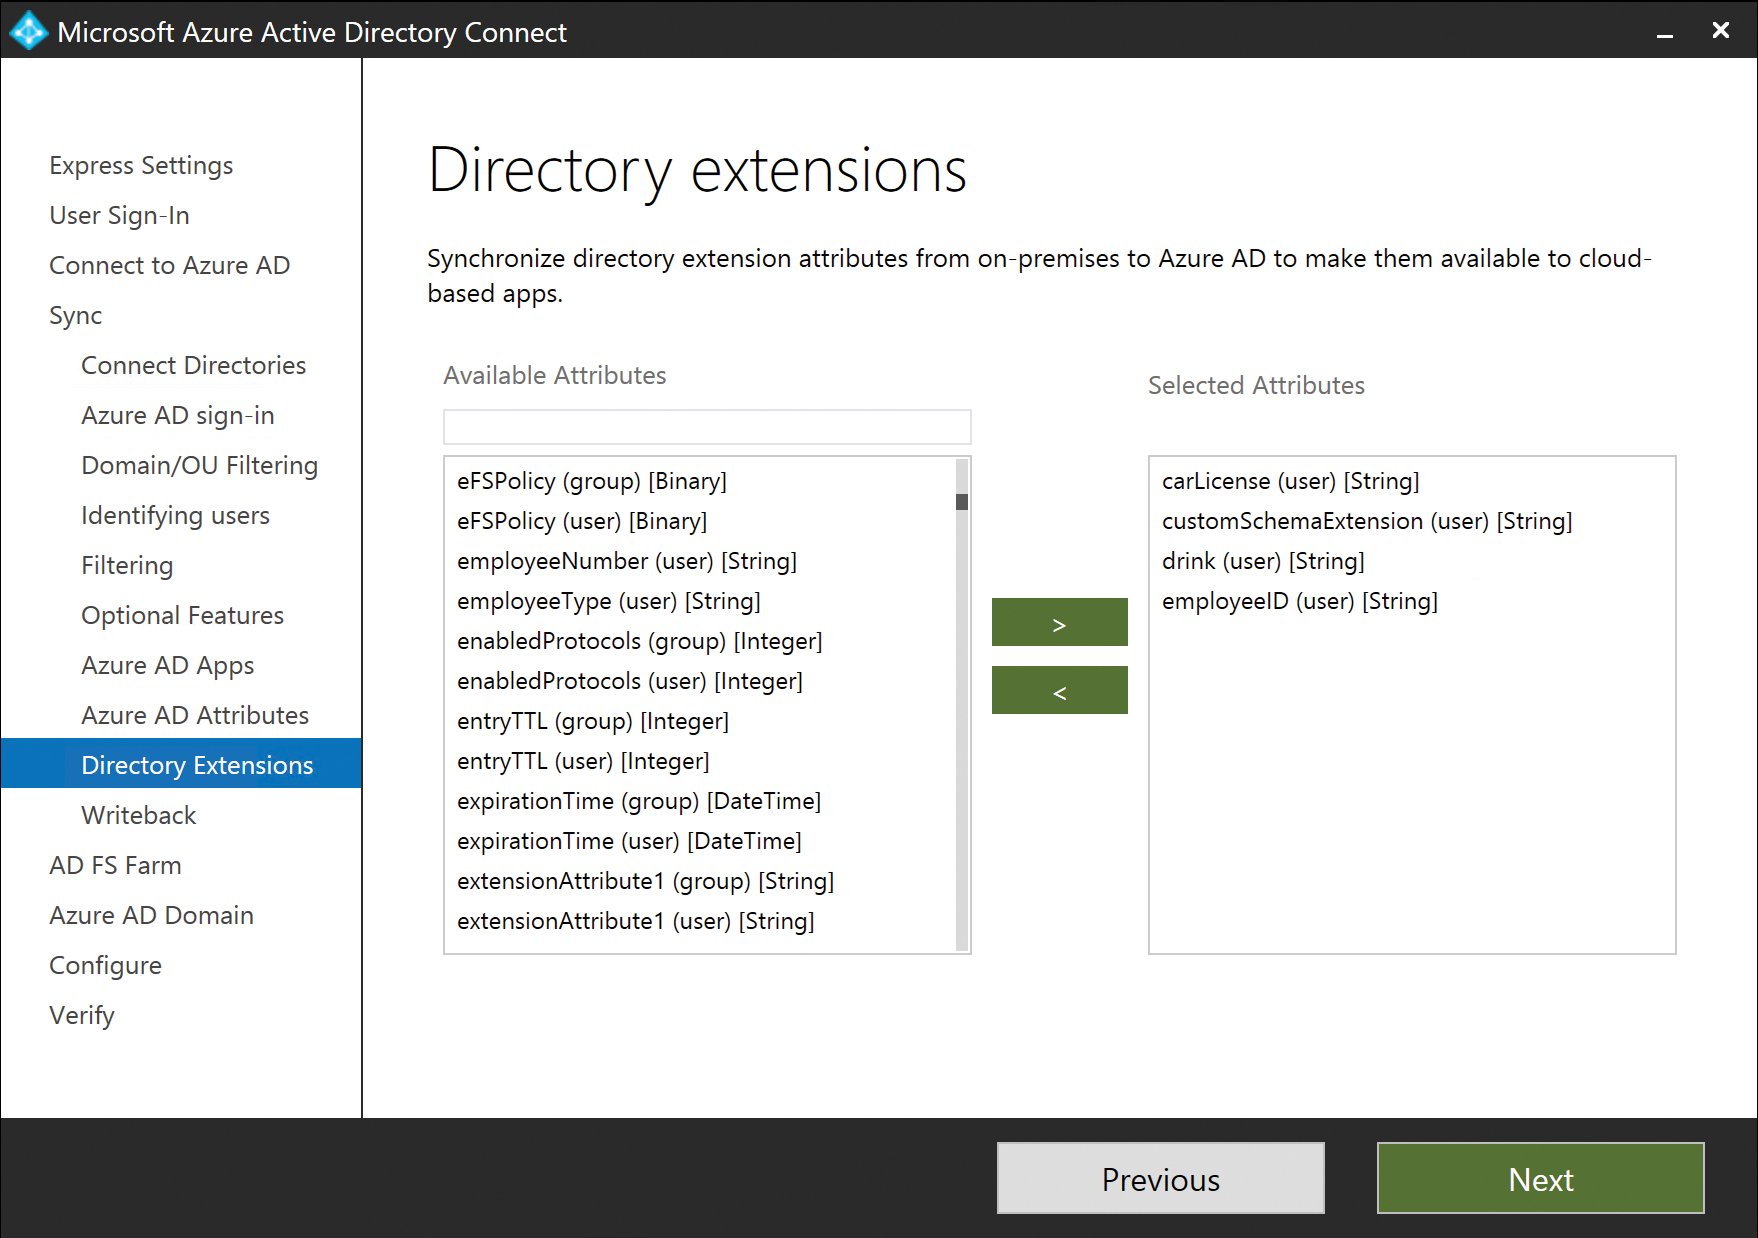
Figure 5-60 Directory Extensions page
The Directory Extensions attribute sync has the following requirements and limitations.
- The directory extensions attribute sync is limited to a total of 100 additional attributes.
- Attributes can only be 250 characters or fewer in length; characters beyond 250 are truncated during the synchronization.
- Attributes that are synchronized in this manner are not visible in Exchange, SharePoint, and so on and are visible only when using Microsoft Graph or GraphAPI.
- Any attribute synchronized by using the AAD Connect Directory Extensions attribute sync are considered mastered on-premises and cannot be modified in Azure AD.
After the Directory Extensions attribute sync has been configured, the AAD Connect installation adds new inbound and outbound synchronization rules, which contain the selected attributes, to the configuration, as shown in Figure 5-61.
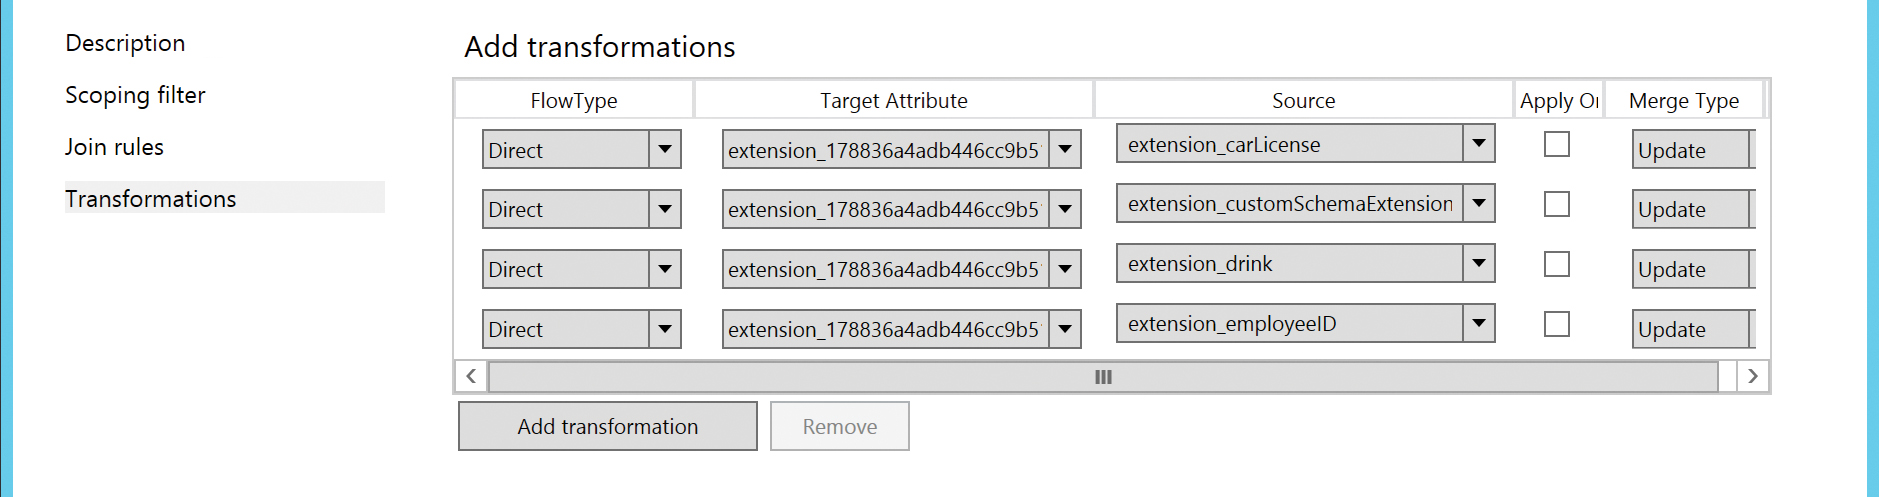
Figure 5-61 Additional outbound rule for directory extension attributes
If additional attributes are required, these rules cannot be edited; you must use the AAD Connect Wizard located on the desktop to add additional attributes to the configuration.
Finally, the Directory Extensions attribute sync also registers a new application in Azure AD that you can find by selecting Azure Active Directory in the portal and selecting App Registrations, as shown in Figure 5-62.
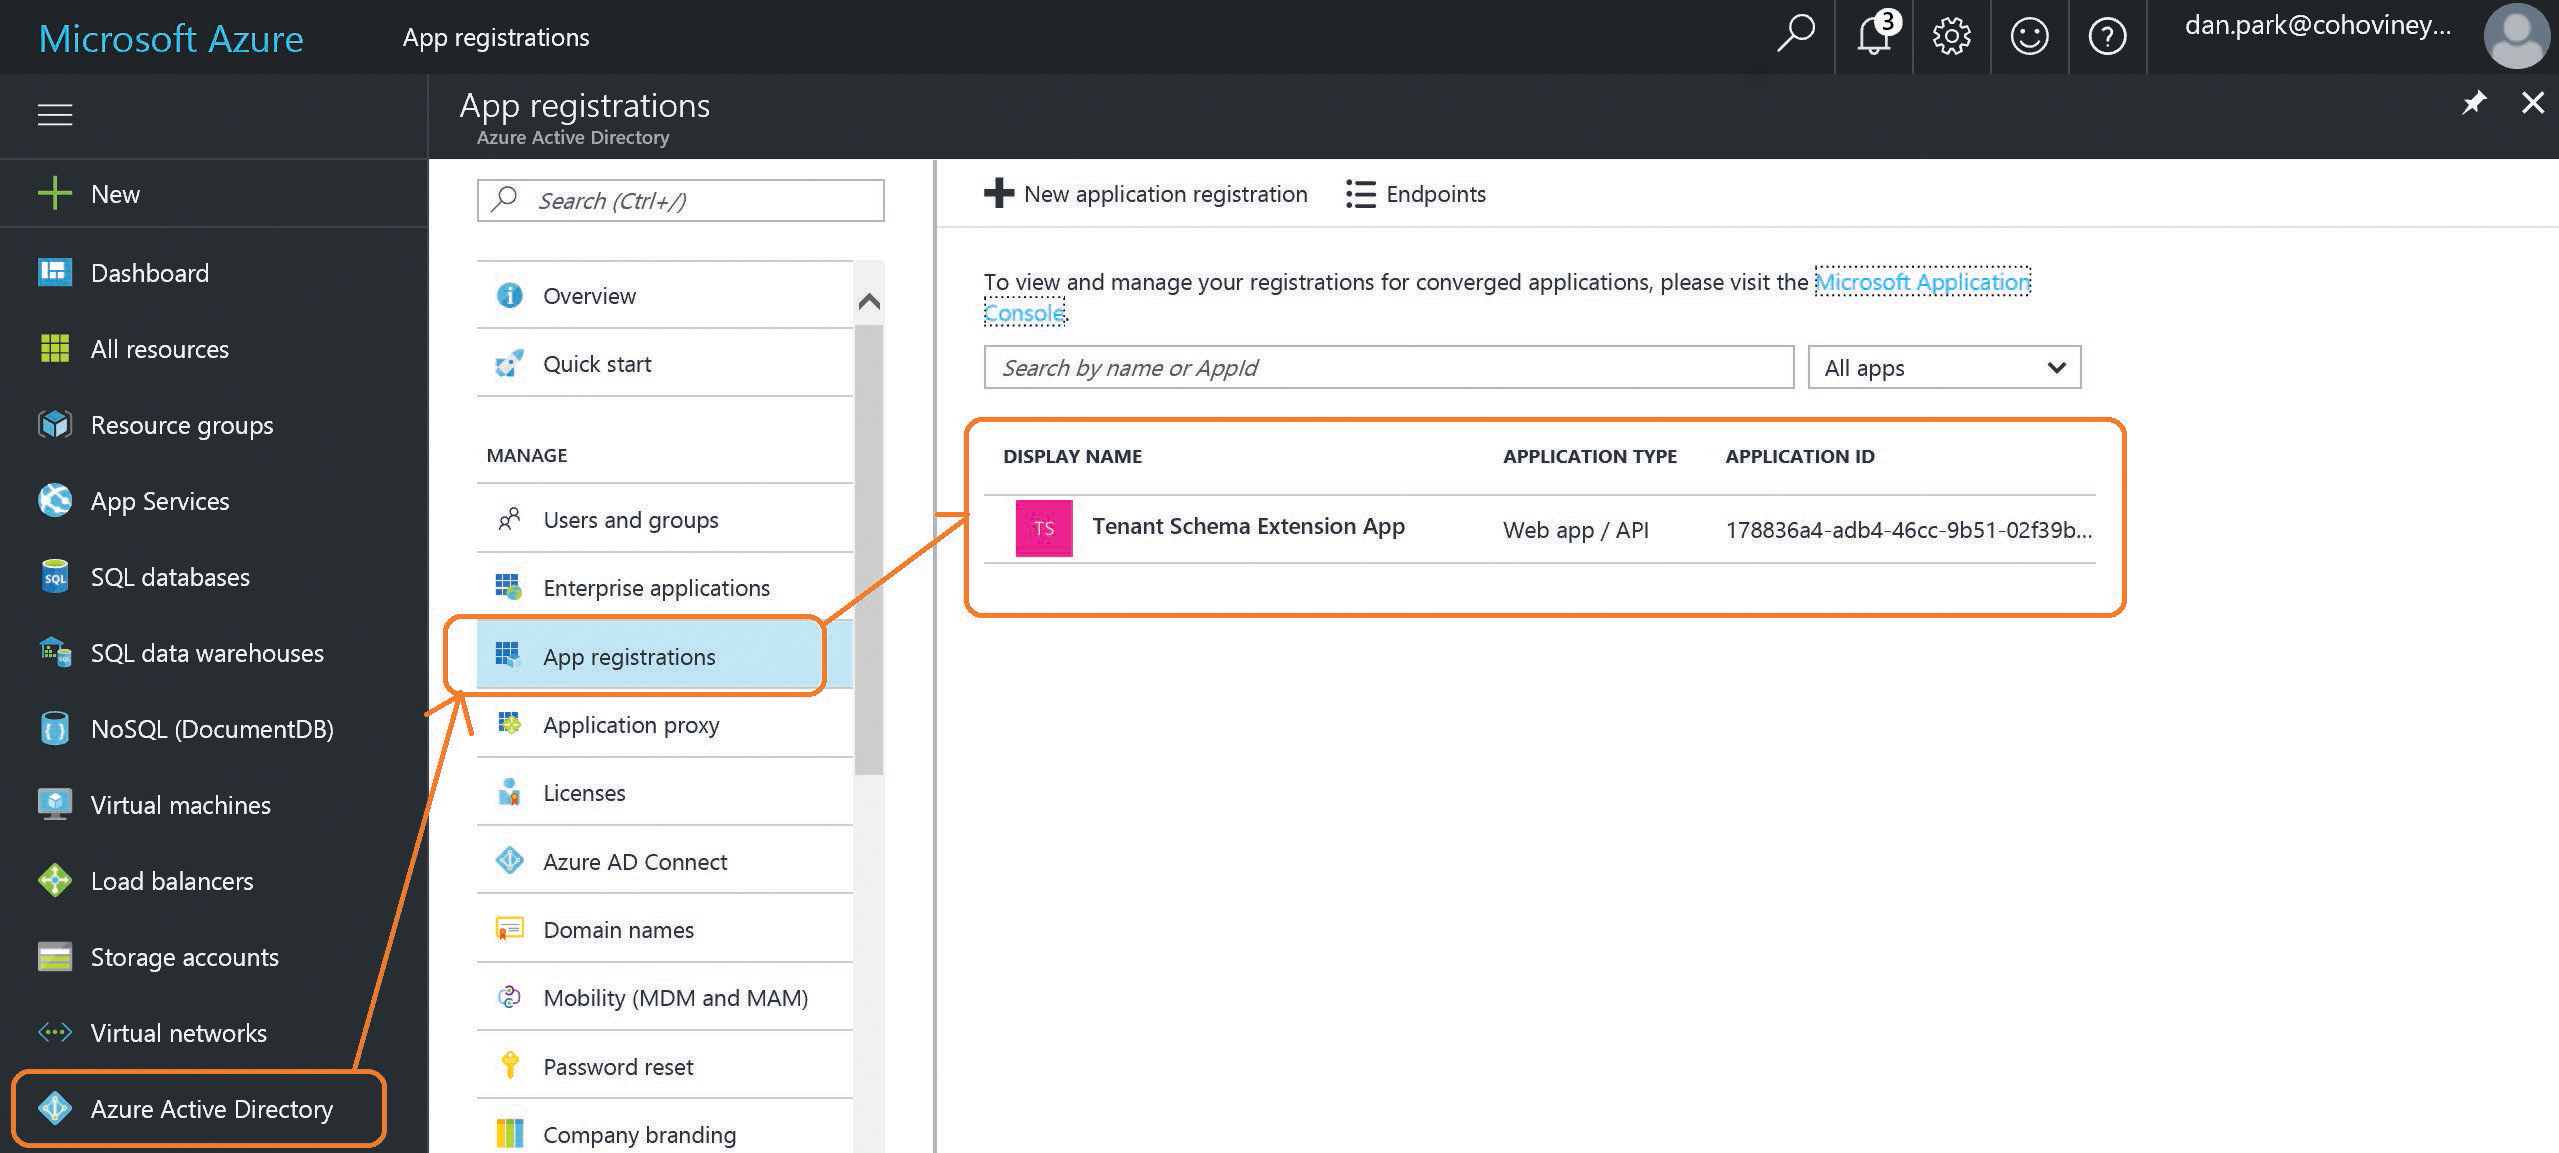
Figure 5-62 Azure AD application for the directory extension sync
It’s important to note the application ID for the new tenant schema extension app; it is used in the naming for all custom schema attributes created in Azure AD. A GraphAPI view of the new attributes synchronized for the user is shown in Figure 5-63. The attributes are in the Extension_ApplicationID_On-PremAttributeName format.
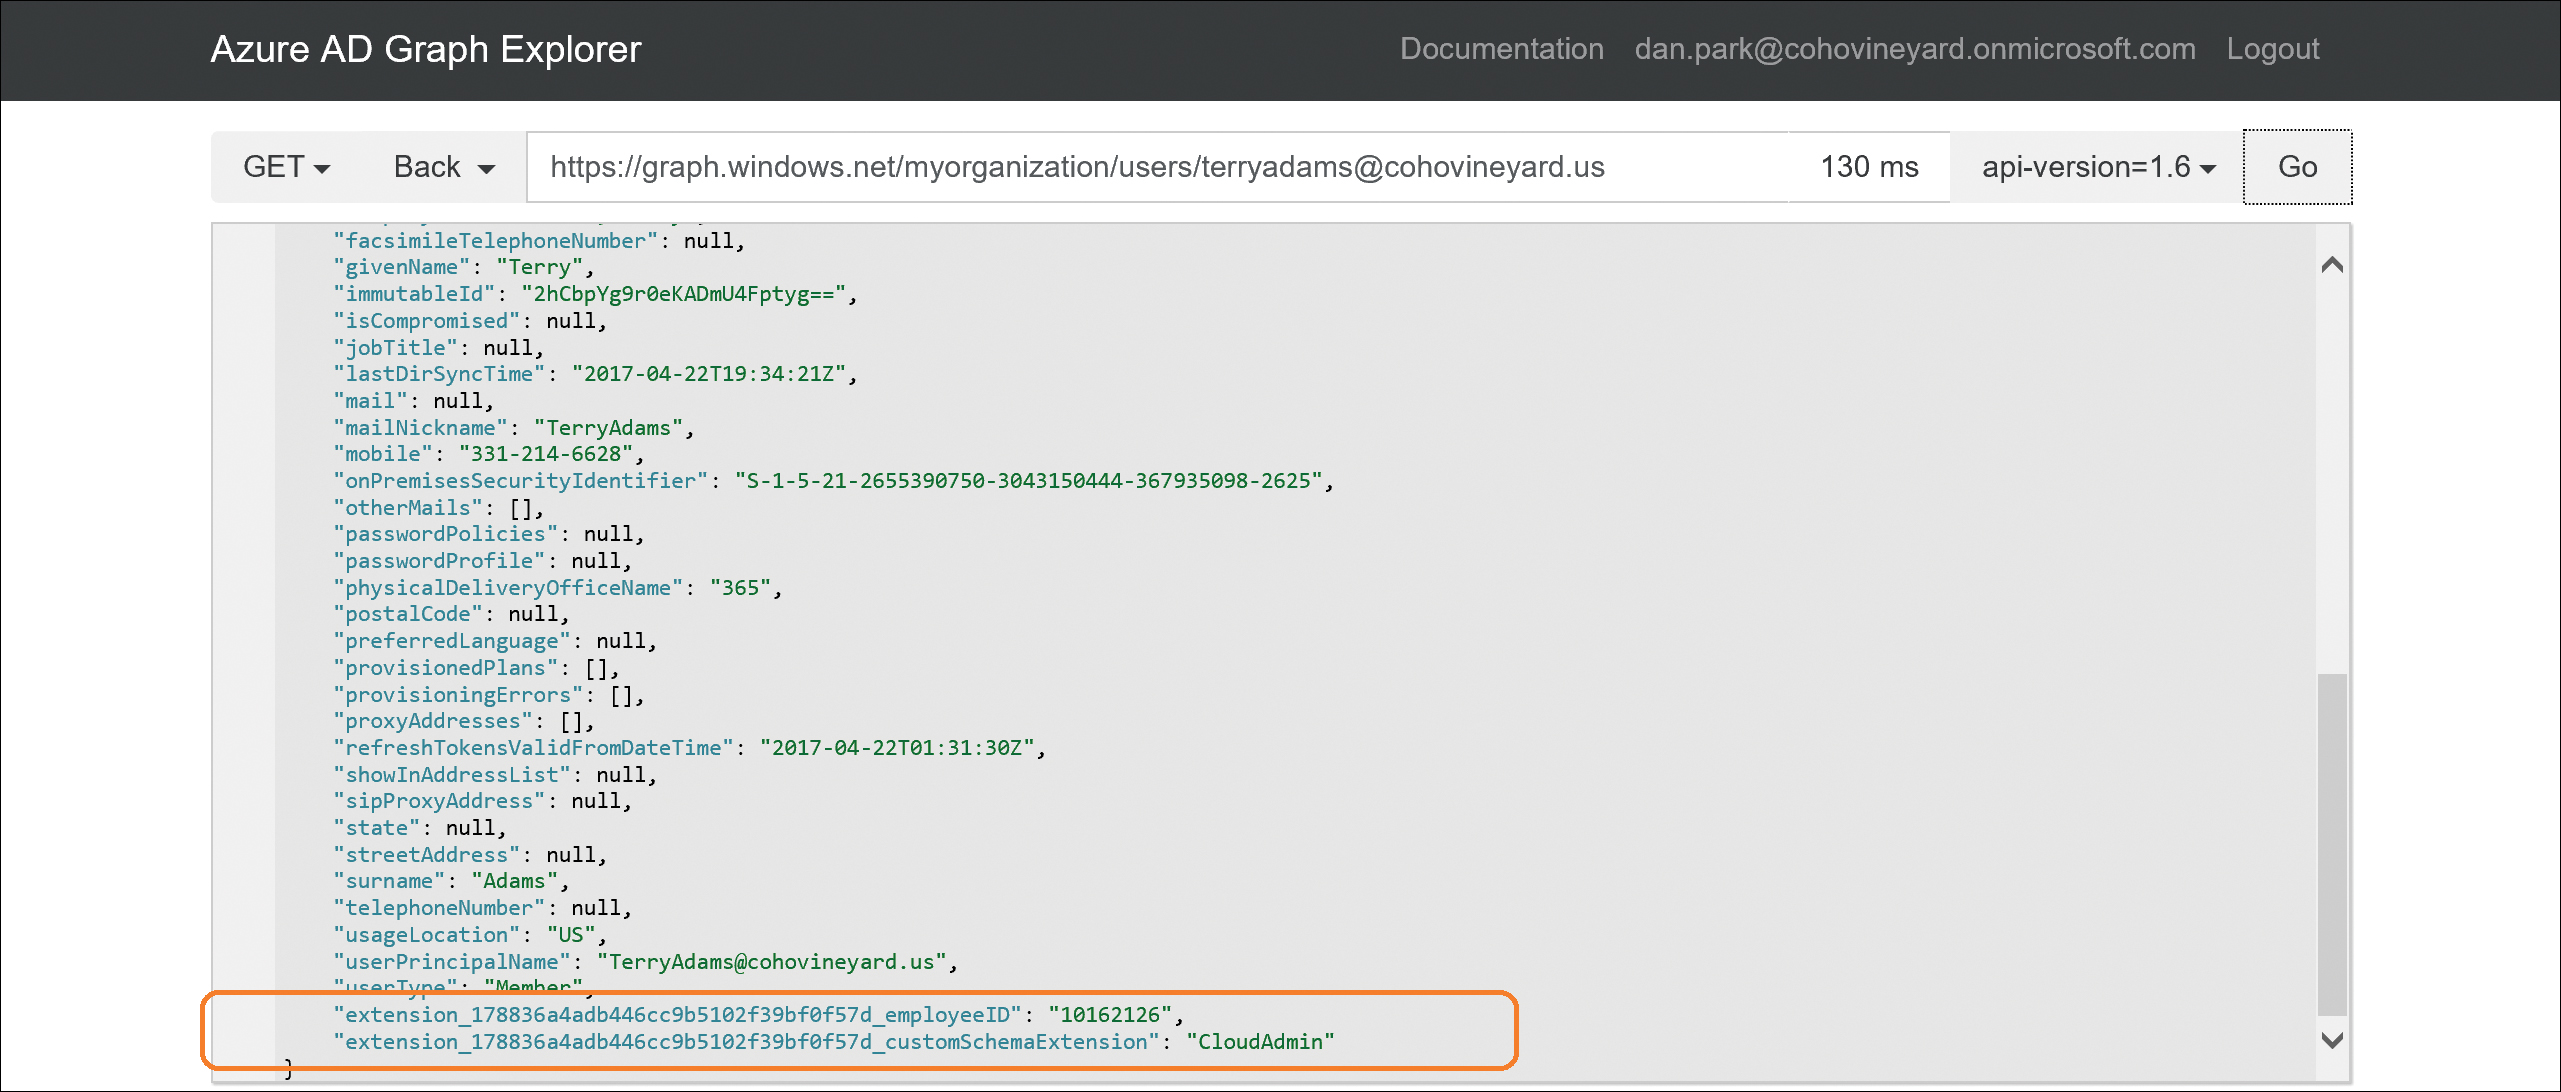
Figure 5-63 GraphExplorer view of custom attribute sync values
Finalizing the installation
After you have completed the Optional Features selections, clicking Next presents the Ready To Configure page, shown in Figure 5-64, which provides a summary of the selections you made in the installation wizard and two final options before proceeding with the installation.

Figure 5-64 Ready To Configure page
The Start The Synchronization Process When Configuration Completes check box tells the AAD Connect installation wizard to start the synchronization process automatically as soon as the installation completes.
Leave this box clear if you plan to edit synchronization rules, add additional rules, enable device writeback, or make any other changes that might require you to run the AAD Connect Wizard on the desktop.
Finally, the Enable Staging Mode check box enables you to put the AAD Connect server in read-only mode.
If you are installing your first AAD Connect server in the enterprise but wish to make changes, or if you simply aren’t ready to start exporting users and groups to Azure, you can enable staging mode. Staging mode enables the server to read from Active Directory and apply synchronization rules to your objects, but nothing will be exported to Azure AD. This enables you to review the results of your configuration and make changes without ever exporting to Office 365.
More information about staging appears at the end of this chapter.
Configuration complete
After the AAD Connect installation completes, the installation wizard presents a summary screen that displays the status of the installation as well as any warnings about the environment, along with synchronization status. See Figure 5-65.
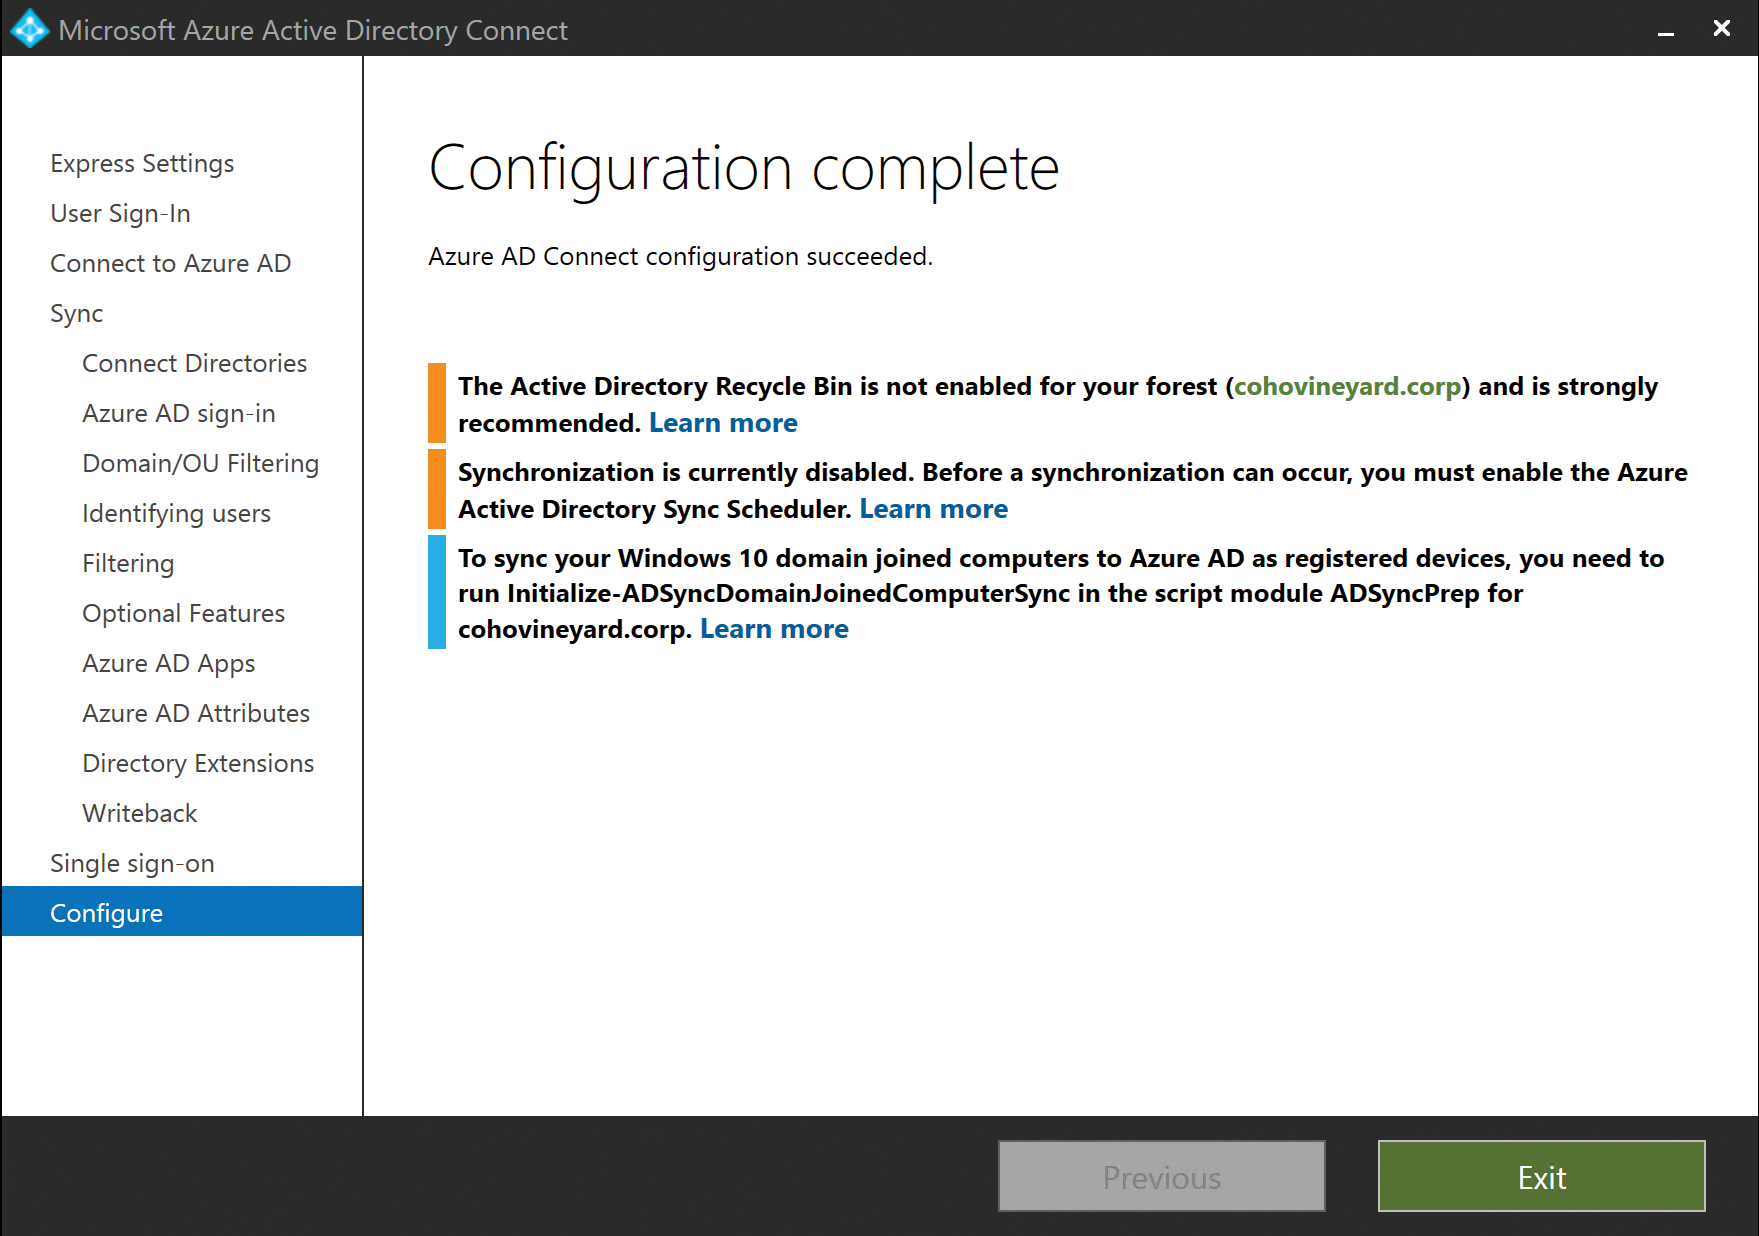
Figure 5-65 Configuration Complete page
Review all notifications and warnings the installer displays and take any additional action if required.
If synchronization was disabled (the check box was left cleared) on the final installation screen, you are reminded to re-enable the scheduler before synchronization will occur.
It is now safe to click Exit.
Precedence, and why it matters
Precedence is defined as priority in importance, order, or rank, and this definition, when referring to directories or synchronization rules in AAD Connect, could not be more relevant.
Ordering of the Active Directory forests when performing a multi-forest installation of AAD Connect is critical to the precedence of values as they are synchronized. However, even in a single-forest configuration, precedence could be a concern if configuration changes are planned after deployment.
Although it might not be obvious during the installation of the tool, the resulting synchronization rules dictate the value synchronized to Azure AD for each object, so it’s important to understand precedence and its impact on the configuration.
Each object that falls within the scope of the AAD Connect implementation, through organizational unit membership or even group filtering, is subject to the precedence order of the synchronization rules that the AAD Connect installer created based on selections you made through the setup wizard.
Synchronization rules, as shown in Figure 5-66, are ordered first by direction (inbound vs. outbound), second by object type, and finally by order of importance, or precedence.
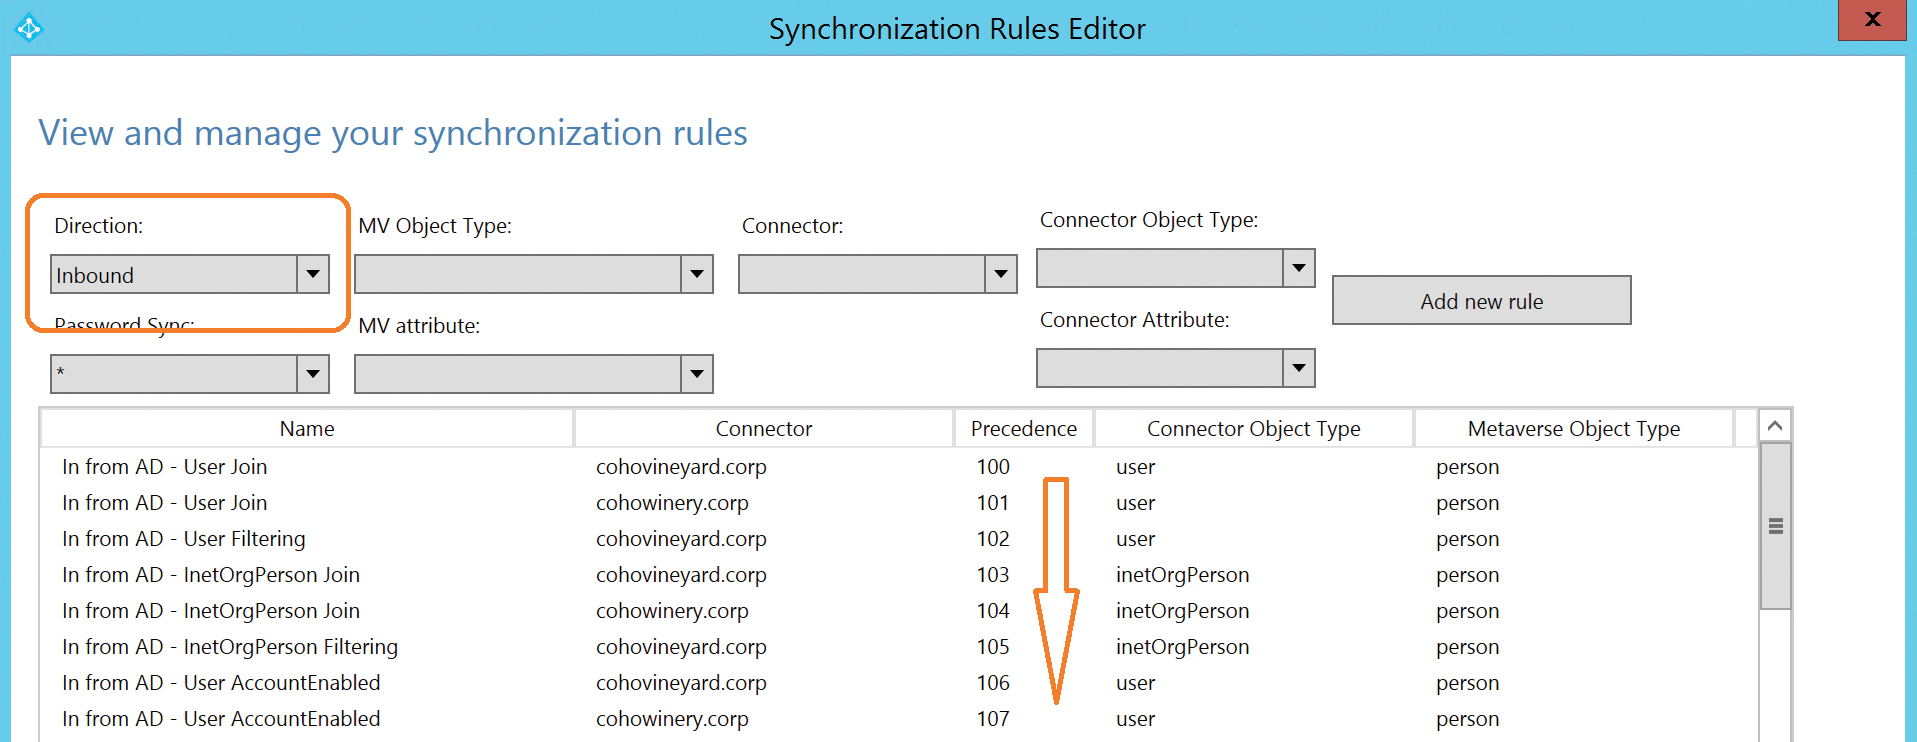
Figure 5-66 Precedence of synchronization rules
Each rule is assigned a precedence value, typically starting from 100 and increasing in value as order of importance decreases. As a result, the lower the numerical value of a rule, the higher its precedence.
When a new object enters the scope of the AAD Connect sync, each rule is applied to the object, based on its object type, visible in the Connector Object Type column, starting at the top of the precedence list and working downward.
Some rules might not apply to an object, depending on their purpose. For example, an Exchange synchronization rule will not apply to an object that is not mail-enabled.
The rules that are applied to an object can be found at the bottom of the preview pane for a user (discussed in Chapter 4, “Directory Synchronization Basics”), and the rule that contributed each attribute is visible in the Sync Rule column, as shown in Figure 5-67.
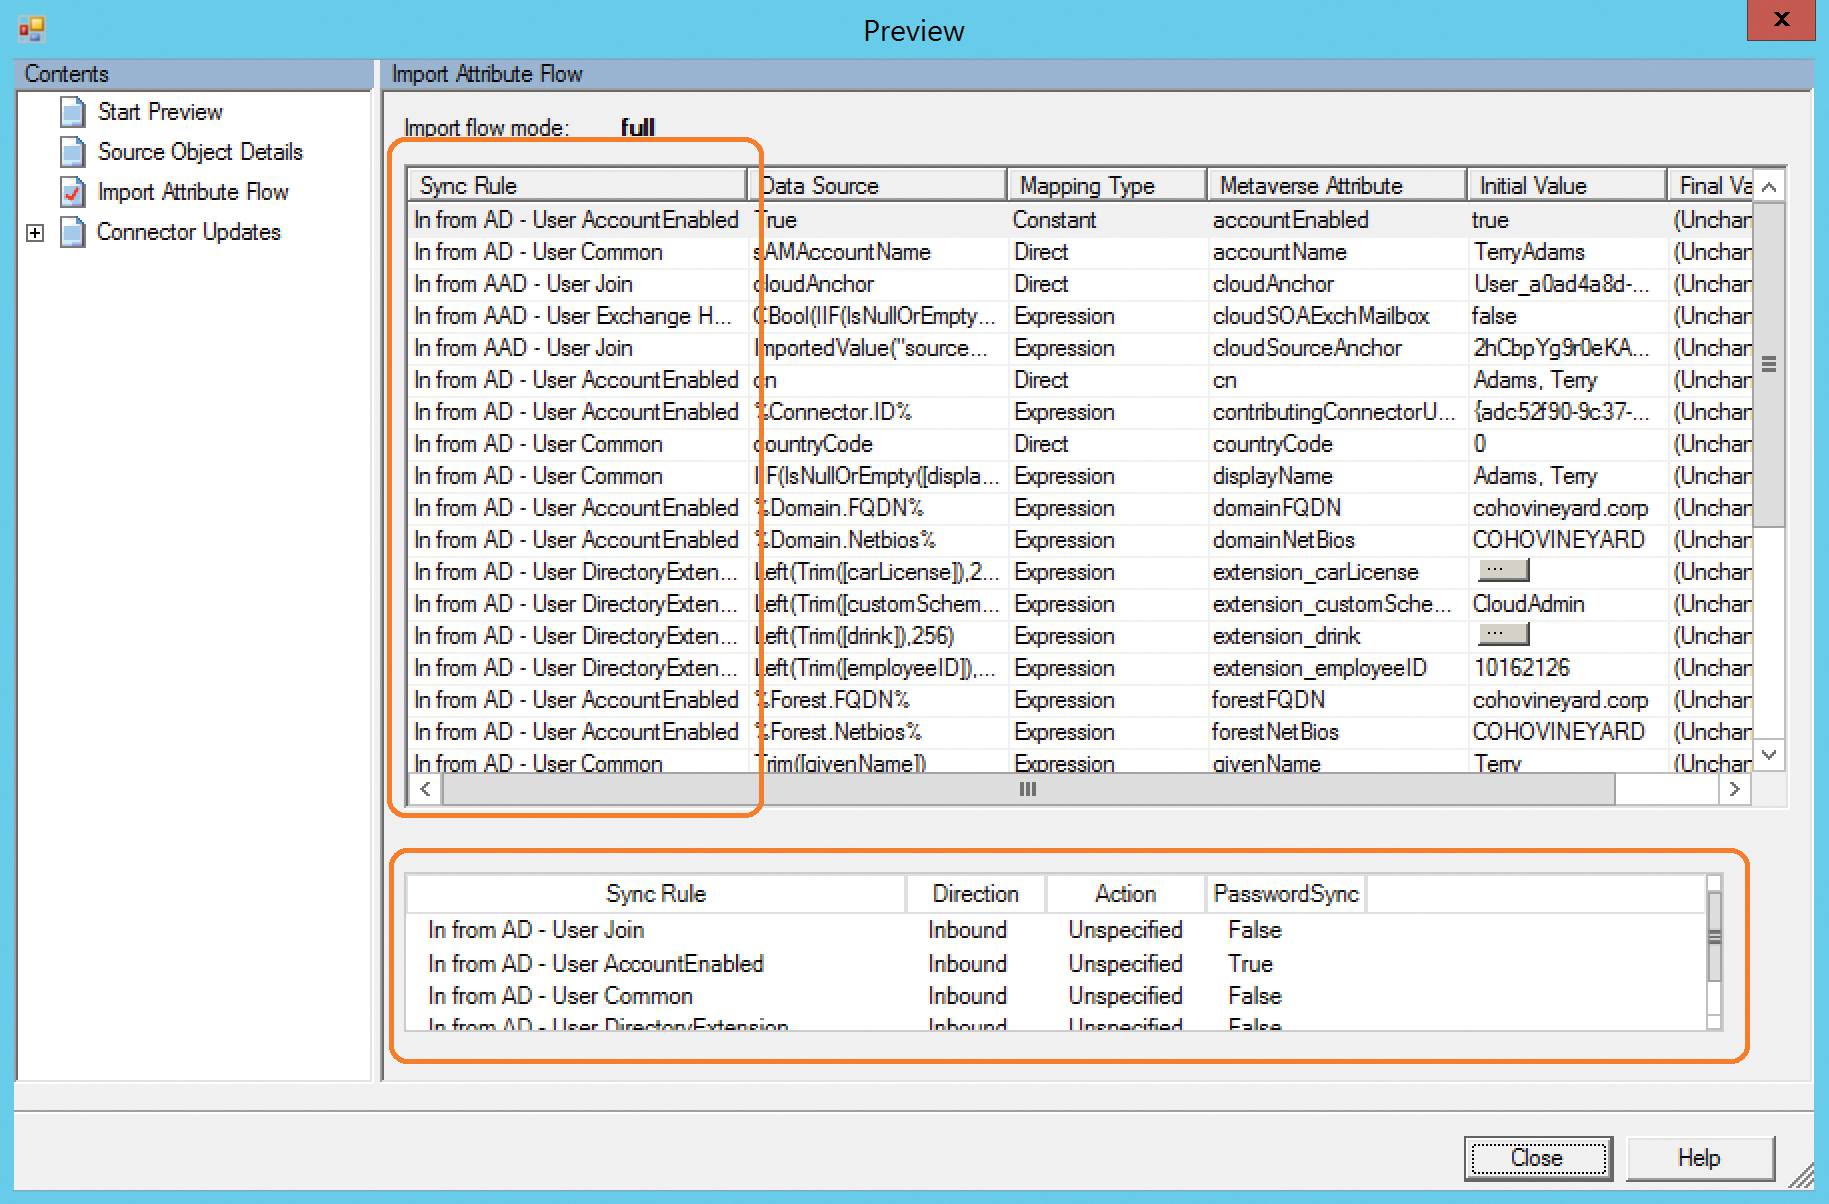
Figure 5-67 Preview dialog box showing synchronization rules
In Figure 5-68, you can see that the value for AccountEnabled, visible in the Metaverse Attribute column, is set to True and was set in the In From AD – User AccountEnabled rule.
The In From AD – User AccountEnabled rule has a precedence value of 106, so if you wanted to create a new rule that forced the value of AccountEnabled to False, your new rule would need a precedence that is higher (that is, numerically lower) than rule number 106, as shown in Figure 5-68.
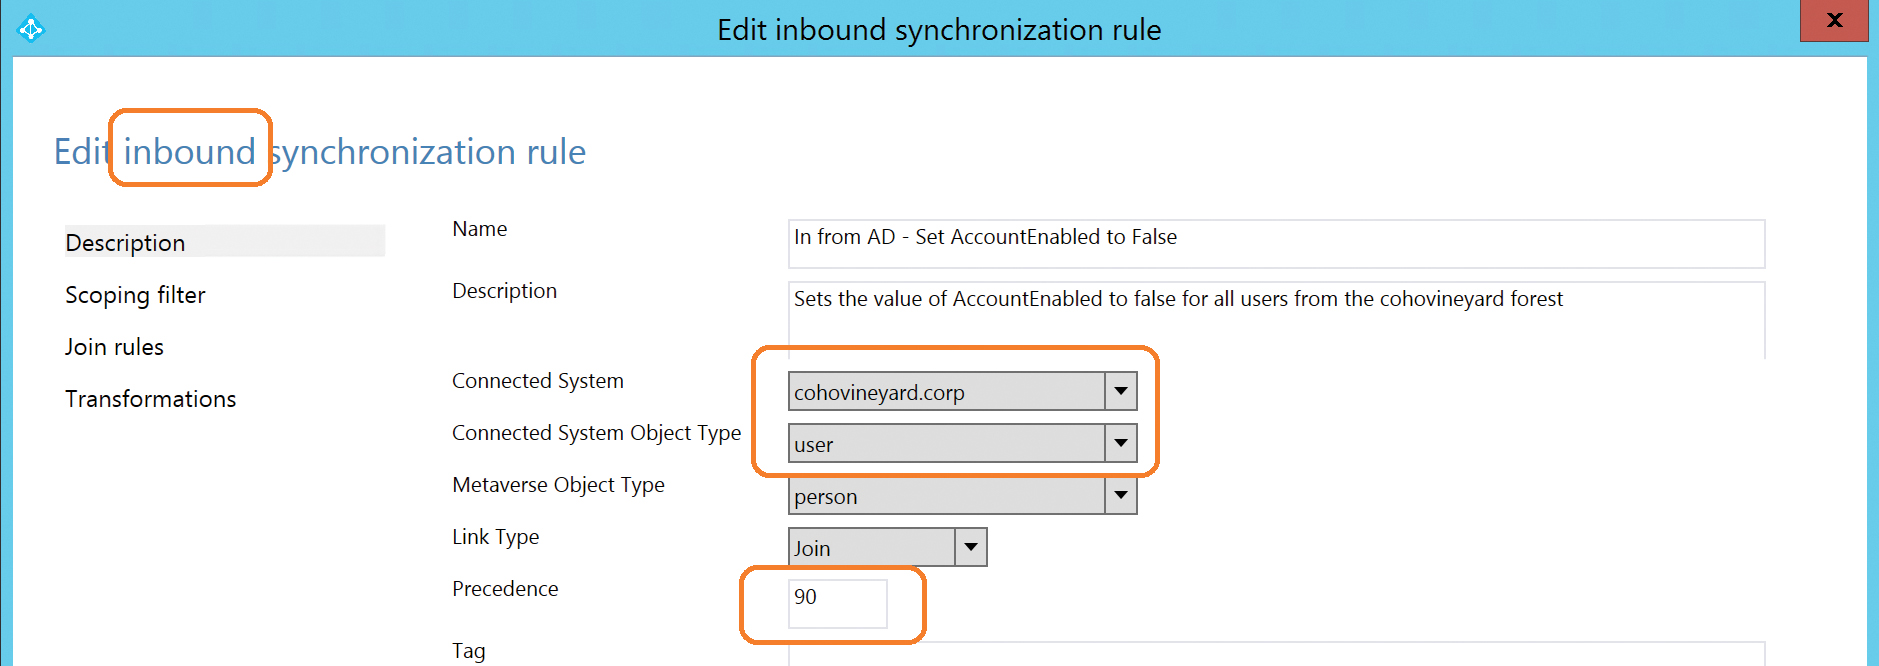
Figure 5-68 New Inbound Sync rule with higher precedence
The new synchronization rule is an Inbound rule, as appears in the top left corner, and it is configured to apply to User objects from the CohoVineyard.corp forest, with a precedence value of 90.
This means that the AccountEnabled value (not shown here but configured on the Transformations page) will be set to False when you resynchronize your user account as shown in Figure 5-69.
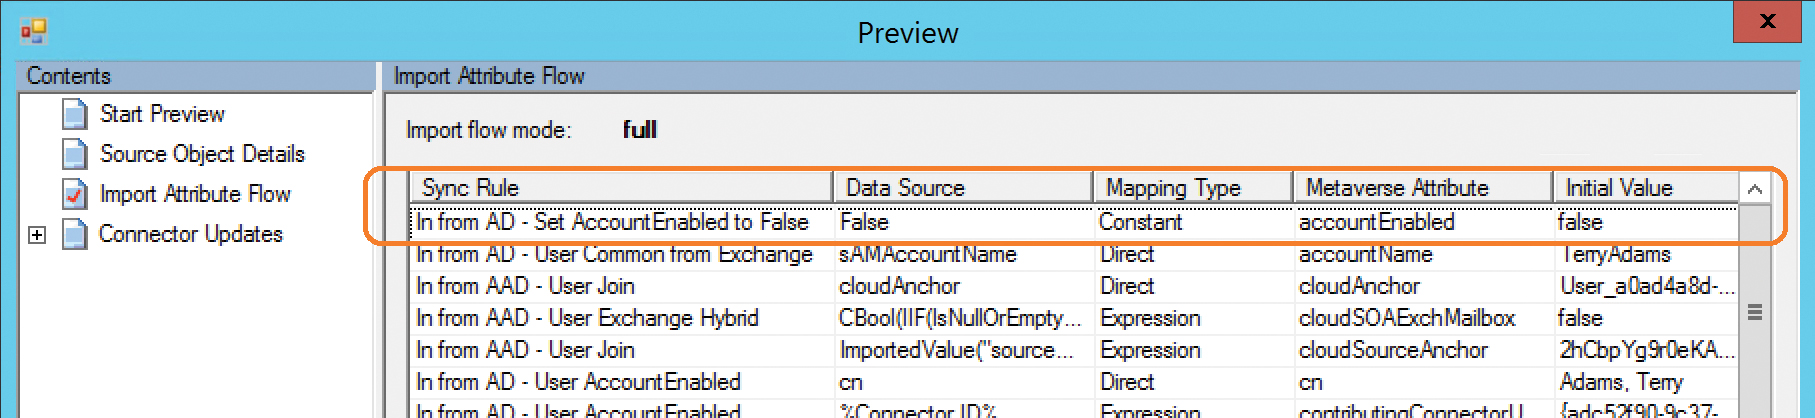
Figure 5-69 AccountEnabled value changed to False
Synchronization rule precedence can be used to change one or more attribute values for objects by creating new synchronization rules or customizing the rules the AAD Connect installation wizard created. However, it is even more important to understand the ordering of synchronization rules in a multi-forest configuration where objects are configured to join on attributes such as Mail, because the order in which the forests were added to the AAD Connect Wizard affects the resulting objects synchronized to Azure AD.
In Figure 5-70, two Active Directory forests are configured to synchronize to Azure. Each forest is enabled for Exchange and contains a combination of mail users and mailboxes; a join on the Mail attribute was selected in the AAD Connect installation wizard.
If you compare the precedence value of the In From AD – User Join rules, you can see that the CohoVineyard.corp forest was added first in the installation wizard, because it has a precedence value that is higher (that is, numerically lower) than the precedence value for the CohoWinery.corp forest.
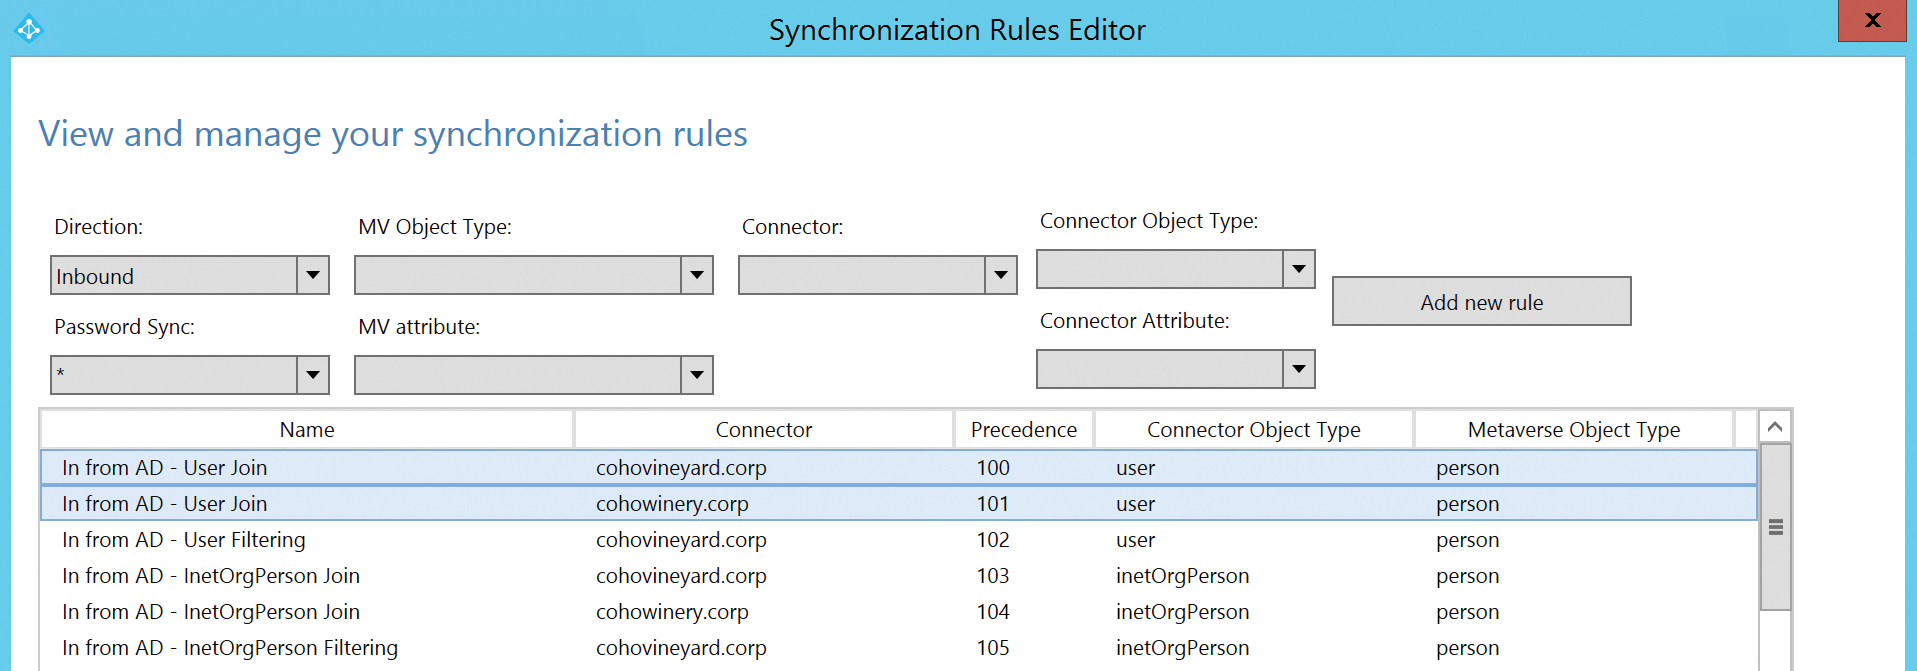
Figure 5-70 The In From AD – User Join rules for two forests
When you can recognize the precedence order the synchronization engine uses to process objects, you can quickly identify where problems might occur. It is best to understand this rule-ordering process prior to installation; however, in some cases, you might inherit an existing installation of AAD Connect and do not have the luxury of re-installation.
Under those circumstances, it might be necessary to clone existing rules to change the behavior of the synchronization rules or create new rules to force an alternate precedence configuration.
In Figure 5-71, two objects are joining on the Mail value to create a single object that will be synchronized to Office 365. A mailbox from the CohoWinery.corp forest joins with a mail user from the CohoVineyard.corp forest.

Figure 5-71 Metaverse object properties for a joined user
In the Contributing MA column, all the attributes for the user are coming from the CohoVineyard.corp forest except for the msExchMailboxGUID value, which comes from the CohoWinery.corp forest. This is because the CohoVineyard.corp forest is the precedent forest, its In From AD – User Join rule has a value of 100, and it is therefore higher in precedence than CohoWinery.corp for all values.
The only reason msExchMailboxGUID is coming from the CohoWinery.corp forest is because the CohoVineyard.corp object is a mail user and has no msExchMailboxGUID in CohoVineyard.corp.
In this example, provided that the properties for values from CohoVineyard.corp were the values expected in Azure AD, nothing further would be needed. The synchronization process would flow the object to Office 365 as a mail user, the object type in the precedent forest, and the msExchMailboxGUID attribute would be ignored.
If, however, there were values that should be precedent from the CohoWinery.corp forest, it would be necessary to make changes to the synchronization rules so that those values were precedent.
Two methods are available for achieving this goal.
- Clone the synchronization rule(s) that flow those attributes as a higher precedence (lower numeric value).
- Create a new inbound synchronization rule with a higher precedence for the attributes in question.
In this example, you would select the second option because you are only concerned with the Title and Department values.
First, create a new inbound synchronization rule with a precedence higher than 100 for user objects from the CohoWinery.corp forest. See Figure 5-72.
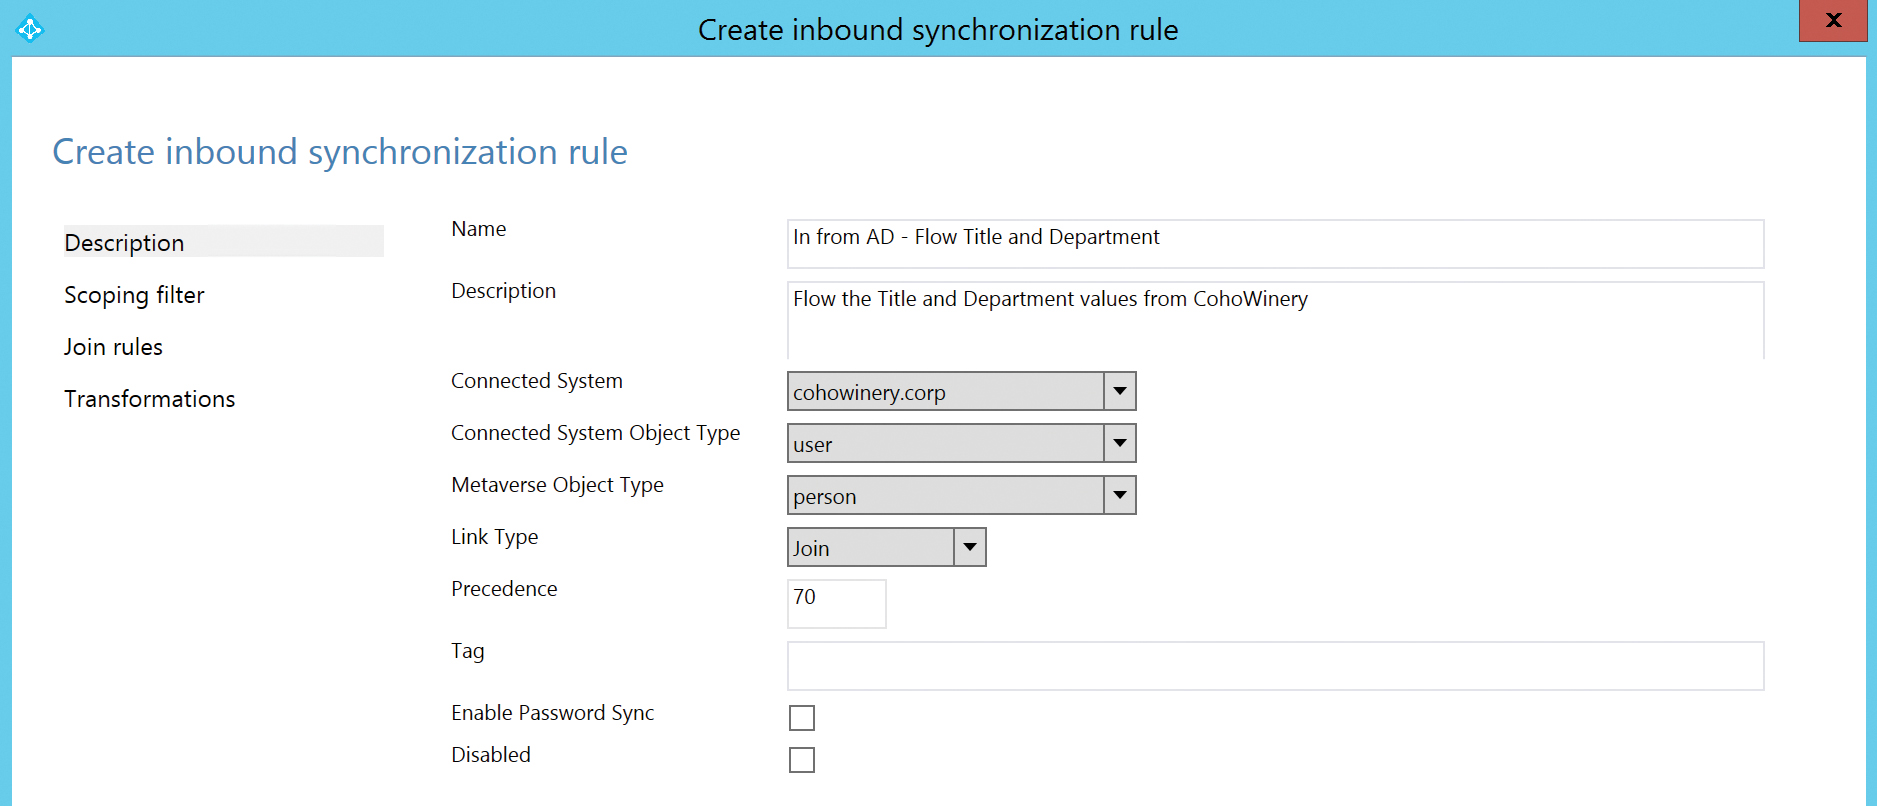
Figure 5-72 Creation of a new synchronization rule for Title and Department
Add the attribute transformations for the Title and Department values, as shown in Figure 5-73.
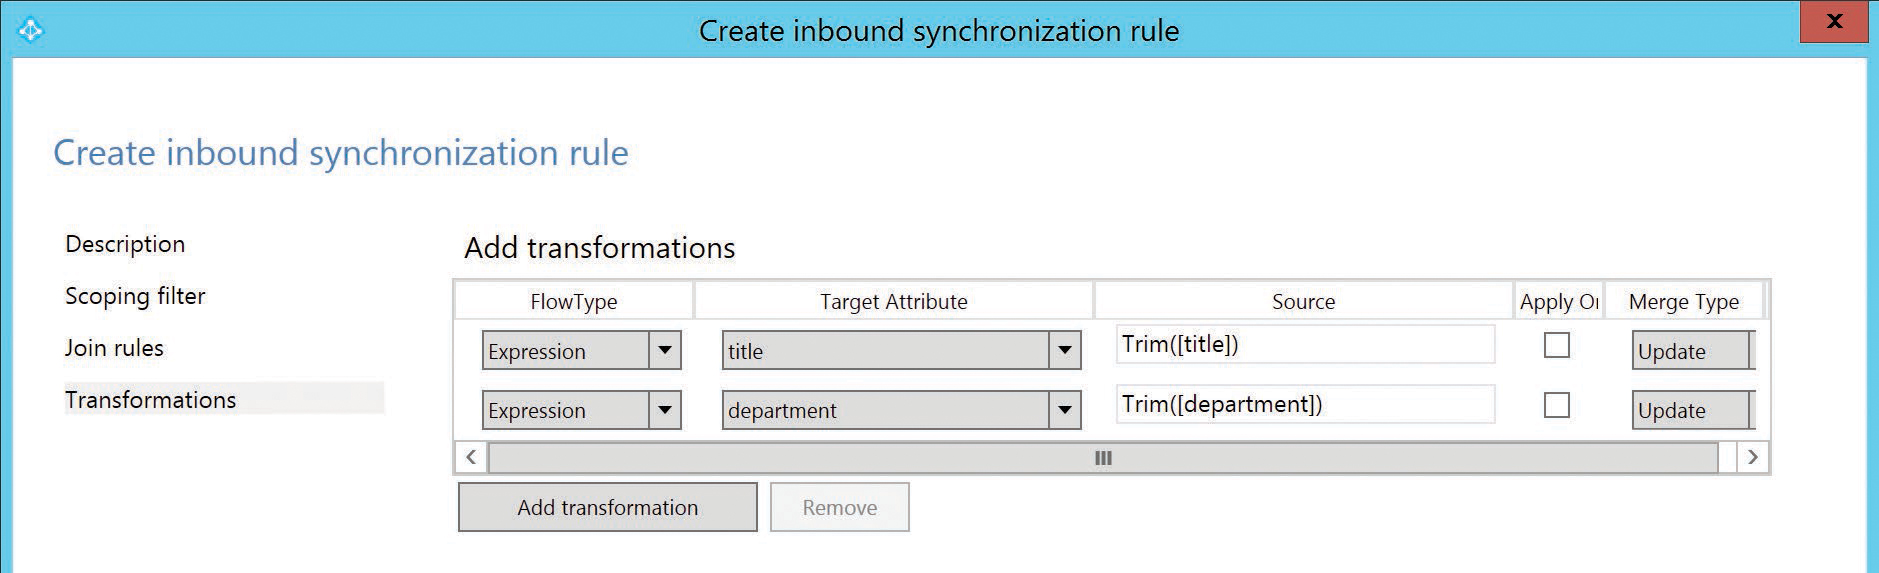
Figure 5-73 Transformations for Title and Department attributes
Note that the attribute transformations are not direct flows, but are instead expressions, primarily because the AAD Connect tool takes certain precautions to help ensure that the data synchronized to Azure AD is free from formatting errors.
In the case of the Title and Department values, the Trim() function eliminates any leading or trailing white space.
In addition, you would not need to create the expressions used in this rule. Instead, you would search the synchronization rules for the rule that would ordinarily flow those two values (that is, In From AD – User Common) and copy the existing transformation expression to your new rule.
Searching the synchronization rules is simply a matter of using the drop-down lists at the top of the Synchronization Rules Editor. Selecting the connector, object type (for instance, User), and attribute (that is, Title) drop-down lists causes the editor to filter all rules that do not meet those criteria. You can then edit these rules and review the transformation for the attribute in question and duplicate that transformation in your new rule. See Figure 5-74.

Figure 5-74 Filtering in the Synchronization Rules Editor
After the new synchronization rule has been saved, re-synchronization of the user object shows that the values being synchronized to Azure AD for Title and Department are now coming from the CohoWinery.corp forest through the new synchronization rule that was created, as shown in Figure 5-75.
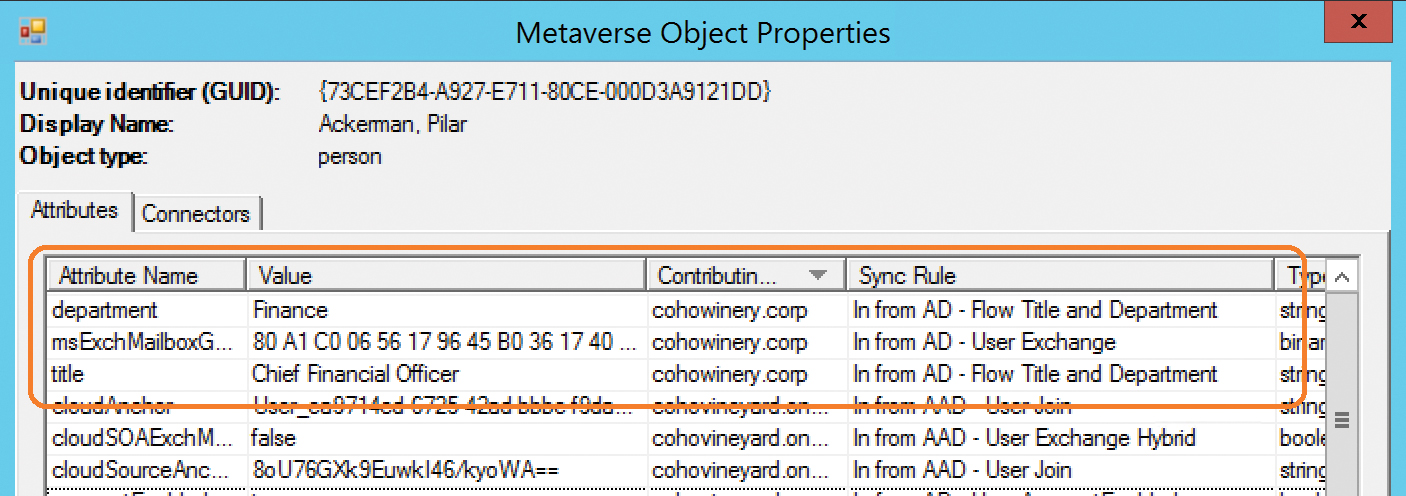
Figure 5-75 Attribute values flowing from the CohoWinery forest
Although it is possible to make precedence changes by cloning rules or creating new rules, depending on the number of customizations, it might ultimately make more sense to uninstall and reinstall the AAD Connect tool because it will keep the number of customizations to a minimum and simplify the configuration.
Should you synchronize now?
If you enabled staging mode at the end of the installation wizard, you can safely start the AAD Connect scheduler. The tool begins reading objects from your directories, applying synchronization rules and staging exports to Azure AD. This process continues every 30 minutes, but nothing is exported until you are ready.
This is the beauty of staging mode. It gives you the opportunity to review your configuration, especially if you are not completely sure that all your selections are correct or you are aware of unique configurations in your environment, but you are not sure what the tool will do with your data and how those objects will sync to Azure—all without writing any data to the cloud or making any changes to your environment!
Now take your time, review as many objects as possible and consider the following scenarios.
- Do you have data that should not leave your on-premises Active Directory (such as that EmployeeID is the user’s Social Security number)? If so, either remove that data from your environment or use the Azure App And Attribute filtering option in the AAD Connect Wizard to remove the attribute from the configuration.
- Do you have objects that should be synchronized to Azure but are not being staged for export? Confirm that you have selected the correct OUs and, if necessary, run the AAD Connect Wizard and use domain/OU filtering to include the missing OUs.
- Do you have too many objects staged for export to Azure? Confirm that you have selected the correct OUs or use group membership filtering to reduce the object count. Depending on your directory hierarchy, it might be necessary to create additional synchronization rules to filter these objects in other ways.
- Are you joining user objects across forests properly? Take careful note of the attributes flowing to Azure when joining object types between your forests. It might be necessary to use the sync rule editor to change precedence for one or more synchronization rules or create your own.
It’s often said that nothing shines the light of day on your directory data like synchronizing it to Azure. Conditions that are possible in on-premises Active Directory, such as duplicate values for attributes such as Mail, are not allowed in Azure AD, and the AAD Connect tool flags these conditions as errors during the export process.
Remember that after you start synchronizing objects to Azure AD, it becomes increasingly difficult to make changes to the configuration, especially if there are changes to the SourceAnchor value, and data cleanup is critical to get your data to the cloud.
Starting synchronization
Now that you’ve reviewed your configuration thoroughly and tested as many of your objects as possible, you’re ready to start exporting your data to the cloud.
- If you enabled staging mode, disable it by using the AAD Connect Wizard on the desktop.
- Launch the AAD Connect Wizard and select Configure on the welcome screen.
Several options appear.
- Select Configure Staging Mode and click Next, as shown in Figure 5-76.
Figure 5-76 Configuring staging mode
- Type credentials for a global administrator in the tenant and click Next.
These credentials are not stored in the configuration; they are used simply to ensure that you have the proper privileges to enable synchronization of objects to your Azure AD tenant.
- Clear the check mark from the Enable Staging Mode check box shown in Figure 5-77 and click Next.
Figure 5-77 Configure Staging Mode page
The Ready To Configure page appears, with the option to start the synchronization immediately, as shown in Figure 5-78.
Figure 5-78 Ready To Configure staging mode page
- Click Configure to complete the change.
If you selected Start the Synchronization Process, the synchronization starts immediately, and objects begin exporting to your Office 365 tenant. No further action is required.
If, however, you did not immediately enable synchronization but are ready to do so sometime later, you can start the synchronization process by using Windows PowerShell.
- Open an administrative Windows PowerShell prompt and issue the following command.
Start-ADSyncSyncCycle
This starts the synchronization process immediately; however, it executes only one time, leaving the scheduled sync cycle disabled.
During initial population of the Azure AD tenant, this single export to Azure helps identify any issues with data, in the form of export errors, but allows you time to review and correct the data before a second synchronization cycle occurs.
- When you are ready to enable the regular 30-minute sync cycle, enter the following Windows PowerShell command.
Set-ADSyncScheduler -SyncCycleEnabled $True
This enables the scheduler for a regular 30-minute synchronization interval.
- If at any time, you want to view the status of the scheduler, you can use the following command.
Get-ADSyncScheduler
- Finally, if you want to disable the scheduler again, you can enter this command.
Set-ADSyncScheduler -SyncCycleEnabled $False
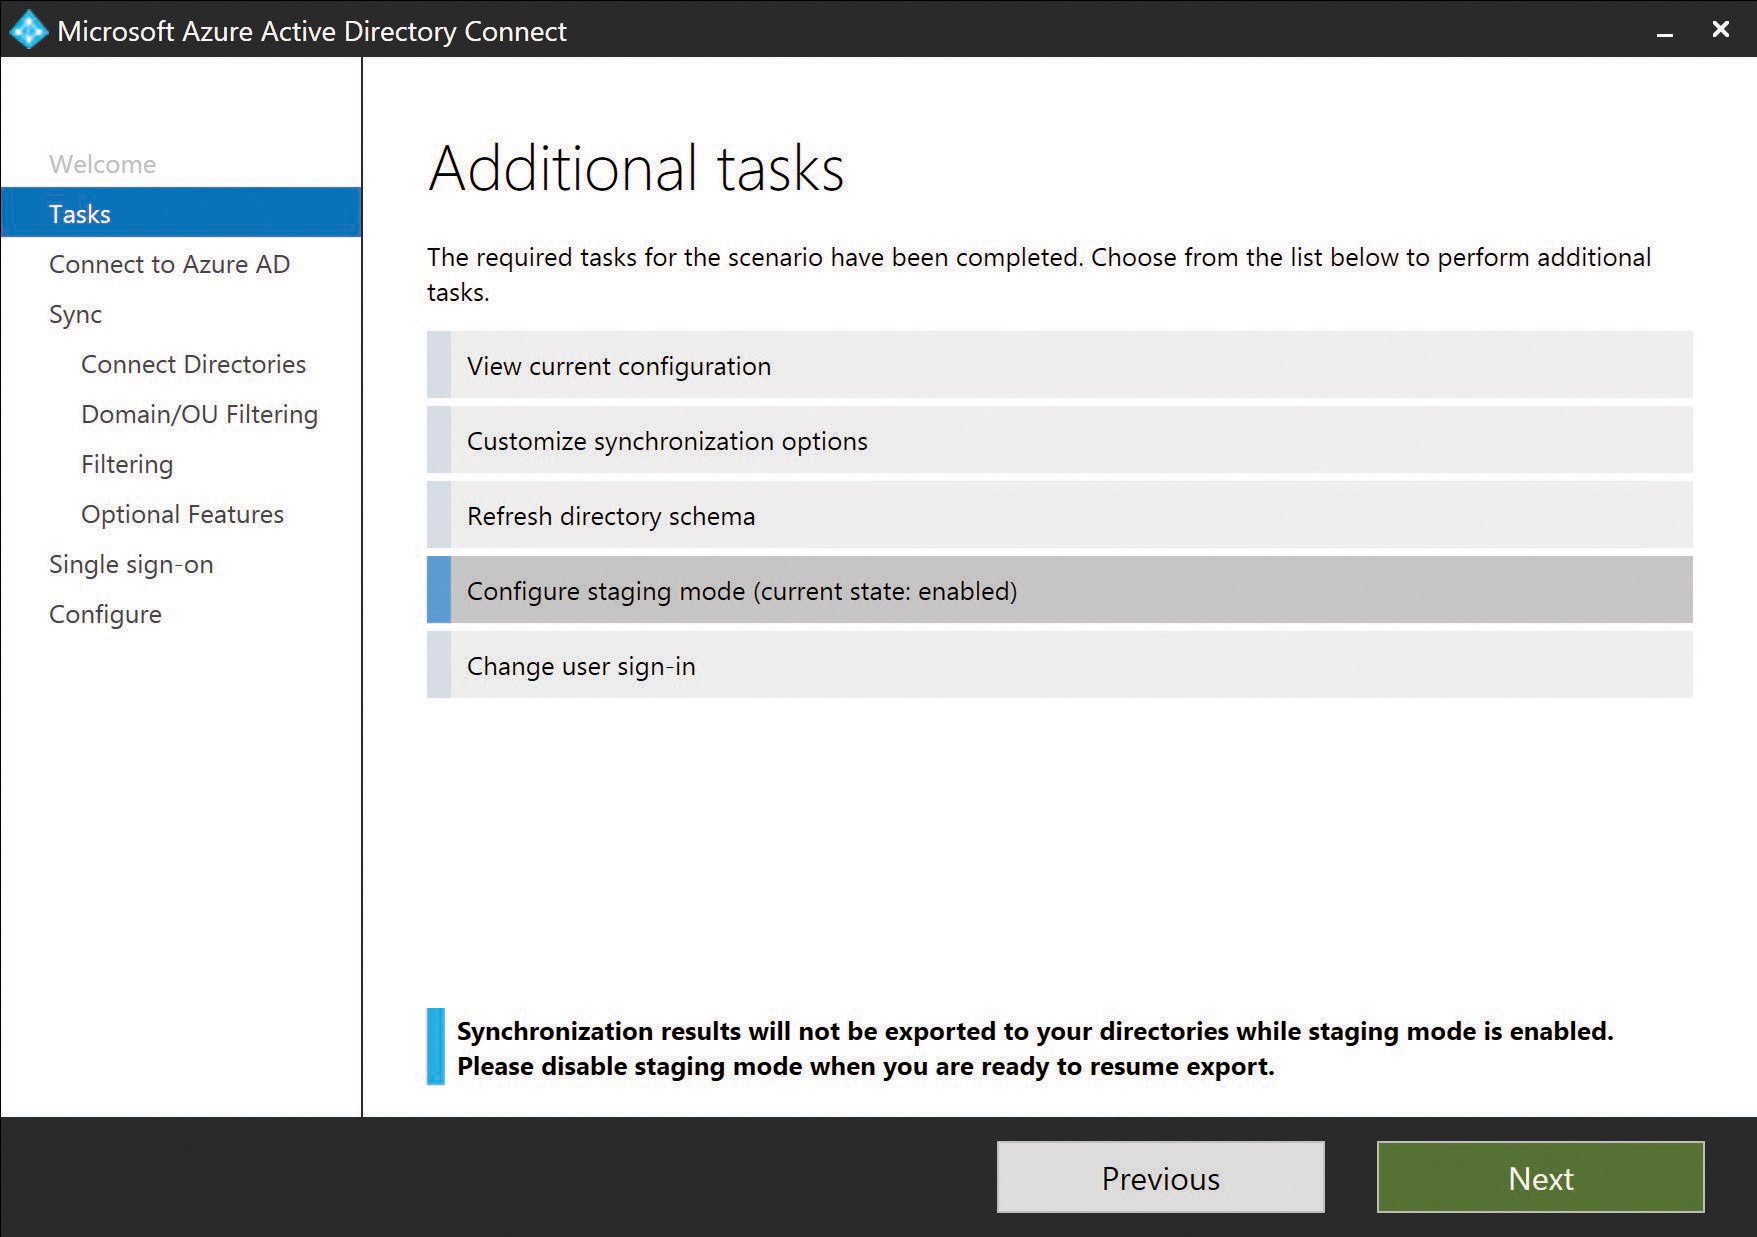
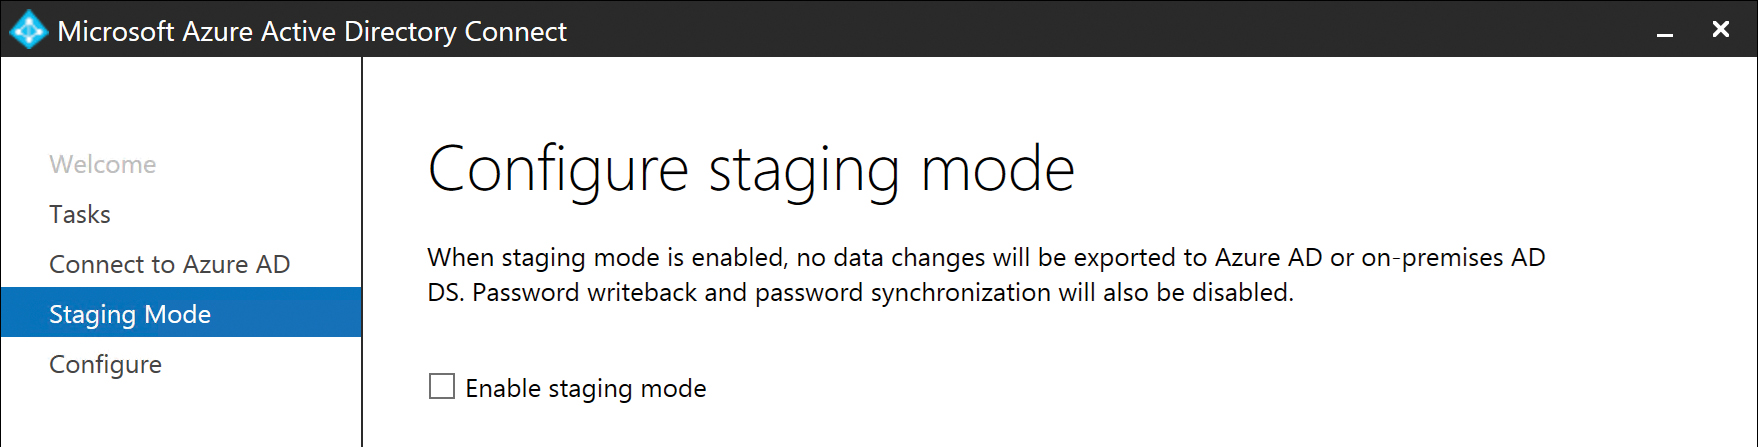
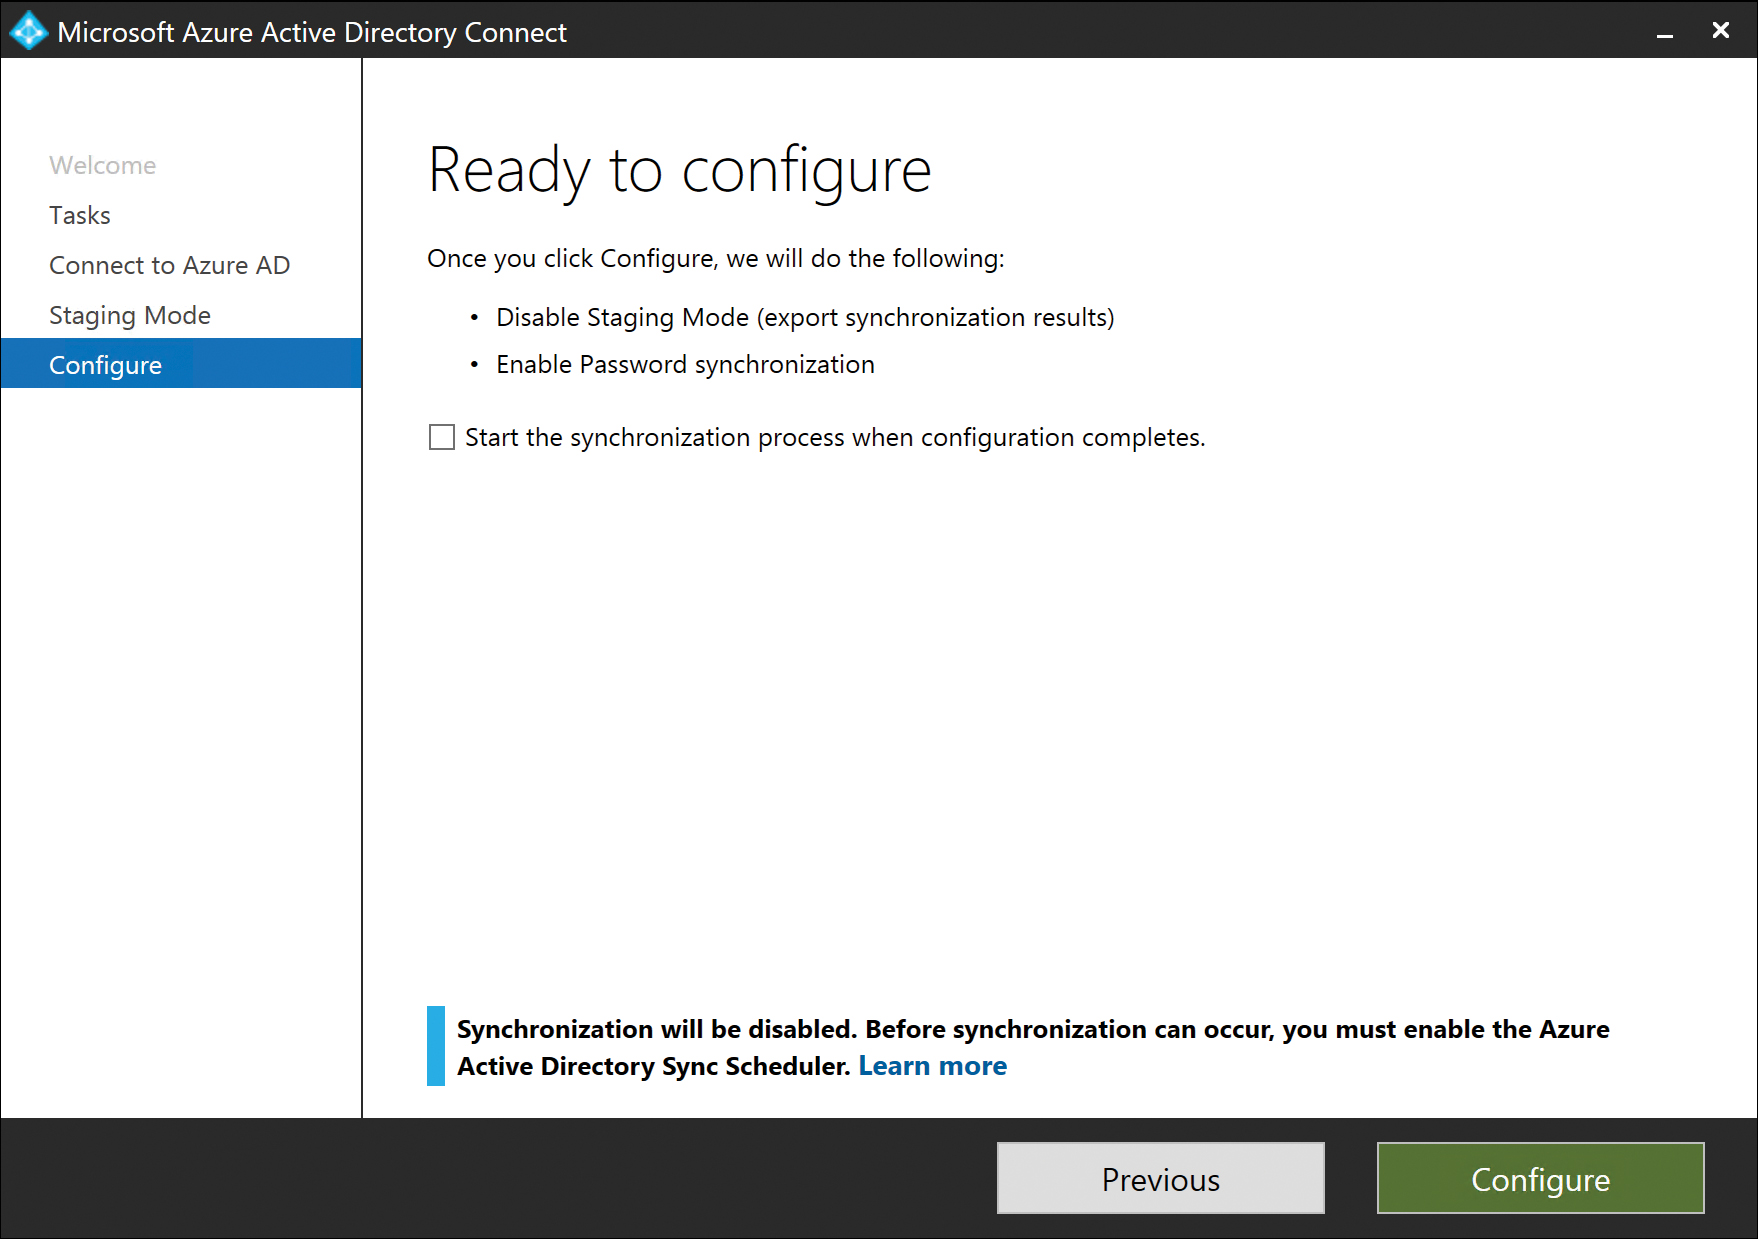
Staging mode
Previously, staging mode was discussed as an option for reviewing synchronization of objects and testing the configuration of the AAD Connect installation prior to the first export of data to Azure AD.
The staging mode server, however, has an equally important purpose in a typical Azure AD synchronization strategy. It is designed to provide a warm-standby server to use for failover purposes if the primary synchronization server is down.
The added benefit of a staging mode server is that instead of relying on SQL Server high-availability features such as log shipping or clustering, AAD Connect can be installed on a separate stand-alone server with its own SQL database without any need to interact with the primary synchronization server. Because both databases are independent of one another, any SQL database corruption on the primary server would not be replicated to the staging server.
Migrating from the primary synchronization server to the staging server is simply a matter of running the AAD Connect Wizard on the desktop and disabling staging mode. It is assumed that the primary server is down or unavailable when this action is performed, and you must ensure that prior to bringing the primary server back online, the secondary server is returned to staging mode.
Two AAD Connect servers both synchronizing to the same tenant is not supported.
Summary
The installation of AAD Connect, as discussed in this chapter, is not a simple task. Many customization options are available during the setup, and some of these customizations are permanent, requiring a complete re-installation if they need to be changed. It is therefore important for you to read and understand each of the customization options available in the installation wizard before proceeding with the installation of the tool.
When you have completed the installation of AAD Connect, you can start synchronizing objects to Office 365 and using other workloads such as Skype for Business, Exchange Online, and SharePoint Online. Just remember to review all your available options before starting the installation so you avoid redoing work and correcting mistakes that might cost you time and money.