Chapter 11. Understanding the Office 365 resource types
When performing nearly any action in Office 365, you perform it against some type of object, whether it’s a user, a contact, a group, or a resource mailbox—the list goes on. Depending on the type of environment (managed domains with cloud ID or synchronized from an on-premises directory) and type of workload (Exchange, Skype, Microsoft SharePoint, Azure Active Directory), you might need to manage one or more object types or an object type in different contexts (managing the object properties of an Azure AD user versus the email properties of a mail-enabled user).
The Office 365 Admin Center displays several types of objects, as shown in Figure 11-1.

Figure 11-1 Office 365 resource types
The objects presented are a composite view, displaying properties from Azure Active Directory as well as Exchange Online and Skype for Business Online.
When you explore the details of a user, for example, this is evident. See Figure 11-2.

Figure 11-2 Active user properties
As you can see in the screenshot, you can manage Azure Active Directory and Exchange properties (as well as settings for Office ProPlus and Microsoft OneDrive). For example, on a user’s properties sheet, you can view or manage Sign-In Status (Azure Active Directory), Group Memberships (Azure Active Directory or Exchange), Product Licenses (Azure Active Directory), Roles (Azure Active Directory), User Name (Azure Active Directory), Email Address (Exchange), and Aliases (Exchange).
Azure Active Directory
Just as Active Directory is the foundation for on-premises services such as Exchange and Skype for Business, Azure Active Directory plays the analogous foundational role for online services. Before you can manipulate Azure AD objects with Windows PowerShell, you must download and install the necessary components.
Some features require the older version of the cmdlets (Azure Active Directory 1.0 or MSOnline), and some features require Azure Active Directory 2.0. Eventually, all features will be migrated to the newer module, but as of the time of writing, you still need both sets of modules to administer all the object types and settings fully.
- Download and install the .NET Framework 4.5 or later (if you don’t already have it) from https://www.microsoft.com/en-us/download/details.aspx?id=42642.
- Install PowerShellGet, available in Windows 10, the Windows Management Framework 5.0 (http://go.microsoft.com/fwlink/?LinkId=398175), or through the MSI Installer package for PowerShellGet at http://go.microsoft.com/fwlink/?LinkID=746217&clcid=0x409.
- Install the Azure AD PowerShell 1.0 module from http://connect.microsoft.com/site1164/Downloads/DownloadDetails.aspx?DownloadID=59185.
After you install these components, launch an elevated Windows PowerShell prompt and run the following command to install the Azure Active Directory 2.0 PowerShell module:
Install-Module AzureADPreview
If this is the first time you’ve used Install-Module or PowerShellGet, you might be prompted to install NuGet or allow it to download from untrusted repositories.
After you’ve installed the necessary components, you can launch a new Windows PowerShell window and connect to Azure Active Directory, as shown in Figure 11-3:
Import-Module MSOnline,AzureADPreview
$Credential = Get-Credential
Connect-MsolService -Credential $Credential
Connect-AzureAD -Credential $Credential

Figure 11-3 Connecting to Azure and MSOnline PowerShell endpoints
From here, you have several avenues to view, create, manage, or delete objects. This section focuses mainly on cloud ID users. Because many synchronized users’ details are managed on-premises, you won’t be able to run most Set- commands on them. For purposes of this discussion, the MSOnline module cmdlets are referenced because the newer Azure Active Directory and Azure AD Preview modules don’t have all of the capability at this time.
Object types
In Azure Active Directory, you can manipulate several object and resource types. Here’s a list of types of common objects you can work with.
- Users Security principal that allows logon. Licenses for services are applied to users, and the licenses that those services grant might attach additional properties to the Azure Active Directory user object.
- Groups A collection of objects, such as users, contacts, or other groups.
- Contacts A contact that represents a recipient, typically in an external organization, that does not have logon privileges.
Managing the objects
As mentioned earlier, there are many ways to interact with objects in Office 365, including the Office 365 admin centers and Windows PowerShell.
Users
Users are the basic security principals in Azure Active Directory. The main cmdlets for managing users are:
- New-MsolUser
- Get-MsolUser
- Set-MsolUser
- Remove-MsolUser
As you might expect, New-MsolUser is used for creating security principals, Get-MsolUser returns objects, Set-MsolUser sets properties on the objects, and Remove-MsolUser removes a user object from Azure Active Directory.
In these next two examples, you can see how the process of creating a new user is a relatively simple task in either the Office 365 Admin Center or Windows PowerShell.
To create a user in the Office 365 Admin Center, follow these steps.
- Navigate to Office 365 Admin Center.
- From the Home screen, click + Add A User (shown in Figure 11-4) or, in the navigation pane, select Users | Active Users and then click + Add A User.
Figure 11-4 Adding a user
- Fill out the user details. Optionally, specify a password (one is randomly generated if you don’t select the option), whether you want any administrative roles granted, and licensing.
If licensing is selected, additional features are enabled, such as an Exchange mailbox or access granted to download the Office ProPlus Click-To-Run media. See Figure 11-5.
Figure 11-5 Office 365 Admin Center Add User dialog box
- Close the Add User dialog box.


To do the equivalent new user creation task in Windows PowerShell, follow these steps.
- Launch a Windows PowerShell window and connect to Azure Active Directory with the Connect-MsolService cmdlet.
- Use the following cmdlet and parameters shown in Figure 11-6 (replacing the UserPrincipalName and LicenseAssignment for your environment) to create a new user with the same options you selected in the Office 365 Admin Center:
New-MsolUser -UserPrincipalName [email protected] -FirstName Kim -LastName Akers -DisplayName “Kim Akers” -UsageLocation US -LicenseAssignment cohovineyardandwinery:ENTERPRISEPACK
Figure 11-6 Creating a new user with New-MsolUser

For more information on license assignment in Office 365, see Chapter 2, “Preparing your environment for the cloud,” as well as https://blogs.technet.microsoft.com/undocumentedfeatures/2016/06/21/office-365-license-assignment/, “Office 365 License Assignment.”
You can use the Get-MsolUser cmdlet to look at the properties of a user. For example, if you want to return the list of properties that appear in the Office 365 Admin Center default view of an active user, you can run these commands when connected to Office 365 by Windows PowerShell.
$FormatEnumerationLimit = -1
$User = Get-MsolUser -UserPrincipalName [email protected]
$Groups = @()
$Roles = @()
$GroupsMembers = @()
$RolesMembers = @()
$Groups = Get-MsolGroup
$Groups | % { $data = Get-MsolGroupMember -GroupObjectId $_.ObjectID | ? { $_.ObjectId -eq $User.ObjectId }; $data | Add-Member -Type NoteProperty -Value $_.DisplayName -Name “Groups“; $GroupsMembers += $data }
$Roles = Get-MsolRole
$Roles | % { $RoleName = $_.Name; $data = Get-MsolRoleMember -RoleObjectID $_.ObjectId | ? { $_.ObjectId -eq $User.ObjectId }; $data | Add-Member -Type NoteProperty -Value $RoleName -Name Roles; $RolesMembers += $data }
$User | Add-Member -Type NoteProperty -Value $GroupsMembers -Name Groups
$User | Add-Member -Type NoteProperty -Value $Rolesmembers -Name Roles
$User | Format-List @{Name=“User Name“; Expression={$_.UserPrincipalName}}, @{Name=“Aliases“; Expression={$_.ProxyAddresses}}, Licenses, @{Name=“Group Memberships“; Expression={$_.Groups.Groups}}, @{Name=“Sign-in Status“; Expression={If ($_.BlockCredential -eq $false) {“Sign-in Allowed“} Else {“Sign-in Blocked“}}}, @{Name=“Roles“;Expression={$_.Roles.Roles}}, @{Name=“Display Name“; Expression={$_.DisplayName}}, @{Name=“Office Phone“;Expression={$_.PhoneNumber}}
The resulting output in Figure 11-7 shows you the same data that you see in the portal, with the exception of Office Installs (because there currently is no Windows PowerShell cmdlet you can use to return that data).

Figure 11-7 Windows PowerShell script to display user information similar to Office 365 Admin Center
Just as you can navigate and edit the properties of a user through the admin center, you can also update the properties by using the Set-MsolUser command. For example, you could use the following command to change the Department property for a user.
Set-MsolUser -UserPrincipalName [email protected] -Department “Marketing“
The Remove-MsolUser cmdlet is the corollary to deleting a user in the admin center. Deleting a user is a two-step process. First, the user is moved to the Recycle Bin. Then, if the user is not recovered in 30 days, an Azure Active Directory cleanup job removes the object. Alternatively, you can run the Remove-MsolUser cmdlet with the RemoveFromRecycleBin parameter to delete the user fully, as shown in Figure 11-8.
Remove-Msoluser -UserPrincipalName [email protected]
Remove-Msoluser -UserPrincipalName [email protected] -RemoveFromRecycleBin

Figure 11-8 Removing a user from Azure Active Directory and the Recycle Bin
Contacts
Contacts are objects that you can create to represent mail-enabled external recipients. External recipients can be on-premises mailboxes or distribution lists that aren’t synchronized to Office 365, third-party email systems, or partner organizations—any object that you want to configure to appear in the global address list.
Contacts can be created from the Office 365 Admin Center with the following process.
- Navigate to Office 365 Admin Center.
- From the Home screen, select Users and then select Contacts.
- On the Contacts page, click + Add A Contact.
- Type the properties for the new contact and then click Add.
- Close the New Contact dialog box.
Contacts, like distribution lists and Office 365 groups, are actually created in Exchange Online and then synchronized back into Azure Active Directory. As such, there is no corresponding new contact cmdlet in either the MSOnline or AzureAD PowerShell modules.
Groups
There are many types of groups in Azure AD and Office 365.
- Microsoft Online roles
- Distribution and security groups
- Modern or unified groups
Role groups
You use roles to grant rights to perform certain functions in either the Office 365 Admin Center or other service admin centers. For example, the Global Administrator role grants full administrative access to every object and inside every service admin center in the tenant.
You can manage role memberships from the Office 365 Admin Center by navigating to a user, clicking the Edit button next to Roles, and then selecting a role you want to assign to the user. By selecting Customized Administrator (Figure 11-9), you can select either built-in Office 365 administrator roles or more restrictive roles for individual services or features.

Figure 11-9 Granting a user administrator roles
If you want to manage the user’s role membership from Windows PowerShell, you must get a list of roles and role ObjectIds, which you obtain from running Get-MsolRole. See Figure 11-10.
After you find the ObjectId of the role you want to add a member to, you can note it, copy it to the clipboard or Notepad, or save it to a variable.
The next step is to locate the user’s ObjectId. You can find that by running:
Get-MsolUser -UserPrincipalName [email protected] | Select ObjectId
Again, save the value to the clipboard, Notepad, or a variable.
Finally, assign the role to the user and confirm membership. Use this command:
Add-MsolRoleMember -RoleObjectId <role_object_ID> -RoleMemberObjectID <user_object_ID>

Figure 11-10 Executing Get-MsolRole from Windows PowerShell
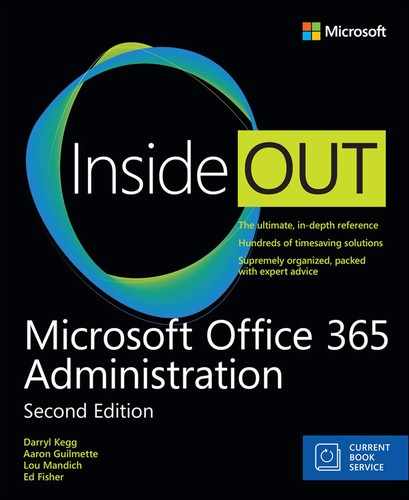
In the following example, the object ID for the user Terry Adams is saved to the variable $UserObjectID, and the Object ID of the role to be assigned to the user, SharePoint Service Administrator, is saved as $SharePointRoleObjectID. Review the output in Figure 11-11.
$SharePointRoleObjectId = (Get-MsolRole | ? { $_.Name -eq “SharePoint Service Administrator” }).ObjectId
$UserObjectID = (Get-MsolUser -UserPrincipalName [email protected]).ObjectId
Add-MsolRoleMember -RoleObjectId $SharePointRoleObjectId -RoleMemberObjectId $UserObjectID
Get-MsolRoleMember -RoleObjectId $SharePointRoleObjectId
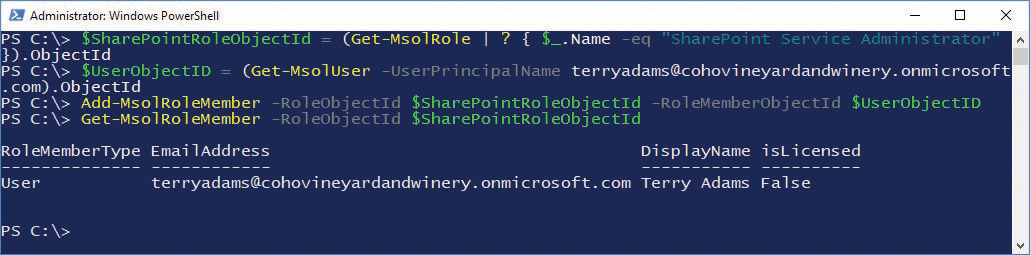
Figure 11-11 Assigning a role to a user through Windows PowerShell
Roles are built in to the service and cannot be added or removed.
Security and distribution groups
Security and distribution groups (or distribution lists, as they’re sometimes referred to) are group objects that can be used for granting access to resources or delivering messages to multiple users.
Security and distribution groups can be easily managed from the Office 365 Admin Center, as demonstrated in the following example.
- Navigate to Office 365 Admin Center.
- From the Home screen, point to Groups and then select Groups.
- On the Groups page, click + Add A Group.
- From the Type drop-down list, select the appropriate type of group.
Office 365 groups, mail-enabled security groups, and distribution lists are provisioned through Exchange Online, and then the underlying group object is synchronized back to Azure Active Directory through the backward sync process. See Figure 11-12.
Figure 11-12 The Office 365 New Group dialog box
- Fill out the appropriate group details.
If you choose an Office 365 group, a distribution list, or a mail-enabled security group, you can also enable the group to receive messages from Internet users. This sets the RequireSenderAuthenticationEnabled parameter to $false in Exchange Online. For Office 365 groups, you also have options to configure whether the group is public or private, what language the mailbox is in, and whether you want members of the group to receive emails and invites in their mailbox like a traditional distribution or mail-enabled security group. If you want to configure an Office 365 group to receive email from external senders, you have to edit the group after creation.
- Click Add.

Because Office 365 groups, distribution lists, and mail-enabled security groups are Exchange objects, the only option for creation from the Azure Active Directory module or MSOnline modules is a standard security group. You can create a security group in Azure AD by following this example.
- Launch a Windows PowerShell window and connect to Azure Active Directory with the Connect-MsolService cmdlet.
- Use the following cmdlet and parameters to create a new security group with the same options as you selected in the Office 365 Admin Center.
New-MsolGroup -DisplayName “Coho Marketing Security Group” -Description “Marketing Security Group” -ManagedBy (Get-MsolUser -userprincipalname [email protected]).ObjectID
Get-MsolGroup shows you distribution groups or lists, security groups, and unified groups (also known as Office 365 groups or modern groups). However, because unified groups are a combination of a distribution group and a mailbox, they appear as distribution lists with the Get-MsolGroup cmdlet, as shown in Figure 11-13.

Figure 11-13 Get-MsolGroup
Even though they show up as DistributionList in Get-MsolGroup, they do not show up as distribution lists when using the companion Get-DistributionList in Exchange Online. You must use the Get-UnifiedGroup cmdlet, which is covered later in this chapter.
Exchange Online
As is mentioned elsewhere in this book, Exchange Online is the messaging service that’s built on Azure Active Directory. You can administer it through both the Office 365 Admin Center (under Admin Centers | Exchange) and Windows PowerShell. To connect to Exchange Online by Windows PowerShell, you only need to import the cmdlets from Exchange Online into your current session. See Figure 11-14.
$Credential = Get-Credential
$ExchangeSession = New-PSSession -ConfigurationName Microsoft.Exchange -ConnectionUri https://outlook.office365.com/powershell-liveid -Authentication Basic -AllowRedirection -Credential $Credential

Figure 11-14 Connecting to Exchange Online PowerShell endpoint
Object types
Exchange Online has several types of objects, many of which overlap the objects that you can create or manipulate with Azure Active Directory and MSOnline. The types of objects in Exchange Online include:
- Mailboxes In Exchange terminology, a mailbox is a recipient data storage object attached to an Active Directory security principal. In terms of Office 365 and Exchange Online, it’s a tenant-level data storage container attached to an Azure Active Directory user object.
- Regular A regular mailbox is a normal mailbox attached to a security principal.
- Shared A shared mailbox is a mailbox that has been configured as a resource. A resource mailbox typically has a disabled logon security principal and isn’t logged on to explicitly (with a user name and password). Shared mailboxes in Office 365 don’t require licenses. Without a license, a shared mailbox cannot be logged on to with a user name or password or added to an ActiveSync profile. Shared mailboxes, from a resource perspective, cannot have the calendar processing parameters AddNewRequestsTentatively, ProcessExternalMeetingMessages, or ResourceDelegates configured.
- Room A room mailbox is a resource mailbox with specific recipient attributes that designate it as a conference room. The calendar processing agent is enabled in room mailboxes. You can configure room mailboxes with additional details such as ResourceCapacity to indicate the size of the room.
- Equipment An equipment mailbox is a resource mailbox with specific attributes that designate it as a type of equipment; it might be used for anything that a user can check out or reserve, such as a laptop, media station, projector, conference line, or car. Calendar processing can be applied to equipment mailboxes.
- Group A group mailbox is a special type of mailbox containing the storage for a unified group.
- Inactive An inactive mailbox is a mailbox that has been put on hold prior to removal of its license. Inactive mailboxes are used for preserving content of deleted mailboxes.
- Public Folder Instead of a dedicated database infrastructure and model from previous versions of Exchange, Microsoft designed modern public folders to store the public folder hierarchy and data inside of specially designated mailboxes. This facilitates the use of a single resiliency method (Database Availability Groups) for all storage in Exchange.
- Site A site mailbox is the combination of a SharePoint site membership, an Exchange mailbox for email messages, and a SharePoint site for documents.
The Site Mailbox feature was deprecated as of March 2017. You can no longer provision new site mailboxes, but existing site mailboxes will continue to function. Office 365 tenants created after March 2017 do not have access to the site mailbox feature. For more information about the transition plan for site mailboxes to Office 365 groups, visit https://support.office.com/en-us/article/Prepare-for-using-site-mailboxes-in-Office-365-6381daa5-3d98-4629-972d-d19e1dc48c1b.
- Mail-Enabled Users A mail-enabled user has the features of a contact overlaid with an Active Directory (or Azure Active Directory) security principal. In the context of Exchange Online, mail-enabled users (or mail users) are typically used to represent Exchange on-premises mailboxes in a hybrid configuration. Mail users have the ability to log on to an Office 365 tenant and consume other services.
- Contacts As mentioned previously, a contact is an object that represents a recipient in an address book. From an Exchange Online perspective, a contact is a mail object that represents a recipient not present in the Office 365 global address list, such as a mailbox or distribution list in an external organization or in an on-premises solution that doesn’t have recipients synchronized to the tenant.
- Groups A group is a collection of objects, such as users, contacts, or other groups. There are several types of groups in Exchange Online.
- Distribution A distribution group is the simplest form of list, containing mail-enabled recipients. You can configure all distribution lists to accept or reject mail from Internet senders (by the RequireSenderAuthenticationEnabled parameter).
- Mail-Enabled Security Mail-enabled security groups are distribution lists that can also be used to secure resources such as SharePoint online sites.
- Unified Unified groups (also known as Office 365 groups or modern groups) are the combination of a mailbox (a group mailbox, as listed previously) and a distribution list. Unified groups have distribution list–like features that enable users to receive a message in their inboxes and preserve a copy of the message in the group mailbox for later viewing.
- Room Lists A room list is a special type of distribution group made up of room mailboxes and is useful for helping users find an available conference or meeting room from a group of rooms.
- Dynamic Distribution The membership of a dynamic distribution group is calculated each time a message is delivered to it.
Managing the objects
Just as you can manage directory objects through both the admin centers and Azure AD PowerShell, you can also manage Exchange-specific objects both ways.
Mailboxes
As discussed previously in this chapter, users are the fundamental principal objects in Azure Active Directory. A mailbox is the primary recipient object type in Office 365 and Exchange Online. The main cmdlets for creating, managing, and deleting mailboxes are:
- New-Mailbox
- Set-Mailbox
- Remove-Mailbox
In these next two examples, you see a new mailbox created in both the Office 365 Admin Center and in Windows PowerShell. The first is from the admin center.
These steps are identical to those to create an Azure Active Directory user from the Office 365 Admin Center earlier, with one minor change—you must select a license that includes a service plan for Exchange Online.
Here are the steps.
- On the Home screen, click + Add A User or point to Users and select Active Users.
- Fill out the user details. Optionally, specify a password (one is randomly generated if you don’t select the option) and whether you want to assign any administrative roles.
- Expand Product Licenses and then select a license that includes an Exchange Online service plan. You can enable a top-level license (which enables all service plans and features) or expand a license and select only Exchange Online, as shown in Figure 11-15.
Figure 11-15 Assigning a product license as part of creating a new user
- Click Add.
- If you would like to send information about the new user and the user’s password to the administrator, click Send Email And Close. Otherwise, clear the Send Password In Email check box and click Close.

Although user mailboxes require a license, shared and resource mailboxes do not. You can create these mailboxes through the Office 365 Admin Center (Groups | Shared Mailboxes | Add A Mailbox for shared mailboxes or Resources | Rooms & Equipment | Add for room and equipment mailboxes), the Exchange Admin Center (Recipients | Resources | + | Room Mailbox or Equipment Mailbox for room and equipment mailboxes or Recipients | Shared | + for shared mailboxes), or Windows PowerShell (using New-Mailbox -Type [room | shared | equipment]) for the appropriate mailbox type.
When creating a room, equipment, or shared mailbox through either one of the admin centers or Windows PowerShell, a disabled Azure Active Directory user account is created as well for the mailbox.
You can also remove a mailbox from either the Office 365 Admin Center or Exchange Admin Center or through a remote Exchange Online session by running the Remove-Mailbox cmdlet.
In Exchange Online (as opposed to Azure Active Directory), if you remove a mailbox, the deletion flows through the backward synchronization process to Azure Active Directory, and the associated user account will be moved to the Recycle Bin.
When this happens, the user account’s UserPrincipalName is renamed ExRemoved-<guid>@tenant.onmicrosoft.com, as shown in Figure 11-16.
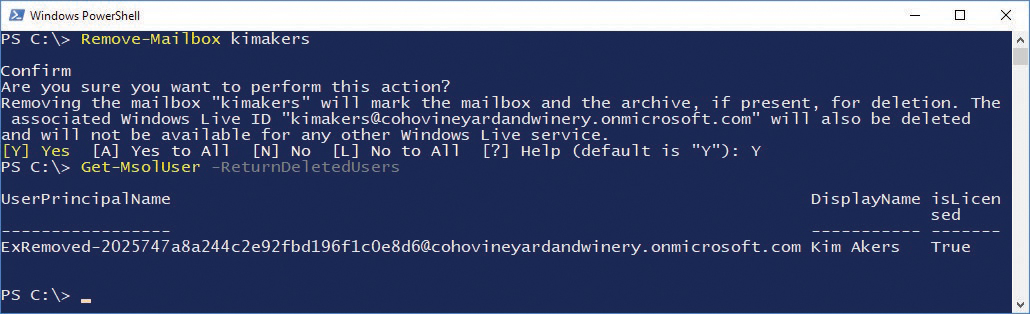
Figure 11-16 Mailbox removed using Windows PowerShell with the Remove-Mailbox cmdlet
It’s a fact of IT administration—at some point, human error happens and a user account is mistakenly deleted. When that happens in an Office 365 environment, how do you recover the account and mailbox?
In the example shown in Figure 11-17, user Kim Akers has been deleted through a remote Windows PowerShell session, although it also could have happened through an automated process or from the admin center.

Figure 11-17 User removed in Windows PowerShell
After the user has been deleted, you can confirm that the user is in the Azure Active Directory Recycle Bin and the mailbox is in a SoftDeleted state by using the Windows PowerShell commands Get-MsolUser -ReturnDeletedUsers and Get-Mailbox -SoftDeletedMailbox, as shown in Figure 11-18.
Figure 11-18 Confirming that user and mailbox are deleted
The steps to recover are straightforward, from either the admin center or Windows PowerShell. From the admin center, follow these steps.
- Point to Users and then select Deleted Users. See Figure 11-19.
Figure 11-19 Office 365 Admin Center showing the Deleted Users option
- When prompted, select either Auto-Generate Password or Let Me Create The Password and click Restore. See Figure 11-20.
Figure 11-20 Restoring a deleted user


After a short period, the user should be visible in Users | Active Users. You might find that you need to refresh the webpage.
The restore process is similarly easy from Windows PowerShell, as shown in Figure 11-21, using the Restore-MsolUser command.

Figure 11-21 Using Restore-MsolUser to recover a user account and mailbox
If, however, you removed a user with an Exchange mailbox from the Exchange Admin Center, the user account is renamed to ExRemoved-<guid>@tenant.onmicrosoft.com. To restore this account to its pre-deleted state, you must restore it from Windows PowerShell, using the Restore-MsolUser cmdlet with the NewUserPrincipalName parameter (specifying the original UserPrincipalName as its argument), or reset the UserPrincipalName after the restore has completed.
If you don’t set the restored object’s UserPrincipalName to the value it was when the mailbox was attached, the mailbox won’t reconnect. If you have forgotten the original address of the deleted mailbox, you can retrieve it by running the following command:
Get-Mailbox -SoftDeletedMailbox | Select DisplayName,PrimarySmtpAddress,UserPrincipalName,WindowsEmailAddress,MicrosfotOnlineServicesID
Depending on your configuration, one of those values will contain the previous mailbox identity of the user.
For more advanced account recovery techniques involving AAD Connect, please refer to Chapter 4, “Directory Synchronization Basics.”
You can also create a user mailbox by using Windows PowerShell.
- Launch a Windows PowerShell window and connect to Azure Active Directory with the Connect-MsolService cmdlet.
- Use the following cmdlet and parameters to create a new mailbox-enabled user with the same options you selected in the admin center (Exchange Online only as part of the Enterprise E3 license).
[array]$DisabledPlans = @()

$Sku = (Get-MsolAccountSku | ? { $_.AccountSkuId -like “*ENTERPRISEPACK*“}).AccountSkuId

[array]$ServicePlans = (Get-MsolAccountSku | ? { $_.AccountSkuId -eq $sku }).ServiceStatus

[array]$EnabledPlans = @('EXCHANGE_S_ENTERPRISE')
[regex]$EnabledPlansRegex = '(?i)^(' + (($EnabledPlans |foreach {[regex]::escape($_)}) –join “|“) + ')$'
Foreach ($Plan in $ServicePlans)

{

$item = $Plan.ServicePlan.ServiceName

If ($item -notmatch $EnabledPlansRegEx)

{$DisabledPlans += $Plan.ServicePlan.ServiceName}

}

$LicenseOptions = New-MsolLicenseOptions -AccountSkuId $Sku -DisabledPlans $DisabledPlans

New-MsolUser -UserPrincipalName [email protected] -FirstName David -LastName Hamilton -DisplayName “David Hamilton” -UsageLocation US -LicenseAssignment cohovineyardandwinery:ENTERPRISEPACK -LicenseOptions $LicenseOptions
The Get-Mailbox cmdlet returns data about mailboxes in your Exchange Online tenant. You can specify a number of parameters to return different sets of mailboxes.
- IncludeInactiveMailboxes When using this parameter, Get-Mailbox returns mailboxes for deleted users that have had LitigationHold set on them along with active mailboxes.
- InactiveMailboxesOnly As the name implies, this parameter causes Get-Mailbox to return only inactive mailboxes. Active mailboxes are not displayed in the output.
- PublicFolder The PublicFolder parameter causes Get-Mailbox to return only the public folders that were created as part of the public folder topology (either new in Office 365 or migrated from an on-premises environment).
- GroupMailbox With the GroupMailbox parameter, Get-Mailbox shows the mailbox storage used for Office 365 groups (also known as unified or modern groups).
- SoftDeletedMailbox Soft-deleted mailboxes are mailboxes that have been disconnected from a deleted user account. A soft-deleted mailbox can be reconnected to a user account by restoring or creating a user with the same mailbox identity as the deleted soft-deleted mailbox.
You can run Set-Mailbox commands against all mailbox types (user and resource) to configure or update various settings, such as mailbox quotas, regional configurations, proxy addresses, and names. In synchronized environments, however, a number of attributes are managed in the on-premises directory. If you attempt to manage attributes that are synchronized from the on-premises environment, you receive an error and guidance to update the attribute in Active Directory.
For more information on customizing Office 365 licensing, see Chapter 5, “Installing Azure AD Connect,” and https://blogs.technet.microsoft.com/undocumentedfeatures/2016/06/21/office-365-license-assignment.
Mail-enabled users
A mail-enabled user (or mailuser) is a user account in Azure Active Directory that has mail properties applied to it so that it shows up in the Exchange global address list.
A mail-enabled user can be created or managed from the Exchange Admin Center or Windows PowerShell.
To create a mail-enabled user in the Exchange Admin Center, follow these steps.
- Launch the Exchange Admin Center.
- Navigate to Recipients | Contacts.
- Click the + (plus) sign and then select Mail User. See Figure 11-22.
Figure 11-22 Exchange Admin Center Mail User option
- Fill out the user details, as shown in Figure 11-23. Because this is a security principal, it requires a password (which enables the user to log on to the Office 365 portal and access any applications for which they might be licensed). Click Save to create the new mail user.
Figure 11-23 New Mail User dialog box
- If necessary, refresh the page to see the newly created mail user.


From Windows PowerShell, the creation of a new mail-enabled user is accomplished by running New-MailUser, as shown in Figure 11-24, after you import the remote Exchange Online session.
New-MailUser -FirstName Sanjay -LastName Patel -Alias sanjaypatel -ExternalEmailAddress [email protected] -DisplayName “Sanjay Patel” -Name “Sanjay Patel” -Password (Get-Credential).Password -MicrosoftOnlineServicesID [email protected]

Figure 11-24 Creating a new mail-enabled user with the New-MailUser cmdlet
Contacts
Contacts are mail-enabled objects that show up in the global address list. You can create contacts from the Office 365 Admin Center (mentioned earlier in this chapter), through the Exchange Admin Center, or through Windows PowerShell.
To create contacts through the Office 365 Admin Center, follow these steps.
- Navigate to Office 365 Admin Center.
- From the Home screen, point to Users and then select Contacts.
- On the Contacts page, click + Add A Contact.
- Enter the details for the new contact. Click Add.
- Close the New Contact dialog box.
Creating and managing a contact from a remote Exchange Online PowerShell session requires only a single line of code. See Figure 11-25.
New-MailContact -FirstName David -LastName Pelton -Name DavidPelton -DisplayName “David Pelton” -Alias davidpelton -ExternalEmailAddress [email protected]

Figure 11-25 Using Exchange Online PowerShell to create a new mail contact
Groups
Exchange Online has many available types of groups, depending on the needs of the organization. Distribution lists, for example, can be managed from the Office 365 Admin Center, Exchange Admin Center, or Windows PowerShell.
Security and distribution groups can be managed easily from the Office 365 Admin Center, as demonstrated in the following example.
- Navigate to Office 365 Admin Center.
- From the Home screen, point to Groups and then select Groups.
- On the Groups page, click + Add A Group.
- From the Type drop-down list, select the appropriate type of group (Security Group or Distribution List).
- Fill out the appropriate group details.
If you choose an Office 365 group, a distribution list, or a mail-enabled security group, you can also enable the group to receive messages from Internet users. This sets the RequireSenderAuthenticationEnabled parameter to $false in Exchange Online. For Office 365 groups, you also have options to configure if the group is public or private, mailbox language, and whether you want members of the group to receive email and invites in their mailbox like a traditional distribution or mail-enabled security group. If you want to configure an Office 365 group to receive email from external sources, you have to edit the group after creation.
- Click Add.
Manage groups from the Exchange Admin Center by following these steps.
- Launch Exchange Admin Center.
- Navigate to Recipients | Groups.
- Select the + and then select the type of group to create. See Figure 11-26.
Figure 11-26 New group in the Exchange Admin Center
- Select a group type.
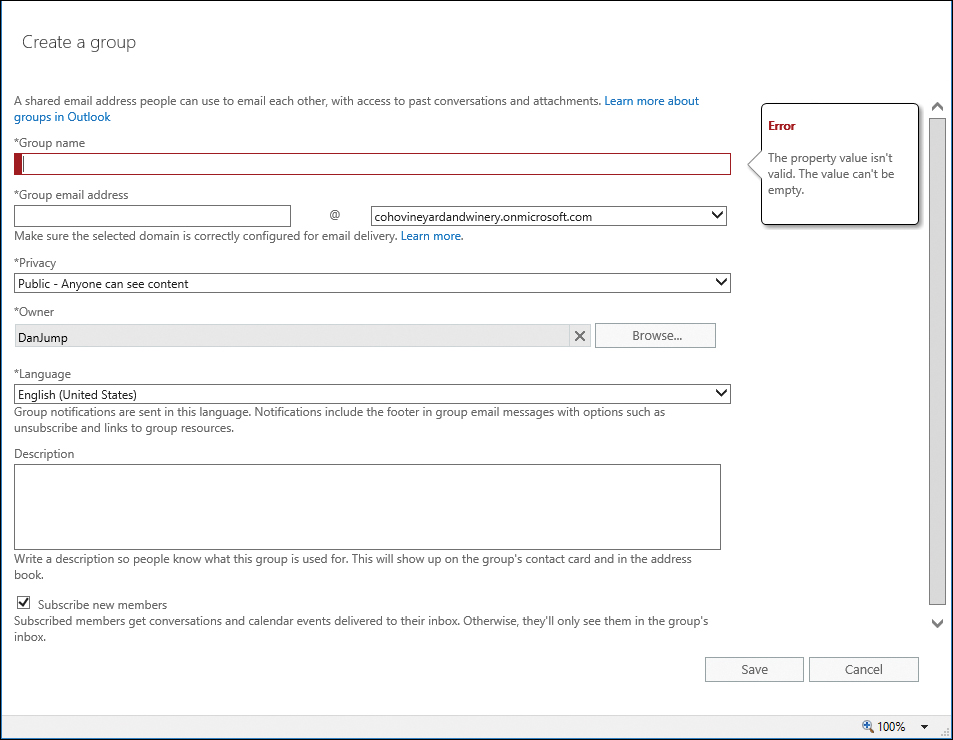
If you select an Office 365 group, a dialog box appears similar to the following, shown in Figure 11-27.
Figure 11-27 Creating a new Office 365 group from the Exchange Admin Center
Although the Office 365 New Group dialog box in the Office 365 Admin Center enables you to configure the group to allow anonymous senders from outside the organization in setup, you must configure that afterward, when adding an Office 365 group in the Exchange Admin Center.
If you select a distribution group, a very similar dialog box appears, except it has a link, to create a standard distribution group if you would rather do that.
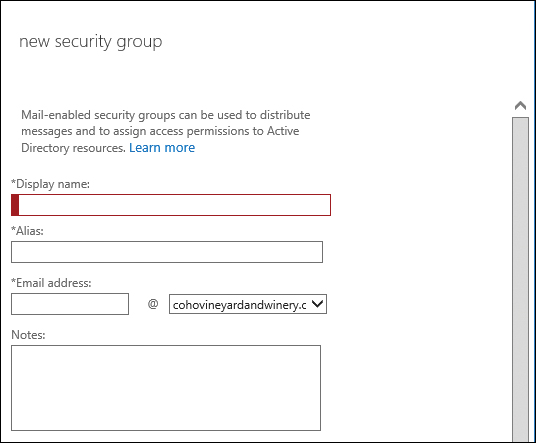
If you select Security Group, the New Security Group dialog box appears, as shown in Figure 11-28.
Figure 11-28 New Security Group dialog box
If you select Dynamic Distribution Group, you see the dialog box shown in Figure 11-29, which enables you to select criteria for creating and evaluating the group.
Figure 11-29 New Dynamic Distribution Group dialog box
- Fill out the appropriate details and click Save.


Because there are a few types of distribution groups in Office 365, there are slightly different cmdlets to configure them all from an Exchange Online PowerShell session.
To create a standard distribution list, use the following command.
New-DistributionGroup -Name Coho-Marketing-DL -DisplayName “Coho Marketing DL” -RequireSenderAuthenticationEnabled $false -PrimarySmtpAddress [email protected] -alias cohomarketingdl
A room list is a special distribution list that is designed to contain room mailboxes. Room lists help users search for available rooms across the entire group and appear in Room Finder in Microsoft Outlook. Room lists can only be created from Windows PowerShell. Creating a room list is exactly the same as a normal distribution list, except it also includes the RoomList parameter, as shown in Figure 11-30.
New-DistributionGroup -Name Coho-MeetingRooms -DisplayName “Coho MeetingRooms” -RequireSenderAuthenticationEnabled $true -PrimarySmtpAddress [email protected] -alias cohomeeting -RoomList

Figure 11-30 Creating a new room list with the New-DistributionGroup cmdlet
A mail-enabled security group is a type of distribution group that can be used to grant permissions to resources. The syntax is again very similar to creating a distribution group, except it uses the Type parameter with a value of Security, as shown in Figure 11-31.
New-DistributionGroup -Name Coho-SalesSecurity -DisplayName “Coho Sales Security Group” -RequireSenderAuthenticationEnabled $true -PrimarySmtpAddress [email protected] -alias cohosalessecurity -Type Security

Figure 11-31 Creating a mail-enabled security group with the New-DistributionGroup cmdlet
All the distribution groups based on the New-DistributionGroup cmdlet can be viewed, modified, or removed using these additional cmdlets.
- Get-DistributionGroup
- Set-DistributionGroup
- Remove-DistributionGroup
- Get-DistributionGroupMember
- Add-DistributionGroupMember
- Remove-DistributionGroupMember
You can find additional syntax for these cmdlets online at https://technet.microsoft.com/en-us/library/dn641234(v=exchg.160).aspx, “Users and groups cmdlets in Exchange Online.”
Unified groups are new to Office 365 and are created through the New-UnifiedGroup cmdlet. They’re referred to as Office 365 groups in the Office 365 and Exchange admin centers. See Figure 11-32.
New-UnifiedGroup -Name “CohoHR-UnifiedGroup” -DisplayName “Coho HR” -PrimarySmtpAddress [email protected] -Alias cohohr -AccessType Public -SubscriptionEnabled

Figure 11-32 Creating an Office 365 group
Unified groups have a unique set of cmdlets available to them.
- Get-UnifiedGroup
- Remove-UnifiedGroup
- Set-UnifiedGroup
- Add-UnifiedGroupLinks
- Get-UnifiedGroupLinks
- Remove-UnifiedGroupLinks
Additional syntax for these cmdlets is online at https://technet.microsoft.com/en-us/library/dn641234(v=exchg.160).aspx, “Users and groups cmdlets in Exchange Online.”
The membership for dynamic distribution groups is evaluated during delivery. By using Windows PowerShell, you can use filters and attributes to specify which members to include.
New-DynamicDistributionGroup -Name 'Coho Wine Club Administartors' -Alias 'cohowine' -IncludedRecipients 'MailboxUsers' -ConditionalDepartment @('Wine Club')
After a dynamic distribution group is created, you can use the following cmdlets to view, update, or remove the group.
- Get-DynamicDistributionGroup
- Set-DynamicDistributionGroup
- Remove-DynamicDistributionGroup
Additional syntax for these cmdlets is online at https://technet.microsoft.com/en-us/library/dn641234(v=exchg.160).aspx, “Users and groups cmdlets in Exchange Online.”
Summary
This chapter discussed the various object types in Office 365 and how to manage them. There are many types of objects (users, groups, contacts), and most of them have dozens of properties that are used to define them further. Some properties are only manageable through certain interfaces, so as you gain more experience in managing Office 365, you’ll know which cmdlets or user interface to use by which types of properties you need to modify.