Chapter 13. Exchange Online hybrid
Overview of Exchange Online hybrid features
Office 365 Hybrid Configuration Wizard
Moving mailboxes to or from Exchange Online
Decommissioning the hybrid environment
Most organizations that have been managing on-premises infrastructure and want to move to software-as-a-service offerings (such as Exchange Online) won’t be able to pivot and begin using online services immediately. They need to understand the features and capabilities, test the resiliency and features, and plan for coexistence, migration, and user experiences.
Deploying Exchange Online in a hybrid configuration enables you to test the features of Office 365 as well as provide a path to migrate your data and configurations online at a pace that meets your organization’s requirements.
This chapter covers architecture and planning for Exchange Online hybrid configurations, enabling the on-premises and cloud infrastructures, migrating mailboxes between the platforms, public folder coexistence and migration, and management.
This chapter is broken down into seven topics.
- Overview of Exchange Online hybrid features
- Planning
- Office 365 Hybrid Configuration Wizard
- Moving mailboxes to or from Exchange Online
- Public folders
- Mailbox provisioning
- Decommissioning the hybrid environment
Overview of Exchange Online hybrid features
Although the overall architecture of an organization’s Exchange on-premises and Exchange Online deployment varies based on technical, security, or business constraints, each organization must identify the components and features it will be using.
Configuring a hybrid environment enables your organization to take advantage of several features, such as the following.
- Secure mail flow between on-premises and cloud environments with a shared namespace
- A unified global address list (GAL) for both on-premises and cloud users
- Free/busy and calendar sharing
- A single Outlook Web Access URL
- Ability to move mailboxes between on-premises and online environments
- Centralized mailbox management and provisioning from the on-premises environment
- Cross-premises mailbox search, MailTips, and message tracking
- Cloud-based archiving for both on-premises and cloud mailboxes
From an architectural perspective, implementing an Exchange Online hybrid configuration is similar to a multi-forest Exchange organization with identity synchronization, permissions delegation, and mail routing concerns. For services to work across environments, you must allow network connectivity between Exchange Online and your organization, manage identity, and provide a way for users to resolve resources in either environment.
The Office 365 Hybrid Configuration Wizard, formerly known as the Exchange Hybrid Configuration Wizard, is an organization-wide Exchange configuration toolset.
The Hybrid Configuration Wizard runs a series of Windows PowerShell commands against both the on-premises Exchange Server configuration and the Office 365 Exchange Online tenant. The Hybrid Configuration Wizard configures organization-level and server-level parameters to support the rich coexistence topology with two key protocols, HTTPS and SMTP, to build the bridge between one or more on-premises Exchange organizations and Exchange Online.
Although many people refer to the server(s) that the Hybrid Configuration Wizard has been run against as “the hybrid servers,” there isn’t a role for a hybrid server during the Exchange installation process. You can run the Hybrid Configuration Wizard on any server with the appropriate connectivity in the organization, and it can enable or disable the participation of other servers in the hybrid configuration. Only servers with an enabled transport role appear selectable in the Hybrid Configuration Wizard. This role name differs by version: Hub Transport role in Exchange 2010, Client Access Server (CAS) and Mailbox role in Exchange 2013, and Mailbox role in Exchange 2016.
The most critical planning topics are Autodiscover, free/busy, mail flow and transport, public folders, and cross-premises access.
Planning
Prior to implementing a hybrid configuration, ensure that your environment meets all the basic requirements and notify your network team for any changes that might need to be made. In addition, some organizations have strict requirements around configuring endpoints for access to the Internet, so you might also need to work with your organization’s security team to ensure that your deployment meets both the operational and security requirements of the business.
General
One of the most often overlooked planning steps in an Exchange Online hybrid configuration is making sure your environment meets the prerequisites. Please refer to Chapter 10, “Preparing an On-Premises Environment to Connect to Exchange Online,” for details on minimum software versions as well as other important server and networking prerequisites.
Autodiscover
Clients use the Autodiscover service to locate mailboxes. Clients can be users or servers querying on their behalf. The best practice for Exchange deployments is to update the Autodiscover configuration to point to the newest version of Exchange to enable the newest feature set and ensure the widest compatibility. When designing a hybrid solution, the best-practice recommendation is no different. If you are deploying a newer version of Exchange into your environment than currently exists, it is recommended to update Autodiscover to use the newer version of Exchange.
For more information about Autodiscover, see Chapter 10.
Azure Active Directory Connect
To synchronize mailboxes as mail-enabled users to Office 365 as well as perform necessary writeback of Exchange hybrid permissions, you must install and configure Azure Active Directory Connect (Azure AD Connect or AAD Connect).
For information about how to deploy and configure AAD Connect, please review Chapter 4, “Directory Synchronization Basics,” and Chapter 5, “Installing Azure AD Connect.” For additional information about configuring permissions delegation for Azure AD Connect scenarios, see https://gallery.technet.microsoft.com/AD-Advanced-Permissions-49723f74.
Cross-premises access and delegation
Cross-premises access is the ability to continue to access a mailbox as an additional resource after it has been moved to Exchange Online. Currently, only the Full Access mailbox permission is supported for a migrated mailbox when an on-premises mailbox accesses it.
Other permissions, such as Send As, Receive As, or Send on Behalf Of, are not supported in a cross-premises scenario. Delegation using the Microsoft Outlook client is also not supported cross-premises. Office 365 Dedicated and International Traffic in Arms (ITAR) (vNext) environments are the exception to this because they support additional functionality more closely aligned with an Exchange resource forest model.
When mailboxes are moved to Exchange Online, most permissions and delegation of those mailboxes are moved as well. Careful analysis of who to move with whom is required so certain things don’t break such as cross-premises access or delegation. For instance, if you move an executive to Office 365 Exchange Online and do not move the executive’s assistant, and the executive’s assistant has delegated calendar rights to the executive’s calendar, that breaks their connection temporarily. For that reason, they should be in the same migration batch and migrated together.
DNS
Successful configuration of an Exchange Online hybrid environment requires adding records to your organization’s external DNS. All domains to be shared between Exchange Online and Exchange on-premises must be verified in the Office 365 tenant, which is accomplished by a DNS TXT record. In addition, federation also requires external DNS records to prove domain ownership.
Email address policies and proxy addresses
The Exchange hybrid configuration process updates the email address policies of domains that are selected to be shared between the on-premises and online environments. After the email address policy update, users configured to inherit email address policies are updated.
Because updating proxy addresses can have a large impact on your address book (and, subsequently, offline address book downloads), you might want to perform the email address policy and proxy address templates manually. If the Hybrid Configuration Wizard detects that the policies have been updated, that step of the process will be skipped.
Email address policies can be updated manually (the default format is <alias>@<tenant>.mail.onmicrosoft.com) or by using a script (https://gallery.technet.microsoft.com/Bulk-or-Selectively-Update-be06b784). Proxy address can also be updated manually, using a script (https://gallery.technet.microsoft.com/Add-Office-365-Tenant-93391e4c) or by adding a rule to AAD Connect (https://gallery.technet.microsoft.com/Create-an-AAD-Connect-Rule-45ea6591).
Exchange Server Deployment Assistant
The Microsoft Exchange Server Deployment Assistant is a web-based tool that you can use to build a roadmap or checklist of tasks to complete for a number of Exchange server configurations, including hybrid, based on your organization’s existing topology and business requirements. It asks several questions about your current infrastructure and then prescribes a set of general steps to follow to complete the configuration. You can find the Microsoft Exchange Server Deployment Assistant at http://aka.ms/exdeploy.
Exchange server versions
A hybrid configuration can be performed with on-premises Exchange servers from 2003 and later. However, there are certain coexistence requirements, based on your deployed version of Exchange. See Table 13-1 for a version support matrix.
Table 13-1 Supported Exchange Server versions
Minimum Exchange Version |
Minimum Hybrid Configuration Version Based on Exchange Coexistence |
Exchange 2003 |
Exchange 2010 coexistence required. Exchange 2013 or Exchange 2016 are not options because they cannot be installed in a forest with Exchange 2003 present. |
Exchange 2007 |
Exchange 2010 coexistence or Exchange 2013 if OAuth is required. Exchange 2016 is not an option. |
Exchange 2003 and Exchange 2007 |
Exchange 2010 coexistence required. Exchange 2013 and Exchange 2016 are not options because they cannot be installed in a forest with Exchange 2003 present. |
Exchange 2007 with Exchange 2010 |
No additional version requirements unless OAuth is required. If OAuth is necessary, deployment with Exchange 2013 is required. Exchange 2016 is not an option because it cannot be installed in a forest with Exchange 2007 present. |
Exchange 2010 |
No additional version requirements unless OAuth is required. If OAuth is necessary, deployment with Exchange 2013 or Exchange 2016 is required. |
Exchange 2013 |
No version requirement, Use existing topology. |
Exchange 2016 |
No version requirement, Use existing topology. |
Free/busy and hybrid authentication
Free/busy is the ability to check calendar availability for one or more users or resources. Free/busy endpoints are located through the availability service, looking by default for the Autodiscover endpoint. For more information about the Autodiscover service, refer to Chapter 10.
Depending on the versions of Exchange in the environment, the Hybrid Configuration Wizard might allow the configuration of two methods of free/busy lookup: OAuth (Open Authorization) and DAuth (Delegated Authentication).
Delegated authentication occurs when a network service accepts a request from a user, obtains a token to act on behalf of that user, and then initiates a new connection to a second network service on behalf of the user. OAuth is an authorization mechanism whereby a third-party application or service accesses a user’s data without the user providing credentials.
Exchange 2010 uses DAuth to facilitate the server-to-server communication required for free/busy lookups. Environments that include only Exchange 2013 or later can use OAuth in addition to DAuth to provide authentication for additional features. Table 13-2 explains which authentication configurations are available, configured as part of the Hybrid Configuration Wizard, and which require additional configuration.
Table 13-2 Hybrid configuration DAuth and OAuth options
Versions |
DAuth |
OAuth |
Exchange Server 2003/2007/2010 |
Part of Hybrid Configuration Wizard Configuration |
Not available |
Exchange Server 2007/2010/2013 |
Part of Hybrid Configuration Wizard Configuration |
Manual configuration |
Exchange Server 2010/2013/2016 |
Part of Hybrid Configuration Wizard Configuration |
Manual configuration |
Exchange Server 2013/2016 |
Part of Hybrid Configuration Wizard Configuration |
Part of Hybrid Configuration Wizard Configuration |
Exchange Server 2013 |
Part of Hybrid Configuration Wizard Configuration |
Part of Hybrid Configuration Wizard Configuration |
Exchange Server 2016 |
Part of Hybrid Configuration Wizard Configuration |
Part of Hybrid Configuration Wizard Configuration |
As Table 13-2 shows, DAuth is always configured. This means the administrator must configure at least one federated domain proof prior to running the Hybrid Configuration Wizard or during the Hybrid Configuration Wizard process. If you do not create a federated trust prior and add a domain proof, it will be done as part of the Hybrid Configuration Wizard process. Configuring a domain proof (either before or during the Hybrid Configuration Wizard) requires the ability to add an external DNS text record.
The Azure Active Directory Authentication Service is a trust broker between two federated Exchange organizations. Configuration of the federation trust is required to enable sharing free/busy information. Because each organization’s federation trust is configured with the Azure Active Directory Authentication Service, it can be used to enable federated sharing with other organizations, using Exchange on-premises or Exchange Online.
Organization relationships contain the parameters for free/busy in Exchange on-premises and Exchange Online; specify which domains are part of the configuration as well as the target endpoint to resolve the free/busy query.
When planning free/busy for your organization, you must ensure that you enable network access to the endpoints for free/busy lookup. Your organization might require exchanging availability information with other organizations as well, and those can be managed with additional organization relationships. If you are attempting to federate with an organization that is already in Exchange Online, you must configure additional organization relationships to create a mesh topology. Architecture of a hybrid mesh can be found on the Exchange Team Blog at https://blogs.technet.microsoft.com/exchange/2016/10/17/the-hybrid-mesh.
Message sizes
The Mailbox Replication Service migration method enables you to migrate individual messages up to 150 MB. If you will be migrating mail with third-party tools or have items larger than 150 MB, review the number of messages exceeding the threshold. You can use the Exchange Large Item Compliance script to assist in this process. Go to https://gallery.technet.microsoft.com/office/PowerShell-Script-Office-54d367ea.
Mail transport
Planning for mail transport is an essential part of the overall hybrid deployment process. By default, the hybrid configuration enables secure mail between on-premises and cloud environments by creating inbound and outbound connectors in Exchange Online and either creating new or modifying existing connectors in your Exchange on-premises environment. Mail originating from the Internet is delivered to the host listed in your organization’s MX record (whether the record points to your on-premises environment or to Exchange Online), and then Exchange continues to route the mail to its final destination, relaying over the hybrid mail flow connectors to reach recipients in the connected environments.
Mail originating in Office 365 and Exchange Online is routed, by default, out to the MX hosts for recipient organizations. Mail originating on-premises continues to egress through the existing configuration. This configuration is suitable for most organizations, but you might have other requirements, depending on your business or security posture.
If your organizations have Exchange Server 2013 or Exchange Server 2016 edge transport servers, they can be configured during the hybrid configuration, if desired, although they add complexity to the overall solution. If you plan to use Exchange Server 2010 edge transport servers, they will require manual configuration. You can find specific instructions for Exchange Server 2010 edge transport servers in the Exchange Server Deployment Assistant (http://aka.ms/exdeploy).
Centralized mail transport (CMT) is a mail routing architecture that routes all outbound mail from Office 365 through the on-premises environment. Centralized mail transport (also commonly referred to as central mail flow or centralized mail) is frequently used when organizations are required to apply additional processing to outbound mail. Such requirements might include the following.
- On-premises data loss prevention (DLP) systems
- On-premises encryption gateways
The physical and logical network requirements for either standard or centralized mail transport are the same (both requiring inbound and outbound port 25 between your transport servers and Exchange Online Protection). If centralized mail transport is enabled, but a specific domain needs a different path, a criteria-based routing rule must be configured separately.
Interruption of the SMTP/TLS mail flow between Exchange Online and the Exchange on-premises systems with a third-party appliance is not supported. Breaking the TLS handshake results in the messages being seen as “out of organization” and might prevent name resolution of user email addresses when displayed in Outlook or cause automatic resource booking requests to fail.
If your organization will be configuring a hybrid environment by using Exchange Server 2010 hub transport servers and they are behind a network address translation device, you might need to plan to modify the Office 365 receive connector on each hub/transport server to include the IP address of the device performing the translation.
Networking
Configuring a hybrid Exchange Online environment has the following network requirements.
- Exchange on-premises servers that will be configured for mail transport must have inbound and outbound access on port 25 to Exchange Online Protection (http://aka.ms/o365endpoints) with no pre-authentication, Secure Sockets Layer (SSL) offloading, or packet inspection.
- Exchange on-premises servers with the Client Access Server role must be accessible (at a minimum) from Exchange Online over port 443 to resolve Autodiscover requests for free/busy and to perform mailbox moves.
Public folders
Many organizations have deployed public folders on-premises. If your organization has deployed them on-premises and needs to maintain them, plan for hybrid connectivity to public folders and, potentially, a migration to Exchange Online modern public folders. Both hybrid coexistence and migration are covered later in this chapter.
Public folders can be enabled in a hybrid fashion (so that cloud users can access on-premises public folders). This can be configured immediately to provide continued access to the public folder data throughout the course of a migration. It is recommended to migrate public folders last.
Hybrid public folder configuration is relatively straightforward and requires a working organization relationship. Hybrid public folders rely on the organization relationship created during the Hybrid Configuration Wizard.
Office 365 Hybrid Configuration Wizard
The Office 365 Hybrid Configuration Wizard is a tool that configures one or more on-premises organizations to connect to Office 365. It simplifies the process of configuring federation and secure mail flow and enabling your on-premises environment for mailbox migrations.
In September 2015, the product group released the third version of the Hybrid Configuration Wizard, rebranding it the Office 365 Hybrid Configuration Wizard. The new Office 365 Hybrid Configuration Wizard is now hosted in the Office 365 service, and the most recent configuration updates are downloaded and used each time the wizard is run.
Overview
The Office 365 Hybrid Configuration Wizard itself has been improved in many ways.
- Version-agnostic hybrid experience Prior to this release, the hybrid configuration experience depended on the specific Exchange Server version, service pack, cumulative update, or rollup. By hosting the engine in the service, the latest version and features are applied to the configuration automatically. The new wizard is no longer tied to the Exchange update release cycle, so updates based on best practices and user feedback can be integrated with the process more quickly. You can open the Hybrid Configuration Wizard from the Exchange Admin Center or by going directly to http://aka.ms/hybridwizard.
- Early access for First Release customers Another benefit of a stand-alone, web-based distribution method is the ability to pilot specific versions as needed. The First Release version is available at http://aka.ms/taphcw.
- Enhanced error handling and logging Logging detail has been updated and is easier to understand. The wizard now has more information per phase and task, error codes that map to specific errors, a specific error-handling option code (HCW8****), and access to log files in %appdata%MicrosoftExchangeHybridConfiguration by using a shortcut. Diagnostic information can be accessed by pressing F12 during the wizard. This F12 function also enables launching dedicated Windows PowerShell consoles connected to both Exchange on-premises and Exchange Online, each with a different color background to make it easier to differentiate between the two environments.
- Telemetry By default, every execution of the Hybrid Configuration Wizard uploads the logs for analysis. This can be disabled using a registry key if required. This provides the team invaluable insight into the running of the configuration wizard and helps the team diagnose and fix issues faster than ever before.
The Hybrid Configuration Wizard enables the following features over HTTPS for coexistence.
- Free/busy between the two (or more) Exchange organizations by using OAuth and IntraOrganization connectors or the Azure Active Directory authentication service.
- Mailbox migrations using the Mailbox Replication Service Proxy (MRSProxy). MRS-based mailbox moves, in conjunction with the synchronization of the Exchange Mailbox GUID by AAD Connect, preserves the user’s Outlook Offline Storage (OST) file and allows for automatic profile configuration post-migration. This feature also provides offboarding from Office 365 if needed.
- MailTips to display important informative messages (such as data loss prevention–related tips or out-of-office messages) during message composition.
- Cross-premises E-discovery search, Exchange Online Archiving and Messaging Records Management policy cross premises, using OAuth configuration.
- Outlook Web Access redirection to Office 365 from on-premises Outlook Web Access, using organization relationship settings.
The Hybrid Configuration Wizard enables secure SMTP mail flow, using one of the following methods (depending on the versions of the Exchange servers involved in hybrid transport).
- TLS-secured transport between Exchange Server 2013 or Exchange Server 2016 and Exchange Online, using certificates.
- TLS-secured transport between Exchange Server 2010 and Exchange Online, using remote domains and remote IP address ranges, and certificates.
The Hybrid Configuration Wizard also enables these features regardless of Exchange version.
- Message tracking, which records messages to and from the on-premises and online Exchange organizations.
- Accepted domains/remote domains and email address policies configured to support hybrid mail flow by using tenant.mail.onmicrosoft.com.
Prerequisites
The minimum architecture required to use the Office 365 Hybrid Configuration Wizard varies by Exchange version.
- Exchange 2016 requires a mailbox server role because the roles have been combined in the most recent Exchange version.
- Exchange 2013 requires the client access and mailbox server roles; although they can be split between separate servers, deploying them on the same server is recommended.
- Exchange 2010 requires the Client Access Server role and the Hub Transport role. The mailbox server role is required if the Exchange 2010 environment is coexisting with an Exchange 2003 environment.
The Hybrid Configuration Wizard also requires an Office 365 global admin account as well as an account that has been granted the Exchange Organization Management role.
There is no sizing guide for Office 365 Hybrid Configuration Wizard, because it is simply a tool to configure features already in use in your organization and extends your organization to the cloud. Use the Microsoft Exchange Server Role Requirements calculator located at http://aka.ms/exchangecalc. Calculate using the existing or projected maximum number of users in the organization and follow the published calculator guidance.
You can find more information about the release announcement of the updated Office 365 Hybrid Configuration Wizard at https://blogs.technet.microsoft.com/exchange/2015/09/04/introducing-the-microsoft-office-365-hybrid-configuration-wizard/.
Many organizations migrating from third-party mail systems might not require a full hybrid configuration and can use the express hybrid migration option as mentioned in Chapter 12, “Mailbox Migration Types.” Express hybrid configures the addressing components for the Exchange organization such as email address policy and accepted domains and enables the MRS proxy. Regardless of the type of hybrid configuration being deployed, the on-premises environment still requires a supported version of Exchange Server.
Installing the Office 365 Hybrid Configuration Wizard
As previously mentioned, the Office 365 Hybrid Configuration Wizard is a stand-alone tool that has components downloaded on the server from where it is run. Because the tool checks for updates each time it is launched, the server requires Internet access to complete the configuration.
- Log on to an Exchange server in your organization. It does not have to be one that will be included in the hybrid configuration.
- Launch the Hybrid Configuration Wizard through one of the three methods.
- For any version of Exchange, open a browser and navigate to http://aka.ms/hybridwizard.
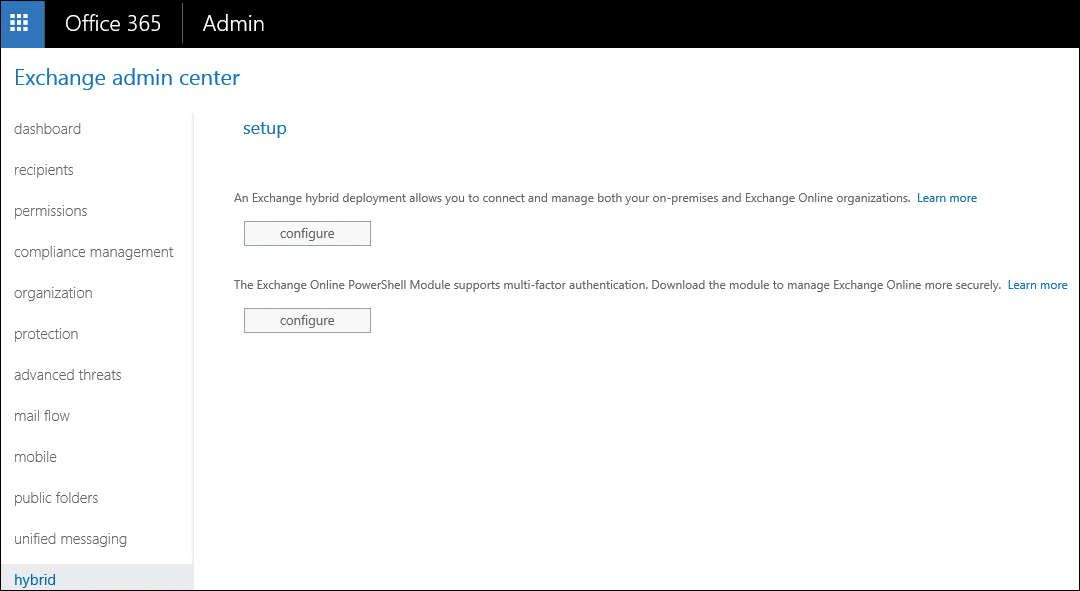
- For Exchange Server 2013 or Exchange Server 2016, launch the Exchange Admin Center, navigate to the hybrid node, and click Configure.
- For any version of Exchange, log on to the Office 365 Admin Center, navigate to the Exchange Admin Center, select the hybrid node, and then click the Configure button located under the Exchange Hybrid Deployment text, as shown in Figure 13-1.
Figure 13-1 Exchange hybrid setup page
- After launching the process and after the application has downloaded, click the Install button shown in Figure 13-2. If you’ve already installed the Hybrid Configuration Wizard before, you can launch it by clicking the desktop shortcut. If a newer version exists, you are prompted to update. Click Yes.
Figure 13-2 Application Install – Security Warning dialog box for the Office 365 Hybrid Configuration Wizard
- Click Cancel to close the wizard.

Running the Office 365 Hybrid Configuration Wizard
Before starting the configuration, review the configuration settings described in Table 13-4 to understand which configuration option (Minimal, Express, Full) configures the features necessary for your environment.
Table 13-4 Office 365 Hybrid Configuration Wizard selection options
Hybrid Features |
Minimal |
Express |
Full |
E-mail Address Policy and Domain Configuration |
Yes |
Yes |
Yes |
Send and Receive Connector Configuration |
No |
No |
Yes |
OAuth Configuration |
No |
No |
Yes (Exchange version–dependent) |
Federation Trust and Organization Relationship |
No |
No |
Yes |
MRS Endpoint Configuration |
Yes |
Yes |
Yes |
AAD Connect in Express Configuration |
No |
Yes |
No |
After you have decided which options to select for the Hybrid Configuration Wizard, double-click Microsoft Office 365 Configuration Wizard on the Exchange Server desktop to begin the configuration process. Follow these steps to complete the wizard.
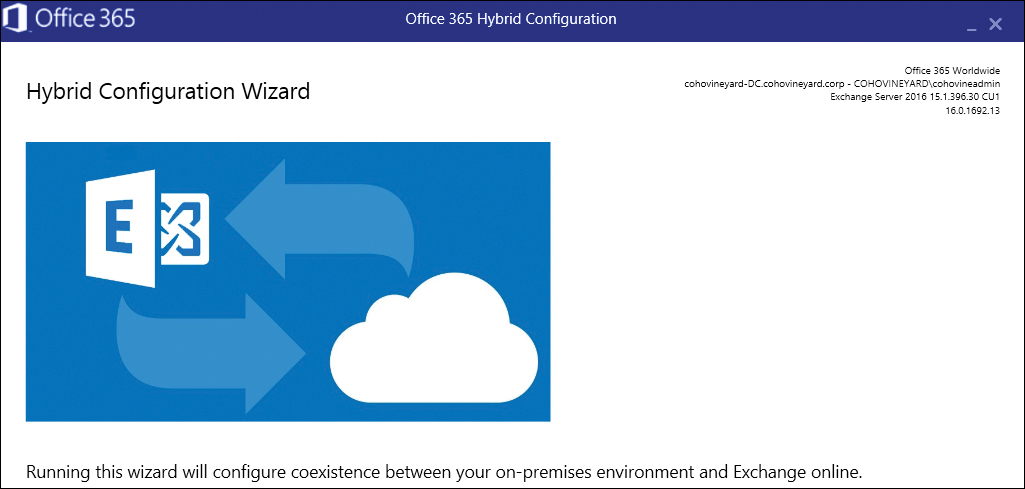
- On the Office 365 Hybrid Configuration Wizard launch page, which provides a built-in help option in the lower left corner, indicated by the hyperlink, What Does This Application Do? as shown in Figure 13-3, click Next.
Figure 13-3 Office 365 Hybrid Configuration Wizard launch page
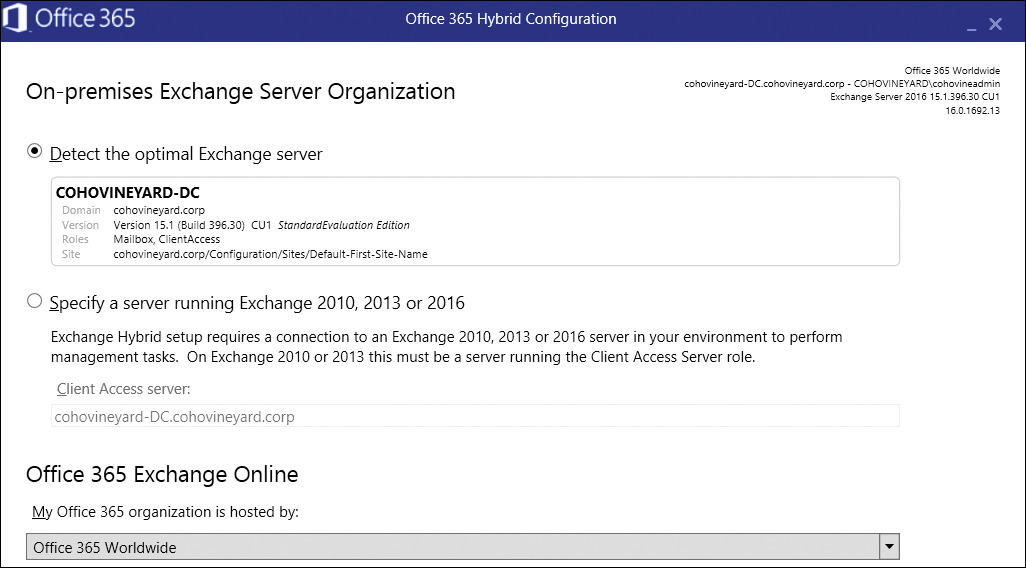
On the On-Premises Exchange Server Organization configuration page, shown in Figure 13-4, the wizard determines the optimal Exchange server to use for the configuration process.
- If you prefer to use a specific server, select the Specify A Server Running Exchange 2010, 2013, Or 2016 button and then enter the fully qualified domain name of a Client Access Server.
Figure 13-4 Selecting the on-premises Exchange server
- From the Office 365 Exchange Online drop-down menu, select the appropriate Office 365 hosting organization. For most organizations, this is Office 365 Worldwide. Other options include Office 365, Office 365 Germany, and Office 365 vNext (Dedicated). Click Next.
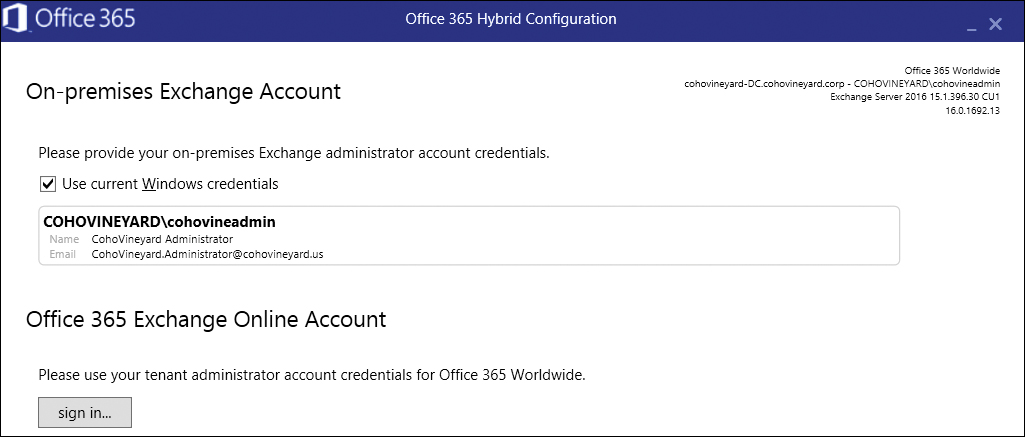
For the Hybrid Configuration Wizard to complete successfully, credentials for both the Exchange on-premises and Exchange Online environments must be supplied, as shown in Figure 13-5. If the Use Current Windows check box is selected, the currently logged-on account will be used to connect to Exchange on-premises. The account must be an organization administrator to complete the on-premises configuration and must be a local administrator on each server that will be configured.
Figure 13-5 Office 365 Hybrid Configuration Wizard account selection
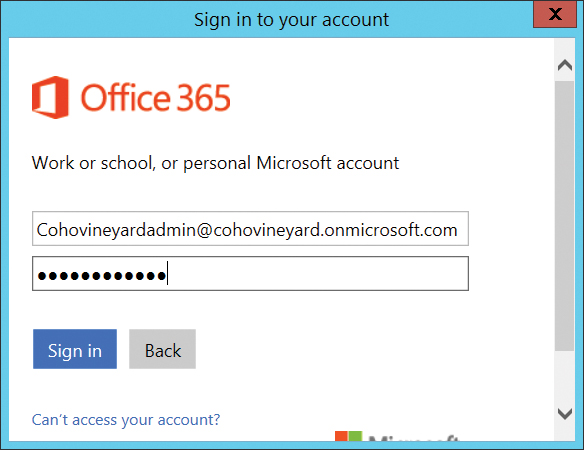
- Click the Sign In button under Office 365 Exchange Online Account, as shown in Figure 13-5. Enter an Office 365 Global Admin account credential. See Figure 13-6.
Figure 13-6 Office 365 Exchange Online Account credential prompt
- After both sets of credentials have been entered as shown in Figure 13-7, click Next.
Figure 13-7 Office 365 Hybrid Configuration Wizard saved credentials
On the Gathering Configuration Information page, the Office 365 Hybrid Configuration Wizard tests Windows PowerShell connectivity by using the provided credentials. If successful, information for both the on-premises and online environment are collected, as shown in Figure 13-8.
- Click Next.
Figure 13-8 Gathering configuration information from Exchange environments
- On the Hybrid Features page, select the Full Hybrid Configuration button (shown in Figure 13-9) and click Next.
Figure 13-9 Hybrid features selection
- On the Federation Trust page, click Enable and then click Next, as shown in Figure 13-10. This page is shown only if there is no existing federation trust.
Figure 13-10 Federation Trust page
- Depending on your environment configuration, choose the option that relates to one of three scenarios on the Hybrid Domains page.
- No hybrid domains To complete the Hybrid Configuration Wizard successfully, the wizard must detect at least one common domain configured in both the Exchange on-premises and Exchange Online environments. If no common domains are configured, you receive the error shown in Figure 13-11. The only course of action is to close the wizard, verify a domain in Office 365 that matches a domain in your on-premises Exchange environment (or add an accepted domain in your Exchange environment that matches a verified domain in Office 365), and restart the wizard.
Figure 13-11 Office 365 Hybrid Domains selection with no shared domains
- A single shared domain If the Hybrid Configuration Wizard detects a single shared domain in common between Office 365 and the Exchange on-premises environment, it skips to the Domain Ownership page to obtain the text record for the federated domain proof. If the domain proofs were already generated and verified, the wizard skips to the Mail Transport page.
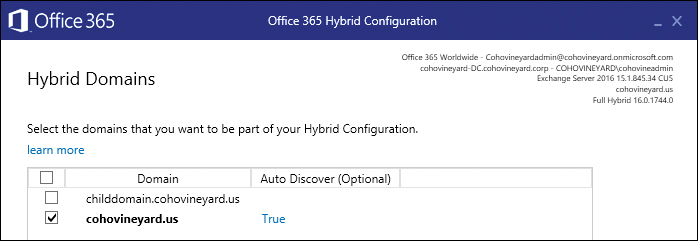
- Multiple shared domains If the Hybrid Configuration Wizard detects more than one shared domain in common between Office 365 and the Exchange on-premises environment, the page shown in Figure 13-12 appears. Select each domain that you want to include in the hybrid configuration. Each domain selected can also have an Autodiscover configuration set to either True or False. Configure the settings to True for each domain that has an external Autodiscover record that responds to queries.
Figure 13-12 Hybrid Domains page with multiple shared domains
- No hybrid domains To complete the Hybrid Configuration Wizard successfully, the wizard must detect at least one common domain configured in both the Exchange on-premises and Exchange Online environments. If no common domains are configured, you receive the error shown in Figure 13-11. The only course of action is to close the wizard, verify a domain in Office 365 that matches a domain in your on-premises Exchange environment (or add an accepted domain in your Exchange environment that matches a verified domain in Office 365), and restart the wizard.
- Select all domains that will handle mail flow or free/busy requests between Exchange Online and Exchange on-premises. See Figure 13-13. Click Next.
Figure 13-13 Hybrid Configuration Wizard with multiple shared domains selected
If federated domain proofs have not been completed previously, the Domain Ownership page appears (Figure 13-14). Each domain to be included in the hybrid configuration has a value in the Token column that needs to be added as a TXT record in the domain’s external DNS.
Figure 13-14 Domain Ownership page
- After you have created the external TXT records to verify ownership, select the I Have Created A TXT Record For Each Token In DNS check box and click Verify Domain Ownership (see Figure 13-15).
Federated domain proofs need to be completed only once per accepted domain. If you rerun the Hybrid Configuration Wizard, you will not need to verify additional proofs unless you add more domains.
Figure 13-15 Office 365 Domain Ownership page, text record complete
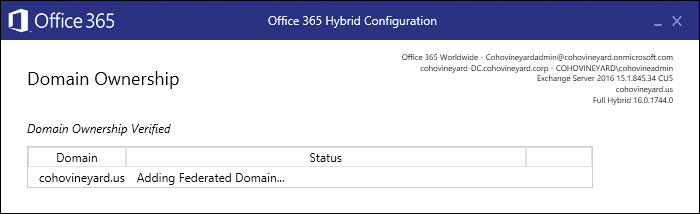
When the domain verification process is complete, the wizard adds the domains to the federation, as shown in Figure 13-16.
- Click Next.
Figure 13-16 Adding a federated domain
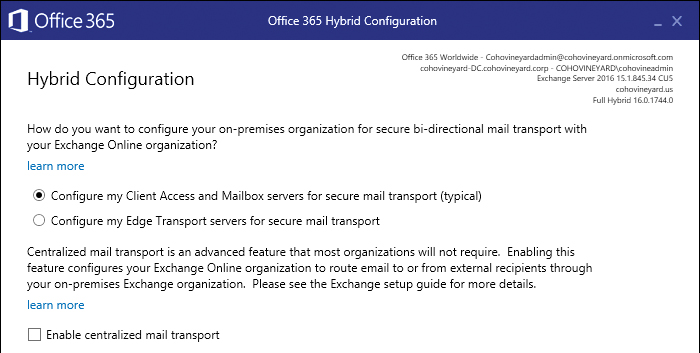
- On the Hybrid Configuration page, choose the servers to configure for mail transport.
By default, the Configure My Client Access And Mailbox Servers For Secure Mail Transport (Typical) button is selected. In Figure 13-17, the Advanced button has been selected to show the Enable Centralized Mail Transport option.
Figure 13-17 Hybrid Configuration page
- On the Receive Connector Configuration page, select which servers will be configured to receive mail from Exchange Online.
If you select servers running Exchange Server 2013 or Exchange Server 2016, the Hybrid Configuration Wizard modifies the default receive connector to support hybrid mail transport. If you select servers running Exchange Server 2010, the Hybrid Configuration Wizard creates a new receive connector. Figure 13-18 shows an Exchange 2016 server selected.
- After selecting servers, click Next.
Figure 13-18 Receive Connector Configuration page
The servers selected must be able to receive mail from the Exchange Online Protection IP address ranges. For more information about the Exchange Online Protection endpoints, see http://aka.ms/o365endpoints.
- On the Send Connector Configuration page, select one or more servers to be used to host the send connector to Exchange Online. If you are configuring Exchange Server 2013 or Exchange Server 2016, the server must be configured with the Mailbox role. If you are configuring Exchange Server 2010, the server must have the Hub Transport role. See Figure 13-19.
Figure 13-19 Send Connector Configuration page
The servers selected must be able to connect on port 25 to the Exchange Online Protection IP address ranges and will be responsible for relaying mail to the tenant.mail.onmicrosoft.com address space. For more information about the Exchange Online Protection endpoints, see http://aka.ms/o365endpoints.
- On the Transport Certificate page, select the third-party certificate that will secure mail (Figure 13-20) and click Next.
This certificate must be installed on all servers that will be involved in mail transport to or from Exchange Online.
Figure 13-20 Office 365 Hybrid Configuration, Transport Certificate page
- On the Organization FQDN page (shown in Figure 13-21), enter the fully qualified name for the on-premises mail hosts that will be sending to Exchange Online. The name entered must match a name in either the Subject or Subject Alternative Name field on the transport certificate. If you selected a wildcard certificate, enter a name valid for the certificate domain. The name entered must be resolvable on the Internet. Click Next when finished.
Figure 13-21 Organization FQDN page
- On the Ready For Update page, click Update.
The Office 365 Hybrid Configuration Wizard, shown in Figure 13-22, runs the necessary configuration steps.
Figure 13-22 Ready For Update page
During the configuration process, a progress meter and information about the current task appears (Figure 13-23). If you click the Stop button, the wizard stops the configuration process, but no changes will be rolled back.
Figure 13-23 Hybrid Configuration Wizard processing changes
After the Office 365 Hybrid Configuration has completed, a final screen appears so you can rate the experience and provide feedback if desired.
- Click Close to complete the wizard. See Figure 13-24.
Figure 13-24 Congratulations page


When the Hybrid Configuration Wizard has completed successfully, you are ready to route mail between your on-premises and cloud environments, migrate mailboxes, and configure public folders.
Rerunning the Hybrid Configuration Wizard
After the initial hybrid configuration, there are four instances when the Hybrid Configuration Wizard needs to be run again.
- Adding or removing transport servers
- Adding or removing hybrid domains
- Changing between standard and centralized mail flow
- Updating the transport certificate
The Hybrid Configuration Wizard does not need to be run after updates, roll-ups, or cumulative updates are applied, unless otherwise specified in the update.
Moving mailboxes to or from Exchange Online
After the Hybrid Configuration Wizard has completed, your environment should be configured to enable you to move mailboxes between on-premises and cloud environments.
Overview
Mailboxes migrations can be performed using either the Exchange Admin Center or Windows PowerShell. When a mailbox migration is run, the Mailbox Replication Service Proxy (MRSProxy) queues and manages the requests.
For a mailbox to be migrated to Exchange Online, the following criteria must be met.
- The mailbox must be synchronized to Exchange Online as a mail-enabled user.
- The synchronized mail-enabled user must have a value for ExchangeGuid that matches the value of the on-premises mailbox being migrated.
- The synchronized mail-enabled user must have a proxy address with a domain suffix that matches <tenant>.mail.onmicrosoft.com.
- The synchronized mail-enabled user must not have any proxy email addresses containing domains not verified in Office 365.
- The mailbox must have Active Directory inheritance enabled.
- The migration endpoint must be accessible by HTTPS from Exchange Online. SSL Offloading is not supported.
Migration endpoints
The Hybrid Configuration Wizard attempts to create a migration endpoint in Exchange Online, named Hybrid Migration Endpoint - <FQDN>, where <FQDN> is the external Exchange Web Services (EWS) URL of your on-premises environment. If that was unsuccessful, you can create the endpoint manually by using the following steps.
- Log on to the Office 365 portal, navigate to the Exchange Admin Center, and click Recipients.
- On the Recipients page, select Migration. To view existing migration endpoints, click the ellipsis and select Migration Endpoints. See Figure 13-25.
Figure 13-25 Viewing migration endpoints
- Click the plus sign (+) to add a new migration endpoint, as shown Figure 13-26.
Figure 13-26 Migration Endpoints page
- On the Select The Migration Endpoint Type page, select the Exchange Remote button (Figure 13-27) and click Next.
Figure 13-27 Select The Migration Endpoint Type page
- Type in the email address of an on-premises mailbox that Autodiscover can discover and credentials for the account to be used to run the migration. The user account used for mailbox migrations must be a member of the on-premises Organization Management or Recipient Management Role Based Access Control Group. See Figure 13-28. Click Next.
Figure 13-28 Enter On-Premises Account Credentials page
- Type in the fully qualified domain name of the remote MRS proxy server.
Normally, this is the same host name as the external EWS URL or the external-facing Client Access Server with the MRSProxy service enabled. See Figure 13-29.
- Click Next.
Figure 13-29 Confirm The Migration Endpoint page
- Enter a migration endpoint name.
In this example, it is mirroring what the Hybrid Configuration Wizard would call the migration endpoint. The value for Maximum Concurrent Migrations is set to 20 by default and can be increased up to 300. The value for Maximum Concurrent Incremental Syncs is set to 10 by default.
- Click New to create the migration endpoint, as shown in Figure 13-30.
Figure 13-30 General Configuration Information page for migration endpoint
After the migration endpoint has been created, the Migration Endpoints page is updated with the newly created endpoint. See Figure 13-31.
Figure 13-31 New migration endpoint created


At this point, migration batches can be created to move mailboxes to or from the on-premises environment.
Migration batches
Migration batches are configuration objects containing mailboxes to be moved between organizations. A migration batch can contain one or more mailboxes, and settings configured for the batch apply to all mailboxes in the batch.
After a batch is created, a validation process checks the availability of the endpoint and credentials and that the mailboxes included meet the prerequisites. Migration batches that are configured for manual completion are set for automatic incremental synchronizations to keep batches up to date and minimize the time to finalize a migration. Migration batches also include notification and reporting.
After a migration batch has been validated, Exchange Online generates a move request for each mailbox being migrated. Migration batches are the recommended method for migrating mailboxes.
Onboarding
Onboarding is the process of migrating a mailbox to Exchange Online. At the completion of the batch, the on-premises mailbox is migrated to Exchange Online, the on-premises mailbox is disconnected from the user account, and the on-premises mailbox account is converted to a remote mailbox user. The target address for the on-premises account is updated to point to <tenant>.mail.onmicrosoft.com.
Creating a batch
Follow these steps to create an onboarding migration batch.
Launch a browser and log on to the Office 365 Admin Center. Navigate to the Exchange Admin Center and then select Recipients | Migration.
Click the plus sign (+) and select Migrate To Exchange Online.
- Select the Remote Move Migration (Supported By Exchange Server 2010 And Later Versions) button, as shown in Figure 13-32, and click Next.
Figure 13-32 Select A Migration Type page
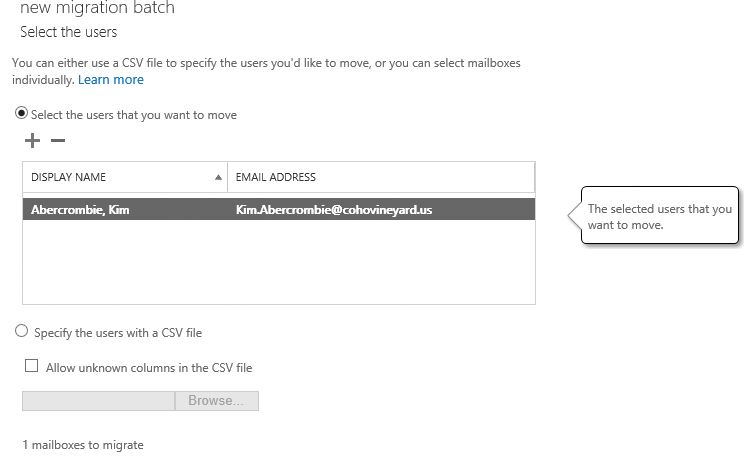
- On the Select The Users page, click the plus sign (+) to add mail-enabled users from the global address list, as shown in Figure 13-33. Alternatively, you can upload a comma-separated value (CSV) populated with email addresses. The CSV must have the EmailAddress header.
Figure 13-33 Select The Users page
- Select users from the list and click Add, as shown in Figure 13-34, to add users to the migration batch. If you want to select multiple users, hold down the CTRL key and click each user to highlight each as a selection and then click the Add key. Click OK to close the window.
Figure 13-34 Selecting the mail user for migration
- Verify the users to migrate and click Next. See Figure 13-35.
Figure 13-35 Users added to migration batch
- On the Confirm The Migration Endpoint page, select the endpoint that will be used to perform the migrations.
If multiple endpoints have been configured, a drop-down box becomes available to select a specific migration endpoint for use. If only one exists, the wizard automatically selects the endpoint, as shown in Figure 13-36.
- Click Next.
Figure 13-36 Confirm The Migration Endpoint page
- On the Move Configuration page, type a name for the batch.
- Select a target delivery domain.
When moving to Exchange Online, the target delivery domain is the domain ending in <tenant>.mail.onmicrosoft.com. A proxy address with this domain suffix will be configured as the target address for the mail user account in the Exchange on-premises environment after the mailbox move is complete.
- Select an option for any attached Exchange Archive mailboxes.
The Move The Primary Mailbox And The Archive Mailbox If One Exists button is selected by default.
- Select a value for the Bad Item Limit, the number of items the migration skips before failing the migration. The default is 10 and can be increased to Unlimited.
- Select a value for Large Item Limit.
The maximum size for an individual message migrating to Office 365, including all attachments, is 150 MB. If the limit is set to zero, any large message exceeding 150 MB causes the migration to fail. If Large Item Limit is set to a non-zero number, that number of large messages are skipped before the migration fails. Choosing a non-zero limit results in data loss for the messages exceeding the 150 MB limit.
- Confirm that all the fields have been populated, as depicted in Figure 13-37. Click Next.
Figure 13-37 Confirm migration options
- On the Start The Batch page, select a user or distribution list to receive email notifications about the batch.
- Select a batch start method.
The Automatically Start The Batch button is selected. The batch starts synchronizing immediately.
- Select a batch completion method.
- The Manual Complete The Batch (by clicking the Complete This Migration Batch Link on the right pane, after the link becomes active) button is selected by default, as shown in Figure 13-38.
With this option selected, the batch synchronizes all selected mailboxes and leaves the migration process at 95% complete. The migration batch automatically performs an incremental synchronization every 24 hours.
Figure 13-38 Start The Batch page
- Click New to create the batch and start the synchronization process.


Monitoring a batch
The migration status page shows the status of each batch. The newly created batch is shown in Figure 13-39.

Figure 13-39 Exchange Admin Center migration batch status
If the batch is selected, statistics appear on the right side in a column. Three links in the status page are actionable.
- Complete The Migration Batch For batches that are synchronized, selecting Complete The Migration Batch starts the finalization process.
- View Details Select the View Details link under Mailbox Status to launch a new window with more details on the migration process, including completed mailboxes and errors. See Figure 13-40.
Figure 13-40 Migration details
- View Details Select the View Details link under Associated Endpoint to view or edit the endpoint being used for the selected migration. For example, if the credentials for the migration account change after the migration batch was created, they can be changed through the interface shown in Figure 13-41.
Figure 13-41 Viewing migration endpoint details


Completing a batch
Batches configured for manual completion automatically perform an incremental update every 24 hours after the initial synchronization has been completed.
To complete the migration to Exchange Online, select a batch and click the Complete This Migration Batch link, highlighted in Figure 13-42.

Figure 13-42 Complete This Migration Batch migration status page
When prompted, select Yes to continue the completion process.
The status changes from Synced to Completing and then to Completed. In the background, the mailbox move process is synchronizing the mailbox delta since the last incremental sync. The target Exchange Online mail user is converted to a mailbox, and the on-premises mailbox is converted to a Remote User Mailbox (a special type of mail-enabled user) with the target or external email address set to alias@<tenant>.mail.onmicrosoft.com.
After all mailboxes in the batch have completed the migration process, the batch status is updated to Completed, as shown in Figure 13-43.

Figure 13-43 Completed migration batch
Completing a user within a batch
If you have configured a migration batch, you might want to complete just a single user to ensure that everything works correctly. You can accomplish this task, though not through the Exchange Admin Center. To complete an individual user in a migration batch, follow these steps.
- Connect to Exchange Online PowerShell.
- Identify the migration batch with the following command.
Get-MigrationBatch | FL Identity,CompleteAfter
The data returned should look like the following.
Identity:CohoMail
CompleteAfter : 12/31/9999 11:59:59 PM
The CompleteAfter date indicates the earliest time that the batch can be completed. Tenants that have been configured for Protocol Agnostic Workflow (PAW) have the CompleteAfter date set for the year 9999. PAW can be confirmed with the following command.
Get-MigrationConfig | FL Identity,Features
Identity : cohovineyard.onmicrosoft.com
Features : MultiBatch, PAW
If PAW is in the Features list, the tenant is enabled.
- Update the user’s move request.
Get-MoveRequest -Identity [email protected] | Set-MoveRequest -CompleteAfter (Get-Date).AddDays(-1)
Resume-MoveRequest -Identity [email protected]
This changes the complete-after date for the individual user within the batch to the day before the current date and completes the migration for the user without completing the entire batch.
Now that the migration process is complete, the user should be redirected to Exchange Online. When Outlook is launched, it reconfigures the profile to connect to Exchange Online. Mail sent to the user is also redirected to the Exchange Online mailbox.
All new tenants are PAW-enabled. To convert a tenant to PAW, all existing ones (new, synced, failed, or completed) must be removed. The PAW enablement process happens automatically as long as there are no existing batches in the tenant.
Offboarding
At some point, it might be necessary to migrate users from Exchange Online to an on-premises Exchange environment. You can complete this migration process, referred to as offboarding, through the Exchange Admin Center or with Exchange Online PowerShell.
The overall process is nearly identical to onboarding and requires you to select a migration endpoint, users to migrate, and target delivery domain (which is generally the primary SMTP address domain). The only additional piece of information required is the on-premises target database name.
When offboarding a mailbox, the same requirements must be met as for onboarding (such as valid proxy addresses and an ExchangeGuid). There is also the additional consideration of archive mailboxes. If you are offboarding to an Exchange Server 2007 or Exchange Server 2010 environment, you must migrate the content to the primary mailbox first, disable the archive, and then migrate.
Depending on how a cloud mailbox was enabled, the on-premises remote mailbox might also be missing the ExchangeGuid. For mailboxes that were moved to Exchange Online from an on-premises environment, the ExchangeGuid property will be populated. However, for mailboxes created online, using the New-RemoteMailbox or Enable-RemoteMailbox commands, the on-premises account will not have a valid ExchangeGuid. To check a remote mailbox for the presence of the ExchangeGuid, follow these steps.
- Connect to the Exchange Management Shell.
- Run
Get-RemoteMailbox [email protected] | FL Name,ExchangeGuidto view the user’s ExchangeGuid property.Get-RemoteMailbox lzhang | FL Name,ExchangeGuid Name : Larry Zhang ExchangeGuid : 00000000-0000-0000-0000-000000000000
The ExchangeGuid property has all zeros for the value. This is normal for mailboxes provisioned using New-RemoteMailbox or Enable-RemoteMailbox commands. To update the ExchangeGuid for a user, follow these steps.
- Connect to Exchange Online PowerShell.
- Run
Get-Mailbox [email protected] | FL Name,ExchangeGuidto display the mailbox’s ExchangeGuid. - Copy the ExchangeGuid.
- Launch the Exchange Management Shell on-premises and run the following command.
Set-RemoteMailbox -identity [email protected] -ExchangeGuid <ExchangeGuid value copied in step 3>
After the ExchangeGuid is synchronized, you can offboard the mailbox.
To complete the offboarding, specify an Exchange mailbox database in the on-premises environment to where the offboarded mailbox will be migrated. Depending on the version of the target Exchange environment, you might need to specify the database as a single name (such as MBXDB01) for destinations in Exchange Server 2010 or later, or in SERVERDATABASE format (CONTOSOSERVERMBXDB02) for Exchange Server 2003 or Exchange Server 2007 destinations.
You can also use the mailbox database GUID to identity the target database. To obtain a list of database GUIDs, run Get-MailboxDatabase -IncludePre | FT Name,Guid.
To create the migration batch for offboarding, you can use the Exchange Admin Center (selecting Migrate From Exchange Online on the migration page) and select the users and endpoint details or use Windows PowerShell, as shown in the following example.
- Create a CSV with the header EmailAddress and enter the email addresses of the users to offboard, one per line, and save to a temp folder (such as C:TempOffboard.csv).
- Connect to Exchange Online PowerShell.
- Run the following command.
New-MigrationBatch -Name Offboard -CSVData ([System.IO.File]::ReadAllBytes(“C:TempOffboard.csv”)) -TargetEndpoint ((Get-MigrationEndPoint)[0]) -TargetDeliveryDomain <PrimarySMTPDomain> -TargetDatabase MBX1 -AutoStart -AutoComplete -NotificationEmails [email protected]
Troubleshooting
Mailbox moves might fail for a number of reasons, including network timeouts, inaccessible databases, insufficient permissions, invalid proxy addresses, or missing Exchange GUIDs. For any migrations that fail, you can export the underlying move request and use the MRS Explorer tool (https://gallery.technet.microsoft.com/office/MRS-Explorer-for-Exchange-b55c0c67) to examine the error. Some of the more common errors (and resolutions) follow.
- You Can’t Use The Domain Because It’s Not An Accepted Domain For Your Organization
This error occurs because a proxy address on the source mailbox doesn’t match an accepted domain in the target environment. This frequently happens if you have removed accepted domains in your on-premises environment without updating the proxy address for the users, or if you have not added and verified all on-premises accepted domains in the Exchange Online environment.
You can use the following script to identify proxy addresses that are causing this error.
$Users = (Get-MigrationUser -Status Failed | ? { $_.ErrorSummary -match “not an accepted domain” }).Identity

[regex]$AcceptedDomainsRegex = '(?i)(' + (($Domains |foreach {[regex]::escape($_)}) –join “|@“) + ')$’

Foreach ($user in $users)
    {
    Write-host processing $user
    $obj = Get-MailUser $user
    for ($i=($obj.EmailAddresses.count)-1; $i -ge 0; $i--)
        {
        $address = $obj.EmailAddresses[$i]
        if ($address -notlike “*@*“)
            {
            Continue
            }
        if ($address -inotlike “*x500:*” -and $address -like “*@*” -and $address -notmatch $AcceptedDomainsRegex)
                { Write-Host -ForegroundColor Red "     Address $($address) doesn’t match” }
            else { }
        }
     Write-host “-----------“
     }
Review the output and then add the necessary domains to the Office 365 tenant or remove the offending proxy addresses from the on-premises users and retry the migration.
- Target Mailbox Doesn’t Have An SMTP Proxy Matching <tenant>.mail.onmicrosoft.com
During an Exchange mailbox migration, the source mailbox’s targetAddress attribute is configured to point to an email address in the new Exchange environment. The Hybrid Configuration Wizard configures an email address template for all email address policies that contain domains selected on the Hybrid Domains page of the wizard. The email addresses are applied during the next email address policy update cycle.
However, if you have mailboxes with the EmailAddressPolicyEnabled attribute set to False, those mailboxes will never receive the updated proxy address from the email address template. Without a valid proxy address matching the Exchange Online routing domain, MRS cannot configure the targetAddress value for the source account.
To resolve this error, add a proxy address for the mailbox in the format of <alias>@<tenant>.mail.onmicrosoft.com. You can use a script, such as the one located at https://gallery.technet.microsoft.com/Add-Office-365-Tenant-93391e4c/file/145326/4/Add-TenantProxyAddress.ps1, to help automate this task.
- Insufficient Access Rights To Perform The Operation (INSUFF_ACCESS_RIGHTS)
This error frequently occurs when Active Directory inheritance has been disabled for the mailbox account being migrated.
The two primary sources of permissions inheritance problems are the following.
- A security policy for least-privilege access to sensitive accounts
- adminSDHolder and SDProp
Exchange depends on the presence of a certain set of permissions for the migration account to update the attributes of the migrated user. If permissions inheritance has been disabled, the permissions for the Exchange Server groups will not be applied to the mailbox.
To resolve this error, verify that Active Directory object security inheritance is enabled on all mailboxes being migrated. You can use a script, such as the one located at https://gallery.technet.microsoft.com/Find-and-Fix-Broken-Object-5ae18ab1, to identify and resolve accounts with disabled inheritance.
- The User Object Does Not Have A Valid ExchangeGUID Property And Cannot Be Migrated
As previously mentioned, for a mailbox migration to be successful, the ExchangeGuid (msExchMailboxGuid, when viewed from Active Directory) property of the source user mailbox and target mail-enabled user must be populated with the same value.
If the ExchangeGuid property of the target mail-enabled user in Exchange Online is not synchronized, remove the user from Azure AD and re-synchronize the user account with the following steps.
- Connect to Azure AD PowerShell by using the Connect-MsolService cmdlet.
- Remove the user object from Azure AD and the Azure AD recycle bin:
Remove-MsolUser -UserPrincipalName <[email protected]> -Force
Remove-MsolUser -UserPrincipalName <[email protected]> -RemoveFromRecycleBin -Force
- Wait for AAD Connect to run a delta synchronization (or run a manual delta synchronization task).
- A Recipient Wasn’t Found For [email protected] On The Target
No mail-enabled user in Exchange Online matches a mailbox in the migration batch. This usually happens because an address specified in a CSV file was typed incorrectly. Verify that all mailboxes in the CSV file for migration have a matching recipient object in the Office 365 tenant.
- This Mailbox Exceeded The Maximum Number Of Corrupted Items That Were Specified For This Move Request
If the mailbox being migrated has more bad items or large items than either the BadItemLimit or LargeItemLimit thresholds, the migration generates this error. There are two ways to resolve the error.
- Remove the corrupt or large items from the source mailbox.
- Increase the BadItemLimit and LargeItemLimit parameters for the move request by using
Set-MoveRequest -BadItemLimit <number> -LargeItemLimit <number> -AcceptLargeDataLoss
- Target User Already Has A Primary Mailbox
This error occurs when a user is included in a migration batch that has already been migrated. Remove the user from the migration batch.
- Mailbox Is Already Being Moved To <databasename>
This error can happen if a move request is created manually using the New-MoveRequest cmdlet prior to the mailbox’s inclusion in a batch. Either remove the existing move request or remove the user from the migration batch.
- The Request Channel Timed Out While Waiting For A Reply
This error is frequently caused by an incorrect load-balancer configuration or another device interrupting the MRSProxy traffic (such as an intrusion detection/intrusion prevention appliance or an SSL offloading configuration). Ensure that Exchange Online can reach the on-premises Exchange server environment without any packet-inspecting devices acting as intermediaries.
Public folders
In a hybrid Exchange deployment, public folders can exist either on-premises or in-cloud. They can only exist in one place at a time, so it’s important to plan where they will be, based on your user mailbox locations and Exchange versions.
Typically, the recommended migration plan is to move public folders to Office 365 after all the mailboxes have been moved to Exchange Online.
Hybrid public folders
There are two types of hybrid public folder implementations—those in which the public folders exist on-premises and those in which the public folders exist online. Use the information in Table 13-6 to determine what options are available, based on your public folder and user mailbox locations.
Table 13-6 Hybrid public folder topologies
Public folder location |
On-premises Exchange 2007 or Exchange 2010 mailbox |
On-premises Exchange 2013 mailbox |
Exchange Online mailbox |
Exchange 2003 |
Not Supported |
Not Supported |
Not Supported |
Exchange 2007 or Exchange 2010 |
N/A |
N/A |
Supported |
Exchange 2013 |
N/A |
N/A |
Supported |
Exchange Online |
Not Supported |
Supported |
N/A |
On-premises public folders
Hybrid public folder deployments in which the public folders are on-premises are the most common coexistence or migration strategy. In this case, you might be migrating your users and data to Office 365 and need to provide access to on-premises public folders for users whose mailboxes have already been moved.
This is the simplest deployment, because the requirements are the easiest to meet and the configuration steps can be minimal, depending on your on-premises environment. The prerequisites are as follows.
- Your on-premises Exchange environment is accessible through the Internet.
- Autodiscover is configured properly and points to an on-premises endpoint. Hybrid public folders in Exchange Online use Autodiscover to locate on-premises public folders.
- Outlook Anywhere has been configured on your Exchange servers.
- You have the correct permissions or role group memberships.
- For Exchange Online, you are a member of the Organization Management role group.
- For Exchange 2010, you are a member of the Organization Management or Server Management role-based access control (RBAC) role groups.
- For Exchange 2007, you have been assigned the Exchange Organization Administrator or Exchange Server Administrator roles as well as the Public Folder Administrator role. You are also a member of the local Administrators group on the Exchange server hosting the public folder database.
- For Exchange 2007, if your server is running Windows Server 2008 x64 or Windows Server 2003 x64, you have upgraded to Windows PowerShell 2.0 and WinRM 2.0.
- All Exchange Online users attempting to access on-premises public folders are represented by an on-premises mail-enabled user object.
- You have downloaded the public folder sync scripts from https://www.microsoft.com/en-us/download/details.aspx?id=46381 and saved them to a folder on one of the public folder servers, such as C:PFScripts.
Exchange 2007
When configuring prerequisites for hybrid public folders or public folder migrations for Exchange 2007, you only need to create a mailbox database and a mailbox and then update the organization configuration in Exchange Online to point to the new mailbox.
- Create an empty mailbox database on each public folder server. This mailbox database will be used for the public folder proxy mailbox you create. No other mailboxes should be placed on this database.
New-MailboxDatabase -StorageGroup “<PFServerNameStorageGroup>” -Name <NewPFDatabaseName>
- On each public folder server, add a mailbox in the database created in the previous step.
New-Mailbox -Name <PFMailbox1> -Database <NewPFDatabaseName>
Set-Mailbox -Identity <PFMailbox1> -HiddenFromAddressListsEnabled $true
- Launch a Windows PowerShell session and change to the folder containing the public folder sync scripts.
- Run the following command daily to synchronize the mail-enabled public folders to Exchange Online, using your Office 365 credentials when prompted.
Sync-MailPublicFolders.ps1 -Credential (Get-Credential) -CsvSummaryFile:sync_summary.csv
- Connect to Exchange Online PowerShell and run the following command, specifying all the public folder mailboxes created in step 1 for the RemotePublicFolderMailboxes parameter.
Set-OrganizationConfig -PublicFoldersEnabled Remote -RemotePublicFolderMailboxes PFMailbox1,PFMailbox2,PFMailbox3
Exchange 2010
The prerequisites for configuring hybrid public folders or public folder migrations for Exchange 2010 are a little more involved, requiring everything that Exchange 2007 does, as well as configuration of the Client Access Server role on public folder servers.
- Install and configure the Client Access Server role on all mailbox servers that have a public folder database.
The public folder servers do not have to be part of a client access load balancing, but they do need the Microsoft Exchange RpcClientAccess service to be running.
- Create an empty mailbox database on each public folder server and exclude it from the mailbox provisioning load balancer.
This mailbox database will be used for the public folder proxy mailbox you create. No other mailboxes should be placed on this database.
New-MailboxDatabase -Server <PFServerName> -Name <NewPFDatabaseName> -IsExcludedFromProvisioning $true
- On each public folder server, add a mailbox in the database created in the previous step.
New-Mailbox -Name <PFMailbox1> -Database <NewPFDatabasename>
Set-Mailbox -Identity <PFMailbox1> -HiddenFromAddressListsEnabled $true
- On each public folder server, enable Autodiscover to return the public folder mailboxes.
Set-MailboxDatabase <NewPFDatabaseName> -RPCClientAccessServer <PFServerName>
- Launch a Windows PowerShell session and change to the folder containing the public folder sync scripts.
- Run the following command daily to synchronize the mail-enabled public folders to Exchange Online, using your Office 365 credentials when prompted.
Sync-MailPublicFolders.ps1 -Credential (Get-Credential) -CsvSummaryFile:sync_summary.csv
- Connect to Exchange Online PowerShell and run the following command, specifying all the public folder mailboxes created in step 1 for the RemotePublicFolderMailboxes parameter.
Set-OrganizationConfig -PublicFoldersEnabled Remote -RemotePublicFolderMailboxes PFMailbox1,PFMailbox2,PFMailbox3
Exchange 2013 and Exchange 2016
Due to the consolidation of server roles for Exchange 2013 and Exchange 2016, the Client Access Server role is already present on any servers on which mailboxes or public folders are deployed. Exchange 2013 and Exchange 2016 use modern public folders (where the public folder data is stored in public folder mailboxes), so the steps to create separate public folder mailboxes are unnecessary. You only need to configure Exchange Online with the on-premises public folder mailbox names.
- Get a list of all on-premises public folder mailboxes from Exchange Management Shell.
Get-Mailbox -PublicFolder | Select Alias
- Launch a Windows PowerShell session and change to the folder containing the public folder sync scripts.
- Run the following command daily to synchronize the mail-enabled public folders to Exchange Online, using your Office 365 credentials when prompted.
Sync-MailPublicFolders.ps1 -Credential (Get-Credential) -CsvSummaryFile:sync_summary.csv
- Connect to Exchange Online PowerShell and run the following command, specifying all the public folder mailboxes obtained in step 1 for the RemotePublicFolderMailboxes parameter.
Set-OrganizationConfig -PublicFoldersEnabled Remote -RemotePublicFolderMailboxes PFMailbox1,PFMailbox2,PFMailbox3
Online public folders
In this type of hybrid configuration, your mailbox users are on-premises, and your public folders are online. You might have already migrated your public folders to Exchange Online, or you might have created and begun using new public folders in Exchange Online. In either case, you need to synchronize contacts for the mail-enabled public folders to your on-premises environment so they are available as mail recipients. The prerequisites are as follows.
- All user mailboxes are hosted on Exchange 2013.
- Autodiscover is configured properly and points to an on-premises endpoint.
- Outlook Anywhere has been configured on your Exchange servers.
- You have downloaded the public folder sync scripts from https://www.microsoft.com/en-us/download/details.aspx?id=52037 and saved them to a folder on one of the Exchange servers, such as C:PFScripts.
To configure Exchange Online public folders, follow these steps.
- Launch a Windows PowerShell session and change to the folder containing the public folder sync scripts.
- Run the following command daily to sync mail-enabled public folders from Exchange Online to your on-premises Active Directory.
Sync-MailPublicFoldersCloudToOnprem.ps1 -Credential (Get-Credential)
- Run the following command daily to sync public folder mailboxes from Exchange Online to your on-premises Active Directory.
Import-PublicFolderMailboxes.ps1 -Credential (Get-Credential)
- From the on-premises Exchange Management Shell, run the following command to enable access to Exchange Online public folders.
Set-OrganizationConfig -PublicFoldersEnabled Remote
Public folder migration
Public folders can be migrated from Exchange 2007, Exchange 2010, Exchange 2013, or Exchange 2016 to Office 365 or Exchange Online. The following are the general prerequisites to do this.
- Your on-premises Exchange environment is accessible through the Internet.
- Autodiscover is configured properly and points to an on-premises endpoint. Hybrid public folders in Exchange Online uses Autodiscover to locate on-premises public folders.
- Outlook Anywhere has been configured on your Exchange servers.
- You have the correct permissions or role group memberships.
- For Exchange Online, you are a member of the Organization Management role group.
- For Exchange 2007, you have been assigned the Exchange Organization Administrator role or Exchange Server Administrator role as well as the Public Folder Administrator role. You are also a member of the local Administrators group on the Exchange server hosting the public folder database.
- For Exchange 2010, Exchange 2013, and Exchange 2016, you are a member of the Organization Management or Server Management role-based access control (RBAC) role groups.
- You have checked your public folders for invalid names by using IDFix for Public Folders, available at https://gallery.technet.microsoft.com/IDFix-for-Public-Folders-341522d6.
- SMTP addresses and aliases for mail-enabled public folders are unique across your organization.
- There are no orphaned public folder mail objects in the Microsoft Exchange System Objects container in Active Directory.
- You have checked your public folders for size. If you have any individual folders greater than 2 GB, consider deleting some content, migrating some content to another folder, or increasing the public folder quota size.
- You don’t have more than 10,000 subfolders in any particular folder, because this can cause the migration to fail. This is typically only an issue in the DUMPSTER_ROOT folder. To see whether this could affect you, run the following command from the on-premises Exchange Management Shell.
(Get-PublicFolder -GetChildren “NON_IPM_SUBTREEDUMPSTER_ROOT”).Count
- You have verified that your servers meet the minimum software requirements.
- For Exchange 2007, your servers are running Service Pack 3 with RollUp 15 or later.
- For Exchange 2007, if your server is running Windows Server 2008 x64 or Windows Server 2003 x64, you have upgraded to Windows PowerShell 2.0 and WinRM 2.0.
- For Exchange 2010, your servers are running Service Pack 3 with RollUp 8 or later.
- For Exchange 2013, you have deployed Cumulative Update 15 or later.
Exchange 2007 or Exchange 2010
Before you begin migrating, you must ensure that your environment meets the prerequisites and that you have completed the planning exercises necessary.
In addition to the general prerequisites, there are some version-specific prerequisites as well.
- You have downloaded the scripts and supporting files from https://www.microsoft.com/en-us/download/details.aspx?id=38407 and saved them to a folder on one of your Exchange servers in a directory such as C:PFScripts.
- You have downloaded the public folder sync scripts from https://www.microsoft.com/en-us/download/details.aspx?id=46381 and saved them to a folder on one of the public folder servers, such as C:PFScripts.
To migrate public folders, follow these steps.
- If you are using Azure AD Connect to synchronize your directories, ensure that you are not synchronizing Exchange mail public folders, because that causes the migration to fail. If you are not using AAD Connect, you can skip this step.
- On the server running AAD Connect, launch the Azure AD Connect Setup Wizard.
- Click Configure.
- Click Customize Synchronization Options and then click Next.
- On the Connect To Azure AD page, enter your Office 365 credentials and click Next.
- On the Connect Your Directories page, click Next.
- On the Domain And OU Filtering page, click Next.
- On the Optional Features page, ensure that the check box for Exchange Mail Public Folders is cleared. If it is selected, clear it and click Next. Otherwise, you can cancel the wizard and exit it.
- If Group Writeback was selected, click Next on the Writeback page.
- On the Ready To Configure page, click Configure.
- Click Exit.
If you had to clear the Exchange Mail Public Folders check box on the Optional Features page, you must run a full import and synchronization because the wizard removes six synchronization rules and clears the public folder object type in the connector properties.
- On the older Exchange server you have downloaded the public folder scripts to, launch a Windows PowerShell session, change to the directory containing the downloaded public folder scripts, and connect to Exchange Online:
$Session = New-PSSession -ConfigurationName Mircrosoft.Exchange -ConnectionUri https://outlook.office365.com/powershell-liveid -Authentication Basic -AllowRedirection -Credential (Get-Credential)

Import-PSSession $Session
- On the older Exchange server you have downloaded the public folder scripts to, launch an Exchange Management Shell session and change to the directory containing the downloaded public folder scripts.
- Check for existing public folder migrations in both Exchange Online and Exchange on-premises management shells and check to make sure all entries are returned as False.
Get-OrganizationConfig | FL Public*Migration*
The screen output should look similar to the following.
PublicFoldersLockedForMigration        : False
PublicFolderMigrationComplete          : False
PublicFolderMailboxesMigrationComplete : False
If any of the preceding conditions are true, a public folder migration has been started or completed or is underway.
- If you are certain that no public folder migrations have occurred or are in progress, you can set the values to false with the following command.
Set-OrganizationConfig -PublicFoldersLockedforMigration:$false -PublicFolderMigrationComplete:$false
- Check to ensure that no public folder mailboxes have been created in Exchange Online. If they have, remove them with the following commands from your Exchange Online PowerShell session.
Get-PublicFolderMigrationRequest | Remove-PublicFolderMigrationRequest -Confirm:$False $PFMigrationBatch = Get-MigrationBatch | ? { $_.MigrationType.ToString() -eq “Public Folder” } $PFMigrationBatch | Remove-MigrationBatch -Confirm:$False Get-MailPublicFolder | where {$_.EntryId -ne $null}| Disable-MailPublicFolder -Confirm:$false Get-PublicFolder -GetChildren | Remove-PublicFolder -Recurse -Confirm:$false $hierarchyMailboxGuid = $(Get-OrganizationConfig).RootPublicFolderMailbox.HierarchyMailboxGuid Get-Mailbox -PublicFolder:$true | Where-Object {$_.ExchangeGuid -ne $hierarchyMailboxGuid} | Remove-Mailbox -PublicFolder -Confirm:$false Get-Mailbox -PublicFolder:$true | Where-Object {$_.ExchangeGuid -eq $hierarchyMailboxGuid} | Remove-Mailbox -PublicFolder -Confirm:$false - Check the public folder quota sizes by using the following command from your Exchange Online PowerShell session.
Get-OrganizationConfig | fl *quot*
DefaultPublicFolderIssueWarningQuota : 1.7 GB (1,825,361,920 bytes)
DefaultPublicFolderProhibitPostQuota : 2 GB (2,147,483,648 bytes)
- If you have public folders larger than 2 GB, adjust this. For example, this command can be run in the Exchange Online PowerShell session to set the public folder warning quota to 9.5 GB and the hard quota to 10 GB.
Set-OrganizationConfig -DefaultPublicFolderIssueWarningQuota 9.5GB -DefaultPublicFolderProhibitPostQuota 10GB
- Capture public folder statistics and permissions by using the following commands from the on-premises Exchange Management Shell.
Get-PublicFolder -Recurse -ResultSize Unlimited | Export-Clixml .LegacyPFStructure.xml

Get-PublicFolder -Recurse -ResultSize Unlimited | Get-PublicFolderStatistics | Export-Clixml .LegacyPFStatisticsRecurse.xml

Get-PublicFolder -Recurse -ResultSize Unlimited | Get-PublicFolderClientPermission | Select-Object Identity,User -ExpandProperty AccessRights | Export-Clixml .LegacyPFPerms.xml
- From your on-premises Exchange Management Shell, create an accepted domain to be used to route mail for mail-enabled public folders. The DomainName parameter is a well-known ID, so be sure to create it as specified, replacing <tenant>.onmicrosoft.com with your Office 365 tenant ID.
New-AcceptedDomain -Name “PublicFolderDestination_78c0b207_5ad2_4fee_8cb9_f373175b3f99” -DomainName <tenant>.onmicrosoft.com -DomainType InternalRelay
- Run a final check to ensure that you don’t have any public folders with forward slashes or backslashes.
- For Exchange 2007, run this command from the Exchange Management Shell.
Get-PublicFolderDatabase | % { Get-PublicFolderStatistics -Server $_.Server | ? { ($_.Name -like “**“) -or ($_.Name -like “*/*“)} | FL Name,Identity - For Exchange 2010, run this command from the Exchange Management Shell.
Get-PublicFolderStatistics -ResultSize Unlimited | ? { ($_.Name -like “**“) -or ($_.Name -like “*/*“)} | FL Name,Identity
- For Exchange 2007, run this command from the Exchange Management Shell.
- Back up the Send-As permissions. From the Exchange Management Shell, run the following command.
Get-MailPublicFolder -ResultSize Unlimited | Get-ADPermission | ? {($_.ExtendedRights -Like “Send-As”) -and ($_.IsInherited -eq $False) -and -not ($_.User -like “*S-1-5-21-*“)} | Select Identity,User | Export-Csv Send_As.csv -NoTypeInformation - Back up the Send-On-Behalf permission. From the Exchange Management Shell, run the following script.
Get-MailPublicFolder | Select Alias,PrimarySmtpAddress,@{N=”GrantSendOnBehalfTo”;E={$_.GrantSendOnBehalfTo -join “|“}} | Export-Csv GrantSendOnBehalfTo.csv -NoTypeInformation $File = Import-Csv .GrantSendOnBehalfTo.csv $Data = @() Foreach ($line in $File) { If ($line.GrantSendOnBehalfTo) { Write-Host -ForegroundColor Green “Processing Public Folder $($line.Alias)“ [array]$LineRecipients = $line.GrantSendOnBehalfTo.Split(“|“) Foreach ($Recipient in $LineRecipients) { Write-Host -ForegroundColor DarkGreen “ $($Recipient)“ $GrantSendOnBehalfTo = (Get-Recipient $Recipient).PrimarySmtpAddress $LineData = New-Object PSCustomObject $LineData | Add-Member -Type NoteProperty -Name Alias -Value $line.Alias $LineData | Add-Member -Type NoteProperty -Name PrimarySmtpAddress -Value $line.PrimarySmtpAddress $LineData | Add-Member -Type NoteProperty -Name GrantSendOnBehalfTo -Value $GrantSendOnBehalfTo $Data += $LineData } } } $Data | Export-Csv .GrantSendOnBehalfTo-Resolved.csv -NoTypeInformation - Run the Export-PublicFolderStatistics.ps1 script from the Exchange Management Shell.
.Export-PublicFolderStatistics.ps1 C:PFScriptsPFStatistics.csv <PFServerName>
If you have more than 10,000 public folders, you probably want to modify the Export-PublicFolderStatistics.ps1 script. Look for the $index%10000 string and update it to $index%100000 (or a number higher than your existing public folder count), as shown in Figure 13-44.
Figure 13-44 Updating code for public folder count
- Run the public folder mapping generator.
The mapping generator reads the CSV created in the previous step and assigns branches of the public folder tree to individual public folder mailboxes based on the size of the public argument you give it. The syntax is:
.PublicFolderToMailboxMapGenerator.ps1 <size> <Name of CSV from previous step> <output map file>
For example, if you want to divide the public folder content into 10 GB mailboxes, use the previously generated PFStatistics.csv file and set the output to PFMapFile.csv.
.PublicFolderToMailboxMapGenerator.ps1 10000000000 PFStatistics.csv PFMapFile.csv
You should receive output that looks similar to the following.
[4/8/2017 4:02:22 AM] Reading public folder list...
[4/8/2017 4:02:22 AM] Loading folder hierarchy...
[4/8/2017 4:02:24 AM] Allocating folders to mailboxes...
[4/8/2017 4:02:24 AM] Trying to accomodate folders with their parent...
[4/8/2017 4:02:24 AM] Exporting folder mapping...
The public folder map file output is a list of target public folder mailboxes and which branch of the public folder tree is the first one in the public folder mailbox. The public folder mapping generator processes the public folder statistics output and distributes the public folder branches among the public folder mailboxes by using the specified target public folder mailbox size.
Because the output is readable, you can edit it and make adjustments based on your working knowledge of the public folder hierarchy, how you might expect data to grow, or how active a particular folder or branch might be. See Figure 13-45.
Figure 13-45 Public folder mapping generator output
After you have completed the mapping file, you create public folder mailboxes in Exchange Online based on the mapping file.
- Switch to the Windows PowerShell window connected to Exchange Online and then use the Create-PublicFolderMailboxesForMigration.ps1 script to complete this task.
.Create-PublicFolderMailboxesForMigration.ps1 -FolderMappingCsv C;PFScriptsPFMapFile.csv -EstimatedNumberOfConcurrentUsers 40000
Depending on how many users you have, the Create-PublicFolderMailboxesForMigration.ps1 script might generate more public folder mailboxes than the mapping generator tool said you needed. The Create-PublicFolderMailboxesForMigration.ps1 script creates one mailbox for every 2,000 users, and if that comes to a greater number of mailboxes than the mapping generator recommended, you are prompted to acknowledge the update. After it has completed, you see an output similar to Figure 13-46. If you were prompted to create more mailboxes, you see them named AutoSplit_GUID, and the IsMigrationTarget property is set to False for those mailboxes.
Figure 13-46 Create-PublicFolderMailboxesForMigration.ps1 output
- Launch a new Windows PowerShell prompt and run .Sync-MailPublicFolders.ps1 to sync the mail objects to Exchange Online. Don’t run this from the Exchange Management Shell or the existing Windows PowerShell prompt connected to Exchange Online. After the sync has run, you can close this Windows PowerShell window.
.Sync-MailPublicFolders.ps1 -Credential (Get-Credential) -CsvSummaryFile:SyncOutput.csv
- Review the output in the CSV Summary File for errors.
These errors must be resolved prior to migration.
- In your Exchange Management Console window, ensure that you are in the C:PFScripts directory and then run the following commands.
(Get-Mailbox <admin user>).legacyExchangeDN | Out-File .MailboxLegacyExchangeDN.txt (Get-ExchangeServer <public folder server>).ExchangeLegacyDN | Out-File .ServerExchangeLegacyDN.txt $OAEndpoint = ((Get-ExchangeServer | ? { $_.ServerRole -match “ClientAccess”})[0]|Get-OutlookAnywhere).ExternalHostName $OAEndpoint | Out-File .OAEndpoint.txt - Switch to the Windows PowerShell window connected to Exchange Online and ensure that you are in the C:PFScripts directory, because that is where the output of the previous step’s commands was saved. Run these commands in the Exchange Online PowerShell window:
cd PFScripts
$OAEndopint = gc .OAEndpoint.txt
$MailboxLegacyExchangeDN = gc .MailboxLegacyExchangeDN.txt
$ServerExchangeLegacyDN = gc .ServerExchangeLegacyDN.txt
$Credential = Get-Credential <domainadmin user>
The credential specified in the $Credential variable must be an on-premises administrator account in DOMAINUsername format. If it is not in that format, the endpoint creation will fail with an authentication error.
- Create the public folder migration endpoint in Exchange Online. From the Exchange Online PowerShell window, run the following command.
$PFEndpoint = New-MigrationEndpoint -PublicFolder -Name PublicFolderEndPoint -RpcProxyServer $OAEndPoint -Credentials $Credential -SourceMailboxLegacyDN $MailboxLegacyExchangeDN -PublicFolderDatabaseServerLegacyDN $ServerExchangeLegacyDN -Authentication Basic
- Create the public folder migration batch.
New-MigrationBatch -Name PublicFolderMigration -CSVData (Get-Content .PFMapFile.csv -Encoding Byte) -SourceEndpoint $PFEndpoint.Identity -NotificationEmails <emailaddress>
- To begin the migration, run the following command.
Start-MigrationBatch -Identity PublicFolderMigration
- To check on the status of the migration, you can run:
Get-Migrationuser -BatchID PublicFolderMigration | Get-MigrationUserStatistics | Select Identity,Status,SyncedItemCount,SkippedItemCount,BytesTransferred,PercentageComplete
- After all mailboxes show the Synced status, you can complete the migration batch. To do this, lock the public folders on the source side first. From the on-premises Exchange Management Shell, run the following command.
Set-OrganizationConfig -PublicFoldersLockedForMigration $True
- Run the Complete-MigrationBatch command from the Exchange Online PowerShell session to complete the migration.
Complete-MigrationBatch -Identity PublicFolderMigration


Exchange 2013 or Exchange 2016
Before you begin migrating, you must ensure that your environment meets the prerequisites and that you have completed the planning exercises necessary.
In addition to the general prerequisites, make sure you have downloaded the scripts and supporting files from https://www.microsoft.com/en-us/download/details.aspx?id=54855 and saved them to a folder on one of your Exchange servers in a directory such as C:PFScripts.
To migrate public folders, follow these steps.
- If you are using Azure AD Connect to synchronize your directories, ensure that you are not synchronizing Exchange mail public folders, because that causes the migration to fail. If you are not using AAD Connect, you can skip this step.
- On the server running AAD Connect, launch the Azure AD Connect Setup Wizard.
- Click Configure.
- Click Customize Synchronization Options and then click Next.
- On the Connect To Azure AD page, enter your Office 365 credentials and click Next.
- On the Connect Your Directories page, click Next.
- On the Domain And OU Filtering page, click Next.
- On the Optional Features page, ensure that the Exchange Mail Public Folders check box is cleared. If it is selected, clear it and click Next. Otherwise, you can cancel the wizard and exit it.
- If Group Writeback was selected, click Next on the Writeback page.
- On the Ready To Configure page, click Configure.
- Click Exit.
If you had to clear the Exchange Mail Public Folders check box on the Optional Features page, you must run a full import and synchronization because the wizard removes six synchronization rules and clears the public folder object type in the connector properties.
- On the Exchange server you have downloaded the public folder scripts to, launch a Windows PowerShell session, change to the directory containing the downloaded public folder scripts, and connect to Exchange Online.
$Session = New-PSSession -ConfigurationName Mircrosoft.Exchange -ConnectionUri https://outlook.office365.com/powershell-liveid -Authentication Basic -AllowRedirection -Credential (Get-Credential)

Import-PSSession $Session
- On the Exchange server you have downloaded the public folder scripts to, launch an Exchange Management Shell session and change to the directory containing the downloaded public folder scripts.
- Check for existing public folder migrations in the Exchange Online PowerShell window and make sure all entries are returned as False. From the Exchange Online PowerShell, run the following commands to clear any existing migration requests.
Get-PublicFolderMigrationRequest | Remove-PublicFolderMigrationRequest Get-MigrationBatch | ?{$_.MigrationType.ToString() -eq “PublicFolder”} | Remove-MigrationBatch - Remove any existing public folder mailboxes or public folders that have been created in Exchange Online. If they do exist, you might want to confirm that the data is no longer needed. Existing public folder mailboxes or public folders cause the migration to fail. From the Exchange Online PowerShell window, run the following commands.
Get-MailPublicFolder -ResultSize Unlimited | where {$_.EntryId -ne $null}| Disable-MailPublicFolder -Confirm:$false Get-PublicFolder -GetChildren -ResultSize Unlimited | Remove-PublicFolder -Recurse -Confirm:$false $hierarchyMailboxGuid = $(Get-OrganizationConfig).RootPublicFolderMailbox.HierarchyMailboxGuid Get-Mailbox -PublicFolder | Where-Object {$_.ExchangeGuid -ne $hierarchyMailboxGuid} | Remove-Mailbox -PublicFolder -Confirm:$false -Force Get-Mailbox -PublicFolder | Where-Object {$_.ExchangeGuid -eq $hierarchyMailboxGuid} | Remove-Mailbox -PublicFolder -Confirm:$false -Force Get-Mailbox -PublicFolder -SoftDeletedMailbox | Remove-Mailbox -PublicFolder -PermanentlyDelete:$true - Check for any existing public folder migrations in your on-premises environment. You might have previously migrated to Exchange 2013 or 2016, so you must remove those migration requests and artifacts to migrate to Office 365. From the on-premises Exchange Management Shell, run the following command.
Get-OrganizationConfig | Format-List PublicFoldersLockedforMigration, PublicFolderMigrationComplete, PublicFolderMailboxesLockedForNewConnections, PublicFolderMailboxesMigrationComplete
If either the PublicFoldersLockedforMigration or PublicFolderMigrationComplete parameters are $true, it means you have migrated older public folders at some point. Make sure any older public folder databases have been decommissioned before you continue.
- If any of the properties from the preceding command are listed $true, set them to $false by running the following command in the on-premises Exchange Management Shell.
Set-OrganizationConfig -PublicFoldersLockedforMigration:$false -PublicFolderMigrationComplete:$false -PublicFolderMailboxesLockedForNewConnections:$false -PublicFolderMailboxesMigrationComplete:$false
- Run the following commands from the on-premises Exchange Management Shell to capture information about the current public folder structure.
Get-PublicFolder -Recurse -ResultSize Unlimited | Export-CliXML OnPrem_PFStructure.xml

Get-PublicFolderStatistics -ResultSize Unlimited | Export-CliXML OnPrem_PFStatistics.xml

Get-PublicFolder -Recurse -ResultSize Unlimited | Get-PublicFolderClientPermission | Select-Object Identity,User -ExpandProperty AccessRights | Export-CliXML OnPrem_PFPerms.xml

Get-MailPublicFolder -ResultSize Unlimited | Export-CliXML OnPrem_MEPF.xml
- Run the following command from the on-premises Exchange Management Shell to capture Send-As permissions.
Get-MailPublicFolder -ResultSize Unlimited | Get-ADPermission | ? {($_.ExtendedRights -Like “Send-As”) -and ($_.IsInherited -eq $False) -and -not ($_.User -like “*S-1-5-21-*“)} | Select Identity,User | Export-Csv Send_As.csv -NoTypeInformation - Run the following script from the on-premises Exchange Management Shell to capture Send-On-Behalf permissions.
Get-MailPublicFolder | Select Alias,PrimarySmtpAddress,@{N=”GrantSendOnBehalfTo”;E={$_.GrantSendOnBehalfTo -join “|“}} | Export-Csv GrantSendOnBehalfTo.csv -NoTypeInformation $File = Import-Csv .GrantSendOnBehalfTo.csv $Data = @() Foreach ($line in $File) { If ($line.GrantSendOnBehalfTo) { Write-Host -ForegroundColor Green “Processing Public Folder $($line.Alias)“ [array]$LineRecipients = $line.GrantSendOnBehalfTo.Split(“|“) Foreach ($Recipient in $LineRecipients) { Write-Host -ForegroundColor DarkGreen " $($Recipient)“ $GrantSendOnBehalfTo = (Get-Recipient $Recipient).PrimarySmtpAddress $LineData = New-Object PSCustomObject $LineData | Add-Member -Type NoteProperty -Name Alias -Value $line.Alias $LineData | Add-Member -Type NoteProperty -Name PrimarySmtpAddress -Value $line.PrimarySmtpAddress $LineData | Add-Member -Type NoteProperty -Name GrantSendOnBehalfTo -Value $GrantSendOnBehalfTo $Data += $LineData } } } $Data | Export-Csv .GrantSendOnBehalfTo-Resolved.csv -NoTypeInformation - From the on-premises Exchange Management Shell, run the Export-ModernPublicFolderStatistics.ps1 script to create the initial statistics data you will use for the public folder mapping generator.
.Export-ModernPublicFolderStatistics.pf1 PFStatistics.csv
- From the on-premises Exchange Management Shell, run the ModernPublicFolderToMailboxMapGenerator.ps1 script to create the CSV file that maps public folder branches into individual public folder mailboxes.
- The MailboxSize parameter specifies the maximum size each public folder mailbox should be.
- The MailboxRecoverableItemsSize parameter is the recoverable items quota for Exchange Online mailboxes.
- The ImportFile parameter specifies the public folder statistics file created in the previous step.
- The ExportFile parameter specifies the output file that will contain the public folder top-level branch-to-public folder mailbox mapping.
.ModernPublicFolderToMailboxMapGenerator.ps1 -MailboxSize 25GB -MailboxRecoverableItemsSize 1GB -ImportFile .PFStatistics.csv -ExportFile PFmap.csv
- From the Exchange Online PowerShell window, run the following commands to create the public folder mailboxes.
$mappings = Import-Csv PFMap.csv
$primaryMailboxName = ($mappings | Where-Object FolderPath -eq “” ).TargetMailbox

New-Mailbox -HoldForMigration:$true -PublicFolder -IsExcludedFromServingHierarchy:$false $primaryMailboxName

($mappings | Where-Object TargetMailbox -ne $primaryMailboxName).TargetMailbox | Sort-Object -unique | ForEach-Object { New-Mailbox -PublicFolder -IsExcludedFromServingHierarchy:$false $_ }
- From the on-premises Exchange Management Shell, run the following script and enter your Office 365 credential when prompted.
.Sync-ModernMailPublicFolders.ps1 -Credential (Get-Credential) -CsvSummaryFile:sync_summary.csv
- From the on-premises Exchange Management Shell, run the following commands.
(Get-Mailbox <admin user>).legacyExchangeDN | Out-File .MailboxLegacyExchangeDN.txt

(Get-ExchangeServer <public folder server>).ExchangeLegacyDN | Out-File .ServerExchangeLegacyDN.txt

$OAEndpoint = (Get-ExchangeServer).[0].ExternalHostNameHostnameString

$OAEndpoint | Out-File .OAEndpoint.txt
- Switch to the Windows PowerShell window connected to Exchange Online and ensure that you are in the C:PFScripts directory, because that is where the output of the previous step’s commands was saved. Run these commands in the Exchange Online PowerShell window:
cd PFScripts
$OAEndopint = gc .OAEndpoint.txt
$MailboxLegacyExchangeDN = gc .MailboxLegacyExchangeDN.txt
$ServerExchangeLegacyDN = gc .ServerExchangeLegacyDN.txt
$Credential = Get-Credential <domainadmin user>
The credential specified in the $Credential variable must be an on-premises administrator account in DOMAINUsername format. If it is not in that format, the endpoint creation will fail with an authentication error.
- Create the public folder migration endpoint in Exchange Online. From the Exchange Online PowerShell window, run the following command.
$PFEndpoint = New-MigrationEndpoint -PublicFolder -Name PublicFolderEndPoint -RpcProxyServer $OAEndPoint -Credentials $Credential -SourceMailboxLegacyDN $MailboxLegacyExchangeDN -PublicFolderDatabaseServerLegacyDN $ServerExchangeLegacyDN -Authentication Basic
- Create the public folder migration batch.
New-MigrationBatch -Name PublicFolderMigration -CSVData (Get-Content .PFMapFile.csv -Encoding Byte) -SourceEndpoint $PFEndpoint.Identity -NotificationEmails <emailaddress>
- To begin the migration, run the following command.
Start-MigrationBatch -Identity PublicFolderMigration
- To check on the status of the migration, you can run:
Get-Migrationuser -BatchID PublicFolderMigration | Get-MigrationUserStatistics | Select Identity,Status,SyncedItemCount,SkippedItemCount,BytesTransferred,PercentageComplete
- After all mailboxes show the Synced status, you can complete the migration batch. To do this, lock the public folders on the source side first. From the on-premises Exchange Management Shell, run the following command.
Set-OrganizationConfig -PublicFoldersLockedForNewConnections $True
- After the PublicFoldersLockedForNewConnections parameter has replicated, run the following command from the Exchange Online PowerShell window.
Compete-MigrationBatch -Identity PublicFolderMigration
Post-migration configuration
After migrations have completed, you might need to reapply permissions, configure the location of public folders in both the Exchange cloud and on-premises organizations, and update the mail routing configuration.
Exchange Online public folder location
Update the organization settings to use Exchange Online as the public folder source.
From an Exchange Online PowerShell session, run the following commands.
Set-OrganizationConfig -PublicFoldersEnabled Local -RemotePublicFolderMailboxes $null
Get-Mailbox -PublicFolder | Set-Mailbox -PublicFolder -IsExcludedFromServingHierarchy $false
Set-Mailbox -Identity <test user> -DefaultPublicFolderMailbox <public folder mailbox1>
After waiting for a few minutes, log on to Outlook at the user specified in the -Identity parameter and access the public folders.
Exchange Online mail-enabled public folder routing
Depending on how the on-premises organization is configured and where the organization’s MX record is configured, you might need to perform one or more mail routing configurations.
If your MX record is pointed to Office 365, disable Directory-Based Edge Blocking (DBEB) so that mail-enabled public folders can receive Internet mail. From the Exchange Online PowerShell window, run the following command to disable DBEB.
Set-AcceptedDomain -Identity <domain.com> -DomainType InternalRelay
Exchange Online mail-enabled public folder external email address
If your on-premises public folders were migrated from Exchange 2013 or Exchange 2016, run the following script to update the on-premises mail-enabled public folder objects with the appropriate Exchange Online object. From the on-premises Exchange Management Shell, run the following script from the C:PFScripts directory.
.SetMailPublicFolderExternalAddress.ps1 -ExecutionSummaryFile:mepf_summary.csv
Exchange on-premises mail routing domain
If your MX record points to an on-premises gateway, or on-premises systems send mail to mail-enabled public folders in Exchange Online, you might need to configure the on-premises Office 365 connector to route messages for mail-enabled public folders over the Office 365 hybrid transport connector. This step might not be necessary if you have disabled DBEB in Exchange Online.
Modify the properties for the on-premises Outbound To Office 365 connector and add the <tenant>.onmicrosoft.com domain that was created as part of the public folder migration process.
Exchange on-premises public folder migration complete
Set the PublicFolderMigration property to true. From the on-premises Exchange Management Shell, run the following command.
Set-OrganizationConfig -PublicFolderMigrationComplete $True
Apply Send-As permissions
From the Exchange Online PowerShell session, change to the C:PFScripts directory containing the exported Send-As permissions file (SendAs.csv) created during the migration process and run the following script.
$SendAs = Import-Csv .SendAs.csv
$i=1
foreach ($obj in $SendAs)
    {
    write-host “$($i)/$($SendAs.Count) adding $($obj.User) to $($obj.Identity)“
    Add-RecipientPermission -Identity $obj.Identity.Split(“/“)[2] -Trustee $obj.User.Split(““)[1] -AccessRights SendAs -confirm:$false; $i++
    }
Apply Grant-Send-On-Behalf-To permissions
From the Exchange Online PowerShell session, change to the C:PFScripts directory containing the exported Send-On-Behalf permissions file (GrantSendOnBehalfTo-Resolved.csv) created during the migration process and run the following script.
$GrantSendOnBehalfTo = Import-Csv .GrantSendOnBehalfTo-Resolved.csv
$i=1
Foreach ($obj in $GrantSendOnBehalfTo)
    {
    Write-host “$($i)/$($grantsendonbehalfto.count) Granting $($obj.GrantSendOnBehalfTo) Send-On-Behalf to folder $($obj.PrimarySmtpAddress)“
    Set-MailPublicFolder -Identity $obj.PrimarySmtpAddress -GrantSendOnBehalfTo $obj.GrantSendOnBehalfTo
    $i++
    }
Troubleshooting
While migrating public folders, you might run into a number of kinds of errors, especially if your organization has a long history of public folders. Here are common errors you might encounter during migrations and how to resolve them.
- Active Directory Operation Failed. The Object Already Exists.
Error text: 4/12/2017 6:11:16 PM,1a3a8d9e-0eb6-4b8a-bf00-a305f5229c2e,Update,”Active Directory operation failed on CY1PR14A001DC04.NAMPR13A001.PROD.OUTLOOK.COM. The object ‘CN=FolderName,OU=tenant.onmicrosoft.com,OU=Microsoft Exchange Hosted Organizations,DC=NAMPR13A001,DC=PROD,DC=OUTLOOK,DC=COM’ already exists.”,”Set-EXOMailPublicFolder -OnPremisesObjectId:””ae9563f4-1056-44c1-846a-c948c771720b”” -HiddenFromAddressListsEnabled:””False”” -ExternalEmailAddress:””[email protected]”” -Alias:””FolderName”” -EmailAddresses:@(“”X400:C=US;A= ;P=ORG;O=Exchange;S=FolderName;””,””SMTP: [email protected]””,””x500:/O=ORG/OU=EXCHANGE/CN=RECIPIENTS/CN=FOLDERNAMEC89080BC4725C2AEEDFB74A5292C16AE6F7CEE””,””smtp: [email protected]””) -Name:””Folder Name”” -Identity:””CN=Folder Name,OU=tenant.onmicrosoft.com,OU=Microsoft Exchange Hosted Organizations,DC=NAMPR14A001,DC=PROD,DC=OUTLOOK,DC=COM”” -ErrorAction:””Stop”” -WindowsEmailAddress:””[email protected]”” -DisplayName:””Folder Name”””
Cause: This error appears in the CSVSummaryFile that Sync-MailPublicFolders.ps1 generates. It means there is a mail-enabled public folder and another mail-enabled public folder, mail-enabled group, contact, or user with one or more of the same values.
Resolution: You can use the following command in the on-premises Exchange Management Shell to locate it, replacing “Folder Name” with the value referenced in the error message:
Get-Recipient -anr “Folder Name”
- Exceeded Maximum Number Of Corrupted Items
Error text: Error: This mailbox exceeded the maximum number of corrupted items that were specified for this move request.
Cause: The number of corrupt or unreadable source items exceeded the BadItemLimit threshold.
Resolution: Remove corrupt items in the source public folder(s) or increase the error threshold. Increasing the error threshold is the simpler solution (and the result is the same).
Set-MigrationBatch -BadItemLimit 10000
- Subscription Couldn’t Be Loaded
Error text: WARNING: The subscription for the migration user <Mailbox> couldn’t be loaded. The following error was encountered: A subscription wasn’t found for this user.
Cause: Transient error retrieving mailbox information from Office 365.
Resolution: Non-fatal. This error usually resolves itself.
- Make Sure Public Folder Access Is Locked
Error text: Before finalizing the migration, it is necessary to lock down public folders on the legacy Exchange server (downtime required). Make sure public folder access is locked on the legacy Exchange server and then try to complete the batch again.
Cause: When running
Complete-MigrationBatch, you might receive this error if you haven’t updated the organization configuration to lock the public folders or have not waited long enough for the change to replicate.Resolution: Wait for the
Set-OrganizationConfigcommand to replicate. If you have not run it, run the following command in the on-premises Exchange Management Shell and wait 15 minutes before attempting to complete the migration.Set-OrganizationConfig -PublicFoldersLockedForMigration $True
- No Such Request Exists
Error text: Couldn’t find a request that matches the information provided. Reason: No such request exists.
Cause: Transient error when running Get-MigrationUser <mailbox> on a failed public folder mailbox. This error can happen during a database failover or while the mailbox request is being restarted.
Resolution: This error will resolve itself.
- Public Folder “/Path” Could Not Be Mail-Enabled
Error text: Public folder “/Path/To/Public Folder” could not be mail-enabled. This error message is displayed when reviewing the Get-MigrationUserStatistics report for a failed mailbox.
Cause: The mail-enabled public folder is missing required attributes.
Resolution: Launch the public folder administration tool and navigate to the public folder path specified in the error. Mail-disable the folder. Mail-enable the folder again, run Sync-MailPublicFolders.ps1 again, and restart the migration batch.
- Public Folders Could Not Be Mail-Enabled
Error text: Error: There are 30 Public Folders that could not be mail-enabled. Please, check the migration report starting at 4/9/2017 8:13:15 PM for additional details. This may indicate that mail public folder objects in Exchange Online are out of sync with your Exchange deployment. You may need to rerun the script Sync-MailPublicFolders.ps1 on your source Exchange server to update mail-enabled public folder objects in Exchange Online Active Directory.
Cause: The Microsoft Exchange System Objects container in Active Directory contains orphaned objects (objects without a parent path).
Solution: From the on-premises Exchange Management Shell, run the following script.
$resultsarray = @()
$mailpub = Get-MailPublicFolder -ResultSize unlimited
foreach ($folder in $mailpub) {
  $email      = $folder.primarysmtpaddress.local + “@” + $folder.primarysmtpaddress.domain
  $pubfolder  = Get-PublicFolder -Identity $folder.identity
  $folderpath = $pubfolder.parentpath + “” + $pubfolder.name
  # Create a new object for the purpose of exporting as a CSV
  $pubObject = new-object PSObject
  $pubObject | add-member -membertype NoteProperty -name “Email” -Value $email
  $pubObject | add-member -membertype NoteProperty -name “FolderPath” -Value $folderpath
  # Append this iteration of our for loop to our results array.
  $resultsarray += $pubObject
}

$resultsarray | export-csv -Path .mail-enabled-public-folders.csv -NoType

$NoPublicFolderPath = Import-Csv C:Tempmail-enabled-public-folders.csv | ? { $_.Parentpath -eq “” } | Export-Csv .NoFolderPath.csv -NoType
Launch Active Directory Users And Computers, enable View Advanced Features, and navigate to the Microsoft Exchange System Objects container. Review the NoFolderPath.csv and remove the corresponding items in the Microsoft Exchange System Objects container. Run Sync-MailPublicFolders.ps1 again and then restart the migration batch.
Mailbox provisioning
When the hybrid configuration is complete, new mailboxes can be provisioned directly in Exchange Online from the Exchange Management Shell. These new mailboxes are provisioned as remote mailboxes. The remote mailbox is a special type of mail-enabled user. In Exchange Server 2010, the objects are referred to as remote mailboxes. In Exchange Server 2013 and Exchange Server 2016, the display name has changed to Office 365 Mailbox.
The following steps illustrate how to create a new user and remote mailbox in one step or enable an existing user as a remote mailbox with Exchange Management Shell. In either case, after the next AAD Sync cycle is run, a temporary 30-day mailbox is created. The mailbox then must be licensed in Office 365 to make it a fully functional mailbox.
- Launch a browser and connect to the Exchange Admin Center for the on-premises Exchange organization.
- Navigate to Recipients | Mailboxes.
- Click the plus sign (+) and select Office 365 mailbox, as shown in Figure 13-47.
Figure 13-47 Creating a new Office 365 mailbox
- Fill out the new Office 365 Mailbox page with the required attributes as shown in Figure 13-48.
The email address policy that the Hybrid Configuration Wizard updated creates the proper proxy address for the remote mailbox and sets its remote routing address to the Exchange Online organization.
Figure 13-48 New Office 365 Mailbox dialog box
- Click Save.
The Exchange Admin Center shows the newly created Active Directory user account with an Office 365 mailbox. See Figure 13-49.
Figure 13-49 Recipients page showing new Office 365 mailbox
- Double-click the newly created user and select the Email Address tab as shown in Figure 13-50. View the email address details, including the remote routing address. Click Cancel.
Figure 13-50 User email address properties

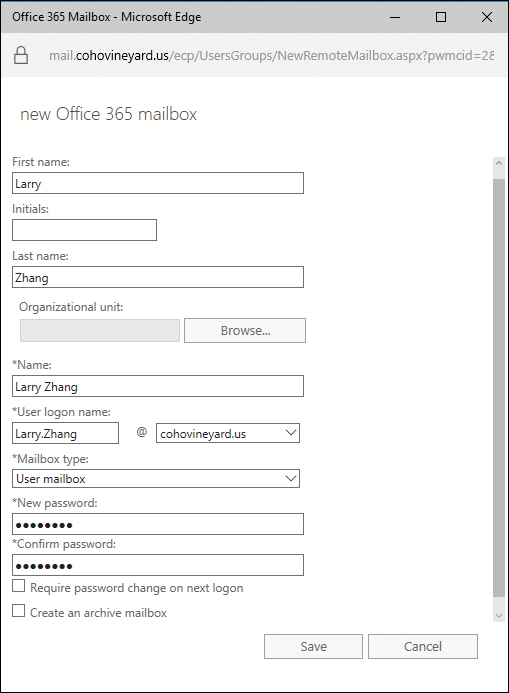
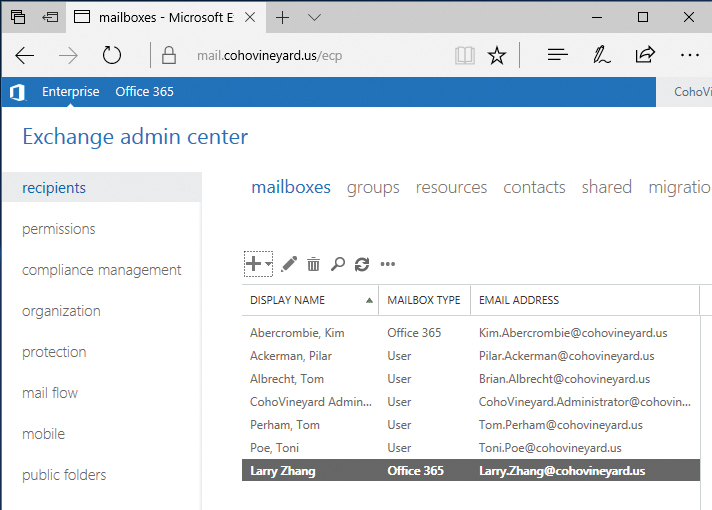
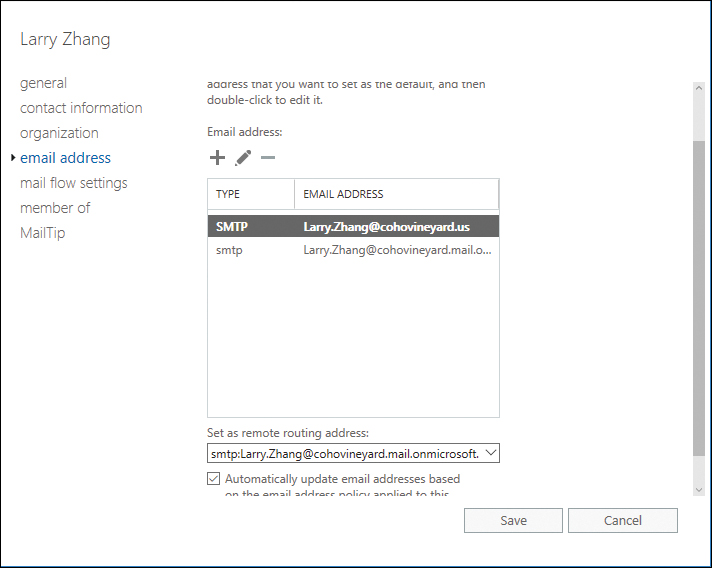
Decommissioning the hybrid environment
After all migrations have been completed, depending on the mail flow configuration, many existing Exchange servers can be decommissioned.
Unless your organization is completely removing AAD Connect and moving to a cloud-only identity management scenario, it is strongly recommended to keep a minimum of one Exchange server on-premises for attribute management and mailbox provisioning. Additional servers might be required for fault tolerance and disaster recovery or if mail flow is still occurring from on-premises systems through the Exchange servers for secure mail flow to Exchange Online.
If you decide that you want to remove your entire Exchange environment, including the hybrid components, you must remove or disable the following items.
- Inbound and outbound hybrid connectors in Exchange Online
- The O365 to On-Premises Organization Relationship in Office 365
- Intra-Organization connectors if OAuth has been configured
- Hybrid configuration object
For more information about decommissioning scenarios, please see https://technet.microsoft.com/en-us/library/dn931280(v=exchg.150).aspx, “How and when to decommission your on-premises Exchange servers in a hybrid deployment.”
Summary
This chapter discussed the planning and configuration aspects of an Exchange hybrid environment, including Autodiscover, free/busy, name resolution, networking, transport, and public folders, as well as migration tasks to and from the Exchange Online environment.
The configuration of an Exchange Online hybrid environment enables your organization to transition seamlessly from a current or older on-premises environment to Office 365 while maintaining mail flow and operational management capabilities. Hybrid configurations might also provide value for organizations migrating from non-Exchange systems to Office 365 by enabling secure mail transport and integrated provisioning with Active Directory.