Chapter 17. SharePoint Online
SharePoint Online is both a collaboration tool and a platform. You can use it successfully as a tool to manage documents, lists, and tasks, or you can extend it as a platform with business analytics integrations, dashboards, and third-party plug-ins and applications.
SharePoint Online can function as an intranet or extranet, a document storage and collaboration platform, an enterprise search portal, a social platform, or a workflow engine. In addition, it can be used as a business intelligence platform, bringing in data sets from online or on-premises databases and displaying results in enterprise dashboards, charts, or pivot tables in a browser.
SharePoint Online concepts
SharePoint Online is organized into a hierarchy system of site collections, sites, and libraries. If you are familiar with administering SharePoint Server 2007 or later on-premises, you’ve undoubtedly used the Central Administration web application to manage SharePoint Server farm features.
SharePoint Online has many of the same features as SharePoint Server, although some notable things are hidden, presented differently, or not available.
One of the advantages of SharePoint Online (and, indeed, the entire Microsoft Office 365 experience) is that much of the underlying management tasks are removed, leaving you with purely application-level management. Microsoft handles tasks such as scheduling and updating, and you manage the content, plug-ins, and integration with your on-premises environments.
The following list shows some features that are re-abstracted, hidden, or not available from the user interface.
- Central Administration
- Service accounts
- Read-only databases
- Throttling
- SharePoint Health Analyzer
- Timer job management
- Wizards
- Individual server management and role distribution
- Content database management
- Access to service and web applications
- Access to server management for updating or service management
One notable exception that has been renamed is the Term Store. In SharePoint Server on-premises, you access this through the Metadata Management Service; in SharePoint Online, the Term Store is directly accessible from the SharePoint Admin Center. You can only have one term store (which can contain 200,000 terms) in SharePoint Online.
SharePoint Online capacities
When it was originally released as part of the Business Productivity Online Suite, SharePoint Online had a number of capacity limitations. As the cost for storage and bandwidth as gone down, the product group has been able to expand the storage capacity and limits for the service.
Overall service limits
Some overall limits apply to all subscriptions.
- File sizes The maximum size for a single file uploaded to a library is 15 GB. For files attached to a list item, the limit is 250 MB per file.
- Groups A user can belong to 5,000 groups, and each group can contain 5,000 members. You are limited to 10,000 groups per site collection.
- Items and files There are several item limits of which to be aware.
- A list can have up to 30 million items.
- A library can also have up to 30 million items (combined folders and files).
- A view can have up to 12 lookup columns.
- A file name, including the path, must be fewer than 400 characters.
- A filename stored in SharePoint Online, OneDrive for Business on Office 365, and SharePoint Server 2016 cannot have any of the following characters: “ * : < > ? / |
- SharePoint Online has no blocked files types, with the exception of certain executable web files: .aspx, .asmx, .ascx, .master, .xap, .swf, .jar, .xsf, .htc. Those files can be uploaded as long as scripting is enabled, per https://support.office.com/en-us/article/Allow-or-prevent-custom-sc-1f2c515f-5d7e-448a-9fd7-835da935584f.
- Subsites You can create up to 2,000 sites per site collection.
- Sync The OneDrive sync client can synchronize 100,000 items per OneDrive or team site library. The previous OneDrive sync client, Groove.exe, can sync 5,000 items per library.
- Users You can have up to 2 million users per site collection.
- Versions Each document can contain 5,000 major versions and 511 minor versions.
Individual service plan limits
In addition to the overall service limits, some limits are imposed on the various service plan levels, as shown in Table 17-1.
Table 17-1 SharePoint service plan limits
Service Plans |
|||
Feature |
Office 365 Business Essentials and Office 365 Business Premium |
Office 365 Enterprise E1, E3, E5 Office 365 Education, Office 365 E5 Education, Office 365 U.S. Government Office 365 Germany and Office 365 operated by 21Vianet SharePoint Online stand-alone plans (Plan 1 and Plan 2) |
Office 365 Enterprise K1 (kiosk) |
Storage |
1 TB per organization base, plus 500 MB per subscribed user |
1 TB per organization base plus 500 MB per user license purchased |
10 GB per organization, with no additional storage per kiosk user |
Terms in term store |
200,000 |
200,000 |
200,000 |
Up to 25 TB per site collection or group |
Up to 25 TB per site collection or group |
Up to 25 TB per site collection or group. Kiosk workers cannot administer site collections. Administration requires one enterprise user license. |
|
Site collections and Office 365 Groups |
500,000 per organization, not including OneDrive for Business sites |
500,000 per organization, not including OneDrive for Business sites |
500,000 per organization |
OneDrive storage |
1 TB per user |
1 TB per user by default; users with a OneDrive P2 license have unlimited storage. |
2 GB per user |
Number of users |
Up to 300 |
1–500,000+ |
1–500,000+ |
For updated capacity information, please see https://support.office.com/en-us/article/SharePoint-Online-limits-and-quotas-8f34ff47-b749-408b-abc0-b605e1f6d498, “SharePoint Online limits and quotas,” and https://technet.microsoft.com/EN-US/library/sharepoint-online-service-description.aspx, “SharePoint Online Service Description.”
SharePoint Online features
SharePoint Online contains a number of features, ranging from very basic to very complex and advanced. It includes the following features.
- One Drive for Business
- Office Online
- Delve
- Yammer
- Enterprise Search
- Office Store Apps
- Business Connectivity Services
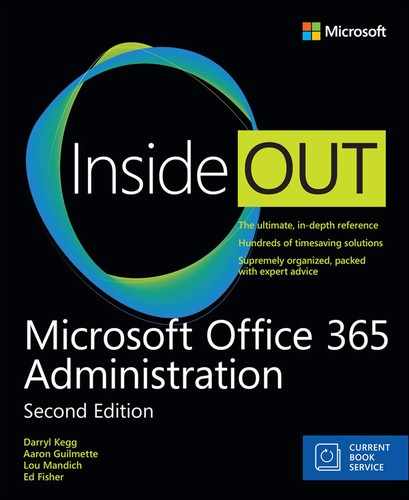
OneDrive for Business
Formerly known as SkyDrive Pro, OneDrive for Business is a personal SharePoint site collection. Similar in function to a home directory on a file share, a user can use the OneDrive for Business site to create and store online content, sync content between folders on-premises, or provide a collaboration space for external users. See Figure 17-1.
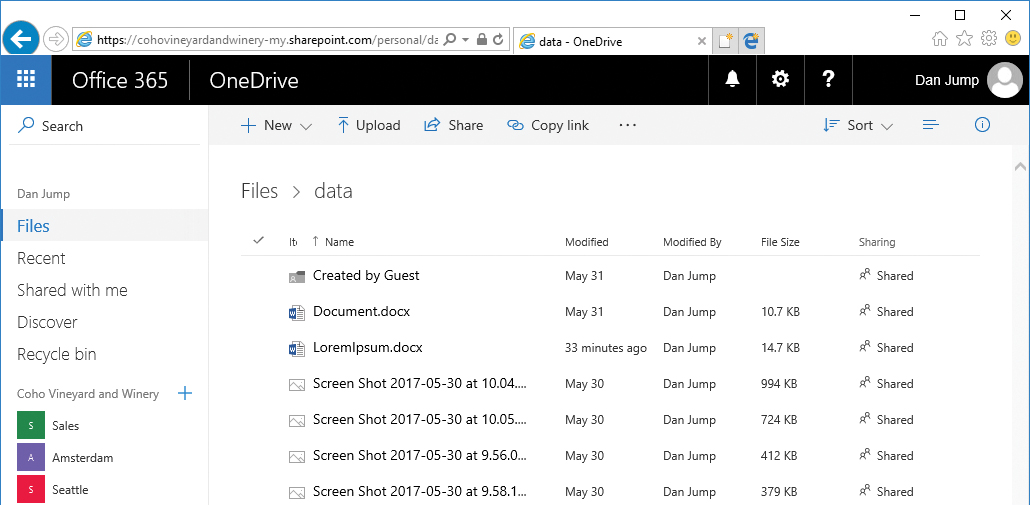
Figure 17-1 OneDrive for Business
A user is enabled for OneDrive for Business when a license for SharePoint Online is assigned. Normally, the user’s OneDrive for Business site is provisioned the first time the user accesses the site, although you can provision sites ahead of time by using Windows PowerShell.
For more information about configuring and managing hybrid OneDrive for Business, see Chapter 18, “SharePoint Online Hybrid.” For more information about deploying and managing OneDrive for Business, see Chapter 19, “OneDrive for Business.”
Office Online
The Office Online apps are web-enabled versions of the popular Office desktop software. Applications, including Word Online, Excel Online, and PowerPoint Online, enable your users to create, view, and update documents through any browser, with no desktop software installed.
When a document is stored in either a SharePoint Online document library or a user’s OneDrive site, the document is immediately available for co-authoring. Co-authoring is an Office 365 feature that enables multiple people to view and edit a document at the same time. Users can edit documents with a web browser and the Office Online apps or by choosing to open the documents in their desktop application, as shown in Figure 17-2.
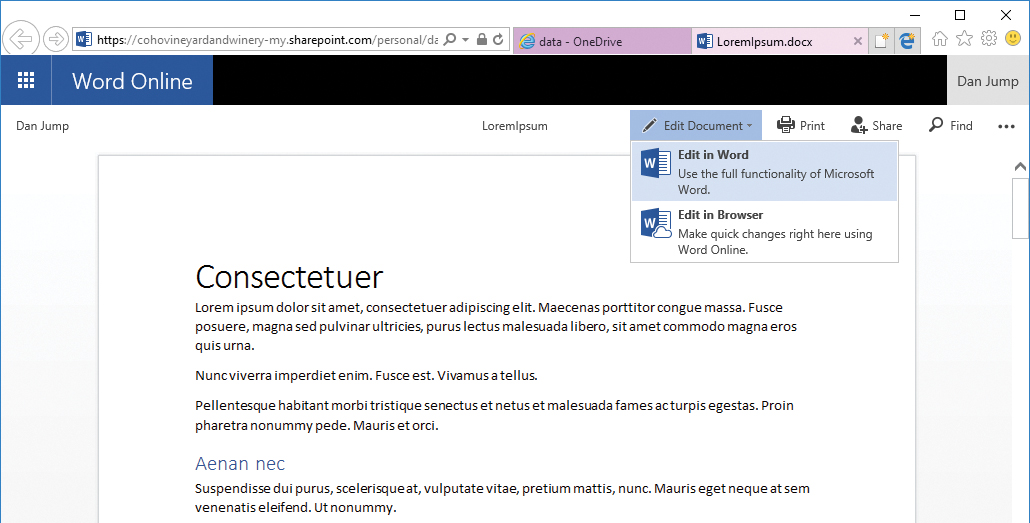
Figure 17-2 Choosing to edit a document in application or browser
The Office Online apps are enabled automatically when a user is licensed for a SharePoint Online plan.
Delve
Delve is an Office Graph API-based application integrated with Microsoft SharePoint and is used to display the contents of your user profile in SharePoint Online. Data in Delve is arranged on cards and displays data based on your usage as well as documents that your peers are working on. Delve cannot change permissions on any content and can only display content that you can access already. Delve discovers and displays information and documents that it thinks might be relevant to your work, based on its analysis of data stored in the Office Graph. You can disable access to the Office Graph in SharePoint settings. Your Delve profile also shows recently accessed documents and generates a list of users with whom you’ve recently interacted, as shown in Figure 17-3.
Figure 17-3 Delve
Delve is enabled automatically when a user is licensed for SharePoint Online.
Yammer
Yammer is a post and feed–style collaboration solution, purchased by Microsoft in 2012 and integrated with Office 365. Yammer enables users to post and reply to messages and supports files and polls. See Figure 17-4.

Figure 17-4 Yammer
Yammer is activated and configured outside of the SharePoint interface; however, it can be integrated and replaces the Newsfeeds feature of SharePoint Online.
Access to Yammer is controlled by an individual user license in the Office 365 portal. Yammer is administered separately through its own portal as well.
For more information on configuring and managing Yammer, see Chapter 20, “Yammer.”
Enterprise search
Although search is important to organizations of all sizes, it is vital to those with hundreds of thousands or millions of documents scattered among sites and file shares. As documents stored in file shares and sites are moved to Office 365, search indexes them and makes them available for discovery.
If you configure a hybrid search solution between SharePoint Online and your on-premises SharePoint Server farm, you can present a single pane-of-glass view for content—whether your users are looking in cloud or on the local network.
For more information about hybrid search options and configuration, see Chapter 18.
SharePoint Store apps
The SharePoint Online platform naturally lends itself to development. Your organization can develop its own application solutions and publish them in an app catalog available to your SharePoint Online users or sell them in the Office.com marketplace. Your organization can also purchase applications from the SharePoint Store (Figure 17-5) and deploy them to your SharePoint Online users.

Figure 17-5 SharePoint Store
Business Connectivity Services
Through the use of Business Connectivity Services, you can make data in other locations available in SharePoint Online for consumption, processing, visualization, and updating. External data sources might include another SharePoint Online repository, an OData source on the Internet, or a database instance available in your on-premises environment or a partner’s.
Depending on configuration of the Business Connectivity Services data connector, data might be read-only or potentially written back to the data sources. With a Business Connectivity Services connector, SharePoint Online becomes a client to an external data source.
SharePoint Online hybrid
You can configure hybrid coexistence and integration between an on-premises SharePoint Server farm and SharePoint Online. Some of the features of a SharePoint hybrid configuration include on-premises OneDrive redirection to Office 365 and cross-environment hybrid search.
For more information about configuring SharePoint Online hybrid, please see Chapter 18.
SharePoint Online management
SharePoint Online is a large product, with hundreds of settings and features and configurations ranging from simple deployment to deep enterprise integration. Because it’s a service, a repository, and an application platform, there really isn’t any limit to what you can do with the service.
There are, however, some configurations that help you get the most out of your enterprise subscription.
Unless otherwise specified, you perform all management and configuration changes inside the SharePoint Admin Center (Figure 17-6), available by logging on to the Office 365 portal, selecting the Admin tile, and then navigating to Admin | SharePoint or by browsing to https://<tenant>-admin.sharepoint.com.
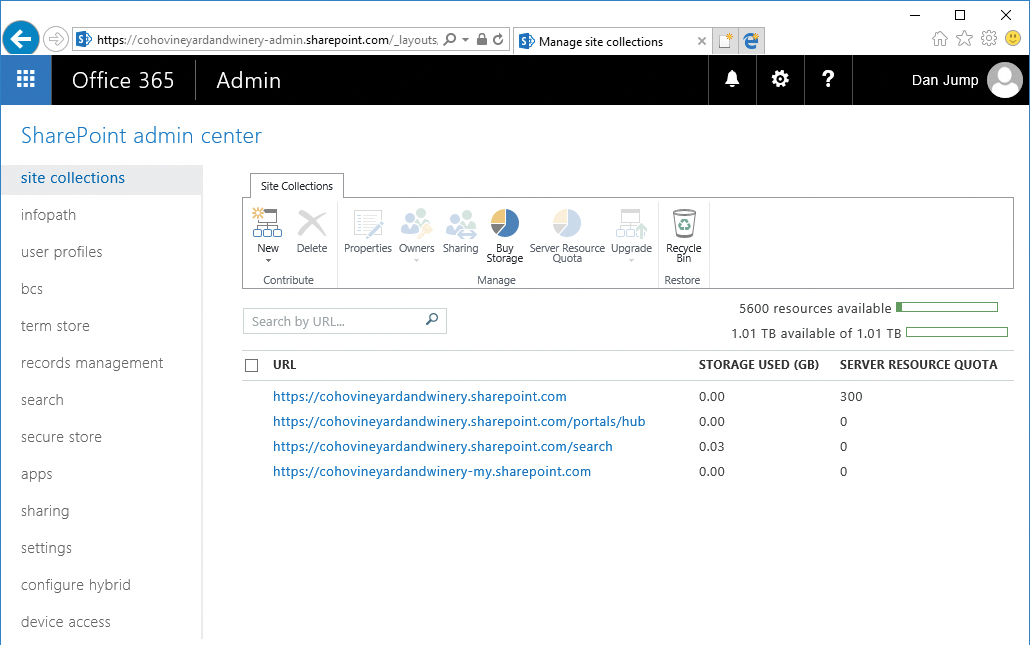
Figure 17-6 SharePoint Admin Center
Site collections
The top-level administrative unit in SharePoint Online is the site collection. Site collections hold sites, and sites can contain pages, applications, lists, document libraries, and other sites.
You administer site collections from the Site Collections page in the SharePoint Admin Center. The Site Collections page, shown in Figure 17-7, is where you can create and manage the resources for site collections, purchase additional storage, assign ownership, and restore deleted items.

Figure 17-7 Site Collections page
The Server Resource Quota column indicates the number of server resources allocated to sandboxed solutions. Adjusting the server resource quotas might be necessary if you have custom code solutions that use more server resources. You use this setting to limit the risk to availability that sandboxed solutions can have on other site collections. When you reach your quota, sandboxed solutions are turned off. You can configure the quota to notify you when you reach a threshold, so you can make modifications to the application code or the quota, as shown in Figure 17-8.

Figure 17-8 Set Server Resource Quota dialog box
The total number of server resources available to allocate is based on the number of licenses available in your tenant. If the majority of the sites in your site collections are using out-of-the-box site templates, you can accept the default resource quotas.
Out of the box, your SharePoint Online tenant comes with four site collections.
- https://<tenant>.sharepoint.com This is the default site collection. The default team site is created here. You can manage it and create additional sites or subsites inside it.
- https://<tenant>.sharepoint.com/portals/hub This site collection is where Office 365 video content is stored. Users can upload videos directly and create channels.
- https://<tenant>.sharepoint.com/search This is the enterprise search portal.
- https://<tenant>-my.sharepoint.com Users’ OneDrive for Business sites are automatically provisioned into thsite collection.
Infopath
The Infopath page enables you to configure the SharePoint Online Infopath Forms Services. From this page, you can enable or disable browser-based forms (which would require clients to complete forms by using the Infopath desktop application). You can also configure user agent exemptions for indexing. Configuring user agent exemptions causes search indexers with matching user agents to index the Infopath form as XML text instead of as a web form.
User profiles
The user profile is where all of a user’s personal information and properties are stored for SharePoint Online. If your organization is synchronizing with Active Directory, user attributes from the on-premises environment are synchronized into Microsoft Azure Active Directory, and then the User Profile Synchronization Service (which is not exposed in SharePoint Online) synchronizes that data into the individual user profiles. See Figure 17-9.
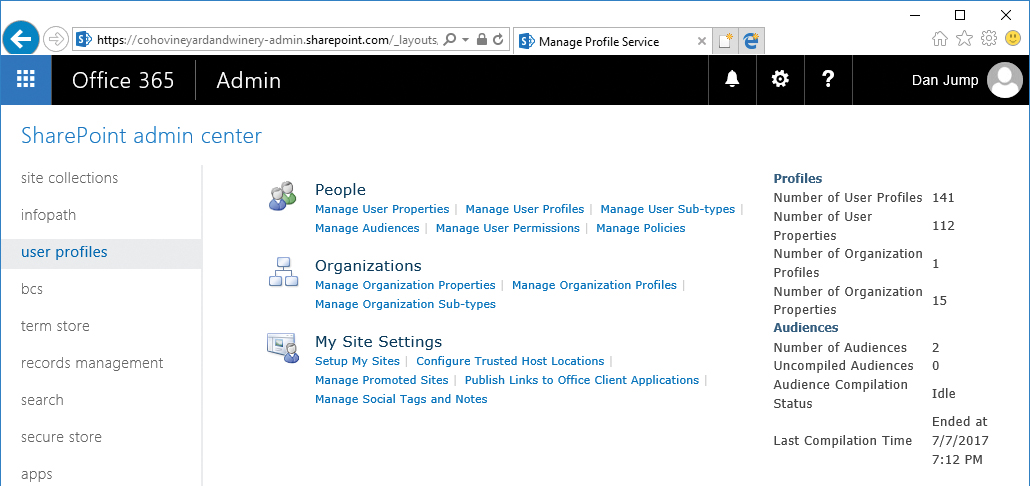
Figure 17-9 User Profiles page
People
The People area of User Profiles contains management tasks related to users. Tasks in this area include configuring additional user properties and audiences—both of which can be used to make SharePoint Online deliver customized value to your organization.
Managing user properties
By creating additional property fields, you give users the ability to enter data in their SharePoint profile that might not otherwise be captured in other systems. This can be useful for creating audiences (SharePoint terminology for groups that can be created based on certain properties) or for enabling user discovery through search. For example, you might create a property field called Previous Departments to provide users a way to indicate what other roles they might have had in an organization. See Figure 17-10.

Figure 17-10 Page for managing user properties Managing user profiles
In User Profiles, you find options to manage the individual user profiles of users in your organization, as shown in Figure 17-11.

Figure 17-11 Manage user profiles
From this page, you can use Edit My Profile to modify the individual properties associated with a user. If you are synchronizing data from Active Directory, fields might be overwritten during the next profile synchronization process. You can also delete the user profile or update settings for the user’s OneDrive for Business site by selecting either Manage Personal Site or Manage Site Collection Owners.
Managing user subtypes
User subtypes are classifications that you can apply to user profile properties. You can use subtypes to configure which profile fields are available for various user types. For example, you might create a subtype for employees and contractors and then restrict a profile field such as Office Phone to be available to employees only.
Managing audiences
Audiences are groups of users that can be created based on user profile properties. For example, you might choose to create an audience that contains all members whose department is Marketing and whose work phone contains the digits 555.
Manage user permissions
You can use Manage User Permissions to adjust the permissions users have for the User Profile service. You can use this, for example, to restrict OneDrive for Business provisioning (for more information, see Chapter 19) or access other User Profile Service features.
Managing policies
You can manage the policies to configure which profile fields are required or optional for the User Profile Service as well as to configure visibility of those profile fields.
Organizations
You can use the Organizations area to manage more global-facing settings of the User Profile Service.
Managing organization properties
In Manage Organization Properties, you can control additional global profile properties. You can map profile properties to Active Directory or other LDAP directory service properties as well as Application Entity fields from Business Data Connectivity.
Managing organization profile
Just as users have profiles, your organization can have a profile as well. You can use the Manage Organization Profile page to create and maintain properties about your organization.
Managing organization subtypes
You can create subtypes for your organization profile by selecting Manage Organization Sub-types.
My Site Settings
The My Site Settings area contains settings by which you manage My Sites (OneDrive for Business) sites across your organization.
Setting up My Sites
You can modify the settings in Set Up My Sites to configure the behavior of the sites the User Profile Service application manages, as shown in Figure 17-12.
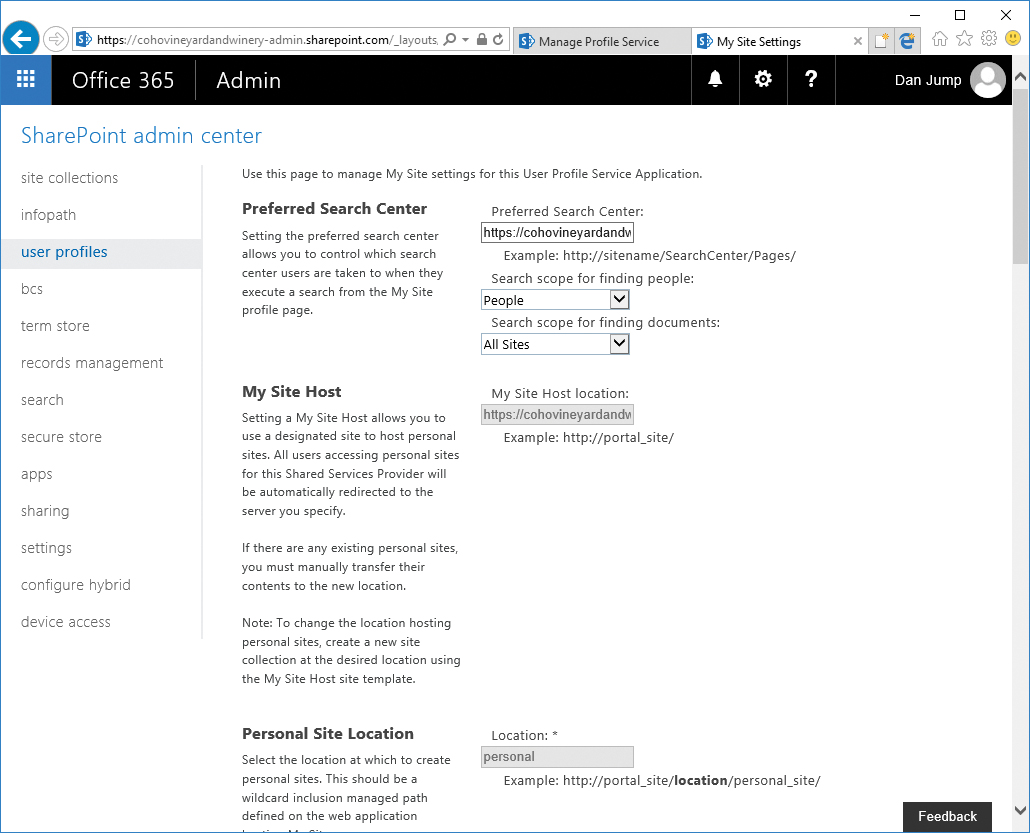
Figure 17-12 Managing site settings for user profiles
Some of the settings, such as My Site Host and Personal Site Location, cannot be changed, because they were configured when the User Profile Service for your tenant was created.
Configuring trusted host locations
You can use this feature to manage a list of other My Site hosts in your organization. Most organizations cannot use this feature because Office 365 has only one User Profile Service application per tenant.
Managing promoted sites
You can configure promoted sites to appear on the Sites page in a user’s My Sites (OneDrive for Business). You can restrict promoted sites by audiences.
Publishing links to Office client applications
You can create and manage links for saving documents in Office client applications with Publish Links To Office Client Applications. These links show up in Favorite Links when users perform a Save As operation in an Office client application connected to Office 365.
Managing social tags and notes
You can use Manage Social Tags And Notes to manage the social items of users. This only affects data stored in SharePoint Online and does not connect to Yammer, regardless of the setting for the enterprise social platform in general settings.
You can learn more about planning for user profiles at https://technet.microsoft.com/en-us/library/ee721054.aspx, “Plan user profiles in SharePoint Server 2013.”
Business Connectivity Services
Business Connectivity Services enables you to connect to data sets outside of SharePoint Online and then make them available for use. The Business Connectivity Services page enables you to configure connections to external data sources, as shown in Figure 17-13.
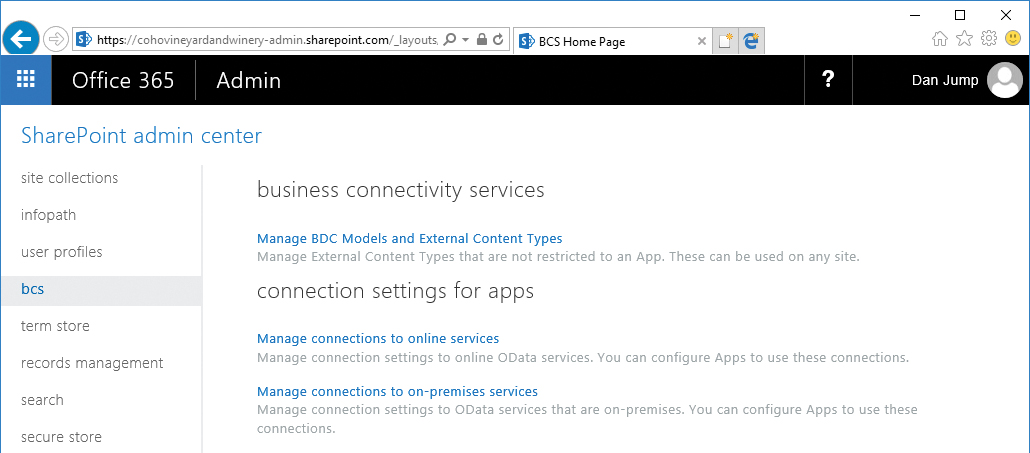
Figure 17-13 Business Connectivity Services page
To configure Business Connectivity Services fully, configure permissions, configure a Secure Store credential mapping, create an external content type, configure a connection to a data source, create an output (such as an External List), and then grant permissions to view and manage the external content type.
Before you begin configuring Business Connectivity Services, use the Manage BDC Models And External Content Types page to configure permissions on the Business Connectivity Metadata Store.
Select the Set Metadata Store Permissions button on the ribbon and then add the administrators for the application to the list, selecting the appropriate permissions, and then click OK. See Figure 17-14.
You must create an external content type (ECT) by using Visual Studio or SharePoint Designer 2010. SharePoint Designer 2010 is available as a free download from the Microsoft Download Center at https://www.microsoft.com/download/en/details.aspx?id=16573.
For an example of how to create an ECT and build an external list that retrieves data from a SQL Azure table, see https://support.office.com/en-us/article/Make-an-External-List-from-a-SQL-Azure-table-with-Business-Connectivity-Services-and-Secure-Store-466f3809-fde7-41f2-87f7-77d9fdadfc95, “Make an External List from a SQL Azure Table with Business Connectivity Services and Secure Store.”

Figure 17-14 Set Metadata Store Permissions dialog box
You can configure connections to online services by using the Manage Connections To Online Services setting. Connections might be used by apps that you develop or purchase from the SharePoint Store.
You can configure connections to on-premises data services by using the Manage Connections To On-Premises Services setting. If you configure an on-premises data service, you can use a credential stored in a target application (configured on the Secure Store page).
Term Store
SharePoint Online enables you to tag and categorize data for standardization purposes. You can use data contained in the Term Store to achieve this.
For example, if your organization is a winery and you are cataloging products in your inventory, you might want to create a set of standard terms describing flavor characteristics, such as strawberry or vanilla (Figure 17-15). If your organization produces vehicles, you might want to create categories and terms describing passenger vehicles, trucks, or trailers.

Figure 17-15 Term Store
To manage the term store, you must be granted permissions to do so. Select the top level of the Term Store (Taxonomy_<ID>) and add administrators in the Term Store Administrators area.
For more information about term sets, see https://technet.microsoft.com/en-us/library/ee519604.aspx, “Plan terms and term sets in SharePoint Server 2013.”
Records management
You can configure SharePoint Online to manage records in place or send them to a records management center. The Records Management page enables you to configure a Send To connection for records management that the Content Organizer can use.
Before implementing a records management plan, you should work with business owners and content experts to develop a file plan to describe the types of items and documents to acknowledge as records and where the records will be stored.
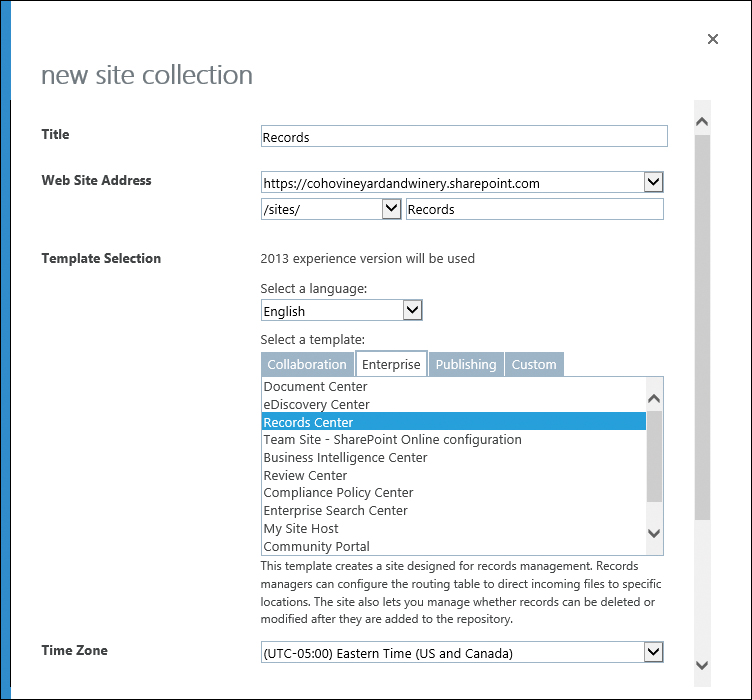
The following example can be used to set up a Records Management site collection and configure a site to route documents there automatically. To do so, follow these steps.
- From the SharePoint Admin Center, select Site Collections.
- Click New | Private Site Collection.
- Fill out the page details, including Title, Address, Template Selection, Time Zone, Administrator, and Server Resource Quota details. For the template, select the Enterprise tab and then select Records Center. See Figure 17-16.
Figure 17-16 New Records Management site collection
- Click OK to create the site collection.
- After the site collection has been created, you can navigate to it and examine the structure. See Figure 17-17.
Figure 17-17 SharePoint Records Center page

When your records center has been configured, you can configure libraries and lists to manage and contain records. Content types are associated with libraries, which ultimately enable documents to be routed to the correct libraries. Follow these steps.
- On the Records Center site, click Libraries in the navigation pane.
- Click New and then select Document Library.
- In the Create Document Library fly-out, type a name and click Create.
Content types enable the Records Center to process documents automatically. Follow these steps to add content to a library.
- Select the new library you just created in the navigation pane and then, on the ribbon, select Library. See Figure 17-18.
Figure 17-18 Library settings
- In the Settings group, select Library Settings.
- In the Content Types section, click Add From Existing Site Content Types.
- Select a content type from the list, click Add, and then click OK.

Finally, create an information management policy to route documents to the library.
- On the Records Center site, click the gear icon and select Site Settings.
- In the Web Designer Galleries https://technet.microsoft.com/en-us/library/ee519604.aspx section, click Site Content Types.
- Select the content type to which you want to apply the policy settings, such as Document.
- Select Information Management Policy Settings.
- Type a description, a policy statement, enable one or more policy settings, and then click OK.
For more information about configuring a records center and management policies, see https://support.office.com/en-us/article/Implement-Records-Management-0BFE419E-EB1D-421A-BECD-5BE9FED1E479, “Implement Records Management.”
Now that a Records Center has been created, you can configure the Send To connection in the SharePoint Admin Center. To do so, follow these steps.
- In the SharePoint Admin Center, select Records Management.
- Configure Send To Connections by typing a name for the connection and a Send To URL. The Send To URL can be obtained from the Records Center site in Site Settings | Content Organizer Settings. See Figure 17-19.
Figure 17-19 Configuring the Send To connection
- Click Add Connection.

Your organization might also use the combination of a records management site and preservation or retention policies (configured through the Security & Compliance Center) to label and preserve important business data. See Chapter 8, “Inside the Security & Compliance Center: Data Classification, Loss Prevention, Governance, and Discovery,” for more information.
Search
The Search Administration page enables you to customize Search for your organization.
- Manage Search Schema The search schema enables you to control which properties of users, documents, and other objects are indexed for search.
- Manage Search Dictionaries This option opens the term store, enabling you to create and manage term sets.
- Manage Authoritative Pages Use the Authoritative Pages settings to tune the order and weight of returned documents. For example, if you have a document called Procedures.docx in /sites/active and a copy from several years ago with outdated historical content in /sites/archive, you can choose return results so that the item in /sites/active is ranked higher.
- Query Suggestion Settings Use these settings to enable or disable search suggestions. You can also pre-populate common search phrases from a text file.
- Manage Result Sources Configure locations that search queries.
- Manage Query Rules Create rules to promote important or preferred results and tune search ranking.
- Manage Query Client Types Use Client Types to manage the sources of queries and rank them in priority for performance.
- Remove Search Results Use this to remove specific URLs from the search results. URLs are re-added upon the next crawl. To remove a result from search permanently, change permissions on the item or remove it completely.
- View Usage Reports View usage reports to get information about how often your users are using search as well as what types of queries are being run.
- Search Center Settings Use this setting to point to the URL of the enterprise search portal. By default, it points to https://<tenant>.sharepoint.com/search/Pages.
- Export Search Configuration Create an export file containing the query rules, ranking models, and settings.
- Import Search Configuration Import a search configuration file.
- Crawl Log Permissions Type the email addresses of users to whom you wish to grant permissions to read the crawl log.
Secure Store
The Secure Store management page is in the SharePoint Admin Center. On that page, you can create a new target application (see Figure 17-20) and configure which users are mapped to this application and credential.
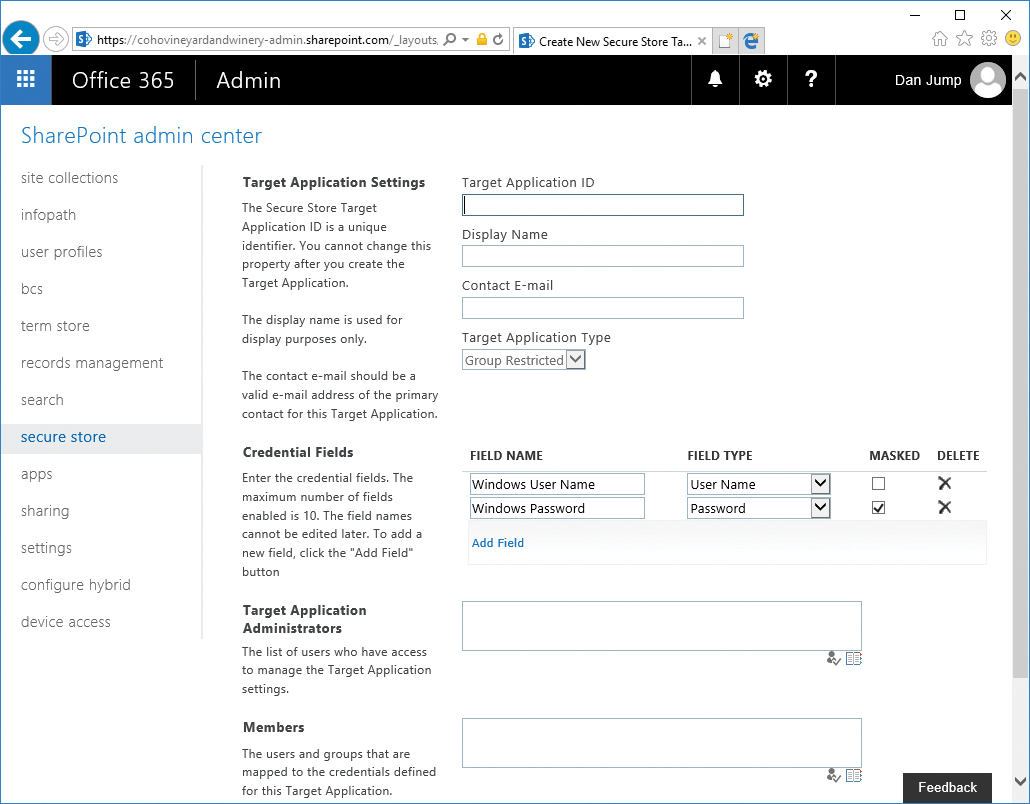
Figure 17-20 Secure Store new target application
After a target application has been configured, you can configure credentials. They are encrypted and enable you to store them in SharePoint Online for usage by Business Connectivity Services or apps.
Apps
You can enable the use of apps in your SharePoint Online environment to extend the capabilities of the platform further. See Figure 17-21.

Figure 17-21 Apps page in the SharePoint Admin Center
App catalog
You can configure an app catalog to make apps available to your users. The first time you select the App Catalog link, you are prompted to create a new app catalog site or use an existing site. When you have provisioned or connected to an app catalog, it appears as a new site collection.
Purchase apps
You can click the Purchase Apps link to launch the SharePoint Store. When the SharePoint Store opens, you can navigate to an app and click Add It. If purchase details are needed, you can input those.
Selecting Purchase Apps from the SharePoint Admin site results in the error shown in Figure 17-22.

Figure 17-22 SharePoint Store warning
The error, “Sorry, this site does not support apps but you can still acquire them and add them on other sites,” appears because you cannot install apps to the SharePoint Admin Center site. You can purchase the apps here, but you have to install them directly into sites.
After you have acquired an app, you receive a notification that the app has been made available to everyone in your organization. Site administrators can then add the app to their sites.
Manage licenses
Use the Manage Licenses page (Figure 17-23) to view information about apps for your organization.

Figure 17-23 Managing licenses
You can select an individual app to display licensing details (Figure 17-24) as well as revoke individual licenses and assign a license manager.

Figure 17-24 App details
Configure Store settings
Use the settings in Configure Store Settings to control store behavior and app requests. See Figure 17-25. Clicking the Click Here To View App Requests link redirects you to the App catalog site.

Figure 17-25 Configuring Store settings
Monitor apps
Configure app monitoring in Monitor Apps. This enables you to track usage of apps across your tenant. To configure an app for monitoring, click Add App from the ribbon and select the app from the list.
App permissions
Use the app permissions page to remove permissions granted to apps. By default, the only app permission listed is Office 365 Exchange Online. As you add more apps to your organization and they request access to data on behalf of your users, they appear here.
Sharing
Use the Sharing page to manage whether and how content can be shared outside your organization, as shown in Figure 17-26. These settings are global and apply to OneDrive for Business sites as well.

Figure 17-26 Sharing page
A number of restrictions are available, such as prohibiting all external sharing, only allowing sharing with certain domains, or preventing users from using sharing invitations with addresses other than the intended recipient.
Sharing activities can be audited through the Security & Compliance Center. For more information about auditing, see Chapter 7, “Inside the Security & Compliance Center: Alerting, Threat Management, and Reporting.”
Settings
The Settings page contains a number of options that can be configured to change the experience and capabilities of SharePoint Online.
- Show Or Hide Options This option contains buttons to show or hide OneDrive For Business and Sites tiles. This setting removes the tiles from the App Launcher but does not disable the services. If users have bookmarked the URLs or otherwise know how to navigate to them, they can still access them. The default setting is Show for both OneDrive for Business and Sites.
- Site Collection Store Management This setting has two options—automatic and manual. Manual storage operation means you as the administrator must update quotas for site collections as they grow, whereas the automatic setting automatically grows the size of the site collection as it nears its limit. The default is Automatic.
- OneDrive for Business Experience You can enable the New Experience or Classic Experience user interface. The default is New Experience, as shown in Figure 17-27.
Figure 17-27 OneDrive for Business new user experience interface
You can also switch to the Classic Experience, as shown in Figure 17-28.
Figure 17-28 OneDrive for Business classic user experience interface
- OneDrive Sync Button You can use this option to show or hide the Sync button in the OneDrive user interface. The default is Show The Sync Button.
- Sync Client for SharePoint This option selects which sync client to start when a user clicks the Sync button in a SharePoint library. The recommended option is to use the new client by selecting the Start The New Client button. The default setting, however, is Start The Old Client.
- SharePoint Lists and Libraries Experience This option enables you to toggle the user interface experience between the newer interface and the classic interface. This affects the default view of the site, and users can switch between the user interface experiences. The default setting is New Experience (Auto Detect).
- Admin Center Experience This setting controls whether to show a minimal set of configuration options or all options. The default setting is Use Advanced.
- Office Graph Use this setting to enable or disable access to Office Graph. Office Graph analyzes the relationships between users and data in Office 365 and presents it through interfaces such as Delve. Disabling Office Graph disables applications that rely on it, such as Delve. The default setting is Allow Access To The Office Graph (Default).
- Enterprise Social Collaboration You can select whether to use Yammer or SharePoint Newsfeed as the social platform. Yammer is currently not covered in the Office 365 Trust Center. The default setting is Use SharePoint Newsfeed (Default).
- Streaming Video Service This option determines whether the Azure Media Service is available and enables or disables the video portal. The default option is Enable Streaming Video Through Azure Media Services And Enable The Video Portal.
- Site Pages Modifying this option enables you to control whether users can create site pages by using the authoring canvas. The default setting is Allow Users To Create Site Pages.
- Global Experience Version Settings This option controls which version of a site collection users can create and whether users can upgrade site collections. The default option is Prevent Creation Of Old Version Site Collections, But Allow Creation Of New Version Site Collections. Allow Opt-In Upgrade To The New Version Site Collections.
- Information Rights Management (IRM) Enable or disable Information Rights Management for your tenant. To enable Information Rights Management, you must have a subscription that includes Azure Rights Management and enable Information Rights management in your Office 365 tenant before enabling IRM in SharePoint Online. For more information about deploying Azure Rights Management, see https://docs.microsoft.com/en-us/information-protection/deploy-use/activate-service. The default setting is Do Not Use IRM For This Tenant.


After making any changes to settings, click OK at the bottom of the page to commit changes.
Configure hybrid
The Configure Hybrid page, shown in Figure 17-29, provides information about hybrid configuration options available between SharePoint Server and SharePoint Online as well as a link to the Hybrid Picker. The Hybrid Picker is a wizard designed to assist in configuring some SharePoint hybrid features.

Figure 17-29 Configure Hybrid page
For more information about SharePoint hybrid configurations, see Chapter 18.
Device access
You can use the settings on the Device Access page to restrict locations from which users can connect to SharePoint Online–based services. These settings apply to SharePoint sites, OneDrive for Business sites, and Office 365 groups (because they have a SharePoint component). See Figure 17-30.

Figure 17-30 Device Access page
Summary
This chapter discussed SharePoint Online concepts and features as well as how to manage the settings in the SharePoint Online Admin Center. SharePoint Online can be configured in a variety of hybrid modes, as discussed in Chapter 18. In addition, OneDrive for Business is a SharePoint Online feature and is discussed in Chapter 19. Finally, Yammer can also be integrated with SharePoint Online, replacing the Newsfeed feature with Yammer groups. For more information on configuring Yammer, see Chapter 20.