Chapter 20. Yammer
Yammer is a collaboration tool integrated with Office 365. It is formatted in a feed-style layout, with content arranged under topics (called Groups), and enables users to post updates, files, pictures, polls, and announcements as well as acknowledgements (praise) for others. Yammer is accessed by the Office 365 tile, shown in Figure 20-1, or by browsing to http://www.yammer.com and signing in with your Office 365 credentials.
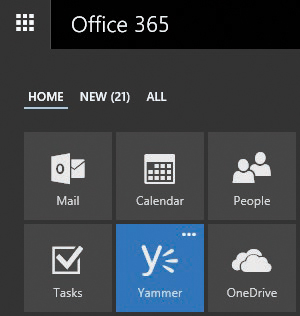
Figure 20-1 Office 365 Yammer tile
Yammer’s security and collaboration boundary is known as a network. From a subscription perspective, networks can be either stand-alone (basic) or Enterprise (integrated with Office 365 as part of an Office 365 subscription). From a configuration perspective, networks can be internal (corporate network or domains registered to the network) or external.
Concepts and administration
Before setting up your Yammer environment, familiarize yourself with the terminology, administrative roles, authentication methods, and the user interface elements and ways to add users to the environment.
Terminology
To design and structure a Yammer environment, you should understand the basic components that make up a Yammer deployment.
- Networks A network is a collection of groups and users and is the top structural and administrative unit in the Yammer organization. The network is the collaboration space where other objects (groups and users) exist. Each Yammer organization can have one or more networks.
- Internal network The internal network is the network associated with the organization’s subscription. It’s also known as the home network. Only users with a verified corporate address can join the home network and view its content.
- External network An external network is a network made up of users who don’t have one of an organization’s verified corporate addresses. External networks can be used for collaboration among internal users, partners, vendors, and customers.
- Groups All collaborative activities take place in groups. The group object is much like a bulletin or message board. Groups are typically formed around topics, products, teams, or services and contain posts and members. Collaboration can include posts and replies, polls, documents, and file uploads. You don’t necessarily need to be a member to post to a group. However, if you join a group, it will show up on your navigation pane, and you will see notifications or badges that indicate new content.
- Users A user is the basic security principal who logs on to a Yammer network and can post content or administer settings. Users can be members of one or more networks, zero or more groups, and hold zero or more administrative roles.
Roles
At some point, you might wish to delegate certain levels of administration to various users in the organization. Yammer has three types of admin roles: group admins, network admins, and verified admins.
Group admins can only administer certain options of groups for which they are delegated admin access or for groups that they have created (and own). Network admins have all the rights of group admins, but only for public groups, plus the ability to configure some organization-level settings. Verified admins can administer any group.
Office 365 global admins with a user principal name (UPN) that matches a domain configured in Yammer inherit the Yammer Verified Admin role. For group administrative tasks, group admins can perform any of the listed tasks for their respective groups, and network admins can perform any of the tasks listed for public groups and networks for which they have been granted the network admin role. Table 20-1 lists the rights associated with roles.
Table 20-1 Yammer roles and rights
Right |
Group admin |
Network admin |
Verified admin |
Configure network settings, features, and applications |
X |
X |
|
Set network design, including logo and color scheme |
X |
X |
|
Create Usage policy and require all users to accept it |
X |
X |
|
Configure defaults for users who log on in the future |
X |
X |
|
Configure user profile fields |
X |
X |
|
Invite anyone, including outside guests |
X |
X |
|
X |
X |
||
Delete any message |
X |
X |
X |
Post announcements |
X |
X |
X |
Grant and revoke network admin privileges |
X |
X |
|
Grant and revoke verified admin privileges |
X |
||
Remove or block any user |
X |
X |
X |
Manage user account activity |
X |
||
Perform integrations (such as for Microsoft SharePoint, Active Directory Sync) |
X |
||
Monitor keywords |
X |
||
Set data retention policy |
X |
||
Export data |
X |
||
Read messages in any private group |
X |
||
Configure security settings |
X |
||
Monitor private content in Yammer |
X |
||
Upload an image for a group |
X |
X |
X |
Set a group name |
X |
X |
X |
Set a group description |
X |
X |
X |
Add to a group or remove members from a group |
X |
X |
X |
Mark content official |
X |
X |
X |
Edit privacy of a group |
X |
X |
X |
Manage group membership options such as restricting membership |
X |
X |
X |
Yammer configuration
Deploying Yammer for your organization is straightforward. As soon as a verified admin logs on to Yammer the first time, the service is enabled. From that point forward, it is a matter of configuring it to fit your organization’s requirements.
- Log on to the Office 365 portal (https://portal.office.com) with a credential that has Global Admin rights.
- Select the Admin tile from the landing page.
- In the navigation pane, select Admin Centers, and then select Yammer, as shown in Figure 20-2.
The Yammer administration landing page opens in a new tab.
Figure 20-2 Yammer Admin Center link
- Familiarize yourself with the Yammer Success page layout and complete the sections that are relevant to your configuration.
The Yammer Success page, shown in Figure 20-3, is the landing page for configuring Yammer and getting the most out of your subscription.
Figure 20-3 Yammer Success page

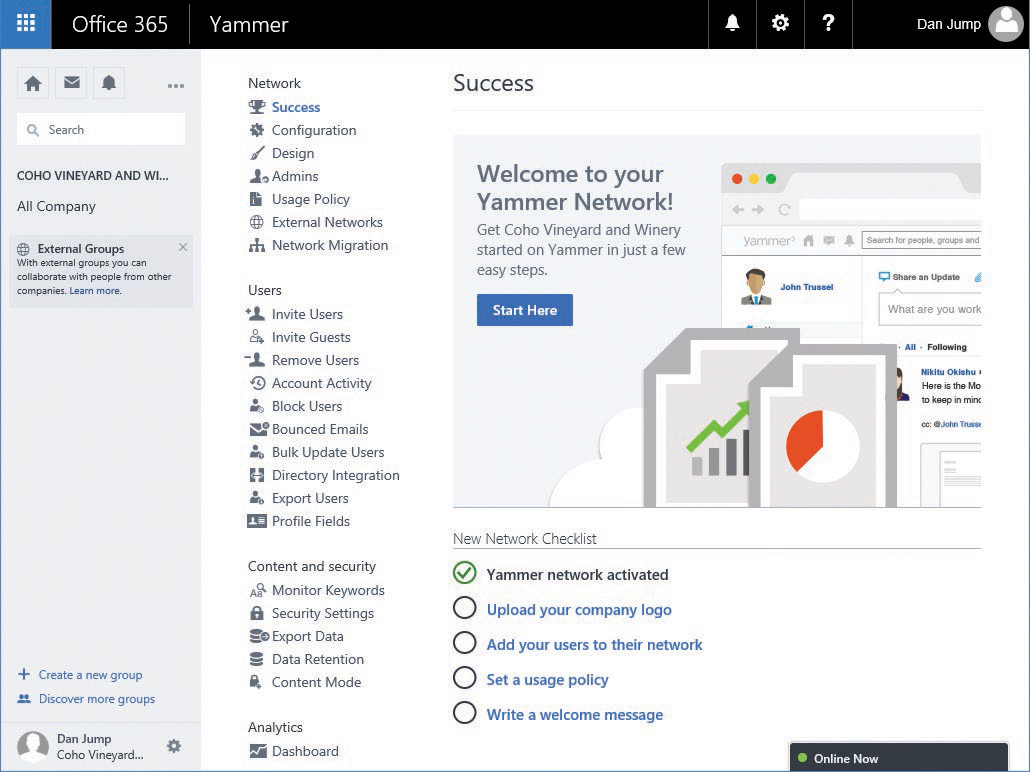
The following sections comprise the Yammer Success page.
- Navigation pane The navigation pane appears on the left side of the screen. A Yammer organization’s home network contains a default group called All Company.
- Network The network section contains seven items relating to the network and organization configuration.
- Success This is the landing page currently displayed.
- Configuration This screen contains general configuration information about your networks and domains.
- Design The Design screen enables you to select basic color schemes (background color, header background color, and header text color) as well as the images for the network, masthead, and Yammer-generated emails.
- Admins In the Admins screen, you can assign additional network or verified administrators.
- Usage Policy The usage policy settings can be used to display custom usage policy text and a URL to an existing corporate usage policy as well as require users to accept the usage policy during sign-up and every time changes are made to the policy.
- External Networks Use the External Networks Settings screen to define who can create external networks (any user or admins), as well as settings related to discovery and joining external networks.
- Network Migration If you have a stand-alone Yammer network or are merging with another organization that does, you can use the Network Migration screen to add those networks to the Office 365 tenant.
- Users The Users section contains ten configuration items relating to adding, removing, importing, updating, and exporting users.
- Invite Users Use this screen to send invites to internal users.
- Invite Guests Use the Invite Guests screen to invite users with email domains external to the organization.
- Remove Users You can remove users from the network by using this screen.
- Account Activity Use the Account Activity screen to view user activity and disconnect sessions.
- Block Users Use the Block Users screen to prevent users from creating new accounts on the network by entering the email address of the user you wish to prevent.
- Bounced Emails Use the Bounced Emails screen to see which users might have invalid email addresses. Yammer sends periodic updates to enabled users; use this screen to track which users might no longer be part of the organization. You can deactivate users from this screen.
- Bulk Update Users You can upload a CSV through this screen to bulk update user information.
- Directory Integration Directory synchronization used to be a stand-alone product but has since been included in Azure AD Connect. Available configuration options include sending users a welcome message upon being added to the Yammer network or instructions on how to access it after they are synchronized.
- Export Users This screen enables you to export all or some of your users (based on date ranges) to a CSV file.
- Profile Fields Use this screen to select which attributes to show on member profiles in the network.
- Content and Security The Content and Security section contains five options to manage and monitor content in your Yammer network.
- Monitor Keywords This screen enables you to monitor posts for certain keywords and email to the specified administrator.
- Security Settings This screen has several settings to control access to the service through IP ranges, configure password policies (if Office 365 Single Sign-On is not configured), enforce Exchange transport rules for messages leaving the Yammer environment, and enforce Office 365 identity. When Office 365 identity is enforced, and if your Office 365 tenant is associated with a single tenant, Connected Groups is enabled.
- Export Data This option enables you to export a date-limited range (including attachments, if selected) for your internal and external networks to a CSV file.
- Data Retention This setting controls how deleted data is handled (deleted permanently or stored in the Yammer environment until specifically removed with the Developer application programming interface [API]).
- Content Mode This setting controls content that is visible to your admin account.
- Default Mode See only content you normally have access to.
- Private Content Mode See private messages between people and posts in private groups that you are not a member of.
- Analytics The Analytics section contains a single item, Dashboard, for reviewing data about your Office 365 Yammer subscription. The dashboard shows a variety of analytic information such as how many users your network has, number of messages posted, number of active groups, and how users are posting data.
- New Network Checklist The new network checklist is a list of common items that you should configure to finish preparing your Yammer configuration.
- Yammer Network Activated This task is completed when you launch the Yammer Admin Center for the first time.
- Upload Your Company Logo This task links you to the Network > Design screen to set up color schemes and upload various logos and artwork to customize your network.
- Add Users To Their Network This task links you to the Users > Invite Users screen to add users to your network.
- Set A Usage Policy This task links you to the Users > Usage Policy section to create or link to a corporate acceptable-use policy.
- Write A Welcome Message This task links you to the All Company group so you can post a message for all new users to see.
Network administration tasks
To configure your Yammer network fully, you must complete each of the tasks in the Network section of the Admin Success page.
Configuration
The Configuration section, as shown in Figure 20-4, enables you to configure basic settings for the network, including the network display name, the default message prompt when you compose a new message, and network domains.

Figure 20-4 Yammer network configuration
The Network Name field controls how the network appears throughout the application, and the Message Prompt field denotes the initial text displayed in the text box area before a user begins typing a post.
Farther down the screen, you can manage email notification settings, as well as additional features enabled in the network, such as third-party applications, Org chart, and message translation.
Email Settings determines whether to require confirmation for posts made to a group through email.
The Yammer Org chart is built from the reporting relationships listed in a user’s profile. Clearing the Org Chart check box disables the building and display of the Org chart in the Yammer user interface.
Design
Customizing the Office 365 Yammer portal is a way to extend your corporate branding image into Office 365. The Design screen gives you that option. Here, you can set a color theme as well as the masthead and logo to be displayed on Yammer pages.
You can select a header background color, a header text color (for the desktop app), the network logo, the masthead image, and an email logo. The recommended sizes for the images are as follows.
- Network logo: 40 x 160 pixels
- Masthead image: 56 x 1200 pixels
- Email logo: 50 x 160 pixels
By default, the header text color is chosen automatically when you choose a background color to provide an optimal viewing experience. Yammer supports GIF, JPEG, or PNG images. Avoid images that have transparent portions.
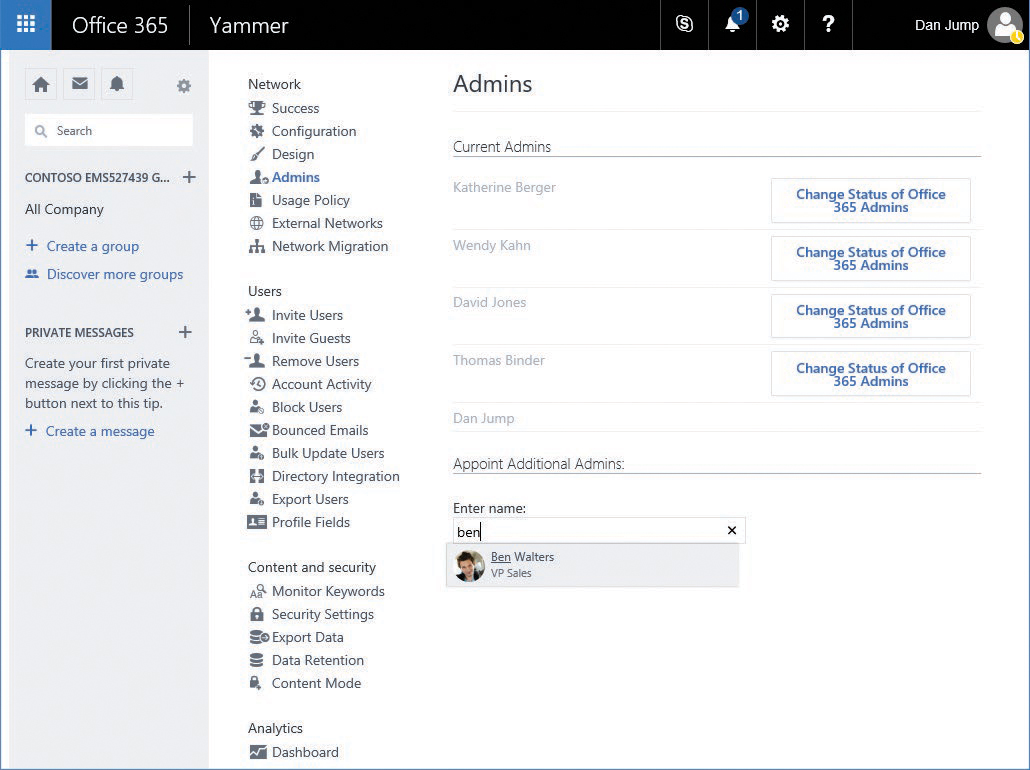
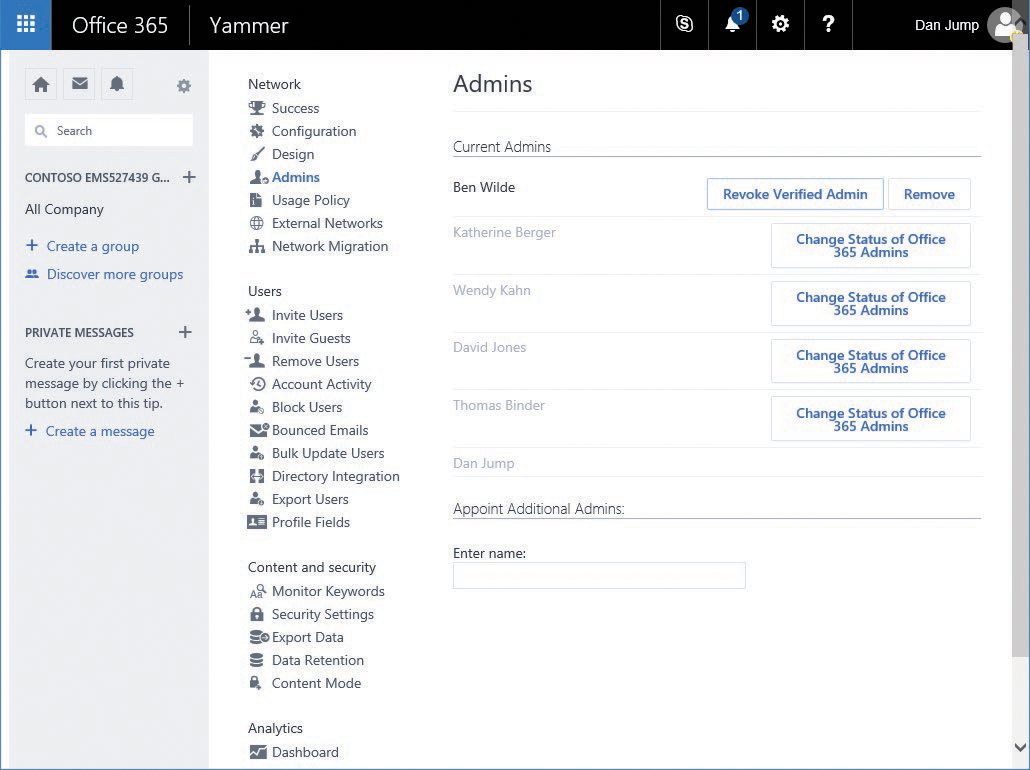
Admins
The Admins screen enables you to create and manage admins in the Yammer network. To add a user as an admin, you either grant them Global Admin rights in the Office 365 portal (and the user will automatically be configured as a verified admin in the home network) or appoint them as an additional admin within the Yammer Admin Center.
In the following task sequence, you grant a user Network Admin privileges, elevate them to the Verified Admin level, revoke their Verified Admin level privileges (returning them to Network Admin), and finally, remove their administrative rights altogether.
Admin rights are granted in two ways—through inheritance by granting the Global Admin right in the Office 365 portal or by explicitly granting Network Admin or Verified Admin rights from the Admins screen in the Yammer Admin Center.
Yammer can have a mix of inherited and explicitly delegated admins. To make the admin tasks easier, the Change Status Of Office 365 Admins button appears in the Network Admins section. This button opens the Active Users screen in a new tab.
To add and remove admins, follow these steps.
- If you are in Yammer and not the Yammer Admin Center, in the navigation pane, select the gear icon and then click Network Admin.
- In the Yammer Admin Center, select Admins.
- Under Appoint Additional Admins, type the name of a user in the tenant to whom you will grant admin privileges. See Figure 20-5.
Figure 20-5 Yammer Admins page
- Click Submit.
At this point, the user is now a Network Admin. To elevate privileges to Verified Admin, click the Grant Verified Admin button.
- For users who were granted Verified Admin status (and not inherited from membership in Global Admins), you can confirm the grant by noticing the button text change to Revoke Verified Admin. See Figure 20-6.
Figure 20-6 Yammer Revoke or Remove Admin option
- Click Revoke Verified Admin for a user who was elevated to Verified Admin to return the user to a Network Admin Role.
There is no confirmation dialog box for this task.
- Click Remove to remove the Network Admin privileges of the user and then click OK to confirm the removal.
Usage policy
The Yammer Usage Policy settings offer a way to inform the site’s users of the organization’s acceptable use policy. You can force users to accept the usage policy upon signup and after changes are made, as well as display a reminder of the usage policy in the sidebar.
To configure a usage policy, follow these steps.
- In the navigation pane in Yammer, select the gear icon and then click Network Admin.
- In the Yammer Admin Center, select Usage Policy.
- Select the Require Users To Accept Policy During Sign Up And After Any Changes Are Made To The Policy check box.
- Select the Display Policy Reminder In Sidebar check box. In the Sidebar Message text box, type a short reminder of the usage policy.
- In the Enter Your Policy In The Textbox Below text box, type your organization’s acceptable use policy.
- Click the Save button.
External networks
External networks are collaborative areas where users can invite others who are not members of the organization with a verified email address domain. A business might create this type of network for customers or vendors; a school might create an external network for alumni or parents.
To restrict creation of external networks, follow these steps.
- Select the gear icon in the Yammer navigation pane and then click Network Admin.
- In the Yammer Admin Center, select External Networks.
- Below External Networks Can Be Created By, select the Only Admins button and click Save.
To create an external network, follow these steps.
- Select the gear icon in the Yammer navigation pane and then click Create A New Network, as shown in Figure 20-7.
Figure 20-7 Creating a new Yammer network
- Choose an image and a name for your external network, select any additional options, and click Create Network. See Figure 20-8.
Figure 20-8 The Create A New Network dialog box


After creating the network, the new network appears. You can now create groups and administer this network like your home network. To navigate back to your home network, click the gear icon and then select your network name.
To delete an external network, follow these steps.
- Select the gear icon in the Yammer navigation pane and then select your external network, as shown in Figure 20-9.
Figure 20-9 Selecting the external network
- Select the gear icon in the Yammer navigation pane and then select Network Admin.
- Under Network, select Configuration.
- Scroll to the end of the page and, under External Network, click Delete External Network. See Figure 20-10.
Figure 20-10 Deleting an external network
- On the confirmation page, click Delete.


Network migration
If your organization acquires another organization with either a Yammer stand-alone network or enterprise network, you might want to consolidate networks. You can migrate one or more Yammer networks with their own email domains (a subsidiary network) into a Yammer Enterprise network. The network you migrate into is known as the parent network.
The subsidiary networks can be either stand-alone or enterprise, but the parent network must be enterprise activated.
In this example, depicted in Figure 20-11, Contoso is the parent network, and Fabrikam is the subsidiary network. Contoso has an Enterprise-activated Yammer network in its Office 365 subscription. Fabrikam has a stand-alone Yammer network not associated with an Office 365 subscription.
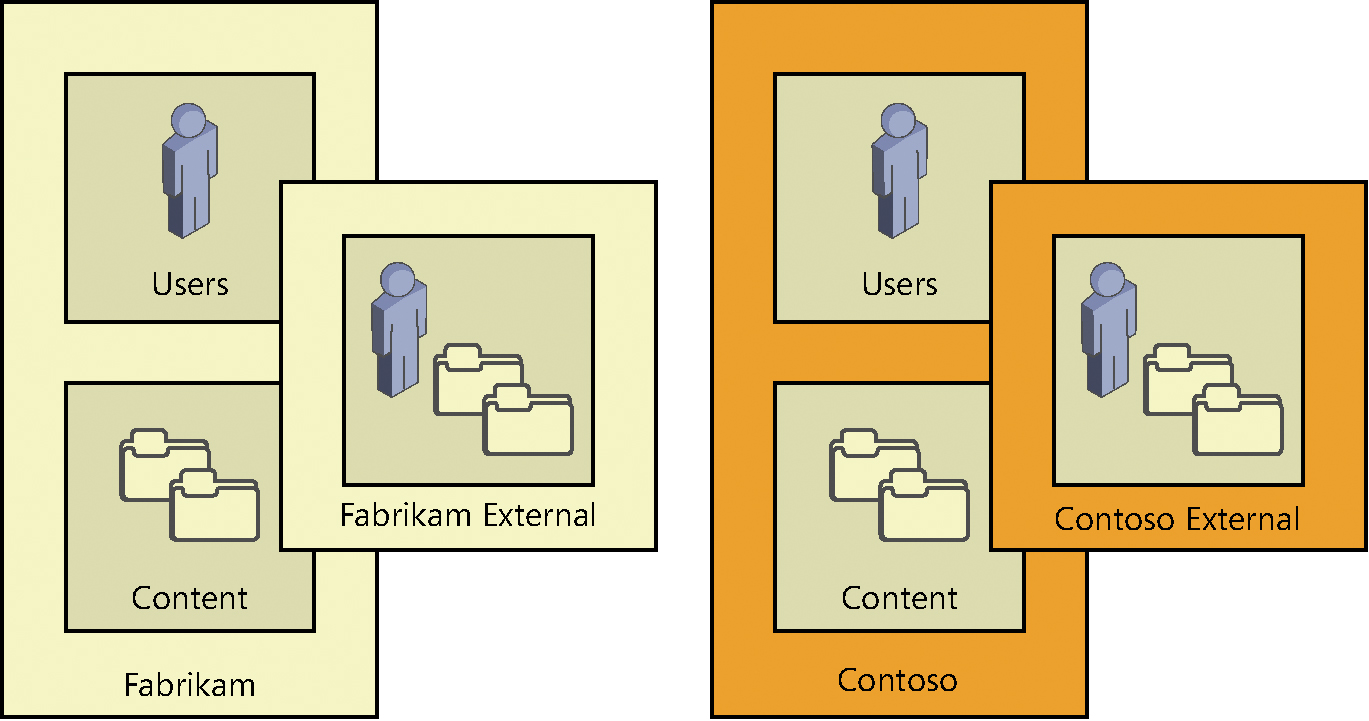
Figure 20-11 Yammer networks prior to consolidation
Post-migration, the Fabrikam users are relocated to the Contoso network, and the Fabrikam external network is reassigned to the Contoso network. See Figure 20-12.

Figure 20-12 Yammer network after consolidation
The key factor is that although content from the subsidiary’s external networks remains available, content from the subsidiary’s internal network will not be.
Before you begin a network migration, be sure you understand the requirements, limitations, and what happens in the event of errors.
- Only Office 365 global admins can perform a network migration. Network migrations involve retrieving the list of verified domains in the tenant, which is a task only a global admin can perform.
- You can start multiple network migrations without waiting for the previous migrations to finish.
- If a user exists in both networks, the account in the parent network will be promoted from a guest to a regular account, and the account in the migrating subsidiary network will be deleted.
- Network migrations can only be started from Yammer networks that have been enterprise activated from an Office 365 subscription.
To migrate a Yammer network, follow these steps.
- Notify users and business owners that the Yammer subsidiary network will no longer be available after the migration is complete. Recommend that users back up any attachments, message threads, or private messages they wish to keep.
- In the parent network, select the gear icon in the Yammer navigation pane and then click Network Admin.
- Click Network Migration.
- Verify that the subsidiary email domain is part of your tenant. If it is not, click the link to open the Office 365 Domain Administration page to verify that the new domain is in your tenant.
- If all the domains you wish to migrate are present on the screen, click Next, as shown in Figure 20-13.
Figure 20-13 Yammer Network Migration page
- Select the button, pictured in Figure 20-14, to confirm the Yammer network you are moving. If you don’t see the network listed, confirm that the domain linked to the Yammer network is verified in your Office 365 tenant. If it is verified but the Yammer network is not showing up, contact support. Click Next.
Figure 20-14 Selecting the Yammer network to migrate
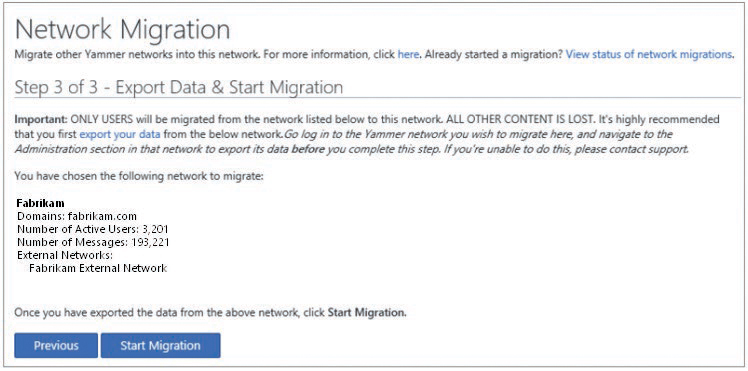
- Verify the migration details.
The last step of the migration recommends that you export your data, which you might want to do. Remember—you cannot import the data back into the parent Yammer network, nor can you go back to the subsidiary network after it has been migrated.
- Click Start Migration. See Figure 20-15.
Figure 20-15 Starting Yammer network migration
- Confirm the start of the migration by typing the name of the network in the text box, shown in Figure 20-16, and click Migrate.
Figure 20-16 Confirming migration of Yammer network


Click View Status Of Network Migrations to view the status of the migration that you initiated. The status lists the network, domains, and which Office 365 administrator initiated the migration. Clicking the Show Details button gives more details about the network, including active users, messages, and external networks.
Table 20-2 Network migration error messages
Error Message |
Description |
Failed to migrate source network <name> |
The migration of the subsidiary network <network> to the parent network failed. |
Failed to migrate user <email address> |
The user account could not be migrated. Re-create the user in the parent network. |
Failed to migrate external network <name> |
The external network could not be migrated. The subsidiary network has been migrated. Contact support. |
User administration tasks
Managing users in your Yammer network consists of inviting, removing, blocking, and updating tasks. In addition, you can gather statistics and control the fields that users can edit within their own user profiles.
Users can be added in a number of ways.
Invite users
The most basic way to invite users to join your Yammer network is by inviting them. Only employees with a company email address can be invited by the Invite Users dialog box, as shown in Figure 20-17. Verified admins can import users in bulk from this dialog box by using an address book export created from an application such as Microsoft Outlook.
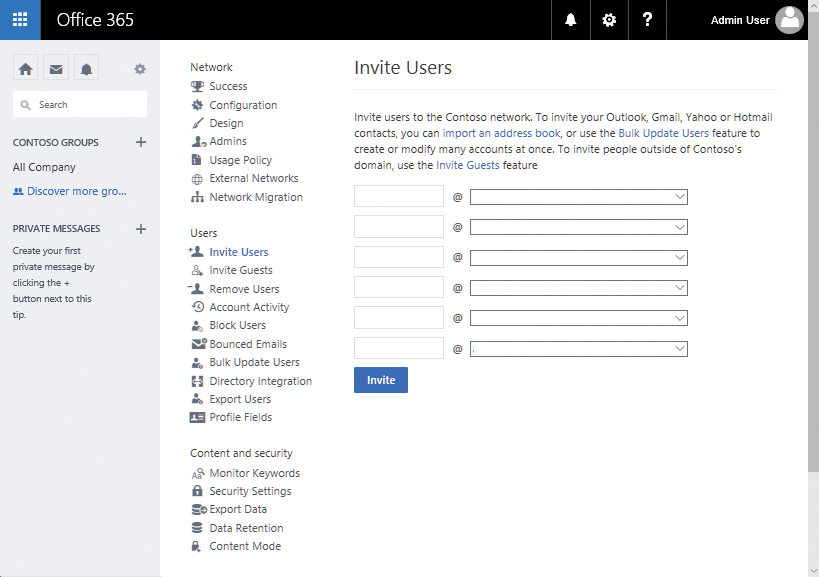
Figure 20-17: Invite Users
You can invite users individually by entering the user’s alias and domain on the Invite Users page. As an alternative, you might invite users from an export of your email application. You can use Outlook to create a CSV export for this purpose. To do this, follow these steps to create a CSV export from an Outlook address book.
- Launch Outlook.
- Click the File tab.
- Click Open & Export.
- Click the Import/Export button.
- Select Export To A File and click Next.
- Select Comma Separated Values and click Next.
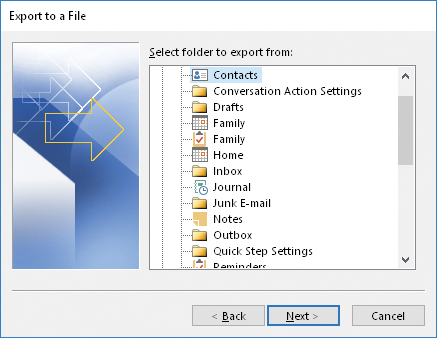
- Select the Contacts folder, shown in Figure 20-18, that you wish to export to a CSV file and click Next.
Figure 20-18 Selecting the Contacts folder in the Import/Export Wizard
- Browse to a location in which to save the exported contacts CSV file and click Next.
- Confirm the export action and click Finish.
With a CSV export file, you can import users through the Invite Users page in the Yammer Network Admin Center. To import them, follow these steps.
- Select the gear icon in the Yammer navigation pane and then click Network Admin.
- Under Users, click Invite Users.
- On the Invite Users screen, click the Import An Address Book link, highlighted in Figure 20-19.
Figure 20-19 The Invite Users dialog box from an address book
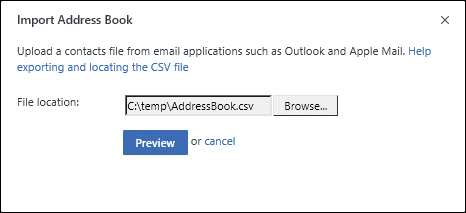
- Click Browse to locate an exported address book CSV file and then click the Preview button, shown in Figure 20-20.
Figure 20-20 Import Address Book
- Select which users to import. Users with a check box have a valid verified domain in the tenant. Users with a red X do not and cannot be invited as users. Click the Send Invitation button at the bottom of the dialog box. See Figure 20-21.
Figure 20-21 Selecting users to whom you will send an invitation


Invite guests
If you want to invite users who are not members of one of your verified domains, you can use the Invite Guest dialog box. Guest users (including active and pending users who have not yet responded to their invitation) are listed on the Guests page.
To invite guests, follow these steps.
- Select the gear icon in the Yammer navigation pane and then click Network Admin.
- Under Users, select Invite Guests.
- Enter the email addresses of users outside of your verified networks that you wish to invite to your Yammer network and then click Invite.
Invited guests show up farther down the page, with either a pending or active status. See Figure 20-22.
Figure 20-22 Invited guests

Remove users
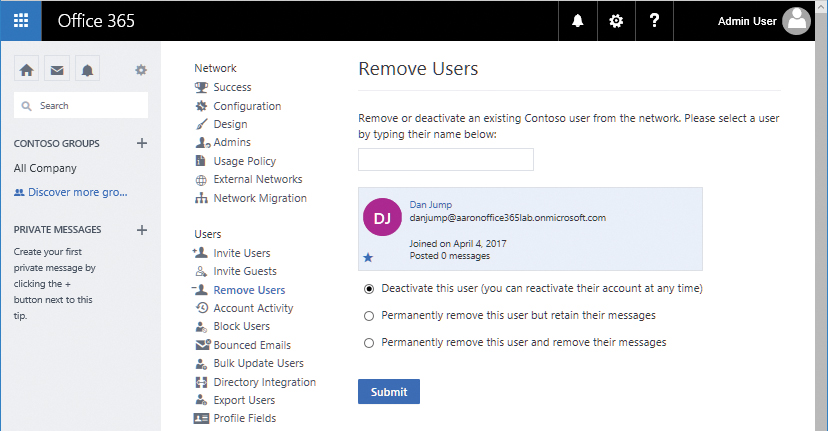
At some point, it might become necessary to remove users from your Yammer network. You can remove users temporarily or permanently. After entering a name to delete, three options appear.
- Deactivate This User (You Can Reactivate Their Account At Any Time) Deactivating a user blocks the user from logging on to the Yammer network until they verify their email address again. If you have removed access to their verified email address, they will not be able to reactivate their account. Deactivated accounts stay in this state for 90 days. After 90 days, the account is permanently deleted.
- Permanently Remove This User But Retain Their Messages Selecting this option deletes the user account but retains the messages, replies, and attachments they posted.
- Permanently Remove This User And Remove Their Messages Selecting this option removes the user as well as all the messages, replies, and attachments they have posted to the network.
To remove or deactivate a user, follow these steps.
- Select the gear icon in the Yammer navigation pane and then click Network Admin.
- Under Users, select Remove Users.
- Type the name of the user you wish to remove.
The text box automatically filters matching user names.
- Select Deactivate This User (you can reactivate the account at any time) and click Submit. See Figure 20-23.
Figure 20-23 Deactivating a user
If you find that you need to reactivate a disabled user, you can do that from the Remove Users dialog box as well. To reactivate a user, follow these steps.
- Select the gear icon in the Yammer navigation pane and then click Network Admin.
- Under Users, select Remove Users.
- Review the list in Deactivated Users and click the Reactivate button for the user you wish to re-enable.
- Click OK in the confirmation dialog box.
If, however, you want to delete a deactivated user permanently, simply click the Delete button in the Deactivated Users list.
- Select the gear icon in the Yammer navigation pane and then click Network Admin.
- Under Users, select Remove Users.
- Review the list in Deactivated Users and click the Reactivate button for the user you wish to delete.
- Click the Delete button.
- Click OK to confirm the permanent deletion.
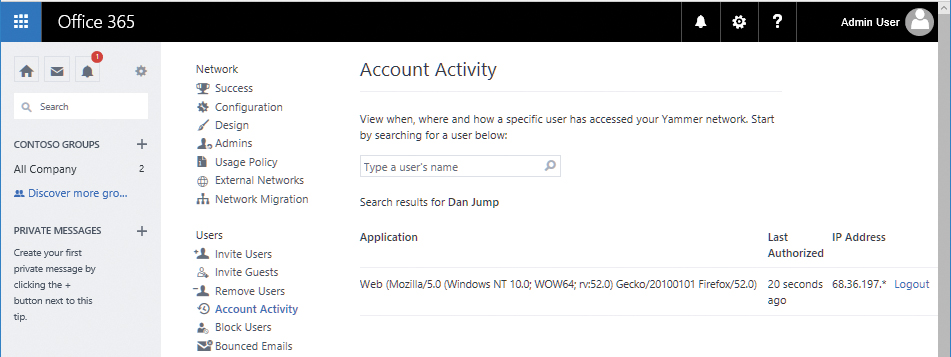
Account activity
Sometimes, it is necessary to track a user’s activity in a particular system. Yammer activity can be tracked through the Account Activity admin screen. You can perform session administration activities such as logging off individual user sessions on devices.
To log off an active user session, follow these steps.
- Select the gear icon in the Yammer navigation pane and then click Network Admin.
- Under Users, select Account Activity.
- Search for the user to log off.
- To cancel the session for a currently logged-on user, click the Logout link next to their name, as shown in Figure 20-24.
Figure 20-24 Account Activity page displaying actively logged-on user
- After clicking the Logout button, the Account Activity page opens and a message appears, stating that it could take up to 2 minutes to log the user off from their session.
- During this time, any activity the user performs (post, reply, screen refresh, clicking any link) returns them to the Yammer sign-in page.
- After the user is logged off, the Account Activity page is updated to show remaining sessions for the user.
Block users
It may be necessary or desirable to block certain accounts from joining the Yammer network. Users with a blocked email address cannot join the network. You might do this for email addresses of shared mailboxes.
A blocked user can only register after an admin removes their address from the blocked user list. To block users from signing up for Yammer, perform these steps.
- Select the gear icon in the Yammer navigation pane and then click Network Admin.
- Under Users, select Block Users.
- Enter one (or more) email addresses, separated by commas, into the text box and click Block.
After blocking users, they appear in the list of blocked users, as shown in Figure 20-25.
Figure 20-25 Blocked Email Addresses area after adding users to it

When a user with a blocked email address signs up using that address, they will be unable to complete the process.
Instead of being able to complete the signup process, they are just redirected to the same page and the Sign Up Free button changes to Retry.
Bounced emails
Yammer users receive periodic emails from the service, such as post notifications, digest emails, and service or system announcements. When a user’s email address is disabled, the messages destined for their mailbox bounce, and the service records that as a bounced email address. Bounced emails might indicate users who have left the organization. You can view a list of users whose email addresses have returned non-delivery reports and deactivate them if necessary.
- Select the gear icon in the Yammer navigation pane and then click Network Admin.
- Under Users, select Bounced Emails.
- If a user is listed as bouncing, you can click Deactivate, which deactivates the user account (similar to the option under Remove Users).
Bulk update users
If your organization is just starting to deploy Yammer or is acquiring another organization or business unit, you might want to configure many users at once. Conversely, if your organization is going through a divestiture, you might wish to remove many users at once. The Bulk Update feature enables you not only to add or remove several users; it also performs updates and deactivations.
To use this feature, you must place your users in a CSV-formatted table and include a header with the following fields from left to right: Action, Email Address, Full Name, Job Title, Password, New Email.
Place one of the following values in the action column.
- New Provisions new users. If the password field for a user is left blank, the user is created as pending. If the password field is populated, the user is provisioned as active and is visible in the member directory.
- Update Updates the existing account. The values in the populated fields overwrite the values on the user object. If you specify a new email address that is already in use, the previous user with that email address is suspended.
- Suspend Deactivates the specified user account. The user must log on again to reactivate it.
- Delete Deletes the user account if the action is specified as delete. The user account is deleted, but the messages and attachments remain.
To bulk update users, prepare and upload a CSV as follows.
- Launch Notepad.
- Enter the data you wish to update, separating each field with a comma. Change the domain to match a verified domain in your network. See Figure 20-26 for an example of how an update file might look.
Action,Email Address,Full Name,Job Title,Password,New Email
Figure 20-26 Notepad window containing users to add to a Yammer network from bulk update CSV
- Click File | Save As and browse to a location.
- Select All Files (*.*) in the Save As type, enter a file name in the file name box, select UTF-8 in the encoding drop-down list, and click Save.
- Launch a web browser, navigate to the Yammer portal, and log on as a verified admin.
- Select the gear icon in the Yammer navigation pane and then click Network Admin.
- Under Users, select Bulk Update Users.
- Scroll to the bottom of the window, click Browse, locate your CSV, and click Open.
- Click Bulk Update.
The screen refreshes, showing you the status of the updates in progress. Clicking the Show Failures button gives you details about any errors. If any errors occur, correct the errors in the CSV and re-import.

Directory integration
Use this page to manage users imported with the Directory Sync function. Yammer DSync has been deprecated and replaced with Azure Active Directory Connect.
The Directory Integration page has three tabs. See Figure 20-27.
- Directory Integration This tab has a link to the Yammer Admin documentation for configuring Directory Sync.
Figure 20-27 Yammer Directory Integration page
- Email Invitation This tab has a customizable email template that can be sent to users as Directory Sync provisions them into the Yammer network. You can make changes to the From address and the email template in this dialog box and then click Save Changes to commit the configuration.
- Welcome Message The welcome message is shown to users who have been provisioned by Directory Sync but navigated to the Yammer portal to begin the signup process.

Configuring Directory Synchronization and authentication is discussed later in the chapter.
Exporting users
The Export Users dialog box enables you to export a CSV of users in the Yammer network. The fields exported include the User ID, Email Address, Name, Job Title, Location, and Joined On (date the user joined the Yammer network). To export users, follow these steps.
- Select the gear icon in the Yammer navigation pane and then click Network Admin.
- Click Export Users.
- Click either the button to export all users or the button to filter by a joined-on-date range.
- Click Export.
Profile fields
The Profile Fields dialog box enables you to customize the profile page where users can update their information. Profile fields are searchable by other users in the Yammer network. Select or clear check boxes to make the fields appear when a user edits their profile.
- Select the gear icon in the Yammer navigation pane and then click Network Admin.
- Click Profile Fields.
- Select or clear the check boxes shown in Figure 20-28 and then click Save.
Figure 20-28 Yammer Profile Fields page

Content and security tasks
The Content and Security section of the Yammer Admin Center enables you to monitor and track potentially sensitive content, restrict access to content within certain IP ranges, configure password policies, route Yammer email notifications through your Exchange Online Transport Rules, and configure data retention policies.
Monitor keywords
It might be necessary to monitor posts for particular words or phrases. Your organization’s usage policy or internal security and compliance policies might have guidelines about posting certain types of sensitive content such as social security numbers, credit card numbers, or other personally identifiable information (PII). You can use the Monitor Keywords setting to generate notifications to an administrator whenever content matching certain patterns is posted.
The Monitor Keywords setting uses regular expressions to search posts for content. Regular expressions are entered one per line and might span multiple lines.
Only verified admins can modify the patterns in the Monitor Keywords dialog box. To configure monitoring, follow these steps.
- Select the gear icon in the Yammer navigation pane and then click Network Admin.
- Click Monitor Keywords.
- Type the email address to be notified when content matching the keywords, patterns, or phrases is detected.
- Type keywords, phrases, or regular expressions to monitor in the text area.
- Click Save.
If there is a problem with the formatting of your regular expression, you are notified and must correct it before the save commits your changes. You might want to copy the content to the Clipboard or Notepad before clicking Save so you have a copy of your edits.
Although the Yammer interface supports both plaintext matching and regular expressions, try to use regular expressions whenever possible to account for the highest level of potential matches.
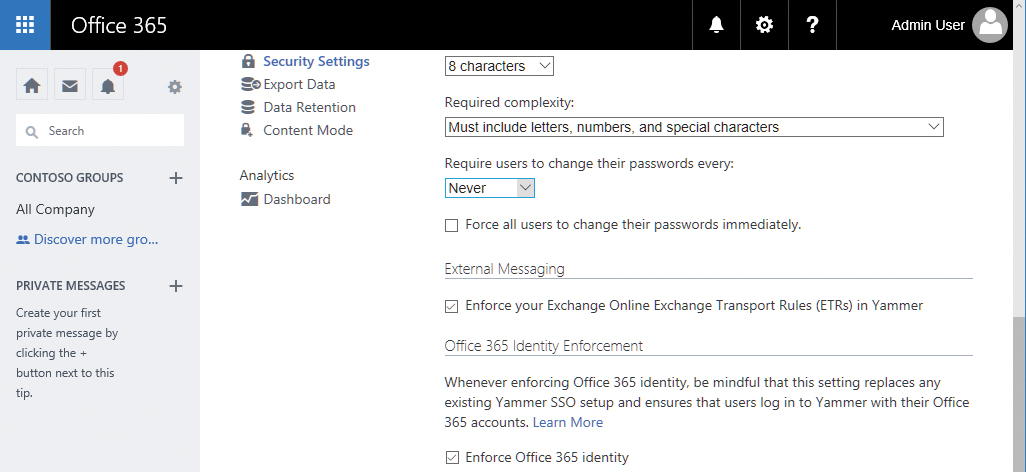
Security settings
Use the Security Settings page, shown in Figure 20-29, to configure IP address restrictions (such as allowing access to Yammer for your organization’s internal and VPN subnets), password policies (password change frequency as well as complexity settings), whether Yammer email delivery flows through your organization’s Office 365 tenant and is subject to its configured Exchange Transport Rules, and whether Office 365 Identity is enforced.

Figure 20-29 Yammer Security Settings page
IP ranges
IP range restrictions can be put in place to limit access to the Yammer network. If your organization has restrictive network access requirements, you might need to administer this setting.
The following process will help you restrict access to corporate IP ranges.
- Obtain the external public IP ranges from your network administration team for your corporate networks.
If the network administrators supply you with a classless inter-domain routing (CIDR) network block such as 13.104.0.0/14, you must convert it to an IP range expressed as a starting IP and ending IP address (13.104.0.0–13.107.255.255). A number of online CIDR and subnet calculators can assist you in performing this task.
- Select the gear icon in the Yammer navigation pane and then click Network Admin.
- Click Security Settings and navigate to the IP Ranges section.
- Enter the starting and ending IP addresses along with a description of the IP range.
- Ensure that the Allow Login button is selected to allow mobile device applications to continue to access the service.
- Scroll to the bottom of the page and click Save.
Password policies
Password policies can be used to enforce certain standards for your users, such as minimum password length, complexity, change frequency, and emergency forcing of password changes.
Selecting the option to force all users to change passwords immediately requires all users to change their passwords upon their next logon, regardless of the password change frequency policy.
Password policy settings are not available for external networks.
To set password restriction policies, follow these steps.
- Select the gear icon in the Yammer navigation pane and then click Network Admin.
- Click Security Settings and navigate to the Password Policies section.
- Select nine characters from the Minimum Length drop-down list.
- In the Required Complexity drop-down list, note the following options.
No Requirements
Must Include Both Letters And Numbers
Must Include Letters, Numbers And Special Characters
Must Include Upper- And Lower-Case Letters, Numbers, And Special Characters
- Select Must Include Letters, Numbers And Special Characters.
- In the Require Users To Change Their Passwords Every drop-down list, select 1 Month.
- Scroll to the bottom of the page and click Save.
External messaging
External Messaging controls whether Yammer network messages are routed through your organization’s Office 365 tenant. This option is not available for stand-alone or basic Yammer networks that are not part of an Office 365 subscription.
At any point in a conversation, an internal user can add an external user to a message thread by typing their email address in the Cc line.
When an external user participates in a Yammer conversation, they might receive notifications regarding replies to their post. Applying Exchange transport rules (ETRs) to Yammer messages helps protect the corporate IP by restricting the delivery of messages based on rules configured in Exchange Online Protection (EOP).
If Yammer is configured to use Exchange transport rules, it checks the message against the transport rules to see whether the message complies. If the message is found not to meet the transport rules, a notification is returned and the user cannot post the message with the external recipient added. See Figure 20-30.

Figure 20-30 Flowchart showing Exchange Transport rules evaluation when an external user is added to a Yammer message
Not all ETRs work with Yammer. Yammer uses only Exchange Online transport rules and cannot be configured to integrate with on-premises Exchange transport rules. To use on-premises transport rules, ensure that you have an activated Office 365 subscription and at least one Exchange Online license. You can then export the transport rules from your Exchange on-premises environment and import them into Exchange Online.
Yammer ignores rules with the following conditions and actions.
- Conditions MessageSizeOver, ContentCharacterSetContainsWord, MessageTypeMatches, SCLOver, WithImportance
- Actions SetSCL, PrependSubject, RemoveOME
To configure external messaging options, follow these steps.
- Log on to Yammer as a verified admin.
- Select the gear icon in the Yammer navigation pane and then click Network Admin.
- Click Security Settings and navigate to the External Messaging section.
- Select Enforce Your Exchange Online Exchange Transport Rules (ETRs) In Yammer.
- Scroll to the bottom of the page and click Save.
Office 365 Identity enforcement
As your organization adopts Yammer as part of its enterprise social strategy, you might want to consider full integration with Office 365 Identity. Enforcing Office 365 Identity enables you to take advantage of a single identity source for your internal Yammer network.
With a Yammer stand-alone or Basic network or Yammer Enterprise with Yammer Identity, users are logged on with credentials in the Yammer network.
However, when Office 365 Identity Enforcement is selected for an enterprise network, only users with a valid Office 365 account can sign in. Users without a valid Office 365 Identity (either created manually or through directory synchronization) cannot log on to the Yammer network.
The authentication flow is shown in Figure 20-31.

Figure 20-31 Yammer Identity and authentication flowchart
If you are currently using Yammer Identity and want to begin using Office 365 Identity, communicate the impending change to your network. In addition, make sure all of your Yammer users are represented by an Office 365 identity. After you enable Office 365 Identity enforcement, any previously configured Yammer network user who does not have a corresponding Office 365 identity will be unable to log on.
One possible exercise would be to open the Export Users page in Yammer to generate a list of all configured users and compare it against a list of Office 365 identities. If you have more users in Yammer than identities in Office 365, create them in Office 365 (either manually or through directory synchronization) prior to making the switch.
Enabling Office 365 Identity Enforcement overrides any previously configured single sign-on configuration and, when enabled in Committed Enforcement mode, is not reversible because enabling Office 365 Identity also enables Connected Yammer Groups. Thus, an Office 365 group is created for every new Yammer group, giving users access to SharePoint, Planner, and Microsoft OneNote features connected to the Office 365 group. Reverting the identity enforcement change blocks Yammer Identity users from accessing the connected resources.
To enable Office 365 Identity Enforcement, you must be a global admin who has been synchronized to Yammer as a verified admin. Manually promoted verified admins and network admins cannot make this change.
When you are ready to make the change, the following steps enable Office 365 Identity in Yammer.
- Log on to the Yammer network as a verified admin who has been synchronized from Office 365.
- Select the gear icon in the Yammer navigation pane and then click Network Admin.
- Click Security Settings and navigate to the Office 365 Identity Enforcement section.
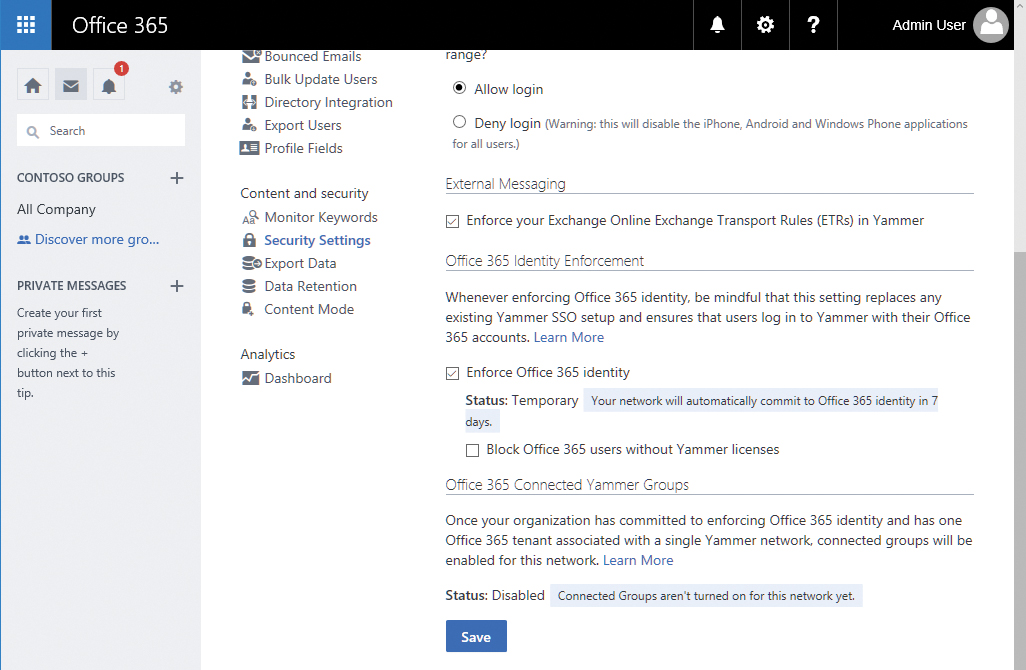
- Select the Enforce Office 365 Identity check box. See Figure 20-32.
Figure 20-32 Yammer Office 365 Identity Enforcement
- After you select the check box for identity enforcement, select your level of enforcement from one of the two options for enforcement, as shown in Figure 20-33.
Figure 20-33 Yammer Office 365 Identity enforcement level selection
- Committed Enforcement All of your Yammer users are represented by Azure Active Directory or Office 365 Identity. This is the default setting. This change cannot be reverted without assistance from support. Committed enforcement enables Office 365 Connected Yammer groups.
- Temporary 7-Day Enforcement This is useful if you are testing Office 365 Identity with Yammer. If you do nothing after 7 days, the change is automatically committed. If you navigate back to the Settings page after saving the change, you can clear the Enforce Office 365 Identity check box. Temporary enforcement does not enable Office 365 Connected Yammer groups.
In addition, you can choose to force all your users to log out and then log back in using their Office 365 Identity.
- Select Temporary 7-Day Enforcement and click Okay.
The Enforce Office 365 Identity box is now selected, and an additional message appears below it. See Figure 20-34.
Figure 20-34 Yammer Office 365 Identity Enablement temporary status message
If you select the check box to block Office 365 users without a Yammer license, users will be able to authenticate but will not be able to use the service.
- Scroll to the bottom of the page and click Save.

If for some reason you need to undo your Office 365 Identity configuration during the temporary enforcement period, you can revert the configuration by using the following process.
- Log on to the Yammer network as a verified admin who has been synchronized from Office 365.
- Select the gear icon in the Yammer navigation pane and then click Network Admin.
- Click Security Settings and navigate to the Office 365 Identity Enforcement section.
- Clear the Enforce Office 365 Identity check box.
- Click OK to acknowledge Stop Enforcing Office 365 Identity For This Network.
- Scroll to the bottom of the page and click Save.
Export data
You might have a number of reasons to export your Yammer network’s content, such as manipulating it inside a business analytics tool, for archival purposes, a divestiture, or a network merger. In any event, you can achieve this by using the Export Data dialog box in the Yammer Admin Center. Only verified admins can export data from a Yammer network.
To export data from a Yammer network, follow these steps.
- Select the gear icon in the Yammer navigation pane and then click Network Admin.
- Click Export Data to open the Export Data page, shown in Figure 20-35.
Figure 20-35 Export Data page
- Enter a starting and ending date.
- Select or clear check boxes to enable attachment export or exports from external networks.
- Click Export.
- After the content has been gathered, and the Download dialog box opens, click Save or Save As to save the download to your computer.

The Yammer Developer Center (https://developer.yammer.com) has sample scripts for both Linux and Microsoft Windows that can be used to export data on a scheduled basis.
Data retention
The Yammer data retention policy focuses on how deleted content is handled. Two options are available.
- Hard Delete This is the default option. When messages or data is deleted, it is deleted permanently and nothing is visible in the data exports.
- Soft Delete Deleted data is no longer visible to users but can be accessed through the Export Data function. Permanently deleting data requires use of the Developer API.
Only verified admins can modify Data Retention settings. To configure the data retention policy, follow these steps.
- Select the gear icon in the Yammer navigation pane and then click Network Admin.
- Click Data Retention.
- Select either the Hard Delete (Recommended) or Soft Delete button and click Save.
If your organization has certain regulatory or eDiscovery compliance requirements, you might need to select Soft Delete so that the data is discoverable and exportable, even if it isn’t visible to users.
Analytics
The Analytics view in the Yammer Admin Center does not have any exportable data. However, you can view a dashboard with graphs depicting engagement and client distribution. The Analytics page is shown in Figure 20-36.
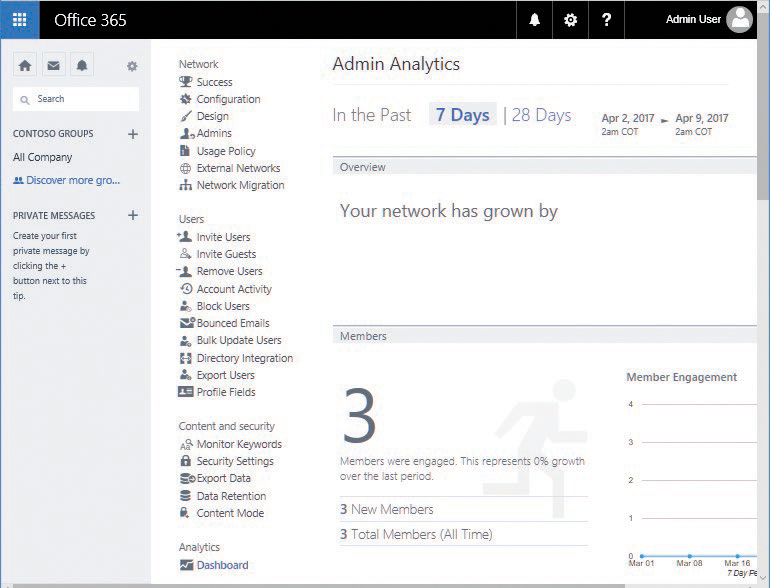
Figure 20-36 Yammer Analytics dashboard
Directory synchronization with Yammer
As of December 1, 2016, Yammer DSync and Yammer SSO were deprecated for use with Office 365. Their features and functionality have been replaced with Azure AD Connect and Office 365 Identity.
Office 365 Identity for Yammer works in the same fashion as the identity scenarios for the rest of the Office 365 product suite.
- Cloud Identity Users are managed in Office 365 only.
- Synchronized Identity On-premises Active Directory users are synchronized to Office 365 and Azure Active Directory, and users are managed on-premises. You can also choose to synchronize password hashes so that users can authenticate using the same passwords in the cloud as they do on-premises.
- Federated Identity On-premises Active Directory users are synchronized to Office 365 and Azure Active Directory, and users are managed on-premises. User authentication is redirected to an on-premises identity provider (such as Active Directory) through a federation solution such as Active Directory Federation Services (AD FS).
More information about Azure Active Directory Connect (Azure AD Connect), Azure Active Directory synchronization, and federation is available starting in Chapter 2, “Preparing Your Environment for the Cloud.”
Yammer directory synchronization is configured when you set up Azure AD Connect.
- Review the server requirements for Azure AD Connect.
- Install Azure AD Connect and synchronize your users to Office 365.
- If you had an existing Yammer network, compare an export of your Yammer users with the users synchronized to Office 365 through Azure AD Connect. You can use a script such as this (save the following codeblock as CompareYammerToAzureAD.ps1) to assist you in comparing user sets.
<# .SYNOPSIS Compare Yammer User Export with Azure AD User list .PARAMETER Credential Standard PSCredential object for Office 365 Credential .PARAMETER IncludeAllYammerUserStates Include users in all Yammer activity states (active, soft_deleted, etc) .PARAMETER InputFile Yammer User Export file. Obtain from Network Admin | Export Users. .PARAMETER OutputFile Path to output file. .PARAMETER UseExistingConnection Use an existing Office 365 PowerShell session. .EXAMPLE .CompareYammertoAzureAD.ps1 -InputFile .YammerUsers.csv -OutputFile .YammerAzureADCompare.csv #> Param ( [System.Management.Automation.PSCredential]$Credential, [switch]$IncludeYammerInactiveUsers, [string]$InputFile, [string]$OutputFile = “.YammerAzureADCompare.csv“, [switch]$UseExistingConnection ) Import-Module MSOnline If (!($UseExistingConnection)) { Write-Host “Creating a new connection. Login with your Office 365 Global Admin Credentials...“ If (!($Credential)) { $Credential = Get-Credential } Connect-MsolService -Credential $Credential } If (!($InputFile)) { Write-Host -ForegroundColor Red “Input file not specified. Exiting.“ Break } # Import users from AAD Write-Host “Getting all Office 365 users from Azure AD. This can take a while...“ [array]$o365Users = Get-MsolUser -All | Select-Object UserPrincipalName, @{ Name = “PrimarySmtpAddress“; ' Expression = { ($_.ProxyAddresses -cmatch “SMTP:“).Substring(5) } } Write-Host “$($o365Users.Count) users in Azure AD.“ # Import users from Yammer User Export CSV Write-Host “Importing Yammer Users from $($InputFile)...“ If (!($IncludeYammerInactiveUsers)) { $State = “active” } Else { $State = “*” } [array]$YammerUsers = Import-Csv $InputFile | ? { $_.state -like $State } Write-Host “$($YammerUsers.Count) Active users in Yammer Export.“ # Add Yammer Users to Hash $YammerHash = @{} foreach ($obj in $YammerUsers) { $YammerHash[$obj.id] = $obj.Email } # Add AAD Users to Hash $o365UsersHash = @{} Foreach ($obj in $o365Users) { $o365UsersHash[$obj.UserPrincipalName] = $obj.PrimarySmtpAddress } # Figure out the difference $YammerUsersNotInAAD = $YammerHash.Values | Where-Object { $_ -notin $o365UsersHash.Values } # Save the file Write-Host -ForegroundColor Green “Writing the output csv file...“ $YammerUsersNotInAAD | Export-Csv $OutputFile -NoTypeInformation - Enable Enforce Office 365 Identity in Yammer Network Admin, using the steps earlier in this chapter.
Summary
In this chapter, you learned how to deploy and manage Yammer. Before deploying Yammer, develop a governance plan and determine whether the content retention policies and search tools available in the Yammer environment meet your organization’s requirements. With some of the advances in group collaboration, you can integrate Yammer successfully and make it part of your Office 365 social strategy.