Chapter 1. Office 365 deployment milestones
Deciding on a tenant: What’s in a name
Delegating access to your tenant
Is your Exchange environment ready?
Syncing your users and moving services
Planning and deploying Office 365 is not a trivial task; a significant number of design decisions require careful planning before any implementation should begin. These decisions range from tenant naming to licensing plans, network and Active Directory readiness, mail routing, and client and user impact. Each of these deployment milestones should be reviewed and the long-term ramifications of each decision considered before proceeding to the next step, because several of these milestones include irrevocable decisions.
Deciding on a tenant: What’s in a name
One of the very first decisions you make when creating your Office 365 tenant is your tenant name. In fact, you are prompted for this name during the first few pages of your initial Office 365 registration, and although that name prompt is accompanied by very little fanfare and absolutely no warning that you are about to pass the point of no return, it is the first of many deployment milestones that represent a critical decision that cannot be undone when setting up Office 365.
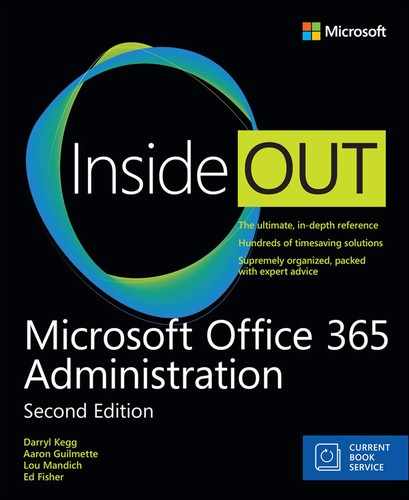
The tenant name selection occurs on the User ID creation page, as shown in Figure 1-1, immediately after you have selected your preferred Office 365 subscription type and you’ve supplied your name, phone number, email address.
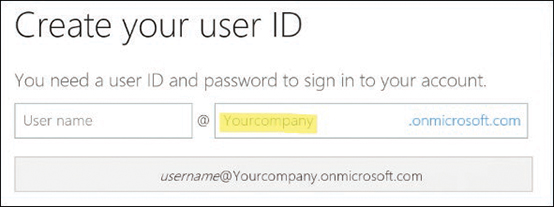
Figure 1-1 User ID creation page
The Yourcompany value provided in the User ID creation process becomes the tenant name you use to set up your Office 365 subscription and is added to the front of the onmicrosoft.com domain name suffix.
The selection process tells you whether the Yourcompany portion of the sign-in ID is already in use. It won’t allow you to proceed if it is not unique, as Figure 1-2 shows, but nothing indicates that this will be your Office 365 tenant name.
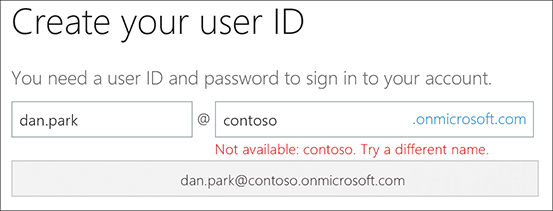
Figure 1-2 Selecting a tenant name that is not available
When you’ve successfully selected a user ID, a green check mark appears beside the ID. After you click the Create My Account button, your tenant name is now permanently set for your Office 365 subscription, as shown in Figure 1-3.

Figure 1-3 Selecting a unique tenant name
As the new subscription process is completed in the background, your new name is set up across the Office 365 tenant and appears in several locations.
Where to see your tenant name
When the tenant name selection is complete, each of the services in your Office 365 subscription (Exchange, Microsoft SharePoint, Skype) is branded with the name you selected. As mentioned, this branding process is permanent, and the name will be visible in several locations, both internal to the Office 365 service and your users and to external parties.
Exchange Online
Exchange Online uses your tenant name in the routing email address stamped on every mail-enabled object you create.
The Exchange hybrid process, discussed in more detail in Chapter 13, “Office 365 Hybrid Configuration Wizard,” enables a recipient policy in your Exchange on-premises organization that automatically creates an email address suffix of @tenantName.mail.onmicrosoft.com for every mail-enabled object. This @tenantName.mail.onmicrosoft.com address is typically referred to as the service routing address.
This service routing address is optional and therefore might not appear on mail-enabled objects when viewed in the Exchange Online global address list (GAL). In the Exchange Online service, however, is another automatic email address assignment that is neither optional nor changeable.
As shown in Figure 1-4, Exchange Online automatically assigns an email address ending in @tenantName.onmicrosoft.com to every mail-enabled object.
Figure 1-4 The tenantName.onmicrosoft.com email address
The email address in the example is only visible to your internal users when viewing the contact properties of another mail-enabled object. It is also important to note that this address does not contain the word “mail,” as in the service routing address mentioned earlier.
This additional onmicrosoft.com routing address is not visible outside of your organization, nor is it present in the email header when sending messages to external recipients over the public Internet.
SharePoint Online
Out of all the services in Office 365, your tenant name appears most prominently in SharePoint Online. It is visible in site content URLs internally as well as in the sharing URLs provided to external parties.
As Figure 1-5 shows, the tenant name is present in the URL for every external sharing request sent by email.

Figure 1-5 The tenant name visible in the URLs for SharePoint sharing requests
OneDrive for Business
Because Microsoft OneDrive is essentially part of the SharePoint Online service, and exists as an extension of MySites in SharePoint, your tenant name appears in any OneDrive sharing URLs sent by email to internal or external recipients. In addition, OneDrive content, viewed when navigating between folders or stored files, displays the tenant name in the URL visible in the address bar at the top of the browser, as Figure 1-6 shows.

Figure 1-6 The tenant name visible in OneDrive URLs
Skype for Business
The tenant name in Skype for Business is visible when viewing the meeting URL in meeting requests sent by email. It is the Office 365 service that contains the least number of references to your tenant name.
You can view the meeting URL by right-clicking or hovering over the Join Skype Meeting hyperlink in email invites, as shown in Figure 1-7; it displays the tenant name.
You can find the same information by selecting any existing Skype for Business meeting requests in your calendar and viewing the hyperlink for that meeting.
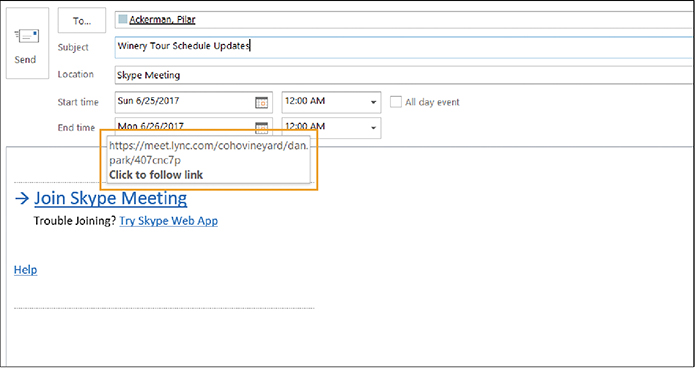
Figure 1-7 Viewing the tenant name in a Skype for Business sharing request
Office Pro Plus
The tenant name is not visible when viewing the properties of the Office Pro Plus applications, nor is it visible in any of the additional licensed Office suite applications such as Microsoft Visio or Project.
Office Online
Office Online applications automatically use OneDrive for Business as the default save location for newly created documents, as shown in Figure 1-8. This is visible to your user in the browser address bar, and if these documents are shared with external parties, the URL of the file will contain the tenant name.

Figure 1-8 Tenant name visibility when using Office Online applications
Selecting your licenses
When setting up an Office 365 subscription, you select a license plan as part of the setup process. This license plan can be a trial subscription, typically only valid for 30 days, after which you must either start paying for that subscription or select another; or you can sign up and pay for an annual subscription during the enrollment process and skip the free trial.
Selecting a trial subscription, as shown in Figure 1-9, enables you to start the tenant setup and even begin syncing users and assigning them licenses so that they may begin testing the service. After the trial subscription expires, you can choose to renew the licenses that you have already chosen or add completely different licenses.

Figure 1-9 Selecting a free trial subscription for an Office 365 license plan
Four basic technologies are present in Office 365: Exchange, Skype, SharePoint, and Office Pro Plus. These four technologies, along with the many other additional services available in Office 365, make the license selection process seem very complex.
Moreover, the plans are further divided into categories such as Small Business, Education, Government, Nonprofit, and even Home Use.
It is not possible to outline all the combinations of plans available, because they are constantly evolving; nor is it possible to provide a single answer as to the best possible plan.
It is important, however, for you to understand the most common plans and their fundamental differences so you can make an informed decision.
Where should I start?
If you are planning to provide all, or most, of the core Office 365 features (email, conferencing, Office applications, SharePoint) to your users, then the first decision you need to make is whether you should purchase Office 365 Business or Office 365 Enterprise.
The easiest way to make this determination is to look at your user and mailbox count in your on-premises environment. If you have fewer than 300 users, and you don’t plan to exceed that number in the next one or two years, Office 365 Business might be the best option for you.
If you have, or will have, more than 300 users, consider Office 365 Enterprise to start.
When considering Office 365 Business plans, the best approach is to examine the features that are not present, compared to the Office 365 Enterprise plans, to help you make the best decision about whether Office 365 Business is right for you.
Frequently, customers select Office 365 Business simply based on size and then soon discover that despite their user count, they require several of the features included by default in an Office 365 Enterprise plan that are either not available in an Office 365 Business plan or available at an added cost that makes the Enterprise plan a better value.
Office 365 Business plans
Office 365 Business plans, when compared to Office 365 Enterprise plans, have the following key differences.
- Office 365 Business plans do not provide unified communications options such as public switched telephone network (PSTN) conferencing or Cloud PBX.
- Office 365 Business plans include SharePoint Online Plan 1, which does not include enterprise search, Visio, or Excel services. Excel services should not be confused with the Excel application. Excel services are a server technology in SharePoint that enables a user to load, calculate, and display Microsoft Excel workbooks in SharePoint.
- Office 365 Business plans have a 50 GB mailbox storage limit, whereas Enterprise plans have a 100 GB limit and, in most cases, unlimited archive mailboxes.
- Office 365 Business plans have no litigation hold capability for Exchange Online mailboxes.
If Office 365 Business is not right for your organization, based either on your size or on the features that you require, several Office 365 Enterprise options are available.
Office 365 Enterprise plans
At the time of this writing, there are four Office 365 Enterprise plans to choose from: Enterprise E1, E3, E5, and F1. Each plan adds additional features as well as additional costs for each user license.
Office 365 Enterprise E1
The Office 365 Enterprise E1 license is the most basic of the Office 365 Enterprise plans. It contains Exchange, SharePoint, Skype for Business, and OneDrive; however, it does not include Office Pro Plus and has a limit of 50 GB on user and archive mailboxes. In addition, it does not include Exchange Rights Management.
Office 365 Enterprise E3
The Office 365 Enterprise E3 license includes all the features of the E1 license and adds Exchange Rights Management, Office Pro Plus, and the eDiscovery Center and allows for the addition of paid Skype for Business add-ons such as PSTN calling and conferencing as well as Cloud PBX. These additional paid Skype for Business features cannot be added to an E1 license.
The Enterprise E3 also increases the user mailbox limit from 50 GB to 100 GB and archive mailboxes from 50 GB to unlimited, along with the addition of the Litigation and Legal Hold features.
Office 365 Enterprise E5
The Office 365 Enterprise E5 license includes all the features of the E3 license and adds Advanced eDiscovery, Customer Lockbox, PowerBI Pro, and Delve Analytics as well as the Skype for Business PSTN Conferencing feature.
Office 365 Enterprise F1
The Office 365 Enterprise F1 license, sometimes referred to as the Kiosk, Deskless, Firstline, or Front-Line Worker license, is designed to enable users to use email, calendaring, instant messaging, and other Office 365 web-based features without the need for a full-featured workstation. Office 365 Enterprise F1 licenses are targeted primarily at browser or phone use, without the need for any application software to be installed.
Office 365 Enterprise F1 licenses include a 2 GB limit on user mailboxes and support for connectivity using most browsers, as well as ActiveSync connectivity for phones and POP for some desktop clients.
F1 license users are also provided with a 2 GB OneDrive for Business storage account (compared to 1 TB for all other Enterprise licenses) and a license to use the Office Online applications. Office Pro Plus is not included in the Enterprise F1 license.
Additional Office 365 plans
In addition to the Business and Enterprise plans and the long list of additional (and constantly increasing) add-on plans such as Visio, Project, PowerBI, Dynamics, PowerApps, Stream, Flow, and Intune, a few other specialty plans, such as Nonprofit, Government, and Education, mirror the Enterprise plans but with specific eligibility requirements.
Office 365 Nonprofit
The Office 365 Nonprofit plans include the same features as the corresponding Enterprise plans; the only difference between them and the equivalent Enterprise plans is the price. Your organization must qualify for Nonprofit status to receive the discounted plan prices.
Office 365 Education
Like the Office 365 Nonprofit plans, Office 365 Education plans include the same features as their corresponding Enterprise plans; however, Office 365 Education licenses are free to students and teachers. Like Nonprofit plans, your organization must qualify to receive the plan.
Office 365 Government
The Office 365 Government plans are identical to their corresponding Enterprise plans; however, Office 365 Government plans have the following additional features and capabilities.
- All services comply with federal requirements for cloud services, including the Federal Risk and Authorization Management Program (FedRamp), criminal justice, and federal tax information systems.
- Office 365 Government complies with accreditations and certifications required for United States public sector customers.
- Office 365 Government content is logically separated from other customer content in the commercial Office 365 environments.
- Office 365 Government customer content is stored in the United States only.
- Access to customer content is restricted to screened Microsoft personnel.
Office Pro Plus
The final plan worth mentioning here is Office Pro Plus. Some of the core Business and Enterprise plans listed previously do not include any Office Pro Plus licenses; as a result, an Office Pro Plus plan should be added if those licenses are required, or the next level of Business or Enterprise plan should be considered.
In many cases, the cost of the next tier plan that includes Office Pro Plus is less expensive than buying a plan without Office Pro Plus and adding it separately.
It is also important to note that if your organization already owns Office product licenses through a volume license or other agreement, you will use a different activation mechanism for those volume license users than the users who have been assigned an Office 365 Pro Plus license. Keep this in mind when upgrading workstation software, because reactivation and possibly reinstallation of Office might be required to activate them properly.
It is also recommended not to mix Office 365 Pro Plus licenses from the Business and Enterprise plans; doing so might also cause reinstallation or reactivation issues because they use different authentication mechanisms.
Viewing and adding subscriptions
Your current subscriptions can be viewed in the Office 365 Admin Center by selecting Billing from the Admin menu and choosing Subscriptions, as shown in Figure 1-10.
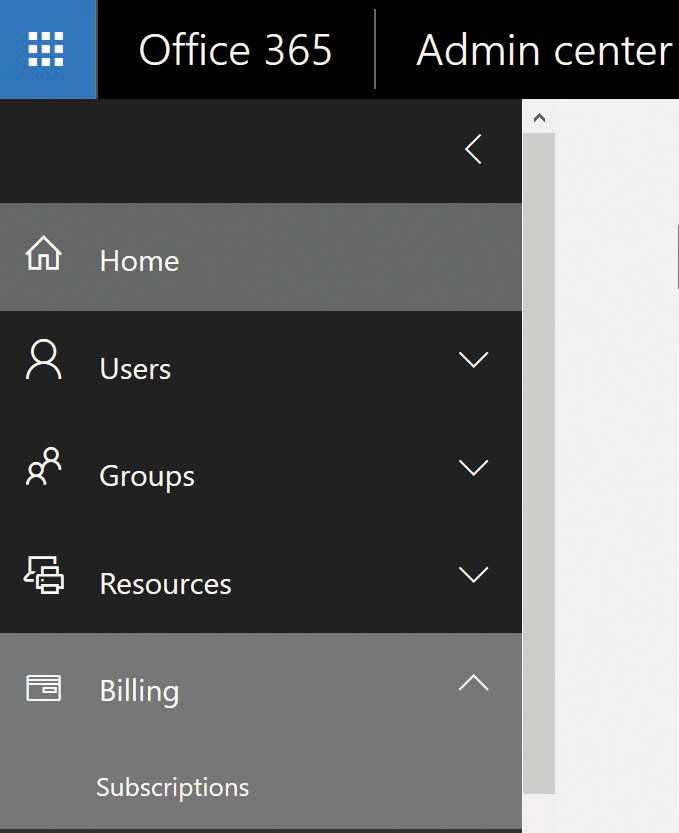
Figure 1-10 Viewing subscription and license information from the Office 365 portal
The subscription page displays each of your active subscriptions, and clicking a single subscription, as shown in Figure 1-11, displays statistics about that subscription, such as cost per user per year, total number of licenses owned and in use, and the expiration date for the subscription.

Figure 1-11 Viewing subscription information about a specific Office 365 plan
The subscription page enables you to switch plans if you decided to change all your users from one plan to another. You can also purchase additional add-on plans, assign unused licenses to your users, remove licenses, and update your payment method details.
Delegating access to your tenant
After you have created your tenant, selected at least one subscription, and started creating or synchronizing users, you might find that you need to provide access to additional administrators in your tenant.
By default, the user account that was used to set up the tenant has the Global Administrator privilege, which provides unrestricted access to all features of the tenant and underlying Azure Active Directory. There are, however, several additional administrative roles in Office 365 that enable you to delegate additional levels of permissions to the service without the need to grant unrestricted access.
Currently, there are five pre-built administrative roles: Global Administrator, Billing Administrator, User Management Administrator, Services Administrator, and Password Administrator.
Global Administrator
The Global Administrator role has all rights in the Office 365 subscription. It is like the Domain Administrator role in on-premises Active Directory and should be treated in the same manner. The number of global administrators in your Office 365 tenant should be kept to a minimum and their credentials protected. Like the Domain Administrator role, global administrators can create any of the administrative roles, including another global administrator.
Billing Administrator
The Billing Administrator role can view service settings, manage billing and subscription services, view company information, view service health, and manage support tickets.
In addition, users with the Billing Administrator privilege can view users, groups, and contacts in the tenant; however, they cannot modify or delete them, nor can they assign licenses.
User Management Administrator
The User Management Administrator role member can view users, groups, and contacts in the tenant as well as create and delete each of these object types. The user management administrator can also set user licenses and reset passwords.
User management administrators can also view service health as well as create and view support tickets.
Services Administrator
The Services Administrator role member can access service settings and subscription services, view company information and service health, and manage support tickets, but the role member cannot modify subscription or billing detail.
Users with the Services Administrator privilege can view users, groups, and contacts in the tenant; however, they cannot modify or delete them or assign licenses or reset passwords.
Password Administrator
The Password Administrator role member can view service settings, manage billing and subscription services, view company information, view service health, and manage support tickets.
Users with the Password Administrator privilege can view users, groups, and contacts in the tenant; however, they cannot modify or delete them nor can they assign licenses.
The password administrator role is like the User Administrator role, except that it cannot create users, groups, or contacts.
Administrative role summary
Table 1-1 provides an easy-to-read comparison of the five built-in administrator roles in Office 365 and the most commonly associated privileges. Each privilege is listed on the left, with any role with that permission appearing on the right.
View users, groups, and contacts |
All roles |
Create, edit, and delete users, groups, and contacts |
User Management Administrator Global Administrator |
View company information |
All roles |
Edit company information |
Global Administrator |
Assign licenses |
User Management Administrator Global Administrator |
Edit subscriptions and billing |
Billing Administrator Global Administrator |
Manage service tickets |
All roles |
View service health |
All roles |
Reset user passwords |
Password Administrator User Management Administrator Global Administrator |
Global Administrator |
|
Assign administrative roles |
Global Administrator |
Should you deploy hybrid?
When deploying Office 365, hybrid is one of the most common terms that you hear when discussing your Office 365 deployment options. In fact, the term “hybrid” is used not only when discussing Exchange Online, but also SharePoint Online, Skype for Business, and even directory synchronization.
Understanding what hybrid means will help you decide whether it is something you want to configure, and you should make this decision typically before the installation and configuration processes begin, because it drives additional infrastructure and setup tasks.
Exchange hybrid
When referring to Exchange, hybrid is a configuration methodology that provides for the seamless appearance and behavior of a single organization between on-premises Exchange and Office 365. The Exchange hybrid mode offers near parity of features and experience between Exchange Online and Exchange on-premises by enabling things such as cross-premises calendaring and mailbox migrations and enabling administrators to manage both environments from a single administrative interface. Figure 1-12 shows the most common features configured when using Exchange Hybrid.

Figure 1-12 Exchange hybrid architecture overview
An Exchange hybrid configuration provides the following features.
- Enables delegated authentication between on-premises Exchange and Exchange Online
- Enables free/busy information sharing, calendar sharing, and message tracking
- Enables administrators to manage both environments from a single Exchange Administrative Center (EAC)
- Allows for online mailbox moves
- Preserves the Microsoft Outlook profile and Offline Store (OST) file after mailbox move
- Uses the Exchange Mailbox Replication Service
- Enables authenticated and encrypted mail flow between on-premises Exchange and Exchange Online
- Preserves Exchange mail headers during email transport between organizations
- Allows for a centralized transport to support compliance mail flow
Exchange hybrid mode requires an additional setup step to enable, which is explained in detail in Chapter 13, as well as several deployment prerequisites prior to running the Exchange Hybrid Configuration Wizard.
- Implementation of directory synchronization between on-premises and Office 365
- Exchange Autodiscover DNS records properly configured for each SMTP domain used in the hybrid process
- A publicly trusted certificate from a third-party certification authority (CA)
- Additional TXT records in the public DNS for Exchange federation
- Additional firewall and network configurations
- Internet-facing Exchange 2013 (or later) CAS/MBX roles
- Active Directory Windows Server 2003 forest-functional level or later
- Exchange Web Services and Autodiscover published to the Internet and secured with a public certificate
The Exchange hybrid configuration process is complex, and despite the Exchange Hybrid Configuration Wizard, many pre-setup and post-setup tasks must be performed to achieve a successful implementation.
Refer to Chapter 13 for a detailed description and walk-through of the Exchange hybrid configuration process.
SharePoint hybrid
Hybrid for SharePoint refers to a configuration by which organizational content is mixed between SharePoint Online and on-premises SharePoint. Unlike Exchange hybrid, the SharePoint hybrid configuration is much less complex, typically consisting of the two environments, with a reverse-proxy configuration that enables users to traverse links across the two environments.
There are three basic topologies when configuring SharePoint hybrid.
One-way outbound
The on-premises SharePoint farm connects one-way, outbound, to SharePoint Online, and search is supported in this topology; see Figure 1-13.
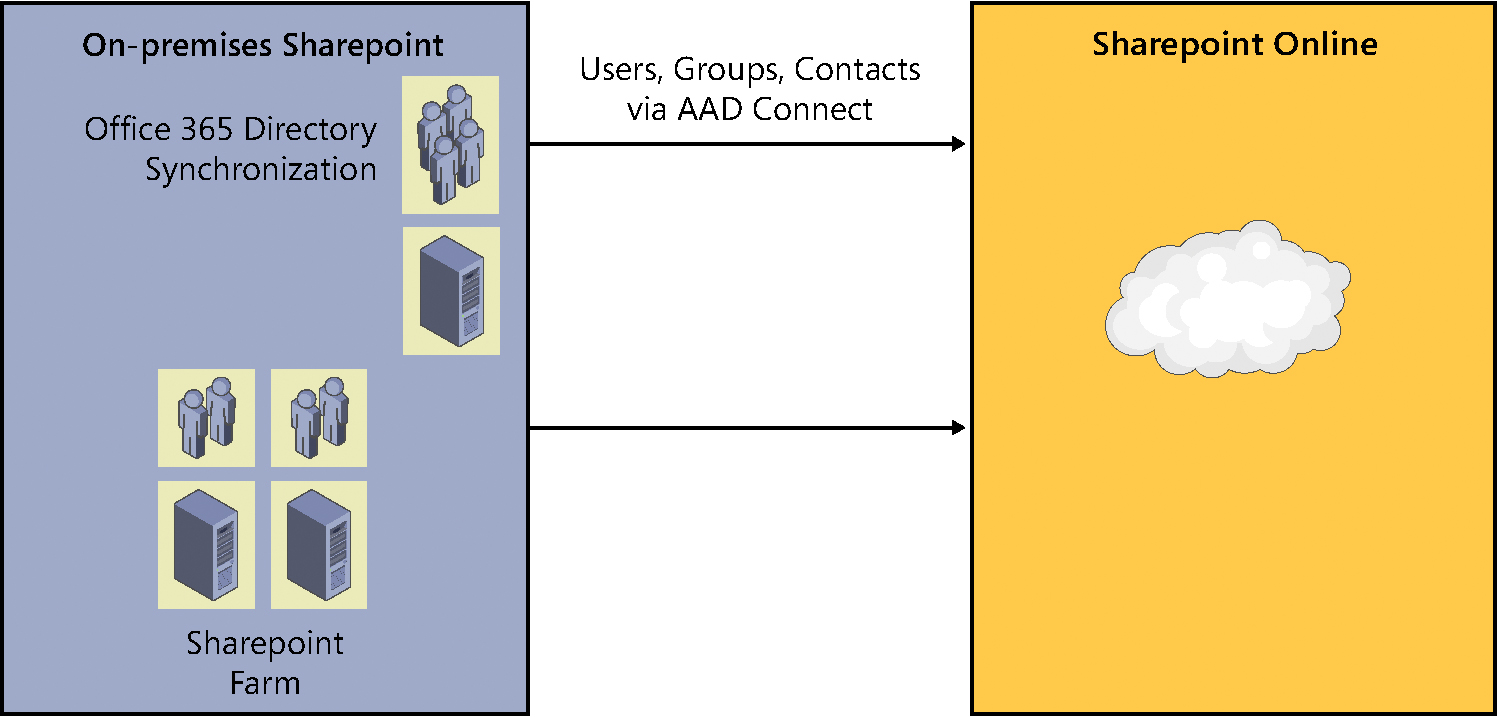
Figure 1-13 SharePoint hybrid one-way outbound topology
One-way inbound
SharePoint Online connects to an on-premises SharePoint farm, one-way, inbound, by a reverse proxy; search is supported in this topology. See Figure 1-14.

Figure 1-14 SharePoint hybrid one-way inbound topology
Two-way hybrid
SharePoint Online and the on-premises SharePoint farm are connected to one another, using a reverse proxy; search and Business Connectivity Services (BCS) are both supported. See Figure 1-15.

Figure 1-15 SharePoint hybrid two-way inbound topology
SharePoint hybrid provides for a somewhat homogeneous user experience; however, there are several limitations to SharePoint hybrid.
- There is no combined navigation experience between the two environments; bookmarked sites and links in one environment do not appear in the other.
- Document templates, branding, and content type chaining are not shared across the two environments; they must be maintained separately.
- Although search does work across the two environments, searches are done in two stages (first one environment, then the other), and the results from each search are displayed in separate result blocks.
Please refer to Chapter 18, “SharePoint Online Hybrid,” for a detailed description and walk-thru of the SharePoint hybrid configuration process.
Skype hybrid
Skype hybrid refers to a configuration in which on-premises Skype/Lync on-premises servers are connected to your Skype for Business Online environment, allowing for a split Session Initiation Protocol (SIP) domain so a single SIP address can be shared across both environments, and media connectivity is established between both environments, giving users the seamless appearance and behavior of a single configuration.
In addition, the Skype hybrid configuration enables migration of data, such as for contact lists and scheduled meetings, between the two environments.
The Skype hybrid configuration is less complex than Exchange hybrid but slightly more complex than SharePoint hybrid. As shown in Figure 1-16, it consists of connectivity between on-premises Lync edge servers and Skype for Business Online through the public Internet and requires additional configuration steps, which are explained in Chapter 16, “Deploying Skype for Business Online.”

Figure 1-16 Skype for Business hybrid topology
Each of the hybrid scenarios can create additional deployment tasks when implementing Office 365. It is important to understand the benefits of each hybrid configuration and ensure that you have identified whether these scenarios are needed or wanted before beginning your Office 365 deployment, because each increases the cost of deployment as well as the project timeline.
Is your Exchange environment ready?
When beginning any Office 365 implementation that includes Exchange Online, it is important to review your on-premises Microsoft Exchange environment to ensure that you meet the minimum requirements for deployment and ascertain whether you have any configurations that might require a change in your deployment strategy or additional pre-work.
These configurations include, but are not limited to, physical Exchange server infrastructure, mail routing, spam and antivirus appliances, load balancers, proxy servers, network configurations, and firewall rules.
Physical Exchange server infrastructure
When evaluating your physical Exchange on-premises infrastructure, begin by reviewing the number of Exchange servers you have in your enterprise and each of their roles.
The Mailbox Replication Service (MRS), which is responsible for mailbox migrations to Office 365, acts as a proxy server for mailbox move requests on any existing (or additional) Exchange servers you designate during the hybrid setup.
If your user mailboxes are distributed geographically in the enterprise, but your hybrid servers, which proxy the move requests, are in another physical location across wide-area network links, you will encounter additional latency during moves and increase the possibility of timeouts or migration failures.
In some cases, depending on the distribution of mailboxes, it might be necessary to perform two-stage migrations. The first stage would migrate the mailbox over the wide area to a mailbox server closer to the hybrid MRS server, and the second stage would migrate the mailbox to Exchange Online.
Depending on the geographic difference, this approach might make the process easier, despite adding additional steps, because the net impact to the users would be mitigated. The migration, internally between servers, would enable you to move the mailbox without any user downtime, based on the way that Exchange handles MRS moves in progress. The second step, although noninvasive as well, would then be at a much lower risk for failure because the mailboxes are in the same data center or location as the hybrid server moving them to Office 365.
Mail routing
The next important physical infrastructure component is the location of any Exchange client access servers (CAS) that support mail exchange (MX) records and answer Autodiscover requests for Outlook and other email clients.
Depending on the intended mail routing and the complexity of your environment, it might be necessary to add additional endpoints for mail routing, change the location of existing public-facing endpoints, or even remove endpoints, depending on your users’ locations relative to their mailboxes.
Also, it is important to note that you cannot put any additional mail transport appliances between Exchange Online and the Exchange on-premises hub or transport servers used for hybrid routing between on-premises and Office 365. Doing so strips the Exchange verbs used in message headers. If an additional mail transport is required, be prepared to install Exchange edge servers.
Mailboxes
Physical infrastructure aside, the next item to consider, which relates to both migration time and licensing, is your mailboxes. The number of mailboxes in your environment has a direct impact on the project timeline because the quantities of mailboxes and their sizes affect migration time as well as batch size limitations during migration windows.
Furthermore, you must remove any large attachments that exceed the attachment limit (150 MB when using MRS moves) from mailboxes, or the migration of the mailbox will fail. There is an option to skip large items; however, the offending messages will then be automatically removed from the mailbox during migration.
Large items
The identification of large items is typically a task that must be either assigned to your users by asking them to create Outlook views to identify large items, or done with Windows PowerShell or other utilities to create reports that then require additional action on the part of your users to remove or archive them. These tasks all require lead-time and user interaction, lengthening your migration project timeline.
Finally, when identifying mailboxes in your environment, it is recommended to sort mailboxes by type. Not only will this help with calculating the total number of licenses required—User and Shared mailboxes (over 50MB) require a license, Room and Equipment mailboxes do not—but it will help provide a better understanding of how many mailboxes of each type exist in your environment. You need this information when creating migration batches, because it is customary to move groups of users and their resource mailboxes together.
Recipient types
One additional step that should be included when reviewing mailboxes is a review of each mailbox’s recipient type compared to the intended purpose of the mailbox. In past versions of Exchange, there were no Room and Equipment–type mailboxes, so it was common practice to create User mailboxes and simply delegate access differently.
Mailboxes in this state will not cause issues in on-premises Exchange; however, after they are migrated to Exchange Online, licensing requirements apply. If a mailbox that is considered a room or resource, based simply on its name or historical use, is not converted to a Room mailbox and instead remains a User mailbox, it will be deleted if it is not licensed within 30 days after that mailbox has been migrated to Office 365.
Proxy addresses and domains
Many Exchange environments evolve over time, so there are likely email domains that have either been acquired, and subsequently decommissioned, or relegated to a secondary address. There might also be domains that were purchased as part of special projects or divestiture efforts.
The migration to Office 365 requires a housecleaning of sorts to ensure that the only email domains that remain are valid and supported domains in your enterprise.
When migrating to Office 365, your users are synchronized to Azure AD, and any mail-enabled or mailbox-enabled objects (users, resources, groups) are created as mail-enabled objects in Exchange Online.
During this initial synchronization, and while the source mailbox remains in on-premises Exchange, Office 365 does not care whether the email addresses on the object are valid. In fact, many customers don’t realize, until their very first pilot mailbox migrations, that they have invalid email domains configured for their users. This is because Exchange Online allows a mail-enabled user object to be created in Exchange Online because it is there simply to allow for mail flow and a complete global address list experience, with non-routable email domain suffixes in the proxy addresses array. However, the object will not be converted to a mailbox, a step that occurs during the mailbox migration, unless all the email addresses of the user are valid domains registered in Office 365.
For this reason, it is recommended that reports of all mail-enabled objects and their email addresses be generated prior to starting mailbox moves. You might find that you have a great deal of cleanup to do in Exchange before you can start migration of mailboxes.
Along with the cleanup of email addresses, it is also recommended that you review any email addressing policies (EAPs) in Exchange to ensure that older or unused domains are not still being automatically assigned to newly mail-enabled or mailbox-enabled objects in your Exchange organization.
One final note about mailboxes and migrations is that delegation of access between mailboxes does not work across the on-premises and cloud environments; so although any permissions that already existed prior to migration are retained, any new delegation can occur only if both the mailbox and the delegate exist in the same environment.
This means that when planning mailbox migration batches, it is advisable to identify any shared or delegated mailboxes within teams and departments in your organization and make sure that those mailboxes are moved to Exchange Online during the same migration batches to avoid any confusion or loss of functionality.
Public folders
The next item in your on-premises Exchange infrastructure that warrants careful review is public folders. If you have no public folders in your organization, or if you are only using public folders for free or busy data in support of older Outlook clients, you can rest easy.
If, however, you have public folders, and you require public folder data to be migrated to Office 365, you will want to learn about your options for coexistence and migration of public folder data, including mail-enabled public folders, discussed in Chapter 13.
Load balancers, network configurations, proxy servers, and firewall rules
Finally, review the network configurations related to your Exchange environment.
Server placement
The hybrid servers that support the MRS role should be located as close to the public Internet as possible, directly exposed if possible, to ensure that network connectivity, latency, or other network devices (such as stateful packet inspection applications) do not interfere with mailbox moves.
In fact, it is often recommended, based on the distribution of mailboxes as compared to hybrid servers, that you configure multiple MRS endpoints in an enterprise to enable more efficient migration of mailboxes, particularly in environments that are geographically dispersed.
Load balancers
The placement of hybrid servers supporting MRS moves behind load balancers is also an item that you should review carefully. Some load balancers might be configured to ignore or enforce sticky state as well as change header behavior, which might affect the speed at which mailbox migrations occur. Talk with your load balancer vendor and ensure that they support load-balancing Exchange hybrid servers that are used to perform MRS mailbox migrations.
Network configurations
Next, review the end-to-end network configuration of your Exchange servers relative to one another and to Active Directory. If you are adding new Exchange servers to perform hybrid roles instead of using existing Exchange servers, make sure those hybrid servers are not separated from the rest of your Exchange infrastructure, or even from Active Directory domain controller connectivity, by firewalls or network devices that might otherwise limit or block traffic.
Although it is not possible to identify every device that might cause problems in your environment simply by looking at a network map or reviewing server roles, these exercises will help you become more familiar with your environment so that you understand which configurations might require change to accomplish mailbox migrations to Exchange Online.
Proxy servers
Proxy servers, although not directly related to Exchange Online or Office 365 roles, are equally important. Before any mailboxes can be migrated to Exchange Online, your tenant directory must be fully populated by the directory synchronization tool.
Proxy servers, particularly authenticated proxies, cause issues with the synchronization of identities to your tenant. Authenticated proxies are not supported for use with the Azure AD Connect synchronization tool and should therefore either bypass the proxy configurations or change them to use non-authenticated proxy servers.
As you can see from these lists, a large number of items should be carefully reviewed when discussing the placement of infrastructure in your organization that will be used for mailbox migrations.
In some cases, your environment can support migration to Office 365 with minimal effort. However, if your environment does require changes to network routing, firewall, or load balancers, or even the deployment of new servers, include these activities in the project timeline. They will increase migration time and possibly drive the need for upgrades to other supporting technologies.
Is your directory ready?
After you have had an opportunity to review your Exchange infrastructure, you must perform similar activities in your on-premises Active Directory environment.
Your Active Directory environment affects not only Exchange but all the services available in Office 365 because, in most environments, your Active Directory identities are synchronized to Azure and form the foundation of all Office 365 use cases.
User readiness
Unless your users are all cloud users, explained in more detail in Chapter 3, “Federation Services and Authentication,” you must synchronize your Active Directory to Azure so that your users can log on to Azure to consume Office 365 services.
When synchronizing your users to Azure, many of the attribute values must be unique and meet certain requirements before they synchronize successfully. Many times, invalid character values in key attributes, or duplication of values between users that must be unique, create synchronization errors that must be resolved before the object will exist in Azure.
UserPrincipalName
Because the UserPrincipalName attribute in Active Directory is primarily used for the user logon name in Office 365, it must meet several requirements before it can synchronize to Azure.
- The value must be unique in your environment. Two users cannot share the same UserPrincipalName value if this attribute is configured as your logon name, even in multi-forest scenarios.
- The value must not contain any spaces.
- The value must not contain any special characters.
- The value must be in the format of [email protected]. Failure to create a UserPrincipalName value in this format prevents a user from synchronizing properly to Office 365.
- A routable email domain suffix (the portion after the @ symbol) must be used.
- The UserPrincipalName cannot begin with the @ symbol.
- The UserPrincipalName cannot end with a period (.), an ampersand (&), a space, or the @ symbol.
- The value must not exceed 79 characters, 30 characters on the left side of the @ symbol and 48 characters on the right side.
- The ampersand (&) character, when present in the value, is replaced by an underscore (_).
MailNickname
The MailNickname attribute, much like the UserPrincipalName attribute, must also meet several requirements.
- The value must not exceed 64 characters.
- The value cannot contain a space.
- The value cannot contain special characters.
- The value must be unique in each on-premises Exchange organization.
It is important to note that Exchange manages the MailNickname value. If Exchange is the only mechanism allowed to create or modify the MailNickname value, the value will never violate any of the previously mentioned conditions. If, however, Windows PowerShell scripts or third-party applications set the value programmatically, review the values to ensure uniqueness.
In a multi-forest environment in which more than one Exchange organization exists, it is necessary to compare the two environments programmatically. Neither the IDFix application nor Exchange can evaluate both environments when searching for uniqueness across them.
SamAccountName
The SamAccountName attribute in Active Directory is as important as the UserPrincipalName attribute and therefore must also meet several requirements for a user to be synchronized to Azure.
- The value must not exceed 20 characters.
- The value cannot contain any special characters.
- If the SamAccountName value is invalid, but UserPrincipalName is properly formatted, the user account will successfully synchronize to Azure.
- If both the SamAccountName and UserPrincipalName values are invalid, the user account will not synchronize.
Invalid characters
In each of the preceding lists, unless specified otherwise, invalid characters include the following.
- { and } (curly brackets)
- ( and ) (parentheses)
- [ and ] (square brackets)
- < and > (angle brackets)
- and / (left or right slash)
- Comma (,)
- Apostrophe (‘)
- Equals sign (=)
- Pound or hashtag (#)
- Ampersand (&)
- Dollar ($)
- Percentile (%)
- Asterisk (*)
Forests and domains
When evaluating your Active Directory, take care to review all Active Directory forests as well as any subdomains within each. This is particularly important because it could reduce the total number of objects that you must synchronize to Azure and possibly the synchronization server configuration by reducing the number of objects in the database and potential rules applied to those objects.
The Azure AD Connect synchronization engine can be configured during the installation process and afterward, so that only specific forests, domains, and their organizational units (OUs) are synced to Azure. Understanding your directory structure, where objects are within it, and what types of objects are synchronized to Azure enables you to prepare your environment better for synchronization to Office 365.
Forests
In some environments, it might be necessary to synchronize one or more Active Directory forests to your Office 365 tenant, perhaps because you have users in several forests or because you have a split resource model, and mailboxes exist in one forest, but the users exist in another.
In either case, it is not only important to review objects and their attributes to ensure uniqueness, it is also important to understand whether some or even all domains in the forest must be synchronized.
If you have a forest with multiple subdomains, review each domain. In some cases, an empty forest root domain contains either no objects or only administrative objects or accounts. Unless these accounts should be synchronized to Azure, the forest root can be removed from the scope of the synchronization.
Similarly, when reviewing each forest, ensure that the forest contains users, groups, contacts, or devices that should be synchronized to Office 365. If the domain lacks any of these required object types, cancel the selection of the domain during the installation of the sync tool.
Domains
Finally, when reviewing domains and OUs in your directory, note the locations of the user, group, contact, and devices. In some organizational unit hierarchies, depending on how your Active Directory was architected, you might find that all users, groups, contacts, and devices exist in OUs specifically designed for each object type.
In cases like this, you can minimize the scope of synchronization simply by selecting the OUs containing only these objects and canceling the selection of all others, as Figure 1-17 shows.
If, however, your OUs are separated either geographically or by business unit, team, or function, you might find that you need to select organizational units in which objects of all types are kept together and might contain things like servers and computers (which do not synchronize to Azure) but need to be read and evaluated by the synchronization engine, as shown in Figure 1-18.

Figure 1-17 Selectively choosing OUs that contain desired object types

Figure 1-18 Choosing OUs organized by location or function that contain all object types
Stale or disabled users and empty groups
Another area that should be reviewed prior to synchronization to Azure is groups and user accounts that might be stale, unused, or disabled. These objects add to the total object count synchronized to your tenant and increase synchronization time as well as overall clutter in your Office 365 tenant.
Stale users
Stale users are defined as unused user accounts that are still valid in Active Directory for an extended period without a current last logon attempt. Depending on your company’s requirements or legal requirements based on your industry, you might need to retain user accounts for departed users for an extended period; however, few companies review the last logon date for all user accounts and quarantine or review accounts that are out of date. At best, these accounts represent unnecessary data and, at worst, a security risk. It is therefore recommended that you identify stale accounts prior to starting synchronization to Office 365.
Although synchronization of user accounts does not automatically consume licenses, if there are accounts that have not been used in long periods (90 to 180 days), it is recommended that they not be synchronized to your Office 365 tenant to minimize risk to security. If known stale accounts are synchronized to Office 365, take care not to delegate any administrative privilege to those accounts.
Understandably, some users on leave might require their accounts to remain active; however, if an account is pending deletion, or is simply in a held state, it is recommended to move these accounts to OUs that are not within the scope of the synchronization solution and therefore not synchronized to Office 365.
Disabled users
Disabled users are like stale users, except that they are security principals that are known to be invalid and should not be used. Therefore, disabled users should not be synchronized to Office 365. Like stale users, they should be moved to OUs that are not within the scope of the sync.
Unused or empty groups
It is recommended that you review your company’s groups, security and distribution alike, prior to synchronization to Office 365. Although unused groups do not represent a security threat, they do increase the object count synchronized to your tenant; this results in longer synchronization times as well as a larger synchronization server database.
Evaluate distribution groups to ensure that they are still relevant and their membership is up to date. One of the best methods for auditing and evaluating groups and their validity is to have their owners recertify both the group and the membership. Often, groups are created, especially if users can create their own groups, and then forgotten when the project or event has ended. Requiring recertification of distribution groups is a great way to keep groups and their membership current and accurate.
Unused groups, when referring to security groups, means that the resource to which the group was delegated access is no longer valid. Security groups, like distribution groups, should be recertified and maintained regularly.
Are your users ready?
Whereas most of this chapter has been focused on the major deployment milestones and technical preparation of things like Exchange servers, network devices, firewalls, servers, and Active Directory, one of the most important steps in the move to Office 365 is user readiness—not only the user’s workstation and Office software but the users themselves.
A successful implementation of Office 365 includes user communication and setting clear expectations of the process, timing, and even the possible issues that might occur. It is important for your users to understand how the process works, how their logons might change, what types of problems to expect, and when each step in the process is happening.
Although these might all sound like common activities, some customers have overlooked the value of this level of detail and experienced a deployment that was longer than originally planned.
UPN versus email address
Typically, users are accustomed to logging on to their workstation by using the standard domainuser name format, shown in Figure 1-19.

Figure 1-19 Sign-in using the domain nameuser name format
Office 365 sign-in prompts are very similar; however, instead of expecting the Active Directory domain and the user’s SamAccountName shown in the preceding figure, they expect the user’s UserPrincipalName, as shown in Figure 1-20.

Figure 1-20 Sign-in using the UserPrincipalName format of [email protected]
The UserPrincipalName value, despite being formatted like the user’s email address, is a separate attribute altogether and therefore might be confusing to your users if your environment is configured to use AltId (covered in more detail in Chapter 3) or if your users have multiple email addresses that they use frequently for email communication.
It is therefore important to educate your users about the UserPrincipalName value in how it is the same as or different from their primary email address. They should also be instructed to use the UserPrincipalName whenever they are prompted for credentials, especially after you have deployed Office Pro Plus and started sharing OneDrive and SharePoint content.
Multi-forest environments
Frequently, organizations with a complex architecture that consists of more than one Active Directory forest choose to use the migration to Office 365 as an opportunity to consolidate their directories. The migration of mailboxes to Office 365 enables the elimination of on-premises Exchange infrastructure; in a multi-forest scenario where Exchange is separated from user accounts in a resource forest, you might also need to migrate user workstations as the resource forest is decommissioned.
If user workstations are migrated between forests during an Office 365 migration, it is important to communicate to your users that they might need to change the account they use to log on to their workstation, and they might receive additional logon prompts when launching Outlook.
Office versions
Depending on the version of Office installed on your users’ workstations, you might have to upgrade to a newer version before the client can successfully connect to Office 365 because of the way Outlook authenticates to the Exchange Online environment.
In versions prior to the Outlook 2010 SP2 April 15, 2014, update, the client used an authentication method that is not compatible with Exchange Online. It is therefore imperative for your users to be running the most current version of Outlook possible, and if they are running Outlook 2010, it must be SP2 with the April 15, 2014, update.
One option to help with this issue is to enable Office Pro Plus licenses for your users prior to beginning migration of any Office 365 workloads and instructing your users to use their Office 365 logon to log on to the service and download the latest version of the Office products, including Outlook, prior to any mailbox migrations.
This approach enables you to acclimatize your users to the Office 365 portal experience as well as ensure that their mailbox migration does not encounter client issues that might make the experience lengthy or unpleasant.
Updating
One common problem when migrating users to Office 365, if they cannot upgrade to the latest version of Outlook, is confirming that the latest Microsoft operating system updates (including Office updates) have been applied.
Updating workstations is strongly recommended for many reasons, security included; and it is recommended that the updates be tested, approved, and deployed far in advance of the first mailbox moves.
Delegation is the primary reason that you want to make sure Outlook updates are in place before any mailboxes move. If a user migrates to Exchange Online, but their delegate does not, and the delegate does not have a compliant version of Outlook or the latest updates, the migrated mailbox will be inaccessible while the delegate’s mailbox remains on-premises.
Mailbox cleanup
Earlier, this chapter discussed large items and their impact on mail migrations and the likelihood of data loss if they are not addressed. Another item that you can communicate to your users in advance of mailbox migrations is the identification and remediation of large items.
Ask your users to sort their mailbox, including subfolders and archives, and identify all messages with large attachments. Outlook folders can easily be sorted using message size by selecting the Size column in Outlook, as shown in Figure 1-21.

Figure 1-21 Outlook Inbox sorted by message size
After the mailbox has been sorted, users can delete any large items they do not wish to keep in their mailbox. Alternatively, it is possible to right-click an email containing a large attachment, choose the attachment, and select Remove Attachment. As shown in Figure 1-22, the user is then prompted to remove the item. After removing the attachment, they are prompted to save the update to the email.

Figure 1-22 Removing an attachment from an Outlook email
Removing any large attachments but leaving the email intact enables your users to maintain their email history without adding excessive bloat to their mailbox. In fact, if your users are licensed for SharePoint Online, they could then save the attachments to a SharePoint team site (or OneDrive) before the emails are removed from the mailbox so the attachment is not lost.
Scheduling
If your Exchange environment is version 2010 or later and you have Exchange Hybrid mode set up to allow MRS mailbox moves, your users can continue to work while their mail is migrated. In fact, if mailbox migration batches are configured in Suspend When Ready To Complete (SWRC) mode, mailbox data migration might occur over several days, with a final cutover of the mailbox to Office 365 after hours or over a weekend.
The MRS mailbox move process enables you to move user mailboxes in large batches during the business day without any impact on your users, with the final cutover step happening at a more convenient time for your administrators. When the final cutover step occurs, your users receive a pop-up dialog box in Outlook, shown in Figure 1-23, prompting them to close and reopen Outlook. This is the only impact on your users as part of the migration process.

Figure 1-23 Pop-up dialog box received when Office 365 mailbox migration has completed
The global address list
After your users have migrated to Office 365, one of the first things that might look different to them is the global address list (GAL).
While their mailbox was on-premises, the global address list consisted of all mail-enabled user, group, resource, and contact objects present in Active Directory. After a user has been migrated to Office 365, however, their global address list comprises all mail-enabled user, group, resource, and contact objects present in Azure.
As part of the initial configuration of your Office 365 tenant, you implement directory synchronization, which is discussed in detail in later chapters; however, it is important to understand that decisions made during the synchronization tool implementation have a direct impact on the contents of the global address list. Failure to include the correct OUs from Active Directory, or the manual creation of cloud-based users, groups, and contacts, results in either too few or too many objects in your Exchange Online GAL.
It is therefore strongly recommended that you create pilot groups for mailbox migrations so that users can review the Exchange Online GAL and provide feedback about it when compared with the on-premises GAL before you start moving your users in bulk to Office 365.
Replying to old emails
After your users’ mailboxes have been migrated to Office 365, and the global address list has been confirmed to be accurate, the appearance and behavior of the Exchange Online experience should be identical to that of the on-premises Exchange experience. In fact, some customers have actually reported that their users had no idea they had been migrated to Office 365 because the experience was identical.
One of the most common issues following migration to Office 365 is the occasional receipt of non-delivery errors when replying to some old emails or calendar appointments. Although this does not happen frequently, it can become quite an annoyance for users who do experience the issue.
This typically occurs because an x500 address is missing from the proxy addresses list for the correct recipient in Exchange Online. The x500 address, which should contain the LegacyExchangeDN value of the mailbox that should receive the email, is absent, and Exchange Online is unable to deliver the message, as shown in Figure 1-24.

Figure 1-24 A non-delivery report that includes the IMCEAEX error
The Synchronization process typically handles synchronization of LegacyExchangeDN values from on-premises Active Directory for all mail-enabled objects to Azure AD. Sometimes, however, there are issues with missing LegacyExchangeDN values because of direct manipulation of the attribute. In those cases, the easiest way to resolve any non-delivery report (NDR) issues related to LegacyExchangeDN is to populate the on-premises object with the missing x500 address and allow it to synchronize to Office 365 automatically. Subsequent emails then deliver successfully.
Syncing your users and moving services
After you have successfully reviewed your infrastructure and identified any upgrades, new servers, or configuration changes, you are almost ready to start synchronizing your users and moving your services to Office 365.
There might still be a long road ahead, especially if you are planning to implement any hybrid configurations in Exchange, SharePoint, or Skype; however, the insights provided in this chapter should give you sufficient information to get started with each of those tasks. In addition, each of the major milestone activities (synchronization, hybrid, and mailbox migrations) is described in later chapters in great detail.
For the moment, however, read on. You’ve learned about preparing for Office 365 migration; now it’s time to learn the deployment and configuration processes.