Chapter 14. Managing Exchange Online
Whether you have performed a greenfield deployment to Exchange Online, started or completed a migration (or are somewhere in between), at some point, you’ll need to administer the environment.
This chapter is divided into sections based on the areas you typically need to manage:
- Recipients
- Transport services
- Organization settings
- Auditing
- Hybrid configuration
Although many of the settings can be configured inside the Exchange Admin Center, some tasks are quicker to perform or can only be achieved through Windows PowerShell.
Exchange Admin Center
If you are familiar with managing Exchange Server on-premises, the Exchange Admin Center in Office 365, as shown in Figure 14-1, should feel familiar.

Figure 14-1 Exchange Admin Center in Office 365
The layout of the Exchange Admin Center is very similar to the Exchange Admin Center for Exchange Server, displayed in Figure 14-2, with just a few feature changes.
They both are styled very similarly, with the Office 365 or Exchange Online version of the Admin Center displaying a dashboard (and, optionally, Advanced Threats if your tenant has the appropriate service plans), whereas the on-premises Exchange Server version has menu items for Servers and Tools. Because you are not responsible for the underlying server health in Office 365, there is no need to expose the Servers and Tools options in Office 365.
The admin center available for Exchange Server also has two tabs at the top—Enterprise and Office 365—to enable you to enter credentials and switch back and forth between the two environments inside a single management interface.
For more information on the Exchange Admin Center for Office 365, see Chapter 6, “The Office 365 Portal, Dashboard, and Admin Centers.”

Figure 14-2 Exchange Server Admin Center for Exchange Server
Recipient management
Most of the things that you will be administering in Office 365 are recipients of some sort—whether they are mailboxes, mail-enabled users, contacts, or one of the types of distribution groups. For more information on the various types of recipients in Office 365, please see Chapter 11, “Understanding the Office 365 Resource Types.”
This next section gives you some ideas about tasks that you can perform against the various recipient types in Office 365.
Mailboxes
User mailboxes can contain mail, folders, calendars, contacts, tasks, and rules, and their management rights can be delegated to others.
Permissions and rights
One of the most common tasks you will perform is manage permissions or rights for a mailbox. Here are some common scenarios.
Grant full-mailbox access
With full mailbox access, the delegate can perform any mailbox management task that the original owner can perform, such as creating or deleting folders or moving messages.
To grant full mailbox access for the mailbox Ayla Kol to the user Dan Jump, you can add the permission through the admin center by navigating to Recipients, selecting a recipient, clicking the Edit (pencil) icon, and then selecting Mailbox Delegation, as shown in Figure 14-3.

Figure 14-3 Mailbox delegation
Click the plus sign (+) under Full Access, add the user from the picker to whom you wish to grant access, and then click Save.
For more information about adding mailbox permissions, see https://technet.microsoft.com/en-us/library/bb124097(v=exchg.160).aspx, “Add-MailboxPermission.”
Grant Send-On-Behalf or Send-As permission
If your users need to perform activities as another mailbox, such as sending mail, then you must grant them Send-On-Behalf or Send-As permissions. A common scenario is to include sending as a shared mailbox (such as Sales) to mask the sender.
Users access the Send-As and Send-On-Behalf-Of feature in the same way—by exposing the From field in Outlook and then entering the address of the mailbox they’re acting as. The difference is in how the recipient sees it. Messages sent on behalf of someone else include both the sender and the original mailbox owner’s name in the From line (such as “From Ayla on behalf of Dan”), whereas messages sent using the Send As permission show the mailbox owner as the sender.
Both Send-On-Behalf and Send-As can be granted from the Mailbox Delegation page in the Exchange Admin Center, as shown previously in Figure 14-3, or through Windows PowerShell.
Add-RecipientPermission -Identity <mailbox> -GrantSendOnBehalfTo <delegate>
Add-RecipientPermission -Identity <mailbox> -AccessRight SendAs -Trustee <delegate>
For more information on managing recipient permissions, see https://technet.microsoft.com/en-us/library/ff935839(v=exchg.160).aspx.
Folder permissions
If you configure shared mailboxes to be used as calendars, or want to update calendar permissions for your users, you can use the Add-MailboxFolderPermission or Set-MailboxFolderPermission cmdlets. Although you can use the *MailboxFolderPermission cmdlets to manage the permissions on any folder in the mailbox, the most common usage for it is to manage the calendar. You can specify the folder by using the <mailbox>:Folder syntax.
Table 14-1 lists the individual permissions you can assign.
Permission |
Description |
CreateItems |
The user can create items in the specified folder. |
CreateSubfolders |
The user can create subfolders in the specified folder. |
DeleteAllItems |
The user can delete all items in the specified folder. |
DeleteOwnedItems |
The user can only delete items that they created from the specified folder. |
EditAllItems |
The user can edit all items in the specified folder. |
EditOwnedItems |
The user can only edit items that they created in the specified folder. |
FolderContact |
The user is the contact for the specified public folder. |
FolderOwner |
The user is the owner of the specified folder. The user can view the folder, move the folder, and create subfolders. The user can’t read items, edit items, delete items, or create items. |
FolderVisible |
The user can view the specified folder but can’t read or edit items in the specified public folder. |
ReadItems |
The user can read items in the specified folder. |
The permissions are grouped into roles, which can also be assigned using the Add-MailboxFolderPermission or Set-MailboxFolderPermission cmdlet. Table 14-2 lists the roles and their associated permissions.
Table 14-2 Roles and permissions
Role |
Permissions |
Author |
CreateItems, DeleteOwnedItems, EditOwnedItems, FolderVisible, ReadItems |
Contributor |
CreateItems, FolderVisible |
Editor |
CreateItems, DeleteAllItems, DeleteOwnedItems, EditAllItems, EditOwnedItems, FolderVisible, ReadItems |
None |
FolderVisible |
CreateItems, FolderVisible, ReadItems |
|
Owner |
CreateItems, CreateSubfolders, DeleteAllItems, DeleteOwnedItems, EditAllItems, EditOwnedItems, FolderContact, FolderOwner, FolderVisible, ReadItems |
PublishingEditor |
CreateItems, CreateSubfolders, DeleteAllItems, DeleteOwnedItems, EditAllItems, EditOwnedItems, FolderVisible, ReadItems |
PublishingAuthor |
CreateItems, CreateSubfolders, DeleteOwnedItems, EditOwnedItems, FolderVisible, ReadItems |
Reviewer |
FolderVisible, ReadItems |
AvailabilityOnly |
View only availability data (only applicable to Calendar folder) |
LimitedDetails |
View availability data with subject and location (only applicable to Calendar folder) |
The following examples illustrate how to manage the permissions.
Grant Ayla Kol the ability to create items on Dan Jump’s calendar, using permissions granted in the Author role.
Add-MailboxFolderPermission -Identity DanJump:Calendar -AccessRights Author -User AylaKol
Change the default permission for all calendars from AvailabilityOnly to LimitedDetails.
Get-Mailbox -ResultSize Unlimited | % { Set-MailboxFolderPermission -Identity “$($_.Alias):Calendar” -User Default -AccessRights LimitedDetails }
For more information on folder permissions cmdlets, see https://technet.microsoft.com/en-us/library/dd298062(v=exchg.160).aspx, “Add-MailboxFolderPermission.”
Email addresses
All the addresses that a mailbox can receive mail as are listed in the EmailAddresses attribute. The name of the underlying attribute in Active Directory (and Azure Active Directory) is proxyAddresses.
If your objects are authored in the cloud, you can modify the EmailAddresses attribute. If they are synchronized from an on-premises environment, you must modify the mail-enabled user object or remote mailbox object from that environment. In either scenario, the syntax is the same—simply replace “mailbox” in the cmdlet with “remotemailbox.”
To add a proxy address to a user mailbox, use:
Set-Mailbox TerryAdams -EmailAddresses @{add=“[email protected]“}
You can also replace all the proxy addresses by using a different syntax for the -EmailAddresses parameter.
Set-Mailbox TerryAdams -EmailAddresses @(“SMTP:[email protected]“, “[email protected]“, “[email protected]“)
Automatic calendar processing
When you create shared mailboxes for equipment or conference rooms, you might not be able to enter all the configuration parameters that accurately describe how the resource is to be used. One of those areas might be calendar processing.
Calendar processing controls how the Calendar Attendant or Resource Booking Attendant manages meetings for a given mailbox. For example, you have options to control who is allowed to book a conference room, whether recurring meetings will be accepted, or whether meetings need to be approved by a delegate.
By default, user mailboxes have calendar processing set to AutoUpdate, and resource mailboxes have calendar processing set to AutoAccept.
With calendar automation, requests fall into two classes:
- In-policy requests In-policy requests don’t violate any of the resource scheduling options, such as conflicts or duration.
- Out-of-policy requests Out-of-policy requests violate one or more resource scheduling options.
Seven settings work together to form the foundation of booking policies.
AllBookInPolicy Everyone can automatically reserve a resource with a valid, in-policy meeting request. The default setting is $True.
BookInPolicy Use this setting to specify a list of users who can automatically book a resource with a valid, in-policy meeting request if AllBookInPolicy is set to $False.
AllRequestInPolicy Everyone can request to reserve the resource with a valid, in-policy meeting request. The request is routed to the value stored in the mailbox’s ResourceDelegates property. The default setting is $false.
RequestInPolicy Use this setting to specify a list of users who can request to reserve a resource with a valid, in-policy meeting request. The request is routed to the value stored in the mailbox’s ResourceDelegates property.
AllRequestOutOfPolicy Everyone can reserve a resource with a valid, in-policy meeting request. If the meeting request violates the policy defined in the scheduling options, the request can be approved by one of the mailbox’s resource delegates, stored in the mailbox’s ResourceDelegates property. The default value is $false.
RequestOutOfPolicy Use this setting to specify a list of users who can automatically reserve a resource with a valid, in-policy meeting request. If the request violates the policy defined in the scheduling options, the request can be approved by one of the mailbox’s resource delegates, stored in the ResourceDelegates property.
ResourceDelegates This setting is for users who can approve or decline meeting requests on behalf of a resource mailbox.
Here are some examples of how you might configure the Room1 conference room.
Enable Room1 to accept meeting requests from people outside the organization. This might be useful if you have a facility with public meeting rooms, such as a library, that you want to allow people who are outside the organization to schedule.
Set-CalendarProcessing -Identity Room1 -ProcessExternalMeetingMessages $True
Specify additional text to be sent back to a meeting organizer when the resource is booked.
Set-CalendarProcessing -Identity Room1 -AddAditionalResponse $True -AdditionalResponse “Your room has been successfully booked. Please arrive at least 5 minutes prior to your scheduled meeting.“
Choose to retain attachments on resource mailboxes. By default, attachments to meeting requests are deleted.
Set-CalendarProcessing -Identity Room1 -DeleteAttachments $False
Allow only members of the mail-enabled Marketing security group to be able to schedule meetings in Room1.
Set-CalendarProcessing -Identity Room1 -BookInPolicy Marketing -AllBookInPolicy $False
Allow only members of the mail-enabled Marketing security group to be able to schedule meetings in Room1, but allow members of the mail-enabled security group Sales to be able to schedule a meeting with the delegate’s approval. Finally, set Lori Penor as the delegate.
Set-CalendarProcessing -Identity Room1 -BookInPolicy Marketing -AllBookInPolicy $False -RequestInPolicy Sales -ResourceDelegates LoriPenor
For more information about the Calendar Attendant and Resource Booking Attendant, please see https://technet.microsoft.com/en-US/library/ms.exch.eac.EditEquipmentMailbox_ResourceDelegates(EXCHG.150).aspx, “Set scheduling permissions for an equipment mailbox.”
Mail-enabled users
As discussed in Chapter 11, a mail-enabled user is a security principal (an object that has an account and could log on to a system) that has the mail properties of a contact applied to it.
Mail-enabled users can have many of the same properties that a mailbox user can, but it is only a routing entity from the global address list’s point of view. The core properties of a mail enabled user are:
- msExchRecipientDisplayType This property is set to 6.
- msExchRecipientTypeDetails This property is set to 128.
- mail This property is set to an email address, either inside or outside of your environment’s authoritative domain name space.
- targetAddress This property is set to an email address, typically outside of your environment’s authoritative name space.
For example, you can create a mail-enabled user with the following syntax.
New-MailUser -Name “Jeff Hay” -FirstName Jeff -LastName Hay -ExternalEmailAddress [email protected] -MicrosoftOnlineServicesID [email protected]
The user account would have a primary SMTP address matching the value for ExternalEmailAddress, and you would be able to sign in to the Office 365 service with the password you assigned to it. Because mail-enabled users are security principals and mail recipients, they can be granted management permissions on objects as well as become members of distribution lists.
Contacts
Contacts are designed to give representation only to mail objects inside the global address list. They are recipients and can be made members of distribution groups but cannot be granted management rights or permissions, nor can a contact object be used to log on to Office 365.
Contacts can be created from the Exchange Admin Center or through Windows PowerShell.
New-MailContact -FirstName Tanja -LastName Plate -Name “Tanya Plate” -ExternalEmailAddress [email protected]
Distribution groups
Distribution groups are collections of objects designed to make addressing simpler. Office 365 has several kinds of groups. The types of groups, as well as cmdlets used to add and remove members, are discussed in Chapter 11.
Restricting delivery
At some point, you might need to restrict sending to either users or groups. You can set different types of restrictions, including allowing or prohibiting sending to users and groups, or ensure that content goes through review (perhaps by a manager) before being delivered to recipients.
Restrict delivery from outside senders
You can configure both users and distribution groups to accept mail only from internal users. To do this, you can set the RequireSenderAuthenticationEnabled property to $True, as shown in the following examples.
Set-Mailbox TerryAdams -RequireSenderAuthentication $True
Set-DistributionGroup “Quality Control” -RequireSenderAuthentication $True
Restrict delivery to allowed senders
You can also restrict delivery to users or distribution lists to usage by named individuals by using the AcceptMessagesOnlyFrom parameter. The following example configures the All Employees distribution group to allow only Lori Penor to send to it.
Set-DistributionGroup “All Employees” -AcceptMessagesOnlyFrom [email protected]
If you want to grant a group send-to permissions (instead of a user), you can use the AcceptMessagesOnlyFromDLMembers parameter, and, if you want to restrict sending to a user or group by using a combination of named users and group memberships, you can use the AcceptMessagesOnlyFromSendersOrMembers.
Moderate messages sent to a group
You can also configure moderation for a distribution group. Messages sent to a distribution group are first routed to the listed moderator for approval. You can configure moderation by using the ModerationEnabled and ModeratedBy parameters, as shown in the following example.
Set-DistributionGroup “Ask the CEO” -ModerationEnabled $True -ModeratedBy DanJump
Require approval for messages sent to a user
You can configure a transport rule to redirect messages to another user (such as a manager) prior to delivery.
To configure a rule redirecting all messages by using the Exchange Admin Center, follow these steps.
- In the Exchange Admin Center, select Mail Flow | Rules.
- Click the plus sign (+) and then select Create A New Rule.
- In the Name box, enter a name for the rule.
- In the Apply This Rule If drop-down list, select The Recipient Is and then choose a name from the Select Members dialog box.
- In the Do The Following drop-down list, select Forward The Message For Approval To and then choose a name from the Select Members dialog box.
- Click Save.
To configure a transport rule to redirect all messages intended for Ayla Kol to Dan Jump for approval, using Windows PowerShell, use the following command.
New-TransportRule -SentTo AylaKol -ModerateMessageByUser DanJump -Name 'Moderate Messages Sent to ''Ayla Kol''' -StopRuleProcessing:$false -Mode 'Enforce' -RuleErrorAction 'Ignore' -SenderAddressLocation 'Header'
As with any transport rule, you can add additional conditions and exceptions to meet your requirements.
Transport
For many organizations that move to Office 365, the default mail routing configuration is sufficient. In the default Office 365 mail flow, all outbound mail goes directly to the Internet from Office 365, and inbound mail is received directly from the Internet (if your MX record is pointed to Office 365), from your on-premises environment (if you have on-premises applications or mailboxes delivering through a hybrid environment), or both.
Connectors
Connectors are configuration objects that direct mail flow. In Office 365, connectors go in two directions: inbound (in to Office 365) and outbound (out from Office 365). These map to the on-premises receive (into the Exchange environment) and send (out to other servers or systems) connectors. If you have a hybrid environment, you have inbound and outbound connectors in Office 365 and send and receive connectors in your Exchange on-premises environments.
To manage connectors, you can navigate to the Exchange Admin Center and select Mail Flow | Connectors. By default, Exchange Online has no connectors and routes mail directly to the Internet.
You can control the path that a connector takes or restrict it to handle traffic only for certain domains. Exchange automatically uses the connector with the most specific match. Consider the following configuration.
PS C:> Get-OutboundConnector
Name          RecipientDomains             SmartHosts  Enabled
----          ----------------             ----------  -------
Coho Vineyard {cohovineyard.com}           {[1.2.3.4]} True
Marketing     {marketing.cohovineyard.com} {[5.6.7.8]} True
If you sent a message to [email protected], the message would use the connector marketing.cohovineyard.com with the smart host 5.6.7.8, because the email address domain marketing.cohovineyard.com is an exact match for the Marketing connector.
Transport rules
Transport rules are a set of logic that can be applied to messages as they pass through the system to influence which route a message might take or other actions that can happen to a message based on sender, recipient, or contents in the header or message body.
Transport rules are made up of three parts:
- Conditions Conditions are settings or properties under which a particular rule is applied. Conditions might specify senders or recipients; sensitive information types; contents in the subject, body, or header; attachments; or other message properties. Conditions are also referred to as predicates in some documentation.
- Actions Actions specify which functions are performed on a message. Actions might include forwarding a copy of a message to another recipient, redirecting the message to a new recipient, applying encryption, redirecting the message to a designated connector, or rejecting the message.
- Exceptions Exceptions are conditions or properties under which a particular rule is blocked or skipped. For example, you might configure a rule to add recipients to the Cc line if the subject is Sales Order but make an exception if the subject contains the text RE: at the beginning.
You configure transport rules on the Mail Flow page (Figure 14-4) in the Exchange Admin Center or through Windows PowerShell.
To create a rule, click the plus sign (+) and select from the available options, as shown in Figure 14-5. The drop-down list has a number of available rule templates, or you can select Create A New Rule to start with a blank rule.

Figure 14-4 Mail flow rules

Figure 14-5 Create A New Rule
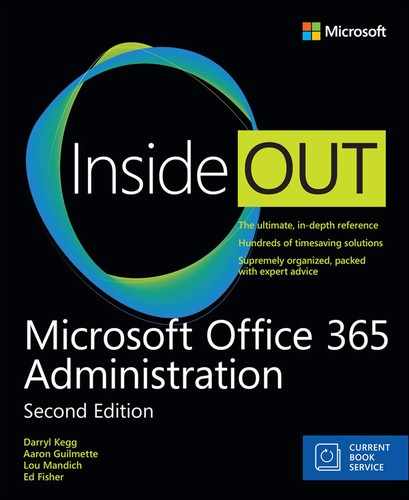
When you create a new rule, it might seem like there aren’t a lot of choices for actions (see Figure 14-6).
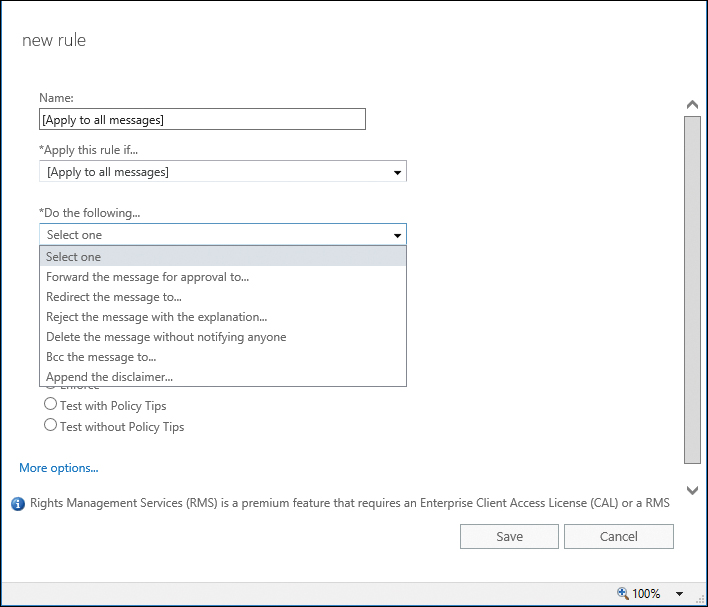
Figure 14-6 New Rule page
Click the More Options link near the bottom of the page. The page refreshes to show the Except If button to specify rule exceptions, and the list of available actions under the Do The Following drop-down list is updated.
You can then create the rule, using all the available predicates and actions. The rule shown in Figure 14-7 redirects all mail intended for Lori to Ayla’s mailbox, except if the messages are of the type Read Receipt or are over 2 MB in size.

Figure 14-7 Mail redirect rule
You can also create the same rule with Windows PowerShell by using the New-TransportRule cmdlet.
New-TransportRule -SentTo [email protected] -RedirectMessageTo [email protected] -ExceptIfMessageTypeMatches 'ReadReceipt' -ExceptIfMessageSizeOver 2MB -Name 'Redirect Lori''s mail to Ayla' -StopRuleProcessing:$false -SetAuditSeverity 'DoNotAudit' -Mode 'Enforce' -RuleErrorAction 'Ignore' -SenderAddressLocation 'Header'
Attachment blocking
Attachment blocking occurs when your organization might wish to block all attachments or all attachments of a certain type.
In this example, you can block a message with attachments based on type, using a malware filter rule.
On the Mail Flow page, select Protection | Malware Filter and then click the plus sign (+) to add a new filter, as shown in Figure 14-8.

Figure 14-8 New Anti-Malware Policy page
Scroll down to the File Types list box and click the plus sign (+) to add a new file type to the list. You can select from the default file types. Click OK to add the file type, add a condition under Applied To, and then click Save to save the rule.
If you want to add a file type that is not present in the file types list, you must either create the rule in Windows PowerShell, using the New-MalwareFilterPolicy cmdlet, or edit one that you have already created, using the Set-MalwareFilterPolicy cmdlet.
For example, to add the ZIP file type to the malware filter policy created in Figure 14-8, you can run this command:
[array]$FileTypes = (Get-MalwareFilterPolicy “Block File Types“).FileTypes
$FileTypes += “zip“
Set-MalwareFilterPolicy “Block File Types” -FileTypes $FileTypes
You can then view the malware filter policy to make sure your file type has been added.
Get-MalwareFilterPolicy “Block File Types” | Select -ExpandProperty FileTypes
ace
ani
app
docm
exe
jar
reg
scr
vbe
vbs
zip
To create a policy that blocks all attachments, you can use a transport rule.
- In the Exchange Admin Center, under Mail Flow, select Rules, click the plus sign (+), and select Create New Rule.
- In the Name box, specify a name for the rule and then click More Options.
- Select the Any Attachment Is Greater Than Or Equal To condition and then type a size of 1 KB.
- Configure an action and click Save.
Although 1 KB will detect most attachments, there might still be some that get through. You can modify the policy in Windows PowerShell by using the Set-TransportRule cmdlet:
Set-TransportRule <Rule> -AttachmentSizeOver 1B
Many senders, however, have images in their email signatures that, depending on the formatting of the message, might be inserted as attachments. This setting renders those undeliverable, so make sure you understand your organization’s requirements before configuring this.
Encryption
You can configure Office 365 Message Encryption to enable users to send encrypted messages to users inside or outside the organization. Common scenarios for message encryption might be to enable encryption if certain keywords are detected in the message or subject, or certain sensitive information types are present.
To use encryption, Azure Rights Management Services (RMS) licenses must be applied to users, the Rights Management service must be enabled in your tenant, and you must have created transport rules to apply encryption.
Users who receive an encrypted message are prompted to sign in to the Office 365 encryption portal to view them. From there, users can read and reply to the secure messages.
Activate Azure Rights Management
You can activate Azure Rights Management either from the Office 365 Admin Center or through Windows PowerShell. To enable Azure Rights Management from the Office 365 Admin Center, follow these steps.
- Log on to the Office 365 Admin Center with an account that has been assigned the Global Admin role.
- Select Settings | Services & Add-Ins and then select Microsoft Azure Information Protection, as shown in Figure 14-9.
Figure 14-9 Microsoft Azure Information Protection
- Click Manage Microsoft Azure Information Protection Settings to open the Rights Management page, shown in Figure 14-10.
Figure 14-10 Rights Management page
- Click Activate.
- In the Do You Want To Activate Rights Management dialog box, click Activate.
- Determine your RMS key sharing location by using the informatioin Table 14-3.
Table 14-3 RMS Online key sharing locations
Tenant Location
RMS Online key sharing location
North America
https://sp-rms.na.aadrm.com/TenantManagement/ServicePartner.svc
European Union
https://sp-rms.eu.aadrm.com/TenantManagement/ServicePartner.svc
Asia
https://sp-rms.ap.aadrm.com/TenantManagement/ServicePartner.svc
South America
https://sp-rms.sa.aadrm.com/TenantManagement/ServicePartner.svc
Office 365 for Government (Government Community Cloud)
https://sp-rms.govus.aadrm.com/TenantManagement/ServicePartner.svc
- From Exchange Online PowerShell, run the following cmdlet, replacing the value for RMSOnlineKeySharingLocation with the value best suited for your deployment.
Set-IRMConfiguration -RMSOnlineKeySharingLocation <RMS Online key sharing location>
- Import the Trusted Publishing Domain from RMS Online by using the following command:
Import-RMSTrustedPublishingDomain -RMSOnline -name “RMS Online“
- Enable IRM with the following command:
Set-IRMConfiguration -InternalLicensingEnabled $True


Create rule to encrypt messages
After Information Rights Management has been enabled and configured in your tenant, you can configure transport rules to apply encryption to messages. To create an Office 365 Message Encryption rule in the Exchange Admin Center that will encrypt messages sent to recipients outside the organization if the subject contains the keyword #encrypt, follow these steps.
- In the Exchange Admin Center, select Mail Flow | Rules.
- Click the plus sign (+) | Apply Rights Protection To Messages.
- In the Name box, enter a name for the rule.
- In the Apply This Rule If drop-down list, select The Subject Matches and then type #encrypt. Click the plus sign (+) and then click OK.
- In the Do The Following drop-down list, point to Modify The Message Security and then select Apply Office 365 Message Encryption, as shown in Figure 14-11.
Figure 14-11 Applying an Office 365 Message Encryption rule
- Click Save.

Create rule to decrypt messages
When a user receives an encrypted message in the Office 365 encryption portal, they can respond to the message there as well. You might want to configure Office 365 to decrypt those messages automatically so your internal users don’t have to sign in to the encryption portal to review encrypted messages.
To create a rule to remove Office 365 Message Encryption, follow these steps.
- In the Exchange Admin Center, navigate to Mail Flow | Rules.
- Click the plus sign (+) and then select Create A New Rule.
- In the Apply This Rule If drop-down list, point to The Recipient Is Located and select Inside This Organization.
- Under Do the Following, point to Modify The Message Security and select Remove Office 365 Message Encryption.
- Click Save.
Inspecting message attachments
Exchange Online transport rules can not only look at the message properties when determining how to handle them, but can also inspect message content—even if it’s buried inside another attachment (for example, a Microsoft Excel workbook inserted in a Word document or inside a ZIP file).
To use these features, you can use the following predicates.
- AttachmentContainsWords This predicate matches messages with supported file type attachments that contain a specified string or group of characters.
- AttachmentMatchesPatterns This predicate matches messages with supported file type attachments that contain a text pattern matching the specified regular expression.
- AttachmentNameMatchesPatterns This predicate matches messages with attachments whose file name contains the characters specified.
- AttachmentExtensionMatchesWords This predicate matches messages with attachments with the specified file name extension.
- AttachmentSizeOver This predicate matches messages with attachments that are greater than or equal to the size specified.
- AttachmentProcessingLimitExceeded This predicate matches messages when an attachment is not inspected by the transport rules agent.
- AttachmentHasExecutableContent This predicate matches messages that contain executable files as attachments.
- AttachmentIsPasswordProtected This predicate matches messages with password-protected attachments.
- AttachmentPropertyContainsWords This predicate matches messages when the specified property of the attached Office document contains specified words.
The predicates are accessed by the Any Attachment menu option under Apply This Rule If, as shown in Figure 14-12.

Figure 14-12 Attachment content filtering
For more information about transport rule predicates, see https://technet.microsoft.com/en-us/library/jj919235(v=exchg.150).aspx, “Mail flow rule conditions and exceptions (predicates) in Exchange Online.” For more information on transport rule actions, see https://technet.microsoft.com/en-us/library/jj919237(v=exchg.150).aspx, “Mail flow rule actions in Exchange Online.”
Central mail transport
Your organization has more complex requirements, such as an on-premises data loss prevention (DLP) infrastructure or an on-premises encryption gateway, you might find that you need to configure your outbound mail from Office 365 to route through your on-premises environment. Central Mail Transport (also referred to as Central Mail Flow in some documentation) routes all outbound mail to the on-premises environment through the hybrid mail connector for further processing.
You can enable Central Mail Transport by running the Hybrid Configuration Wizard on your on-premises Exchange Server and selecting the options as described in Chapter 13, “Office 365 Hybrid Configuration Wizard.”
Manage IP filtering lists
If you want to ensure that messages from a trusted source aren’t blocked, you can use the connection filter policy to create an Allow list. Conversely, if there are sources that you know you don’t trust or want to block from delivering mail to your organization, you can modify the connection filter policy to create a block list.
To configure settings for the connection filter policy, navigate to Protection | Connection Filter inside the Exchange Admin Center, as shown in Figure 14-13, and click the pencil icon.

Figure 14-13 Connection Filter tab
You can add IP addresses and classless inter-domain routing (CIDR) blocks to either the Allowed IP Address or Blocked IP Address list boxes, as shown in Figure 14-14.

Figure 14-14 Allow and block list management
Selecting the Enable Safe List check box also whitelists connections from a trusted sender list that Microsoft provides.
Message trace
As part of administration duties, you might need to find out what happened to an email message. You can do this by performing a message trace in the Exchange Admin Center.
To perform a message trace, you can navigate to Mail Flow | Message Trace in the Exchange Admin Center.
You can create a message trace using date ranges or delivery status as well as search for individual message IDs (obtained from the message header) and filter by sender or recipient.
Message tracing is also available from Exchange Online PowerShell, using the Get-MessageTrace cmdlet. You can filter your search based on starting and ending dates (starting as the earlier of the two dates), sender, recipient, subject, and status.
Running a message trace in Windows PowerShell also gives you more flexibility in creating queries (such as structuring for multiple senders or to see communication between two users).
For example, to search for all messages sent between Dan Jump and Ayla Kol in the past seven days, you can use this command:
$Users = @('[email protected]','[email protected]')
Get-MessageTrace -SenderAddress $Users -RecipientAddress $Users -StartDate (Get-Date).AddDays(-7) -EndDate (Get-Date)
Migration of transport settings between Office 365 tenants
At some point in the future, your organization might need to divest a business unit to a new Office 365 tenant. You can export and copy your existing transport settings between organizations.
You can use the script at https://gallery.technet.microsoft.com/Migrate-EOP-Settings-9d480325 to help you migrate all mail routing configuration parameters between tenants, including malware filter policies, connection filter policies, transport rules, and connectors.
Migration of transport rules collections
If you are migrating to Office 365 from an Exchange 2007 or later on-premises environment, you can export your transport rules and import them into Office 365, using the Export-TransportRuleCollection and Import-TransportRuleCollection cmdlets. Transport rules can also be migrated between Office 365 tenants by using the same procedure.
Export transport rules
Exporting transport rules is a straightforward task. From the Exchange Management Shell, run the following script:
$file = Export-TransportRuleCollection
Set-Content -Path “C:	empRules.xml” -Value $file.FileData -Encoding Byte
The transport rules are exported to the Rules.xml file.
Import transport rules
Importing transport rules is also a straightforward task. After connecting to Exchange Online through remote PowerShell, you can run the following script to import the rules exported in the previous step.
[Byte[]]$Data = Get-Content -Path “C:	empRules.xml” -Encoding Byte -ReadCount 0
Import-TransportRuleCollection -FileData $Data
DKIM
Domain Keys Identified Mail, or DKIM, is an authentication process that relies on DNS records and signing of messages to indicate that messages originated from users inside your organization. You can view or configure DKIM settings for your organization by navigating to Protection | DKIM.
You can learn more about DKIM configuration in Chapter 7, “Inside the Security & Compliance Center: Alerting, Threat Management, and Reporting.”
Spam and malware filtering
Aside from recipient management tasks, managing your organization’s malware and spam settings will most likely be the next most common administrative task. In Exchange Online, malware and spam are separate items—malware is reserved to describe content that performs adverse actions in your environment (such as a virus), whereas spam is generally recognized as unwanted email (such as unsolicited bulk email).
Malware filter
The malware filter is normally configured to manage the flow of messages with attached executable content. However, under the Transport Rules | Attachment Blocking topic earlier in this chapter, the malware filter was configured to block attachments based on file extension.
You can create multiple malware filters for your organization, applying different settings and parameters to different types of content or different groups of users. To configure the malware filter, navigate to Protection | Malware Filter, as shown in Figure 14-15.
You can customize a malware filter policy to respond with custom text, block certain attachment types, and notify internal or external senders about email disposition as well as notify an administrator. You must configure a malware filtering policy to apply to a group of users, as shown in Figure 14-16. You can configure the scope based on user, domain, or distribution group.

Figure 14-15 Malware Filter page

Figure 14-16 Malware filter scope settings
The default malware filter applies to all users in the organization.
Spam filter
Similar to the malware filter policies, you can configure multiple spam filter policies for your organization. To configure a spam filter policy, navigate to Protection | Spam Filter in the Exchange Admin Center. Select the pencil icon to edit an existing policy, as shown in Figure 14-17, or the plus sign (+) to create a new policy.

Figure 14-17 Edit spam filter policy
Under Spam And Bulk Actions, you can set the spam disposition for messages meeting a specific spam confidence level (SCL). By default, spam messages are sent to the user’s Junk Email folder. You can configure the action to Delete Message or Quarantine Message. If you select Quarantine Message, you can configure Retain Spam For (Days), after which it will be automatically deleted. If you select the Quarantine Message action, messages will show up in quarantine in the Exchange Admin Center and can be released by an administrator or by the user.
On the Block and Allow list pages, you can configure whitelisting or blocking of senders and domains.
By using the International Spam settings, as shown in Figure 14-18, you can configure filtering for messages from certain countries or regions or messages written in certain languages. If, for example, your organization receives a high level of financial-related spam or phishing attempts from certain parts of the world or your organization is prohibited from procuring services in certain regions, you can enter those country codes on this page.
There are also a number of advanced settings that you can adjust to fit the needs of your organization. The settings on the Advanced Options page can be used either to increase the spam score for a message or mark it as spam outright (depending on the individual parameter configured).
The default spam filter applies to all users in the organization.
For more information about the spam filter settings, see https://technet.microsoft.com/en-us/library/jj200684(v=exchg.150).aspx, “Configure your spam filter policies.”

Figure 14-18 International spam settings
Outbound spam
Outbound spam filtering is enabled automatically for all Office 365 and Exchange Online subscribers. Although the overall settings aren’t visible or configurable, you can configure notification settings to inform administrators or senders when messages are suspicious or blocked.
To configure outbound spam filtering notifications, navigate to Protection | Outbound Spam in the Exchange Admin Center. Select the pencil icon to edit the Default policy as shown in Figure 14-19.

Figure 14-19 Outbound spam notification settings
Quarantine
The spam quarantine holds messages deemed to be spam by the service. By default, messages flagged as spam are delivered to the user’s Junk Email folder. To quarantine messages, you have to configure spam filter or content filter policies to deliver messages to quarantine instead of to the user’s Junk Email folder.
If you configure your spam filter policy to deliver mail to quarantine, you might want to enable the user quarantine. You can do this in the Exchange Admin Center by scrolling down in the spam filter policy with the quarantine action and then selecting Configure End-User Spam Notifications, as shown in Figure 14-20.

Figure 14-20 Enabling user spam notifications
In the Edit End-User Spam Notifications dialog box, as shown in Figure 14-21, select the Enable End-User Spam Notifications check box, specify a notification frequency, and click Save.
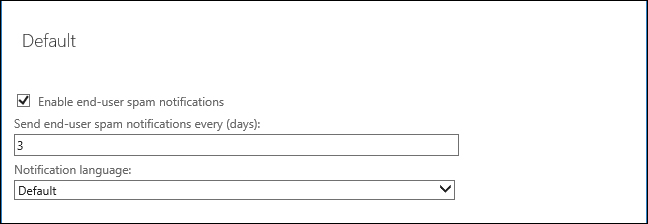
Figure 14-21 Editing user spam notifications
You can also enable the user quarantine by using the Set-HostedContentFilterPolicy cmdlet. For example, to enable the user quarantine setting for the Default spam filter, you can use this command:
Set-HostedContentFilterPolicy -Identity Default -EnableEndUserSpamNotifications $True
Users can access their quarantined messages by following the link in the spam notification email or by navigating to https://admin.protection.outlook.com/quarantine. The user quarantine is simple to use and includes the ability to search, view the details of a message, and release messages to the mailbox. See Figure 14-22. The interface for the user quarantine is identical to the administrator quarantine—the difference is only that the user sees only their own messages.

Figure 14-22 User quarantine interface
Blocked accounts
If a user repeatedly sends messages that are classified as spam, they will be blocked from sending any more messages. Users who have been blocked from sending receive non-delivery reports (NDRs) for messages they attempt to send and need to be unblocked.
You can configure the Outbound Spam settings to notify an administrator when an account is blocked.
To unblock an account, navigate to Protection | Action Center, search for the user, and then click Unblock Account in the description pane.
Compliance and reporting
Because organizations are under increasing threats (both internal and external), regulation and accountability requirements and the need for compliance and auditing becomes more important than ever. Exchange Online (and Office 365) provides a suite of tools and capabilities designed to help your organization meet those requirements.
eDiscovery and hold
In-place hold and eDiscovery features have been part of Exchange for several years. As organizations’ business requirements have grown, the per-application tools for eDiscovery and legal holds have grown as well. Although holds and searches can still be performed in the Exchange Admin Center, those features are being deprecated in favor of more comprehensive tools available in the Office 365 Security & Compliance Center.
For more information on eDiscovery and holds in the Security & Compliance Center, see Chapter 8, “Inside the Security & Compliance Center: Data Classification, Loss Prevention, Governance, and Discovery.”
Auditing
The auditing reports available in the Exchange Admin Center (Figure 14-23) can be used to provide valuable insight into how your data is being accessed.
You must enable mailbox logging before the Non-Owner Mailbox Access Report will return any data. In addition, for the admin audit log to return results, you must enable admin audit logging.

Figure 14-23 Audit reports
To enable mailbox auditing on all mailboxes, use the following command.
Get-Mailbox -ResultSize Unlimited | Set-Mailbox -AuditEnabled $True
You can enable admin audit logging for all services in Office 365 by using the Security & Compliance Center. For more information on globally enabling audit logging, see Chapter 8.
Data loss prevention
Data loss prevention (DLP) enables you to create policies to help manage the flow of sensitive data or data meeting certain policy requirements. Although you can still configure the features in the Exchange Online Admin Center, you can create more comprehensive policies in the Security & Compliance Center.
The exception to this is Document Fingerprinting. Document Fingerprinting enables you to use a document as a template to detect sensitive data. To create a document fingerprint DLP Policy rule, follow these steps.
- In the Exchange Admin Center, navigate to Compliance Management | Data Loss Prevention and click Manage Document Fingerprints. See Figure 14-24.
Figure 14-24 Data Loss Prevention page
- On the Document Fingerprints page, click the plus sign (+) to upload a document to use as a fingerprint or template. See Figure 14-25.
Figure 14-25 Document Fingerprints page
- Click Close.
- Click the plus sign (+) and select New Custom DLP Policy, as shown in Figure 14-26.
Figure 14-26 New Custom DLP Policy
- Type details for the policy and click Save. See Figure 14-27.
Figure 14-27 New Custom DLP Policy page
- With the new policy selected, click the pencil icon to edit the policy.
- Select Rules, click the plus sign (+), and then select an action that most closely matches your requirement. See Figure 14-28.
Figure 14-28 Edit DLP Policy page
- Select Sensitive Information Types, as shown in Figure 14-29.
Figure 14-29 New Rule page
- On the Contains Any Of These Sensitive Information Types page, click the plus sign (+) and select the custom sensitive information type containing the document fingerprint, as shown in Figure 14-30.
Figure 14-30 Selecting a sensitive information type
- Click OK.
- Finish editing the rule conditions and actions and then click Save.
- Click Save to save the DLP policy rule.


For more information about creating DLP policies, see Chapter 8.
Retention policies and tags
In Office 365, there are two types of retention policies—retention policies created and managed inside the Security & Compliance Center, which can cover Exchange, Microsoft SharePoint, Microsoft OneDrive, and Skype, and retention policies and retention tags created and managed in Exchange Online. Although the retention policies and retention tags in Exchange Online are used to manage information inside the mailbox, they work a little differently than the policies in the Security & Compliance Center.
Office 365 and Exchange Online, by default, have a retention tag that moves content to an online archive after two years. This default policy is applied to all users, but only takes effect if the user has had an online archive enabled. To enable the archive for a user, edit the user properties under Recipients | Mailboxes or use the following cmdlet to enable the archive.
Set-Mailbox -Identity <user> -EnableArchiveTo manage a retention policy that automatically moves messages to the online archive, follow these steps.
- In the Exchange Admin Center, navigate to Compliance Management | Retention Tags.
- Select the Default 2 Year Move To Archive retention tag and click the pencil icon.
- Update the Name and the Retention Period parameters to match your requirements and click Save. See Figure 14-31.
Figure 14-31 Retention tag settings

Moving forward, it is recommended that you use the retention policies inside the Security & Compliance Center to manage the preservation of data and, if necessary, use Exchange retention policies and retention tags inside the Exchange Admin Center to move content to archive mailboxes. For more information about overall Office 365 retention policies, see Chapter 8.
Journaling
Journaling is a feature that stores all copies of messages sent and received in an organization. Some organizations refer to this as an archive or a journal archive. Although Exchange Online can send journal messages to an external journaling destination, it is against the service agreement to use an Exchange Online mailbox as a journal destination.
Journal rules can be applied to all users and all messages inbound and outbound and all internal messages or external messages. To configure one or more journal rules, navigate to Compliance Management | Journal Rules in the Exchange Admin Center and click the plus sign (+).
Configure the journal rule parameters, as shown in Figure 14-32, and click Save.

Figure 14-32 New Journal Rule page
If long-term data retention is a requirement in your organization, using a retention policy configured through the Security & Compliance Center to meet your requirement is recommended. For more information about configuring retention policies, see Chapter 8.
Organization management
At some point, you might need to configure calendar sharing with another organization. This other organization might use Office 365, Exchange on-premises, or a hybrid scenario in which users might exist in either location.
Organization relationships, sharing policies, and Availability address spaces all play a part in how Exchange Online locates resources in your own or other Exchange organizations.
Organization relationships
An organization relationship is the container object used to configure a sharing relationship with an external organization. The organization relationship object describes the other organization’s domains with which you’ll be sharing, what level of calendar and free/busy information sharing you’ll grant, and what remote endpoints the relationship will use to connect to the other organization.
To manage organization relationships, navigate to Organization in the Exchange Admin Center, as shown in Figure 14-33, and select Sharing.
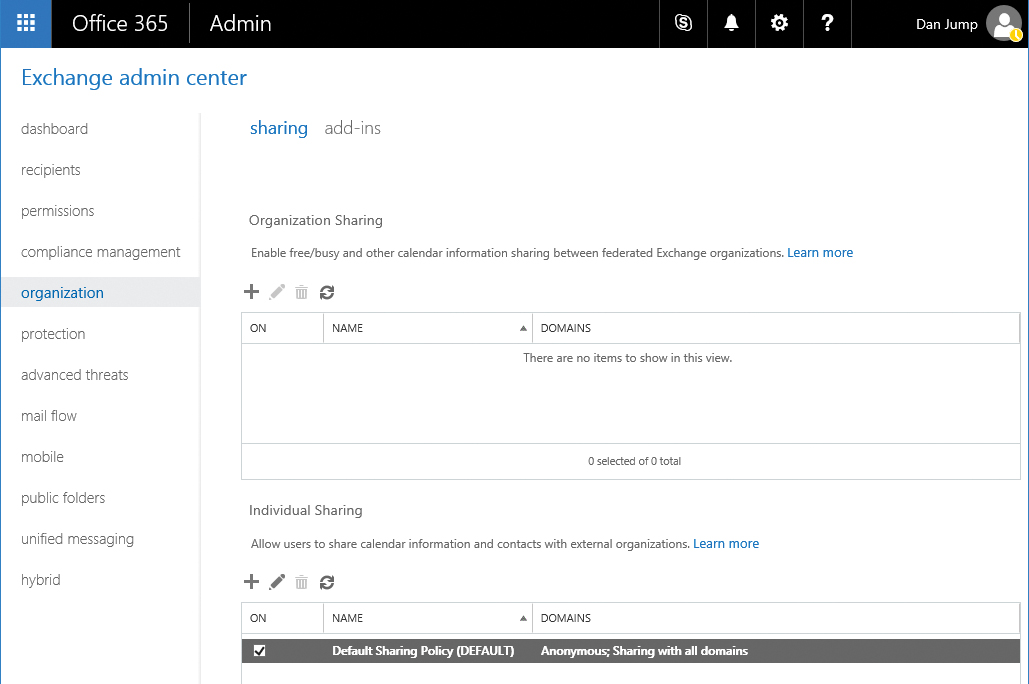
Figure 14-33 Organization management
Click the plus sign (+) in the Organization Sharing area to create a new organization relationship.
See Figure 14-34 for an example of creating a new organization relationship.

Figure 14-34 New Organization Relationship page
To verify the organization relationship settings, you can use the Get-OrganizationRelationship cmdlet.
PS C:> Get-OrganizationRelationship | FL
DomainNames           : {woodgrovebank.com, woodgrovebank.mail.onmicrosoft.com, woodgrovebank.onmicrosoft.com}
FreeBusyAccessEnabled : True
FreeBusyAccessLevel   : AvailabilityOnly
FreeBusyAccessScope   : Coho Finance
MailboxMoveEnabled    : False
MailboxMoveDirection  : None
DeliveryReportEnabled : False
MailTipsAccessEnabled : False
MailTipsAccessLevel   : None
MailTipsAccessScope   :
PhotosEnabled         : False
TargetApplicationUri  : outlook.com
TargetSharingEpr      :
TargetOwaURL          :
TargetAutodiscoverEpr : https://autodiscover-s.outlook.com/autodiscover/autodiscover.svc/WSSecurity
OrganizationContact   :
Enabled               : True
ArchiveAccessEnabled  : False
AdminDisplayName      :
ExchangeVersion       : 0.10 (14.0.100.0)
Name                  : Woodgrove Bank
DistinguishedName     : CN=Cohovineyard,CN=Federation,CN=Configuration,CN=cohovineyardandwinery.onmicrosoft.com,CN=ConfigurationUnits,DC=NAMPR14A003,DC=PROD,DC=OUTLOOK,DC=COM
Identity              : Woodgrove Bank
Guid                  : 29065b56-cf6a-4da7-aabc-fb1a3a6a08c7
ObjectCategory        : NAMPR14A003.PROD.OUTLOOK.COM/Configuration/Schema/ms-Exch-Fed-Sharing-Relationship
ObjectClass           : {top, msExchFedSharingRelationship}
Id                    : WoodgroveBank
IsValid               : True
ObjectState           : Changed
The output shows the settings that were automatically configured, with the exception of FreeBusyAccessScope, which was restricted to the Coho Finance group of users.
TargetApplicationUri
The TargetApplicationUri parameter specifies the target Uniform Resource Identifier of the external organization. The parameter is specified by Exchange when requesting a delegated token for the external organization. This is typically the top-level Outlook Web App URL of the organization. For retrieving free/busy information from an Office 365 organization, this is setting outlook.com as the target. If the organization’s Outlook Web App server URL is https://mail.cohovineyard.com, then the TargetApplicationUri would be mail.cohovineyard.com.
To update the TargetApplicationUri to use the Outlook Web App server at https://mail.cohovineyard.com, you would use the following command:
Set-OrganizationRelationship -Identity <Identity> -TargetApplicationUri mail.cohovineyard.com
TargetAutodiscoverEpr
The TargetAutodiscoverEpr parameter specifies the Autodiscover URL of Exchange Web Services for the external organization. For example, if the external organization’s external Autodiscover service points to autodiscover.cohovineyard.com, the URL would most likely be https://autodiscover.cohovineyard.com/autodiscover/autodiscover.svc/wssecurity. Exchange uses the Autodiscover service to detect the correct Client Access server endpoint automatically for external requests. Hybrid public folder coexistence uses the setting in this parameter to locate the on-premises Exchange environment.
To update the TargetAutodiscoverEpr to point to the Autodiscover service located on https://ex2016.cohovineyard.com, you would run this command:
Set-OrganizationRelationship -Identity <Identity> -TargetAutodiscoverEpr https://ex2016.cohovineyard.com/autodiscover/autodiscover.svc/wssecurity
TargetOwaURL
The TargetOwaURL parameter specifies the Office Outlook Web App URL of the external organization. It is used for Outlook Web App redirection in a cross-premise Exchange scenario. Configuring this attribute enables users in the organization to use their current Outlook Web App URL to access Outlook Web App in the external organization.
TargetSharingEpr
The TargetSharingEpr parameter specifies the URL of the target Exchange Web Services for the external organization. If the TargetSharingEpr parameter is used, it takes precedence over the TargetAutodiscoverEpr parameter information to locate the Client Access server. In Exchange Hybrid scenarios, this might need to be updated if the URL specified in TargetAutoDiscoverEpr points to a version of Exchange Server prior to Exchange Server 2010 SP3.
To update TargetSharingEpr to use the server located at https://hybrid.cohovineyard.com, use the following command:
Set-OrganizationRelationship -Identity <Identity> -TargetSharingEpr https://hybrid.cohovineyard.com/EWS/Exchange.asmx
Sharing policies
Although organization relationships govern the sharing between federated Exchange organizations, sharing policies can be used to provide sharing capabilities on a mailbox-level basis to external users in external Office 365 or Exchange on-premises environments. If the external users aren’t in an Exchange-based organization, sharing policies allow the sharing of calendar information through the use of Internet Calendar Publishing.
To create a sharing policy from the Exchange Admin Center, navigate to Organization | Sharing and click the plus sign (+) in the Individual Sharing area.
After naming the policy, click the plus sign (+) to define the sharing rules. See Figure 14-35 for an example of available options.

Figure 14-35 Sharing rule configuration
Hybrid management
In hybrid coexistence environments, you must perform several administrative tasks—such as creating new users and adding or removing domains that your organization uses for email routing.
Provisioning remote mailboxes
As you enter the daily routine of Office 365 and Exchange Online administration, you will undoubtedly need to create mailboxes. Using the Exchange Admin Center from your on-premises Exchange Server, you can create a new Active Directory account and enable it as an Exchange Online mailbox or add a mailbox to an existing Active Directory user.
You can also use either the Enable-RemoteMailbox cmdlet to provision the Exchange attributes on an existing Active Directory user account or the New-RemoteMailbox cmdlet to create a new Active Directory User and enable it as a mailbox in Office 365.
After the mailbox attributes have been provisioned, AAD Connect synchronizes the attributes to Office 365, triggering a mailbox creation. For more information about provisioning remote mailboxes, see Chapter 13.
Updating domains in a hybrid configuration
In the event that you need to add or remove domains in your hybrid configuration, you can follow this simple process.
- Add the domain to your Office 365 tenant. For more information about adding and verifying a domain in your Office 365 tenant, see Chapter 1, “Office 365 Deployment Milestones,” and Chapter 2, “Preparing Your Environment for the Cloud.”
- Configure the domain as an accepted domain in your on-premises Exchange Server environment. To do this, you can run the New-AcceptedDomain cmdlet:
New-AcceptedDomain -DomainName newdomain.com -DomainType Authoritative
- Run the Hybrid Configuration Wizard and select the new domain to add. This generates a DNS TXT record that you must add to yoexternal DNS. To create the record ahead of time, you can use the Get-FederatedDomainProof cmdlet:
Get-FederatedDomainProof -DomainName newdomain.com
- Add the DNS record to the external DNSto the Hybrid Configuration Wizard, select the I Have Created A TXT Record For Each Token In DNS check box and click Verify Domain Ownership.
- Complete the Hybrid Configuration Wizard. For more information about completing the Hybrid Configuration Wizard, see Chapter 13.
Summary
This chapter discussed management tasks that cover a wide variety of areas, including recipients, transport, and the organization as well as some general hybrid management tasks.