Chapter 16. Deploying and administering Skype for Business Online
Configuring Skype for Business Online
Piloting Skype for Business Online
Deploying the Skype for Business Client
Deploying Skype for Business Online
Administering Skype for Business Online
Integration with on-premises Skype
In this chapter, you learn how to deploy Skype for Business Online (SBO) as well as how to administer it. If you jumped ahead to this chapter, please review Chapter 15, “Skype for Business Online Concepts and Implementation,” first, because many of the concepts you need to understand in this chapter are reviewed in that one. SBO, set up and configured, does not require nearly as much administration as Exchange Online or SharePoint Online, but that doesn’t mean you just want to deploy it and see what happens. Ensuring that you have set up your service and configured your clients properly is the best way to ensure that you get the most out of SBO.
Configuring Skype for Business Online
Start with what you need to administer SBO. There is no role-based access control (RBAC) or delegated administration in SBO. If you are a global administrator in the tenant, or if you have been configured in customized administration as a Skype for Business administrator, then you can administer SBO.
To grant someone the specific workload administrator capabilities for SBO, use the Office 365 Admin Center portal as follows.
- Log on to https://portal.office.com, using a Global Admin account.
- Browse to the Office 365 Admin Center | Users | Active Users.
- Click the user you wish to make an SBO administrator.
- Click the Edit link in the Roles section.
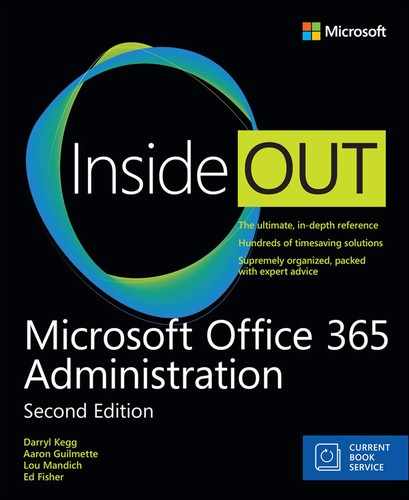
- Click the button next to Customized Administrator.
- Click the check box next to Skype For Business Administrator, as shown in Figure 16-1, and then click Save.
Figure 16-1 Skype for Business customized administrator role
You can also use Windows PowerShell to view the membership of these administrator groups and add members to them. When you are connected to your tenant, run the Get-MsolRole command to view all the available administrative roles in your tenant (Figure 16-2). Note the highlighted line.

Figure 16-2 A screenshot of the output of Get-MsolRole
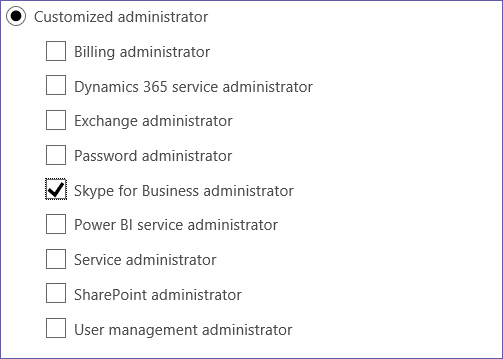
Remember that Skype for Business evolved from Lync, and the internal naming still reflects that. You can view everyone who is a Lync service administrator by running the Get-MsolRoleMember -RoleObjectID 75941009-915a-4869-abe7-691bff18279e | fl command. The ObjectID in your tenant should be the same as any other, but verify it with the Get-MsolRole cmdlet to be sure. As shown in Figure 16-3, there are two members in the SBO Admins group, Allison Brown and Don Funk.
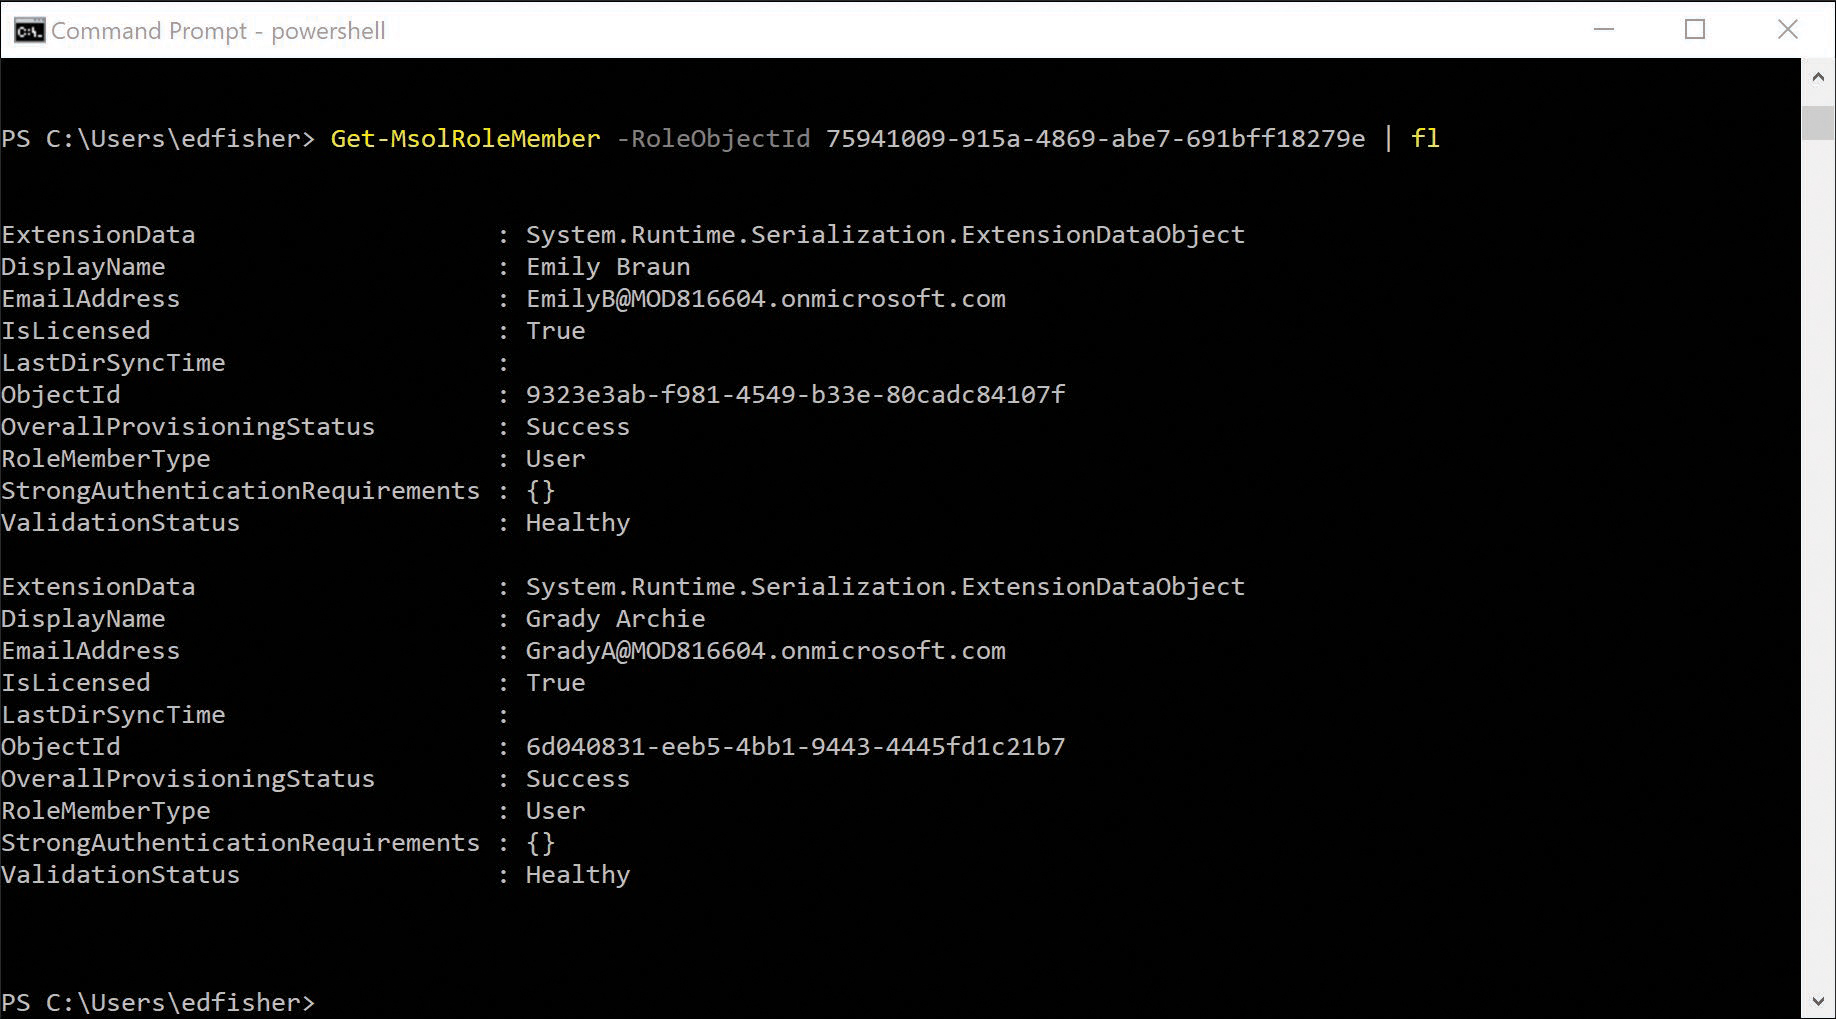
Figure 16-3 Get-MsolRoleMember output
Remember that members of the tenant Global Admins group have SBO administrative rights, even though they won’t show up as members of the Lync Service Administrator group.
When you have the appropriate rights, you’re ready to start configuring SBO for your users. Most of what you do you do only once as a part of your initial configuration. Needs might change and require you to make adjustments, or you might want to start rolling out features slowly, but barring changes, the settings you make generally apply to all users in the tenant and are the settings you use going forward. You can use the Skype Admin portal or Windows PowerShell to administer SBO.
The dashboard
To open the Skype Admin Center, log on to the Office 365 Admin Center portal and navigate to the Skype Admin center. Here’s how to get there.
- Log on to https://portal.office.com/ by using either a Global Admin account or that of a member of the Skype for Business administrator role.
- Click the Admin tile.
- Use the navigation on the left side of the portal to select Admin Centers and click Skype For Business to open the Skype For Business Admin Center dashboard, as shown in Figure 16-4.
Figure 16-4 Skype for Business Admin Center

From here, you can see an overview of your tenant and navigate to the various areas for configuring SBO. The dashboard shows you how many users you have licensed for SBO and enabled for dial-in conferencing and how many are cloud users or synced from your on-premises Active Directory. You can also see your organization name, organization ID, creation date, whether sync is enabled from on-premises, and your organization domains, which are configured for Session Initiation Protocol (SIP). From here, the chapter examines each of the areas to configure in the portal.
Users
The Users section lists all the users in your tenant who have been licensed for Skype for Business Online. Remember, that is done in the tenant admin center by a Global Admin or a User Account administrator. To appear in this section, a user must be licensed, and they must have no settings that might prevent them from syncing to SBO.
You probably won’t spend a lot of time administering users in the Users section. If you find that you need to do this, consider what you are doing and why. In the Users section, you can edit the individual details for one or more users, but you should probably either be making those settings globally for your organization or assigning policies to users through Windows PowerShell. If you do need to manage settings for one or more users, and want to use the GUI, select them in the portal and then click the Edit button. Here is what you can do in the Users section.
General
Under the General settings for a user, you can control audio and video settings, disable their ability to record conversations and meetings, and disable data transfers. Figure 16-5 shows the settings for a user whose default values have not been changed.

Figure 16-5 General user settings
The first setting is Audio And Video, as shown in Figure 16-6. You can select the following options from the drop-down menu.

Figure 16-6 A screenshot of the audio and video options
Audio And HD Video is the default setting, which enables users to use both audio for voice and video for conferencing up to the full bandwidth their hardware and network connection can support. That can use up to 200 Kbps for audio and up to 50,000 Kbps for video. HD video shouldn’t consume more than 4096 Kbps per feed, but a conference with several users, all of whom have HD cameras, can use a lot more. Audio And Video still permits both but limits the video bandwidth consumed to a maximum of 1000 Kbps. Audio Only enables audio but disables video, whereas None disables both.
Record Conversations And Meetings is enabled by default. Clear that check box if you don’t want to permit a user to record conversations or meetings.
For Compliance, Turn Off Non-Archived Features is off by default. That means that users can use SBO to transfer files over instant messaging (IM) and share OneNote pages and annotations to Microsoft PowerPoint decks. Because these methods of file transfer are not logged or archived, you might need to disable them if your organization must track all data transfers.
External communications
External communications enables users to communicate with others outside of your organization, assuming you have configured your SBO tenant to allow this. At the tenant level, this is off by default, so you don’t have to do anything here if you are not going to configure connectivity to external systems, but if you do want to permit your organization to communicate with other SIP systems, including consumer Skype, yet prevent a user from doing so, this is where you configure those exceptions. By default, all users can communicate with external Skype for Business users and external Skype users after you configure the tenant to permit this. Figure 16-7 shows the options set to permit external federation with both other Skype for Business organizations and the consumer Skype service.

Figure 16-7 A screenshot of the options for external communications
Again, you need to clear those check boxes only if you have permitted external connectivity at the tenant level but want to block a specific user from being able to use that. If it’s permitted here (which is the default) but you have not explicitly enabled external connectivity for the tenant, they cannot communicate with other organizations or consumers.
Dial-in conferencing
If you have E5 licenses or subscribe to the SBO Dial-in Conferencing Service separately, you can configure the dial-in conferencing provider and toll and toll-free numbers, reset a user’s PIN, and allow or block anonymous callers in meetings. Figure 16-8 shows these settings.

Figure 16-8 Dial-In Conferencing properties
You have a choice of conferencing providers. If you choose one other than Microsoft, you need to have established service with that provider because that is separate from Skype for Business Online. With Microsoft as your provider, several toll numbers are available across various countries. You can establish a toll-free number for people to dial into, but that incurs additional cost.
Note that the default is not to allow unauthenticated callers to enter a meeting. Unless you select that box, anyone who does not authenticate to SBO, either by using the client or dialing in and using their own PIN, will wait in a lobby until the first authenticated user joins. At that point, all dial-in users are admitted to the call.
You will probably spend the most time here for any user, because this is where you can reset their PIN and generate an email to send them their conference information. This is the same information, minus their PIN, that is appended to any meeting invite they create for an SBO meeting.
Organization
The Organization section includes settings that affect your entire organization. Although specific user settings might prevail, if you haven’t made any specific user settings, these apply to all users.
General
The General tab includes settings for Presence and for push notification to mobile phones. By default, all SBO users’ presence displays to anyone. The other option is to show presence only for a user’s contacts. A user can override this setting with specific settings in the SBO client, but this controls the default behaviors for your tenant if your user does nothing. Figure 16-9 shows the default settings. Remember that users can override what presence information is displayed in their client.

Figure 16-9 Presence Privacy Mode settings
Mobile phone notifications controls whether to use push notifications to mobile clients for incoming IMs, voice mail messages, and missed calls and chats. There are two options, both of which are on by default. The first is to use the Microsoft Push Notification Service, and the second is to use the Apple Push Notification Service. If you leave these on, users can enable or disable notifications on their mobile device, but if you turn them off, they are not available for users at all. Figure 16-10 shows both notification types enabled, which is the default.

Figure 16-10 Mobile Phone Notifications
External communications
External communications includes important settings for you to consider. These options should be set before the first user is enabled for SBO. By default, SBO is a closed system. Users within the tenant can communicate with one another, but no external parties are accessible. However, if you want your users to be able to communicate over IM, voice, and/or video, and to see presence for users in another organization, you can set up Skype federation. You can also set up federation with the Skype consumer service so your users can communicate with users of that public system. This can be very useful for customer service, human resources (HR) functions, and enabling your users to stay in touch with friends and family.
Some organizations might be very open to federation, whereas others might want to control it more tightly or even prevent it completely. Settings here affect the entire organization, but you can permit federation and then restrict specific users from using it. What you cannot do is say that a user can communicate with others in SIP domain X but not SIP domain Y, whereas another user is blocked from SIP domain X and can communicate with SIP domain Y. It can take up to 24 hours for changes in this section to propagate fully throughout the system, so you don’t want to deploy one setting and then change your mind.
In external access, the default is for it to be Off Completely. With this setting, your SBO tenant is a self-contained island. Your users can communicate using SBO with one another, but with no one outside your organization. If set to On Except For Blocked Domains, your user can communicate with other users in any Skype for Business or Lync system that permits external communications, except for those SIP domains you explicitly block. If set to On Only For Allowed Domains, you explicitly add those domains with which you want to have Skype federation. Figure 16-11 shows the external access settings when set to permit federation.

Figure 16-11 External Access options
Federation between two SIP organizations, such as two Office 365 tenants or an Office 365 tenant and an on-premises deployment of Skype for Business, is fairly easy to set up, but it does require both SIP organizations to configure the federation. If both organizations use On Except For Blocked Domains, they can communicate, but if one or both of the organizations is using On Only For Allowed Domains, it will have to add the other SIP domain into its allowed list.
Federation between two SIP organizations used to require company A to specify the FQDN of company B’s edge and vice versa. Today, SIP federation with SBO requires the use of SRV records in DNS, which is defined in RFC 3263 at https://tools.ietf.org/html/rfc3263. SBO does not use FQDNs for itself or to discover federation partners, so if you are trying to federate with another organization and they ask you for your edge FQDN, that is a red flag. To check another company’s SIP records to confirm whether it has SRV records in place for SIP federation, use the DNS NSLOOKUP or DIG tools to check for _sipfederationtls._tcp.contoso.com, substituting the SIP domain for contoso.com. You should see output similar to what is shown in Figure 16-12, which shows both NSLOOKUP and DIG.
Figure 16-12 SBO DNS records
If you do not get an SRV record for _sipfederationtls, contact your partner organization’s admin to confirm that it can use SRV records and ask that admin to implement them into their Internet DNS. Without that record, you cannot federate with them.
Voice
You can configure telephone numbers and other settings in the Voice section if your organization has purchased PSTN services as part of its Office 365 subscription. Customers in the United States can purchase Skype for Business PSTN Domestic Calling or Skype for Business PSTN Domestic and International Calling. Different countries regulate their telephony industries differently, so different options might be available or, in some cases, none at all. If your organization is U.S.-based but has users in different countries, you might not be able to assign some or any of the features for Voice and Call Routing because laws vary from one jurisdiction to another, and it’s where the user is based, rather than where the tenant is provisioned, that governs this. Assuming that your tenant is a North American tenant and your company is U.S.-based, and you purchased one of the calling plans, you will see three sections under Voice.
Phone numbers
In the Phone Numbers section, if you have a PSTN Calling license, you can assign specific Direct Inward Dialing (DID) telephone numbers to your users and for services. Users, conference room phones, and individual devices can have their own DIDs, called user numbers, and you can get service numbers for conference bridges.
Voice users
Cloud PBX capabilities enable you to configure voice users for outbound and inbound calling with PSTN connectivity. You might have more users than you have DIDs or users who only need to make outbound calls, or you might want to limit the users who can make calls outside of your organization.
On-premises PSTN
If you have an on-premises connection to the telephone network through a Public Branch Exchange (PBX), you would configure those settings here. This requires you to have configured Skype for Business hybrid connectivity between your Office 365 and your on-premises Skype environments so that cloud users can connect to the telephony network through on-premises hardware (a discussion that is outside the scope of this book).
Call routing
Call Routing, relevant only if you have a dialing plan, enables you to set up both auto-attendants and call queues.
Auto attendants
The Auto-Attendant feature is an automated system that answers the phone, plays a recorded greeting, and then offers callers a menu of choices they can navigate to reach a particular person, department, or other options. You probably have encountered one when calling a company and then promptly held down the zero button on your phone to connect to a person. If you have one or more DIDs, you can create an auto-attendant by clicking the Add New button. Here’s how you can set this up.
- As a global admin or SBO admin, log on to the admin portal and navigate to the Skype for Business Admin Center | Call Routing | Auto Attendants.
- Click the plus sign (+) Add New link.
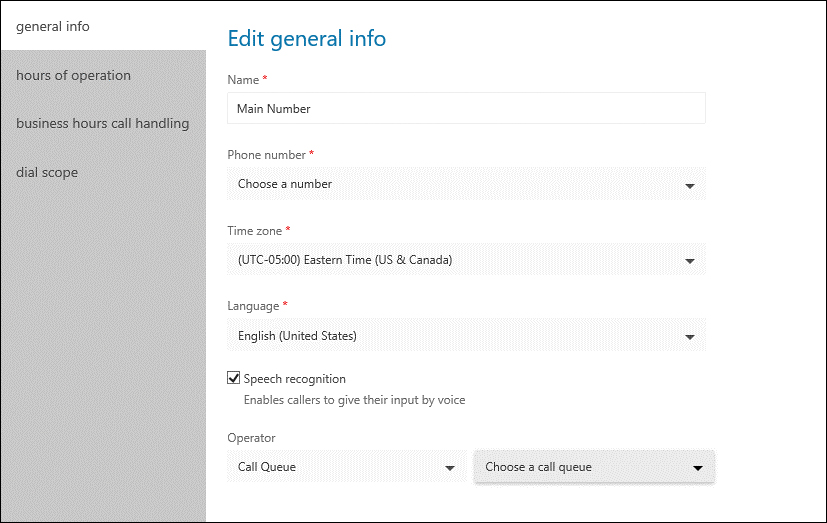
- On the General Info page, give your auto-attendant a name, select the phone number to use, the time zone this number should be in, the language, whether to use speech recognition so callers can speak their desired selection rather than pressing the number on their keypad, and then whether pressing 0 for an operator should route the call to a specific user or to a call queue, as shown in Figure 16-13.
Figure 16-13 Attendant options
- On the Select Hours Of Operation page, select whether this auto-attendant should function 24/7 or only during specific times, such as office hours or after hours, as shown in Figure 16-14.
Figure 16-14 Select Hours Of Operation page
In Business Hours Call Handling (which means during the time you selected in the previous menu, including 24/7), you can build out a menu. You have the option of using text to speech or of uploading an audio file for the company greeting, and you can add up to nine menu choices for where to route a call. These can be to individual users, to call queues, or to other auto-attendants if you need another level of menu options. You can set this as shown in Figure 16-15.
Figure 16-15 Business Hours Call Handling
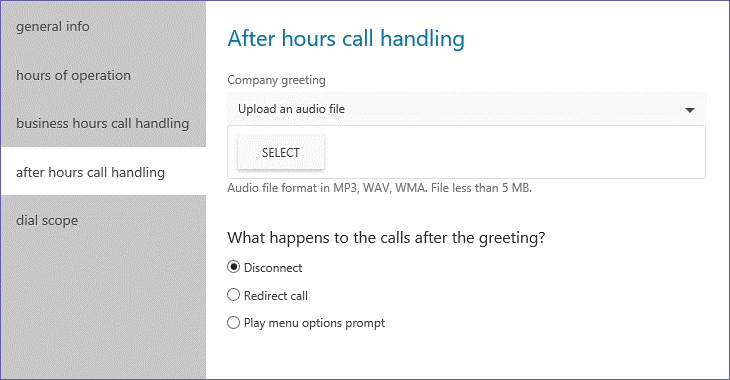
- On the After Hours Call Handling page, set options for what happens to calls that come in outside of business hours.
Figure 16-16 shows how to upload a prerecorded message in MP3, wave (WAV), or Windows Media Audio (WMA) and then how to disconnect the call.
Figure 16-16 After Hours Call Handling options
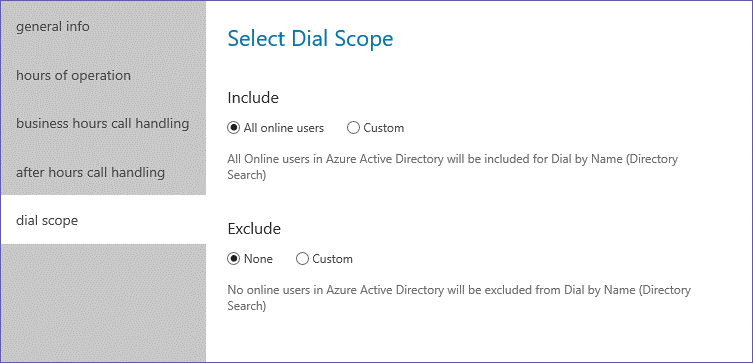
- Finally, in Dial Scope, configure which users to include or exclude in Dial By Name (Directory Search).
By default, this includes all users enabled for telephony, as shown in Figure 16-17.
Figure 16-17 Select Dial Scope options


Call queues
Call queues enable multiple callers to dial in to a single number to reach any one of a group of people. You might use a queue for your help desk, customer service, or any other department with a high volume of incoming calls, when the next available person should be able to address the caller’s needs. To create a call queue, select the Call Queues tab and fill out the appropriate options. Note that in a call queue, there is no text to speech, so you must upload an audio file for the greeting. You can also upload a file for Music On Hold and set values for the maximum number of callers in the queue, the maximum amount of time callers can wait before being forwarded or disconnected, and what to do if the maximums are reached, such as forwarding to a voicemail. Figure 16-18 shows these options.
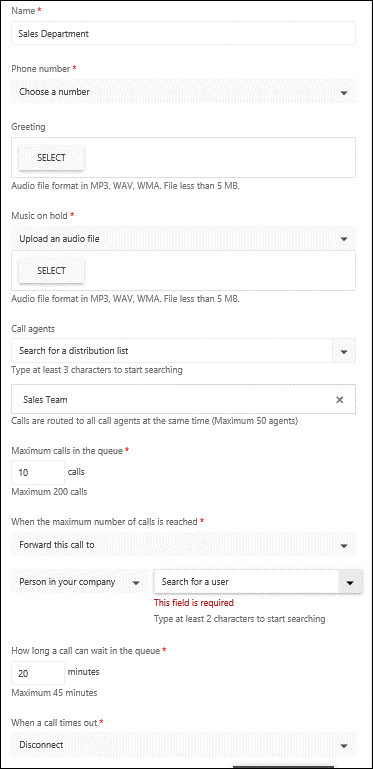
Figure 16-18 Call Queue options
Dial-in conferencing
The next section of the SBO admin portal is Dial-In Conferencing. If you did not purchase E5 licenses or the optional Skype for Business Dial-in Conferencing add-on licenses, you won’t use anything in this section, but if you did, this is the section where you can determine information for your organization and set specific values.
Microsoft Bridge
The Microsoft Bridge section displays the telephone numbers activated for your service in each country that is available. It also shows you the primary language and enables you to set a default. In Figure 16-19, Chicago is selected, and you can click the Set As Default link on the right if that is the number you want to use for your default. Just above that, Los Angeles is currently the default.

Figure 16-19 Dial-In Conferencing bridge selection
At the bottom of this page, a link to configure third-party audio conferencing providers appears, as shown in Figure 16-20.

Figure 16-20 Additional conferencing options
If you already have a conferencing provider, you can use the Click Here link to import and export your user settings from another provider. Remember that this requires you to have conferencing services from that provider, which will include additional charges.
Microsoft bridge settings
Use the Microsoft Bridge Settings tab to configure the meeting join experience as well as the minimum PIN length for users to log on to their conference bridge. By default, notifications are turned off in all meetings. Meeting owners can turn that on for their meeting and, if they do, this setting determines whether an announcement or a tone is played when someone enters or exits a meeting. With Names Or Phone Numbers selected, you can prompt users to record their name before joining. As an alternative, you can choose a simple tone to be played, although this feature is in preview and might not be available yet in your tenant. Figure 16-21 shows the options to enable notifications and to prompt users to record their name and then to press the pound key.
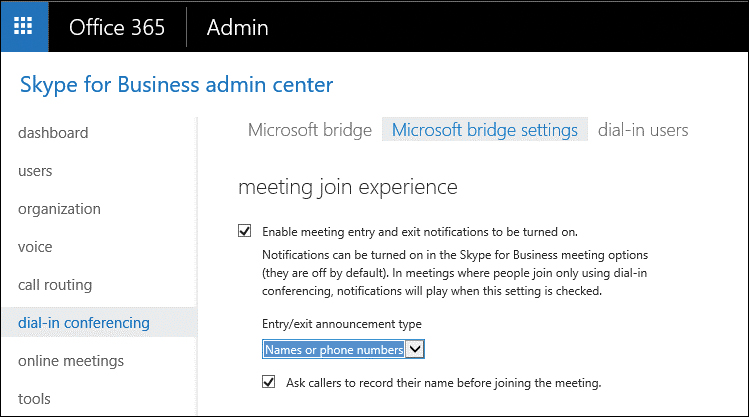
Figure 16-21 Microsoft Bridge Settings page
Each dial-in conferencing user has a PIN that identifies them to the system when they dial in from a landline or mobile phone rather than using the SBO client. In the Security section, you set the PIN length. The default is 5 characters, shown in Figure 16-22.

Figure 16-22 A screenshot of the Security settings
Dial-in users
The last section for Dial-In Conferencing is the Dial-In Users section. This shows your users, the default toll and (optionally) toll-free numbers assigned to them, and their conference ID. If you select a user and then click the Edit button, you see the same interface as you would if you went through Users and then selected the Dial-In Conferencing settings for that user, as shown previously in Figure 16-19.
Online meetings
You can use the Online Meetings page to set up options for online meetings and include your company-specific branding, disclaimers, and links. You also configure Skype Meeting Broadcast settings here.
Meeting invitation
Meeting invitations can be branded to make them more identifiable and to customize other details. You can include the company logo by providing a link to a graphic file hosted on one of your servers. You can also include custom links to Help and Legal Disclaimer pages you host on a web server. Figure 16-23 shows these options.

Figure 16-23 Meeting Invitation options
Completing the information shown in Figure 16-23 creates a meeting invite that looks like the one in Figure 16-24.

Figure 16-24 Microsoft Outlook meeting invitation
Broadcast meetings
Remember that SBO meetings have a maximum of 250 attendees, but Skype for Business Meeting Broadcast can support up to 10,000 attendees. You can use broadcast meetings to support town hall–type meetings, public webinars, investor briefings, and so on. To use Skype for Business Meeting Broadcast, you have to enable it and configure a few settings. Figure 16-25 shows this setup.

Figure 16-25 Broadcast Meetings settings
Tools
The Tools page includes links to several online tools to help SBO administrators manage or troubleshoot potential issues with SBO.
Troubleshooting Skype for Business Online sign-in for administrators
The Troubleshooting tool is a shortcut to https://support.microsoft.com/en-us/help/2541980/how-to-troubleshoot-sign-in-issues-in-skype-for-business-online, providing tips for troubleshooting sign-in issues, including verifying credentials and network connectivity.
Skype for Business Connectivity Analyzer tool
The Connectivity Analyzer tool links to an older Lync Connectivity Analyzer tool for Lync Server 2013 that has been deprecated. Expect to see this link removed soon.
Microsoft Remote Connectivity Analyzer
You can use the Remote Connectivity Analyzer tool to diagnose logon and Autodiscover issues.
Setting up Skype for Business Online external communications
This tool simply links to the page that shows you how to enable external federation to other SBO organizations as well as to consumer Skype.
Skype for Business Online Call Quality dashboard
The Call Quality dashboard (CQD) provides great information to help you diagnose call quality issues. You can diagnose trouble users might be having that are associated with latency, packet loss, the use of TCP, poor Wi-Fi connectivity, using older clients, poor hardware, and more. See Figure 16-26.

Figure 16-26 Call Quality dashboard
Skype for Business Call Analytics (Preview)
Use Call Analytics, currently in preview mode, to search for specific users and view the quality details of their calls and meetings over the past seven days. You can use this to correlate reports of quality issues against actual metrics and troubleshoot issues. This feature is extremely helpful when someone complains about a specific call. Where the CQD gives you aggregate details, Call Analytics focuses on a specific user’s exact call to determine what was wrong.
Reports
The Reports section contains three reports specific to SBO.
PSTN usage details
If you have a dial plan, this is the call details record for your tenant. It reports the user location, user ID, phone number, caller ID, call type, whether it was a domestic or international call, the destination number dialed, the number type, the start time, the duration, the charge, the currency, and the capability of each call. You can use this to check user activity or reconcile your bill. It can also be exported to Microsoft Excel for further analysis, internal chargebacks, and so on.
Users Blocked report
The Users Blocked report shows you which numbers users have blocked, including the time and any supplied reason for the block.
Session Details (preview)
The Session Details report enables you to examine specific time frames for specific users. You can see whether it was an audio or a video call, the start and end times, and the client versions for each participant as well as the Conference URL if it was a meeting rather than a direct call. A sample is shown in Figure 16-27.
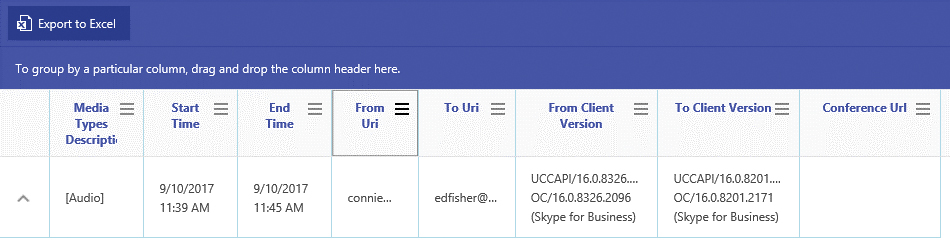
Figure 16-27 Session Details report
Inside Windows PowerShell
The Skype for Business Online Admin Center is where most of your administrative work takes place, assuming you will use the default settings provided in SBO. If you want to customize certain policies or restrict your users from certain capabilities, Windows PowerShell is how to do it. You can download and install the Skype for Business Online PowerShell module on your computer; it uses the same setup as you have already performed for managing Exchange and Azure Active Directory through Windows PowerShell. To manage SBO by using Windows PowerShell, follow these steps.
- Make sure your administrative workstation is running at least Windows PowerShell version 3.0 and that the Microsoft Online Services Sign-in Assistant is installed.
- Download the Skype for Business Online Module. At the time of this writing, that is version 7.0.1045.0, and you can download it from http://www.microsoft.com/en-us/download/details.aspx?id=39366.
- Double-click the Download link to install the module.
- After the module is installed, open Windows PowerShell.
- Enter the following command to store your global admin or SBO credentials.
$credential=Get-Credential
A credential dialog box appears; type your UPN and password.
- Type the following command to create a new session to SBO.
$session=New-CsOnlineSession -credential $credential -verbose
Text confirming the domain, which is derived from your UPN, and the endpoint for your SBO tenant appears.
- Type the following command to import the SBO session to your current session.
Import-PSSession $session
There is a significant amount of documentation online for managing SBO by using Windows PowerShell. You can find detailed information in “Using Windows PowerShell to manage Skype for Business Online” at https://technet.microsoft.com/library/dn362831.aspx. The following sections in this chapter focus on what you might actually need to do when getting SBO set up for your users if the default settings are not to your liking. You can apply these policies to some or all of your users, modify settings in them, or create your own. It’s safer if you create your own rather than modifying an existing policy, because you might want to fall back to the manufacturer’s settings, so consider that if none of the included policies meets your needs. As an alternative, export the settings to a text file before you make changes so you can set things back if you need to.
There are two challenges in modifying and applying policies with Windows PowerShell. The first is that many settings are exposed through Windows PowerShell that are not exposed through the GUI. If different groups of admins are provisioning users, make sure that policies are applied to SBO users consistently. Make sure your workflow includes steps for someone to apply any settings or policies that require Windows PowerShell, or script the provisioning so that even those admins who are only comfortable using the GUI can easily apply policies that require Windows PowerShell. The second challenge is that in many cases, policies you wish to apply are not the default. So again, ensure that your workflow includes steps to ensure that the appropriate policies are applied for each of your SBO users before they log on to the service for the first time.
Client policy
Client policies control a number of settings related to how the SBO client works and what functionality is available or restricted for a user, including such things that, if left to default, might go against your organization’s security or retention policies. Although many client policies are included with SBO, and many settings are contained within them, this chapter focuses on the things customers who want to be a little more circumspect than the default client policy allows most commonly request.
The ClientPolicyDefault client policy is what users get initially. You can view the settings for this policy by using the cmdlet
Get-CsClientPolicy -identity ClientPolicyDefault | fl
From that command, the defaults are as follows.
Identity                                    : Tag:ClientPolicyDefault
PolicyEntry                                 : {Name=OnlineFeedbackUrl;Value=http://aka.ms/skypefeedback,
                                              Name=SendFeedbackUrl;Value= , Name=EnableTraceRouteReporting;Value=TRUE,
                                              Name=PrefetchConfInfo;Value=TRUE...}
Description                                 :
AddressBookAvailability                     : WebSearchOnly
AttendantSafeTransfer                       :
AutoDiscoveryRetryInterval                  :
BlockConversationFromFederatedContacts      :
CalendarStatePublicationInterval            :
ConferenceIMIdleTimeout                     :
CustomizedHelpUrl                           : http://go.microsoft.com/fwlink/?LinkId=389737
CustomLinkInErrorMessages                   :
CustomStateUrl                              :
DGRefreshInterval                           :
DisableCalendarPresence                     :
DisableContactCardOrganizationTab           :
DisableEmailComparisonCheck                 :
DisableEmoticons                            :
DisableFeedsTab                             :
DisableFederatedPromptDisplayName           :
DisableFreeBusyInfo                         :
DisableHandsetOnLockedMachine               :
DisableMeetingSubjectAndLocation            :
DisableHtmlIm                               :
DisableInkIM                                :
DisableOneNote12Integration                 :
DisableOnlineContextualSearch               :
DisablePhonePresence                        :
DisablePICPromptDisplayName                 :
DisablePoorDeviceWarnings                   :
DisablePoorNetworkWarnings                  :
DisablePresenceNote                         :
DisableRTFIM                                :
DisableSavingIM                             :
DisplayPhoto                                : AllPhotos
EnableAppearOffline                         :
EnableCallLogAutoArchiving                  :
EnableClientAutoPopulateWithTeam            : True
EnableClientMusicOnHold                     : False
EnableConversationWindowTabs                :
EnableEnterpriseCustomizedHelp              : True
EnableEventLogging                          :
EnableExchangeContactSync                   : True
EnableExchangeDelegateSync                  : True
EnableExchangeContactsFolder                : True
EnableFullScreenVideo                       :
EnableHighPerformanceConferencingAppSharing : False
EnableHotdesking                            :
EnableIMAutoArchiving                       :
EnableMediaRedirection                      :
EnableMeetingEngagement                     : False
EnableNotificationForNewSubscribers         :
EnableServerConversationHistory             : True
EnableSkypeUI                               :
EnableSQMData                               :
EnableTracing                               :
EnableURL                                   :
EnableUnencryptedFileTransfer               :
EnableVOIPCallDefault                       : False
ExcludedContactFolders                      :
HotdeskingTimeout                           : 00:05:00
IMWarning                                   :
MAPIPollInterval                            :
MaximumDGsAllowedInContactList              : 10
MaximumNumberOfContacts                     :
MaxPhotoSizeKB                              : 30
MusicOnHoldAudioFile                        :
P2PAppSharingEncryption                     : Supported
EnableHighPerformanceP2PAppSharing          : False
PlayAbbreviatedDialTone                     :
RequireContentPin                           : RequiredOutsideScheduledMeeting
SearchPrefixFlags                           :
ShowRecentContacts                          : True
ShowManagePrivacyRelationships              : False
ShowSharepointPhotoEditLink                 : False
SPSearchInternalURL                         :
SPSearchExternalURL                         :
SPSearchCenterInternalURL                   :
SPSearchCenterExternalURL                   :
TabURL                                      :
TracingLevel                                : Light
TelemetryTier                               : Tier3
PublicationBatchDelay                       : 0
EnableViewBasedSubscriptionMode             : False
WebServicePollInterval                      :
HelpEnvironment                             : Office365
RateMyCallDisplayPercentage                 : 10
RateMyCallAllowCustomUserFeedback           : False
IMLatencySpinnerDelay                       : 1500
IMLatencyErrorThreshold                     : 1500
SupportModernFilePicker                     : False
EnableOnlineFeedback                        : False
EnableOnlineFeedbackScreenshots             :
Sometimes, customers want to restrict certain settings in SBO to reduce what they see as risk or to limit the sort of information that can be exposed through eDiscovery. Several organizations believe that instant messaging conversations, being less formal than email, might contain certain wording or information that a company would not like to be exposed outside, so conversation history is a feature these companies choose to disable. Some information security departments might want to prevent users from sending links through instant messages, especially if they must allow external federation and public connectivity to consumer Skype. In some situations, companies want to disable emoticons because they are considered unprofessional.
You can use one of the included policies, such as ClientPolicyNoSaveIMNoArchivingNoIMURL, or create your own policy and apply it to your users. An example policy that you might create to restrict all of the features mentioned in the preceding command could be created in Windows PowerShell as follows.
New-CsClientpolicy -identity “Restrictive” -DisableEmoticons:$true -DisablePresenceNote:$true -DisableSavingIM:$true -EnableServerConversationHistory:$false -EnableURL:$false
Then, to apply that policy to all users, you would type the following command.
Get-CSOnlineUser -ResultSize Unlimited | Grant-CsClientPolicy -PolicyName Restrictive
For the best user experience, determine what, if any, restrictions you need to apply to your users before you deploy SBO to them. It’s much better to deploy something with limits than to take features away after users experience them. If you are not sure, or if your legal, HR, or security teams have not decided on any restrictions, include them in the pilot and make sure all pilot users understand that some features might not be available after SBO is deployed to production.
Conferencing policy
The conferencing policies in SBO are intended to control what can and cannot be done in SBO meetings. With multiple people attending an SBO meeting, you want to ensure that any restrictions to meet compliance requirements or to prevent anonymous users from joining meetings are in place. SBO meetings often are used to present confidential information, either through screen sharing or by presenting PowerPoint decks. This might mean you want to restrict who can download files from a meeting or even record meetings. SBO meetings might also use significant bandwidth because they can include 1080p video content, so you might want to place upper limits on the bandwidth available.
The default SBO conferencing policy is called BPOSSModalityAll. To view what this policy includes, run the following Windows PowerShell command.
get-csconferencingpolicy -identity BPOSSAllModality | fl
Identity                                      : Tag:BposSAllModality
AllowIPAudio                                  : True
AllowIPVideo                                  : True
AllowMultiView                                : True
Description                                   :
AllowParticipantControl                       : True
AllowAnnotations                              : True
DisablePowerPointAnnotations                  : False
AllowUserToScheduleMeetingsWithAppSharing     : True
ApplicationSharingMode                        : VideoWithFallback
AllowNonEnterpriseVoiceUsersToDialOut         : False
AllowAnonymousUsersToDialOut                  : False
AllowAnonymousParticipantsInMeetings          : True
AllowFederatedParticipantJoinAsSameEnterprise : False
AllowExternalUsersToSaveContent               : True
AllowExternalUserControl                      : True
AllowExternalUsersToRecordMeeting             : False
AllowPolls                                    : True
AllowSharedNotes                              : True
AllowQandA                                    : True
AllowOfficeContent                            : True
EnableDialInConferencing                      : False
EnableAppDesktopSharing                       : Desktop
AllowConferenceRecording                      : True
EnableP2PRecording                            : True
EnableFileTransfer                            : True
EnableP2PFileTransfer                         : True
EnableP2PVideo                                : True
AllowLargeMeetings                            : False
EnableOnlineMeetingPromptForLyncResources     : False
EnableDataCollaboration                       : True
MaxVideoConferenceResolution                  : VGA
MaxMeetingSize                                : 250
AudioBitRateKb                                : 200
VideoBitRateKb                                : 50000
AppSharingBitRateKb                           : 50000
FileTransferBitRateKb                         : 50000
TotalReceiveVideoBitRateKb                    : 50000
EnableMultiViewJoin                           : True
EnableReliableConferenceDeletion              : True
All the features are enabled, and clients can use the maximum bandwidth their hardware can handle when using video. Several conferencing policies are built in to SBO. At the time of this writing, 35 are available to customers with North American tenants and over 200 in total, and you can create your own. As an SBO administrator, review the policies available to you to see whether the default policy is appropriate for your organization, or you need to apply one of the more restrictive policies, or you need to create your own. They all start with the BPOS name, followed by some text that should give you an idea of their purpose. Review the settings and pick the policy that is right for your organization or create your own.
Mobility policy
The mobility policy you apply to users controls whether they can use the SBO Mobile client and which features are enabled or requirements are in place. The default policy, called the Global policy, permits users to connect to SBO by using their mobile client, to use cellular bandwidth for all functions, to save IM history, and so on. There are four other policies for Mobility. Each is named for the type of policy, Mobility, and their names imply the limitations they put into play.
- MobilityEnableOutsideVoice
- MobilityDisableOutsideVoice
- MobilityEnableOutsideVoiceNoPushNotifications
- MobilityDisableOutsideVoiceNoPushNotifications
The main things you might wish to use mobility policies for are to reduce the bandwidth the Skype for Business client could use by requiring Wi-Fi connectivity for IP video and file sharing. Those settings can be configured by the user, and with the popularity of unlimited bandwidth plans, this is not something you might need to worry about.
Audio/video
You might only want to disable audio and video for users. This is a setting you control directly within the user settings by using the Set-CsUser command. If you simply want to disable audio and video for all your users, you can run the following command.
Get-CsOnlineUser -resultsize unlimited | Set-CsUser -AudioVideoDisabled:$false
Usage location
It’s very important to set Usage Location for users in your tenant correctly. SBO offers VoIP features that might conflict with certain countries’ regulations regarding telephony. It is your responsibility to set the correct country for your users to ensure that your company remains in compliance with the laws and regulations in your area. Do not simply set all users’ locations as US because you are a company based in the United States. Set the location for where a user is based. Usage Location uses the standard two-letter country code for a country. If you wish to use Windows PowerShell, you can set this for users. If all your users are in the same usage location, this is as simple as the following.
Get-MsolUser | Set-MsolUser -UsageLocation US
It will take a few moments for that command to sync from Azure Active Directory to Skype for Business Online, so if you do make a change, give it time to forward sync. If you have users in multiple locations, create a CSV file with UPN and UsageLocation and use the Import-Csv cmdlet to read the file and feed the Set-MsolUser command like this.
import-csv file.csv | ForEach-Object {
 Set-MsolUser -UserPrincipalName $_.UserPrincipalName -UsageLocation $_.UsageLocation
}
Piloting Skype for Business Online
It’s important for you to pilot SBO. This helps you test any policies or tenant settings you have applied to ensure that you have the required functionality and desired configuration, and to assess your network with real users to ensure that you have the necessary connectivity. For an organization that has no existing SIP solution, such as Lync or Skype on-premises, this is easy. For an organization that has an existing on-premises solution, this can be challenging.
Piloting with no existing solution in place
When you have no existing SIP solution in place, you can deploy SBO at your own pace and test it easily. Ensure that your DNS records are in place (internally and externally if your SIP domain is using split-DNS), configure your tenant to meet your corporate needs, apply any policies, assign the users in the pilot group a license for SBO, and deploy the client to their workstations. You can adjust policies and settings as your user testing identifies the need, with no impact on any production system.
Piloting with an existing solution in place
When you have an existing solution in place, piloting can be more of a challenge. A SIP namespace can only exist in one infrastructure, so unless you choose to deploy Skype hybrid, you cannot really pilot with your production namespace while it is still in use in your existing solution. There are three ways to solve this problem.
- Use the <tenantname>.onmicrosoft.com namespace as the SIP namespace for your pilot.
- Use another DNS namespace that you are not using in your existing solution.
- Create a fake DNS server to host the DNS records and point your clients to this server for DNS during the pilot.
The first option is the easiest and recommended approach. Microsoft already hosts the DNS records you need for the <tenant>.onmicrosoft.com namespace, and that namespace is already in your tenant and enabled for SBO. You just need to set your pilot users’ SIP URI in the proxyAddresses attribute to use that domain and sync that to your tenant.
The second option really doesn’t offer any advantages over the first and requires you to use another DNS namespace, which might mean you need to purchase a new domain name. It also requires you to set up the DNS records to support SBO and still assign the SIP URI in the proxyAddresses attribute. There’s no advantage to this as far as piloting SBO is concerned.
The third option is the most complex but does enable you to test your production namespace, which might be useful to confirm that a cutover will work successfully. That is the only real advantage to this approach. You need to set up a DNS server that not only hosts an authoritative zone for your DNS namespace but can also resolve any Active Directory or other DNS records for your DNS namespace and any other external records your users need to resolve. Set up the DNS server, add the zone and the necessary records, configure forwarding for Internet name resolution, and then configure the clients you will use in the pilot to use this DNS server instead of your normal production servers. Your pilot users will be able to use your production namespace from the on-premises system but will be cut off from the rest of your users.
Deploying the Skype for Business Client
You need to determine which Skype for Business client software you want your users to use as well as how to deploy it to their workstations. The decision on which client to use comes down to a combination of licensing and features. Office 365 plans that include Skype for Business Online might or might not also include the client software. E3 and higher plans include Office ProPlus, which comes with the Skype for Business 2016 client. E1 plans, as well as stand-alone SBO plans, do not include client software. If you are licensing Office Perpetual, then the version of Office you choose might come with Skype for Business client software, or you might need to download and install the basic client, which is free but does have fewer features.
In short, if you intend to deploy Office ProPlus, you will get the Skype for Business client as part of that install. If you mean to deploy Office Professional 2016, use the Skype for Business 2016 client. If you want to deploy Office Professional 2013, use the Skype for Business 2015 client. If you mean to install Office for Mac, use the Skype for Business on Mac client. If you do not have a license entitlement to the full Skype for Business client, you can use the Skype for Business basic client that is free to use and covers most of the SBO functionality. However, if you want to use the telephone features in SBO, you want to use a full client because the following features do not work with the Skype for Business basic client.
- Manage team call settings
- Manage delegates
- Make calls on behalf of another
- Handle another’s calls
- Manage a high volume of calls
- Initiate a response group
- Park a call
- Use group call pickup
Refer to https://technet.microsoft.com/en-us/library/16b14d59-7737-4f9d-aa4d-83765a18ea07 for the complete list.
During testing and even piloting, manually installing the Skype for Business client software on your test users’ workstations should have been manageable. Smaller organizations might choose to continue with a manual approach because Skype for Business client software is part of the Office ProPlus suite. Users licensed for Office ProPlus, and who have administrative rights on their devices, can log on to the Office 365 portal and install Office ProPlus themselves. Here is how.
- Make sure your users are licensed for Office ProPlus and have administrative rights on their workstations.
- Provide them with the link to https://portal.office.com and have them log on to that site.
- Have them click the Install Office 2016 button in the upper-right corner of the top section, as shown in Figure 16-28.
Figure 16-28 Portal landing page with Install Office 2016 link
The Office ProPlus install provides them with the instructions they need to follow. You still should provide instructions telling them that, in this case, it’s okay for them to click the Run button at the bottom of the page, as shown in Figure 16-29.
Figure 16-29 Install Office prompt


They can follow along from there; the application completes automatically. However, if you just want them to install the Skype for Business client, give them these instructions.
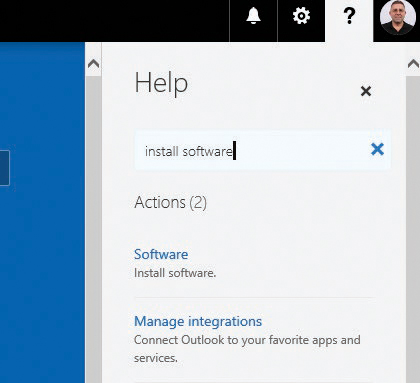
- Log on to the Office 365 portal at https://portal.office.com.
- At the top of the page, in the upper right, click the question mark icon, type install software, and then press Enter, as shown in Figure 16-30.
Figure 16-30 Locating the Skype for Business client install
- Click the first result, Software.
- On the Software page, choose to deploy Office ProPlus, Tools & Add-Ins, Project, Visio, Skype For Business, and Phone & Tablet, as shown in Figure 16-31.
Figure 16-31: Software installation options
- On the left side, click Skype For Business.
This opens the page to install the client. It’s recommended that you install the Skype for Business client that matches your Office install. Usually, that is the Skype for Business 2016 client in 32 bit.
- Follow the install instructions to the end.

Mobile clients
Skype for Business has mobile clients for iOS and Android, so you can use SBO from any mobile phone or tablet. Users can visit the application store appropriate for the platform, search for Skype for Business, and install the mobile client. In the iOS App Store, the Skype for Business client looks like the screenshot in Figure 16-32.

Figure 16-32 Skype for Business for iOS in the App Store
If you use a Mobile Device Management (MDM) solution to manage mobile devices and deploy software to mobile clients, you must permit users to install this application themselves. Due to licensing agreements and restrictions in the app stores, Microsoft does not make the Skype for Business client available to deploy as a package through MDM. Users have to install it from the application store. Do not use one of the packaged installers available online. Microsoft does not support them, and in some cases they have been found to contain malware.
Managing the client
You want to manage your users’ SBO experience by using the tenant settings and the various policies in the service. This is the most efficient way to do so and ensures that your users’ experience is consistent whether they are using a managed Windows machine, a Mac, a mobile client, a tablet, or a personal computer. There are settings for the SBO client that can be managed through Group Policy, but those only apply to domain-joined Windows systems.
You can download the Office 2016 Administrative Template files (ADMX/ADML) from https://www.microsoft.com/en-us/download/details.aspx?id=49030, import them into Active Directory, and use them to manage some client settings. Thirteen machine settings and 14 user settings are available for you to configure, but don’t think that you need to. Most of these settings apply only when you are using an on-premises instance of Skype for Business.
Logging on
The first time a user launches the Skype for Business client, it asks them for their sign-in address, which is their SIP address. That will look like Figure 16-33.

Figure 16-33 Skype for Business desktop client app
If a user’s sign-in address (also known as their SIP address) is the same as their User Principal Name (UPN) and primary SMTP address, you need only tell them to enter their email address when prompted and click Sign In. The Skype for Business client uses Modern Authentication, so your users will be automatically signed in to the service.
However, if you have decided to use a different value for UPN than the SIP address, users must go through an additional step before they can authenticate to the service. Their initial attempt to connect to the service will fail because their SIP address does not match their UPN, and they will be prompted a second time to authenticate, with an additional prompt for their password, as shown in Figure 16-34.
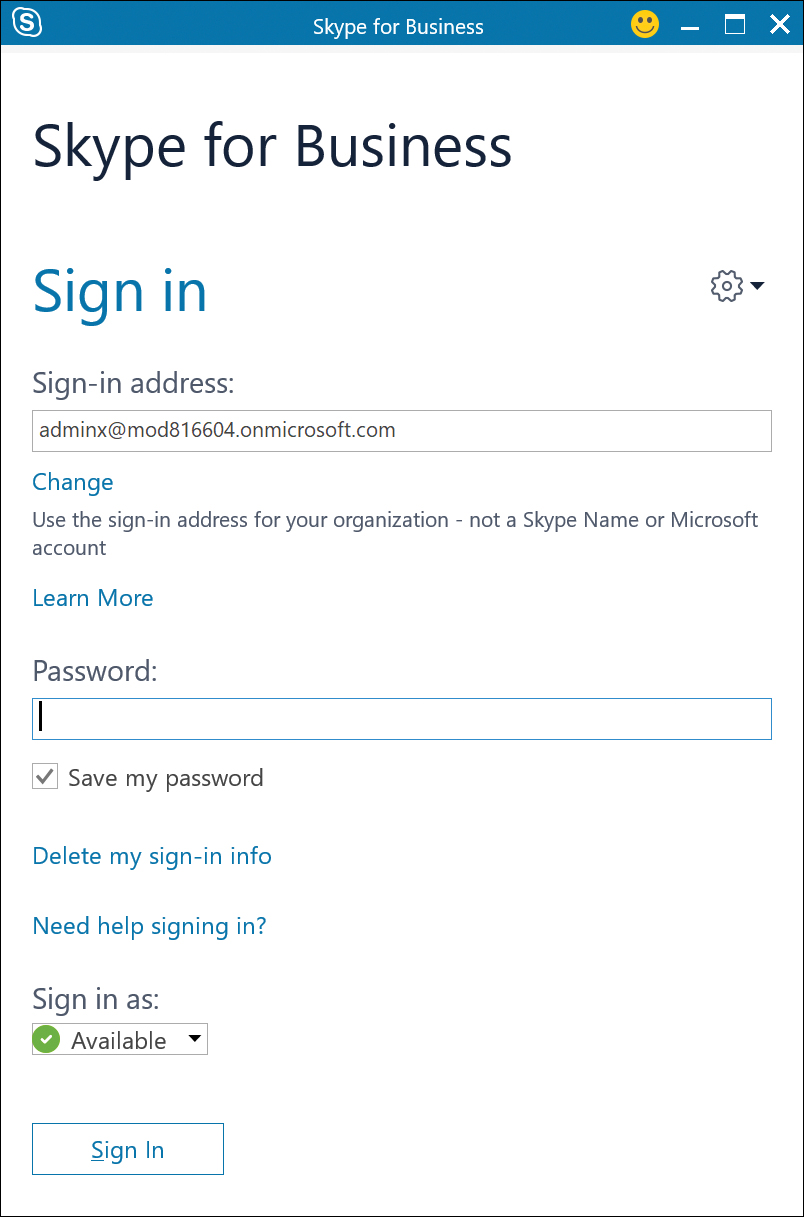
Figure 16-34 Prompt for password
When they enter their password and click Sign In, this authentication attempt will also fail, and they will finally be presented with options in the user interface to submit one value for Sign-In address, which is their SIP address, and another for User Name, which is their UPN, and then Password, as shown in Figure 16-35.

Figure 16-35 Prompt for User Name
Although users only have to do this the first time on their workstation, they have to do it each time they log on to a new workstation. The client behavior this mismatch causes might elicit a significant number of help desk calls, so consider carefully whether any perceived security benefit from using a different value for UPN than for SIP and primary SMTP addresses outweighs the user experience.
Deploying Skype for Business Online
With the clients’ software deployed, the service configured, and testing complete, it’s now time to deploy Skype for Business Online. Many companies elect to deploy SBO as the first major workload after they have identity and authentication set up. Whether you have an existing SIP solution in place or not, the amount of work needed to deploy SBO is much less than is required for Exchange Online or SharePoint Online, and it’s a quick and easy way to start using the cloud and show management some return on its investment to move the company to the cloud.
The two most common ways to do this can be referred to as a rollout and a cutover. Companies that do not have an existing SIP solution can do either, whereas companies that want to switch from an existing but older on-premises SIP solution, such as Lync Server or Skype for Business, to Skype for Business Online, perform a cutover.
Rollout
A rollout deployment can be done on whatever schedule you wish. After you have configured the service to meet your organization’s needs, you can enable users to use SBO in small groups or all at once. All you need to do is license them and they can begin to use the service. If you have not fully assessed or prepared your network for the additional bandwidth SBO uses, you might want to enable users in small groups, or one site at a time, until you get a feel for things. Otherwise, you can license everyone all at once and let them all start using the service together.
Cutover
A cutover becomes necessary when you have an existing SIP-based solution you intend to stop using and replace with Skype for Business Online. A SIP namespace cannot exist in two SIP infrastructures at the same time, so you need to stop using it in the one so you can start using it in the other. This sort of cutover is usually done over a weekend. When users stop using the existing system at the end of the day on Friday, IT makes the required changes and tests them to confirm all is well, and users come in on Monday and start using the new system.
Cutovers are fairly easy to perform, with minimal risk involved. However, they are cutovers; you stop using one system and start using another. For users, this means they start with an empty contact list. For many users, this is a minor inconvenience, but for some, it is a major issue. Whereas there are third-party solutions that can export a contact list to a file and then reimport contacts from that file after the cutover, there is no way to move contacts from an older system to SBO or to export contacts centrally.
To perform a cutover, perform the following steps.
- Start informing your users ahead of the planned cutover date that the change is coming, and that services might be unavailable or only available intermittently during the scheduled weekend.
- Make sure you notify any partners with which you have SIP federation set up that you are changing to SBO, in case they need to update their federation settings to use SRV records and update any firewall rules they might have. Refer them to http://aka.ms/ipaddrs for the list of endpoints SBO uses.
- Reduce the time-to-live (TTL) for your SIP records in DNS ahead of the change; 30 seconds is a good value to facilitate a quick change (and, if necessary, a quick fallback) during the cutover. As a refresher, that includes the SRV records and any hostnames or CNAMEs you might have in place.
- At the end of the business day on the date of the cutover, disable access to the older system. You can stop services or disconnect the server from the network, but keep things running in case you need to fall back.
- Update the DNS records for your SIP domain to refer to the SBO services. Refer to the portal, Setup | Domains | DNS settings and make sure the two CNAMEs and two SRV records for SBO are all added to your DNS for both your Internet and internal DNS.
- For each system you want to use to test with to confirm everything is ready, clear the DNS cache, launch the Skype for Business client, authenticate, and perform your testing.
- When all testers agree that testing passes, you can close your change and be ready for Monday.
- If you cannot resolve any issues and the decision is made to fall back, you simply restart the services or reconnect the older servers to the network, revert your DNS changes, clear your DNS caches and restart the clients, and confirm that you are back on the original system. Before you do that, though, you might want to open a support case with Microsoft to help you quickly identify and resolve any issue you are encountering.
- Service health Check the dashboard in the Office 365 Admin Center portal to ensure that there are no service issues. The likelihood that there is a service issue is practically nonexistent, but it’s a good habit to develop to take the five seconds to confirm rather than spending hours trying to run down an issue that is out of your control.
- Cached data Both Lync and Skype clients cache data under AppDataLocal to improve performance. Sometimes clients seem to stick to the older system and try to connect to it even after you update DNS. Clear out the SIP profile(s) cached on your client machine, restart the client, and try again. You can find these in one of the following locations, depending on version.
Lync 2010: %UserProfile%AppDataLocalMicrosoftCommunicator
Lync 2013: %UserProfile%AppDataLocalMicrosoftOffice15.0Lync
Skype for Business: %UserProfile%AppDataLocalMicrosoftOffice16.0Lync
It’s safe to delete these completely. Any data the client needs is pulled from the service, and the client will re-create the profile for any data it needs to cache. You can also deploy a script to remove the cached data, such as https://gallery.technet.microsoft.com/Delete-Skype-and-Lync-9d8cf887.
- DNS Clients must resolve both CNAMEs and both SRV records on both the internal and external networks for users to use SBO. Use NSLOOKUP or DIG to confirm internal name resolution and those or one of the various Internet web portals to confirm external resolution, and have a second person confirm that there are no typos in your records. Query more than just your primary DNS server to make sure your DNS infrastructure is replicating changes correctly. Remember that if you didn’t reduce the TTL of your records before the change, you might have to wait a much longer period of time before caches expire and you can resolve the new records.
- Testing Make sure that you are testing from both the internal network, and the external one. Use a Mi-Fi device, test from home, or use a Wi-Fi hotspot to confirm that everything works from both inside and outside the corporate network. If you start testing on the inside network, a quick check to determine whether a proxy or firewall might be the cause of any issue is to move to an external network and test again. If it works externally, you can focus on your network internally.
- Proxies If you are using forward web proxies, confirm that they are permitting outbound connections to all the endpoints listed at http://aka.ms/ipaddrs in the “Skype for Business Online,” “Office 365 Portal and Shared,” and Office 365 Authentication and Identity” sections. Also confirm that the proxies are not prompting for authentication before permitting outbound connections to the Office 365 services. A network analyzer such as Microsoft Message Analyzer is very useful here.
- Firewalls If you also control egress at the firewall, confirm that the access control lists permit outbound connectivity to all of the same endpoints listed as required in the sections “Skype for Business Online,” “Office 365 Portal and Shared,” and “Office 365 Authentication and Identity” of the article found at http://aka.ms/ipaddrs.
Testing your Skype for Business Online tenant
How much time you spend testing will vary from one organization to the next, and each company will have its own criteria for testing. At a minimum, test the primary functions of SBO. A high-level testing plan is available at https://support.office.com/en-us/article/Test-your-Skype-for-Business-Online-installation-ae98aef4-5448-43c3-bab0-ba35ff541ca6. It includes the steps a user needs to follow to test each function.
A much more detailed User Acceptance Testing (UAT) plan, with about 200 specific use cases, is included in a UAT spreadsheet published by Shane Hoey to the TechNet Gallery. You can find it at https://gallery.technet.microsoft.com/lync/Skype-for-Business-User-fb20ff12. It is very detailed and well thought out, and it provides tracking of all tests so you can generate a report at the end.
Administering Skype for Business Online
After your Skype for Business Online tenant is set up, tested, and deployed to your clients, the amount of administrative effort it takes to maintain SBO is relatively small. That’s one of the reasons the only two administrative roles for SBO are the Global Admin role and the Skype for Business Administrator role, and there is no delegation or role-based access control (RBAC) in SBO.
If you use the default policies in SBO, there is nothing else you need to do when a user is licensed for SBO. However, if you are applying specific policies to users, then an SBO administrator will need to use Windows PowerShell to assign the appropriate policies, or you might choose to provide your help desk or provisioning team with scripts to do the same.
You might need to tune your policies as business needs evolve, but the primary administrative work includes the following.
- Managing Skype federation settings as you federate with new partners, vendors, or customer organizations
- Assigning phone numbers to new users
- Creating new auto attendants and call queues to support new business needs
- Monitoring the Call Quality dashboard to spot any trends that might indicate network performance or capacity issues
- Using Call Analytics to investigate specific users with any issues
If your organization does not deploy PSTN capabilities, you might go weeks at a time without needing to do anything in the SBO portal.
Integration with on-premises Skype
Up until now you have read about Skype for Business Online as a service wholly provided by Office 365. You can deploy a net new service to your users with a roll-out, or you can cutover your users from an existing but older solution to SBO. For organizations with an existing Lync or Skype for Business on-premises deployment, there is a third option.
Skype hybrid
Skype hybrid connects an existing on-premises Skype for Business Server or Lync Server to an Office 365 tenant and permits them to share a SIP namespace. Administrators can move users from the on-premises infrastructure to online in a staged fashion, enabling you to move to SBO at a more controlled pace. Moving users enables them to maintain their contact list, which might make it very appealing to both users and management because that avoids the most disruptive part of moving to SBO. However, Skype hybrid is not the best choice for many organizations. The amount of work required to set it up is considerable and might not be worth the effort if the goal is to move everyone to SBO and shut down the older on-premises system. The disparity in features between on-premises and online might become a problem for some users if they lose functionality that others keep.
Required infrastructure
The following on-premises topologies are supported when configuring Skype hybrid.
- A single on-premises deployment of Skype for Business Server or Lync Server is installed in one of the following supported topologies.
- An on-premises deployment of Skype for Business Server 2015
- An on-premises deployment of Lync Server 2013
- An on-premises deployment of Lync Server 2010
- A mixed Skype for Business Server 2015 and Lync Server 2013 on-premises deployment, with at least one site running Skype for Business Server 2015 with an edge pool associated with SIP federation for the site
- A mixed Skype for Business Server 2015 and Lync Server 2010 on-premises deployment, with at least one site running Skype for Business Server 2015 with an edge pool associated with SIP federation for the site
- A mixed Lync Server 2013 and Lync Server 2010 on-premises deployment with at least one site running Lync Server 2013 with an edge pool associated with SIP federation for the site
- The Skype for Business administrative tools, or the Lync 2013 administrative tools, is installed on an administrator workstation. You must use the version that supports the latest on-premises platform you have.
- An Office 365 tenant with Skype for Business Online installed.
Your on-premises infrastructure must be deployed in a way that supports external connectivity. You must have at least an Access Edge and an A/V Edge server in the perimeter network and permit connectivity to those servers from Office 365, and from those servers to Office 365.
Connectivity requirements
Your on-premises environment and SBO must be able to communicate with each other. Table 16-1 lists the required connectivity that must be permitted.
Table 16-1 Required network connectivity for Skype hybrid environments
Protocol |
TCP or UDP |
Source IP |
Destination IP |
Source Port |
Destination Port |
Notes |
SIP (MTLS) |
TCP |
Access Edge |
Office 365 |
Any |
5061 |
Signaling |
SIP (MTLS) |
TCP |
Office 365 |
Access Edge |
Any |
5061 |
Signaling |
STUN |
TCP |
A/V Edge |
Office 365 |
50000–59999 |
443, 50000–59999 |
Open for audio, video, application-sharing sessions |
STUN |
TCP |
Office 365 |
A/V Edge |
443 |
50000–59999 |
Open for audio, video, application-sharing sessions |
STUN |
UDP |
A/V Edge |
Office 365 |
3478–3481 |
3478–3481 |
Open for audio, video sessions |
STUN |
UDP |
Office 365 |
A/V Edge |
3478–3481 |
3478–3481 |
Open for audio, video sessions |
This is in addition to the connectivity required for SBO clients, as detailed at http://aka.ms/ipaddrs.
DNS settings
The Office 365 administrative portal only shows you DNS settings for using Skype for Business Online. In a Skype hybrid deployment, the DNS records must resolve to the on-premises infrastructure. Refer to https://technet.microsoft.com/en-us/library/dn951397.aspx for more information on the on-premises DNS requirements.
Federation configuration
Both the on-premises and the online services must be configured with the same settings for federation, and the same entries in the domain allow or deny lists. Even if you will not federate with any other domains, you must permit federation within the online tenant because Skype hybrid is a form of federation between your on-premises and your online organizations.
Online or hybrid user account limitations
There are differences between what you can provide users in your on-premises Skype for Business or Lync Server infrastructure and what you can provide them in Skype for Business Online. If you will deploy Skype hybrid, you need to consider this, because the following features available on-premises are not available to users you move online.
- Enhanced Presence: Use a photo from any public site for My Picture.
- Contacts: Search for response groups.
- IM Support: Persistent chat (group chat) integration.
- IM Support: Escalate a persistent chat room to a Skype for Business meeting with one click.
- External Users: Conduct two-party or multiparty calls with external users.
In addition, although a user’s contact list will migrate, their existing meetings must be updated or rescheduled when moving the user from on-premises to online.
Setting up Skype hybrid
If your on-premises infrastructure meets the requirements and your online tenant is ready, you can set up Skype hybrid. Follow these steps.
- In your on-premises environment, configure the edge server to enable federation by running the following command in Windows PowerShell on the edge server or an on-premises workstation on which the Skype for Business administration tools are installed.
Set-CSAccessEdgeConfiguration -AllowOutsideUsers 1 1 -UseDnsSrvRouting -AllowFederatedUsers
- Identify any existing hosting provider by using this command.
Get-CsHostingProvider
- Remove the existing hosting provider by using this command.
Remove-CSHostingProvider -Identity “Skype for Business Online“
- Add Skype for Business Online back as a hosting provider, but with the following additional parameters.
New-CSHostingProvider -Identity SkypeforBusinessOnline -ProxyFqdn “sipfed.online.lync.com” -Enabled $true -EnabledSharedAddressSpace $true -HostsOCSUsers $true -VerificationLevel UseSourceVerification -IsLocal $false -AutodiscoverUrl https://webdir.online.lync.com/Autodiscover/AutodiscoverService.svc/root
- Log on to the Skype for Business Online Admin Center and confirm that your SBO tenant is configured to permit external access, as shown in Figure 16-36.
Figure 16-36 Skype for Business External Communications
- Open the Skype for Business Server control panel for your on-premises organization and click the Set Up Hybrid With Skype For Business Online link.
- Click Next.
- When prompted, sign in to Office 365, using a Global Admin or Skype for Business Online admin account.
- Click Next.
The wizard confirms prerequisites and then configures hybrid.
- Connect to Office 365 Skype for Business Online by using remote PowerShell.
- Run the following command to enable sharing of the SIP namespace.
Set-CSTenantFederationConfiguration -SharedSipAddressSpace:$true
- Confirm that the users you will use for testing are licensed for Skype for Business Online.
- Use the Skype for Business control panel to move the test users from the on-premises infrastructure to SBO. From the Skype for Business control panel, click Users and right-click a test user to display Move Selected Users To Skype For Business Online, as shown in Figure 16-37.
Figure 16-37 A screenshot of the Action menu in Skype for Business Server 2015
- Test functionality and confirm that the user has their contact list and can communicate with on-premises users as well as with any federation partners.


When you have confirmed that all features are working as expected, you can move users from on-premises to SBO as you need to or back again.
Summary
In this chapter, you learned how to deploy and administer Skype for Business Online as well as the Skype for Business clients. You learned how to configure the service by using both the Skype for Business Admin Center GUI and Windows PowerShell, how policies can be used to enforce settings or restrict features to meet your organization’s needs, and how to deploy Skype for Business Online to your users. With this knowledge, you’re ready to go! SBO is a great choice to deploy first to your users and enables them to start using Office 365 services while you are getting Exchange Online and SharePoint Online ready to go.