Chapter 4. Directory synchronization basics
As a new Office 365 administrator, one of the first things you need to understand and implement is directory synchronization. In fact, unless you plan to have only 10 to 20 users in your tenant, directory synchronization, and an understanding of its impact on the entire Azure Active Directory (Azure AD) experience, will be critical to a successful implementation and a continued positive Office 365 experience.
In simplest terms, directory synchronization is the process of duplicating your on-premises Active Directory objects (such as users, groups, and contacts) in Azure AD. It is, however, a bit more complex than that. There are several common misconceptions about Azure AD, and mistakes that occur during synchronization, that can make the process both cumbersome and confusing.
Directory structure
A typical on-premises Active Directory implementation is all about organization and structure. Your on-premises identity infrastructure, at a minimum, consists of one directory, and your objects are organized, typically by type or function, into containers to help ease administration.
In Active Directory, for instance, you can have one or more forests, and within each forest you have at least one additional container, the domain. Within each domain, your hierarchy consists of organizational units (OUs), enabling you to group objects, and you can nest OUs to categorize or subdivide your objects further.
Azure Active Directory, however, is flat. There is no discernable directory structure, nor can you dictate one. When synchronizing your objects to Microsoft Azure, all your users, groups, and contacts exist in a single container, with no organizational boundaries.
Although this configuration might seem confusing for anyone used to performing Active Directory administration, the Azure AD portal does a good job of separating object types for administrative purposes. It is true that large numbers of any particular object type might make browsing the Office 365 Admin Center portal difficult; however, the interface is designed to enable you to filter objects to help refine your search.
In Figure 4-1, note that users (active, disabled, guest), groups, contacts, and shared mailboxes are organized easily in the navigation pane. This organizational layout, coupled with the ability to search each object type, makes administration simpler despite the flat directory structure in Azure AD.

Figure 4-1 Organization of object types in the Office 365 Admin Center portal
Data uniqueness
Unlike on-premises Active Directory, where it’s possible (but not recommended) to have objects with the same value populated for attributes that should be unique across your directory, Azure does not allow this. In fact, this is the most common type of error encountered when syncing objects to Azure and can be the most challenging to resolve.
The two most common types of attribute value conflict are UserPrincipalName and ProxyAddresses.
UserPrincipalName
The UserPrincipalName attribute, because it is used for authentication with Azure AD, must be unique for every object in your enterprise. Unlike the SamAccountName value, which is used for authentication to on-premises Active Directory and therefore must be unique for logon to Active Directory, the UserPrincipalName value is used for authentication to Azure AD and therefore must be unique in Azure. The SamAccountName value, for all practical purposes, is ignored.
When an object is synchronized to Azure AD, the UserPrincipalName value is checked for uniqueness and, in the event of duplication with an existing object, special action is taken to transform that value. More information about this transformation process follows in the chapter; however, note that because UserPrincipalName is used for authentication with Azure AD, this transformation process renders the account unusable until the conflict is resolved.
Proxy addresses
Mail flow depends on proxy addresses, and just like the UserPrincipalName value, it is possible to have duplicate proxy addresses between objects in an on-premises Active Directory forest. Most commonly, proxy address conflicts appear during the initial synchronization implementation, but it is not uncommon for them to occur during the normal day-to-day administration of on-premises Exchange.
Like UserPrincipalName, when value duplication occurs between objects, Azure takes steps to remediate the duplication by using Duplicate Attribute Resiliency, as discussed in the following sidebar.
Duplicate attribute resiliency
Duplication of attribute values in the synchronization to Azure AD and the subsequent effort involved in the remediation of these scenarios has been a long-time issue in the synchronization of objects to Office 365. To help alleviate this problem, Microsoft introduced a feature in September 2016, Duplicate Attribute Resiliency.
Duplicate Attribute Resiliency operates in Azure AD, independent of the synchronization engine version, and is enabled by default on all new tenants. In fact, since its release, the feature has been enabled on all Office 365 tenants worldwide, and due to its success in remediation of sync issues, it is no longer a feature that you can turn off.
Previously, if an administrator tried to synchronize a user with a duplicate UserPrincipalName or duplicate proxy address when synchronizing users, groups, or contacts to Azure AD, the synchronization would fail, generate an error in the synchronization engine, and continue to retry the export of the object on every subsequent synchronization cycle.
This backlog of synchronization errors would increase each subsequent synchronization cycle’s duration and potentially slow down the export of on-premises Active Directory changes to Azure AD. Now, however, the tenant flags those conflict scenarios, an automated email report is sent to the tenant administrator from Office 365, and the object export is marked as successful.
Duplicate proxy addresses
If a user with a duplicate email address is synchronized to Office 365, the duplicated proxy address value is simply removed from the object being synchronized and placed in a quarantined state. The value remains in this state indefinitely until the conflict is resolved manually, or the offending address is removed from the object.
When Duplicate Attribute Resiliency is triggered for a proxy address conflict, a technical notification email is sent to the tenant administrator as part of the regularly scheduled export cycle, which contains a list of all errors that occurred during that synchronization cycle.
In Figure 4-2, UserPrincipalName identifies the user with the conflict, and the details of the conflict appear. In this example, another object already uses the [email protected] email address.

Figure 4-2 Email notification for duplicate proxy
Although the object has been successfully synchronized to Azure AD, and the offending proxy address conflict quarantined, you cannot assign an Exchange Online license to the user because of the quarantined value. Attempting to assign a license results in an error stating that the object currently has a uniqueness violation, as shown in Figure 4-3.
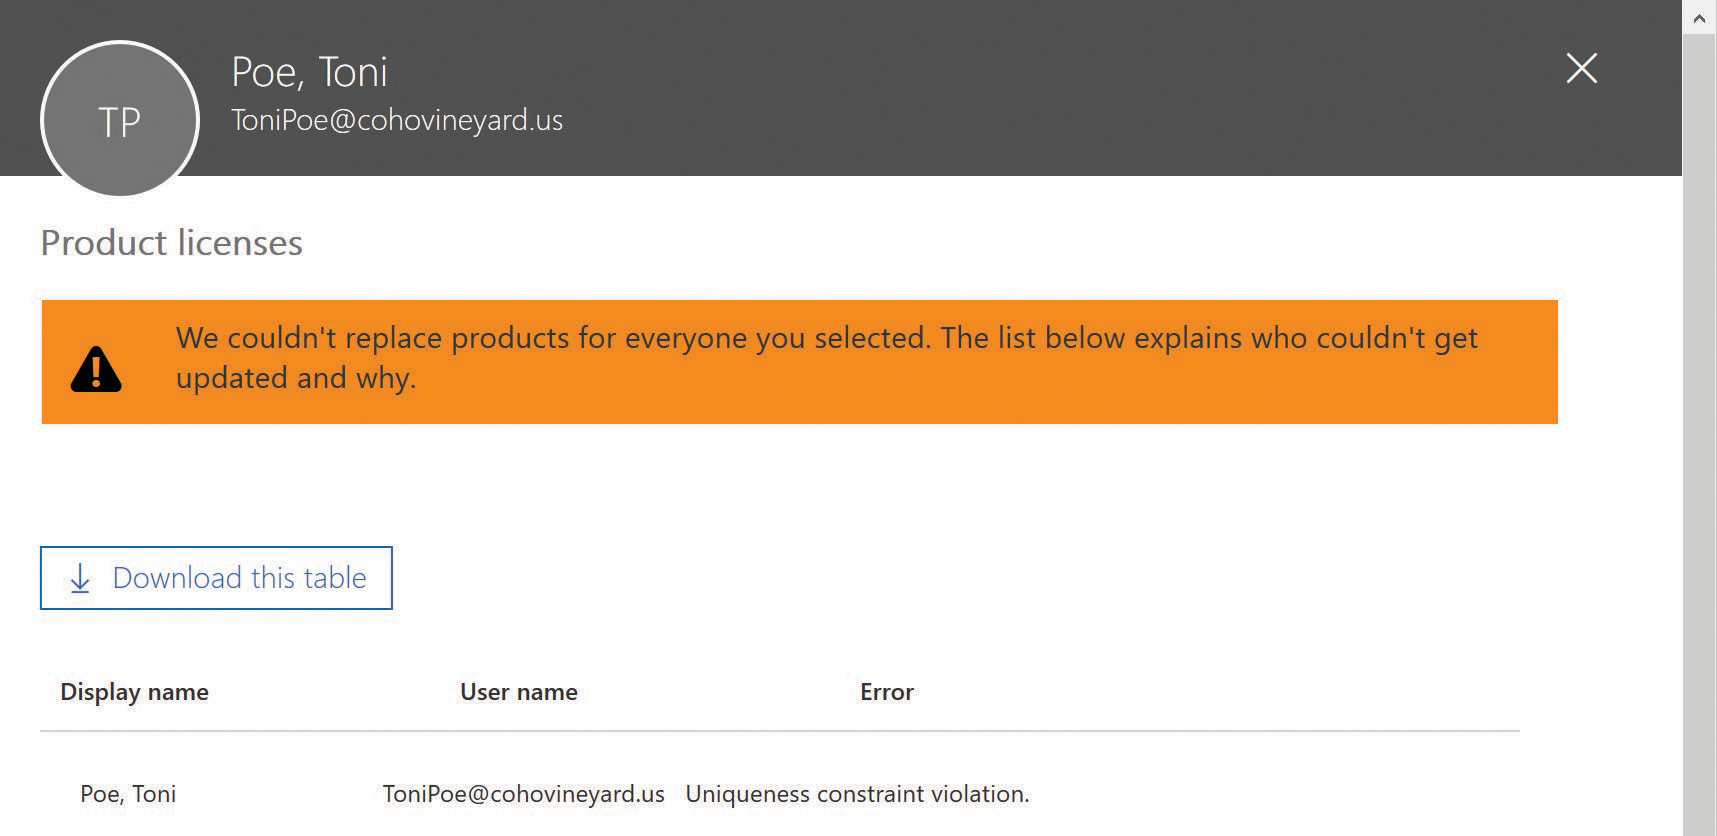
Figure 4-3 Attempt to license a user with a proxy address conflict
In this case, you can assign all the licenses beneath the SKU in question, except the Exchange Online license, until the proxy address conflict is resolved.
Duplicate UserPrincipalName
When a duplicate UserPrincipalName value is synchronized to Azure AD, Azure automatically quarantines the duplicate UserPrincipalName value, as it does for proxy addresses, and the resulting UserPrincipalName prefix for the user becomes the desired prefix, followed by a random four-digit number, and the suffix is replaced with @tenant.onmicrosoft.com, as shown in Figure 4-4.
Items remain in this state until they are manually remediated, and because the UserPrincipalName is used for authentication, this account remains unusable until the conflict is resolved.

Figure 4-4 Email notification for duplicate UserPrincipalName
Technical notification
Both UserPrincipalName and proxy address conflicts result in an email to the technical contact for your Office 365 tenant. Typically, this recipient is identified during tenant setup as the person who created the Office 365 subscription.
After you have successfully set up your tenant and before you have started synchronizing, review the technical notification setting and ensure that the email address is valid. Furthermore, it is typically recommended for the technical notification email setting to be configured to use the email address associated with a distribution list in your on-premises Exchange organization so that more than one administrator receives the notification emails from the synchronization process.
The technical notification email can be configured in the Office 365 Admin Center portal by selecting the company name (such as CohoVineyard) in the upper right corner of the main admin console page, as shown in Figure 4-5.
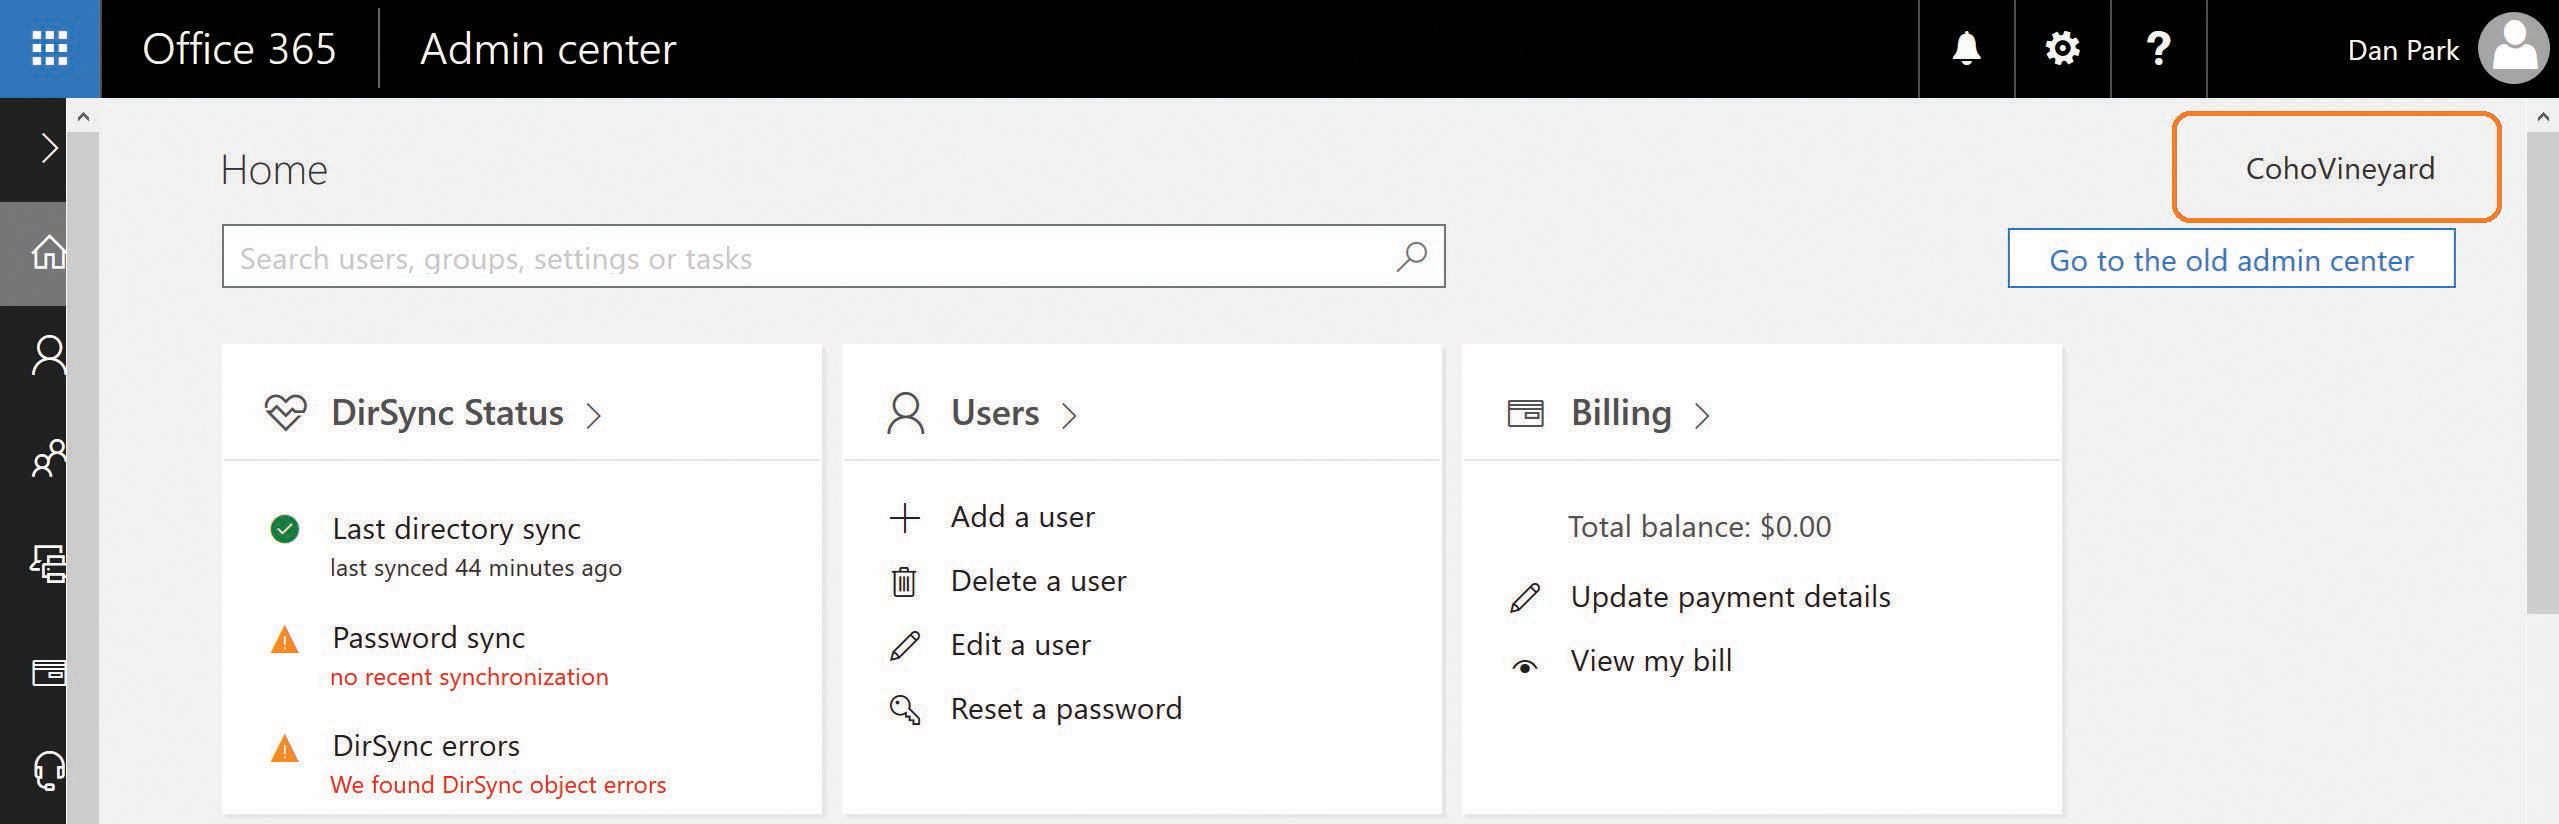
Figure 4-5 Selecting the company name to configure technical notification
This enables you to edit the organization profile for your Office 365 subscription, which includes the Technical Contact email address along with other settings such as Office 365 software release preferences, themes, and tile customizations.
If you prefer not to use the Office 365 portal to set the Technical Notification email preferences, they can also be updated by using Windows PowerShell.
The Get-MsolCompanyInformation command displays the current TechnicalNotificationEmails setting, which is a list of email addresses that receive service notifications and synchronization reports from the tenant.
You can use the Set-MsolCompanyContactInformation -TechnicalNotificationEmails command followed by a comma-separated list of email addresses that you wish to receive the updates, as shown in Figure 4-6.
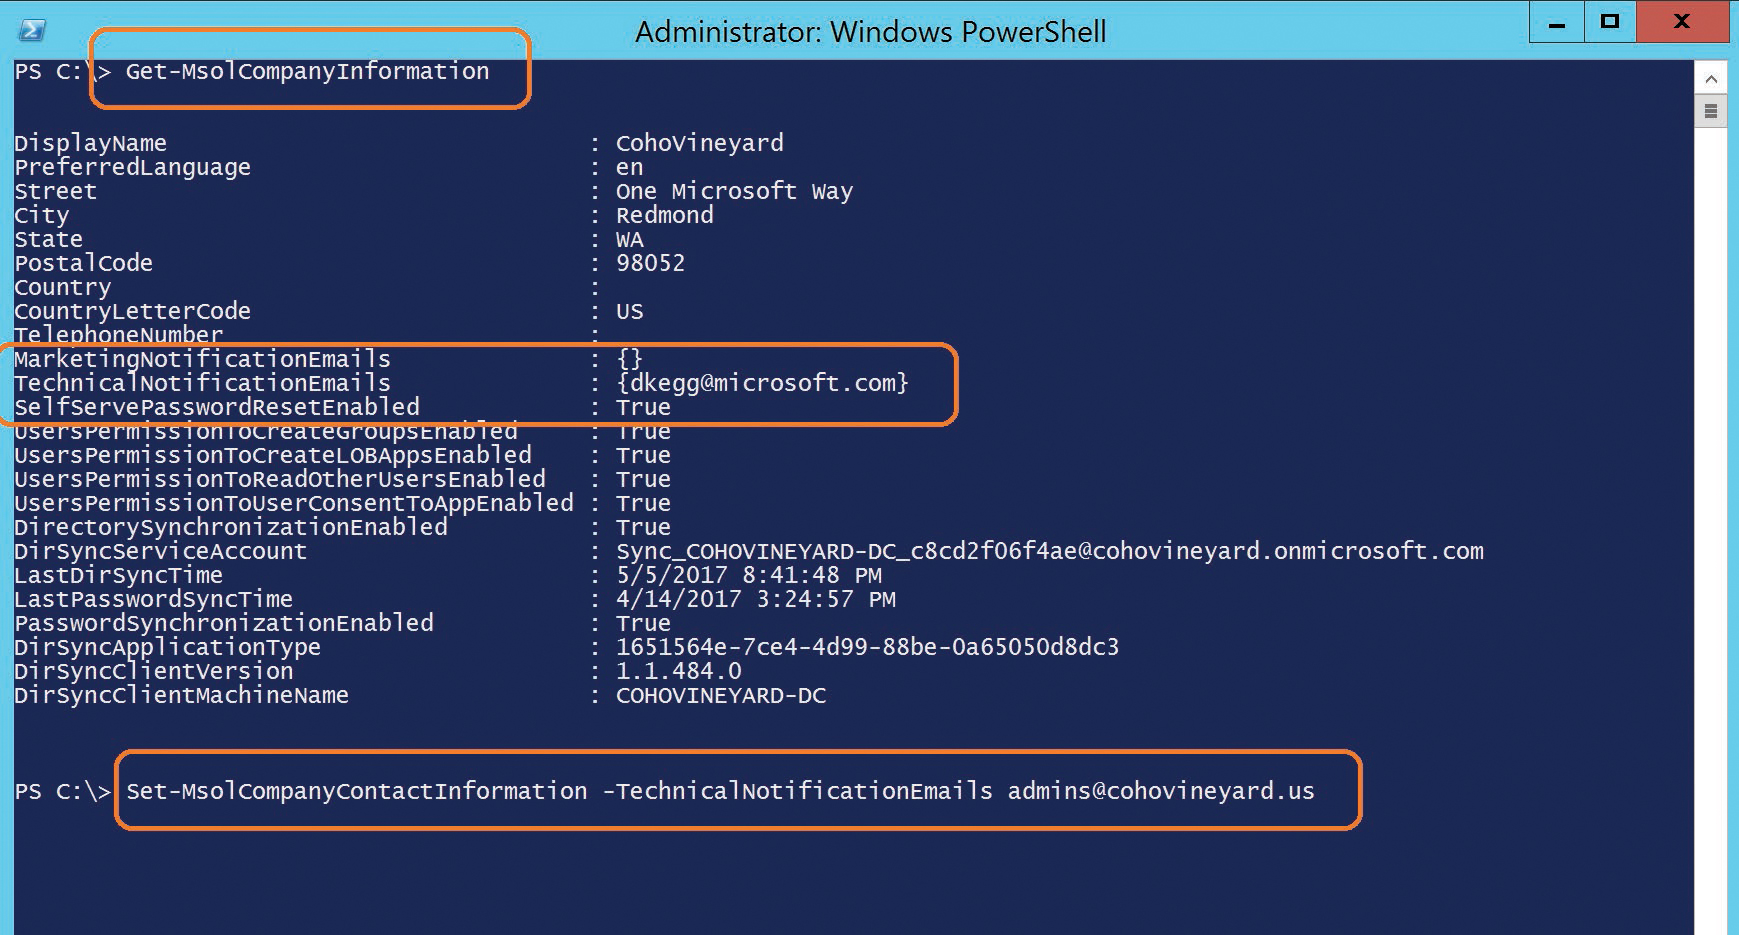
Figure 4-6 Using Windows PowerShell to set the technical notification contacts
Locating objects with errors
After you have successfully configured the company information in your tenant, and you have started receiving technical notification email as part of the ongoing synchronization process, you can now use both the Office 365 Admin Center portal and Windows PowerShell to review the errors present in your tenant.
This chapter discusses how to remediate different types of errors later, but it’s important to understand where those errors can be located so that you don’t need to rely on keeping all the notification emails you receive from the tenant.
Locating error objects in the Office 365 Admin Center portal
Locating objects in an error state in the Office 365 Admin Center portal is a simple matter of logging on to Office 365 and selecting Users on the main admin page.
In the Views drop-down list at the top of the page, you can then select Users With Errors, as shown in Figure 4-7.
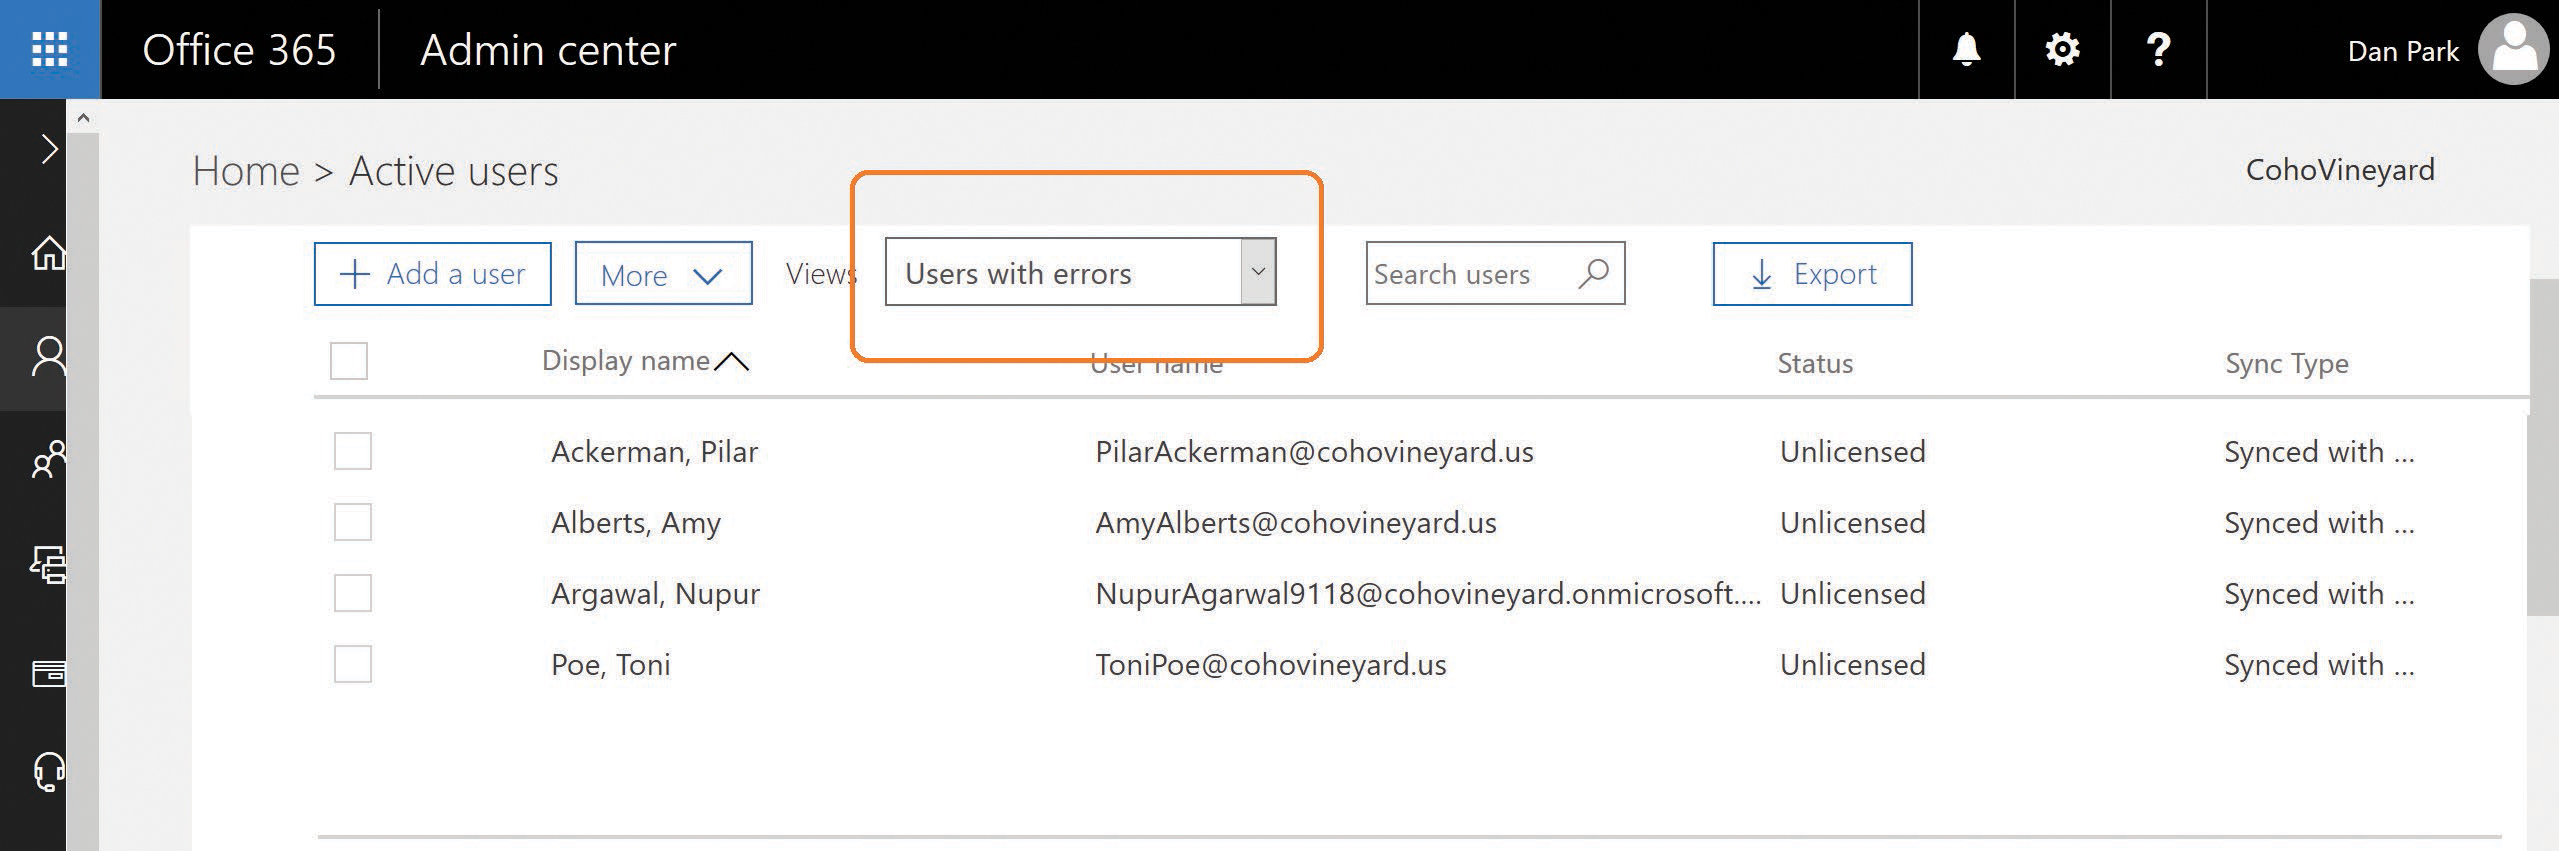
Figure 4-7 Filtering by Users With Errors
From the previous examples, you should be able to distinguish users with proxy address conflicts from those with UserPrincipalName conflicts.
Although the Office 365 Admin Center portal enables you to view the objects with errors, very little additional information appears when filtering for errors in the Users view. In fact, even selecting each user individually does not provide the root cause of the error.
To reveal the cause of the error, look at the identity synchronization error report that you received by email when the error occurred, use the DirSync Status Summary page, or use Windows PowerShell.
Locating error objects by using the DirSync Status Summary page
Although the Users view in the Office 365 Admin Center portal provides limited information by using a filter view about the objects with synchronization errors, it is not the ideal method for viewing error objects. Instead, you can use the Office 365 Admin Center portal DirSync status card on the admin center Home page, shown in Figure 4-8, to drill down into individual synchronization errors.
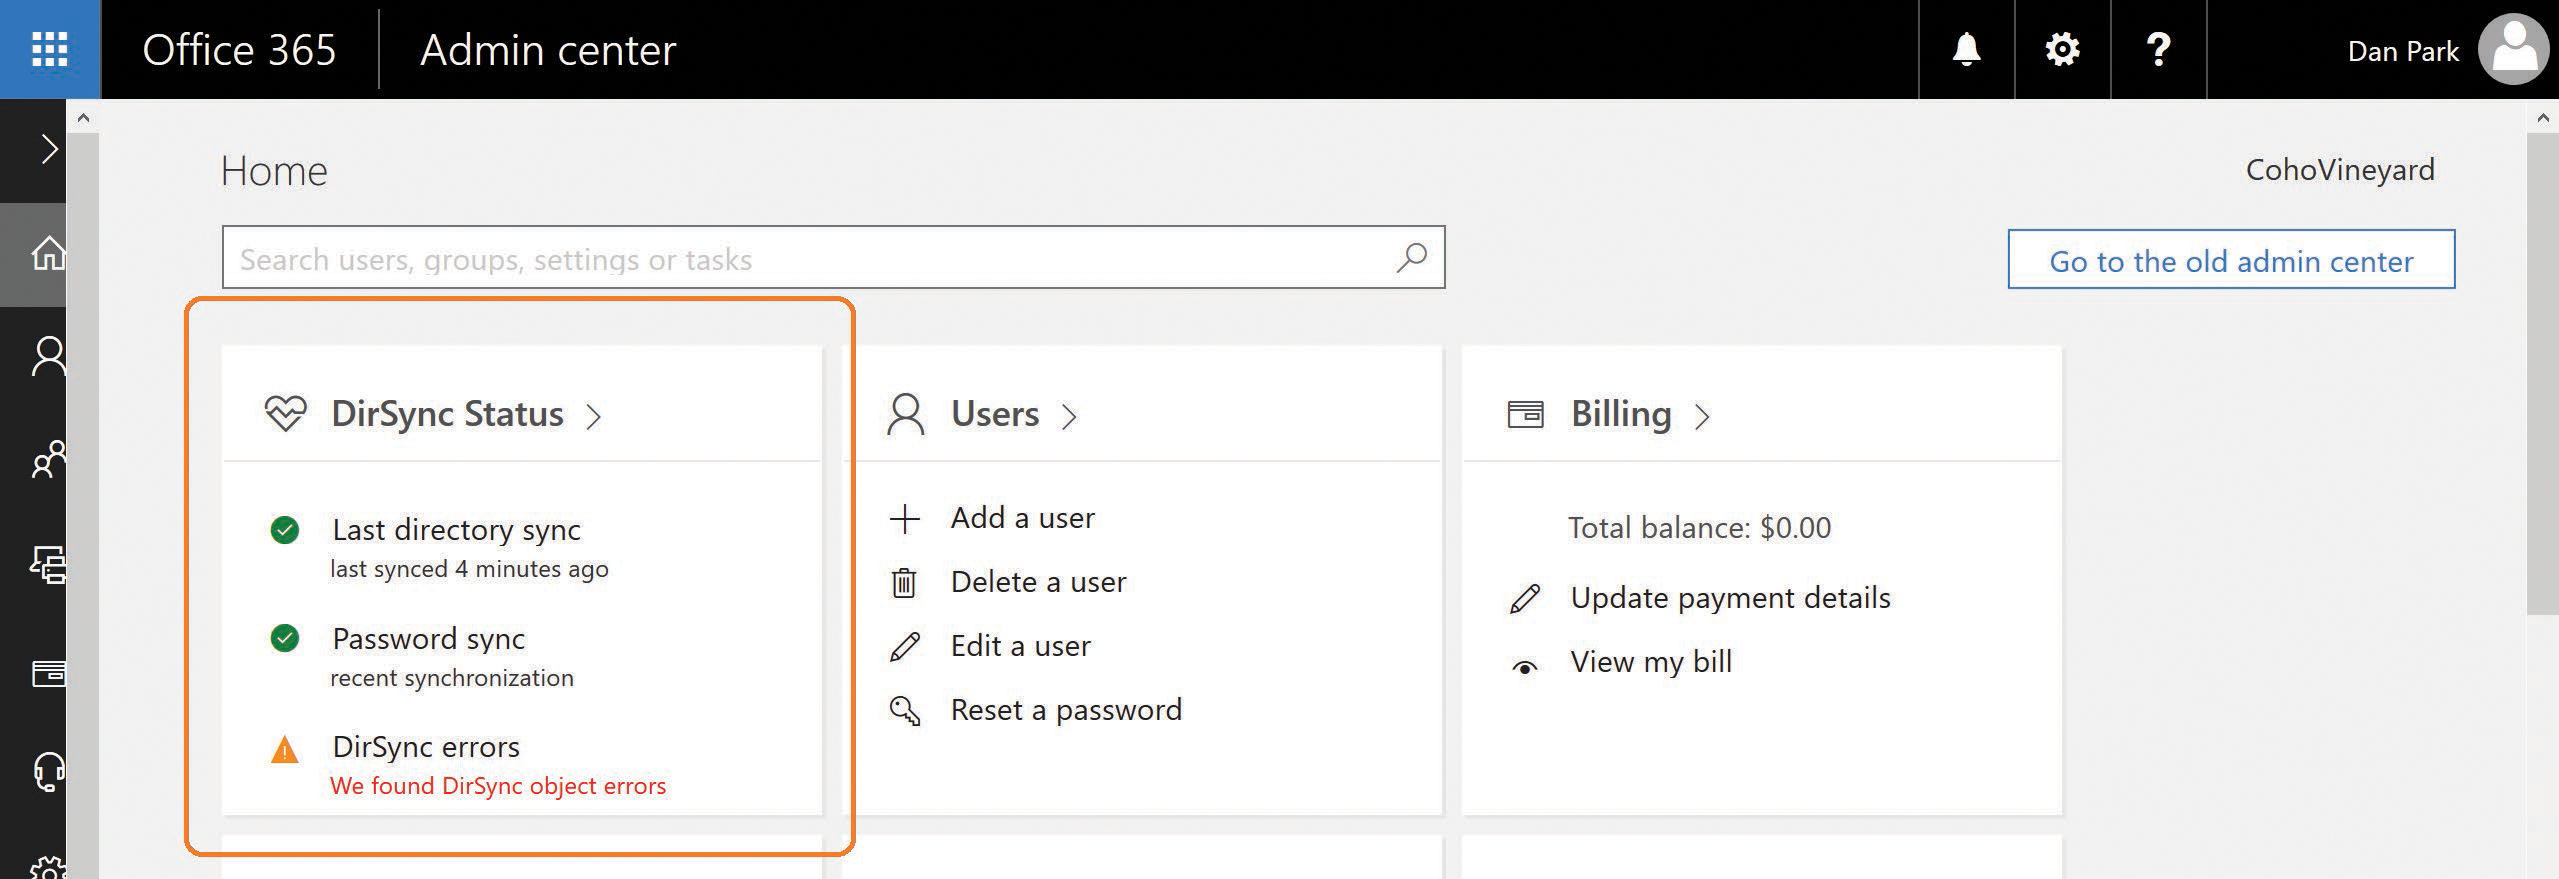
Figure 4-8 The Office 365 Admin Center DirSync Status card
Clicking DirSync errors displays a page listing each of the error objects along with the provisioning error for that object. You can then click each object and see the specific object error information you can use to remediate the error.
As shown in Figure 4-9, Azure AD detected a conflict in the [email protected] proxy address value; the dialog box displays both objects that were configured with that proxy address and the object whose conflicting value was removed, in this case, the second object to be synchronized to Azure AD with this value.
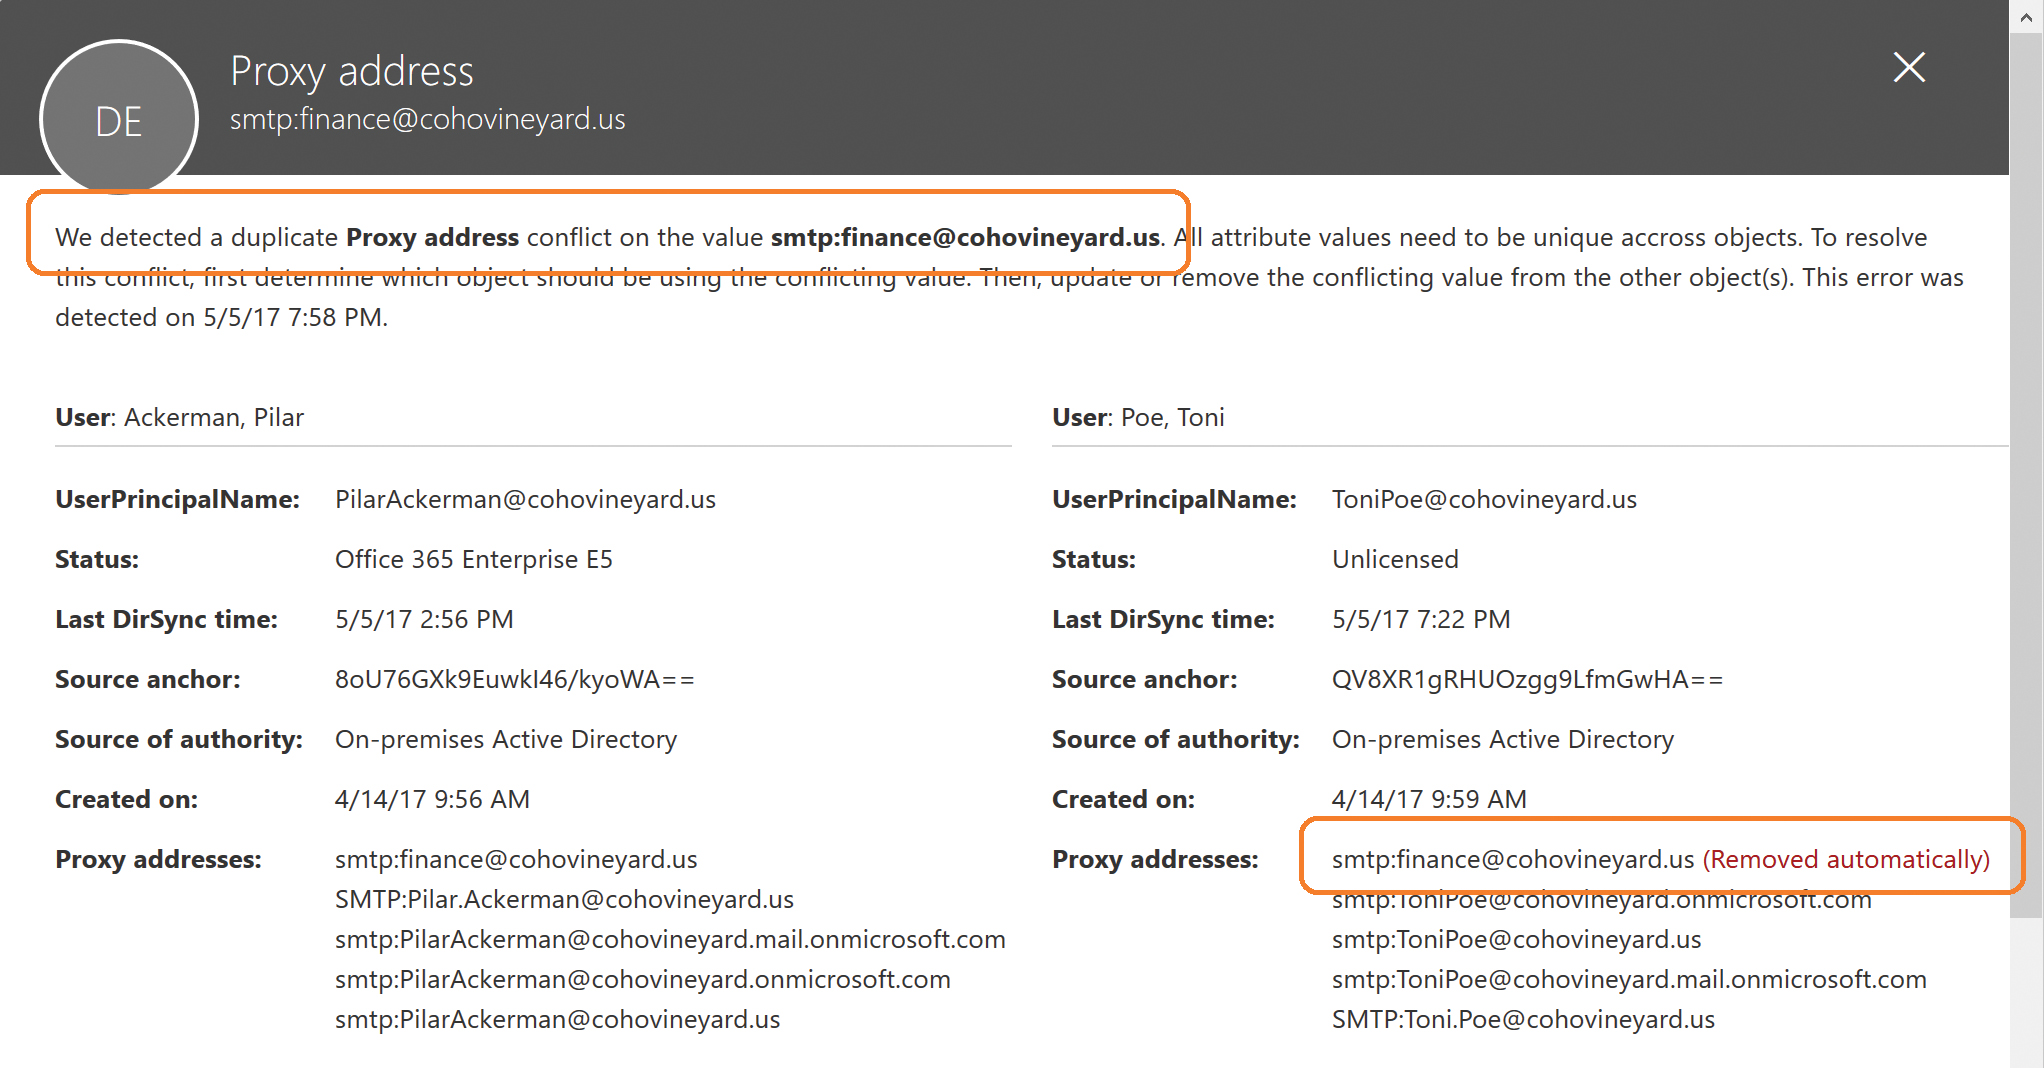
Figure 4-9 Office 365 Admin Center portal proxy address conflict report
Locating error objects by using Windows PowerShell
When locating conflict errors in Azure AD by using Windows PowerShell, you can use a special error category called PropertyConflict when viewing objects. This special error category aligns with the Duplicate Attribute Resiliency feature.
To view all users with a property conflict, you can use the Get-MsolDirSyncProvisioningError -ErrorCategory PropertyConflict command.
As shown in Figure 4-10, this command returns the same four objects viewed in the Office 365 Admin Center portal.

Figure 4-10 Using Windows PowerShell to view objects with provisioning errors
Two objects have provisioning errors on UserPrincipalName, and two have provisioning errors on ProxyAddresses.
If you prefer to sort objects based on the provisioning error type, you can use the Get-MsolDirSyncProvisioningError -ErrorCategory propertyconflict -PropertyName UserPrincipalName command to display only the UserPrincipalName errors, or PropertyName ProxyAddresses to display proxy address conflicts.
Summing up data uniqueness
A variety of methods are available for viewing provisioning and synchronization errors in your tenant. Each method provides certain conveniences when compared to the others.
For example, if you only have a few errors, you can easily navigate the portal, selecting each object in turn and identifying the root cause. When you have a larger number of errors, you can use Windows PowerShell to export a sorted list by provisioning error type to a comma-separated value (CSV) file that you can use to generate a detailed report.
In either case, understand how to access error details in the portal, and the root cause for some of the most common synchronization errors.
This chapter discusses more about detailed error tracking and remediation later; for now, it’s important to understand how the synchronization engine, AAD Connect, handles the synchronization of each object type and its underlying properties.
Understanding directory synchronization
The AAD Connect tool, used to synchronize your objects to Azure AD, is based on the Microsoft Identity Manager product (and its predecessors) and uses an approach referred to as a metadirectory to maintain and synchronize your objects.
By definition, a metadirectory is simply a collection of directories—in this chapter, Azure Active Directory and one or more on-premises Active Directory domains. These individual directories are joined through a central directory that maintains information about each of the source directories. As synchronization occurs, objects from each directory are evaluated, allowing them to be filtered out, joined with objects from other directories, or transformed to create new objects that are ultimately synced to Office 365.
The ultimate goal of the metadirectory is to maintain a connection between each object and its partner as well as any new objects created as a result, so that ongoing changes in any of the directories can be updated on all the connected objects.
This network of connected directories and objects might sound a bit confusing. The following explains how metadirectory services fit into a standard deployment of AAD Connect to synchronize a single on-premises Active Directory forest to Office 365.
Figure 4-11 shows one Active Directory forest, consisting of a single domain and several OUs, which contain users, groups, contacts, and computers. This is, by all accounts, a typical on-premises Active Directory implementation.

Figure 4-11 A typical Active Directory single-domain forest
The directory structure is well defined, grouping each object type.
When synchronizing this data to Azure AD, however, there are several objects, such as ForeignSecurityPrincipal objects and Trusted Platform Module (TPM) devices, that you do not want to synchronize to your tenant. The AAD Connect tool enables you, by using scoping filters (discussed in Chapter 5, “Installing Azure AD Connect”), to eliminate the objects you don’t want exported to your tenant.
Filtering is the first of many functions the directory synchronization provides, and although filtering might seem simple, it’s a critical first step in the transformation process. Objects filtered from the synchronization are still stored in the AAD Connect metadirectory and can be used later if necessary, based on the configuration defined.
Filtering is easy, however, so what objects do you want to export to your Office 365 tenant?
As the synchronization engine imports each object from its source directory, it’s placed into a holding location in the metadirectory. This holding location, called a connector space, maintains all the metadirectory information about your source Active Directory forest and every object inside it. See Figure 4-12.
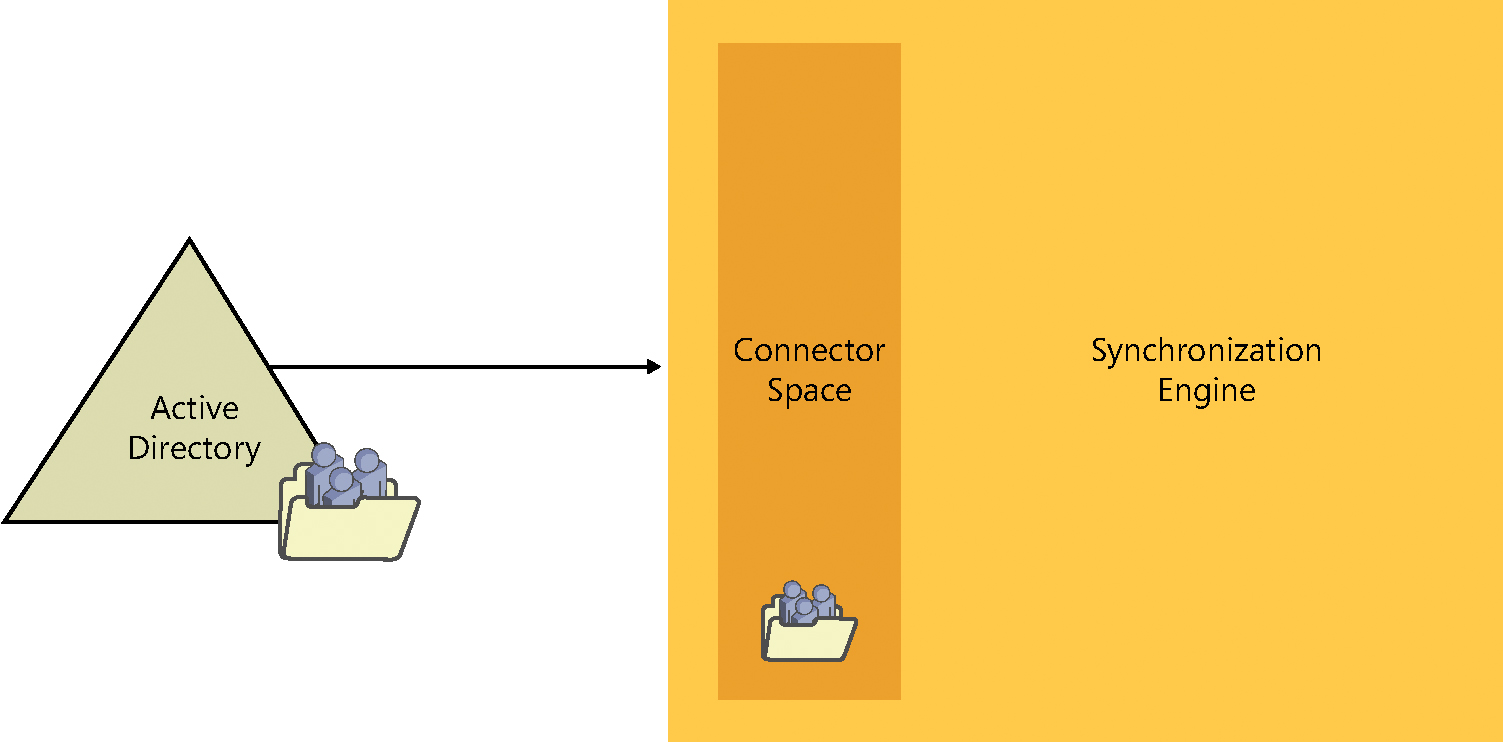
Figure 4-12 The connector space
The connector space contains a copy of each object it represents in the source directory. All the details, or attributes, of that object are maintained in the connector space and are used in subsequent steps to transform the object as it flows through the synchronization engine.
After the synchronization engine has imported an object and stored it in the connector space for that directory, synchronization rules are applied to the object. Depending on the rule, one of two things happens.
- As discussed previously, the object can be filtered at this step. A filtered object never leaves the connector space; however, because it has been filtered using a rule and not excluded from the sync due to its OU, this object might be able to move on to step 2 later. For now, however, it remains in the connector space.
- The object is allowed to flow out into the central directory, called the metaverse, where it can be transformed, joined with other objects, and even used to create brand-new objects in different connector spaces.
The metaverse, as shown in Figure 4-13, is the center of the metadirectory universe. It is where new objects are created and relationships are defined between existing objects from other connector spaces.
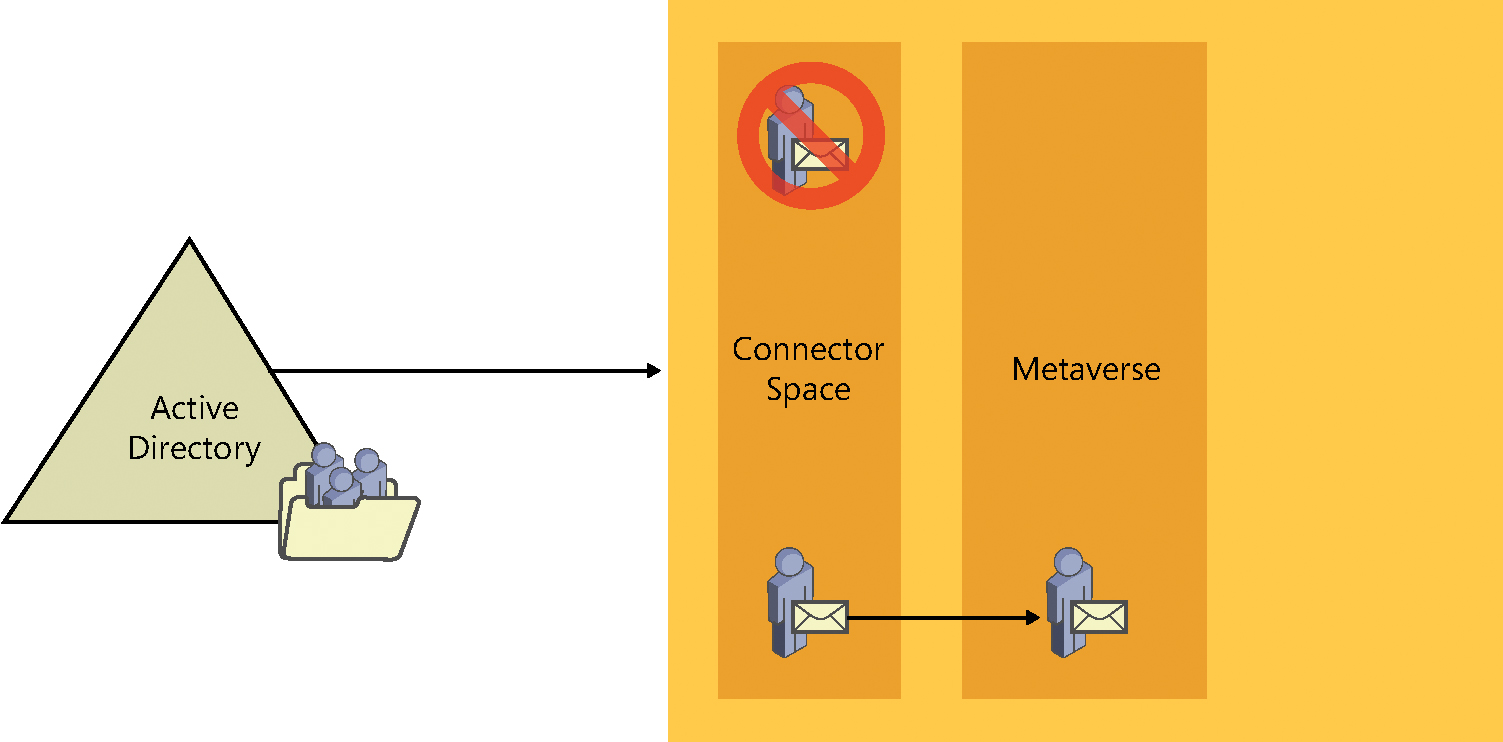
Figure 4-13 Filtering and projecting
In the diagram, the object that is not filtered from the synchronization can proceed to the metaverse and become a new object. This new object maintains a relationship with the object from the Active Directory connector space that it represents, but it is, for all intents and purposes, a brand-new object.
This process, whereby an object in a connector space is allowed through a synchronization rule to flow into the metaverse as a new object while maintaining a connection to its source, is called a projection.
Much like an image on film is projected on a screen by using a bright light, the connector space object is projected into the metaverse.
The new object in the metaverse could be an exact copy of the object it represents, but it’s also possible (as is typically the case) that the new object, although like the object it represents, could contain a number of new or different attribute values from its source as well as fewer attributes. See Figure 4-14.
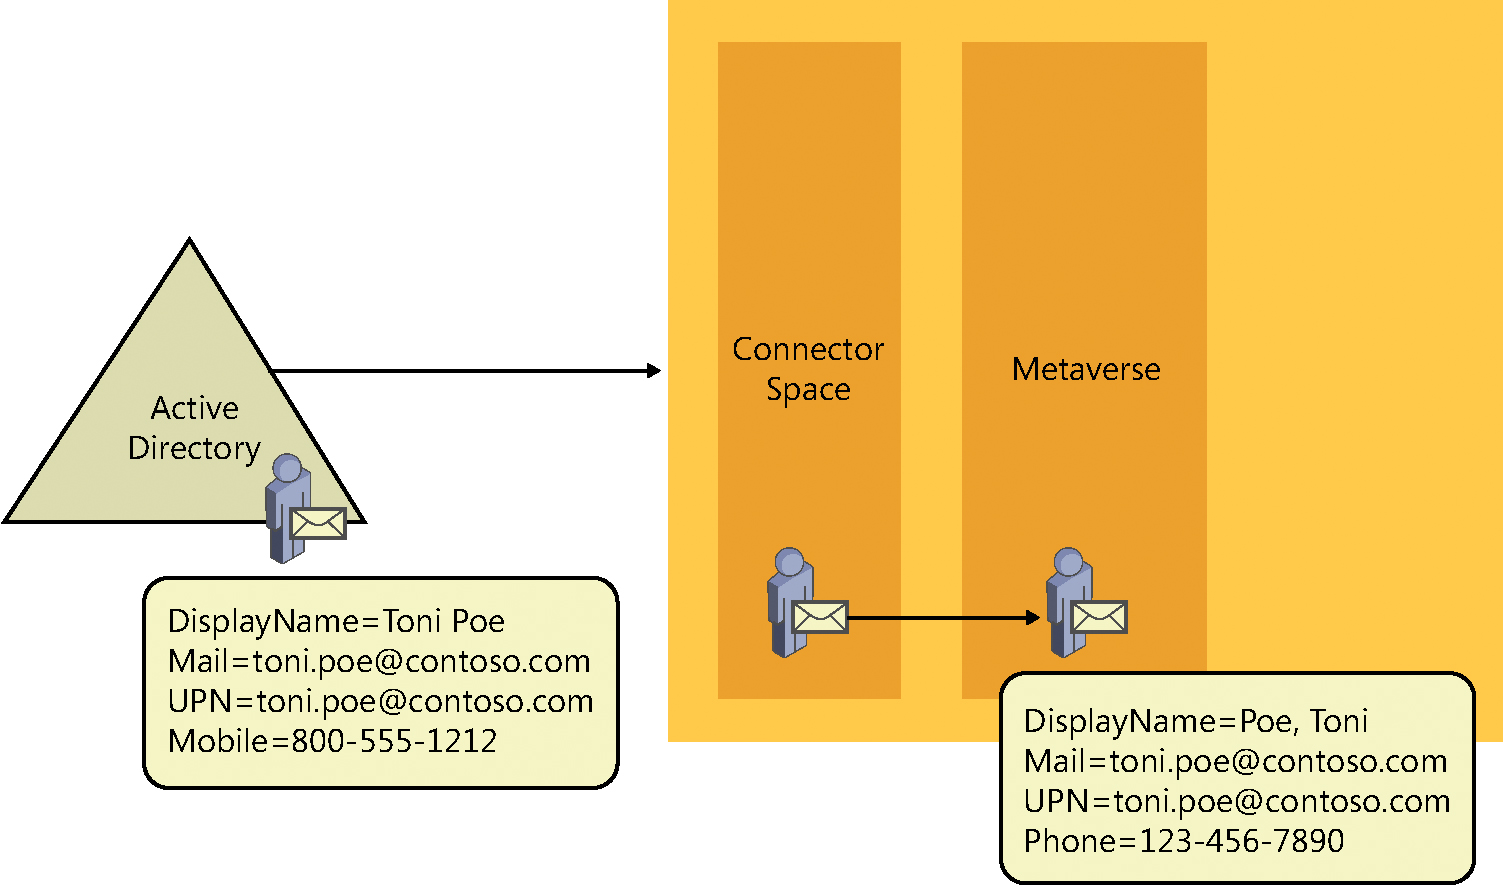
Figure 4-14 Projection from connector space to metaverse
In this example, the on-premises Active Directory object appears in the Active Directory connector space with all the same values, but as the object flows to the metaverse, the DisplayName for the object is transformed from First, Last to Last, First, the Mobile value is removed, and, instead, a new value for Phone has been created. All these changes are the result of transformation rules configured in the synchronization engine.
After our new object has been created in the metaverse, the object that it represents in the Active Directory connector space is now referred to as a connector simply because it maintains a connection with the metaverse object.
This connection, however, is very important. It is how the object in the metaverse is updated whenever the source object (the connector) in the Active Directory connector space is updated, when new proxy addresses are added to the source object, for example.
Conversely, if the source object were to be deleted from Active Directory, the metaverse object and any other object connected to it are automatically deleted as well.
So far, only the inbound synchronization rules have been discussed, the rules that deal with the projection of objects into the metaverse and any data transformations that should occur when the object is projected.
The next step in the synchronization process is the evaluation of each outbound synchronization rule.
The outbound synchronization rules are applied to every object that was projected into the metaverse to determine whether that object meets specific criteria and should be allowed to proceed beyond the metadirectory.
After an object has been evaluated by an outbound synchronization rule, and if it meets the scoping filter requirements, a new object is created in the target connector space. In Figure 4-15, the target connector space is the Azure connector space.
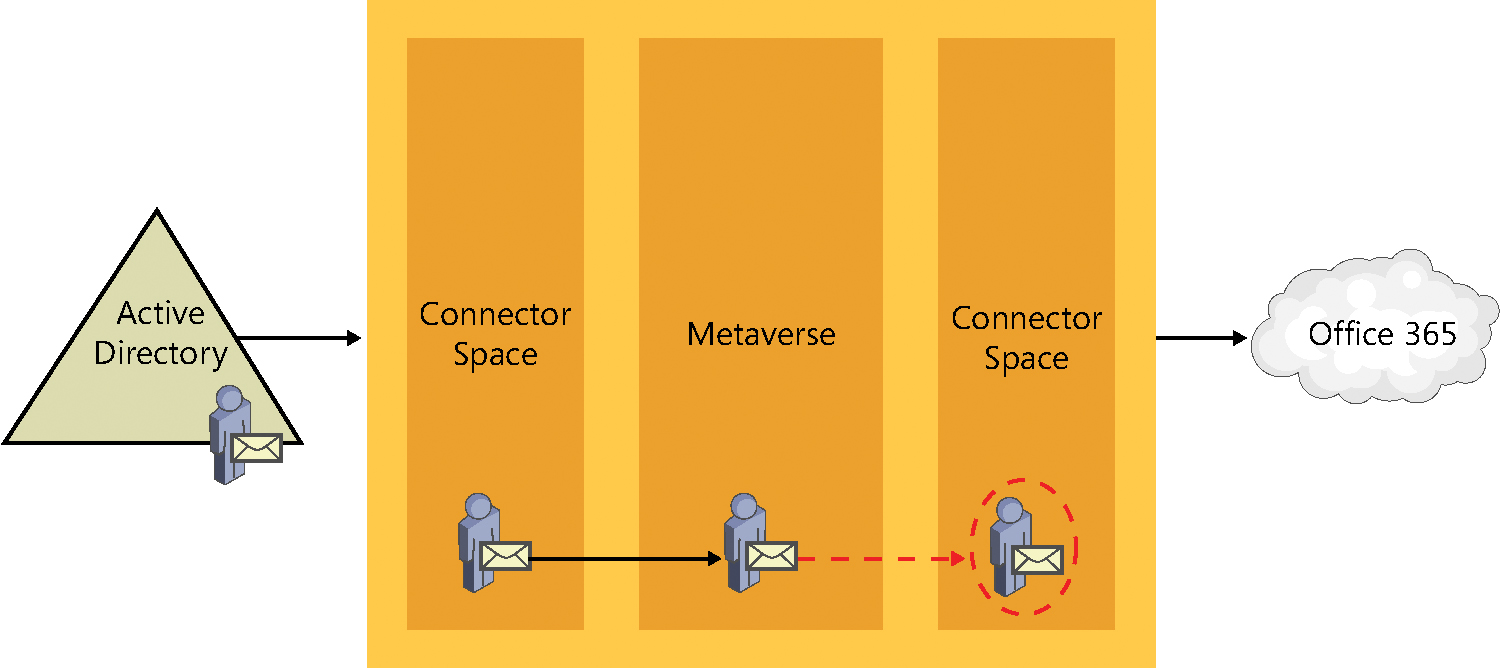
Figure 4-15 Provision from metaverse to Azure connector space
This process, when a new object is created in a different connector space, is referred to as a provision. When a provision occurs, just like a projection, the resulting object can have some or all of the source object’s properties, as defined by the transformations in the synchronization rule that provisioned the object.
The newly provisioned object in the target connector space maintains a connection to the source metaverse object that it was created from, which in turn has a connection from the metaverse back to the source connector space. See Figure 4-16.

Figure 4-16 Connections from a connector space to the metaverse
After this new object has been provisioned into the Azure connector space, it is ready to be exported to Azure, resulting in an object in your tenant that looks similar to your on-premises Active Directory object.
Now that you understand the Active Directory connector space, the projection of an object to the metaverse, and the provision of a new object from the metaverse to the Azure AD connector space, review the process for a real object in Active Directory and follow its path through the synchronization engine and into Azure AD.
Your test object is a mailbox-enabled user in Active Directory, shown in Figure 4-17, that you want to sync to Azure.
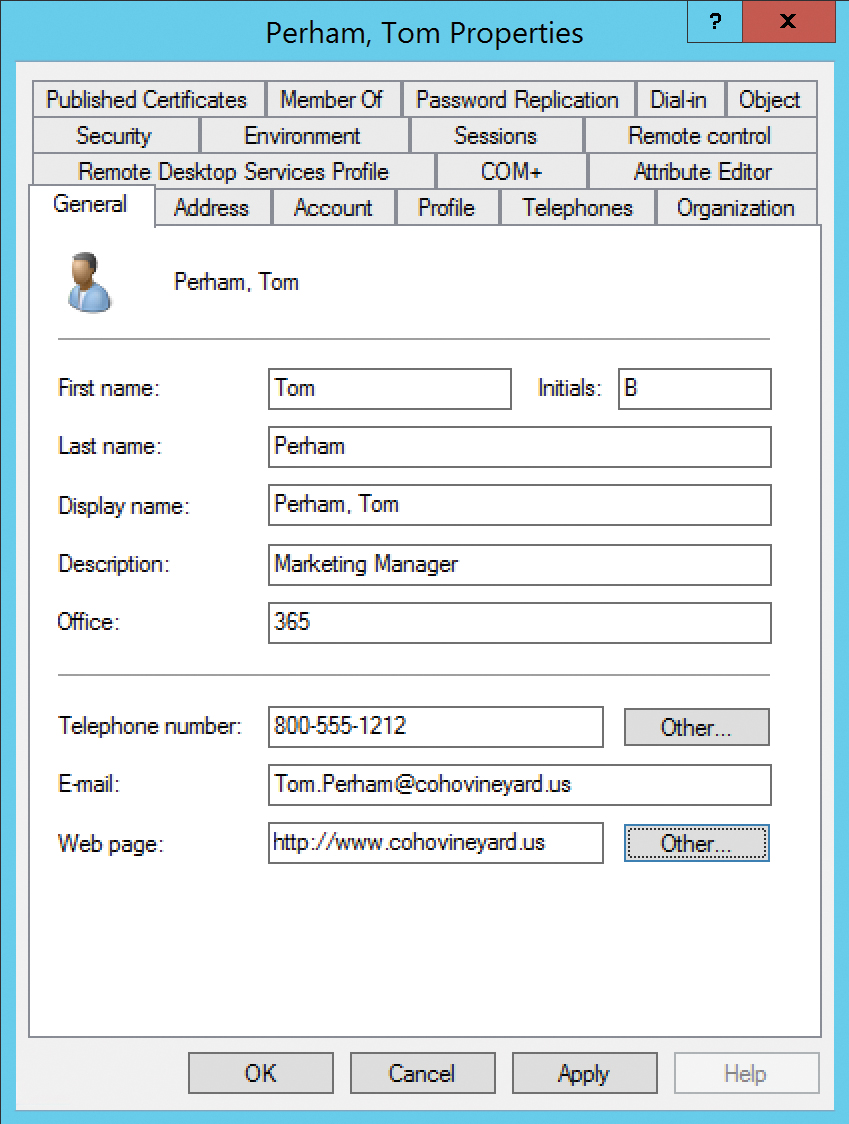
Figure 4-17 Active Directory user properties
The first step in the synchronization process is to read the user from the source directory. AAD Connect does this automatically during the Import step.
After your test user exists in the Active Directory connector space, synchronize the user to apply the rules to the object, as shown in Figure 4-18.
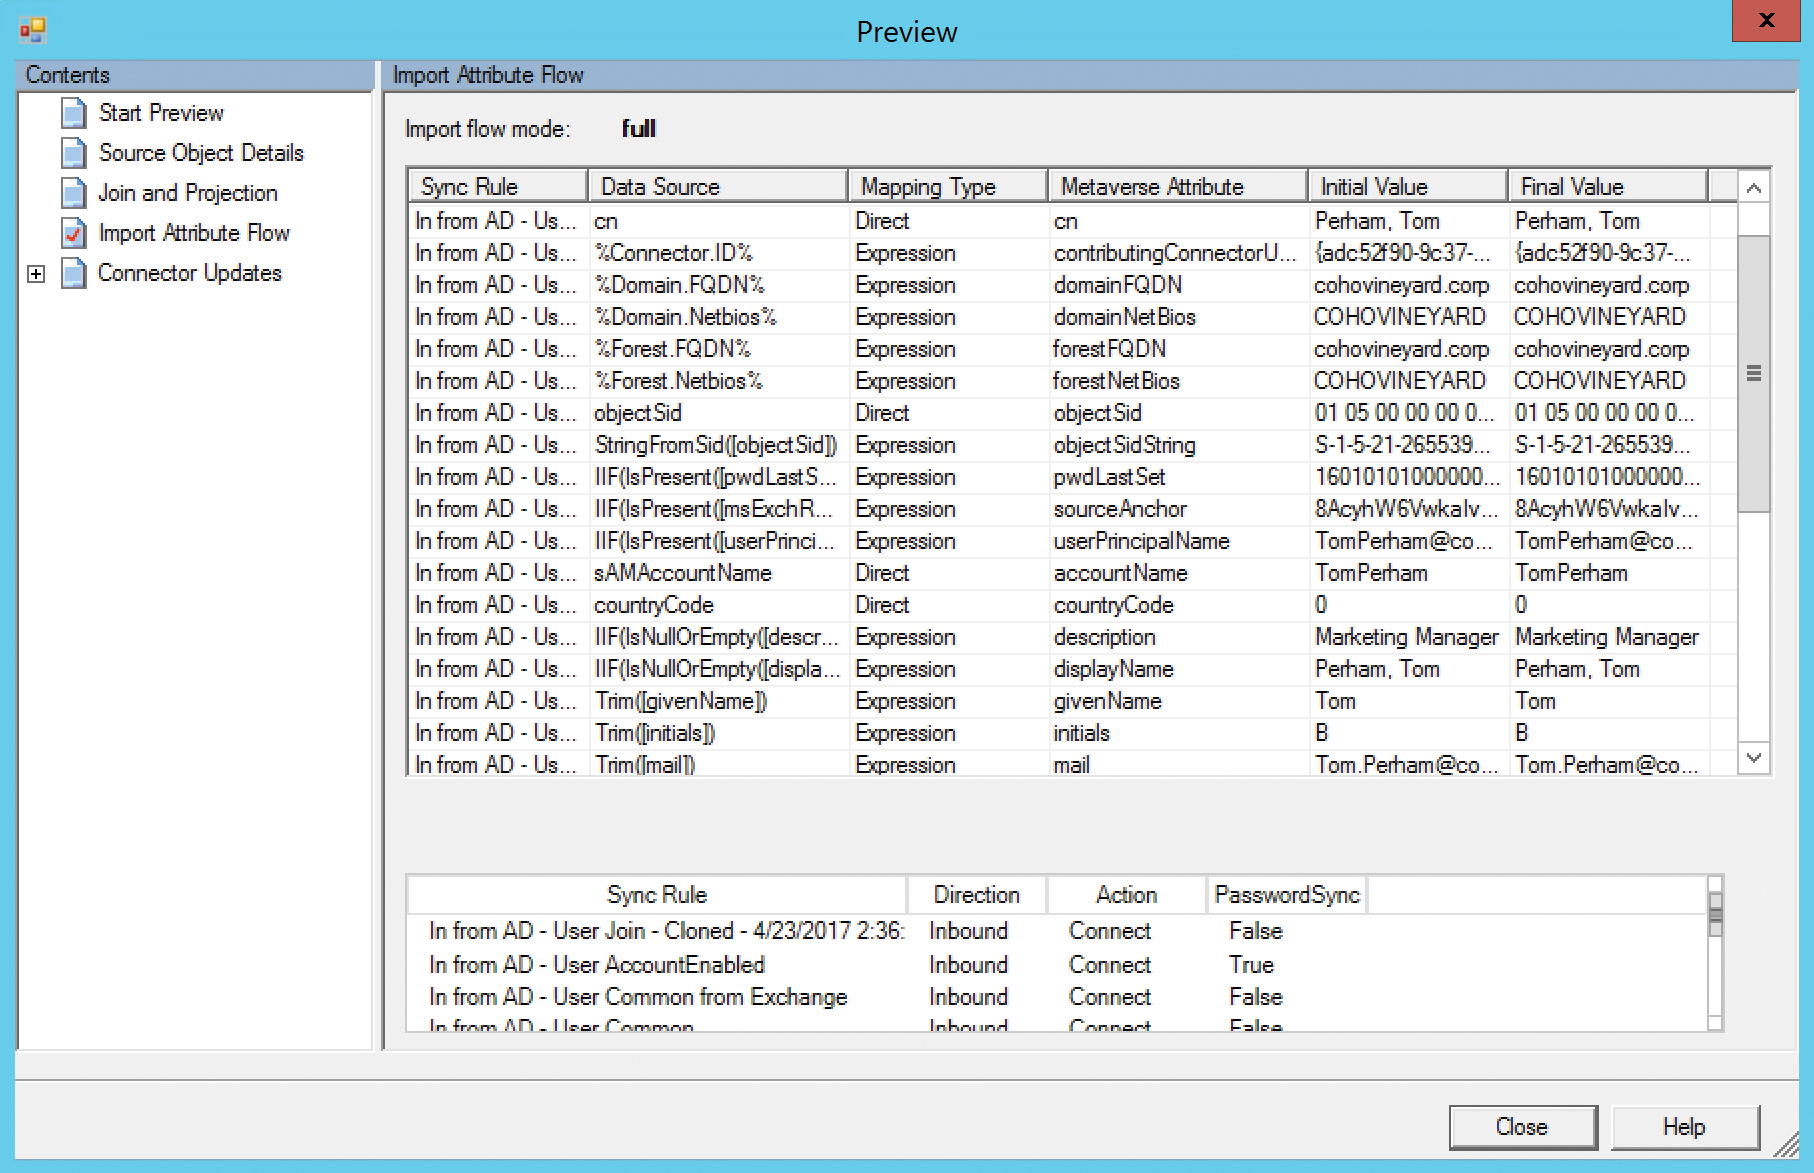
Figure 4-18 User projecting to the metaverse during synchronization
The figure shows that the user was successfully projected into the metaverse, most attributes were populated on the new object directly from Active Directory (displayName, givenName, mail), and some new attributes (domainFQDN, objectSidString) were created during the synchronization process.
In this example, you manually synchronize the objects, using the Preview button in the connector space object properties, shown in Figure 4-19, so you can see the synchronization rules applied to the test object and view the attribute values passing between the connector space object and the metaverse object. Normally, this transformation of values applies behind the scenes automatically for every object each time a synchronization step runs as part of the regular 30-minute cycle.
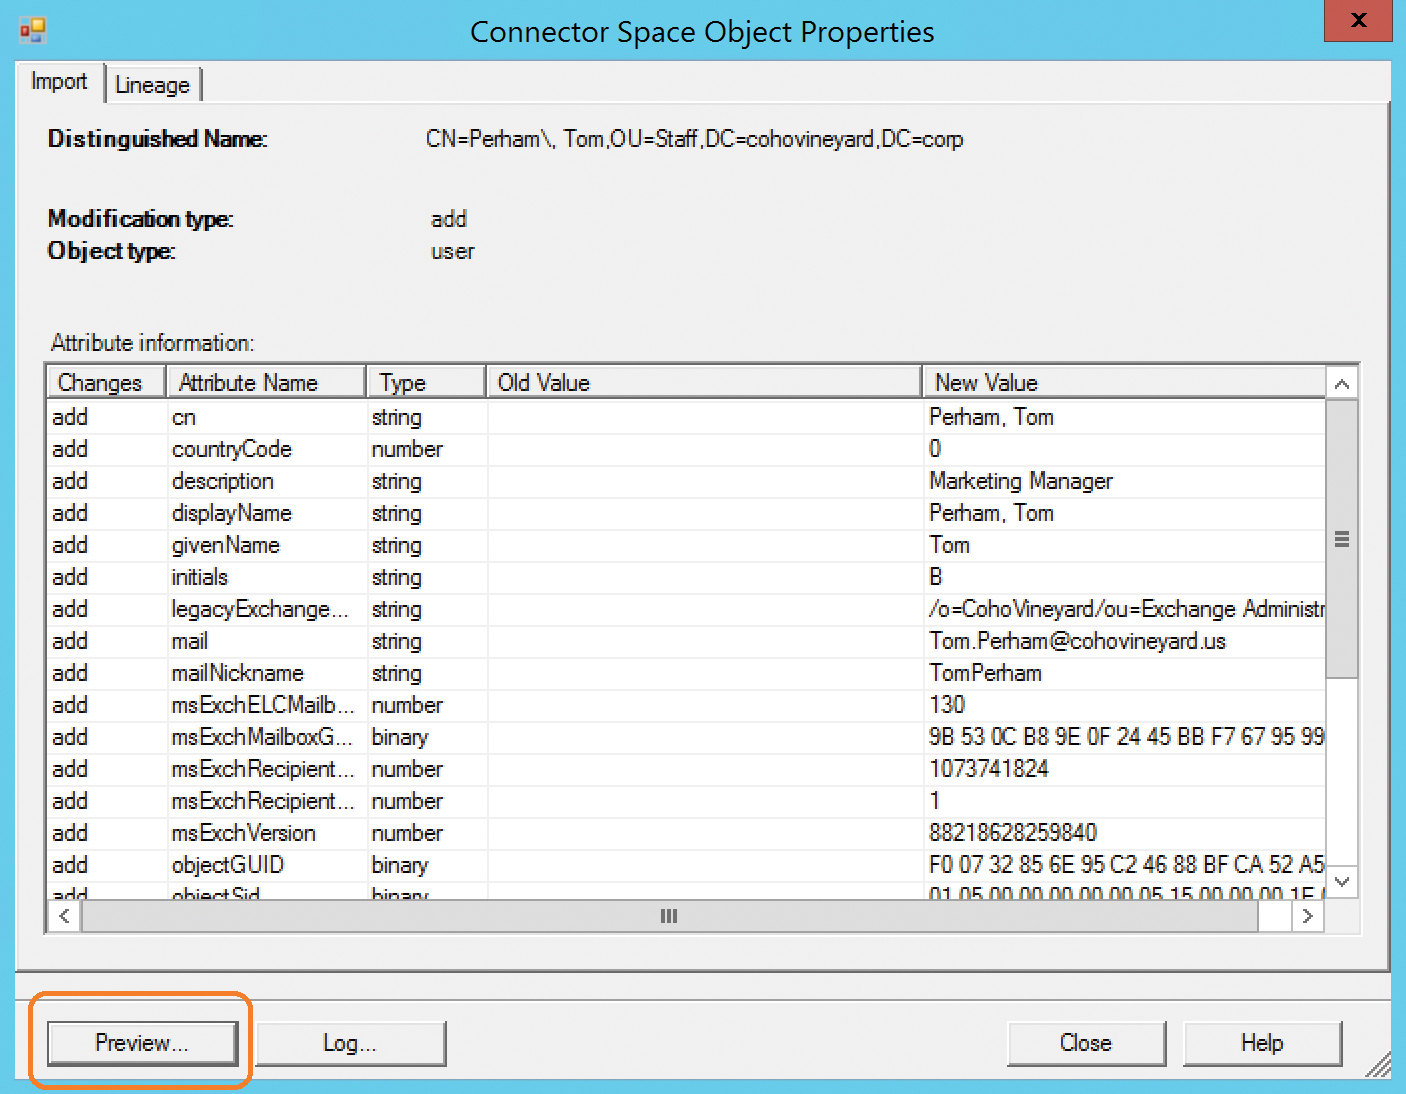
Figure 4-19 The Preview button when viewing a connector space object
While the inbound synchronization rules are being applied to project the test object to the metaverse, the outbound synchronization rules are also being applied, and in the case of the test object shown in Figure 4-20, a new object is being provisioned into the Azure connector space and staged for export to Office 365.

Figure 4-20 Adding a connector for Azure during synchronization
Now that the new object has been provisioned to the Azure connector space, an export places that object in Azure AD, and the initial synchronization is complete, as shown in Figure 4-21.

Figure 4-21 Export pending to Azure AD
Note in the example that the object is in a pending export state, awaiting export to Azure, and the distinguished name of the object appears.
From this point on, any changes to the on-premises Active Directory object are read into the Active Directory connector space, and synchronization rules are applied and flow those changes, where applicable, to the metaverse object it is connected to, out to the object in the Azure connector space it is connected to, and, finally, out to Azure Active Directory.
This process, shown in Figure 4-22, occurs every 30 minutes for every object for the lifetime of each object.

Figure 4-22 Import, sync, projection, provision, and export
The final topic that is key to the metadirectory is the join.
The join is absolutely critical when dealing with multiple on-premises Active Directory forests, allowing objects to be combined, but even in a single-forest implementation of AAD Connect, the join is important.
The join behaves exactly like it sounds; it glues objects together as they enter the metaverse, based on one or more criteria that you define. In the AAD Connect installation wizard, which Chapter 5 covers in depth, you select the criteria used for joins during the user matching selection process.
One of the most common join scenarios is the Exchange account forest/resource forest scenario.
In a multi-forest implementation, one of the most common scenarios is the account forest/resource forest configuration. In this configuration, the account forest consists of user objects that are used for sign-in and authentication to on-premises services, and the resource forest contains the mailboxes for each of those user accounts.
There are a variety of reasons for the implementation of this configuration, and in an on-premises environment, where forest trusts exist and can be used to ensure proper authentication, it’s a straightforward configuration. In Office 365, however, no forest trust exists between the cloud and on-premises, and you cannot use Kerberos for authentication.
It is therefore necessary, when synchronizing users to Azure AD, to use the synchronization process to merge the user account and mailbox account to appear as one object in Office 365.
As discussed earlier, each object in Active Directory is stored in the associated connector space, shown in Figure 4-23. In the case of a multi-forest configuration, this means that two (or more) connector spaces represent the on-premises directories.

Figure 4-23 Multiple connector spaces
When a user in the account forest is mailbox-enabled, a new mailbox is created in the resource forest; this mailbox account is a disabled user account, and Exchange uses the ObjectSID of the user in the account forest to populate an attribute called msExchMasterAccountSID on the mailbox.
Now that there are two objects, one in each of the two connector spaces in Figure 4-24, there needs to be a way to identify which objects belong together during the synchronization process. This is where the join comes into play.
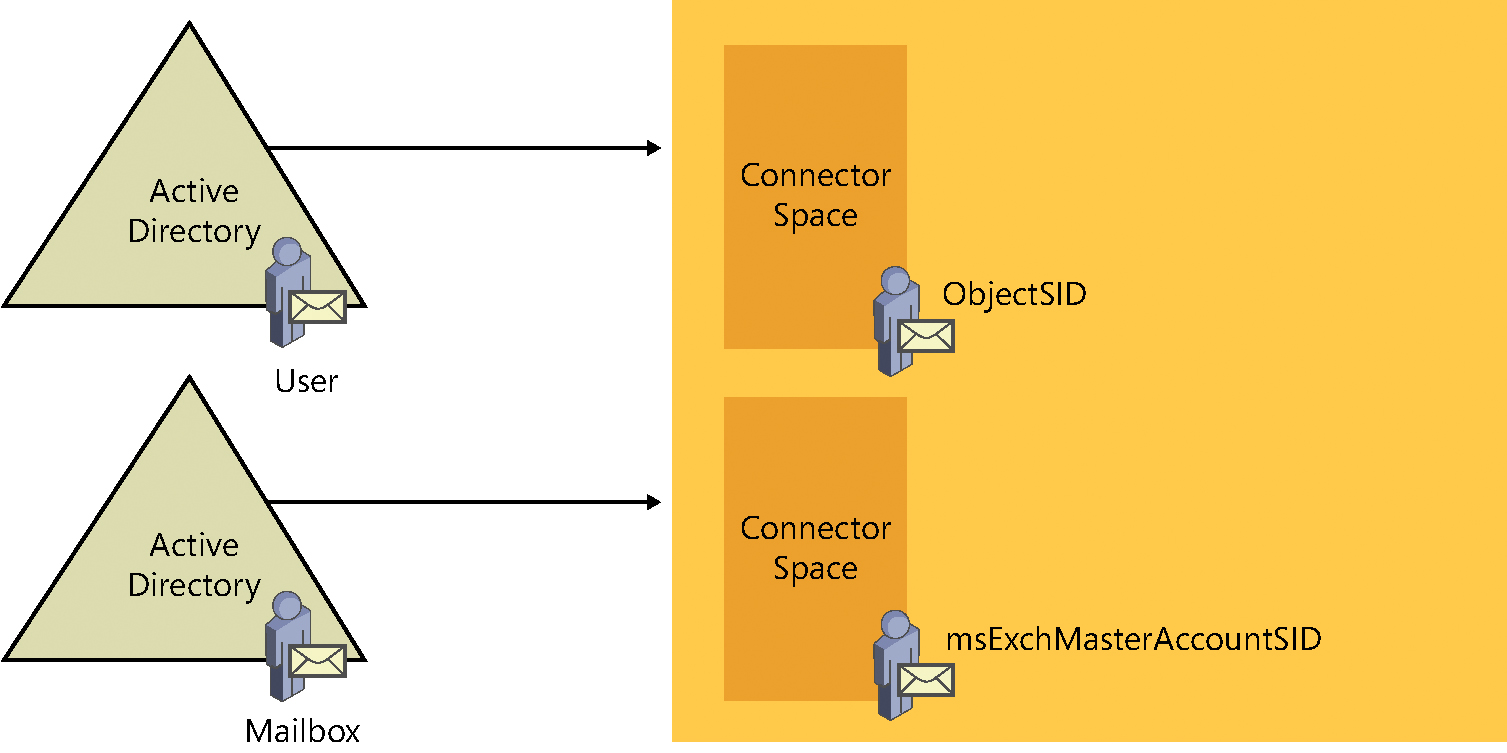
Figure 4-24 Account forest user and resource forest mailbox
AAD Connect uses the msExchMasterAccountSID attribute to join the two objects. AAD Connect populates both the account forest and the resource forest connector spaces during the import step. See Figure 4-25.
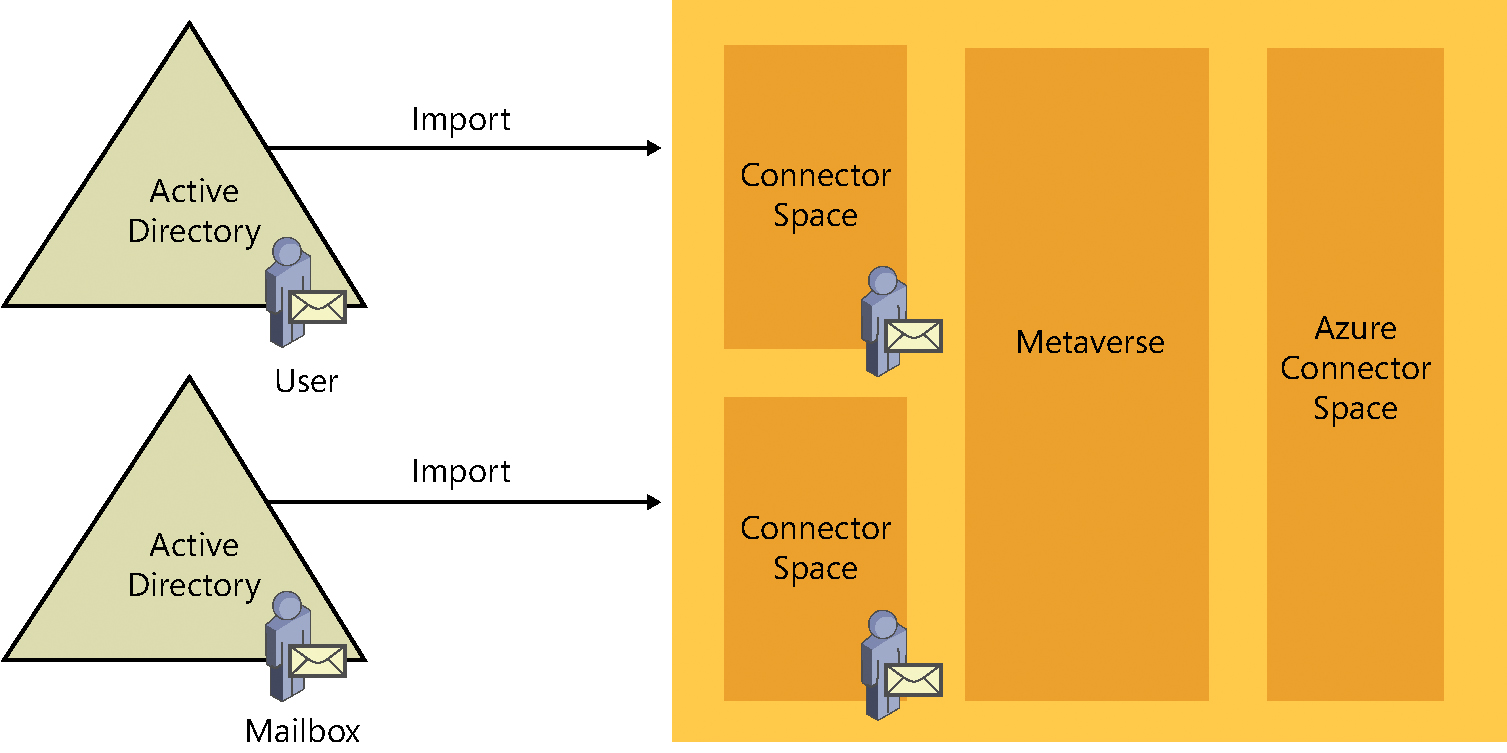
Figure 4-25 Importing User and Mailbox from both forests
During the synchronization step, one of the two objects, depending on which connector space is synchronized first, is projected into the metaverse. In Figure 4-26, the synchronization occurs on the User account first, so the User account is projected into the metaverse.

Figure 4-26 Synchronization from User forest projecting the object into the metaverse
When the second connector space is synchronized, the matching object detects its partner in the metaverse, and the two objects merge. In the diagram in Figure 4-27, the Mailbox object from the resource forest has joined the User object from the account forest, resulting in one object in the metaverse that is a combination of both the User account and the Mailbox account. These two objects in the source connector spaces are now considered connectors, and any changes made to the source objects flow to the new joined object in the metaverse during subsequent synchronizations.
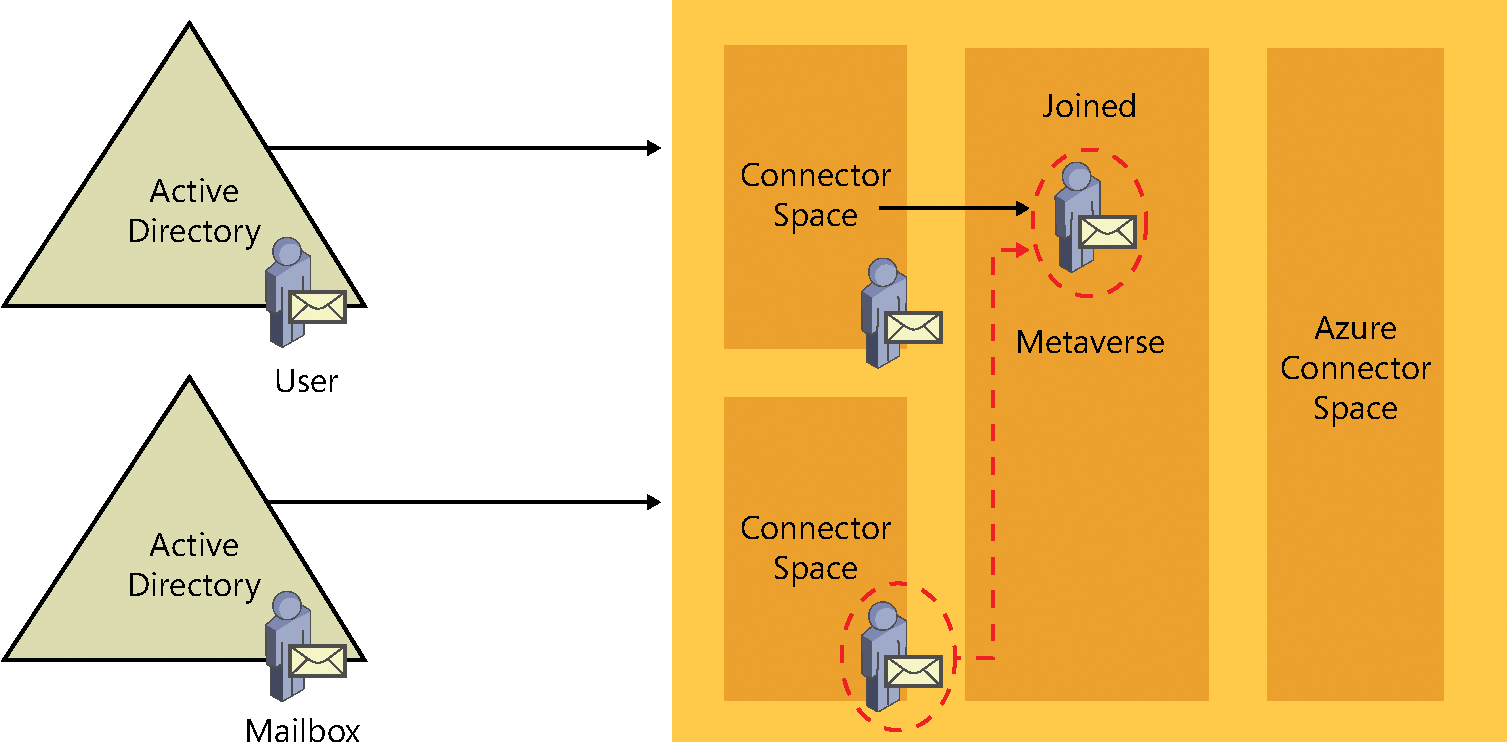
Figure 4-27 User and Mailbox objects joining in the metaverse
Finally, the new object (a combination of the two objects joined in the metaverse) is provisioned to the Azure connector space and staged for export to Office 365.
In Figure 4-28, the newly created object in the metaverse is projected into the Azure connector space for export to Azure Active Directory.
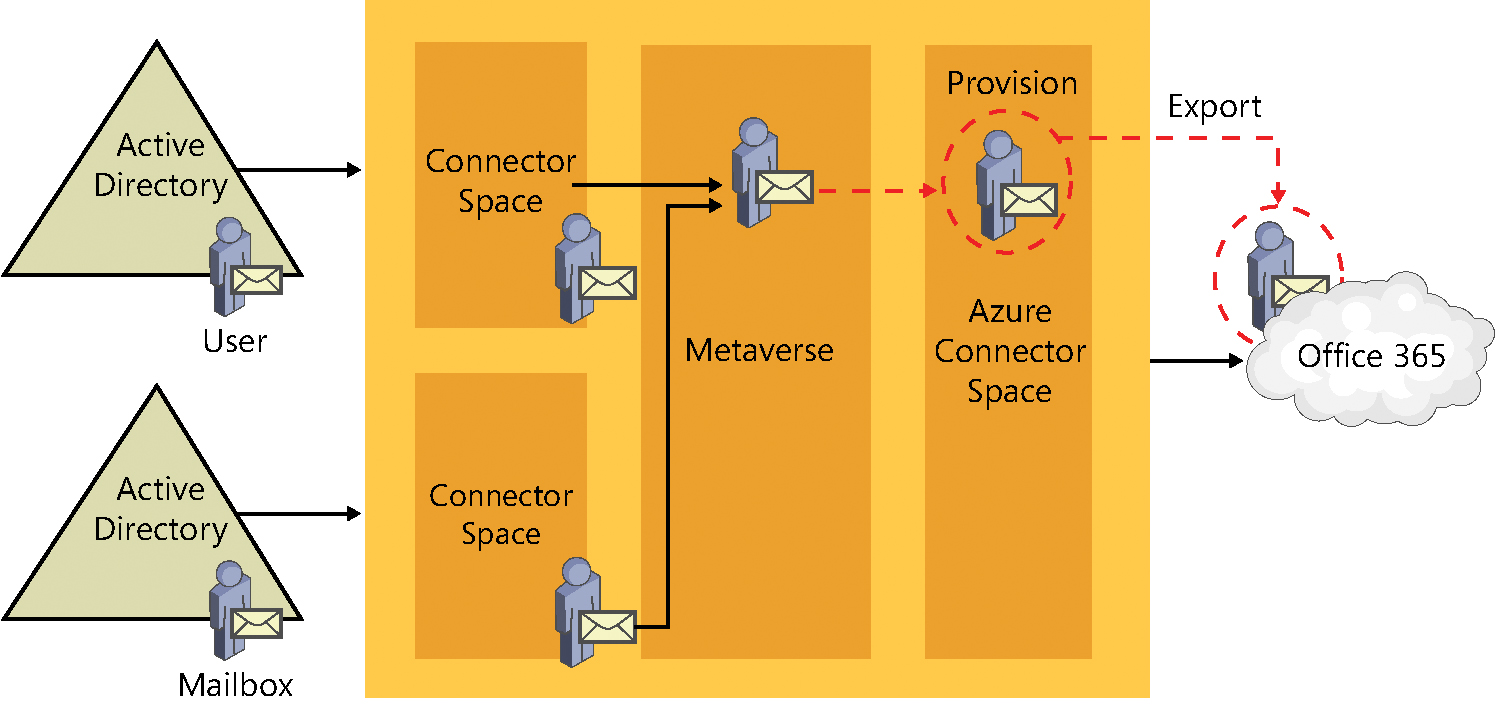
Figure 4-28 New object provisioned to Azure connector space
This oversimplification of the join process did not mention synchronization order or attributes.
- Synchronization order In the flow described previously, the User object was synchronized first. What happens if the Mailbox object is synchronized first instead?
- Attributes How do you configure where the Azure connector space object’s values come from?
Synchronization Order
The AAD Connect tool, as part of the normal out-of-the-box configuration that is created when you perform the installation and select the msExchMasterAccountSID and ObjectSID user-matching mode, automatically creates the necessary join rules that enable the User account and Mailbox to join. You don’t need to change anything; this happens automatically, provided you select the correct User Matching option during installation.
In addition, because the mailbox account in this scenario should be disabled, it adds additional logic to the configuration to ignore the fact that the object is disabled in Active Directory. Instead, it synchronizes the object as enabled by taking that value from the account forest after they join.
Finally, and most important, because the SourceAnchor (discussed in more detail in Chapter 5) for the object cannot come from the mailbox account, additional logic is added to the synchronization engine that prevents the object from synchronizing to Azure if it’s only the mailbox account and not yet joined with the user account.
Attributes
The logic behind the attributes that are populated on the newly provisioned object in the Azure connector space is a bit more complex; it is a combination of predefined behavior in the AAD Connect tool as part of the installation, but also defined by the precedence (covered in more detail in Chapter 5) assigned to the synchronization rules.
By default, when a mailbox-enabled object joins a user account, the values that are specific to the user account, such as UserPrincipalName, SourceAnchor, SecurityIdentifier (SID), and UserAccountControl (enabled or disabled), all come from the user account. Email-specific attributes, such as proxy addresses, TargetAddress, and Exchange recipient type, come from the resource account.
This flow of the obvious account-specific values is fairly straightforward and doesn’t require any special consideration on your part.
What do require special consideration are the values that are used for the account-agnostic attributes, such as First Name, Last Name, Display Name, Company, and Address.
In a typical resource forest configuration, the values for these account-agnostic attributes should be used from the resource (Mailbox) object because those values are visible to all other users in the Exchange global address list (GAL).
Normally, to maintain a consistent and seamless transition from an on-premises global address list to an Exchange Online global address list, you want the values from the mailbox to be visible on the object that is synchronized to Office 365, as shown in Figure 4-29.
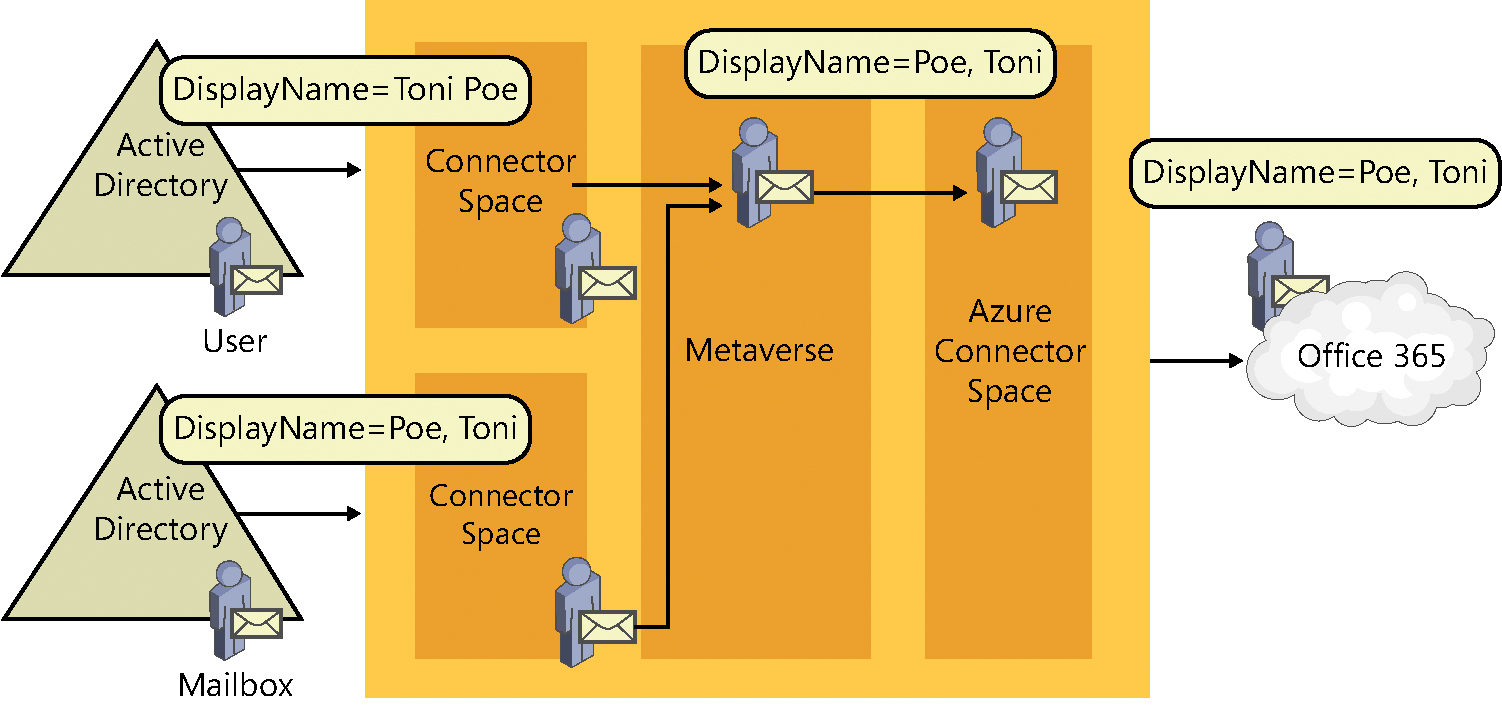
Figure 4-29 Mailbox-related attribute flow from resource forest
In the figure, the DisplayName attribute differs between the User object in the account forest and the Mailbox in the resource forest. The resource forest value for DisplayName is the value that is used on the newly joined metaverse object and flows out to Azure AD through the Azure connector space.
This attribute flow is defined by the order in which you add connectors to the AAD Connect configuration during the initial installation and affects a function of the synchronization referred to as precedence.
Depending on how precedence is configured, the objects that you synchronize to Office 365 could have different values than those visible in the on-premises global address list.
For example, your account forest data is maintained using a human resources (HR) system that populates things such as First Name and Last Name by using the legal first and last name of your users. Brian Albrecht, the user shown in Figure 4-30, appears in the account forest with his official first and last name.

Figure 4-30 Brian Albrecht user account forest properties
However, because Brian prefers to be called Tom (his middle name), the resource forest First Name and Display Name attributes are changed to reflect this preference, as shown in Figure 4-31.
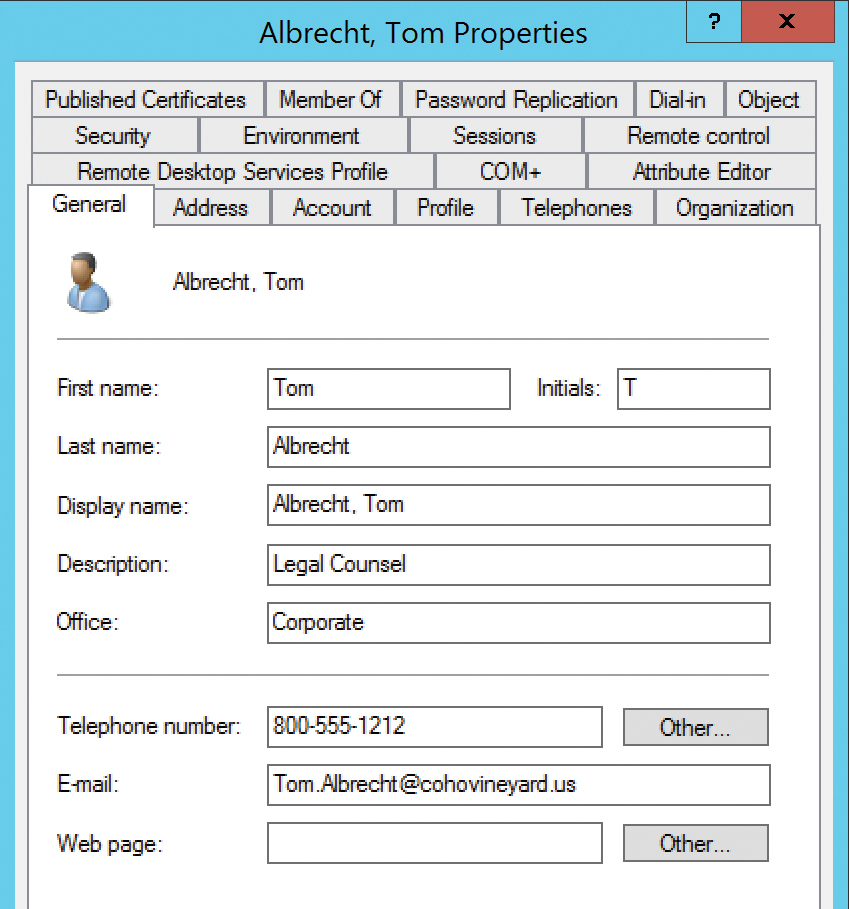
Figure 4-31 Tom Albrecht mailbox resource forest properties
Users can locate Tom in the GAL because the values in the resource forest directory are the values that appear when using Microsoft Outlook, as shown in Figure 4-32.
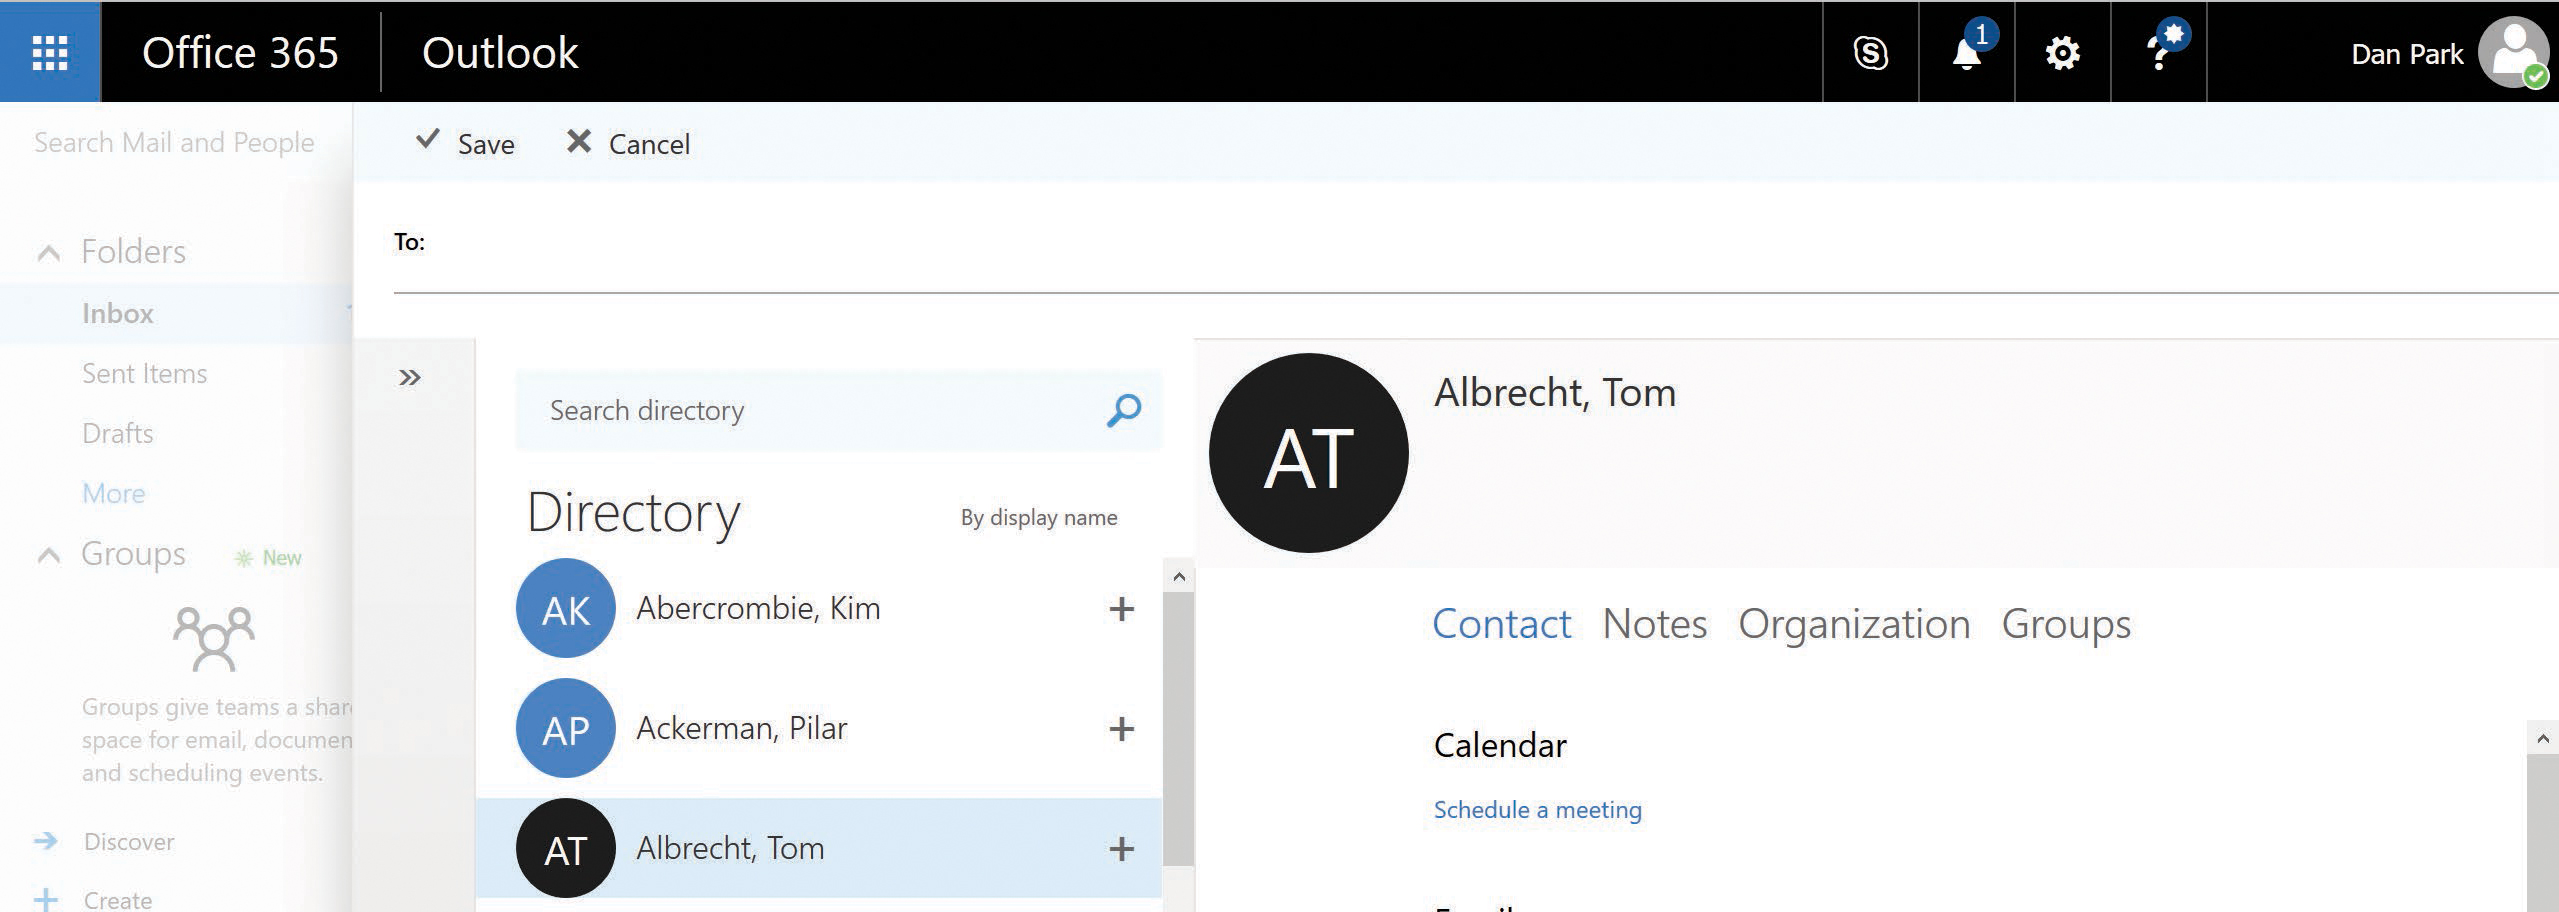
Figure 4-32 Locating a user in the Office 365 GAL
If the account forest values could flow to Azure when joining the user and resource accounts for Mr. Albrecht, the GAL in Exchange Online would show his legal first name, and the address book would look different to your users.
To correct this, the resource forest must be precedent (the winner) so that the correct values, those from the resource forest, are allowed to be the values populated in Azure.
Although the AAD Connect installation can handle the projection, provision, and join activities, you still must make important decisions that affect the Office 365 user experience, and they must be made before you start synchronizing your objects to Azure.
Managing directory synchronization enterprise-wide
Although you can manage the directory synchronization process by directly accessing the synchronization server, non-administrators can be granted access to monitor and manage health by using the Office 365 Admin Center portal. The AAD Connect health dashboard, as well as the Office 365 Admin Center portal home page, can provide additional information about the directory synchronization status.
AAD Connect health dashboard
One of the many additional features included in the AAD Premium license is the AAD Connect health dashboard. During the installation of the AAD Connect tool, discussed in detail in Chapter 5, the AAD Connect health agent is installed on the AAD Connect server and is automatically configured to send health and monitoring information to your Azure Active Directory tenant.
The AAD Connect health dashboard provides information about alerts, usage analytics, and other important information and shows you synchronization health information without needing to remote control your AAD Connect server. This enables you to maintain control over the AAD Connect server and its configuration, but still enables other administrators to view alerts and synchronization errors.
The AAD Connect health dashboard is located at https://aka.ms/aadconnecthealth.
As you can see in Figure 4-33, the AAD Connect health dashboard provides a view into your synchronization configuration, including things such as the number of servers, current alerts, export status, and even the length of time required for the last export to Azure (for example, 8.56 seconds) and even the last export time (such as 8:28 A.M.).
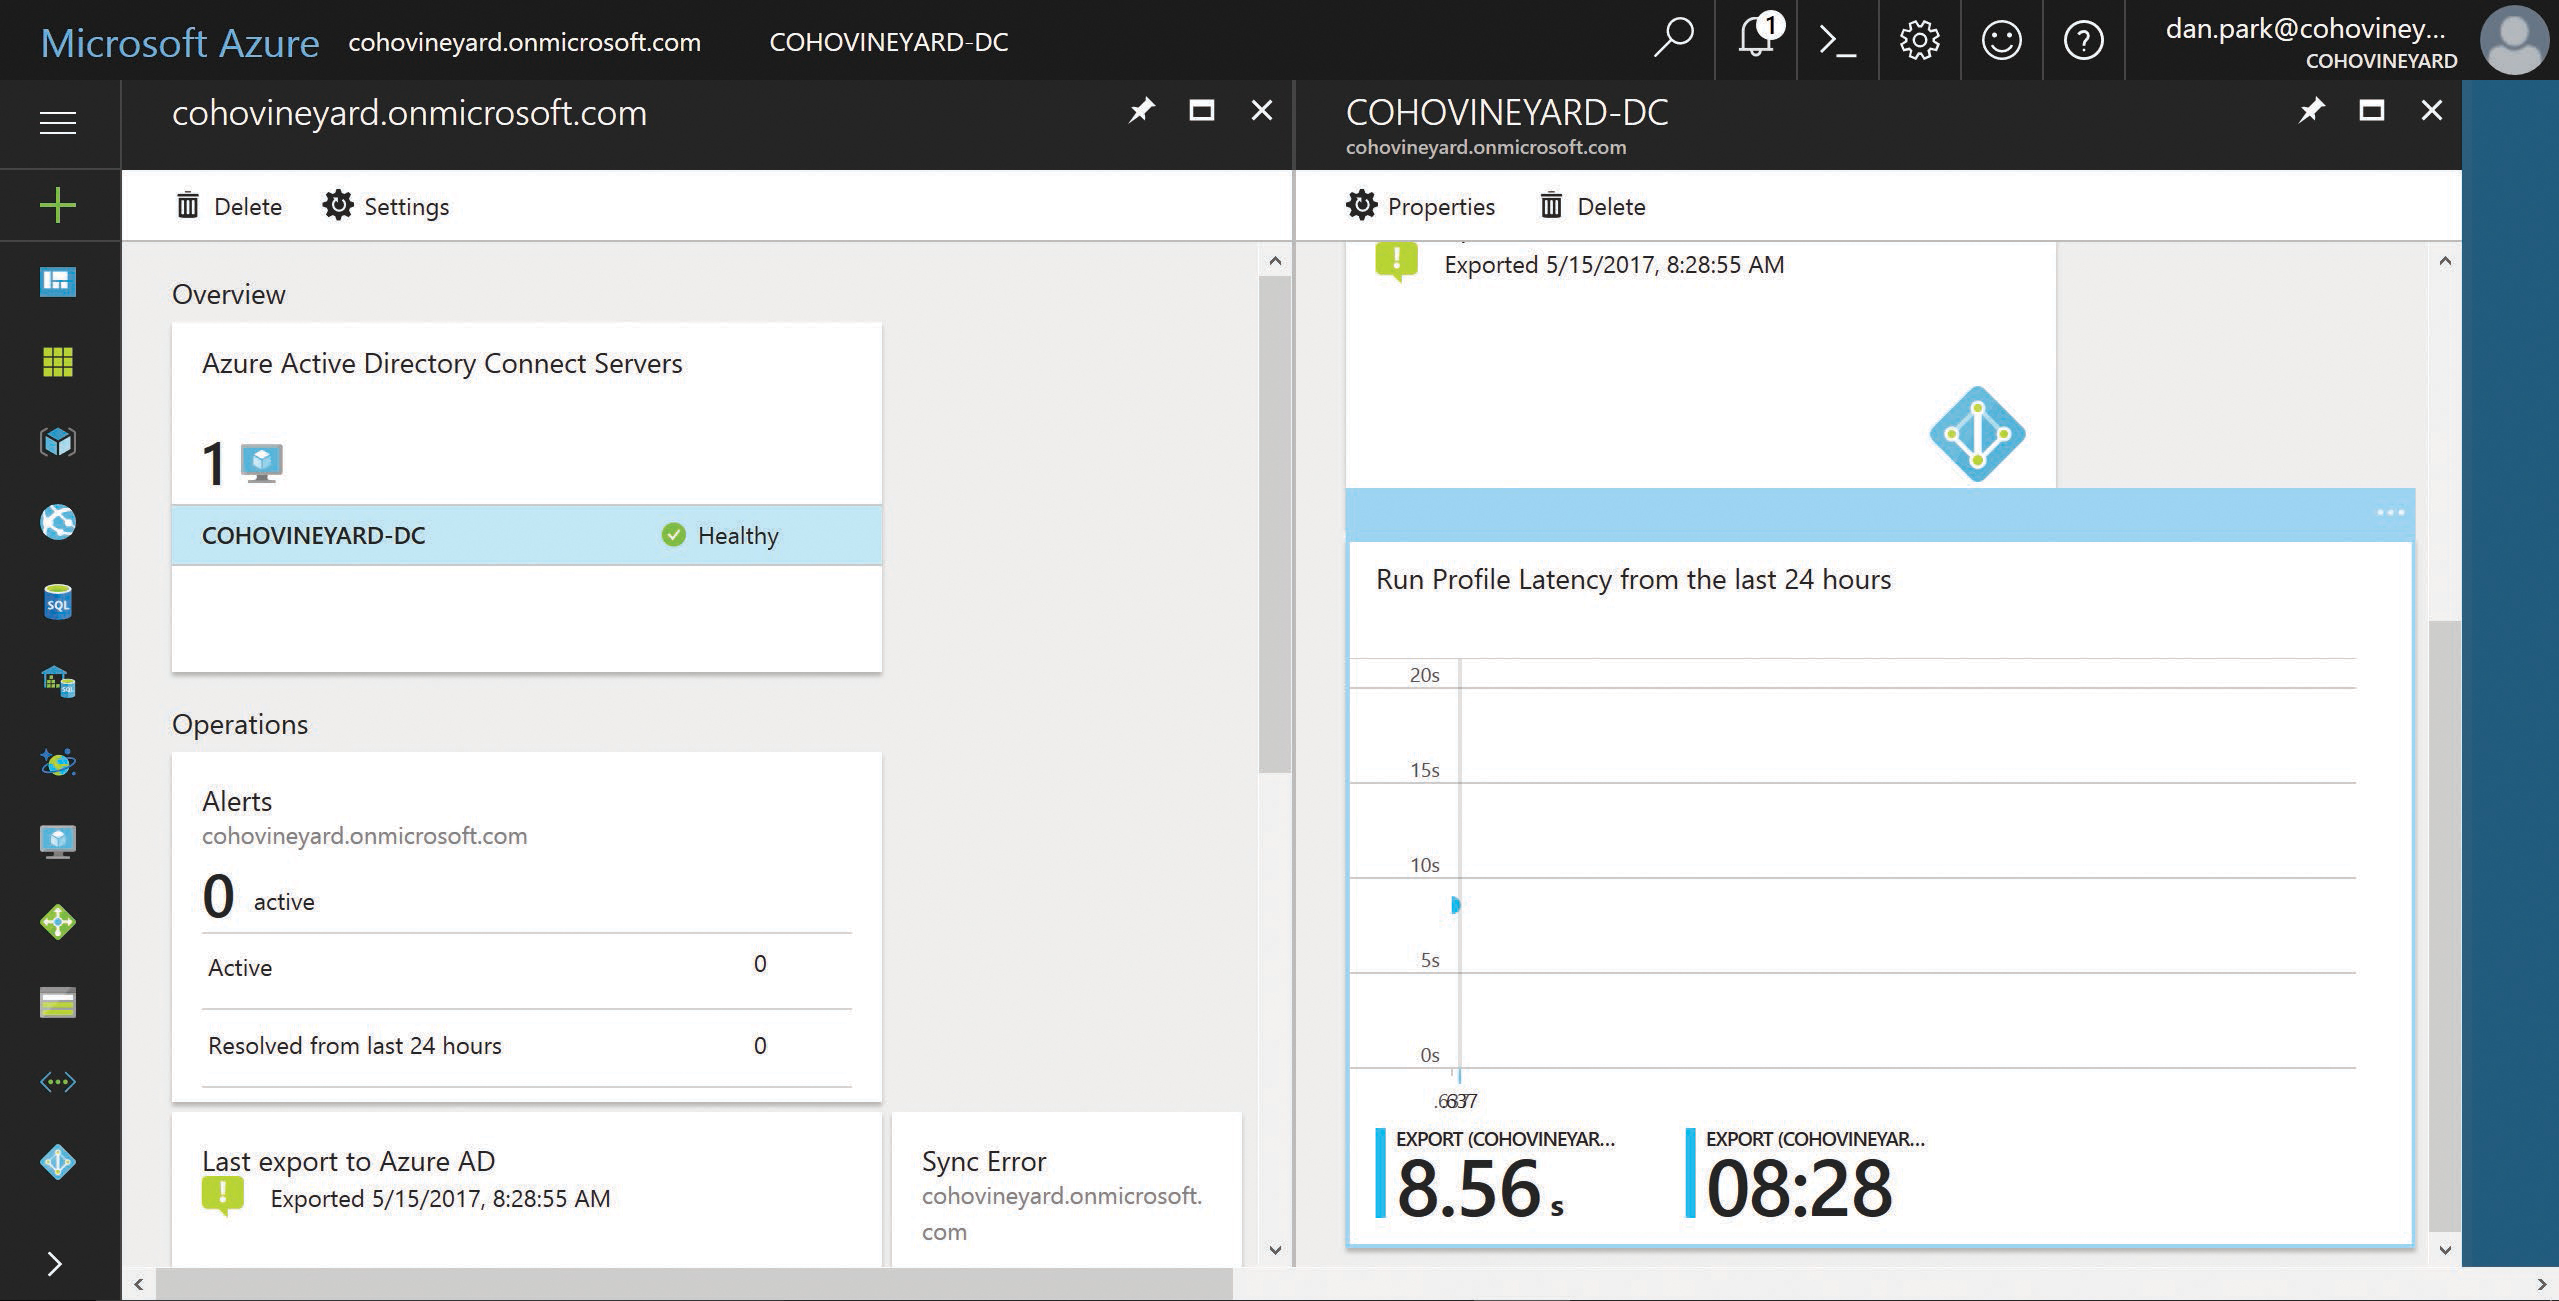
Figure 4-33 AAD Connect health dashboard
The AAD Connect health dashboard enables you to examine the errors that occurred during the last export to Azure by simply clicking the sync error count, and you can then review details about each type of error as well as a categorized view of the error types that were present during your synchronization. See Figure 4-34.

Figure 4-34 AAD Connect health Sync Error By Type
The sync error detail provided in the dashboard matches the data that is available in the AAD Connect synchronization statistics when viewing the Azure run profile, as shown in Figure 4-35.

Figure 4-35 AAD Connect server export error statistics
At this level of detail, the key differences between the AAD Connect health dashboard view and the AAD Connect server statistics is that administrators in the tenant can view this information by using AAD Connect Health without the need to log on to the AAD Connect server.
Limiting access to the AAD Connect server restricts access to the AAD Connect Synchronization Rules Editor, which is the power behind the AAD Connect server configuration. Any changes to the configuration, intentional or unintentional, can have significant impact on both the data synchronized to Azure AD and the length of time that synchronization requires. Providing other administrators or management with the ability to view this information without delegating control to the server’s configuration can be a valuable tool.
After you identify the synchronization errors grouped by type, you can then select each category and review those errors, as shown in Figure 4-36.
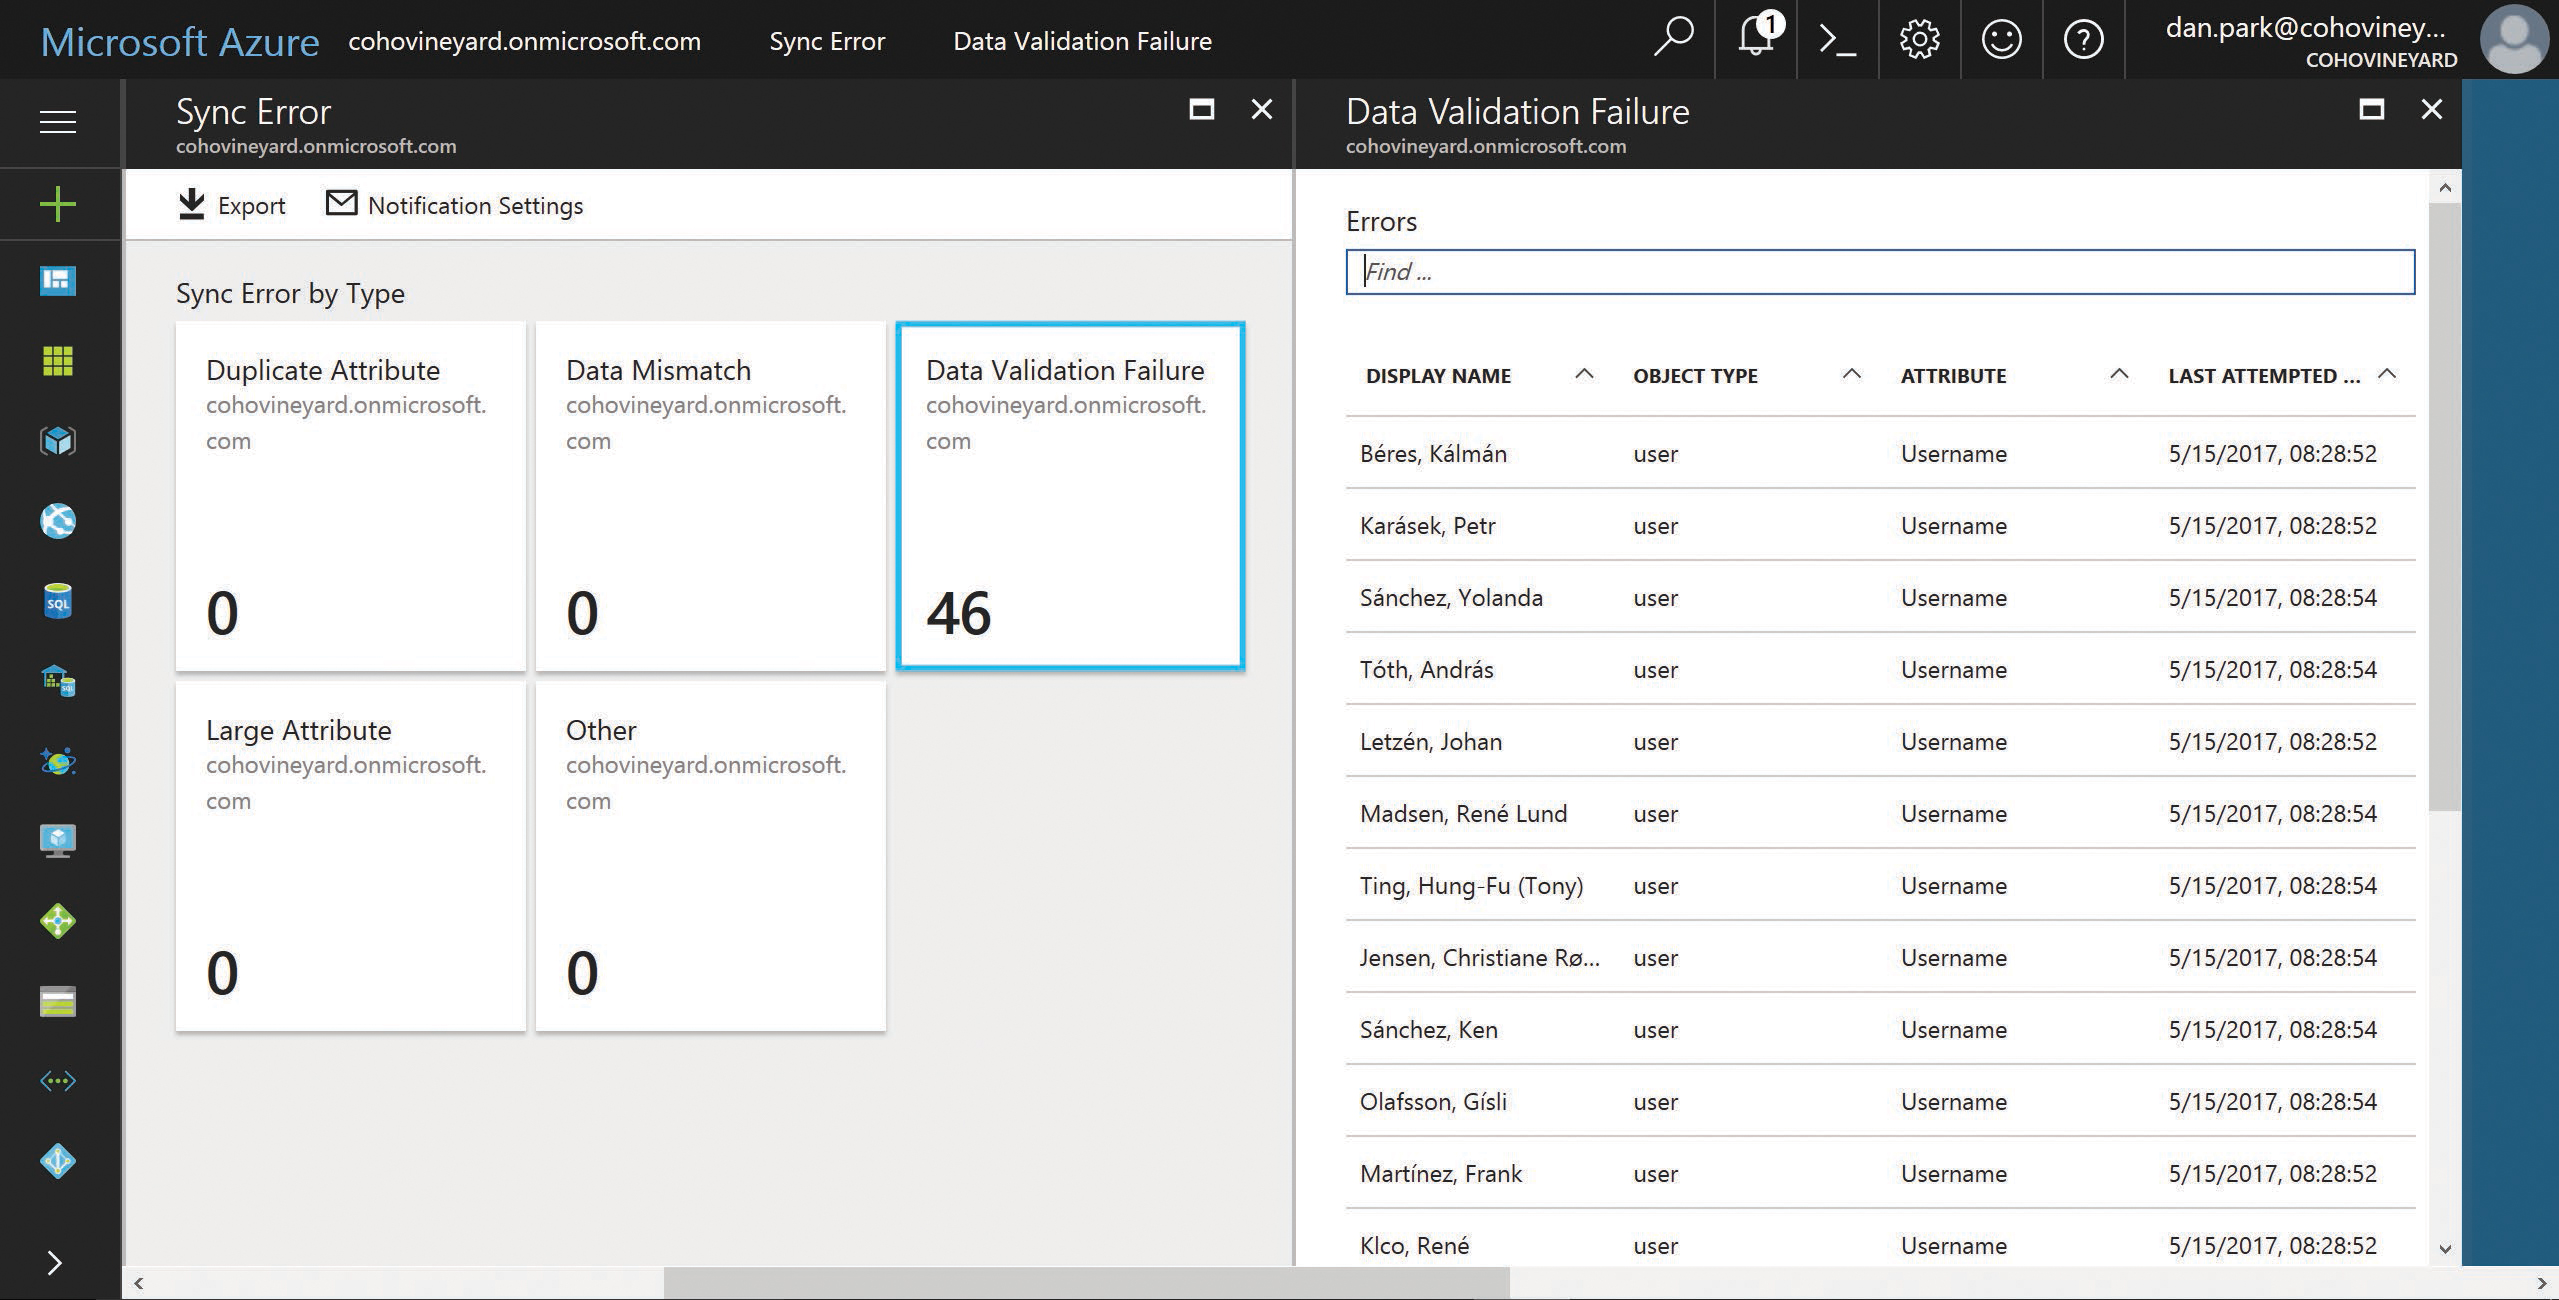
Figure 4-36 View of all errors in each sync error category
Each of the objects in an error state appears within the error category, along with the object type and the attribute that caused the validation failure.
As shown in Figure 4-37, viewing this same information in the AAD Connect synchronization manager would require you to click each object and select the Detail button to provide the error detail. This view does not provide the object type or actual object name, nor does it provide the detail in a single view like you find in the AAD Connect health service dashboard.
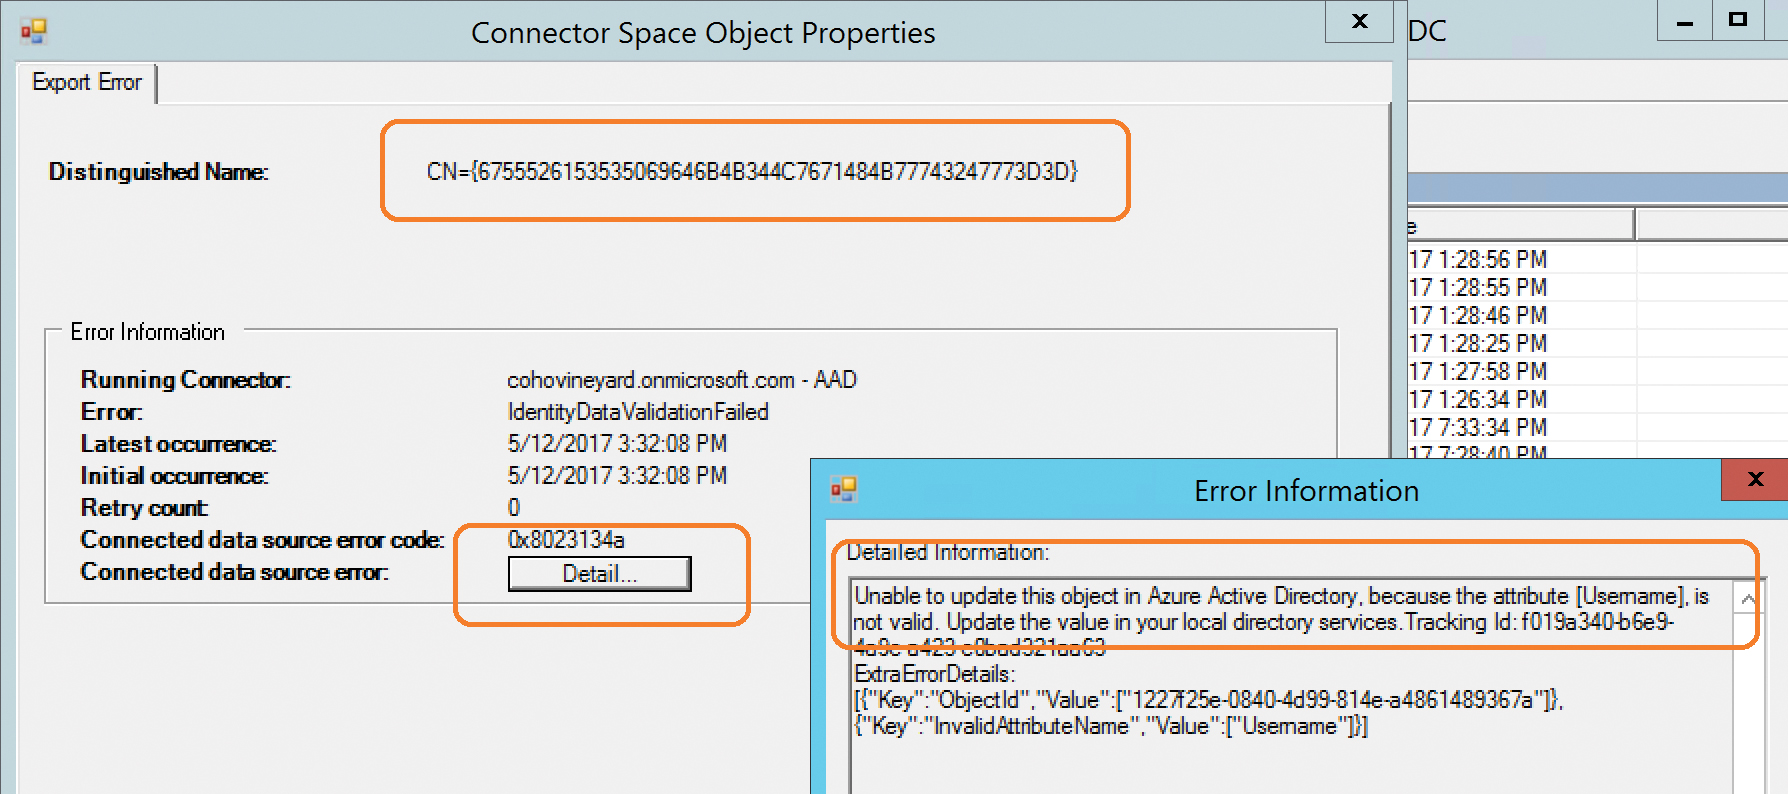
Figure 4-37 Reviewing individual errors by using AAD Connect
Finally, in addition to a detailed list of all the validation errors, you can click each object in the AAD Connect health dashboard view and see a description of the error, details about the error, and key attributes about the object in question to help make it easier to identify in your on-premises Active Directory. See Figure 4-38.
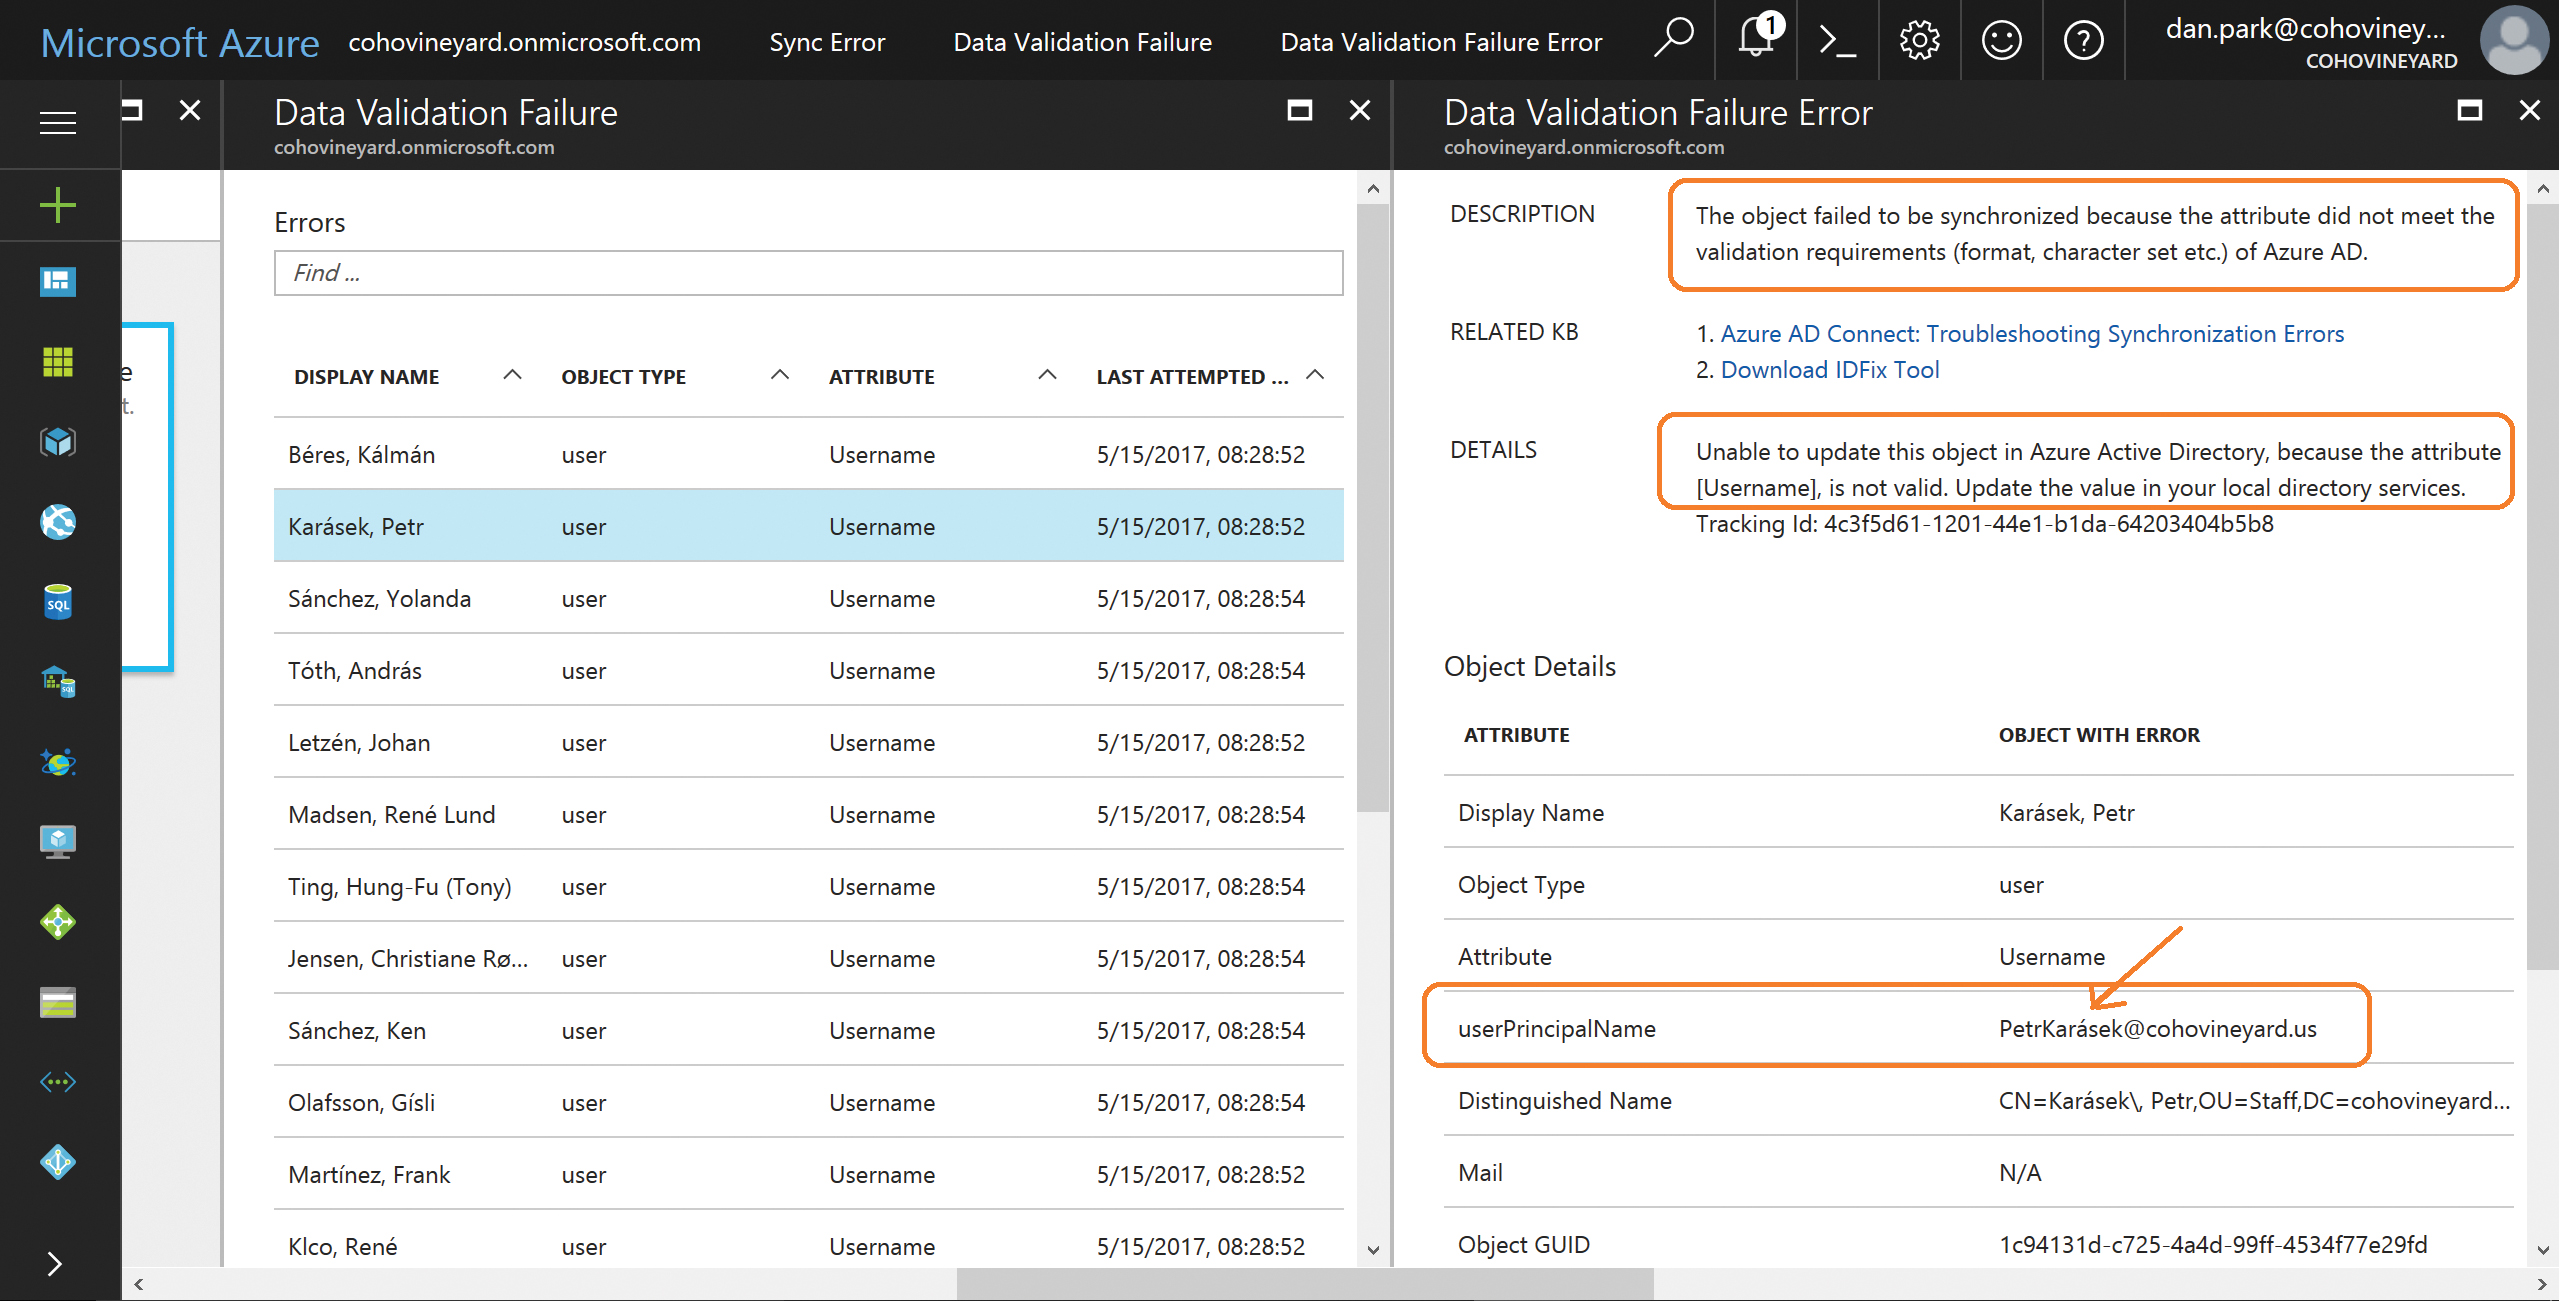
Figure 4-38 Viewing individual object details in the AAD Connect health dashboard
As the screenshot in the figure shows, the user name (UserPrincipalName) attribute contains invalid data, the diacritic above the letter A in the user’s UserPrincipalName.
You would then need to remediate the invalid data in your on-premises Active Directory before the object(s) would successfully synchronize to Azure AD.
Two additional features are available on the Sync Error page, Export and Notification Settings, as shown in Figure 4-39.
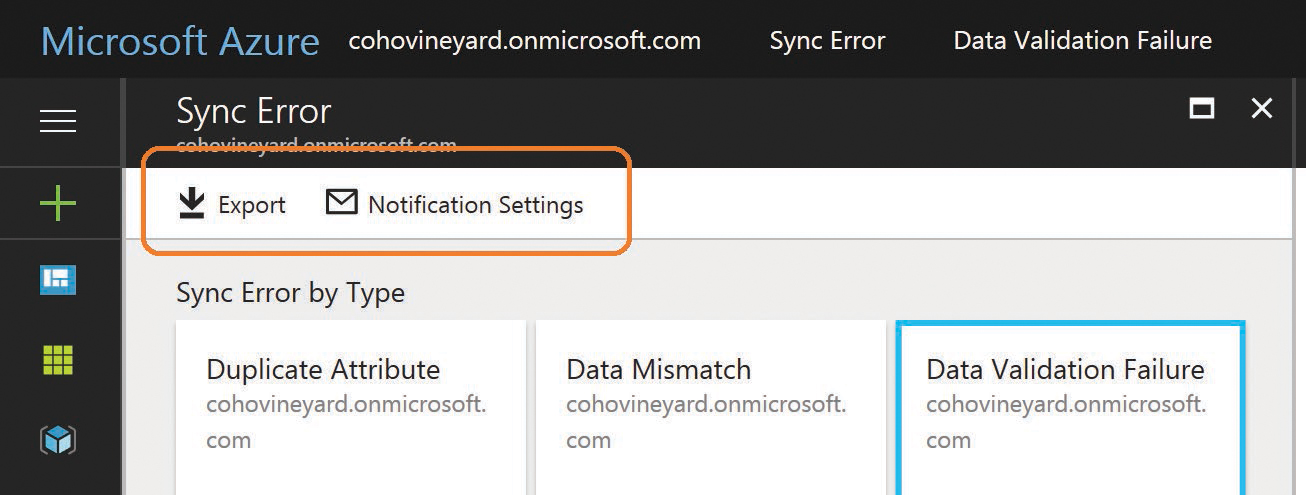
Figure 4-39 AAD Connect health dashboard Sync Error page with Export and Notification Settings
Export enables you to export all the export errors from every category into a comma-separated value (CSV) file that provides not only the error type and object type, but all the other data provided for each object when viewed individually in the dashboard.
Notification Settings enables you to define who should receive notifications from the AAD Connect health dashboard. You can specify that all global administrators in Office 365 receive notifications as well as provide the email address for other recipients.
It is recommended that when providing email addresses for other recipients, especially if you don’t select the option to notify global administrators, that you use the email address of a group. See Figure 4-40.

Figure 4-40 Notification settings in the AAD Connect health dashboard
Managing directory synchronization without AAD Connect health
As the preceding examples show, the AAD Connect health dashboard in Azure can be an invaluable tool in the management of directory synchronization to Office 365. It provides an aggregated view of all directory sync activities, errors, performance statistics, and status at a glance.
It is important to note, however, that the AAD Connect health dashboard requires an Azure AD Premium license for your users. Without the AAD Premium license, you still receive reports about object-level sync errors by email each time a synchronization occurs. These error reports and the technical notification email settings were explained earlier in this chapter.
Even without the AAD Connect health dashboard, you can still monitor your directory synchronization health for a large enterprise. It simply requires a bit more work on your part, and as discussed earlier, it requires access to your AAD Connect server.
The following explains how you would review and remediate synchronization errors by using the AAD Connect tool for the Coho Vineyard tenant.
First, you would rely on the technical notification email you receive from the tenant each time the AAD Connect synchronization process occurs. See Figure 4-41.
These synchronizations occur every 30 minutes, so if you’re not receiving any emails, and you are confident you have errors, start by configuring the technical contact for your tenant.
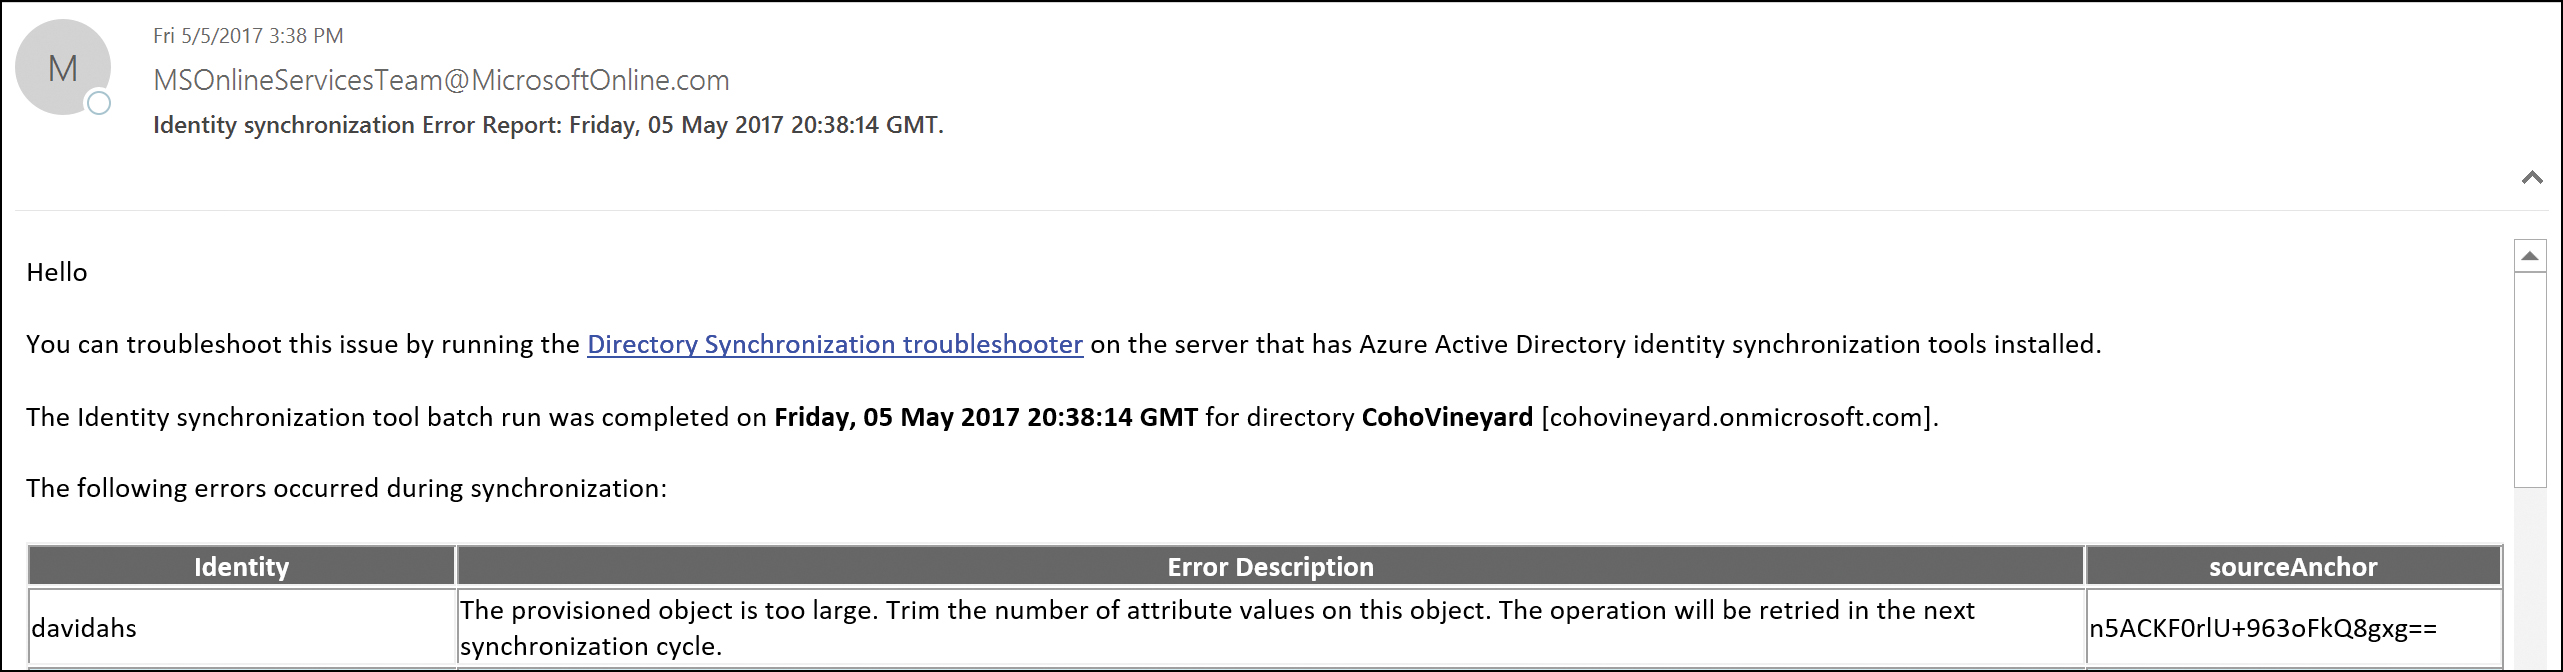
Figure 4-41 Directory synchronization error report
When you receive the synchronization error report from the tenant, as shown in Figure 4-41, identify the object in an error state and then log on to your AAD Connect server and perform the following steps.
- Launch the Synchronization service and select Metaverse Search, as shown in Figure 4-42.
Figure 4-42 The Metaverse Search option
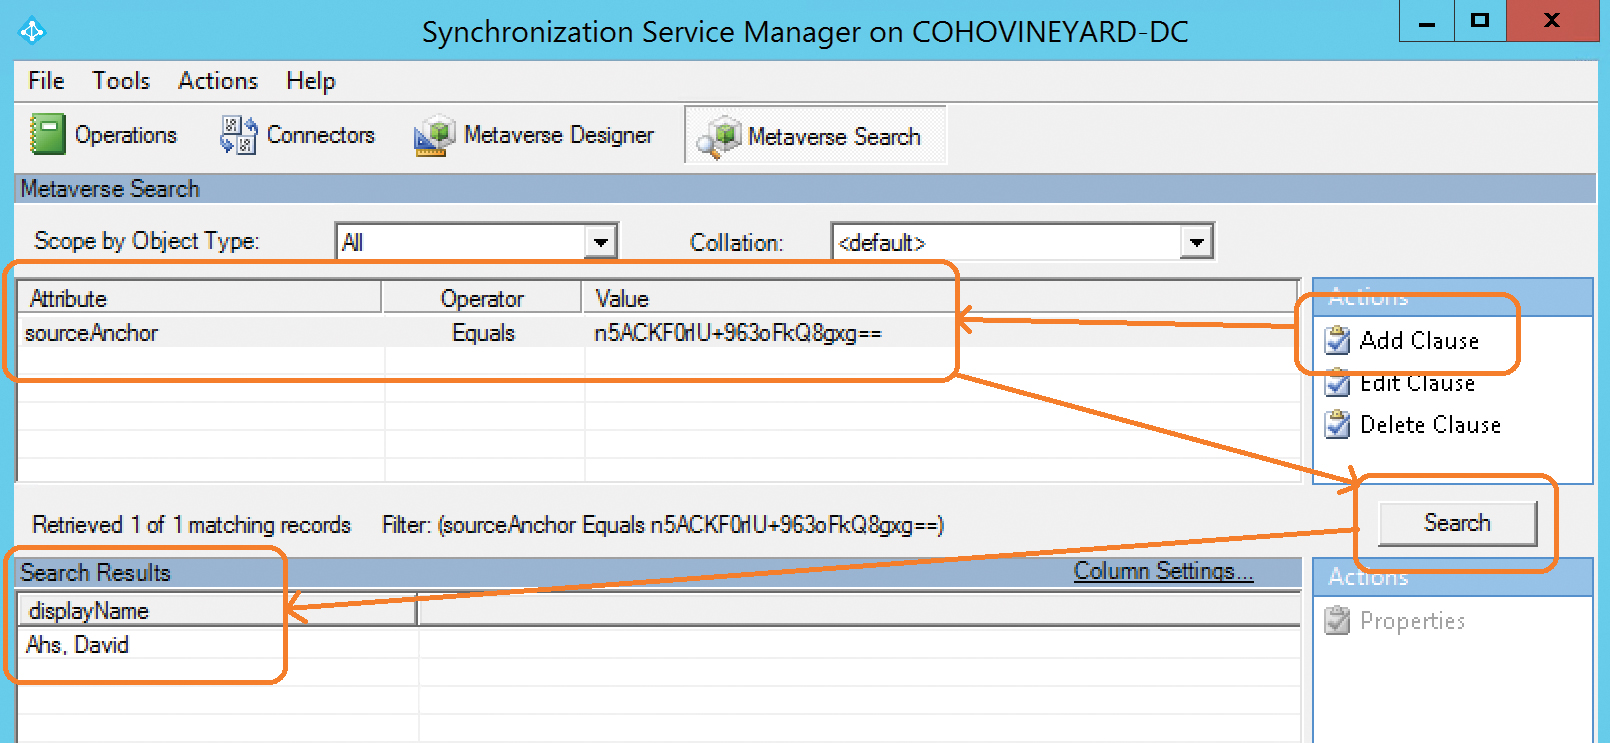
- Use the SourceAnchor value from the email error report to select Add Clause on the right side of the screen in the Actions pane. Select the SourceAnchor attribute in the Attribute drop-down list on the left. Leave the Operator drop-down list set to Equals and paste the SourceAnchor from the email report into the Value field and click Search on the right.
As shown in Figure 4-43, the search results page should return the object that is causing an error.
Figure 4-43 Searching the AAD Connect metaverse
- When you have located the object, you can double-click it in the Search Results view to display all the properties of the object.
The Metaverse view, however, will not tell you what the problem is.
- Instead, click the Connectors tab and select the Azure connector to view the properties of the Azure object that is failing export, shown in Figure 4-44.
Figure 4-44 Metaverse object with connectors
The Azure connector contains most of the attributes found in the metaverse; however, it is not clear from the connector space object alone what the cause of the error is, and selecting the Details button on the Export Error tab only provides similar information to that found in the error email report. See Figure 4-45.
Figure 4-45 Export Error tab details in the Azure connector space
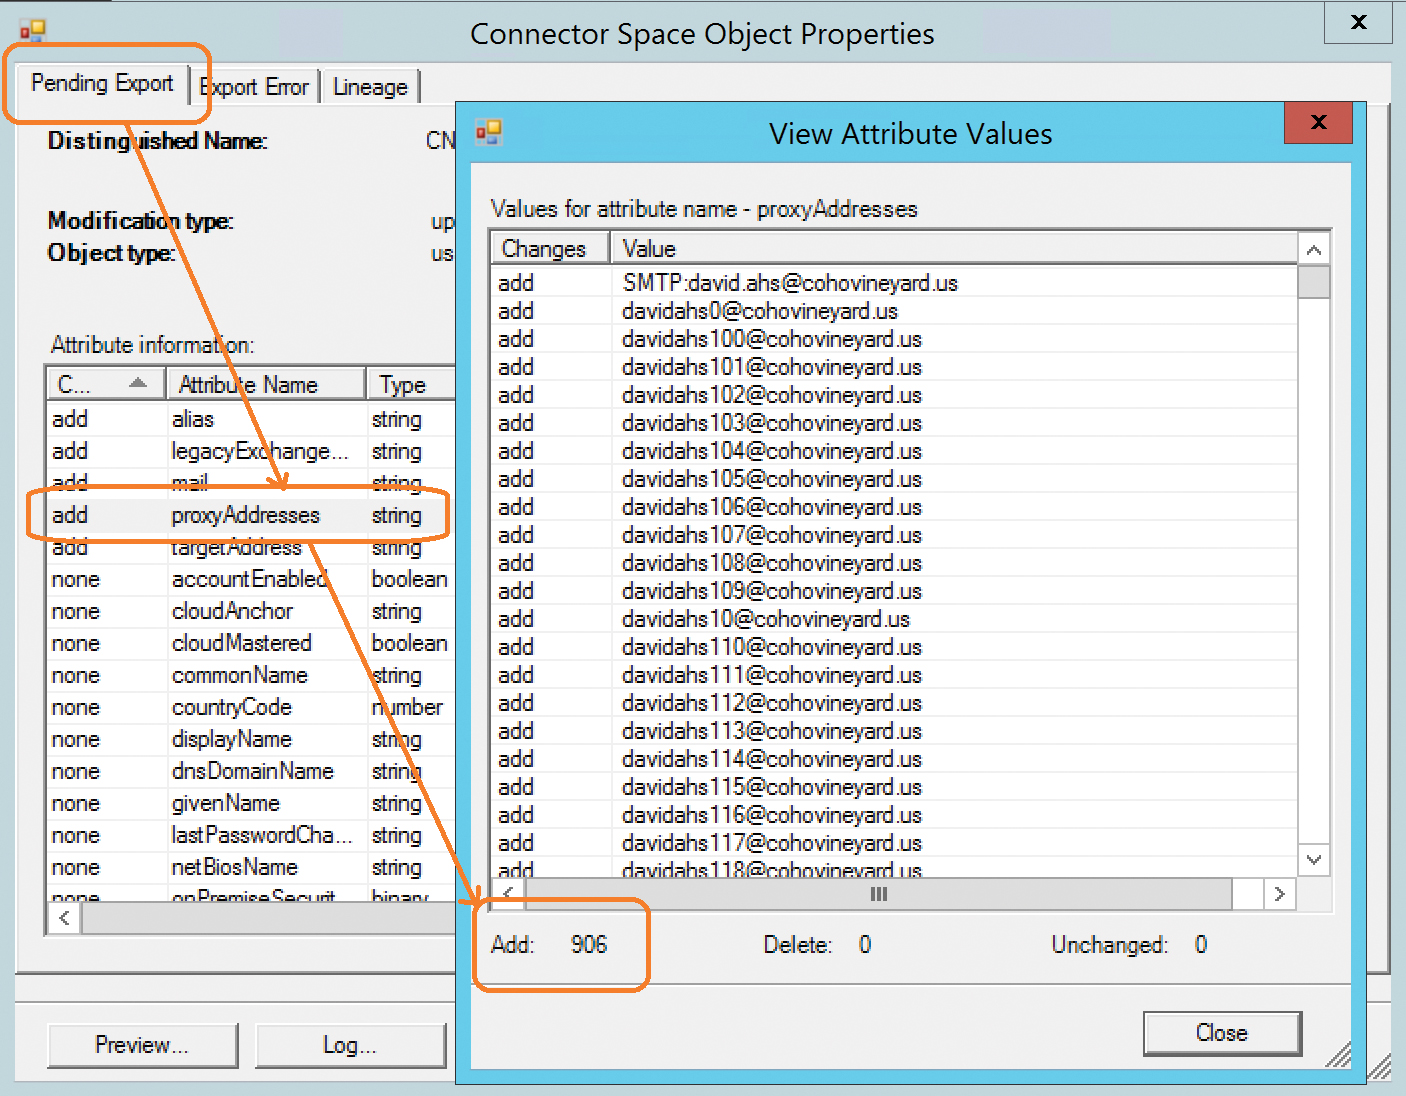
In this case, the object-too-large error refers to the ProxyAddresses attribute, shown in Figure 4-46.
Figure 4-46 Viewing the ProxyAddresses attribute on the Pending Export tab
- Clicking the Pending Export tab for the object and selecting the ProxyAddresses array shows that you are trying to export a user to Azure with 906 email addresses. The limit for proxy addresses on an object in Exchange Online is 500.


Removing excessive email addresses or, in the case of a group or shared account, moving them to another object in on-premises Active Directory clears the error for this object and allows it to export successfully to Office 365.
Interpreting the directory synchronization status
Some errors, such as diacritics in the UserPrincipalName, are relatively easy to identify in the error reports, whereas others such as the object-too-large error don’t provide all the necessary details to remediate the root cause quickly.
As the Office 365 service and the AAD Connect synchronization engine evolve, additional reporting mechanisms are added to help make the troubleshooting and remediation processes easier, so it is important to upgrade your implementation, not only for improvements in sync reporting but also in the synchronization process itself as new versions of the AAD Connect synchronization tool are released.
As each new version of AAD Connect is released, new features are added that improve the speed of synchronization, error reporting, and integration of other service-wide features such as pass-through authentication and group writeback.
You can find the AAD Connect version release history at http://aka.ms/aad-versions.
Summary
As you can see, the directory synchronization process can be quite complicated when it comes to syncing different objects as well as objects from multiple directories. The concepts covered in this chapter should help you identify many of the common problems that could result from an improper implementation of the directory synchronization process or errors that may result from bad data in your directories. The next chapter discusses the installation of the AAD Connect synchronization tool in detail as well as demonstrates several options to help remediate some of the most common issues encountered when configuring directory synchronization.