Chapter 12. Mailbox Migration Types
Chapter 10, “Preparing an On-Premises Environment to Connect to Exchange Online,” discussed the foundation for Exchange Online tenants and covered service descriptions, domain and organization configuration, mail routing, and basic hybrid concepts. Chapter 11, “Understanding the Office 365 Resource Types,” covered the key Exchange Online Recipient types. This chapter covers the three main types of migration available to Office 365 Exchange Online customers: cutover, staged, and express. Exchange full hybrid configuration and migrations are covered in Chapter 13, “Exchange Online Hybrid.”
Cutover, staged, and IMAP migration types haven’t changed much in many years, except for a newer user interface a few years ago, and migration batch commands to help manage large groups. IMAP migration is not covered because this chapter is focusing on the primary methods used to migrate to Exchange Online, and IMAP migration is limited to mail only. You can find a guide for IMAP migrations at https://support.office.com/en-us/article/Migrate-other-types-of-IMAP-mailboxes-to-Office-365-58890ccd-ce5e-4d94-be75-560a3b70a706?ui=en-US&rs=en-US&ad=US.
Migration decision process and key concepts
A key decision point for mailbox migrations is which option to choose to have a balance between the speed of using Office 365 as a service and user satisfaction due to mailbox resynchronization issues. To help illustrate the decision process, see Table 12.1.
Table 12.1 Migration options based on Exchange versions and coexistence state in the customer topology
Exchange Version |
Cutover |
Staged |
Express, Minimal, or Full Hybrid |
Exchange Server 2003 Exchange Server 2007 |
Available if fewer than 2000 users |
Available, recommended if not deploying a newer version of Exchange |
Not available |
Exchange Server 2003 Exchange Server 2007 Exchange2010 |
Available, not recommended |
Not available |
Available, recommended |
Exchange Server 2007 Exchange 2010 Exchange 2013 |
Available, not recommended |
Not available |
Available, recommended |
Exchange 2010 Exchange2013 Exchange2016 |
Available, not recommended |
Not available |
Available, recommended |
There are three key recommendations to understand.
- Available, recommended This version of Exchange and the migration options work and are recommended as the solution. Caveats such as user count limitations might be listed.
- Available, not recommended This version of Exchange and the migration options would work but result in poor user experience and are therefore not recommended.
- Not available This option is blocked by the migration tool set or does not work.
Each migration type explains the considerations regarding the limitations of that migration type, usually related to the Microsoft Outlook resynchronization Offline Storage Folder (OST) process, new Outlook profile configuration, or lack of data migration in an IMAP case when it is mail only.
One of the key concepts after considering the migration method is how the migration will be managed. The two methods available are browser-based access, using the Office 365 Admin Center and the Exchange Admin Center, or using Windows PowerShell to connect to Exchange Online. (The two ways to connect to Exchange Online follow.) The older method does not enable users who have multifactor authentication configured to function properly; the newer connection option is specifically designed to use the Azure Active Directory Authentication Library (ADAL) to connect and use multifactor authentication.
Each migration method can be executed either through a web browser using the Exchange Admin Center or by using Windows PowerShell. The following commands are referred to and reused in each of the subsequent Windows PowerShell migration method sections. Windows PowerShell has two methods of connecting to Exchange Online, one without multifactor authentication and one with multifactor authentication.
Connecting to Exchange Online with Windows PowerShell uses basic authentication if you aren’t using multifactor authentication. For minimum operating system and .NET requirements, refer to https://technet.microsoft.com/en-us/library/jj984289(v=exchg.160).aspx.
Launch Windows PowerShell as administrator and type the following commands:
$Credentials = Get-Credential
$Session = New-PSSession -ConfigurationName Microsoft.Exchange -ConnectionUri https://outlook.office365.com/powershell-liveid/ -Credential $UserCredential -Authentication Basic -AllowRedirection
Import-PSSession $Session
When prompted in the Windows PowerShell Credential Request dialog box, type the user principal name to save the credentials for the connection (for example, [email protected]) in the user name box and then type the appropriate password.
To close the session properly, use Remove-PSSession:
Remove-PSSession $Session
For minimum operating system and .NET requirements when connecting to Exchange Online with Windows PowerShell and multifactor authentication, refer to https://technet.microsoft.com/en-us/library/mt775114(v=exchg.160).aspx.
To install the Microsoft Exchange Online PowerShell module that supports multifactor authentication, follow these steps.
- Launch a browser and connect to portal.office.com.
- Navigate to the Exchange Admin Center.
- On the left side, select Hybrid.
- Below The Exchange Online PowerShell Module Supports Multi-Factor Authentication, click Configure to download the specific module that contains the proper authentication libraries that support multifactor authentication. Download and then install the module.
- After this module is downloaded and installed, launch the module from the Start menu by navigating to Microsoft Corporation | Microsoft Exchange Online PowerShell Module.
This launches a Windows PowerShell module with the multifactor libraries for Exchange Online PowerShell ready to connect using multifactor authentication.
- To connect to Exchange Online, use the following command.
Connect-EXOPSSession -UserPrincipalName [email protected]
- To close the session properly, use Remove-PSSession.
Remove-PSSession $Session
When the connection starts, the Microsoft Exchange Online PowerShell dialog box launches with the user name that was provided in the User Principal Name string of the Connect-EXOPSession command. Type the password for that account. If multifactor authentication (MFA) is enforced on the account, the second factor of authentication by authentication application prompts for permission, for a series of digits as a verification code sent to an email account, or as a text message to a mobile phone. After this second factor of authentication is verified, the Windows PowerShell connection is complete.
The second key concept to understand while using the built-in Exchange Online migration tools is the concept of migration endpoints. Migration endpoints are a group of settings that are configured either before or during the start of the migration process. They can be configured by using a browser or with Exchange Online PowerShell. Each migration option is discussed later in this chapter, which covers how to create the Windows PowerShell endpoints specific to their migration type if they aren’t created automatically. Two of the settings that can be tuned to increase migration velocity are MaxConcurrentMigrations and MaxConcurrentIncrementalSyncs. The definitions of these parameters appear as follows.
- “MaxConcurrentMigrations parameter specifies the maximum number of mailboxes that will be migrated for this endpoint at a specified time.”
- “The MaxConcurrentIncrementalSyncs parameter specifies the maximum number of incremental syncs allowed for this endpoint at a specified time. This value must be less or equal to MaxConcurrentMigrations parameter.”
Currently, the MaxConcurrentMigrations per migration type per tenant is limited to 300 connections. This means 300 Remote, 300 Outlook Anywhere, and 300 IMAP MaxConcurrentMigrations connections are available in a single tenant. Most customers do not have a mixed set of endpoint types, but it is possible. When configured through the Office 365 Admin portal or the Exchange Admin Center, the normal default settings are 20 for MaxConcurrentMigrations and 10 for MaxConcurrentIncrementalSyncs, for example, when using express migration. For smaller customers, these numbers normally work out well and provide a balance between migration speeds and the amount of traffic on the on-premises network or environment. These numbers can be modified to increase concurrency, through either the Exchange Admin Center or Exchange Online PowerShell; however, performance should be carefully monitored so that the existing on-premises environment is not compromised. Be careful with the MaxConcurrentIncrementalSyncs parameter; if that number is too close or matches MaxConcurrentMigrations, the source environment and network will likely have performance-related issues. The maximum of 300 per type of connection does provide configuration flexibility. For example, if a European endpoint and a U.S. endpoint were needed for migrations, each endpoint could have 150 connections.
Cutover Exchange migrations
The cutover migration process is designed for customers with the following criteria.
- Up to a maximum of 2000 users
- Have not deployed Azure AD Connect for directory synchronization
- Are using Microsoft Exchange 2003 or Exchange 2007 without later versions of Exchange in their environments
Although cutover migrations can also be used for later versions of Exchange (Exchange 2010, Exchange 2013, and Exchange 2016), the newer express hybrid option, covered later in the “Express Migrations” section, offers the user and administrator a much better experience and is highly recommended over cutover migration due to the limitations. If the customer has deployed Azure Active Directory Connect (AAD Connect) and synchronized the directory at least once, cutover migration will be blocked in the Exchange Admin Center as a migration option. The customer then must choose a staged migration if Exchange Server 2003 or Exchange Server 2007 is the source; the best choice would be to use Exchange Express or full hybrid Exchange migration with Exchange 2010 and later versions.
Cutover Exchange migrations can be achieved by two methods; one is through the Exchange Admin Center (EAC), and the second is through Windows PowerShell when connected to Exchange Online. The key limitations and considerations of Exchange cutover migrations are that:
- You must have fewer than 2000 users for Exchange Server 2003, Exchange Server 2007, Exchange 2010, Exchange 2103, and Exchange 2016, although better methods are available for Exchange 2010 and later (see the “Express Migrations” section).
- All domains must be registered in Office 365.
- Directory synchronization by AAD Connect must be disabled. If this is enabled by accident, it can be disabled but is a significant amount of work for the customer. Explore staged migration if AAD Connect has been enabled.
- The Offline Storage Folder (OST) signature is not preserved. This means the entire mailbox must be downloaded post-migration.
- Administrators need to provide users with passwords to their mailboxes post-migration.
- Client-side rules and customizations are not migrated. Outlook profiles need to be re-created and are not updated.
- Additional objects or scenarios not migrated are security groups, dynamic distribution lists, system mailboxes, Dumpster, send-as permissions, and messages larger than 150 MB.
- The account performing the migration must have, at minimum, Receive-As permission to the mailbox; full access to the mailbox is preferred.
Cutover Exchange migration requirements
The requirements for performing a cutover migration are as follows and apply to both the Exchange Admin Center and Windows PowerShell methods.
- You must have administrative access to Office 365, global administrator account. This account enables the administrator to perform the license process and migration process.
- Outlook Anywhere must be configured and publicly accessible with a third-party SSL certificate. Depending on the source version of Exchange and what is already accessible on the Internet, some additional work might be needed for the cutover endpoint process to function.
- You must add and verify domains in Office 365. For in-depth information about adding domains, (see Chapter 2, “Preparing Your Environment for the Cloud.”
- Prepare for Mail Exchange (MX) and Autodiscover cutover when migration is complete.
- Disable Unified Messaging on source mailboxes.
- Pre-stage security groups if the desire is to have mail-enabled security groups; otherwise, the default is to have distribution groups.
Cutover using Exchange Admin Center (EAC)
A global administrator logged on to the customer tenant performs the following steps by using the Edge or Internet Explorer browser.
- Launch https://portal.office.com and log on with the global administrator account. Select the Admin tile from the Office 365 app launcher.
- Navigate to the Exchange Admin Center, using the Admin Centers shortcut in the lower left pane of the Office 365 portal.
- In the Exchange Admin Center, select Recipients | Migration.
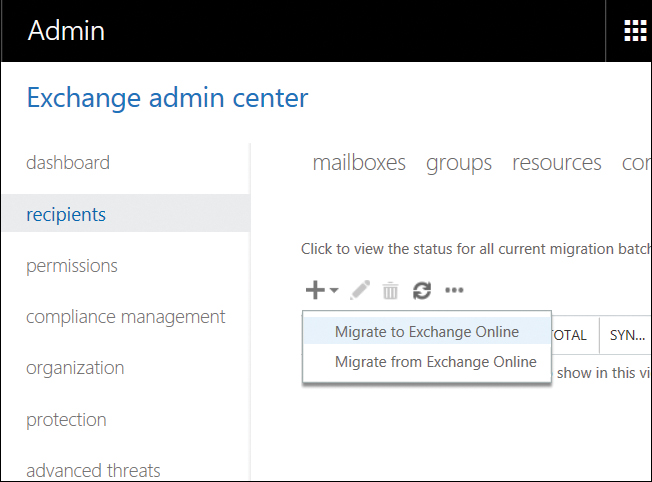
- Click + and choose Migrate To Exchange Online, as shown in Figure 12-1.
This launches the New Migration Batch Wizard.
Figure 12-1 Exchange Admin Center migration console
- Select Cutover Migration and click Next, as shown in Figure 12-2.
Figure 12-2 New Migration Batch Wizard page, Cutover Migration selected
- On the Enter On-Premises Account Credentials page, type in the email address, domain nameuser name, and password for the on-premises administrative account that has access to the mailboxes and then click Next, as shown in Figure 12-3.
This page configures the migration endpoint automatically, using the Autodiscover process with the email address and account information provided.
Figure 12-3 The Enter On-Premises Account Credentials page
- If the automatic configuration fails, see the example and troubleshooting section shown in Figure 12-4.
Automatic configuration uses the email address, privileged domain account, and password of the account in an attempt to detect the Outlook Anywhere configuration automatically and create a migration endpoint. Normally when automatic configuration fails, it is due to an Autodiscover lookup or the Outlook Anywhere configuration. Use the Troubleshooting tip for additional assistance.
Figure 12-4 New Migration Batch page with failed automatic endpoint creation


- Use the Microsoft Remote Connectivity Analyzer at https://testconnectivity.microsoft.com/ to verify Outlook connectivity. On the Exchange Server tab, in the Microsoft Office Outlook Connectivity Tests section, choose Outlook Connectivity, click Next, and follow the directions.
A successful test provides you with the necessary information to fill in the Exchange Server, RPC Proxy Server, and Authentication boxes. The Exchange administrator must determine the mailbox permissions.
- In the Exchange Server box, type the fully qualified domain name (FQDN) for the on-premises Exchange server.
This is the host name for your mailbox server, for example, EXCH-SRV-01.corp.contoso.com.
- In the RPC Proxy Server box, type the FQDN for the RPC proxy server for Outlook Anywhere.
Typically, the proxy server address is the same as the address of your Outlook Web App URL. For example, mail.contoso.com is also the URL for the proxy server that Outlook uses to connect to an Exchange server.
- Use Windows PowerShell to connect to Exchange Online and execute the test migration end sequence.
Please review the section earlier in the chapter, titled “Migration Decision Process and Key Concepts,” which discusses connecting to Exchange Online with Windows PowerShell.
This is useful only if you know your endpoints from the previous step or can pull them from the Exchange server.
- After connecting to Exchange Online by using Windows PowerShell, run the following two commands.
$Credentials = Get-Credential
Test-MigrationServerAvailability -ExchangeOutlookAnywhere -ExchangeServer EXCH-SRV-01.corp.contoso.com -Credentials $Credentials -RPCProxyServer mail.contoso.com -Authentication NTLM
The first command captures the domainusername of the mailbox account that is being tested. Use your server-specific names in the RPC proxy server and Exchange server parameters. The second command uses those credentials to execute the test with the specified endpoints.
If the command completes successfully, no further action is needed, and those parameters can be used in creating the migration endpoint. If the connection fails, consider additional Outlook Anywhere configuration and troubleshooting steps.
- If automatic configuration is successful, confirm the automatically detected settings for the migration endpoint and click Next. See the successful automatically configured batch in Figure 12-5.
Figure 12-5 New Migration Batch Wizard Confirm The Migration Endpoint page
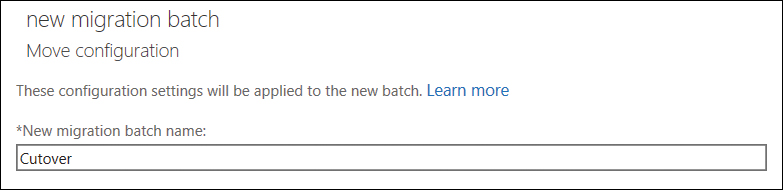
- On the Move Configuration page, name the migration batch Cutover and then click Next, as shown in Figure 12-6.
Figure 12-6 New Migration Batch Wizard Move Configuration page
Configure report by clicking the Browse button and selecting one or more mailboxes or by typing their SMTP addresses in the Check Name box and clicking OK. Choose either to start the batch manually or allow it to start automatically. Click New to create the batch. See Figure 12-7.
Figure 12-7 New Migration Batch Wizard Start The Batch page


After clicking the New button and creating the cutover batch, the default migration page opens in the Exchange Admin Center, on the migration monitoring page. This is the main page where you monitor the cutover progress. You can select the batch to get more information about the process of the users, and each column in the table provides insight into the total number of objects in the cutover migration: number synchronized so far; how many are finalized (completed); and how many objects failed. You can also view additional logging information, as shown in Figure 12-8.
As the cutover process starts and progresses, the numbers increment in the migration console. If additional information is needed about an object-level failure, the View Details hyperlink in the right pane of the migration console can open another window to review the individual object level success or failure. In Figure 12-9, this migration had permissions issues during the cutover process. In this instance, the administrator performing the migration did not have the proper permission to the source mailboxes. The other object types, such as groups and contacts, although referenced as mailboxes, were migrated and synchronized successfully, as shown in the Finalized column, 15 in all; the Failed column shows that 13 user mailboxes failed to start the synchronization process. To fix this issue, add full mailbox access permissions to the mailboxes that failed, stop the batch, and then restart it.

Figure 12-8 Exchange Admin Center migration monitoring view

Figure 12-9 Exchange Admin Center migration status with failures
Completing the cutover migration process
After the mailbox permissions were fixed, the batch completed successfully. The post-migration steps for a cutover migration are as follows.
- Change the MX (Mail Exchanger) Record in the customer’s public DNS to refer to Exchange Online as the domain’s new email endpoint. Validate that mail flow is working, check message headers on received mail, and optionally click the Message Header Analyzer tab on the Microsoft Remote Connectivity Analyzer webpage at https://testconnectivity.microsoft.com/.
- Change the DNS entries for the on-premises Autodiscover endpoint to refer to the Office 365 Autodiscover endpoint.
This normally requires an internal and external DNS name change. For example, Autodiscover.contoso.com would have a CNAME record in DNS pointing to Autodiscover.outlook.com in both internal and external DNS, removing the existing records and creating the CNAME record to complete the Autodiscover migration process to point to Office 365.
- Remove the internal service connection point (SCP) in Exchange (required for Exchange Server 2007 and later). Use the Exchange Management Shell to run the following command.
Get-ClientAccessServer | Set-ClientAccessServer -autodiscoverserviceinternaluri $null
This command removes the internal endpoint for Autodiscover so that the Outlook client uses DNS to find the Office 365 Autodiscover endpoint.
- Assign the appropriate Office 365 licenses to the migrated users; an Exchange Online license is the minimum required.
- Re-create user profiles for Outlook and provide passwords for the Office 365 users.
- Delete the migration batch.
Although this can occur earlier in the sequence, as some cutover documentation states, it does not hurt to leave it in place while Autodiscover records and MX records are being changed, users are being licensed, and new Outlook profiles are being created. Waiting to delete the batch enables the administrator to ensure that everything post-migration is functional prior to removing the batch.
Decommissioning Exchange on-premises
Normally when a cutover migration is performed, the Exchange server can be decommissioned after all user profiles have been successfully pointed to Office 365, Autodiscover is pointed to Office 365, and mail flow is pointing to Office 365. In a cutover scenario, there is no need for AAD Connect for directory synchronization; it is blocked if directory synchronization is enabled in the tenant. If a customer is 100% sure they will never need AAD Connect for directory synchronization and will manage all the new Exchange Online mailboxes and Office 365 users in the cloud, decommissioning can occur at any time. More information about how and when to decommission is in the Microsoft TechNet article at https://technet.microsoft.com/en-us/library/dn931280(v=exchg.150).aspx.
Cutover Exchange migration summary
Cutover Exchange migrations are one of the fastest methods to bring users onboard when the user count is under 2000 users. Remember that there are key limitations in the methodology that might cause user dissatisfaction, such as the need for a separate user name and password, re-creation of the Outlook profile, and resynchronization of all their mail to their local computer.
Staged Exchange migrations
The staged migration process is designed for customers who are only using Exchange Server 2003 and Exchange Server 2007. It is unavailable in later versions of Exchange. Staged migration does not have a maximum user count restriction; however, due to some of the limitations, discussed in sections later in this chapter, many customers choose to add newer versions of Exchange to the environment to coexist with and take advantage of the Exchange hybrid topologies and technology.
Staged Exchange migrations can be achieved by two methods; one is through the Exchange Admin Center (EAC), and the other is by using Windows PowerShell when connected to Exchange Online. The following is a list of the key limitations and considerations of staged Exchange migrations; some are the same limitations as those in a cutover migration due to the use of an Outlook Anywhere migration endpoint.
- This kind of migration is applicable for Exchange Server 2003 and Exchange Server 2007 only and will not work for any other version of Exchange.
- Directory Synchronization must be enabled, which you can accomplish by using AAD Connect.
- All domains must be registered in Office 365.
- The offline Outlook data file (.OST) signature is not preserved; the entire mailbox must be downloaded again post-migration because the Exchange GUID is not preserved on the user account object due to the migration process that staged migrations use.
- Client-side rules and customizations are not migrated; Outlook profiles need to be re-created and are not updated.
- Additional items not migrated are: Out of Office configuration, security groups, dynamic distribution lists, system mailboxes, Dumpster, send-as permissions, and messages larger than 150 MB.
- The account performing the migration must have, at minimum, Receive-As permission to the mailbox; full access to the mailbox is preferred. This should be a secured account to ensure data privacy because these permissions allow the account to read the email of the source mailbox.
- Additional post-migration scripts must be run to remove the mailbox object and convert it to a migrated, mail-enabled user object for best experience.
Staged Exchange migration requirements
The requirements for performing a staged migration are as follows and apply to both Exchange Admin Center and Windows PowerShell methods.
- Administrative access to the Office 365, global administrator account is required for the administrator to perform the license process and migration process.
- Outlook Anywhere must be configured and publicly accessible with a third-party SSL certificate.
- Domains in Office 365 must be added and verified. See Chapter 2.
- Mail Exchange (MX) and Autodiscover cutover must be prepared for when all staged migrations are complete.
- Unified Messaging on source mailboxes must be disabled.
- Outlook Anywhere must be configured properly. (You can use Microsoft Connectivity Analyzer, Exchange Server, Microsoft Office Outlook Connectivity Tests, or Outlook Connectivity at https://testconnectivity.microsoft.com/ to validate this.)
- A migration .csv file must be created for user migration with a maximum of 2000 rows, including header row. If you have more than 2000 users, multiple CSV files will be needed. For more information, see https://support.office.com/en-us/article/CSV-files-for-Mailbox-migration-b79fb81d-d6f4-4385-867e-7bdd0238366e?ui=en-US&rs=en-US&ad=US.
The following is a managed domain example for a migration.csv file. The first line is the required header.
EmailAddress,Password,ForceChangePassword
[email protected],Pa$$w0rd,False
[email protected],Pa$$w0rd,False
[email protected],Pa$$w0rd,False
The following is a federated domain example for a migration.csv file. The first line is the required header.
EmailAddress,Password,ForceChangePassword
[email protected],,
[email protected],,
[email protected],,
Staged Exchange migration using Exchange Admin Center (EAC)
You perform the following steps as a global administrator, logged on to the customer tenant in Office 365, using the Edge or Internet Explorer browser. These steps assume that the customer has completed AAD Connect to synchronize Active Directory, Office 365 domain registration, and migration spreadsheet prerequisites.
- Launch https://portal.office.com and log on with the global administrator account. Select the Admin tile from the Office 365 app launcher.
- Navigate to the Exchange Admin Center by using the Admin Center shortcut in the lower left pane of the Office 365 portal.
- In the Exchange Admin Center, select Recipients | Migration.
- Click the New icon (plus sign) and choose Migrate To Exchange Online to launch the New Migration Batch Wizard.
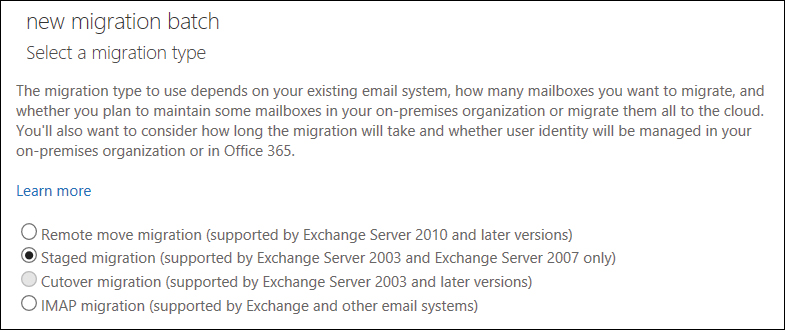
- Select Staged Migration, as shown in Figure 12-10, and then click Next.
Figure 12-10 New Migration Batch Wizard Select A Migration Type page
- On the Select The Users page, click the Browse button and select the location of the saved CSV file that you created for this user migration batch. See Figure 12-11. If more than the standard three columns are in the CSV file, select the Allow Unknown Columns In The CSV File check box. If the wrong CSV file is selected, click Change to display the Open dialog box to select the correct file. Click Next.
Figure 12-11 Staged migration, New Migration Batch Wizard Select The Users page
- Type in the email address, domain nameuser name, and password for the on-premises administrative account that has access to the mailboxes and click Next, as shown in Figure 12-12.
The service is detecting the settings automatically for Outlook Anywhere to create the migration endpoint in the tenant.
Figure 12-12 Staged migration, New Migration Batch Wizard Enter On-Premises Account Credentials page
- If the automatic configuration fails for domain nameuser name and password, additional pages appear with text boxes for email address, domainusername, and password. Complete the three boxes and select Next, as shown in Figure 12-13.
If the server settings cannot be detected, the following four boxes must be filled out to create the Outlook Anywhere migration endpoint: Exchange Server, RPC Proxy Server, Authentication, and Mailbox Permission. The first three settings can be validated by using the Outlook Connectivity test as mentioned in the Troubleshooting sidebar in the “Cutover Using Exchange Admin Center (EAC)” section earlier in this chapter. The Exchange or Active Directory administrator determines and communicates the mailbox permission level.
Figure 12-13 Staged migration, New Migration Batch, Enter On-Premises Account Credentials page
Figure 12-14 shows that the migration endpoint could not be automatically detected.
If automatic detection is successful, the automatically detected configuration appears, as shown in Figure 12-15, and you do not need to enter the information manually. If the configuration wasn’t detected, the administrator must fill out all four sections manually and configure the endpoint again.
Figure 12-14 Staged migration, New Migration Batch Wizard Confirm The Migration Endpoint page showing that automatic detection failed
- If automatic configuration is successful, confirm the automatically detected settings for the new Outlook Anywhere staged migration endpoint and click Next, as shown in Figure 2-15.
Figure 12-15 Staged migration, New Migration Batch Wizard Confirm The Migration Endpoint page, automatic detection success
- Name the migration batch any name that makes sense to you in the New Migration Batch Name text box, as shown in Figure 12-16, and click Next.
Figure 12-16 Staged migration, New Migration Batch Wizard Move Configuration page
- Decide which notification mailbox to alert, click Browse to select the user from the list, and choose either to start the batch manually or allow it to start automatically, as shown in Figure 12-17. Click New to create the batch.
Figure 12-17 Staged migration, New Migration Batch Wizard Start The Batch page


This completes the batch creation process for moving users with staged migration in the Exchange Admin Center console. After you click the New button, the batch wizard process returns to the migration monitoring page in Exchange Admin Center.
Monitoring the Exchange staged migration process
Figure 12-18 shows a staged migration in process and where to monitor that information during the time the mailboxes synchronize to Exchange Online.

Figure 12-18 Staged Exchange migration dashboard monitoring
Figure 12-19 shows the migration Notifications fly-out, which the Office 365 Exchange Admin Center uses to notify the user of major events, in this case, a migration batch in progress and when it started.

Figure 12-19 Staged Exchange migration Exchange Admin Center notification
Completing the staged Exchange migration process
During a staged migration, the administrator continues to use the batch process to migrate the users by a CSV file. After the batch of users has been processed, it can be deleted. Use the following steps after the user’s mailbox has been fully synchronized. Steps 1 through 4 are repeated until all users have been migrated.
- Validate that the user sync status is complete in the migration dashboard. Delete the batch after ensuring that the status of all the users shows them synced.
- Convert the migrated user mailbox to a mail-enabled user account.
Scripts are available to do this for Exchange Server 2003 and Exchange Server 2007. The primary reasons for doing this are so the users who haven’t been migrated can still send mail to the migrated user and have it route properly and, when mailbox profiles are re-created for the migrated user, the mail-enabled user object redirects the migrated user to Office 365 by Autodiscover instead of logging on to their old mailbox, which was synchronized to Office 365 by staged migration.
- Assign the appropriate Office 365 licenses to the migrated users; an Exchange Online license is the minimum required.
- Re-create user profiles for Outlook and provide passwords if applicable for the Office 365 users.
This step is performed only once.
- After all user objects have been migrated to Office 365, repoint on-premises Autodiscover DNS records to Office 365.
This normally requires an internal and external DNS name change. For example: Autodiscover.contoso.com would have a CNAME record in DNS, pointing to Autodiscover.outlook.com.
- After all user objects have been migrated to Office 365, remove the internal SCP point in Exchange if you are using Exchange 2007 or later. Use the Exchange Management Shell to run the following command.
Get-ClientAccessServer | Set-ClientAccessServer -autodiscoverserviceinternaluri $null
This step is performed only once.
- Repoint the MX and SPF records to Exchange Online Protection.
This is an optional customer choice and can be done prior to the migration, during the migration, or at the end of migration. Planning is required.
Decommissioning Exchange on-premises
A staged migration requires AAD Connect directory synchronization. To manage Exchange attributes when the source of authority is on-premises Active Directory, the recommended practice is to maintain a single on-premises Exchange server to manage those attributes on-premises by using either the Exchange Admin Center or Exchange Management Shell. Prior to removing the older versions of Exchange, consider introducing the latest version that is compatible with the oldest version in the environment for management purposes. For example, Exchange Server 2003 environments can have an Exchange 2010 server added to the environment. After all of the Exchange Server 2003 environment has been decommissioned, the customer can then add Exchange 2016 to the environment and remove Exchange 2010, maintaining the latest version of Exchange for attribute management. More information about how and when to decommission is in the Microsoft TechNet article at https://technet.microsoft.com/en-us/library/dn931280(v=exchg.150).aspx.
Staged Exchange migrations work only for Exchange Server 2003 and Exchange Server 2007, and Microsoft no longer supports either of them. Customers will have a much better experience in the migration process if they forgo the use of staged migration and install a later version of Exchange—Exchange 2010 or newer—in the environment and then use express migration. Remember that there are key limitations in the methodology that might cause user dissatisfaction, such as requiring a separate user name and password, re-creation of the Outlook profile, and resynchronization of all users’ mail to their local computer.
Express migrations
Express migration provides customers who are using Exchange 2010 and later the best migration scenario. From a user and administrative perspective, this is the best scenario due to the advanced feature set, using the Mailbox Replication Service (MRS or MRS Proxy). In this topology, either Exchange Server 2003 or Exchange Server 2007 would need to be configured to coexist with Exchange 2010, or Exchange Server 2007 could also be configured with Exchange 2010 and Exchange 2013 in a coexistence topology to support migrations from the older source environments. Express is a newer configuration option that is part of the Office 365 Hybrid Configuration Wizard that was released in 2016. This new feature helps smaller customers who do not want to deal with the limitations of cutover or staged migrations but want to move quickly to Office 365 while maintaining the best Outlook user experience. It takes advantage of a combination of AAD Connect in express configuration and Office 365 hybrid configuration in minimum mode.
The benefits of the express migration method are as follows.
- The Active Directory user and a hash of their password synchronize to Azure Active Directory. For more details about how that functions, see Chapter 5, “Installing Azure AD Connect.”
- Outlook users do not have to re-create Outlook profiles or synchronize a new offline storage file (OST file).
- Mail flow is not interrupted; it continues to function during and after migration, without the need to configure MX records and Exchange Online protection.
- Downtime for users is minimized.
Express migration requirements
The new express migration option is a wizard-driven configuration toolset that has a specific set of requirements. These requirements set up a single server or group of servers to serve as a rapid onboarding system and process instead of the lengthier full hybrid option that is covered in Chapter 13, “Office 365 Hybrid Configuration Wizard.”
- You must plan to migrate to Exchange Online in a rapid time frame with minimal coexistence.
- You must plan to synchronize the users and their password (hash) one time only and not deploy AAD Connect permanently.
- You must have at least one on-premises Exchange 2010, Exchange 2013, or Exchange 2016 server.
- If Exchange Server 2003 is installed, you must install Exchange 2010 to use it with express migration.
- If Exchange Server 2007 is installed, you must install either Exchange 2010 or Exchange 2013 and use it with express migration.
- TCP port 443 must be open and routable from the Internet to the Exchange server.
- You must have a third-party certificate for SSL connection with the fully qualified domain name that is installed and configured on the Exchange server. The name on the certificate can be the subject name or the one in the subject alternative name field. Alternatively, you can use a domain wildcard certificate. For more information about certificates, review the article at https://technet.microsoft.com/en-us/library/hh563848(v=exchg.150).aspx.
- You must have an external DNS address record matching the fully qualified domain name and certificate of the Exchange server.
- You must have an external Exchange Web Services (EWS) URL configured and matching the fully qualified domain name on the certificate and the external DNS address record, known as a DNS A record.
- You must have an Office 365 global administrator account.
- You must have an Exchange on-premises account with organizational management rights.
- Any domain to be migrated to Office 365 must already be added to the portal. For details, see Chapter 2.
- You must have an Internet browser capable of managing Office 365.
Express migration limitations
Express migration has some limitations, most of which are built into the migration dashboard to enforce completion of certain tasks such as licensing a user mailbox prior to migration or only supporting a single migration endpoint at a time.
- Users must be licensed prior to using the Data Migration dashboard for migration. Shared, room, or equipment mailboxes do not need licenses to migrate.
- A single migration endpoint is currently the only supported option; if multiple endpoints are needed, use the more advanced option discussed in Chapter 13.
- Batches currently do not run in parallel. If a batch is started, it must complete prior to starting the next batch. If parallel batches are needed, see Chapter 13.
- The same limitations of a full hybrid MRS migration apply; specifically, non-inherited permissions do not migrate and should be captured and re-applied.
Installing and configuring express migration
To start the express migration process, the easiest method is to log on to the Exchange server and navigate to https://portal.office.com; any domain-joined, Windows-based computer will work if that isn’t possible. Sign in to the portal with global administrator account credentials.
- In the Office 365 Admin Center, shown in Figure 12-20, select Users | Data Migration to open the Migration page. Select Exchange.
Clicking Exchange launches the first run experience for the Office 365 Hybrid Configuration Wizard.
Figure 12-20 Data Migration, Exchange option
- Click Download Application, as shown in Figure 12-21, and then click Run when prompted.
After clicking Run, the Office 365 Hybrid Configuration Wizard prepares to install.
Figure 12-21 Download And Run The Office 365 Hybrid Configuration Wizard fly-out
You can also launch the hybrid wizard by clicking the settings box on the migration dashboard page and then selecting Run Hybrid Wizard, as shown in Figure 12-22.
Figure 12-22 Exchange Migration Endpoint Configuration Settings page
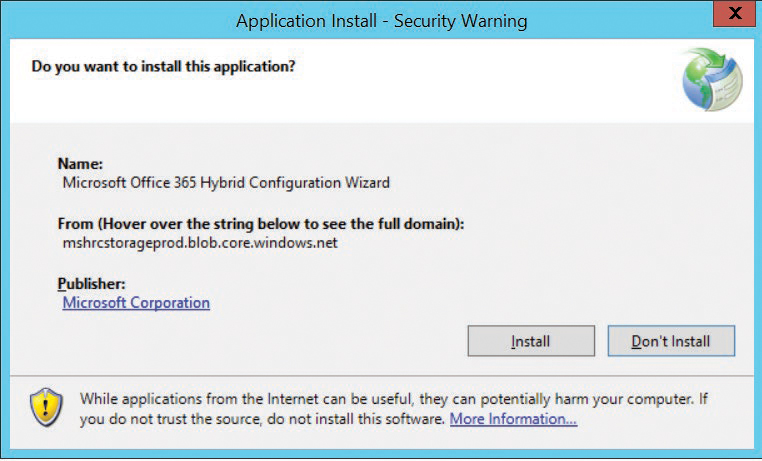
- When prompted, click Install, as shown in Figure 12-23.
The install process pulls the source files from a Microsoft Azure blob data storage location. Depending on the operating system version of your computer and User Account Control (UAC) configuration, when the install completes, you might need to click Run in the UAC Open File – Security Warning dialog box.
Figure 12-23 Installing the Office 365 Hybrid Configuration Wizard
The Office 365 Hybrid Configuration Wizard (see Figure 12-24) provides a built-in help option in the What Does This Application Do? hyperlink. It also provides Exchange system information, account information, and tenant information.
- Click Next to start the configuration process.
Figure 12-24 Office 365 Hybrid Configuration Wizard, first page
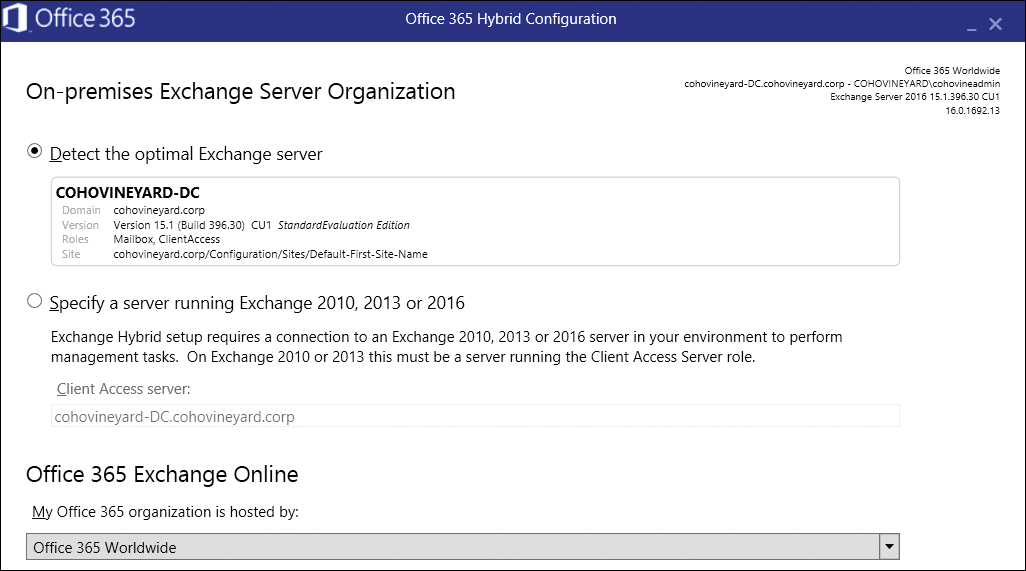
On the on-premises Exchange server organization configuration page, the wizard determines the optimal Exchange server to use for the Windows PowerShell execution process, which is normally the server the wizard is being run from if it meets the Client Access Server role criteria. The application uses the Exchange Management Shell to connect on-premises and Exchange Online PowerShell to connect to Exchange Online. In both cases, they are remote Windows PowerShell calls even if on the physical server due to the architecture of Windows PowerShell in Exchange 2010 and later.
- If the wizard doesn’t determine the optimal Exchange server, or if you prefer to use a specific server, select Specify A Server Running Exchange 2010, 2013 Or 2016 and type in the fully qualified domain name of the client access server the wizard will use to run the commands against. Below Office 365 Exchange Online, specify the location of the Office 365 Exchange Online tenant. The default is Office 365 Worldwide.
The other options as of this writing are Office 365 China, Office 365 Germany, and Office 365 vNext (Dedicated).
- After you have configured the optimal or preferred server and the proper Office 365 organization location (see Figure 12-25), click Next.
Figure 12-25 Office 365 Hybrid Configuration Wizard, On-Premises Exchange Server and Exchange Online selection
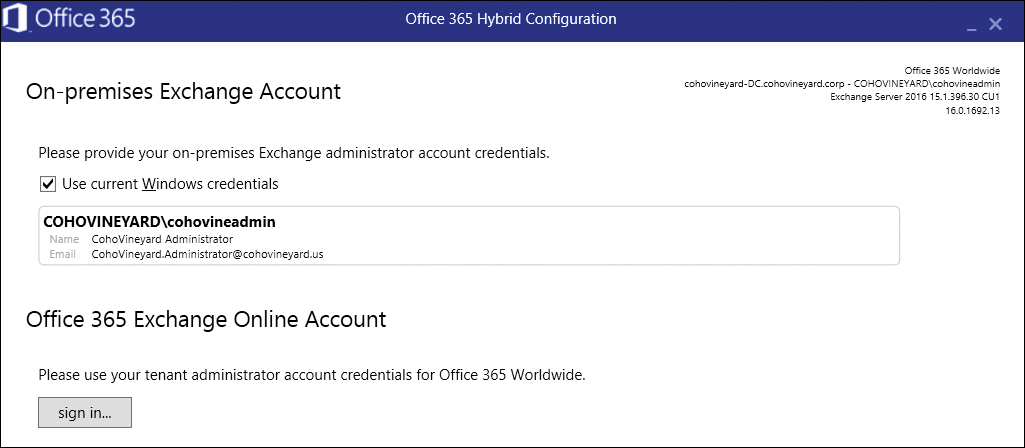
For the Office 365 Hybrid Configuration Wizard to run, two accounts are required. One is an on-premises Exchange account, which is auto-detected when the Use Current Windows Credentials check box is selected, as shown in Figure 12-26, or you can override this option by clearing the check box and specifying an account, using a domainusername format and the account password. Clicking the Sign-In button below Office 365 Exchange Online Account enables you to provide the second required account, which is the Office 365 global administrator user name and password, as shown in Figure 12-27.
Figure 12-26 Office 365 Hybrid Configuration Wizard, On-Premises Exchange Account and Office 365 Exchange Online Account
- As shown in Figure 12-27, type in the global administrator username and password specific to your tenant and click Sign In.
Figure 12-27 Sign in to the Office 365 Exchange Online Account
- After you have typed both sets of credentials, click Next. See Figure 12-28.
Figure 12-28 Office 365 Hybrid Configuration Wizard, On-Premises Exchange Account and Office 365 Exchange Online Account completed
The Office 365 Hybrid Configuration Wizard now tests Windows PowerShell connectivity to the on-premises Exchange server and Office 365, using the credentials you provided on the previous page. If successful, information from both the on-premises and online environments are gathered for logging use as well as for decisions to be made later in the wizard.
Express migration is part of the Minimal Hybrid Configuration process.
- Select Minimal Hybrid Configuration, as shown in Figure 12-29, and click Next.
Figure 12-29 Office 365 Hybrid Configuration Wizard, Hybrid Features choice
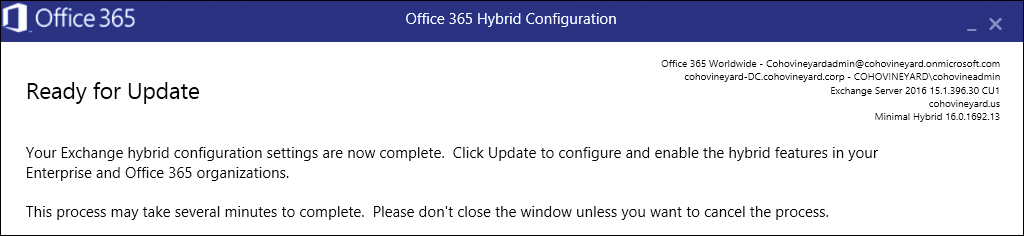
The Ready For Update page, shown in Figure 12-30, runs the commands against the on-premises Exchange server and Exchange Online.
- Click Update and let it configure.
Figure 12-30 Office 365 Hybrid Configuration Wizard, Ready For Update page
During the configuration process, the green bar progresses, with the various tasks, phases, and commands changing as the process runs through the on-premises and online PowerShell cmdlets. If you click the Stop button, you stop the configuration process but do not roll back any changes that the wizard has already completed.
The User Provisioning options page, shown in Figure 12-31, only appears when you select Minimal Configuration and users have not been synchronized to Azure Active Directory through AAD Connect.
- Use express migration to select Synchronize My Users And Password One Time (Recommended) and click Next.
AzureADConnect.msi is downloaded in the background, and the installation process of Azure AD Connect starts.
Figure 12-31 Office 365 Hybrid Configuration Wizard, configuration in progress
Azure AD Connect installs and enables the administrator to choose an express or custom install. Both options are covered in detail in Chapter 5. Because this is an express migration, choosing Express is recommended while installing and configuring Azure AD Connect.
- At the prompt, indicate whether the install succeeded or failed. If it failed, you can retry it. If it succeeded, click Next to start the user synchronization process from the local Active Directory to Azure Active Directory. See Figure 12-32.
Depending on the size of Active Directory, this might take some time.
Figure 12-32 Office 365 Hybrid Configuration Wizard, Azure Active Directory Connect completion status page
- When the Synchronizing Users page is finished, which might take some time, depending on the total number of users in Active Directory, click Next to proceed to the final page.
- Rate the experience, provide feedback, and include your email address, if so desired, as shown in Figure 12-33. Click Close.
Figure 12-33 Office 365 Hybrid Configuration complete
Figure 12-33 shows that the Office 365 hybrid configuration is complete and successful. The mailbox migration process can begin. See Figure 12-34 for a user’s account that is ready to be migrated.
Figure 12-34 Office 365 Admin Center Data Migration dashboard
- Navigate to the Data Migration dashboard in the Users section of the Office 365 Admin Center.
This Data Migration page is where migrations are managed during express migration. Users must be licensed to be migrated. See Chapter 8, “Inside the Security & Compliance Center: Data Classification, Loss Prevention, Governance, and Discovery,” for more details about licensing users. A status column, which indicates whether the user needs a license, appears on the right side of the migration dashboard. If the mailbox type is a shared, room, or equipment mailbox, it normally doesn’t need a license and shows a status of Not Started. If the user has been licensed and successfully migrated, the status shows In Cloud. If the user status shows License Required, this user needs at least an Exchange Online license to start the migration process.
- When the user licensing is complete, select the check box next to the user to add the user to the batch. After the users for this batch are selected, click the Start Migration button.
Only one batch of users is possible while using this Data Migration dashboard at the time of this writing.


In-depth details of the user migration process are not available in the Data Migration dashboard. Using the Refresh button in the browser forces the status to be updated if there is a change; otherwise, it refreshes as the updates are received during the move request process. The normal process starts with Validating, ensuring that it can use the migration endpoint; when it proceeds to Syncing, it starts the process of migrating the mailbox data, progressing finally to Completed. If the user data fails to migrate, it is marked as Failed, and additional details become available. The user has to have logged on to their Exchange on-premises mailbox at least once to ensure that the mailbox initializes properly, or the migration will fail. When the failed issue is resolved, you can select the user and click Start Migration to start the process again.
Express migration summary
Express migration is the best method for smaller customers to use to migrate from Exchange 2010, Exchange 2013, and Exchange 2016. Exchange Server 2003 and Exchange Server 2007 customers need to decide whether the effort to install a compatible version of Exchange and configure it for express migration is worth the time, cost, and effort to obtain the best user migration experience. The dashboard migration process is new and will evolve and get better to support more complex scenarios in the future.
Migration performance
Migration performance involves a multitude of factors that affect the speed with which onboarding to the Office 365 service can be achieved. The size, number of items, and attachment size are factors to consider while testing the onboarding process. The currently available network bandwidth that the migration connection will use, as well as the network latency between the data center and Office 365, is an important factor. Many migrations start after normal working hours or at the end of a work week, when the weekend time can be used for the bulk of the data synchronization process. The type of migration might also have different and important factors that affect speed, such as the three types of throttling Office 365 uses to protect the overall performance of the system: user throttling, migration-service throttling, and resource health–based throttling. The migration administrator can control only some of these parameters.
User throttling does not affect any of the migration types discussed in this chapter; it only affects third-party migration utilities using a single account to perform MAPI migrations or a user manually uploading their own PST file. If a third-party vendor is using a single account for migrations with a protocol such as Exchange Web Services, it is recommended to explore application impersonation configuration. Even then, multiple accounts with impersonation might allow better scalability of the solution.
Migration-service throttling is governed by the concurrency values discussed earlier in this chapter, MaxConcurrentMigrations and MaxConcurrentIncrementalSyncs. This enables the administrator performing the migration to tune the number of migrations as well as the number of daily incremental syncs that occur. These numbers should be tuned and modified with caution; to ensure that the source environment can handle the configuration, start small and increment the MaxConcurrentMigrations value. Incrementing the MaxConcurrentIncrementalSyncs number to match MaxConcurrentMigrations or setting it too close to the MaxConcurrentMigrations number is not recommended. Normal ratios that have been observed are 2:1, with as much as a 5:1 difference, meaning MaxConcurrentMigrations 100 to MaxConcurrentIncrementalSyncs 20. Note that these are observed settings that worked in specific customer instances; testing and validating your own is recommended.
Office 365 resource health–based throttling is how the Office 365 service protects itself when there is a service availability issue. Normally, it manifests by queueing migrations. This can also be traced to the service health dashboard in the Office 365 Admin Center where service incidents are reported. Migration speed varies from many factors as well. The source, the data injection method, the protocol involved, and speeds as low as .1 GB per hour or up to 14 GB per hour with 20 mailboxes concurrently migrating have been tested in the past. A key performance metric many forget about during a migration is how healthy the system was prior to starting the migration. Did the migration methodology tip the performance scales far enough to cause a performance issue? Is the firewall performing intrusion detection during the mailbox migration moves and throttling the request from Office 365?
Summary
This chapter covered which migration method is applicable to the source environment; key planning and configuration concepts; the three migration methods that are options for many customers who are not interested in a full hybrid migration and configuration; and how to complete these migrations when using the Exchange Admin Center, Windows PowerShell, or the new Data Migration dashboard using the latest express migration option provided by a combination of Azure Active Directory Connect and the Minimal HyConfiguration Wizard. The chapter ended by briefly discussing key performance concerns to watch for during migrations.