Chapter 18. SharePoint Online Hybrid
SharePoint Online, as discussed in Chapter 17, “Overview of SharePoint Online,” is a cloud-based collaboration platform comprising sites, storage, and apps. In a SharePoint hybrid configuration scenario, you can connect your on-premises Microsoft SharePoint deployment to Office 365 in a number of ways to extend your infrastructure into the cloud.
SharePoint Online Hybrid has four core components.
- Hybrid OneDrive for Business Redirect SharePoint on-premises storage for user files to Office 365 OneDrive for Business.
- Hybrid Search Enable users to search for content in both on-premises and online systems.
- Hybrid Taxonomy Create managed metadata that can be shared and updated between SharePoint 2016 on-premises and SharePoint Online systems.
- Hybrid Auditing (SharePoint 2016 Preview Feature) Configure auditing to provide insights into users’ online and on-premises file access activities.
Two additional types of configurations exist to complete a robust collaboration space experience.
- App launcher Configure the Office 365 app launcher to help users navigate between on-premises and online environments.
- Business-to-business extranet Create partner sites to allow external users access to relevant online content in a members-only site.
Planning
In planning any SharePoint topology, the first questions you should be asking are about the business goal you’re trying to achieve and how you will manage it. In the case of a hybrid OneDrive for Business configuration, maybe it’s transitioning on-premises storage to the cloud. For hybrid search, maybe it’s providing an integrated search platform so users can locate content on either platform. After you have identified the organizational goals and capabilities of the platforms, it’s important to become familiar with the process and prerequisites of any implementation.
General
After you have decided on the hybrid features to implement, make sure you meet the prerequisites for the services you intend to configure. Some services have specific requirements, whereas others are more general and apply regardless.
- Configuring any hybrid service scenario that includes SharePoint Server 2013 requires SharePoint Server Service Pack 1 (https://go.microsoft.com/fwlink/p/?LinkId=521936). Without it, site redirection features are unavailable.
- The Subscription Settings service application must be configured.
- The User Profile service application must be configured and Active Directory synchronized with the User Profile service.
- The App Management service application must be configured.
- My Sites must be configured.
- The Managed Metadata service application must be configured.
- Identity synchronization between Active Directory and Microsoft Azure Active Directory must be configured. For more information about configuring identity synchronization, see Chapter 4, “Directory Synchronization Basics,” and Chapter 5, “Installing Azure AD Connect.”
OneDrive for Business
Hybrid OneDrive for Business enables you to shift data consumption and sharing from your Microsoft OneDrive on-premises deployment (if it exists) to OneDrive for Business in Office 365. Hybrid OneDrive for Business enables your users to continue using on-premises SharePoint sites and services in addition to cloud-based OneDrive.
Although configuring hybrid OneDrive for Business does enable you to redirect users accessing their OneDrive to Office 365, it’s important to note that the data migration process is separate. Data migration must be performed outside of the hybrid configuration process.
Also, because there’s no link or synchronization between OneDrive for Business in SharePoint Server and OneDrive for Business in Office 365, the Shared With Me list in Office 365 won’t populate with documents shared with a user in the on-premises environment or vice versa.
Hybrid OneDrive for Business configuration also configures hybrid user profiles, so that when users view a profile in SharePoint Server, they are redirected to the user’s Office 365 profile.
If you want to pilot hybrid OneDrive for Business, consider creating an audience in SharePoint to identify those users.
Search
Two types of search are available in SharePoint hybrid configuration: cloud hybrid search and hybrid federated search.
Cloud hybrid search is the simplest to configure and stores the search index for all crawled content in Office 365. This single index exposes all SharePoint content (including on-premises) to the Office Graph, so your users can discover content inside Office 365 applications such as Delve. Results are ranked based on their relevance, regardless of the source of the content, and presented in a single result.
Hybrid federated search returns content from two indices (Office 365 and SharePoint Server on-premises). Results are grouped and ranked independently according to their source and then displayed in separate result blocks.
For most organizations, cloud hybrid search is recommended. Cloud hybrid search has the following advantages.
- Users see unified search results from multiple sources.
- Your organization can begin using the updated SharePoint experience without upgrading on-premises servers to SharePoint Server 2016.
- You don’t need to upgrade on-premises servers past the required updates to enable hybrid functionality.
- You don’t have to upgrade your search index.
- Your organization will have a lower total cost of ownership for search, because no additional on-premises hardware or capacity needs to be deployed moving forward; the enterprise search index is stored in Office 365.
- Office Graph applications such as Delve can present content to users.
- Cloud hybrid search is simpler to deploy and maintain.
This chapter focuses on configuring cloud hybrid search, although you might wish to implement hybrid federated search or use a combination of hybrid federated search and cloud hybrid search (such as for sensitive content sets or unavailable features).
When planning a hybrid search, it’s important to understand what’s different or unavailable, what has been replaced with newer features, or additional configurations you might need to perform to provide the best experience for your users.
- Site search SharePoint Server does not automatically return results for content that has been moved to Office 365. To return Office 365 results in your SharePoint on-premises environment, you must configure your on-premises environment to retrieve search results from the Office 365 Search service application (SSA).
- Search verticals If you currently use search verticals in your on-premises SharePoint Server environment, you must re-create it in your search center in Office 365.
- eDiscovery eDiscovery for Office 365 is managed in the Search & Compliance Center. Office 365 eDiscovery cannot index or search content in SharePoint Server on-premises; eDiscovery managers might have to perform searches in multiple places to return all relevant data.
- Cross-site publishing search Cross-site publishing search is not available with hybrid search.
- Custom security trimming Custom security trimming is not supported in Office 365.
- Usage reports Usage reports are based on information stored in SharePoint Online. The SSA in SharePoint Server doesn’t communicate with SharePoint Online, so the SharePoint Online usage reports do not contain information regarding on-premises user activity.
- Custom Search Scopes Custom Search Scopes is a SharePoint Server 2010 feature. Use result sources in SharePoint Online.
- Best Bets Best Bets is a SharePoint Server 2010 feature. Use result sources in SharePoint Online.
- Multitenancy SharePoint Online cannot preserve tenant isolation in a multitenant SharePoint Server 2013 or SharePoint Server 2016 farm.
- Thesaurus SharePoint Online does not support thesauruses.
- Content Enrichment web service The Content Enrichment web service is not available in SharePoint Online.
- Custom entity extraction SharePoint Online does not support custom entity extraction.
- Index reset for on-premises content It is not possible to clear search results for on-premises content. To remove on-premises content from search results, remove the on-premises content source or create an on-premises crawl rule to exclude the content from the search.
When configuring cloud hybrid search, your on-premises SharePoint server that hosts the cloud SSA needs at least 100 GB of storage space. From a cloud planning perspective, SharePoint Online can index 1 million items for every 1 TB of space. If you need to index more than 20 million items, you must open a case with Microsoft Support.
Taxonomy
Hybrid Taxonomy is the idea that you can define a single SharePoint taxonomy to span SharePoint Server on-premises and SharePoint Online. The benefit is that you can use a single metadata set between both platforms.
Unlike other hybrid configurations, Taxonomy is different in that it is mastered online. With other hybrid solutions (such as Active Directory and Exchange), the on-premises system is the source of authority, and then the cloud derives its data set from what is synchronized from the on-premises environment.
When you configure hybrid taxonomy and content types, you copy your on-premises term store configuration and available content types to SharePoint Online and then configure the on-premises environment to update its taxonomy and content types through a timer job.
Auditing
Hybrid auditing enables users to upload their SharePoint diagnostic and usage logs and have reports generated for them in Office 365. Administrators have visibility into users’ on-premises file access activities.
Hybrid auditing is only available for SharePoint 2016 server farms and requires SharePoint Server 2016 Feature Pack 1, available for download at https://support.microsoft.com/en-us/help/3127940/november-8,-2016,-update-for-sharepoint-server-2016-kb3127940.
App launcher
The hybrid app launcher enables you to create a more seamless experience for users moving between the SharePoint on-premises and SharePoint Online environments. Originally available only with SharePoint Server 2016, the extensible app launcher is available with the July 2016 public update for SharePoint Server 2013. Go to https://support.microsoft.com/kb/3115286 for more information.
The app launcher experience exposes Office 365 apps through the on-premises SharePoint Server app launcher interface.
Business-to-business extranet
An extranet is a restricted site that enables your organization to share information with external users while prohibiting them from accessing other corporate content. In a SharePoint hybrid configuration, you can direct external users to a members-only site in Office 365.
There are many advantages to configuring extranet sites in SharePoint Online.
- Site collections can be configured to allow all users to invite partner users.
- Site collections can be configured to allow only site owners to invite partner users.
- Admins can control the list of partner domains to which the organization allows sharing.
- Office 365 activity reports can be used to track partner site access and usage.
- Guests or partner users can be restricted to only a single site, preventing access to unauthorized resources.
- Guests or partner users can be restricted to be able only to accept invitations from the address that received the email, preventing sharing with additional accounts or accounts from unapproved domains.
In planning your extranet model, you need to make decisions around three core areas.
- Invitation model This determines how users get access to sites—whether all users or only site collection owners can invite users, or an admin-managed model by which you import partner users from a directory.
- Licensing By default, SharePoint guest users have limited capabilities in SharePoint Online and are limited to the restrictions governing the group into which they are placed. Authenticated external users can use Office Online to view and edit documents, but further features (such as installing Office ProPlus or being able to create and manage sites) require assignment of a SharePoint license.
- Account life cycle management At some point, external users might no longer require access to an extranet resource, or the project an extranet site supports will end. In either case, plan for managing and archiving sites as well as for removing partner user accounts and site permissions. If licenses are assigned to some external users, plan for a way that licenses can be assigned to external users (denoted as #EXT# in the directory) and reclaimed when the partner user account is no longer in use.
Configuration
When the prerequisites have been met for the set of hybrid configuration options you want to perform, you can configure the individual services.
Set up SharePoint services for hybrid integration
For all SharePoint hybrid services, you must at least ensure that the base services are configured. The shared services requirements are as follows.
- Managed Metadata service application
- User Profile service application
- My Sites service application
- Apps Management service application
- SharePoint Foundation Subscription Settings service
If you already have a fully deployed SharePoint farm, chances are you’ve already configured these services and won’t have to configure additional instances of them. However, if your SharePoint farm is new or you haven’t provisioned these services, you can use these abbreviated steps to configure them to the minimal level necessary for hybrid configuration. If you are installing SharePoint 2013 with SP1, these services are already enabled and configured.
Managed metadata service
The managed metadata service application enables metadata and content type sharing across site collections and applications. A farm can have multiple managed metadata service applications, and each one can publish a term store and content types to be consumed by a managed metadata connection.
For more information about managed metadata, see https://technet.microsoft.com/en-us/library/ee424402.aspx, “Overview of managed metadata in SharePoint Server 2013.”
To configure the managed metadata service, follow these steps.
- Launch SharePoint Central Administration.
- Select System Settings and then click Manage Services On Server, as shown in Figure 18-1.
Figure 18-1 SharePoint Central Administration System Settings
- If you have more than one server, select the server that you want to run the managed metadata service.
- On the Services page, scroll to the Managed Metadata web service and click Start.
- In Central Administration, select Application Management and then, under Service Applications, click Manage Service Applications.
- If a service isn’t currently listed for Managed Metadata, click New from the menu and select Managed Metadata Services from the list.
- Type a name, database server, and new database name for the managed metadata database. See Figure 18-2.
Figure 18-2 Create New Managed Metadata Service page
- Scroll to the bottom of the page, select the Use Existing Application Pool button, select SharePoint Web Services Default from the drop-down list, and then click OK.


My Sites
Use My Sites to provision and store individual user data sites. Users can create sites and store files in My Sites and synchronize the content through the OneDrive desktop application.
If My Sites is not configured, you can follow these steps to configure the minimum settings necessary to complete the hybrid configuration of SharePoint Server.
- In Central Administration, select Application Management and then select Manage Web Applications.
- Select New on the ribbon.
- Select the Create A New IIS Web Site button and then type a name in the Name box.
- Under Public URL, type a URL or accept the default (http://servername:port).
- Under Application Pool, select the Create New Application Pool button and type a name for the IIS application pool.
- Scroll to the bottom of the page and click OK.
- Click OK to dismiss the dialog box after the web application has been created.
- Click Application Management.
- Under Site Collections, click Create Site Collections.
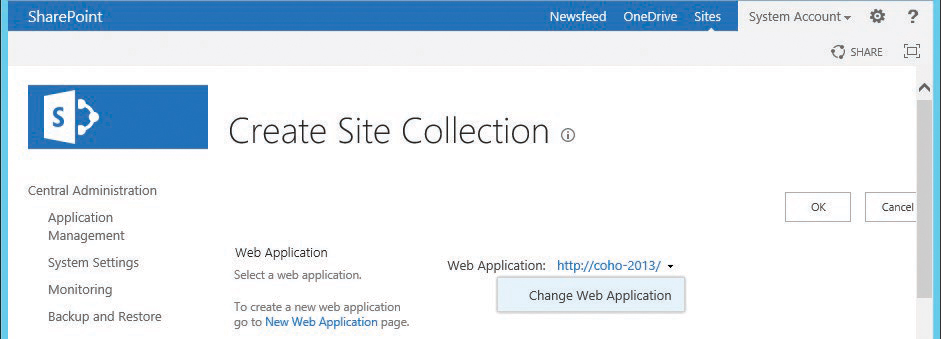
- Under Web Application, click the drop-down arrow and select Change Web Application. See Figure 18-3.
Figure 18-3 Create Site Collection Choose Web Application drop-down list
- Select the newly created web application.
- Type a title and description for the site collection.
- Under Web Site Address, leave the default root (“/”) URL set.
- Under Template Selection, select the Enterprise tab and then select My Site Host.
- Under Primary Site Collection Administrator, type a user name or choose one from the People Picker.
- Click OK.
- Click OK to dismiss the completion dialog box.
User Profile service
The User Profile service contains individual user data. It must be enabled on at least one server in your SharePoint farm. If you have not configured the User Profile Service, follow these steps.
- In SharePoint Central Administration, select System Settings and then click Manage Services On Server.
- If you have more than one server in the farm, select which server to configure.
- In the Service List, locate User Profile Service and click Start.
- Click Application Management and then, under Service Applications, select Manage Service Applications.
- Click New and then click User Profile Service Application.
- Type a name for the service application, such as User Profile Service, in the name box.
- Under Application Pool, select the Use Existing Application Pool button and then select SharePoint Web Services Default.
- In the Profile Synchronization Instance drop-down list, choose the server to run the User Profile Synchronization Service.
- In the My Site URL Host, type the URL of the My Site Host site collection that you created previously and click OK.
- Click OK to dismiss the dialog box.
- Select System Settings from the SharePoint Central Administration navigation pane and then select System Settings.
- Click Manage Services On Server. If you have more than one server in your SharePoint farm, select the server that will run the User Profile Synchronization Service.
- In the services list, locate User Profile Synchronization Service and click Start.
- On the User Profile Synchronization Service page, type the password for the service account that will be used to run the User Profile Synchronization Service and click OK. See Figure 18-4.
Figure 18-4 User Profile Synchronization Service

After you configure the User Profile service, connect on-premises Active Directory to the User Profile service. If it has not already been configured in your environment, follow these steps.
- In SharePoint Central Administration, select Application Management and then click Manage Service Applications.
- Click the User Profile service application.
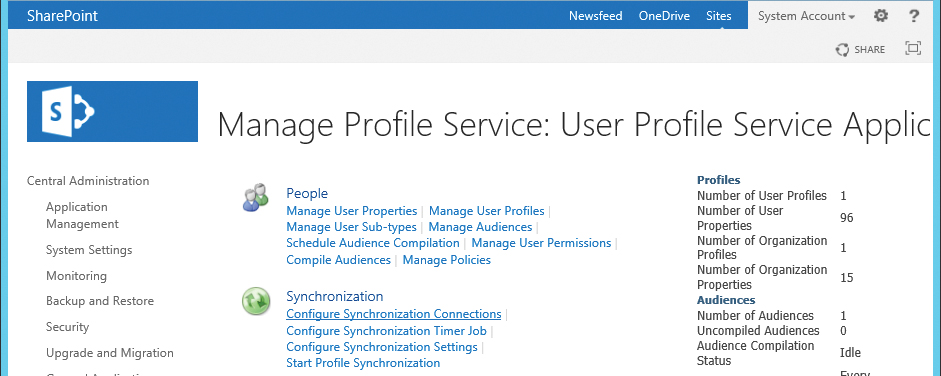
- On the Manage Profile Service: User Profile Service Application page, under Synchronization, click Configure Synchronization Connections, as shown in Figure 18-5.
Figure 18-5 Configure Synchronization Connections
- Click Create New Connection.
- Type a name for the new connection, such as Active Directory.
- Ensure that the type is set to Active Directory.
- Under Connection Settings, type your Active Directory fully qualified forest name, such as contoso.com.
- Under Account Name, enter credentials for a user account that is a member of Domain Admins or is granted the Replication Directory Changes and Replication Directory Changes All rights (to be able to replicate secure account details).
- Click the Populate Containers button.
- Expand the domain node and select the containers where your user objects are located.
- Click OK.
To synchronize user profiles, follow these steps.
- In SharePoint Central Administration, select Application Management and then click Manage Service Applications.
- Click the User Profile service application.
- On the Manage Profile Service: User Profile Service Application page, under Synchronization, click Start Profile Synchronization.
- On the Start Profile Synchronization page, select the Start Incremental Synchronization button and then click OK.
App management service
The App Management service stores information regarding SharePoint app licenses and permissions. Licenses downloaded from the Marketplace are stored in the Apps Management service application. The App Management service must be running on at least one server in the SharePoint Farm.
To configure the App Management service, follow these steps.
- In SharePoint Central Administration, select System Settings and then click Manage Services On Server.
- If you have more than one server in your SharePoint farm, click Change Server and select the server you wish to configure.
- In the Service list, locate App Management Service and click Start.
- In the SharePoint Central Administration navigation pane, select Application Management and then click Manage Service Applications.
- On the ribbon, click New and then click App Management Service.
- In the Service Application Name box, type a name for the service, such as App Management Service.
- Under Application Pool, select the Use Existing Application Pool button and then select SharePoint Web Services Default from the drop-down list.
- Click OK.
- Click OK to close the confirmation dialog box.
SharePoint Foundation Subscription Settings
The SharePoint Foundation Subscription Settings service stores configuration information for site subscriptions. It must be configured with SharePoint PowerShell.
- In SharePoint Central Administration, select System Settings and then click Manage Services On Server.
- If you have more than one server in your SharePoint farm, click Change Server and select the server you wish to configure.
- In the Service list, locate Microsoft SharePoint Foundation Subscription Settings Service and click Start.
- Click Start, type SharePoint, right-click Management Shell, and select Run As Administrator to launch an elevated console.
- Copy and paste the following commands into the Windows PowerShell window to create the SharePoint Foundation Subscription settings.
$AppPool = New-SPServiceApplicationPool -Name SettingsServiceAppPool -Account (Get-SPManagedAccount <DOMAINSharePointServiceAccount>)

$App = New-SPSubscriptionSettingsServiceApplication -ApplicationPool $appPool -Name SettingsServiceApp -DatabaseName SettingsServiceDB

$proxy = New-SPSubscriptionSettingsServiceApplicationProxy -ServiceApplication $App

Get-SPServiceInstance | where{$_.TypeName -eq “Microsoft SharePoint Foundation Subscription Settings Service“} | Start-SPServiceInstance
After the required components for SharePoint hybrid services have been configured, you can begin configuring individual services or settings.
Server-to-server authentication
For a SharePoint Server farm to consume resources and content from SharePoint Online or Office 365, you must configure server-to-server authentication, which enables features to work cross-premises, such as search or other web applications.
Any on-premises application that is currently configured to use Integrated Windows Authentication (IWA) with NTLM can pass claims to Office 365. IWA using NTLM is required for the SharePoint authentication service to pass user claims to SharePoint Online using OAuth. If your existing web application isn’t configured to use IWA with NTLM, you can update it or configure a new web application.
For example, you can create a new website in Internet Information Services (IIS) and connect it to an existing content database and web application, or you can create an entirely new web application and an empty content database. For more information about extending an existing application, see https://technet.microsoft.com/en-us/library/gg276325.aspx, “Extend claims-based web applications in SharePoint 2013.”
OneDrive for Business and hybrid sites
Hybrid OneDrive for Business is part of a bundle option that enables you to configure Hybrid Sites also. Hybrid OneDrive for Business performs redirection for users’ OneDrive for Business sites, whereas Hybrid Sites configures site-following parameters. Hybrid Sites combines the followed sites from SharePoint Online and SharePoint Server into a consolidated list in SharePoint Online. If a user selects the followed-sites link in SharePoint Server on-premises, they are redirected to the followed-sites lists in SharePoint Online.
Configuring hybrid OneDrive for Business can be broken down into three main sections.
- Configure Office 365 for SharePoint hybrid
- Ensure proper permissions
- Redirect OneDrive to Office 365
Prerequisites
To configure hybrid OneDrive for Business and Sites, you must meet the following prerequisites.
- Users with SharePoint Online license in Office 365
- Administration account with SharePoint Online admin role privileges
- SharePoint Online My Sites URL
- Administration account with membership in the Farm Administrators group
Configure Office 365 for SharePoint hybrid
To make hybrid services available for SharePoint Online, you must subscribe to an Office 365 plan that contains SharePoint Online and then connect your on-premises directory to Office 365.
See Chapter 1, “Office 365 Deployment Milestones,” and Chapter 2, “Preparing Your Environment for the Cloud,” for more information about setting up your Office 365 subscription and domains.
Ensure proper permissions
To use OneDrive for Business in Office 365, users must have the Create Personal Site and Follow People and Edit Profile permissions.
To confirm or configure these permissions, follow these steps.
- Log on to the Office 365 portal with a global admin account and select the Admin tile.
- Expand Admin Centers and then click SharePoint.
- In the navigation pane, click User Profiles.
- Under People, click Manage User Permissions.
- In the Permissions For User Profile Service Application dialog box, select Everyone Except External Users or add a specific audience if you are piloting.
Everyone Except External Users is selected by default, with all permissions selected. Click OK.
- Verify that the Create Personal Site And Follow People and Edit Profile boxes are selected.
- Click OK.
Redirect OneDrive to Office 365
Before you begin these steps, ensure that users have a SharePoint Online license in Office 365. (SharePoint Online includes OneDrive for Business.) In addition, you might want to follow the procedure to pre-provision OneDrive for Business sites in Office 365 you find in Chapter 19, “OneDrive for Business.”
To perform the redirection, you need the My Sites URL in Office 365. You can locate it by navigating to the SharePoint Online Admin Center, selecting Site Collections, and then looking for the site collection that matches https://<tenant>-my.sharepoint.com, as shown in Figure 18-6.

Figure 18-6 Locating the My Sites site collection URL
When you have your tenant’s My Sites URL, you can follow these steps to configure OneDrive for Business redirection.
- Log on to Central Administration, using a Farm Administrator account.
- In the navigation pane, select Office 365.
- Click Configure OneDrive Sites And Sites Links (SharePoint Server 2013), as shown in Figure 18-7.
Figure 18-7 OneDrive hybrid configuration in SharePoint Server 2013
If you are using SharePoint Server 2016, the interface is a little different. Click Configure Hybrid OneDrive And Sites Features, as shown in Figure 18-8.
Figure 18-8 OneDrive hybrid configuration in SharePoint Server 2016
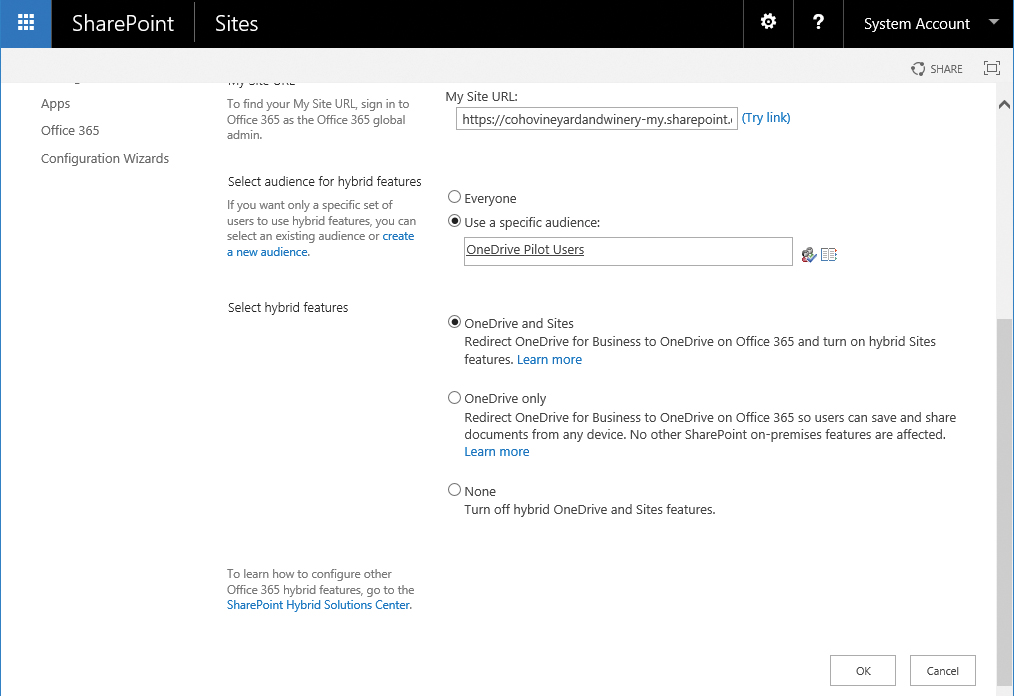
- In the My Site URL box, type the URL obtained from SharePoint Online for the My Sites site collection.
- Under Set The Audience For The Connection, select the Everyone button to perform redirection for all users or select the Use A Specific Audience button to select a pilot audience group.
- Select the site redirection feature. Depending on your version of SharePoint server, you might see a different interface. If you are using SharePoint Server 2013, select the Redirect The Sites Page check box, as depicted in Figure 18-9.
Figure 18-9 Hybrid OneDrive for Business configuration in SharePoint Server 2013
If you are using SharePoint Server 2016, select the OneDrive And Sites button to configure both features, as shown in Figure 18-10.
Figure 18-10 Hybrid OneDrive for Business configuration in SharePoint Server 2016
- Click OK to complete the configuration.


Hybrid Picker
Hybrid Picker is a new option that enables you to configure hybrid OneDrive for Business and Hybrid Sites from a wizard-driven interface. It does not allow the flexibility of the manual control and enables hybrid OneDrive for Business for all users.
To use Hybrid Picker to configure hybrid OneDrive for Business, follow these steps.
- Log on to SharePoint Server 2016 with an account meeting the prerequisites. If SharePoint Hybrid Picker has already been run, you can execute it by double-clicking it on the desktop and skipping to step 9.
- Open Microsoft Internet Explorer and log on to the Office 365 portal.
- Click the Admin tile to launch the Office 365 Admin Center dashboard.
- In the Office 365 Admin Center, expand Admin and then select SharePoint.
- In the navigation pane, select Configure Hybrid.
- On the Hybrid Picker page, click Go To Hybrid Picker Download Page.
- Click the Click Here link to start SharePoint Hybrid Picker.
- Click Install.
- Click Next.
- Type your credentials for both the local Active Directory environment and Office 365. Click Validate Credentials and click Next when the button becomes available.
- Verify that all prerequisites pass. Resolve any errors. Click Next to continue.
- Select the Hybrid OneDrive and Hybrid Sites check boxes and click Next.
- After reviewing the configuration summary page, click Next.
- Click Close.
Hybrid Search
As mentioned previously, there are two hybrid search possibilities—cloud hybrid search, where users perform searches and are returned results from a single, consolidated index, and hybrid federated search, where users perform one search and results are returned from both the cloud and on-premises indices.
Microsoft recommends using cloud hybrid search. The default search configuration is recommended for most organizations.
For information about hybrid federated search, please see https://support.office.com/en-us/article/Learn-about-hybrid-federated-search-for-SharePoint-4ee4b876-1673-4d1f-ba47-d9a0ef4474a9?ui=en-US&rs=en-US&ad=US, “Learn about hybrid federated search for SharePoint.”
Prerequisites
Prior to configuring a hybrid search option for SharePoint, verify that you meet the following prerequisites.
- SharePoint Server 2013 Service Pack 1 and the January 2016 Public Update (https://technet.microsoft.com/library/mt715807.aspx)
- Account with Office 365 Global Administrator role
- Account that is a member of Domain Admins in the on-premises Active Directory environment
- Account that is a member of the SharePoint Farm Administrators group
- CreateCloudSSA.ps1 and Onboard-CloudHybridSearch.ps1 scripts, located in the Microsoft Download Center (https://go.microsoft.com/fwlink/?LinkId=717902)
- Microsoft Online Services Sign-In Assistant for IT Professionals RTW (https://go.microsoft.com/fwlink/?LinkID=286152) installed on the search server
- Azure Active Directory Module for Windows PowerShell (http://connect.microsoft.com/site1164/Downloads/DownloadDetails.aspx?DownloadID=59185) installed on the search server
- URL of Office 365 SharePoint Online site collection (https://<tenant>.sharepoint.com)
Configure Office 365 for SharePoint hybrid
To make hybrid services available for SharePoint Online, you must subscribe to an Office 365 plan that contains SharePoint Online and then connect your on-premises directory to Office 365.
See Chapter 1 and Chapter 2 for more information about setting up your Office 365 subscription and domains.
Create a cloud Search service application
The cloud Search service application will be used to configure result sets for SharePoint searches.
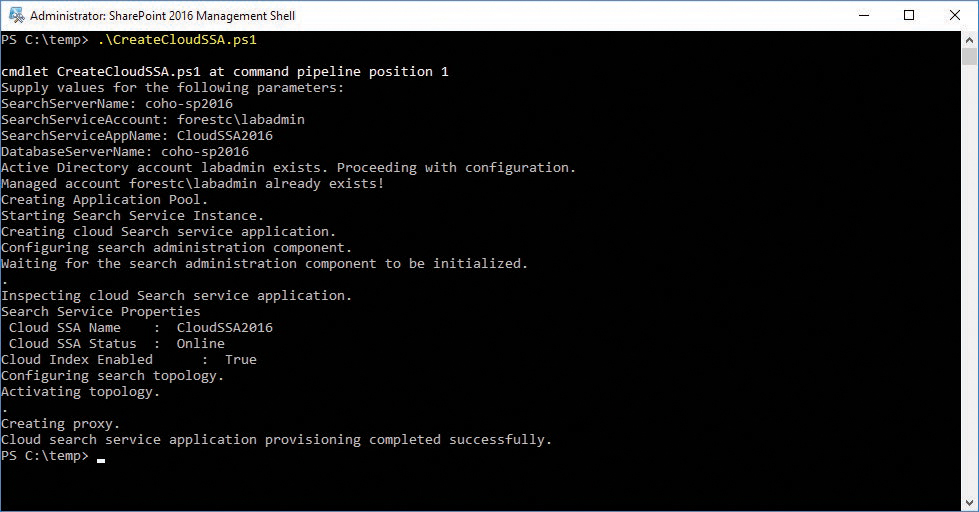
- On the server that will host Search, launch an elevated SharePoint Management Shell.
- Run CreateCloudSSA.ps1 and follow the prompts to provide the necessary values, as shown in Figure 18-11. You might need to unblock the script after downloading it before it will run.
- SearchServerName Server that will run the cloud Search service application
- SearchServiceAccount The Search service account (in DOMAINUsername format)
- SearchServiceAppName Name for the cloud Search service application that will be created
- DatabaseServerName Name of the server where the cloud Search service application database will be created
Figure 18-11 Create the cloud Search service application
Connect the cloud Search service application to Office 365
After you have created the cloud Search service application, you can proceed with connecting it to Office 365.
- From the SharePoint Management Shell, run the following command and enter your Office 365 Global Admin credential when prompted.
$Credential = Get-Credential
- Run the following command, using your organization’s SharePoint Online URL and the name of the cloud Search service application you used when running the CreateCloudSSA.ps1 script. See Figure 18-12.
.Onboard-CloudHybridSearch.ps1 -CloudSsaId <CloudSsaID> -PortalUrl https://<tenant>.sharepoint.com -Credential $Credential
Figure 18-12 Run Onboard-CloudHybridSearch.ps1

Create a content source for cloud hybrid search
After the cloud search application has been created and connected to Office 365, you must create a content source to be incorporated into the Office 365 search index.
- From Central Administration in your SharePoint Server farm, under Application Management, select Manage Service Applications.
- On the Manage Service Applications page, click the cloud SSA that you created earlier. See Figure 18-13.
Figure 18-13 Cloud Search service application page
- Under Crawling, select Content Sources.
- Click New Content Source to create a selection of content to crawl.
- Under Name, type a name for the content source.
- Under Content Source Type, select the type of content that will be crawled. Options include SharePoint Sites, Web Sites, File Shares, Exchange Public Folders, Line Of Business Data, or Custom Repository.
- Under Start Address, enter the addresses that will be included in the content search. If you are searching SharePoint Sites or Web Sites, for example, you can type http://server. If you intend to crawl file shares, type addresses as \servershare.
- Under Crawl Settings, select the behavior for crawling—either the folder and all subfolders or just the top-level folder.
- Under Crawl Schedules, configure a schedule for full and incremental crawls.
- Under Content Source Priority, configure whether this content source will be High or Normal priority. Selecting High priority prioritizes this content source’s processing over content sources with Normal priority.
- Click OK to create the content source.
- Right-click the content source and select Start Full Crawl.
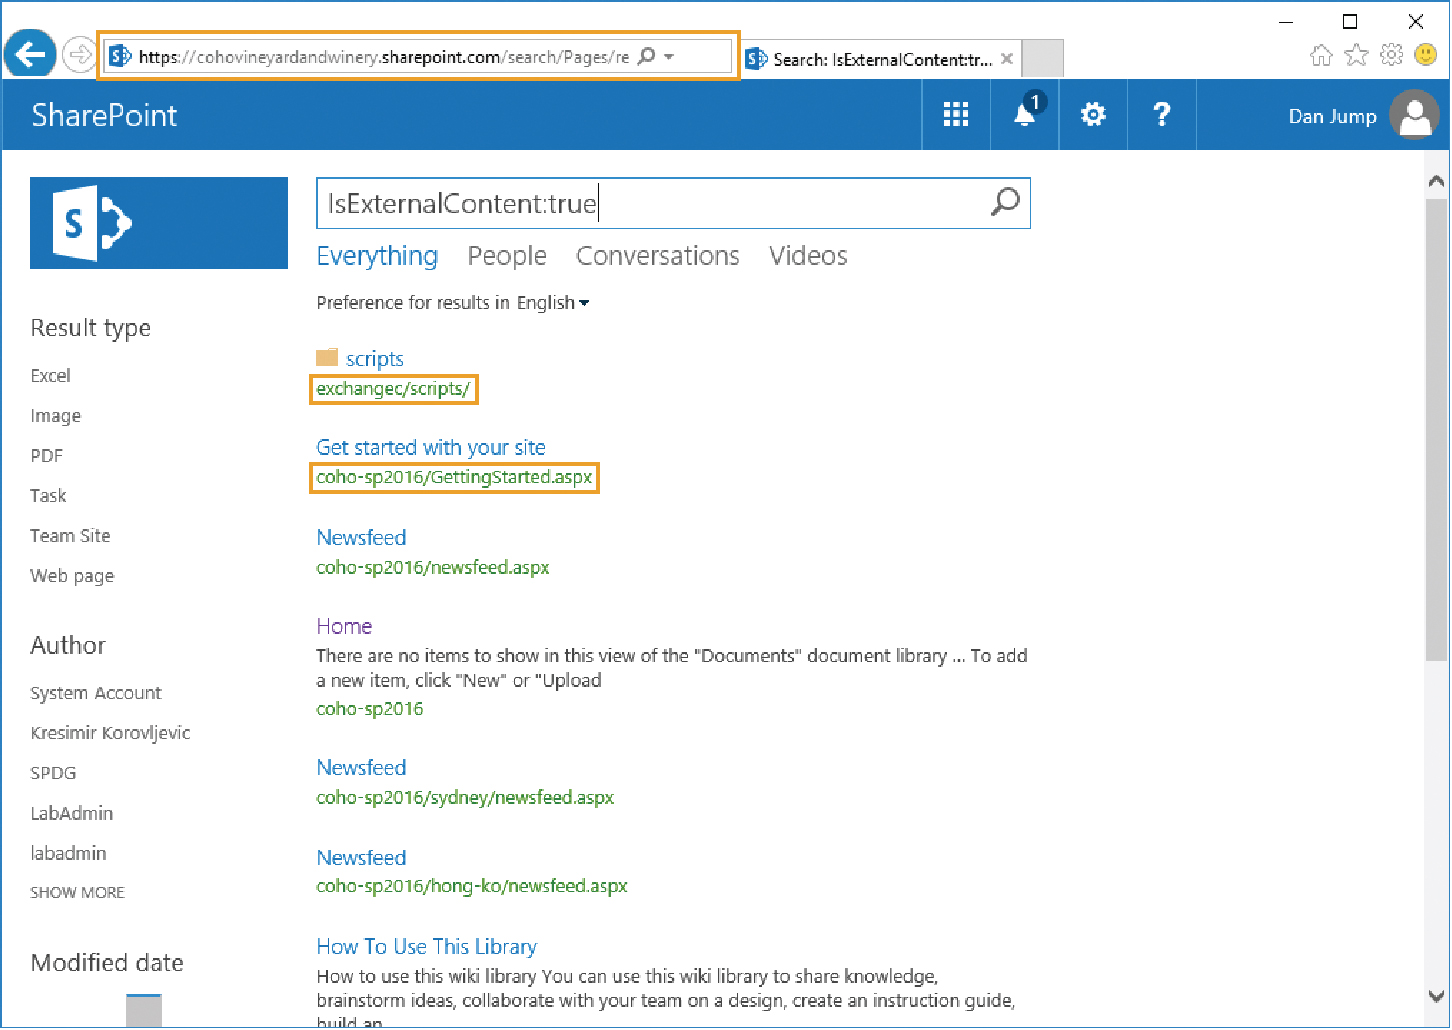
- After the content source crawls are completed, navigate to Office 365 and perform a search for IsExternalContent:true.
The IsExternalContent:true property shows content that is external to the operating environment (in this case, content external to SharePoint Online). In the example in Figure 18-14, a search was executed in SharePoint Online, and the data set shows results from the local SharePoint environment, confirming that the cloud hybrid search is working correctly.
Figure 18-14 SharePoint Online search with SharePoint Server results returned

Configure on-premises Search to display results from SharePoint Online
When you have configured cloud hybrid search so that SharePoint Online can return results from on-premises content sources, you can configure the on-premises SharePoint Server environment to display results from SharePoint Online. This way, your users get the same results from either environment.
To configure on-premises search results to include Office 365 sources, follow these steps.
- Using an account that is a member of the Farm Administrators group, launch Central Administration.
- Under Application Management, select Manage Service Applications.
- Select the cloud SSA.
- Under Queries And Results, click Result Sources.
- Select New Result Source.
- Under General Information, type a name of the result source, such as SharePoint Online.
- Under Protocol, select the Remote SharePoint button.
- Under Remote Service URL, enter the top-level URL of your SharePoint Online tenant (https://<tenant>.sharepoint.com). See Figure 18-15.
Figure 18-15 Configuring result source for cloud SSA
- Under Type, ensure that the SharePoint Search Results button is selected.
- Under Query Transform, leave the default transform value,
{searchTerms}. - Under Credentials Information, ensure that the Default Authentication button is selected.
- Click Save.
- Point to the newly created result source, select the down arrow, and then select Set As Default, as shown in Figure 18-16.
Figure 18-16 Set new result source as default
- Log on to the SharePoint Server search site with an identity that is federated and licensed in Office 365 for SharePoint Online and perform a search, using the
IsExternalContent:truesearch term.


Hybrid taxonomy
Originally available only for SharePoint Server 2016, hybrid taxonomy and content types are available for both SharePoint Server 2013 and SharePoint Server 2016 with the appropriate public updates.
Prerequisites
- November 2016 or later public update for hybrid taxonomy (https://support.microsoft.com/kb/3127940)
- June 2017 or later public update for hybrid content types (https://support.microsoft.com/help/3203432)
- Access to the Copy-SPTaxonomyGroups and Copy-SPContentTypes cmdlets
- Hybrid Picker, which has the following requirements:
- Account that is a member of the Farm Administrators group
- Service application administrator (Full Control) for the User Profile service
- Account that is an Office 365 global administrator
- Ability to run elevated (local administrator) commands on SharePoint server
- Appropriate SharePoint version
- Availability of SPO365LinkSettings cmdlet
Update term store permissions
For the SharePoint Timer job to complete successfully, the Timer service account must be made a member of the Managed Metadata Service administrators. To do this, follow this procedure.
- Launch an elevated SharePoint Management Shell.
- Run the following script:
$SPTimerServiceAccount = (Get-WmiObject win32_service | ? { $_.Name -eq (Get-Service | ? { $_.Displayname -eq “SharePoint Timer Service“}).Name }).StartName $SPSite = “http://coho-2016“ $SPTermStoreName = “Managed Metadata Service“ $Web = Get-SPWeb -Site $SPSite $TaxonomySession = Get-SPTaxonomySession -Site $Web.Site $TermStore = $TaxonomySession.TermStores[$SPTermStoreName] $TermStore.AddTermStoreAdministrator($SPTimerServiceAccount) $TermStore.CommitAll()
Copy on-premises taxonomy to SharePoint Online
If you have configured taxonomy groups, terms, and content types on-premises, export and copy those to Office 365 before beginning the hybrid configuration.
- Log on to SharePoint Server with a Farm Administrator account.
The Farm Administrator account should have access by default to view the content stored in the managed metadata service application.
- Launch the SharePoint Management Shell.
- Run the following script to copy the non-default taxonomy groups and terms to SharePoint Online.
The Copy-SPTaxonomyGroups command will fail if your group contains special term sets. In this example, the default groups People, Search Dictionaries, and System have been excluded because they contain special term sets that cannot be replicated. If you have additional term sets or the term store is stored in another managed metadata service instance name, you must update those parameters accordingly.
$SPOCredential = Get-Credential

$SPOSite = “https://<tenant>.sharepoint.com“

$SPSite = “http://<SharePoint Site URL>r“

$SPTermStoreName = “Managed Metadata Service“

$Web = Get-SPWeb -Site $SPSite

$TaxonomySession = Get-SPTaxonomySession -Site $Web.Site

$TermStore = $TaxonomySession.TermStores[$SPTermStoreName]

[array]$GroupNames = $TermStore.Groups.Name -notmatch (“People|Search Dictionaries|System“)

Copy-SPTaxonomyGroups -LocalTermStoreName $SPTermStoreName -LocalSiteURL $SPSite -RemoteSiteURL $SPOSite -GroupNames $GroupNames -Credential $SPOCredential
- Gather a list of the content types you wish to copy to SharePoint Online. To list all of the content types for a particular site, run the following script from the SharePoint Management Shell. Note any custom content types.
$SPSite = “http://coho-2016“

$Web = Get-SPWeb -Site $SPSite

[array]$ContentTypeNames = $Web.ContentTypes.Name
- Review the values stored in $ContentTypeNames. When you have determined the content types to copy from Office 365, use the following script to copy them.
$SPOCredential = Get-Credential

$SPOSite = “https://<tenant>.sharepoint.com“

$SPSite = “http://<Sharepoint Site Url>“

Copy-SPContentTypes -LocalSiteUrl $SPSite -LocalTermStoreName $SPContentTermStoreName -RemoteSiteUrl $SPOSite -ContentTypeName @(“Content Type 1 Name“,“Content Type 2 Name“) -Credential $SPOCredential
Configure hybrid taxonomy with Hybrid Picker
When you are ready to set up hybrid taxonomy, you can run Hybrid Picker to complete the configuration.
- Log on to the SharePoint server with an account meeting the prerequisites. If SharePoint Hybrid Picker has already been run, you can run it by double-clicking it on the desktop and skipping to step 9.
- Open Internet Explorer and log on to the Office 365 portal.
- Click the Admin tile to launch the Office 365 Admin Center dashboard.
- In the Office 365 Admin Center, expand Admin and then select SharePoint.
- In the navigation pane, select Configure Hybrid.
- On the Hybrid Picker page, click Go To Hybrid Picker Download Page. See Figure 18-17.
Figure 18-17 SharePoint Hybrid Picker page
- Click the Click Here link to start the SharePoint Hybrid Picker, as shown in Figure 18-18.
Figure 18-18 Launching SharePoint Hybrid Picker
- Click Install, as shown in Figure 18-19.
Figure 18-19 SharePoint Hybrid Configuration Wizard application installation
- Click Next, as shown in Figure 18-20.
Figure 18-20 SharePoint Hybrid Picker initial page
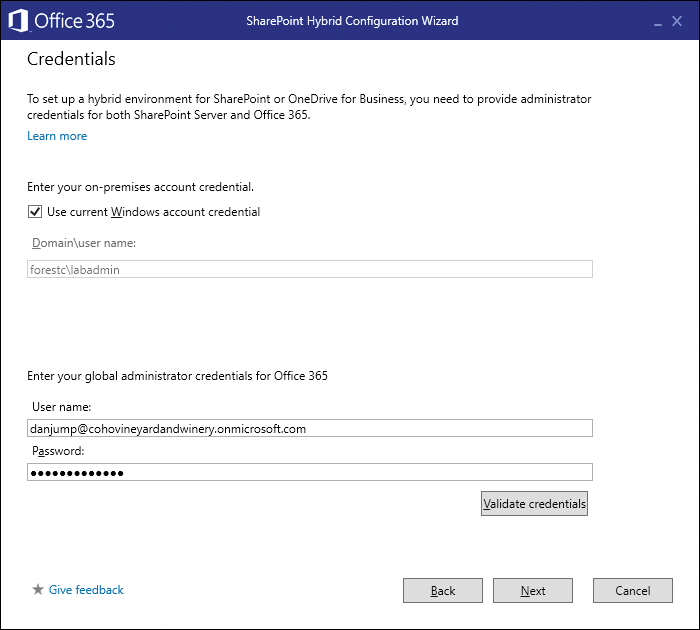
- Type your credentials for both the local Active Directory environment as well as Office 365. See Figure 18-21. Click Validate Credentials and click Next when the button becomes available.
Figure 18-21 SharePoint Hybrid Configuration Wizard Credentials page
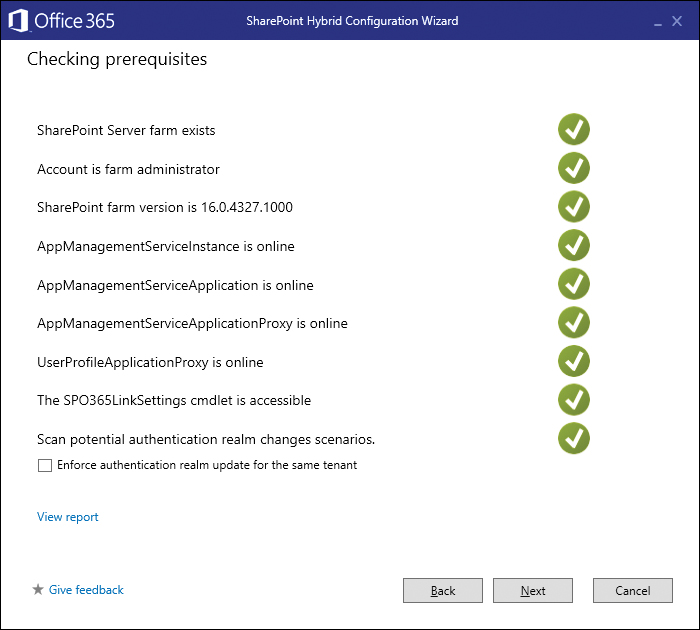
- Verify that all prerequisites pass. Resolve any errors. See Figure 18-22. Click Next to continue.
Figure 18-22 SharePoint Hybrid Configuration Wizard Checking Prerequisites page
- Select the Hybrid Taxonomy And Content Type check box and click Next.
- Enter data for the following values:
- SharePoint Server root site http://<SharePoint Server URL>.
- SharePoint Managed Metadata Application For most organizations, the default name is Managed Metadata Application. If you are unsure of the Managed Metadata Application Service name, launch Central Administration and select Manage Service Application under Application Management. Look for an entry with type Managed Metadata Service and use the value in the Name column in Hybrid Picker.
- Groups Type the names of the taxonomy groups you wish to replicate. You can use the list from the previous task, where you copied the taxonomy groups to Office 365, or you can leave it blank to replicate all groups except the system and default special groups.
- After reviewing the Configuration Summary page, click Next.
- Click Close.


Hybrid auditing
The SharePoint Hybrid Auditing feature is only available with SharePoint Server 2016. It is currently in Preview and is not supported in production environments.
Prerequisites
Before configuring SharePoint Hybrid Auditing, you must verify that you meet the prerequisites.
- SharePoint Server 2016
- An account with membership in the Farm Administrators group
- An account with the Office 365 Global Admin role
- Local administrator privileges on SharePoint Server where the configuration will be performed
- An account granted service application administrator privileges for the User Profile service
- Ability to browse to SharePoint Online from SharePoint Server where the configuration will be performed
Enable Audit Log Search Recording
To make auditing data available from Office 365, enable the recording of activity. These next steps enable logging in Office 365.
- Log on to SharePoint Server 2016 with an account meeting the prerequisites.
- Open Internet Explorer and log on to the Office 365 Security & Compliance Center at https://protection.office.com with an account that is a member of the Global Admin role.
- In the navigation pane, select Search & Investigation and then click Audit Log Search.
- Under Audit Log Search, click Start Recording User And Admin Activities and then select Turn On.
If the Start Recording User And Admin Activities link is not available, then recording is already enabled. For more information about Audit Log Search capabilities, see Chapter 8, “Inside the Security & Compliance Center: Data Classification, Loss Prevention, Governance, and Discovery.”
Enable SharePoint hybrid auditing
After cloud logging has been enabled, you can proceed to the configuration of hybrid auditing. Hybrid auditing is only available for SharePoint Server 2016.
- Log on to SharePoint Server 2016 with an account meeting the prerequisites. If the SharePoint Hybrid Configuration Picker has already been run, you can run it again by double-clicking it on the desktop and skipping to step 9.
- Open Internet Explorer and log on to the Office 365 portal.
- Click the Admin tile to launch the Office 365 Admin Center dashboard.
- In the Office 365 Admin Center, expand Admin and then select SharePoint.
- In the navigation pane, select Configure Hybrid.
- On the Hybrid Picker page, click Go To Hybrid Picker Download Page.
- Click the Click Here link to start the SharePoint Hybrid Picker.
- Click Install.
- Click Next.
- Enter your credentials for both the local Active Directory environment as well as Office 365. Click Validate Credentials and click Next when the button becomes available.
- Verify that all prerequisites pass. Resolve any errors. Click Next to continue.
- Select the Hybrid Auditing (Preview) check box and click Next.
- After reviewing the Configuration Summary page, click Next.
- Click Close.
After the hybrid configuration has been completed, logs are uploaded to SharePoint Online through a timer job. The logs that will be uploaded are stored by default in the %ProgramFiles%Common FilesMicrosoft SharedWeb Server Extensions16LOGSSPUnifiedAuditEntry folder.
App launcher
The hybrid app launcher configures the SharePoint Server App Launcher experience to integrate with Office 365. You configure the app launcher with the SharePoint Hybrid Picker.
Prerequisites
Before configuring the SharePoint Hybrid app launcher, you must verify that you meet the prerequisites.
- SharePoint Server 2013 July 2016 Cumulative Update
- SharePoint Server 2016 RTM
- An account with membership in the Farm Administrators group
- An account with Office 365 global admin role
- Local administrator privileges on SharePoint Server where the configuration will be performed
Enable the hybrid app launcher
To configure the SharePoint Hybrid app launcher, follow these steps.
- Log on to SharePoint Server 2016 with an account meeting the prerequisites. If the SharePoint Hybrid Configuration Picker has already been run, you can run it again by double-clicking it on the desktop and skipping to step 9.
- Open Internet Explorer and log on to the Office 365 portal.
- Click the Admin tile to launch the Office 365 Admin Center dashboard.
- In the Office 365 Admin Center, expand Admin and then select SharePoint.
- In the navigation pane, select Configure Hybrid.
- On the Hybrid Picker page, click Go To Hybrid Picker Download Page.
- Click the Click Here link to start SharePoint Hybrid Picker.
- Click Install.
- Click Next.
- Type your credentials for both the local Active Directory environment as well as Office 365. Click Validate Credentials and click Next when the button becomes available.
- Verify that all prerequisites pass. Resolve any errors. Click Next to continue.
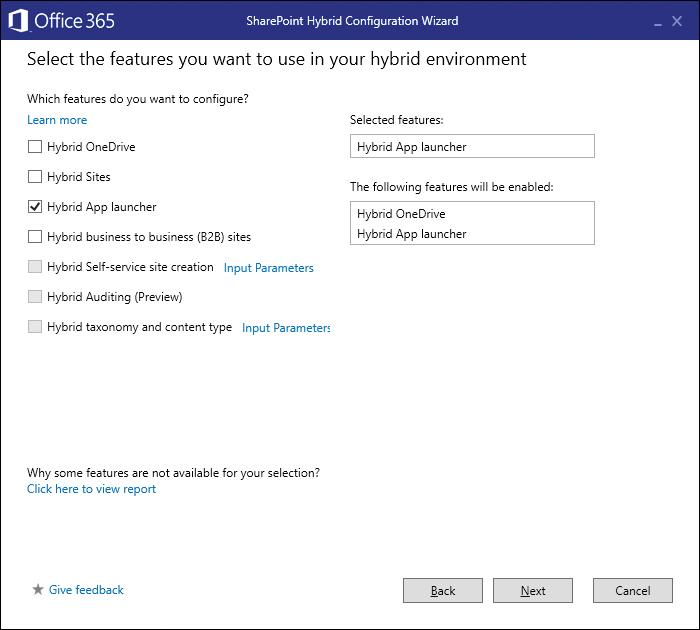
- Select the Hybrid App Launcher check box, as shown in Figure 18-23.
Figure 18-23 Hybrid App launcher configuration
- Review the Configuration Summary page, as shown in Figure 18-24.
Figure 18-24 Hybrid App Launcher Configuration Summary page
- Click Next.
- Click Close.

Business-to-business extranet
Although business-to-business extranets are configured in Office 365, you can configure an optional integration component to enable integrated authentication by using OAuth so that users can navigate seamlessly between local intranet sites on-premises and extranet sites stored in SharePoint Online.
Prerequisites
Before configuring SharePoint hybrid business-to-business sites, you must verify that you meet the prerequisites.
- SharePoint Server 2013 September 2015 cumulative update
- SharePoint Server 2016 RTM
- An account with membership in the Farm Administrators group
- An account with the Office 365 Global Administrator role
- Local administrator privileges on SharePoint Server where the configuration will be performed
Enable hybrid business-to-business (B2B) sites
Use the following steps to enable the integrated authentication between on-premises SharePoint sites and Office 365 sites.
- Log on to SharePoint Server 2016 with an account meeting the prerequisites. If the SharePoint Hybrid Configuration Picker has already been run, you can run it again by double-clicking it on the desktop and skipping to step 9.
- Open Internet Explorer and log on to the Office 365 portal.
- Click the Admin tile to launch the Office 365 Admin Center dashboard.
- In the Office 365 Admin Center, expand Admin and then select SharePoint.
- In the navigation pane, select Configure Hybrid.
- On the Hybrid Picker page, click Go To Hybrid Picker Download Page.
- Click the Click Here link to start SharePoint Hybrid Picker.
- Click Install.
- Click Next.
- Type your credentials for both the local Active Directory environment as well as Office 365. Click Validate Credentials and click Next when the button becomes available.
- Verify that all prerequisites pass. Resolve any errors. Click Next to continue.
- Select the Hybrid Business to Business (B2B) Sites check box, as shown in Figure 18-25.
Figure 18-25 Hybrid Business to Business (B2B) Sites configuration
- Review the Configuration Summary page, as shown in Figure 18-26.
Figure 18-26 Hybrid Business To Business (B2B) Sites Configuration Summary page
- Click Next.
- Click Close.


After OAuth has been configured, you can create extranet sites in SharePoint Online and share the sites with external entities.
Summary
In this chapter, you learned about the various kinds of hybrid configurations available for SharePoint Server 2013 and SharePoint Server 2016 environments. Hybrid SharePoint configurations enable you to give your users the ability to move between on-premises and cloud environments. In addition, you might want to explore configuring other SharePoint Online components, such as OneDrive for Business or Yammer. You can find information on OneDrive in Chapter 19, “OneDrive for Business,” and deployment, planning, and configuration information for Yammer in Chapter 20, “Yammer.”