Chapter 8. Inside the Security & Compliance Center: Data classifications, loss prevention, governance, and discovery
The Security & Compliance Center, shown in Figure 8-1, has three core functions: alerting, tracking, and managing threats; managing permissions and roles in Office 365; and managing the data life cycle.

Figure 8-1 Security & Compliance center
This chapter discusses the data management tools available, including data classifications and labels, loss prevention policies, governance, and eDiscovery.
Classifications
Classifications enable you to specify labels and policies you use to categorize and manage the life cycle of information.
Labels
Use labels to categorize or classify information. After a label has been created and published, it’s available to users in applications such as Microsoft Outlook, Microsoft OneDrive, and Microsoft SharePoint. When labels are applied to email or documents (either manually or automatically), the content is categorized, retained, or deleted based on the settings you specify in policies. You can create labels to retain content for a certain length of time or delete it when it reaches a certain age.
Labels are global features, applying to all Office 365 services and features, including user and resource mailboxes in Exchange Online, SharePoint Online, OneDrive for Business, and Office 365 Groups. Due to their global nature, you should start transitioning older per-service data life cycle management features to labels. This includes:
- Exchange Online Specific features such as retention tags, retention policies, and messaging records management.
- SharePoint Online and OneDrive for Business Specific features such as in-place records management, Records Center, and information management policies.
The older features will continue to work side by side with labels, but moving forward, Microsoft recommends using labels created in the Security & Compliance Center for your data governance needs. Labels can be configured in a label-only mode as well as with retention and deletion actions.
Content can have a number of retention policies or labels applied to it, each with different criteria, actions, and retention periods. In the case of multiple policies, what happens to your data? Figure 8-2 shows the precedence of policy application.

Figure 8-2 Retention precedence
Retention wins over deletion For example, Retention Policy 1 retains email for 1 year and then deletes it, and Retention Policy 2 says retain email for 5 years and then delete it. After 1 year, the email would be deleted and hidden from the user’s view (Retention Policy 1) but retained in the Recoverable Items folder until the content reaches 5 years (Policy 2).
Longest retention period wins If content is subject to multiple policies with retention actions, the content is retained for the longest period. In the previous example, Retention Policy 1 deleted email after 1 year, but the Retention Policy 2 action was to retain for 5 years. Policy 2 has the longest retention period, so the content will be retained for 5 years.
Explicit inclusion wins over implicit inclusion If User 1 applies Label 1 with a retention action of 10 years but the configuration of Retention Policy 2 is to delete after 5 years, the content will be retained for 10 years as long as the user manually applies Label 1 before the message has been permanently deleted. Labels that are applied by policy are considered implicit. Explicit is also conferred in the concept of specificity, meaning that if Retention Policy 1 retains content in all mailboxes for 1 year, but Retention Policy 2 specifically retains content in User 1’s mailbox for 5 years, the content in User 1’s mailbox will be retained for 5 years.
Shortest deletion period wins If content is subject to multiple policies that delete content (with no retention), it will be deleted at the end of the shortest retention period.
Labels are reusable classification mechanisms that you can use as part of multiple label policies. Only one label can be applied per piece of content (such as an email or document), and an explicit label always takes precedence over an auto-apply label. The following are key points regarding label application.
- If a user assigns a label manually, they can change or remove the label.
- If content has an automatically applied label, a user can replace the label manually.
- If a user applies a label to content manually, an auto-apply label cannot replace it.
- If content is subject to multiple policies that auto-apply labels, the label for the oldest rule is assigned.
Labels cannot be applied to Exchange Online public folders or Skype data and can only be automatically applied to content that matches a keyword search or a sensitive data type. Labels that are published to users can be applied to Exchange, SharePoint, OneDrive, and Office 365 Groups. Labels that are auto-applied based on sensitive information types can only be applied to SharePoint and OneDrive, and labels that are auto-applied based on a query can be applied to Exchange, SharePoint, OneDrive, and Office 365 Groups.
Creating a label
Labels are created from the Classifications menu. In this example, you create two labels—one label that will be published for users to apply manually to content they want to retain, and then one label that will be published and automatically applied to email to be retained for a year and then deleted. To create the labels, follow these steps.
- In the Security & Compliance Center, expand Classifications and select Labels.
- Select + Create A Label.
- Type a name and a description for the label and click Next, as shown in Figure 8-3.
Figure 8-3 Creating a label
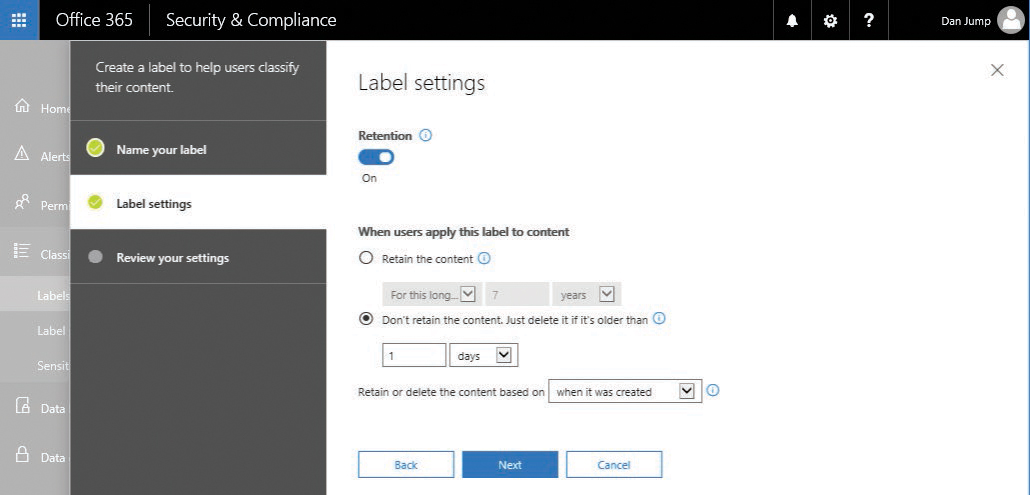
- Turn the Retention slider on, select the Don’t Retain The Content button, select 1 Day, and then click Next. See Figure 8-4.
Figure 8-4 Adjusting label settings
- Confirm the settings and click Create This Label. See Figure 8-5.
Figure 8-5 Reviewing label settings
- Click Close.
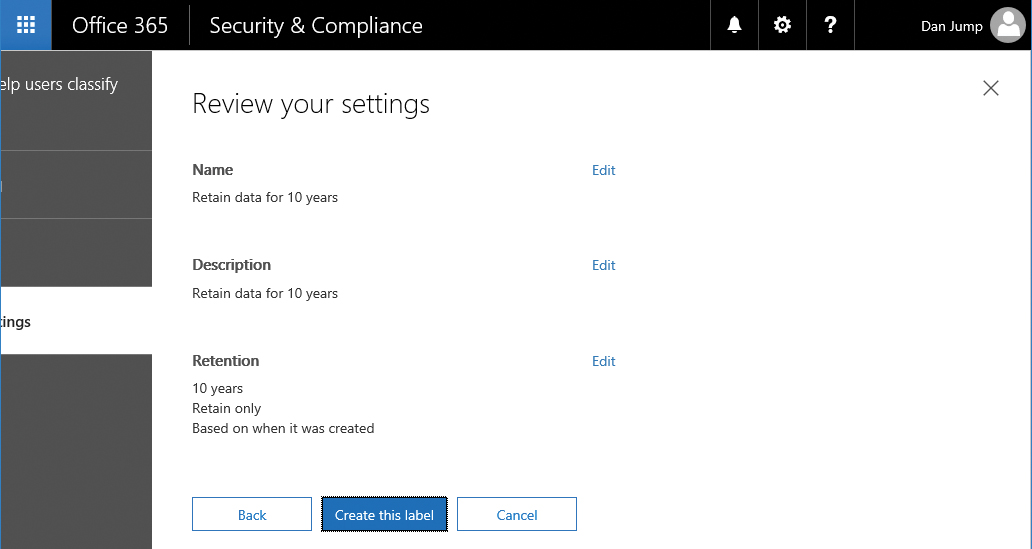
- Create a second label named Retain Data For 10 Years, but select 10 years as the retention period with no delete option. Compare your settings to Figure 8-6.
Figure 8-6 Reviewing settings for label with 10-year retention


Publishing a label for manual application
Publishing a label makes it available for users to use in applications. Labels can be published in two ways—for manual or automatic application. Publishing one or more labels creates a label policy with the selected labels as members. Labels that you want to apply automatically must be based on keyword searches or sensitive data types.
- On the Labels page, select the check box next to the previously created Retain Data For 10 Years label.
- Select Publish Label. See Figure 8-7.
Figure 8-7 Publishing a label
- Click Next after confirming the label to publish.
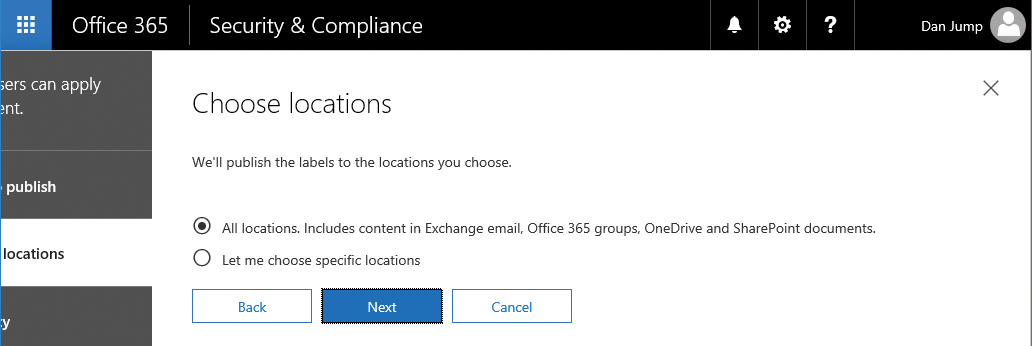
- Select the All Locations. Includes Content In Exchange Email, Office 365 Groups, OneDrive And SharePoint Documents button and click Next. See Figure 8-8.
Figure 8-8 Choosing locations to publish labels
- Type a description and a name for the policy, as shown in Figure 8-9, and click Next.
Figure 8-9 Naming the label policy being published
- Confirm the settings and click Publish Labels, as shown in Figure 8-10.
Figure 8-10 Reviewing settings for publishing a label
- Click Close.


Publishing a label for automatic application
In this example, you create a label that automatically applies to content based on a sensitive-content type of template.
- On the Labels page, select check box next to the Delete Sensitive Data label.
- Click the Auto-Apply Label button, as shown in Figure 8-11.
Figure 8-11 Auto-applying Delete Sensitive Data label
- Click Next.
- Select the Apply Label To Content That Contains Sensitive Information button and click Next. See Figure 8-12.
Figure 8-12 Choosing auto-apply label settings
- Select Custom (Figure 8-13) and click Next at the bottom of the page.
Figure 8-13 Selecting Custom to create a new custom policy template
- Click the Add button and then select one or more check boxes from Sensitive Information Types, shown in Figure 8-14. Click Add when you are finished.
Figure 8-14 Adding sensitive information templates to custom policy
- Click Done.
- Confirm the list of items to detect and click Next.
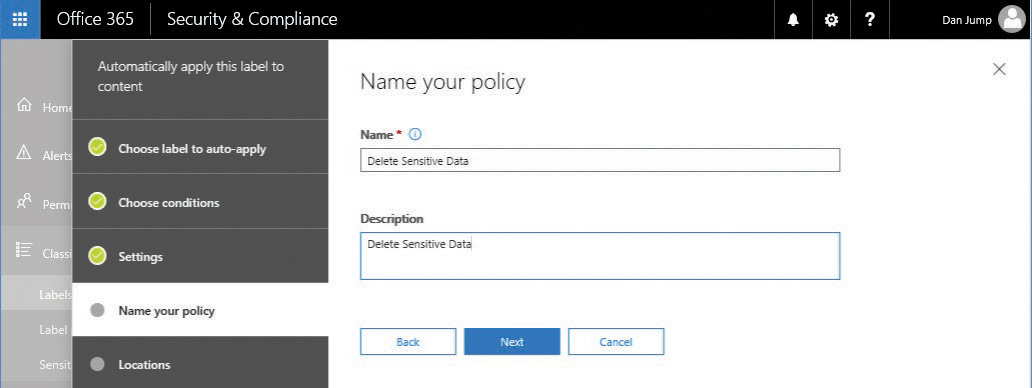
- On the Name Your Policy page, shown in Figure 8-15, type a name and description for the policy and click Next.
Figure 8-15 Naming the policy
- Select the All Locations button and click Next.
- Click the Auto-Apply button, as shown in Figure 8-16.
Figure 8-16 Reviewing the settings for the policy
- Click Close.


Label policies
Label policies can be used to assign labels and specify actions (such as retain or delete) automatically.
Label policies are automatically created when you publish a label for either manual or automatic application. See Figure 8-17.

Figure 8-17 Configured label policies
On the Label Policies page, you can choose to publish or auto-apply labels that you’ve already created. Label policies that contain labels with the retention action also appear under Data Governance | Retention.
Sensitive information types
The Sensitive Information Types page (Figure 8-18) displays the collection of data types that can be used to classify data. Although Office 365 comes with many default sensitive information types, you can also create a custom type based on your organizational requirements (for example, a part number format, unique identifier format that you give customers, or other content that you can search for based on regular expressions). Sensitive information types can be used in labels, retention policies, and data loss prevention policies.
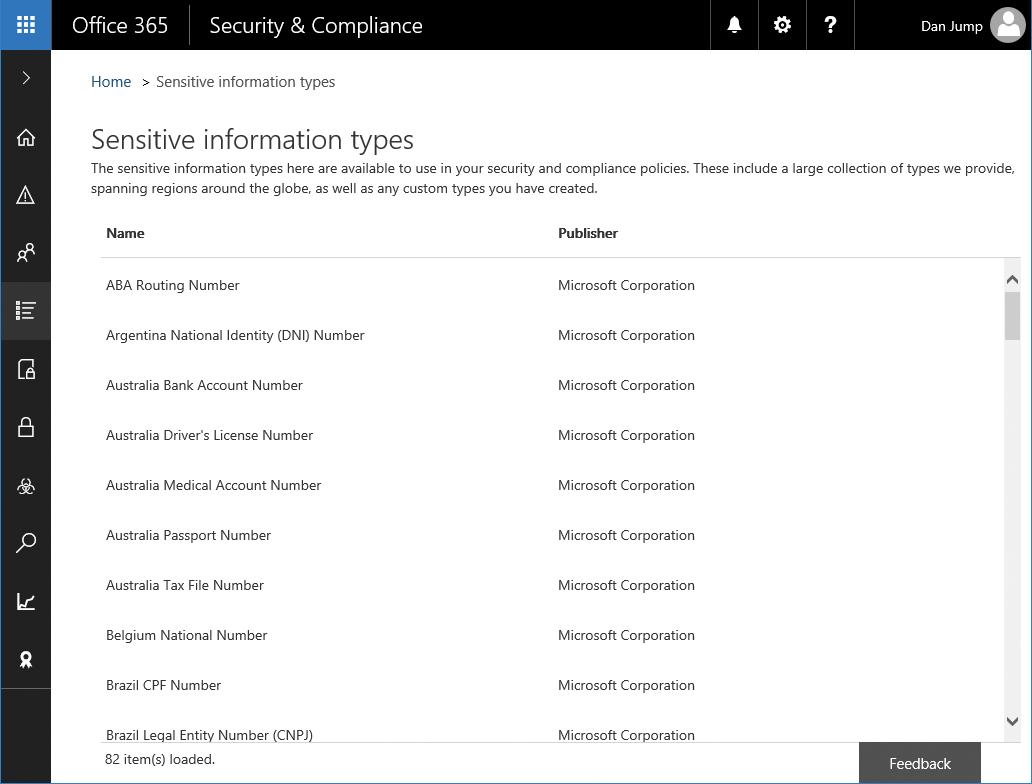
Figure 8-18 Sensitive information types
Custom sensitive information types are specified by an XML file. You can find the specifications for the file structure at https://support.office.com/en-us/article/Create-a-custom-sensitive-information-type-82c382a5-b6db-44fd-995d-b333b3c7fc30 if you want to create a sensitive information type template based on unique patterns and document structures.
Data loss prevention
Data loss prevention (DLP) helps you identify and protect your organization’s sensitive data. You can configure policies based on keywords, sensitive information types, or document fingerprints to restrict distribution of content or perform other actions, such as forcing encryption. A DLP policy can identify data across many locations, including Exchange Online, SharePoint Online, and OneDrive for Business. Figure 8-19 shows the Data Loss Prevention page.
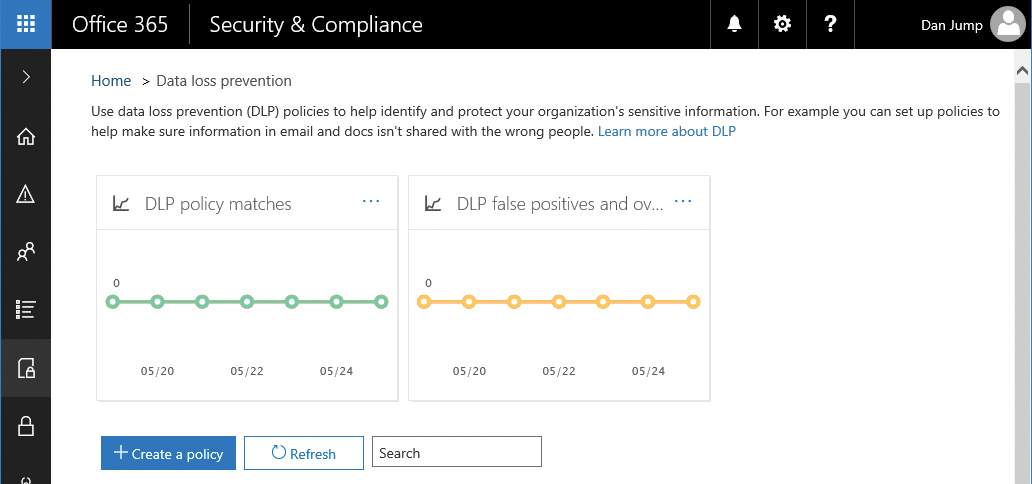
Figure 8-19 Data Loss Prevention page
A DLP policy comprises one or more locations and one or more rules. Locations are the services where sensitive data is stored, such as Exchange Online or OneDrive, and rules contain conditions that content must meet and actions to take when content matching conditions is found.
Conditions examine content and context. For example, sensitive content might be deemed lower risk if it is shared internally versus externally.
Depending on where content is being accessed, Actions restricts content from being accessed or sent.
When a document meets a policy’s conditions for OneDrive or SharePoint content, access is blocked for everyone except the site collection owner and the last user to modify the document. After the document is brought back into compliance, the original permissions are restored. When access to a document is blocked, the document appears with a policy tip icon overlaid on the document’s original icon.
For email content, the action blocks the email from being sent. Depending on the DLP transport rule configuration, the sender might receive a non-delivery report (NDR), a policy tip, or an email notification that their message was found to be noncompliant.
There might be instances when users have a business justification to handle sensitive data or transmit it outside the organization. User notifications and user overrides can notify a user that the content violated a policy and present them with an option to override if they have a business justification.
A DLP policy can also include incident notifications. An incident notification can be sent to a compliance officer; it includes information about the item that was matched, the content that matched the rule, and the name of the person who last modified the content. In the case of an email message that triggers a DLP rule, the report also includes information regarding the sender and attaches the message that matched the policy.
Policy
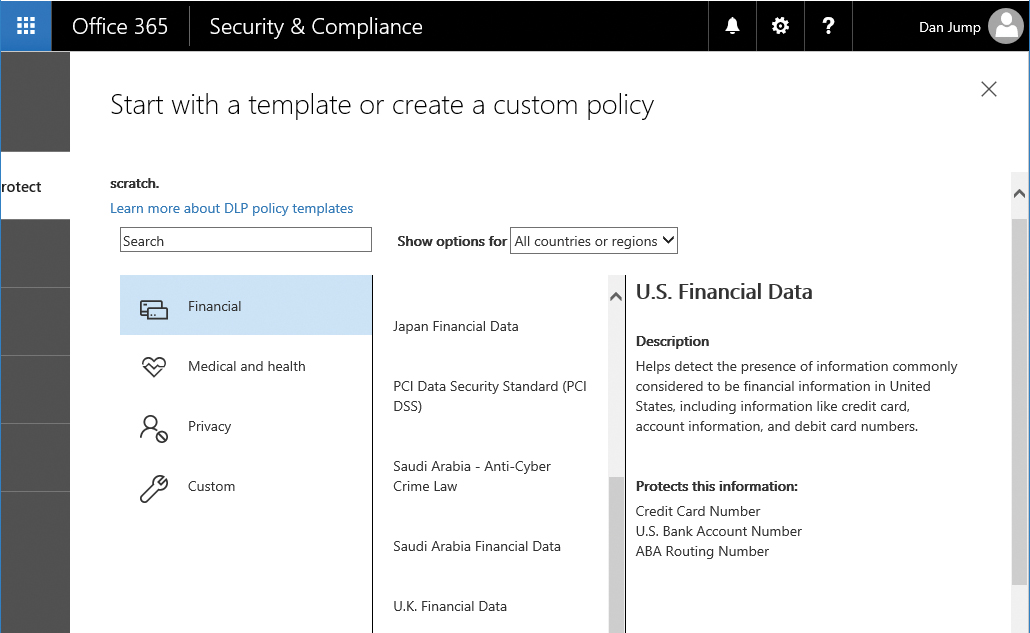
The first step in creating a DLP policy is determining the type of content to protect. Office 365 includes a number of templates (based on sensitive data types) that can be used to give your policy a starting point.
To create a policy from a template, follow these steps.
- In the Security & Compliance Center, click Data Loss Prevention and select Policy.
- Click + Create A Policy.
- Select a policy template from the default templates, such as U.S. Financial Data shown in Figure 8-20, and click Next.
Figure 8-20 DLP policy creation
- Type a name and description for the policy and click Next.
- Select the All Locations In Office 365. Includes Content In Exchange Email And OneDrive And SharePoint Documents button and click Next. See Figure 8-21.
Figure 8-21 Choosing locations to apply a data loss prevention policy
- Choose how to protect the data.
The default option is to detect when the content is shared outside the organization, but you can also choose With People Inside The Organization or configure advanced selection settings.
- Click Next when finished. See Figure 8-22.
Figure 8-22 Choosing options for protecting data
If you choose advanced settings, you can edit the individual rule settings in the template or add your own, as shown in Figure 8-23.
Figure 8-23 Configuring advanced settings for a DLP policy
- After making your selection (either for the default or to modify the rule settings through advanced settings), click Next.
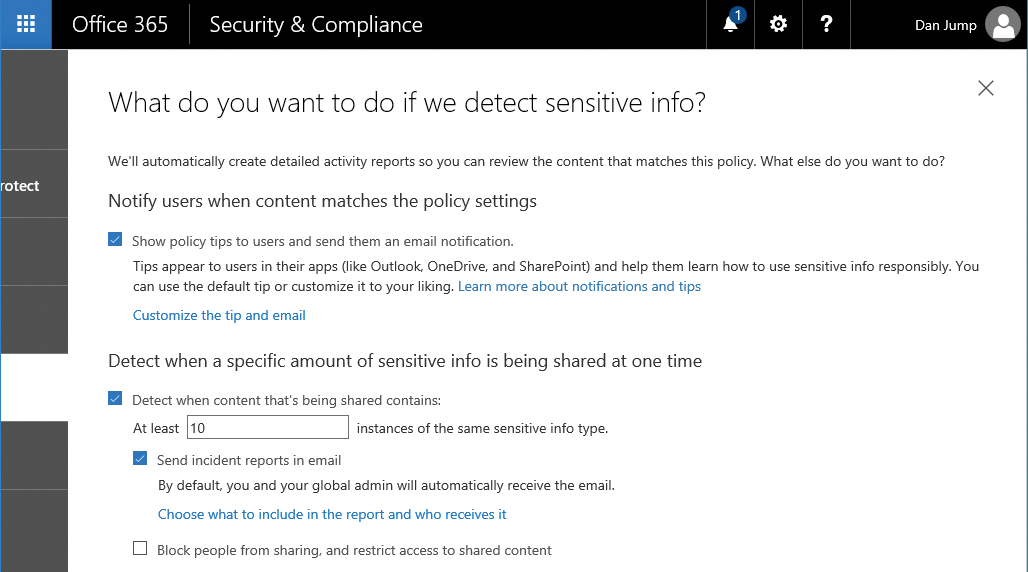
- Select options for how to respond to sensitive data being detected. Options include configuring a policy tip (a notification displayed in the user interface) as well as the thresholds for content sharing, whether to block the user from sending, or whether to deliver an incident report to an administrator or compliance officer. See Figure 8-24.
Figure 8-24 A screenshot shows a list of actions to take if sensitive information is detected by the DLP policy.
- Select the I’d Like To Test It Out First button to enable the DLP policy in test mode. Click Next.
If you’re creating DLP policies with a large potential impact, consider rolling the policy out gradually.
Configure the policy in test mode without Policy Tips Use the DLP reports to assess the impact. You can use DLP reports to view the number, location, type, and severity of policy matches. You can use the reports to tune the queries and policies. In test mode, users will be unaware that DLP policies are scanning their activities. DLP policies will not affect the productivity of people working in your organization. To turn on this mode, select the I’d Like To Test It Out First button when configuring the policy.
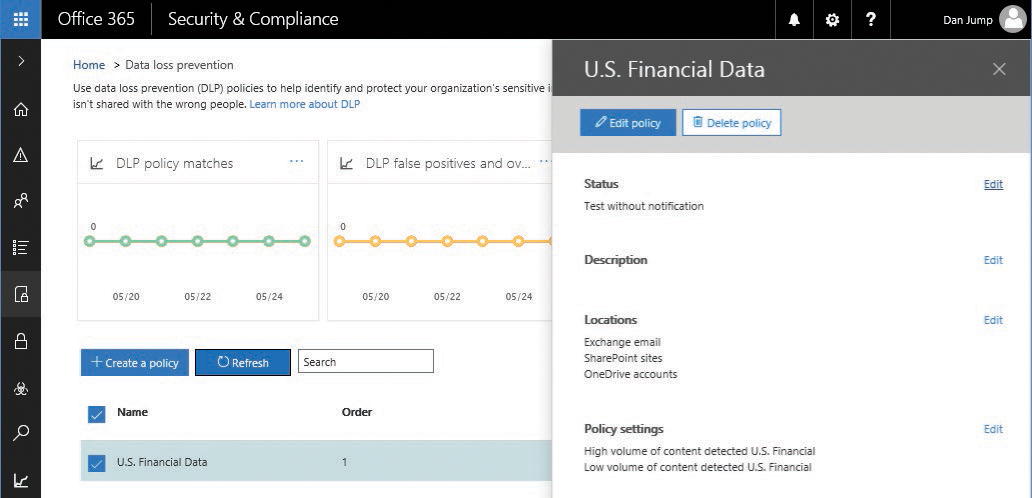
Show Policy Tips while in test mode After you have configured the policy to your liking, you can edit the policy and enable Policy Tips. With Policy Tips enabled, users are notified while they are accessing data that matches the policy. At this stage, you can also ask users to report false positives so that you can refine the rules further, such as by excluding document libraries, users, or recipients of data. To enable Policy Tips, edit the policy, click Edit in the Status section (Figure 8-25), and then select the Show Policy Tips While In Test Mode button.
Figure 8-25 Editing DLP policy
Yes, turn it on right away After you are confident about the configuration, you can begin full enforcement of the policies so that the actions in the rules are applied. To enable the policy fully, edit the policy, click Edit in the Status section, and then select the Yes, Turn It On Right Away button.
You can turn off a policy at any time. If your policy has multiple rules, you can also disable individual rules of the policy if they are having an adverse effect on your organization.
- Confirm the settings and click Create. See Figure 8-26.
Figure 8-26 Reviewing DLP policy settings


App permissions*
App permissions are part of Advanced Security Management. App permissions enable you to configure policies for applications connected and authorized to use your Office 365 subscription. See Figure 8-27.

Figure 8-27 App Permissions page with link to Advanced Security Management
When Advanced Security Management has been activated in your tenant, you can click the Go To Advanced Security Management button to be redirected to https://portal.cloudappsecurity.com/#/app-permissions. From there, you can create and manage policies and reports for applications connected to your Office 365 subscription. See Figure 8-28.
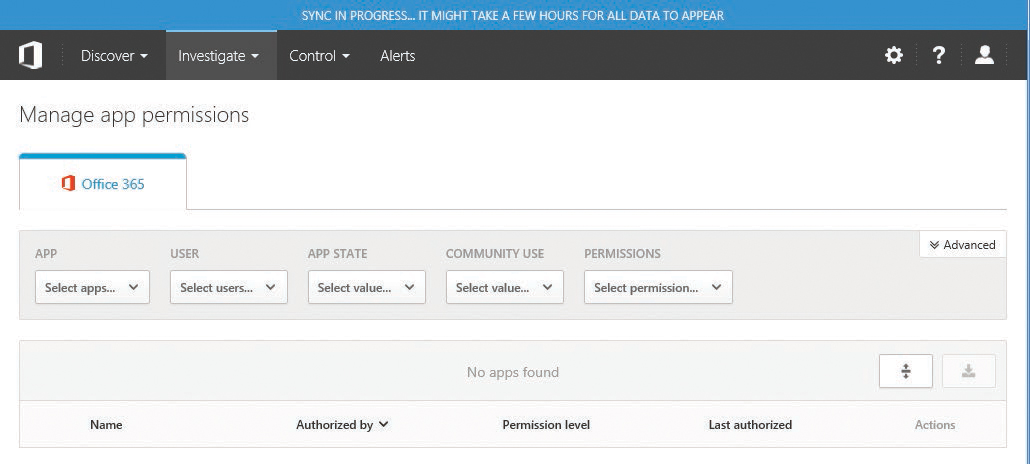
Figure 8-28 Cloud App Security App permissions page
Device management
The built-in Mobile Device Management (MDM) for Office 365 service helps you secure and manage mobile devices such as iPhones, iPads, Android phones and tablets, and Windows phones. You can create and manage device security policies, remotely wipe a device, and view detailed device reports.
To configure MDM for Office 365, you need to go through several steps.
- Activate the Mobile Device Management service.
- Set up Mobile Device Management.
- Configure domains for Mobile Device Management.
- Configure an APN certificate for iOS devices.
- Set up multifactor authentication.
- Manage device security policies.
- Enroll devices.
Activating the Mobile Device Management service
Before you can begin creating policies for device management, you must first activate the Mobile Device Management service. To create mobile device management policies, you must be logged on as a user with the Global Administrator role.
- In the Security & Compliance Center, click Data Loss Prevention and then select Device Management.
- Click Let’s Get Started, as shown in Figure 8-29.
Figure 8-29 Office 365 Mobile Device Management configuration start page
- If desired, update the name of the MDM security group and then click Start Setup. See Figure 8-30.
Figure 8-30 Office 365 Mobile Device Management setup
- After the setup completes, and you are redirected to the Office 365 Admin Center, begin typing mobile device management in the Search box. When it appears, click it.
- Wait for the MDM service activation, shown in Figure 8-31, to complete.
This can take up to a few hours to complete. If you accidentally close the page or navigate away from it, you can return to the page through the Security & Compliance | Data Loss Prevention | Device Management menu.
Figure 8-31 Activating Office 365 Mobile Device Management
After it has completed, you are directed to the Mobile Device Management For Office 365 page, shown in Figure 8-32.
Figure 8-32 Mobile Device Management home page


Configuring domains
If you have custom domains configured for your tenant, you configure additional DNS records for your tenant. If you will not use Windows-based devices with MDM for Office 365, or just use the default tenant name, you can skip this section.
After these configuration steps, users of Windows devices are redirected to enroll in MDM for Office 365.
- Under Settings on the right side of the page, click Manage Settings to display a list of four tasks. See Figure 8-33.
Figure 8-33 Setting up Mobile Device Management for Office 365
If you have already added all your domains and configured the DNS records for your tenant (including the EnterpriseEnrollment and EnterpriseRegistration DNS records), you can skip to the next step. Clicking the Set Up link next to Configure Domains For MDM opens the Domain Management page of the Office 365 Admin Center.
- If you have added your domains but have not created the necessary DNS records for MDM, add these records to your organization’s external DNS, based on the information in Table 8-1.
Table 8-1 MDM for Office 365 DNS records
Host name
Record Type
Target Address
TTL
EnterpriseEnrollmentCNAMEEnterpriseEnrollment-s.manage.windows.com3600EnterpriseRegistrationCNAMEEnterpriseregistration.windows.net3600

Configuring Apple Push Notifications service
If you intend to manage Apple iOS devices, you must configure MDM for Apple Push Notifications service (APNs). The Apple Push Notifications service enables third-party application developers to send notification data to applications (such as MDM for Office 365) installed on Apple devices.
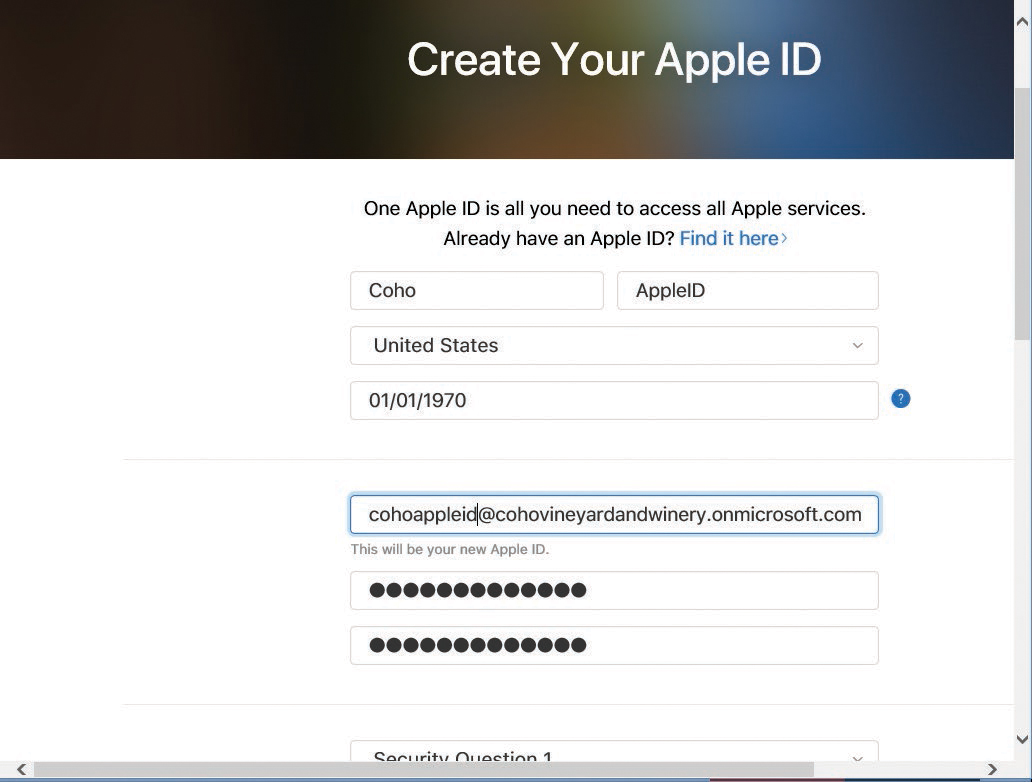
Configuring Apple push notifications requires an Apple ID. To create an Apple ID for your organization, follow these steps.
- Fill out the form, using the details of the shared mailbox created in step 1. Record the answers to the security questions. See Figure 8-34.
Figure 8-34 Creating an Apple ID
To configure APNs, follow these steps.
- Next to Configure An APNs Certificate For iOS Devices, click Set Up.
- On the Install Apple Push Notification Certificate page, click the Download Your CSR File link. Save it to a location on your computer and then click Next.
- Click the Apple APNS Portal link, shown in Figure 8-35.
Figure 8-35 Creating an APNs certificate
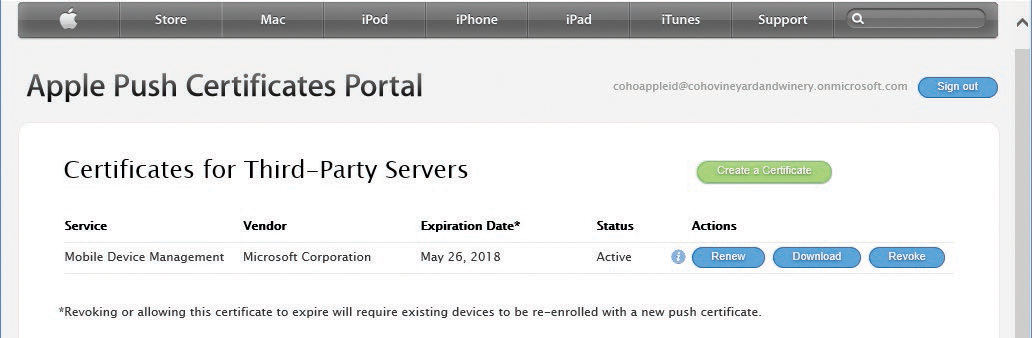
- Click the Sign In With Your Apple ID link. Type your corporate Apple ID and password and click Sign In. See Figure 8-36.
Figure 8-36 Apple Push Certificates Portal
- Click Create A Certificate, select the check box to agree to the terms and conditions, and click Accept.
- Browse to the CSR file you saved previously and click the Upload button, shown in Figure 8-37.
Figure 8-37 Uploading CSR for the Apple Push notifications certificate
- If prompted, cancel the Download The Generated.json File in identity.apple.com. If the page doesn’t refresh, click the browser refresh button.
- Click the Download button next to the Mobile Device Management certificate (Figure 8-38) and save it to a directory on your computer.
Figure 8-38 Downloading the certificate
- Navigate back to Office 365 and click Next on the Create An APNs Certificate page.
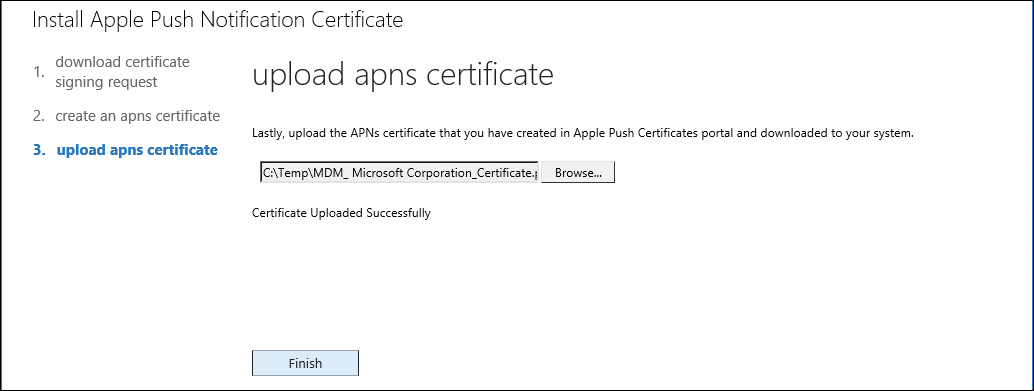
- Browse to the .pem certificate file downloaded from the Apple Push Certificates portal and click Finish. See Figure 8-39.
Figure 8-39 Uploading the APNs certificate
- Navigate back to the Mobile Device Management portal (Security & Compliance | Data Loss Prevention | Device Management) and click Manage Settings.


Configuring multifactor authentication
Click the Set Up link next to Set Up Multi-Factor Authentication To Configure Multi-Factor Authentication (if it hasn’t already been configured). For more information about configuring multifactor authentication, see Chapter 3, “Federation Services and Authentication.”
To configure device security policies, follow these steps.
- Create a Security Group for testing Office 365 MDM Device security policies. For more information about configuring security groups, refer to Chapter 7, “Inside the Security & Compliance Center: Alerting, Threat Management, and Reporting.”
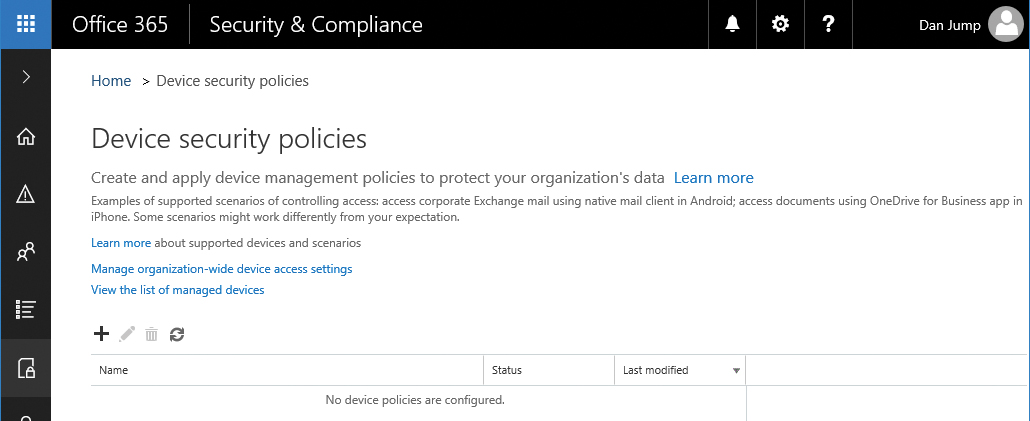
- Click the Set Up link next to Manage Device Security Policies to manage and configure a device security policy. (The link opens the Security & Compliance Center.) Navigate to Data Loss Prevention | Device Security Policies.
- Click the + button to create a new device security policy. See Figure 8-40.
Figure 8-40 Device security policies page
- Type a name and description for the new policy and click Next. See Figure 8-41.
Figure 8-41 New Device Security Policy Wizard
- Select the requirements to apply, such as requiring a password and an inactivity lock.
- Scroll to the bottom of the page and choose either Allow Access And Report Violation (which allows noncompliant devices to access Office 365) or Block Access And Report Violation. Click Next. See Figure 8-42.
Figure 8-42 Second page of the New Device Security Policy Wizard
- Configure any of the additional options shown in Figure 8-43 and click Next.
Figure 8-43 Third page of the New Device Security Policy Wizard
- Click the Yes button to specify a group to test the policy deployment against and then click the plus sign (+) to add a security group to test the policy against. Click Next. See Figure 8-44.
Figure 8-44 Selecting a group to apply the device security policy to
- Confirm the settings shown in Figure 8-45 and click Finish.
Figure 8-45 Confirming device security policy settings


Device security policies
After you have activated Office 365 Mobile Device Management, the Device Security Policies page becomes available. Use this page to configure additional security policies or organization exclusions from MDM.
Organization-wide device access settings
On the Device Security Policies page, select Manage Organization-Wide Device Access settings.
Use the buttons shown in Figure 8-46 to allow MDM-compatible devices to connect to Office 365 or block them from connecting. You can also exclude certain groups from being managed through MDM policies.

Figure 8-46 Organization-wide device access settings
Blocking Exchange ActiveSync for unsupported devices
To secure your organization further, you can block Exchange ActiveSync access to Office 365 for mobile devices that Office 365 MDM does not support. When you are satisfied that your device security policy works, edit the policy to block access for devices not compatible with Office 365 MDM.
- Navigate to Data Loss Prevention | Device Security Policies and select Manage Organization-Wide Device Access Settings.
- Choose the Block button to prevent unsupported devices from accessing Office 365 and click Save.
List of managed devices
Clicking View List Of Managed Devices opens the Mobile Device Management page and displays the default view.
Data governance
The Data Governance section covers how to handle data over the life cycle of your data, from creation or ingestion through retention and deletion.
Dashboard
Launching the Data Governance dashboard, shown in Figure 8-47, presents several options to learn about data governance concepts, topics, and tasks.

Figure 8-47 Data Governance dashboard
Import
The Data Governance | Import page, shown in Figure 8-48, is a dashboard for import tasks that you have configured to import your organization’s PST files into Office 365. Office 365 supports two types of import tasks—network upload and drive shipping.
Drive shipping requires you to purchase hard drives, create a mapping file that describes which PST is to be imported into which mailbox or archive, copy the PSTs to the hard drives, and encrypt the drives with BitLocker and then send the drives by courier to an Office 365 data center for upload to an Azure storage blob by Office 365 support personnel.
Network upload requires you to upload all the PSTs to import to an Azure shared access signatures (SAS) storage blob where Office 365 can access them and create a mapping file that associates the PSTs with the user mailboxes or archives.
In either case, PSTs can be imported into user primary mailboxes, archive mailboxes, or inactive mailboxes. After PST files are imported to an Office 365 mailbox, the Retention Hold setting for the mailbox is turned on for an indefinite duration, and the retention policy assigned to the mailbox won’t be processed until you turn off the retention hold or set a date to turn off the hold to ensure that the mailbox owner or administrator has time to configure appropriate retention settings for the mailbox.

Figure 8-48 Import service dashboard
Network import
The network import process requires you to stage your data on an Azure storage blob, create a mapping file to associate the content with users, and then create an import job responsible for importing the content.
Generate a SAS URL and install AzCopy.
- Log on to the Security & Compliance Center by using an account that has the Organization Management permission (such as a global administrator) in the Security & Compliance Center as well as the Exchange Online Mailbox Import Export role, and navigate to Data Governance | Import. For best performance, perform these tasks on the file server where the PSTs are currently stored.
- On the Import page, click + New Import Job.
- Type a name for the import job and click Next.
Note that the import job name cannot have uppercase letters or spaces.
- Click the Upload Your Data button, as shown in Figure 8-49, to select the network import job type and click Next.
Figure 8-49 Choosing the import job type
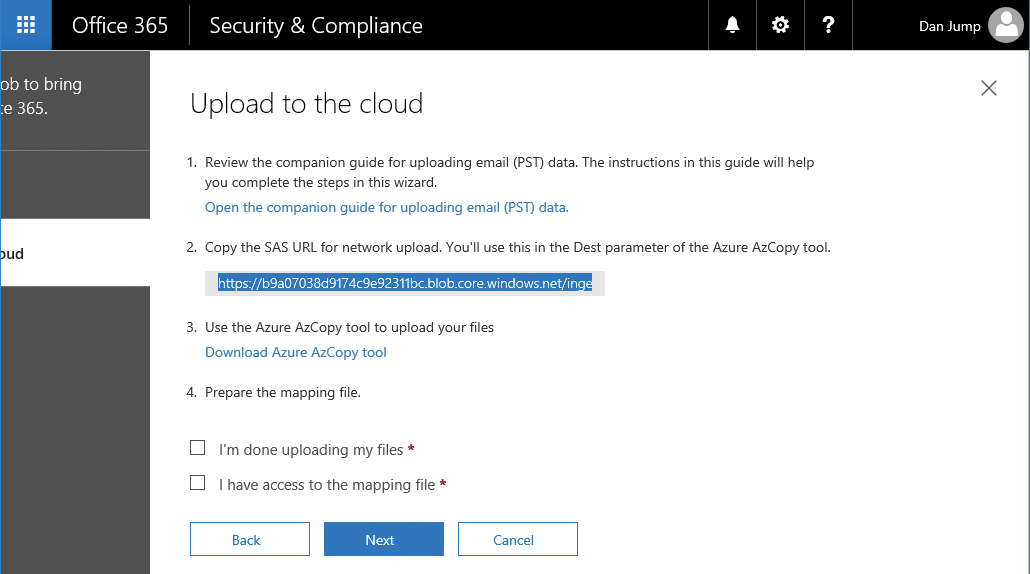
- Click Show Network Upload SAS URL, copy the displayed URL, and save it to a text file for later. See Figure 8-50.
Figure 8-50 Copying the SAS URL to the clipboard and saving it to a text file for later
- If you don’t already have it installed, download the Azure AzCopy tool from the link provided on the page and install it to the default location. (The AzCopy tool requires 64-bit Windows.)
- Cancel the upload wizard.
You restart the wizard after staging and preparing the files.

To copy PSTs to Microsoft Azure, follow these steps.
- Launch a command prompt on the computer where you have installed the AzCopy tool and change to the directory where AzCopy is installed. (The default location is %ProgramFiles(x86)%Microsoft SDKsAzureAzCopy.)
- Run the following command to upload the PST files to Office 365. See Figure 8-51.
AzCopy.exe /Source:<location of PST files> /Dest:<SAS URL> /V:<Log file location>
For example, if you have saved the PSTs in D:PSTs on the computer from where you’re running AzCopy.exe and want to save the log file to C:LogFiles, the syntax would look like this:
AzCopy.exe /Source:D:PSTs /Dest: “https://b9a17028e9174c9e92421bc.blob.core.windows.net/ingestiondata?sv=2012-02-12&se=2017-06-25T17%3A51%3A31Z&sr=c&si=IngestionSasForAzCopy201705261751288693&sig=SqVSSykF09Yyww2p4g2TMJmsrvmgTcCRxZfVY2mMezw%3D” /V:C:LogfilesAzCopyUpload.log
If you are accessing the PSTs through the remote share PSTs on the server FILESERVER, the syntax would look this:
AzCopy.exe /Source:\FILESERVERPSTs /Dest: “https://b9a17028e9174c9e92421bc.blob.core.windows.net/ingestiondata?sv=2012-02-12&se=2017-06-25T17%3A51%3A31Z&sr=c&si=IngestionSasForAzCopy201705261751288693&sig=SqVSSykF09Yyww2p4g2TMJmsrvmgTcCRxZfVY2mMezw%3D” /V:C:LogfilesAzCopyUpload.log
Figure 8-51 Copying files to Azure SAS URL with AzCopy

The PST import file is used to assign the uploaded PSTs to users. To prepare the PST Import mapping file, follow these steps.
- Download a copy of the PST import mapping file from https://go.microsoft.com/fwlink/p/?LinkId=544717. Alternatively, create a CSV file with the following columns:
Workload,FilePath,Name,Mailbox,IsArchive,TargetRootFolder,ContentCodePage,SPFileContainer,SPManifestContainer,SPSiteUrl
- Modify the PST import file, creating one line per PST that you uploaded. Use the information in Table 8-3 to populate the CSV appropriately and save it to a directory on your computer.
Table 8-3 CSV template parameter values
Parameter
Description
Example
Workload
Specifies the Office 365 service that data will be imported to. To import PST files to user mailboxes, use Exchange.
Exchange
FilePath
Specifies the folder location in the Azure storage location where PST files are uploaded.
Name
Specifies the name of the PST file that will be imported into the user mailbox. This value is case-sensitive.
danjump.pst
Mailbox
Specifies the email address of the mailbox that the PST will be imported into. If the destination is an inactive mailbox, you must specify the mailbox GUID of the inactive mailbox.
or
0ba887ee-f7a5-4765-8a40-9a787193fccc
IsArchive
Specifies whether the target mailbox is primary or archive. TRUE is archive, FALSE is primary mailbox.
FALSE or TRUE
TargetRootFolder
Specifies where in the target mailbox to import data.
If left blank, items will be imported from the PST to a new folder called ImportedPST at the root level of the mailbox.
If you specify / , then items will be imported into the user’s inbox folder.
If you specify /<foldername>, items will be imported into a new folder named <foldername>.
<blank>
/
/foldername
Optional parameter to specify numeric value for codepage to use for importing PSTs in the ANSI file format. This is used for importing PSTs from Chinese, Japanese, and Korean sources because these languages typically use double-byte character sets.
See Code Page Identifiers at https://msdn.microsoft.com/en-us/library/windows/desktop/dd317756(v=vs.85).aspx for values that can be used.
SPFileContainer
For PST Import, leave this field blank.
Not applicable
SPManifestContainer
For PST Import, leave this field blank.
Not applicable
SPSiteURL
For PST Import, leave this field blank.
Not applicable
A sample PST Import mapping file might look like the example in Figure 8-52.
Figure 8-52 PST import mapping file for network upload

To create the import job, follow these steps.
- Navigate to Security & Compliance Center | Data Governance | Import and click + New Import Job.
- Type a name for the job and click Next.
- Choose the Upload Your Data button and click Next.
- Select both check boxes on the page to indicate that you have finished uploading files and have created the mapping file, click the Show Network Upload SAS URL link, and then click Next. See Figure 8-53.
Figure 8-53 Continuing the PST upload process
If you don’t click Show Network Upload SAS URL, you get an error when clicking Next, stating that you need to fill out all fields.
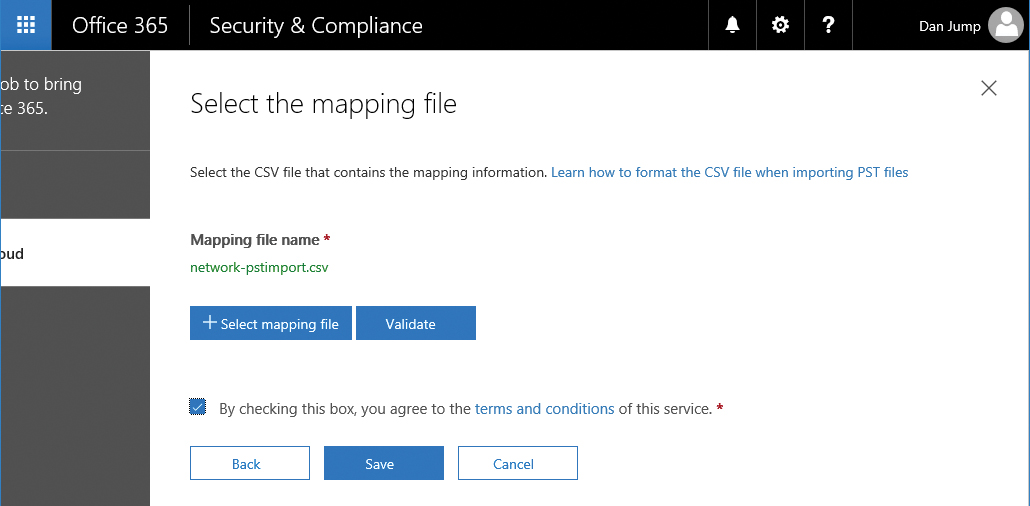
- Click + Select Mapping File and browse to the mapping file you have created.
- Click Validate to check for errors in the CSV.
- Select the check box to agree to terms of service and click Save. See Figure 8-54.
Figure 8-54 Selecting mapping file and validating
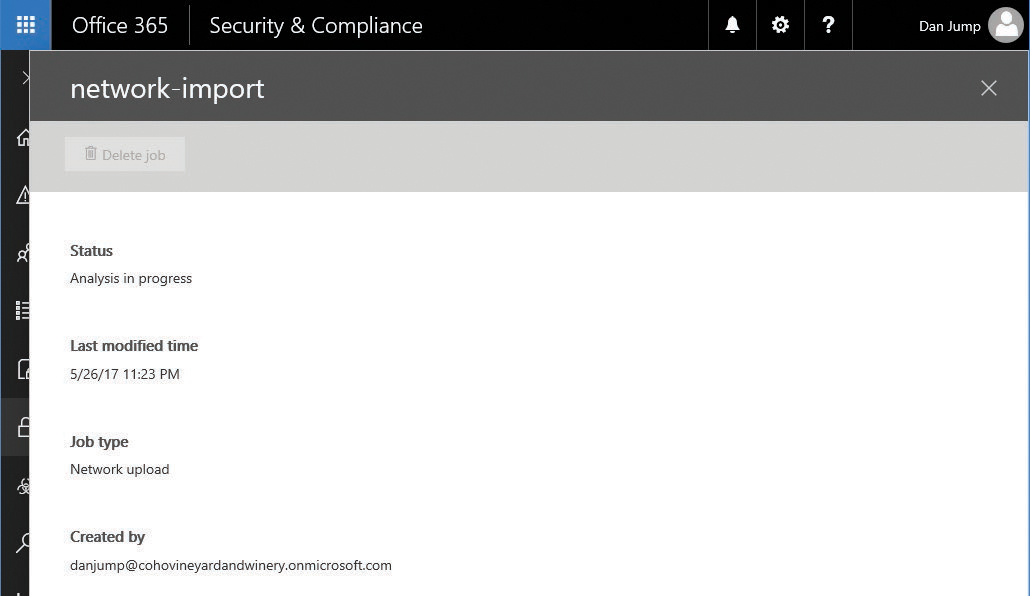
- Click Close and view the informational fly-out, shown in Figure 8-55, that shows the status of the import. Click Close after you have reviewed the information.
Figure 8-55 Network upload informational fly-out
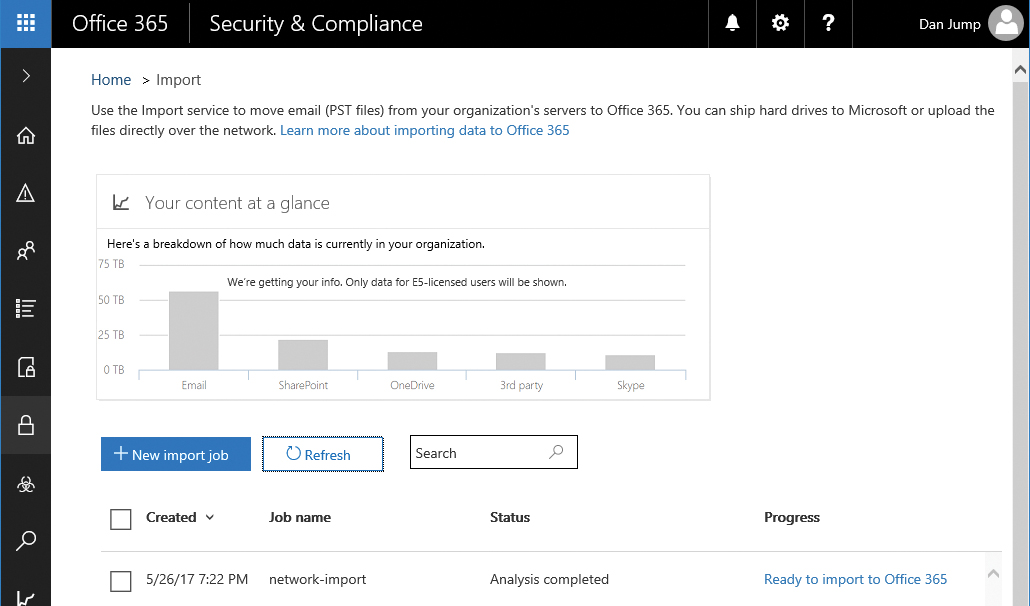
- Monitor the status of the analysis on the Data Governance | Import page.
- After analysis has completed, click the Ready To Import To Office 365 link shown in Figure 8-56.
Figure 8-56 Network PST import job ready to import to Office 365
- Click the Import To Office 365 button shown in Figure 8-57.
Figure 8-57 Beginning the import to Office 365
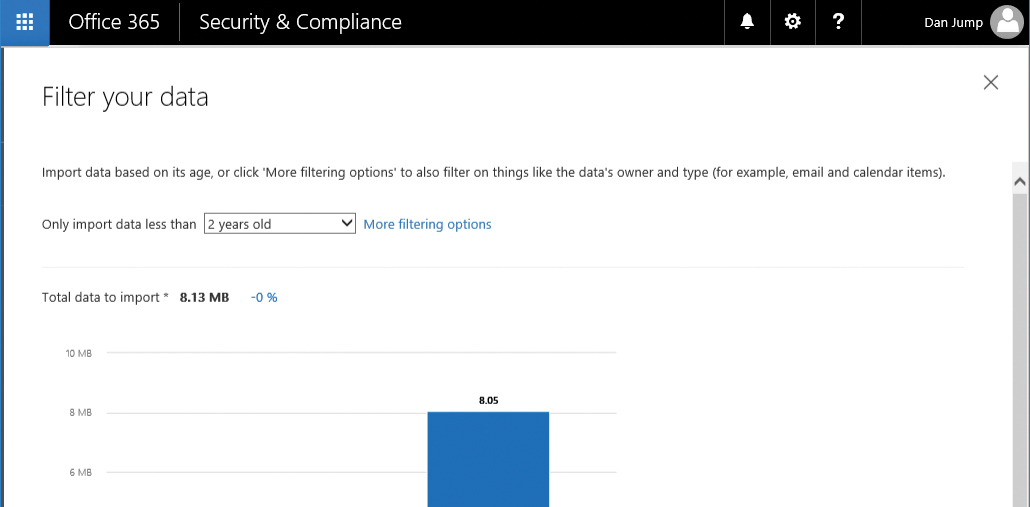
- Choose whether to filter the import (Figure 8-58). If you select the Yes button, clicking Next opens the filtering criteria page. If you select the No button, clicking Next opens the final confirmation.
If you choose to filter the data, you are presented with options to select the types of data to import and exclude content based on date or senders.
Figure 8-58 Choosing filtering option
- Click More Filtering Options to see the additional filtering criteria shown in Figure 8-59.
Figure 8-59 Filter Your Data page
- Review, set any additional filtering options, and click Apply. See Figure 8-60.
Figure 8-60 More filtering options
- If you are filtering data, complete your filtering selections and click Next.
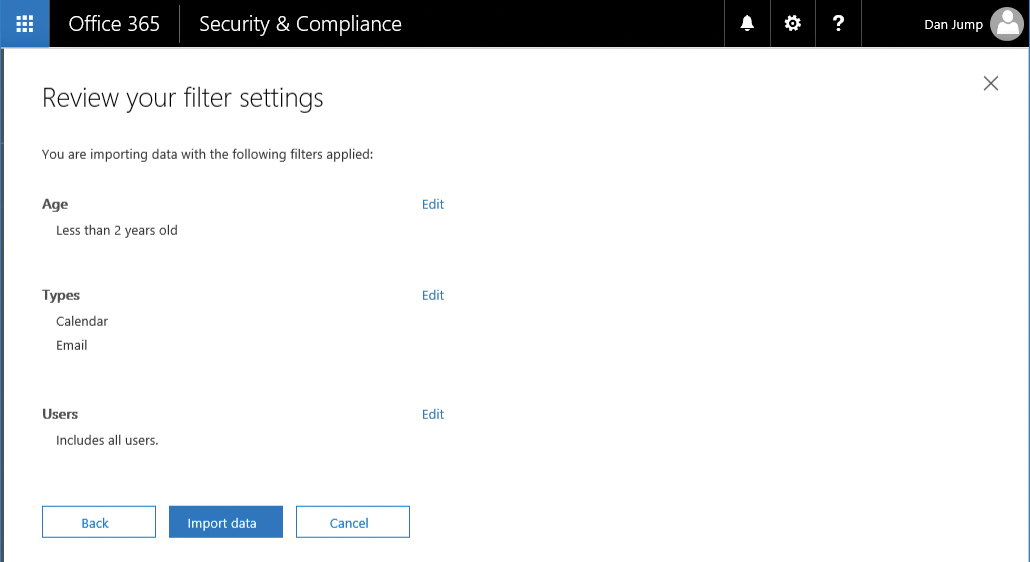
One of two screens appears based on whether you chose to filter data. Figure 8-61 shows the result of choosing to filter data.
Figure 8-61 Import data page if no filtering was selected
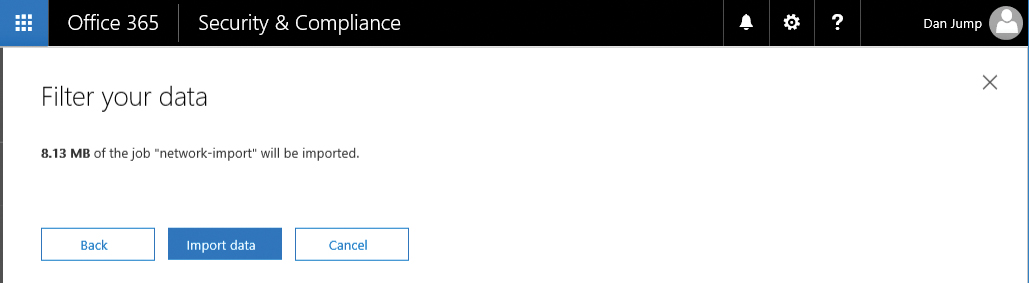
If you choose not to filter data, the Review Your Filter Settings page appears, as shown in Figure 8-62, showing the result of choosing not to filter data.
Figure 8-62 Import data page if filtering options were selected
- Click Import Data.
- Click Close on the confirmation page, shown in Figure 8-63.
Figure 8-63 Import batch confirmation page
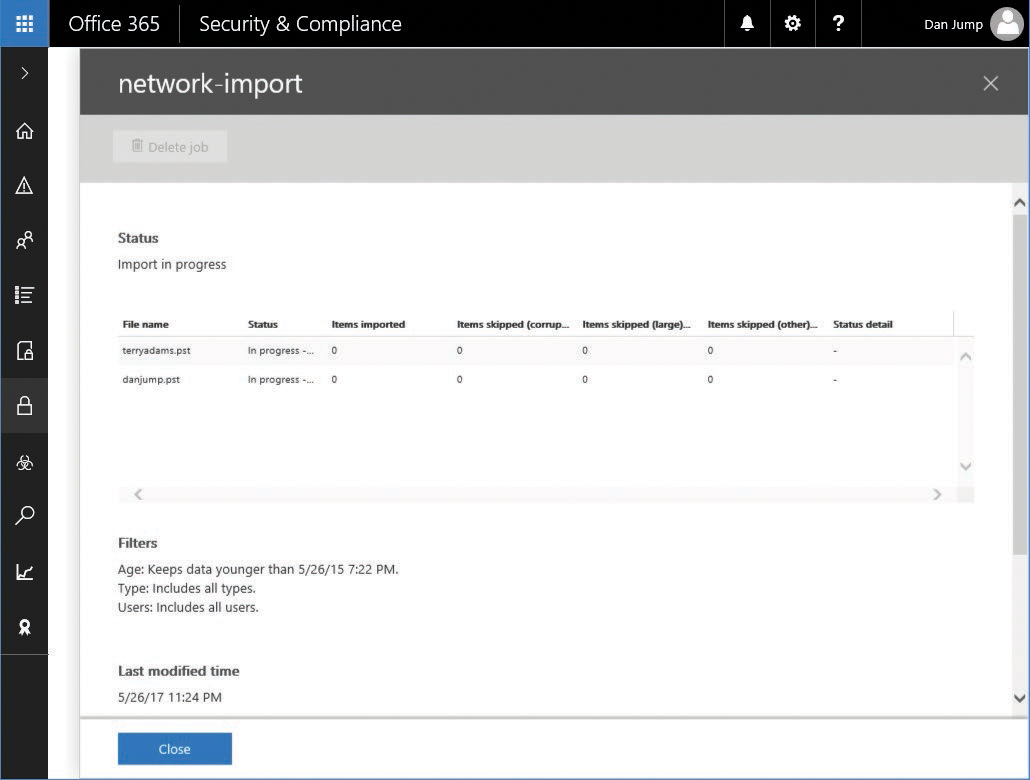
- You can monitor the import progress by selecting the import job on the Data Governance | Import page.
After the import job has completed, the mailboxes are configured with the RetentionHoldEnabled parameter. When you are certain that your retention policies are correct and want to enable the processing of retention policies on the mailbox, you can connect the Office 365 Exchange Online PowerShell endpoint and run this cmdlet on the mailboxes with retention hold enabled:
Set-Mailbox -Identity -RetentionHoldEnabled $false


Drive shipping
If you have a large volume of data to import, you can use a drive shipping import job to ingest your data into Office 365. The overall process is very similar to the Network Import method, except that you are staging data on physical hard drives instead of in an Azure storage blob.
To use drive shipping, you need to prepare the hard drives, and you must use internal SATA or SAS hard drives for drive shipping. External USB hard drives are not accepted.
To download the PST import tool and secure storage key, follow these steps.
- From the Security & Compliance Center, navigate to Data Governance | Import and click + New Import Job.
- Type a name for the job and click Next.
- Select the Ship Hard Drives To One Of Our Physical Locations button, shown in Figure 8-64, and click Next.
Figure 8-64 Choose Import Job Type page for drive shipping
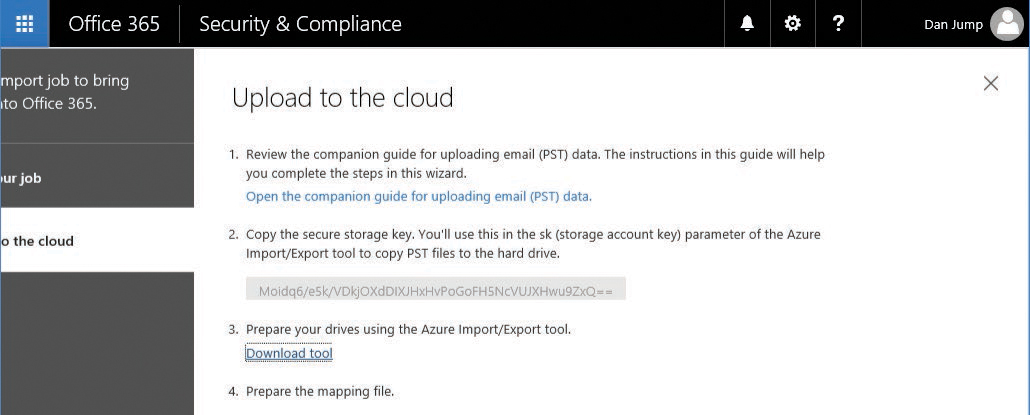
- Click Copy The Drive Shipping Key and then copy the value and save it in a text file.
- Click Download Tool, shown in Figure 8-65, to download the Azure Import/Export tool.
Figure 8-65 Upload To The Cloud page for drive shipping
- Cancel the wizard because you restart the wizard after the hard drives are staged and the PST import mapping file has been created.

To copy the PST files to the hard drive, follow these steps.
- Extract the downloaded WaImportExportV1.zip file to a directory on your computer.
- Open an elevated command prompt on the computer to which the WaImportExportV1.zip was downloaded and extracted and change to the directory to which the WaImportExportV1.zip file was extracted.
- Run the following command to prepare the first hard drive and copy the PST files to it. See Figure 8-66.
WAImportExport.exe PrepImport /j:<Name of journal file> /t:<Drive letter> /id:<Name of session> /srcdir:<Location of PST files> /dstdir:<PST file path> /sk:<Storage account key> /encrypt /logdir:<Log file location>
For example, if your hard drive is mounted as Drive D and the PSTs are stored in the C:PSTs local path, and you want to save the log file to C:Logging, the syntax would look like the following:
WAImportExport.exe PrepImport /j:DriveShip1.jrn /t:D /id:driveship1 /srcdir:C:PSTs /dstdir:“ingestiondata/” /sk:“zbNIIs2Uy7g25Yoak+LlSHfqVBGOeNwjqtBEBGqRMoidq6/e5k/VPkjOXdDIXJHxHvNoNoFH5NcVUJXHwu9ZxQ==” /encrypt /logdir:c:Logging
Figure 8-66 Running the WAImportExport tool to prepare the hard drives
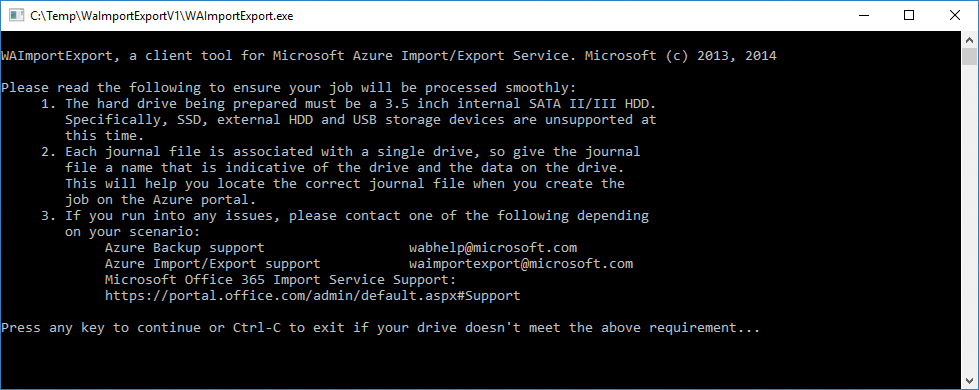
- WAImportExport.exe spawns a new window. Read the contents and press any key to continue or Ctrl-C to cancel if your hard drive does not meet the requirements. See Figure 8-67.
Figure 8-67 Confirming running the WAImportExport tool to prepare the hard drives
- Depending on your system configuration, you might see an additional prompt for the 8dot3 file name creation. Type Yes to let the tool disable it and continue. See Figure 8-68.
Figure 8-68 Confirming disabling of 8dot3 file naming
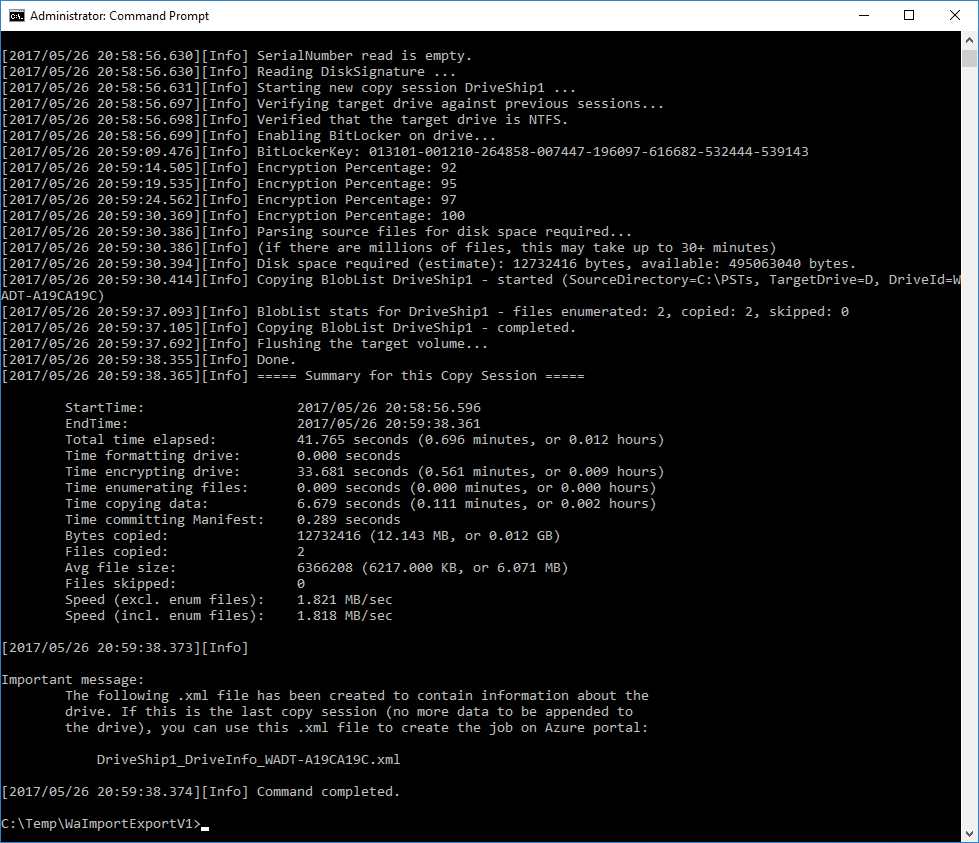
- When the process completes, a command prompt is returned. See Figure 8-69.
Figure 8-69 WAImportExportTool completes drive encryption and copies data to drive
- For subsequent copies to the same hard drive, update the /id: parameter with a new session ID and leave the journal name the same. The WAImportExport process appends to the existing journal file. If you start using a new hard drive, update the Journal parameter (/j:) with a new journal file name and a new session ID (/id:) value.


You use the PST import file to assign PSTs to users. To prepare the PST Import mapping file, follow these steps.
- Download a copy of the PST import mapping file from https://go.microsoft.com/fwlink/p/?LinkId=544717. Alternatively, create a CSV file with the following columns:
Workload,FilePath,Name,Mailbox,IsArchive,TargetRootFolder,ContentCodePage,SPFileContainer,SPManifestContainer,SPSiteUrl
- Modify the PST import file, creating one line per PST that was uploaded. Refer to Table 8-3 for the parameters and examples.
To create the import job, follow these steps.
- From the Security & Compliance Center, navigate to Data Governance | Import and click + New Import Job.
- Type a name for the job and click Next.
- Select the Ship Hard Drives To One Of Our Physical Locations button, as shown in Figure 8-70, and click Next.
Figure 8-70 Choosing import job type for drive shipping
- Click Copy The Drive Shipping Key.
If you do not click the Copy The Drive Shipping Key link, an error states that not all of the fields are populated.
- Select the check boxes to indicate you have prepared the hard drives, the journal files, and the PST Import mapping file and click Next. See Figure 8-71.
Figure 8-71 Upload To The Cloud drive shipping page
- On the Select The Drive File page, click + Select Drive File and select the journal file that was specified with the /j: parameter. Click Validate to check the file for issues. Upload a journal file for each hard drive being shipped. See Figure 8-72.
Figure 8-72 Select and validate drive journal file
- Click Next.
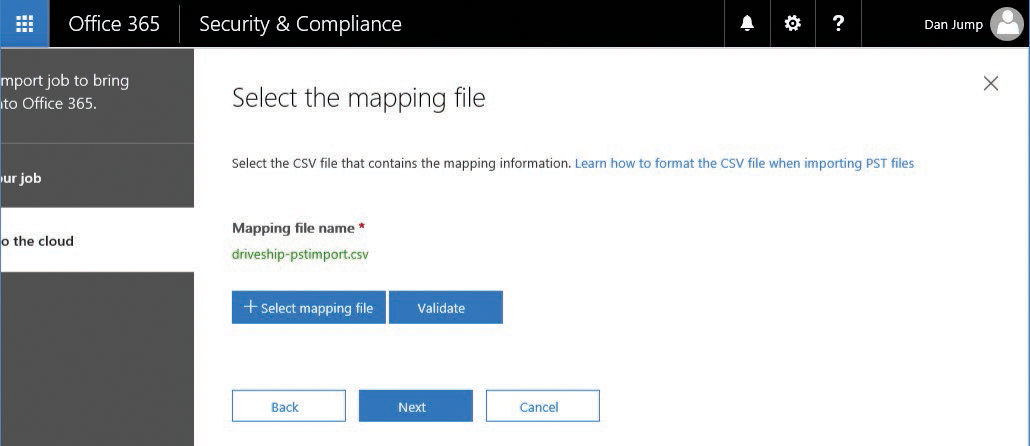
- Click + Select Mapping File and select the mapping file created earlier. Click Validate, check for syntax errors (Figure 8-73), and then click Next.
Figure 8-73 Select and validate PST import mapping file
- Type contact information, as shown in Figure 8-74, select the check box agreeing to the terms of the Azure Import Service, and click Save.
Figure 8-74 Contact information for drive shipping
- Click Close to dismiss the page.
- When you have a tracking number for the shipment, edit the import job and click Enter Tracking Number, fill out the carrier, tracking number, and your return shipping account number and click Save. See Figure 8-75.
Figure 8-75 Diskshipping-job details dialog box
After Microsoft receives your drives, data center personnel begin importing your data into the Azure storage space, and the status on the Import page updates to Import In-Progress.
After all PSTs have been imported, the status changes to Analysis In Progress to identify the age and types of items contained in the PST.
After the analysis is complete, the status is updated to Analysis Complete, and the progress area says Ready To Import To Office 365.
- Click Ready To Import To Office 365, as shown in Figure 8-76.
Figure 8-76 Ready to import drive shipping job
- Click Import To Office 365. See Figure 8-77.
Figure 8-77 Beginning drive shipping import
- Choose whether to filter the import. If you select Yes, click Next to open the filtering criteria page. If you select No, click Next to open the final confirmation. See Figure 8-78.
Figure 8-78 Choosing the filtering option
- If you choose to filter the data, you are presented with options to select types of data to import and exclude content based on date or senders. Click More Filtering Options to see the additional filtering criteria shown in Figure 8-79.
Figure 8-79 Filter Your Data page
- Review and set any additional filtering options and click Apply. See Figure 8-80.
Figure 8-80 More Filtering Options dialog box
- If you are filtering data, complete your filtering selections and click Next.
One of two screens appears, based on whether you chose to filter data. If you chose not to filter, you see the page in Figure 8-81.
Figure 8-81 Import data page if no filtering was selected
If you chose to filter data, you see the page shown in Figure 8-82.
Figure 8-82 Import data page if filtering options were selected
- Click Import Data.
- Click Close on the confirmation page.
- Monitor the import progress by selecting the import job on the Data Governance | Import page, if desired.
After the import job has completed, the mailboxes are configured with the RetentionHoldEnabled parameter.
- When you are certain that your retention policies are correct and want to enable the processing of retention policies on the mailbox, you can connect the Office 365 Exchange Online PowerShell endpoint and run this cmdlet on the mailboxes with retention hold enabled.
Set-Mailbox -Identity -RetentionHoldEnabled $false


Archive
Archive mailboxes provide additional storage to users with Exchange Online Plan 2 or Exchange Online Archiving licenses applied to them. If a user has an archive mailbox enabled, content older than 2 years old is automatically moved from the primary mailbox to the archive mailbox if no other policies are configured. Figure 8-83 shows the Archive page.
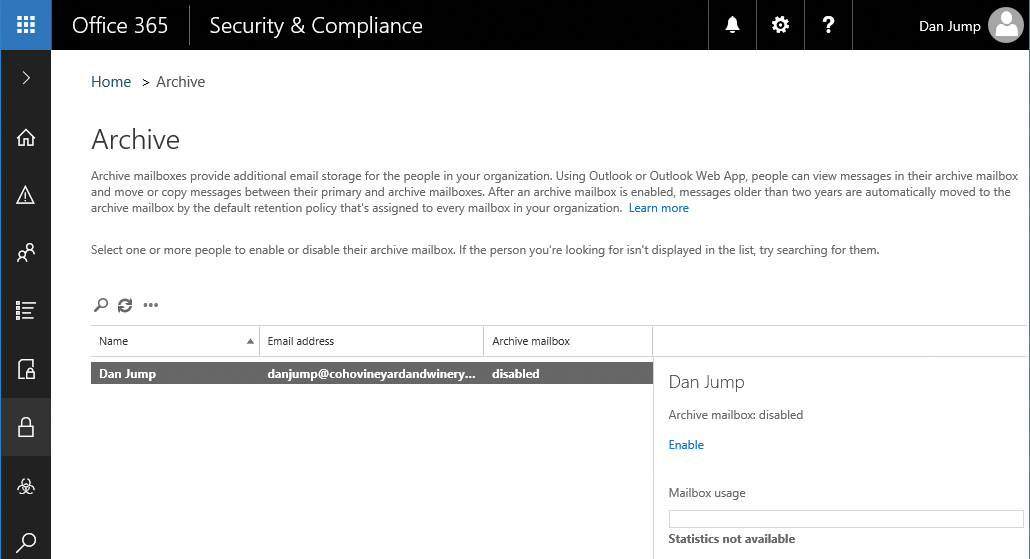
Figure 8-83 Archive page
To enable archives for individual users, follow these steps.
- On the Data Governance | Archive page, select the user for whom you want to enable an archive mailbox. Click Enable.
- Click Yes to enable the archive. See Figure 8-84.
Figure 8-84 Enabling the archive for a user

Archive mailboxes can be enabled for all users from the dashboard in the Security & Compliance Center. To enable archives for all users, follow these steps.
- In the Security & Compliance dashboard, as shown in Figure 8-85, select Online Archive Mailbox from the list of widgets and then select Manage.
Figure 8-85 Security & Compliance Center dashboard with Online Archive Mailbox highlighted
- Click Enable Archives. See Figure 8-86.
Figure 8-86 Enabling archives for users
- Alternatively, from a Windows PowerShell session connected to an Exchange Online session, run:


Get-Mailbox -ResultSize Unlimited | Enable-Mailbox -Archive
Retention
Retention policies are programmatic ways to manage or govern the accumulation, retention, and deletion of content. Depending on your organization’s industry, you might find that you need one or more retention policies configured to:
- Comply proactively with industry regulations and internal policies that require you to retain content for a minimum period of time—for example, the Sarbanes-Oxley Act might require you to retain certain types of content for seven years. In other regulated industries, you might need to retain certain documents pertaining to consumer data for up to 30 years.
- Reduce your exposure in the event of litigation or a security breach by permanently deleting old content that you’re no longer required to keep. Your organization’s legal team might have policies to reduce the amount of data you store and manage organizationally to reduce the scope of data that could be discovered in a lawsuit.
Retention policies in Office 365 can help you by retaining content so it can’t be permanently deleted before a specified period or by deleting content permanently at the end of a retention period to manage the data life cycle.
Office 365 retention policies enable you to create rules to retain; delete; or retain and delete content based on time frames, locations, or search criteria. You can deploy policies to cover certain data sources (such as Skype, Exchange, or SharePoint) or just certain types of data, based on keywords or specific sensitive information types.
Some highly regulated industries might require compliance with Securities and Exchange Commission (SEC) Rule 17aa-4, which requires that after a retention policy is enabled, it cannot be disabled or made less restrictive. By using the Preservation Lock feature of a retention policy, you can ensure that no one can turn off the policy.
Overview of retention policies for content types
When you include a location such as a SharePoint site or mailbox in a retention policy, the content remains in its original location. Users can continue to work with their documents or mail. If the user edits or deletes content that’s covered in the policy, a copy of the content as it existed when you applied the policy is retained.
For sites, a copy of the original content is retained in the Preservation Hold library when users edit or delete it. If the Preservation Hold library doesn’t exist for the site when a retention policy is enabled, a new Preservation Hold library is created. The Preservation Hold library is only visible to the site collection administrator.
If the content being protected is modified or deleted during the retention period, a copy of the original content as it existed when the retention policy was assigned is created in the Preservation Hold library. There, a timer job runs periodically and identifies items whose retention period has expired, and these items are permanently deleted within seven days of the end of the retention period.
If the content is not modified or deleted during the retention period, it’s moved to the first-stage Recycle Bin at the end of the retention period. If a user deletes the content from there or purges this Recycle Bin, the document is moved to the second-stage Recycle Bin. A 93-day retention period spans both recycle bins. At the end of 93 days, the document is permanently deleted from wherever it resides, in either the first- or second-stage Recycle Bin.
For a retention policy to maintain copies of versions of documents in a site or library, versioning must be turned on for the site or library. If a document is deleted from a site that’s being retained and document versioning is turned on for the library, all versions of the deleted document are retained.
If document versioning isn’t turned on and an item is subject to several retention policies, the version that’s retained is the one that’s current when each retention policy takes effect. For example, a document named Doc1.docx dated June 1 exists in a site when the first retention policy is applied to a site. Doc1.docx has been edited several times since the initial retention policy was applied. On July 1, a new retention policy is applied to the same site, and the July 1 version of Doc1.docx is also preserved.
A retention policy can retain content either indefinitely or for a specific period of time. For content to be retained for a specific period, the retention policy can be configured to retain the data based on when it was created or last modified. A retention policy can also delete the content at the end of the retention period. Finally, a retention policy can simply delete old content without having a requirement to retain it for a period of time.
For mailboxes and public folders, the copy is retained in the Recoverable Items folder. These secure locations and the retained content are not visible to users. In the case of a mailbox, the Recoverable Items folder is at the mailbox level. For Public Folders, the Recoverable Items folder is per-folder. Only users who have been granted the eDiscovery role have access to the Recoverable Items folder.
By default, when a user deletes a message in a folder other than the Deleted Items folder, the message is moved to the Deleted Items folder. When a user deletes an item in the Deleted Items folder, the message is moved to the Recoverable Items folder. If the user deletes an item by using Shift+Delete in any other folder, the item is moved directly to the Recoverable Items folder. Content in the Recoverable Items folder is retained for 14 days by default (and can be extended up to 30). At the end of the Recoverable Items retention period, the content is purged permanently unless a retention policy is configured to retain the content for longer.
If a mailbox is deleted or the license removed while governed by a retention policy, or is on Litigation Hold, the mailbox becomes an inactive mailbox. The contents of an inactive mailbox are still subject to any retention policy that was placed on the mailbox before it was made inactive, and the contents are available in an eDiscovery search to users with the eDiscovery role.
Creating a policy
Consider the following requirements.
- You need to preserve content for a minimum of 3 years from when it’s created across all data sources and repositories in Office 365.
- Content can be optionally retained for up to 5 years but must be purged after that.
To achieve these business requirements, you must create two policies—one to preserve content for 3 years from when it’s created and one to delete content older than 5 years.
- In the Security & Compliance Center, click Data Governance and select Retention.
- On the Retention page, shown in Figure 8-87, click + Create.
Figure 8-87 Retention dashboard
- Type a name and description for your 3-year retention policy and click Next. See Figure 8-88.
Figure 8-88 Naming the retention policy
- Type the retention period of 3 years and select No under Do You Want Us To Delete It After This Time? Click Next. See Figure 8-89.
Figure 8-89 Retain content options
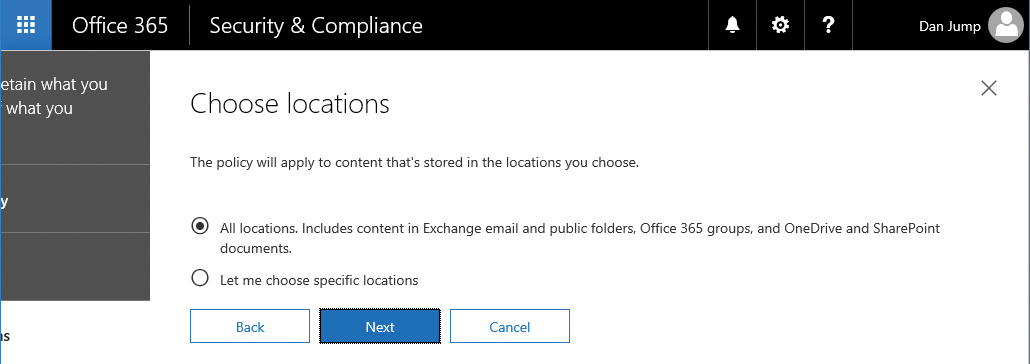
- Select All Locations. Includes Content In Exchange Email And Public Folders, Office 365 Groups, And OneDrive And SharePoint Documents button and click Next. See Figure 8-90.
Figure 8-90 Choose locations to include in retention policy
- Ensure that the Don’t Turn On Preservation Lock button, shown in Figure 8-91, is selected and click Next.
Figure 8-91 Preservation Lock
- Review the settings for the retention policy, as shown in Figure 8-92, and click Create This Policy.
Figure 8-92 Reviewing retention policy settings
- Click Close when the policy is created.
- Click + Create to create another retention policy.
- Type a name and description for the Delete After 5 Years policy and click Next.
- Select the No, Just Delete Content That’s Older Than button and configure the setting to reflect 5 years. Click Next. See Figure 8-93.
Figure 8-93 Configuring retention settings
- Select the All Locations button and click Next.
- Ensure that Don’t Turn On Preservation Lock is selected and click Next.
- Confirm the settings and click Create This Policy. See Figure 8-94.
Figure 8-94 Reviewing retention policy settings
- Click Close.


Supervision
You can configure supervision policies to capture employee communications for examination by internal or external reviewers. Some highly regulated industries might require auditing of communications.
Preparing to configure supervision policies
Before configuring supervision policies, identify users or groups of users whose communication must be reviewed, as well as users or groups of users who will perform the reviewing.
You also might need to add yourself to the Supervisory Review role group to be able to create policies. To do this, from the Security & Compliance Center, point to Permissions, select Permissions, and then edit the membership of the Supervisory Review group.
To configure a supervision policy, follow these steps.
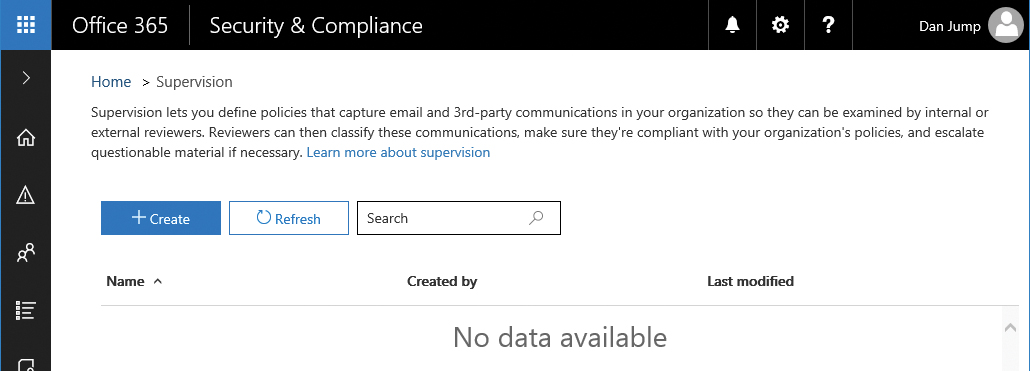
- From the Security & Compliance Center, navigate to Data Governance | Supervision. See Figure 8-95.
Figure 8-95 Supervision dashboard
- Click + Create.
- Type a name and description for the policy and click Next.
- Select the users or groups to supervise and click Next. Type users or groups in the Exclude These Users box to prevent their mail from being captured for review. See Figure 8-96.
Figure 8-96 Configuring users to supervise
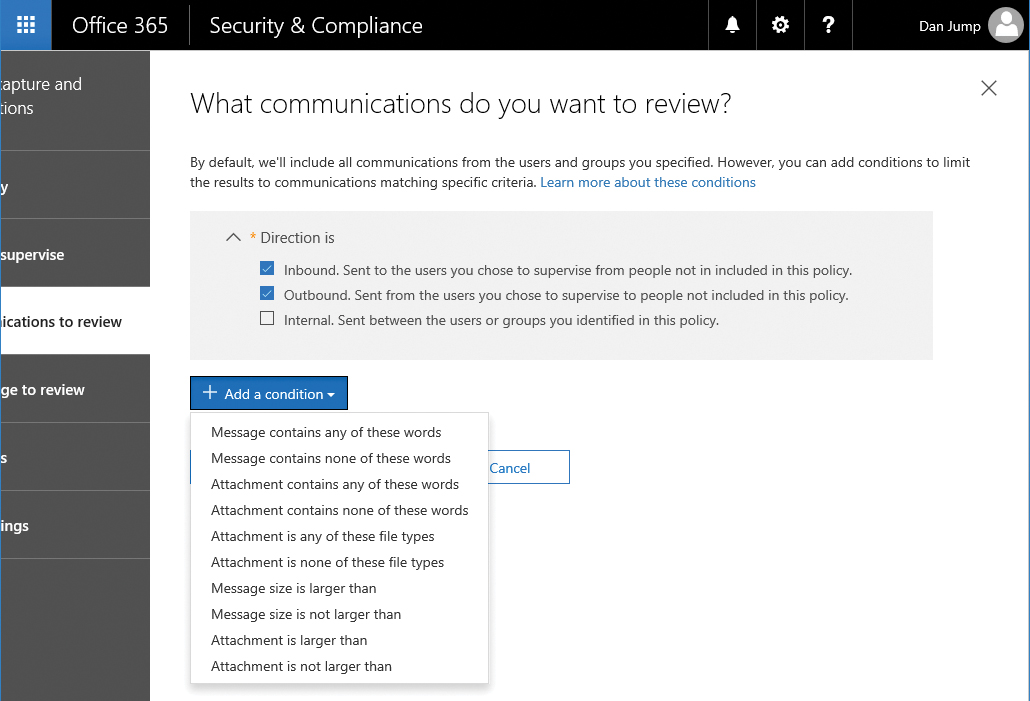
- Specify review criteria. In addition to Inbound and Outbound, you can filter content based on keywords, message size, or the presence of attachments. After you’ve selected criteria (Figure 8-97), click Next.
Figure 8-97 Configuring direction of mail to review and additional selection conditions
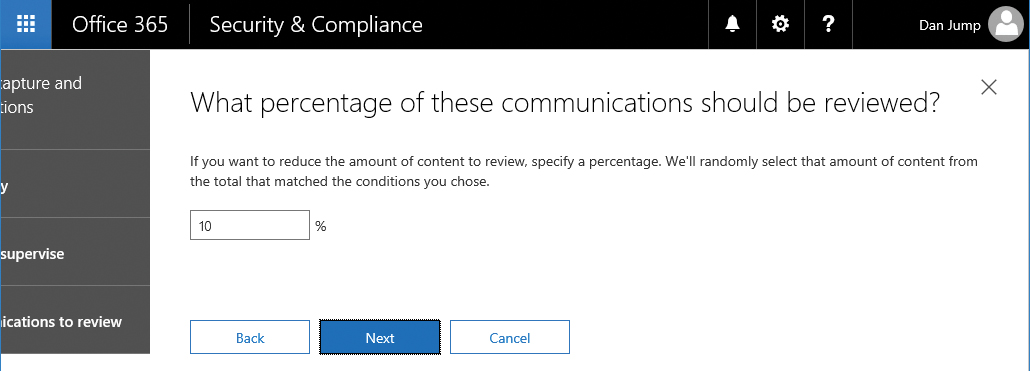
- Choose what percentage of content to review and click Next. See Figure 8-98.
Figure 8-98 Configuring percentage of communications to review
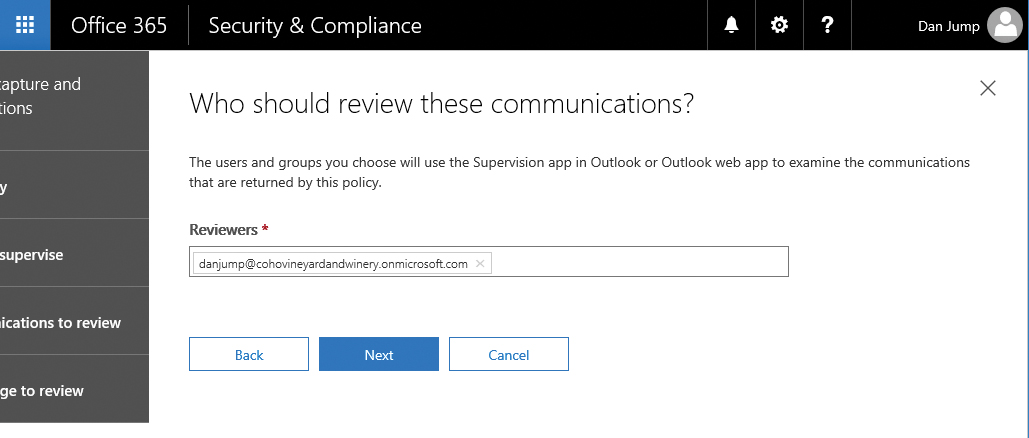
- Choose users or groups who should review the communications from the picker, shown in Figure 8-99, and click Next.
Figure 8-99 Choosing reviewers
- Review settings, shown in Figure 8-100, and click Finish to complete the supervision policy configuration.
Figure 8-100 Review Your Settings page for supervision policy settings


Reviewing supervised content
After a supervision policy has been configured, reviewers can monitor and review the communications through either Outlook Web App or the Outlook desktop application.
Outlook Web App
A special mailbox is automatically mounted, and the Supervision add-in for Outlook Web App is automatically configured in a supervisor’s Outlook Web App mailbox.
After the add-in has loaded into the mailbox, reviewers can mark messages as compliant, non-compliant, questionable, resolved, or not reviewed by clicking the message and then clicking the Supervisory Review add-in link inside the message, as shown in Figure 8-101.
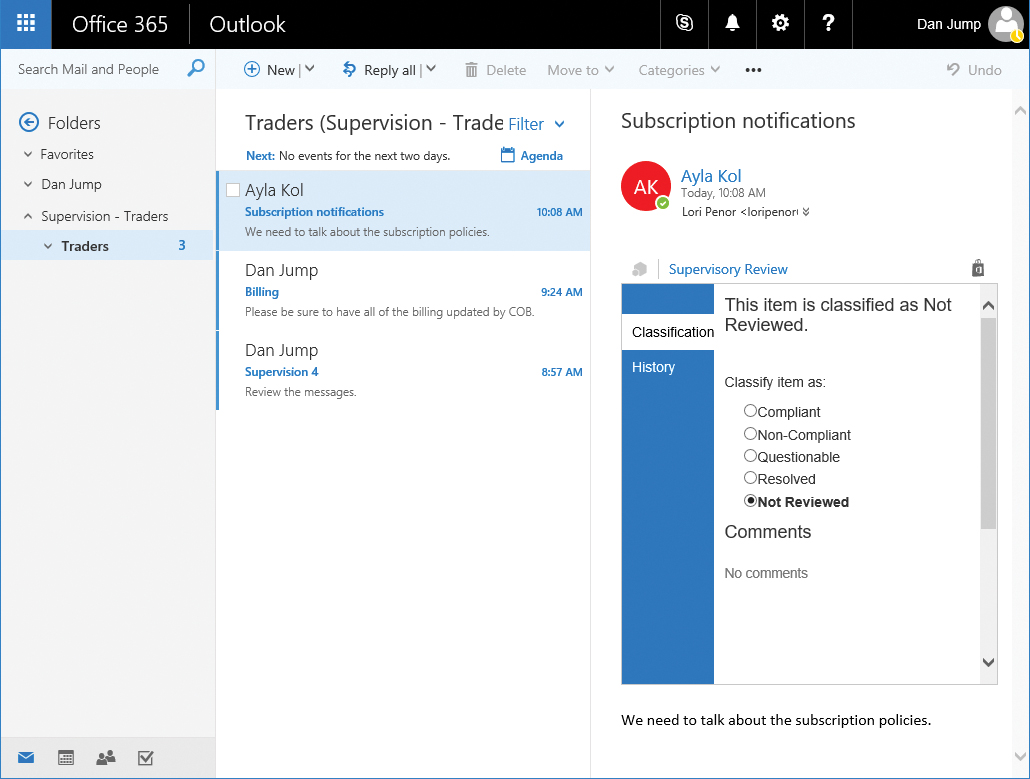
Figure 8-101 Supervisory review in Outlook Web App
Outlook desktop
To connect to the supervisory review mailbox in Outlook, the mailbox must at least be temporarily unhidden from the global address list so reviewers can add the mailbox to their Outlook profile.
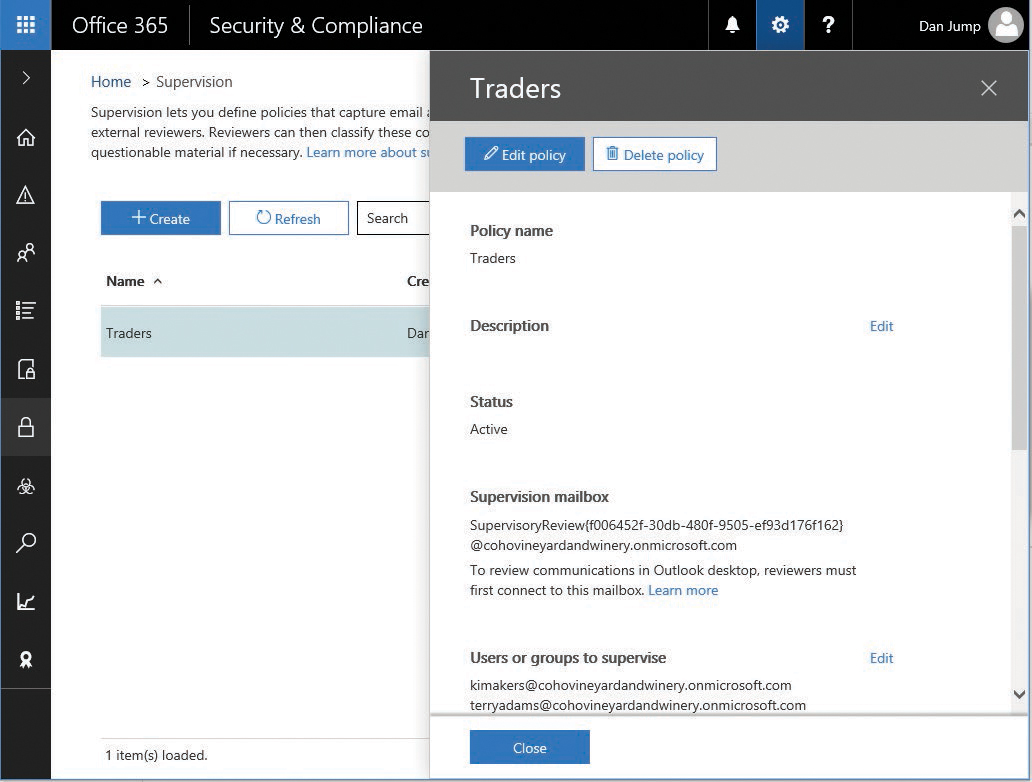
- From the Security & Compliance Center, navigate to Data Governance | Supervision and click a supervision policy to open the policy dialog box.
- Under Supervision Mailbox, select the email address displayed for the policy’s supervision mailbox and copy it. See Figure 8-102.
Figure 8-102 Properties fly-out of supervision group
- Open a Windows PowerShell prompt and connect to an Exchange Online PowerShell session.
- Run the following command to unhide the SupervisoryReview mailbox from the global address list and enable you to add the mailbox to the user’s Outlook profile, as shown in Figure 8-103.
Set-Mailbox -identity “SupervisoryReview{guid}@domain.com” -HiddenFromAddressListsEnabled $FalseFigure 8-103 Viewing folder permissions on the SupervisoryReview mailbox
- From the user’s Outlook profile, select File from the Outlook ribbon and then click + Add Account. See Figure 8-104.
Figure 8-104 Outlook File menu
- In the Add Account Wizard, select the Manual Setup Or Additional Server Types button, shown in Figure 8-105, and click Next.
Figure 8-105 Add Account Wizard
- Select the Office 365 button, paste the email address of the SupervisoryReview mailbox (SupervisiorReview{GUID}@domain.com) in the Email Address field, and click Next.
- If prompted for credentials, type the credentials of the user who was granted the supervisory review role and click OK. See Figure 8-106.
Figure 8-106 Outlook security dialog box
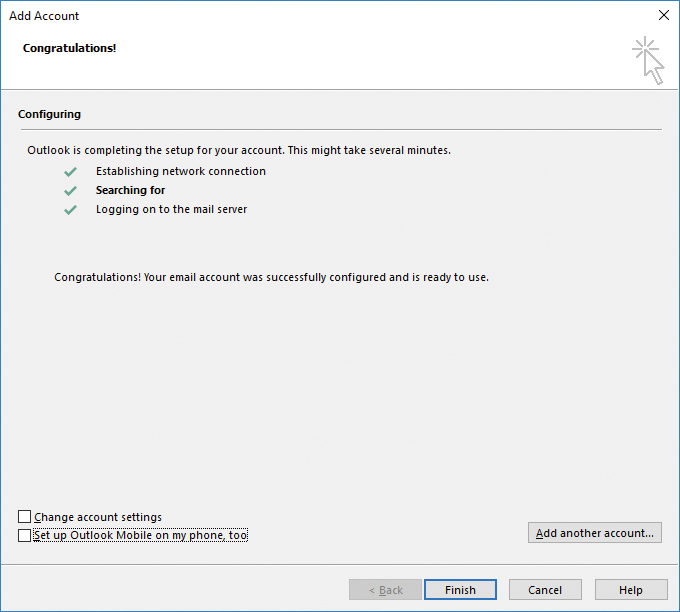
- After the configuration is complete, as shown in Figure 8-107, click Finish.
Figure 8-107 Completed Add Account Wizard
- Close and restart Outlook.
- Click the ellipses (…) at the bottom of the navigation pane, select Folders, and scroll down the navigation pane. Notice that the SupervisoryReview{guid}@domain.com mailbox has been added to the user’s profile.
- Browse to the folder named for the policy configured under Supervision and expand it.
- Select a message and then select the Supervisory Review add-in in the message preview. See Figure 8-108.
Figure 8-108 SupervisoryReview mailbox added to the user’s Outlook profile
- Select a classification and click Confirm.


Reviewing supervision reports
You can see both summary and more detailed reports regarding the disposition of reviewed messages.
To view the summary statistics report, navigate to Data Governance | Supervision and click a supervision policy. Scroll to the bottom of the dialog box to see the summary statistics (Figure 8-109) for messages reviewed for the policy.
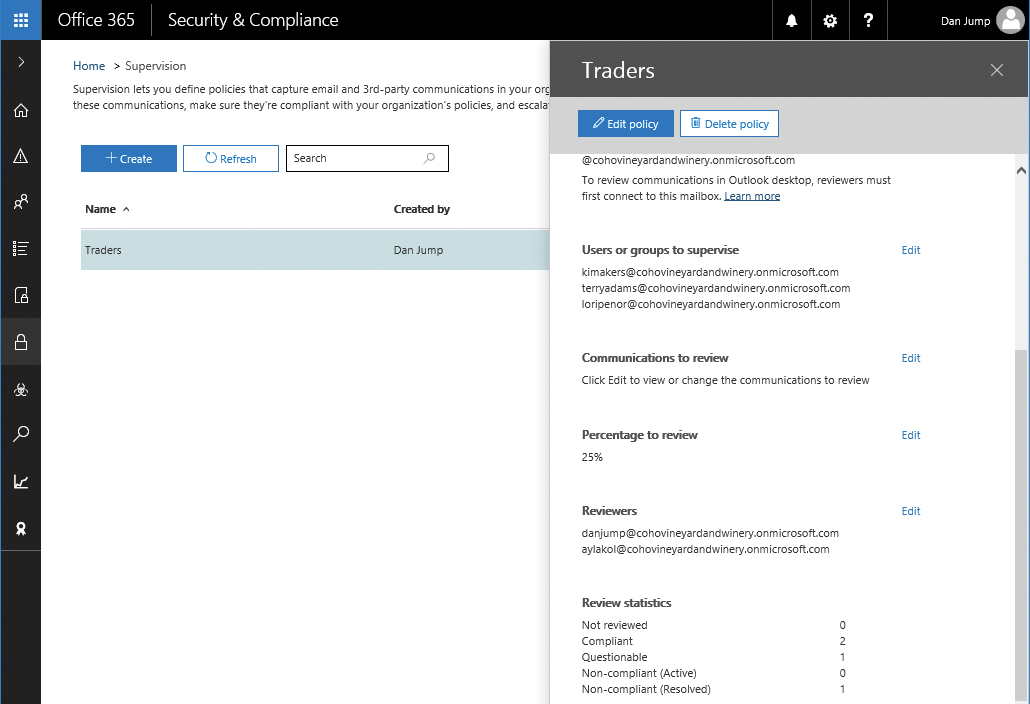
Figure 8-109 Supervision summary statistics
To view more detailed reports, navigate to Reports | Dashboard and select the Supervision widget. See Figure 8-110.

Figure 8-110 Supervision reports
Click the ellipses (…) to open the Export Conditions fly-out and download a report as a comma-separated values (CSV) file. In the Export conditions fly-out, you can select a date range as well as specific policies or reviewers to include in the export. See Figure 8-111.

Figure 8-111 Export conditions fly-out
Search & Investigation
From the Search & Investigation menus, you can perform Content, Audit Log, and eDiscovery searches across all Office 365 services.
If you previously used the Exchange Online Admin Center to create searches or in-place holds, Microsoft recommends that you begin using the Security & Compliance Center to perform those actions. Starting July 1, 2017, you can no longer create in-place eDiscovery searches in Exchange Online directly, although you can still modify existing in-place eDiscovery searches.
Content Search
Use Content Search to discover content in email and documents stored in SharePoint or OneDrive, Skype for Business conversations, and Teams. Search results can be previewed and exported for download and delivered as documents, files, and email archives.
Access Content Search by navigating to Search & Investigation | Content Search in the Search & Compliance Center. Figure 8-112 depicts the Content Search page.

Figure 8-112 Content Search
To perform a search, follow these steps.
- On the Content Search page, click +.
- Provide a name for the search and then select search locations. You can search everywhere or select specific data sources. After finalizing your selection, click Next. See Figure 8-113.
Figure 8-113 Configuring content search parameters
You can search for all content or specific keywords and patterns. You can also add conditions such as message participants (senders or recipients), document authors, item types, and date ranges.
- After you’ve added the conditions, click Search. See Figure 8-114.
Figure 8-114 Configuring search keywords and conditions
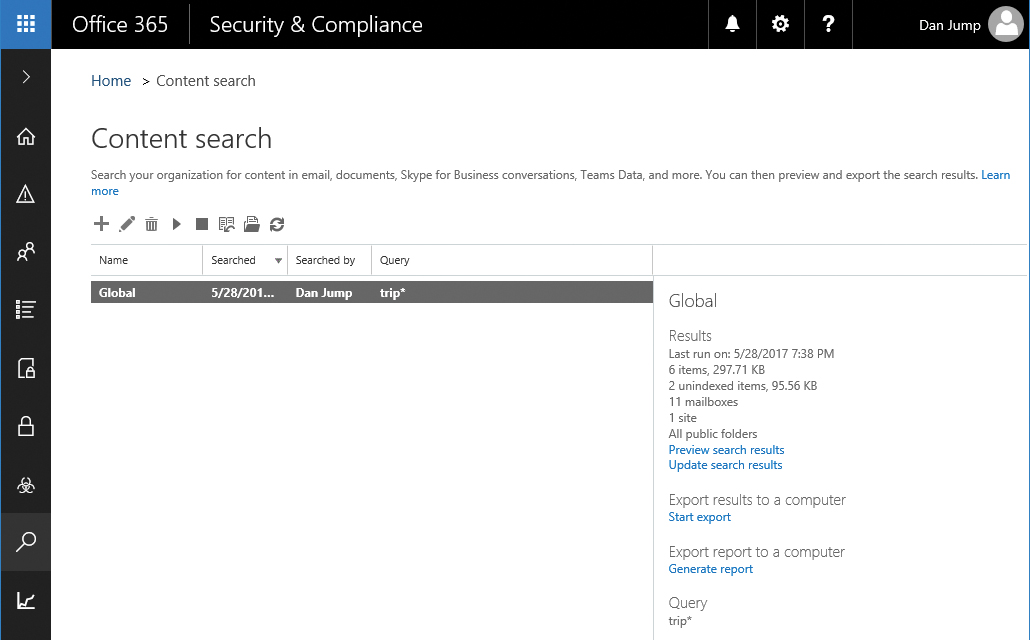
After starting the search, the Content Search page reopens, as shown in Figure 8-115. When the search completes, the results appear.
Figure 8-115 Content Search dashboard with results
The options available include Start (to rerun and update the search), Preview The Search Results In The Browser, Download The Results, and Download The Report.


To export and download results, follow these steps.
- On the Content Search page, click Start Export on a completed search.
- In the Export Search Results dialog box, choose your export options and click Start Export. See Figure 8-116.
Figure 8-116 Export The Search Results For Global dialog box
If you are not a member of the eDiscovery Manager role group, you won’t be able to export results, and an error appears. If you are a member of the Organization Management role group, you can add yourself as a member of the eDiscovery Manager role, sign out of the Security & Compliance Center, sign back in, and retry the export.
- When the export has finished processing, click Download Exported Results.
- On the Download Exported Results page, copy the export key to the clipboard and then click the Download Results link at the bottom of the page, shown in Figure 8-117.
Figure 8-117 Download page for exported search results
After a moment, the Microsoft Client Discovery Unified Export Tool runs. See Figure 8-118.
Figure 8-118 Export download tool
- Paste the export key into the export key text box, type or browse to a directory to save the downloaded files, and then click Start. See Figure 8-119.
Figure 8-119 eDiscovery Export Tool dialog box
- After the files have downloaded, navigate to the path listed in Export Location (Figure 8-120) and close the application.
Figure 8-120 eDiscovery Export Tool status screen


The files are saved in a subdirectory named for the search specified in the eDiscovery Export Tool. A separate subdirectory is created for exports from each service.
Audit Log Search
The Audit log search enables you to search for audited events by both users and administrators. The Security & Compliance Center presents a unified audit log, so you can search the following types of user and admin activity.
- User activity in SharePoint Online and OneDrive for Business
- User activity in Exchange Online (Exchange mailbox audit logging must be enabled.)
- Admin activity in SharePoint Online
- Admin activity in Azure Active Directory
- Admin activity in Exchange Online (Exchange admin audit logging)
- User and admin activity in Sway
- User and admin activity in Power BI for Office 365
- User and admin activity in Microsoft Teams
- User and admin activity in Yammer
Before you can search the audit log, audit logging must be turned on, and you must be a member of a role group that includes either View-Only Audit Logs or Audit Logs roles. Figure 8-121 shows the Audit Log Search page.

Figure 8-121 Audit Log Search page
Performing a search simply requires selecting the types of activities to view and a date range. To refine results further, you can specify users or part of a file name, folder name, or URL. The audit log can be searched for as far back as 90 days.
After you have performed the search, you can filter the results further by clicking the Filter Results button. See Figure 8-122.

Figure 8-122 Audit log search with filtering applied
After clicking the Filter Results button, you can add criteria in the column header areas. For example, if you want to filter by activities that involved passwords, type password in the activity field, and the list will filter in-place. You can click an individual event for more details or select Export Results to download them to your computer. You can download either the filtered list of results shown on screen or the original results before filters were applied.
Figure 8-123 shows the filtering text entry areas with the Export Results button selected.
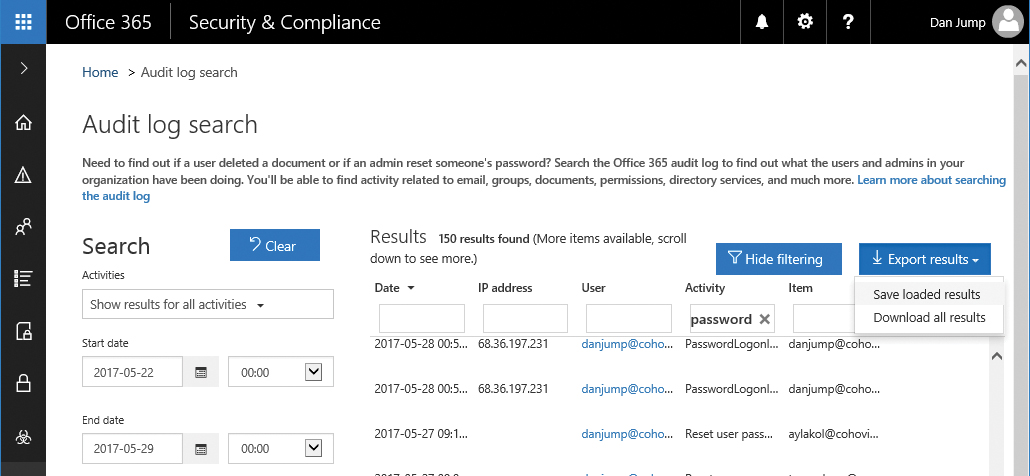
Figure 8-123 Export audit log results options
eDiscovery
You can use the eDiscovery page in the Security & Compliance Center to control who can create, access, and manage eDiscovery search requests (also known as cases) in your organization. If you have an Office 365 E5 subscription, you can also use eDiscovery cases to analyze search results by using Office 365 Advanced eDiscovery. The eDiscovery page enables users with the eDiscovery Manager role to create and manage eDiscovery cases. Users with the Reviewer role can review cases that they are assigned to.
An eDiscovery case enables you to add members to a case, control what types of actions that specific case members can perform, and place holds on content locations. You can also export the results of the content searches associated with a case or prepare search results for analysis in Advanced eDiscovery.
Assigning eDiscovery permissions to case members
Before users can perform eDiscovery searches, review cases, or export results, they must be granted eDiscovery-related permissions. Only users who have membership in an eDiscovery-related role group or a custom role group that has the Reviewer role can be added to an eDiscovery case.
You have to be a member of the Organization Management role group (or be assigned the Role Management role) in the Office 365 Security & Compliance Center to assign eDiscovery permissions. Role permissions are discussed under the Permissions topic in Chapter 7.
Creating a case and adding members
To create a case, you must be a member of the eDiscovery Managers role or role subgroup.
- From the Security & Compliance Center, navigate to Search & Investigation | eDiscovery and then click + Create A Case.
- In the New Case dialog box, give the case a name (unique in your organization) and a description and then click Save.
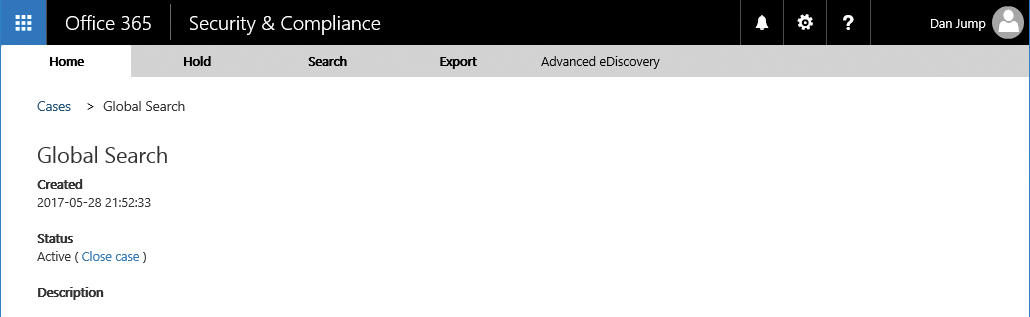
- After the case has been created, click the case to open the Manage This Case dialog box, as shown in Figure 8-124.
Figure 8-124 Manage This Case eDiscovery dialog box
- Click + Add to add additional members to the case and then click Save.
Only users who have been assigned to a group that has the Reviewer role group membership appear.

Placing content on hold
You can use an eDiscovery case to create holds to preserve content that might be relevant to proceedings such as a legal inquiry. You can place holds on mailboxes and OneDrive for Business sites for users, the group mailbox, SharePoint site, and OneDrive for Business site for an Office 365 group and the mailbox and site associated with a Microsoft Team resource. The content is held until you remove the hold from the content location or the hold is deleted.
When creating a hold, you can control the held content’s retention within a date range (sent, received, or created), an indefinite hold for all content in a site or mailbox, or a query-based hold that only retains content matching the query terms.
To create a hold, follow these steps.
- From the Security & Compliance Center, navigate to Search & Investigation | eDiscovery and then click Open next to the case you want to manage.
- Select the Hold tab. See Figure 8-125.
Figure 8-125 eDiscovery case
- On the Hold page, click New +.
- On the Create A New Hold page, name the hold with a name unique in your organization.
- Add the mailboxes and sites to search.
If you add a distribution group, members of the distribution group will be searched.
- Click Next. See Figure 8-126.
Figure 8-126 Creating a hold selection
- Type keywords and conditions to create a query-based hold or leave blank to hold all content in the mailboxes and sites. Click Finish to create the hold. See Figure 8-127.
Figure 8-127 Entering keywords or conditions for a hold


After the hold has been created, you can refresh the Hold page to display updated statistics, shown in Figure 8-128. The statistics include the number of mailboxes and sites on hold and data about the content that was placed on hold, such as the total number and size of items placed on hold and the last time the hold statistics were calculated.
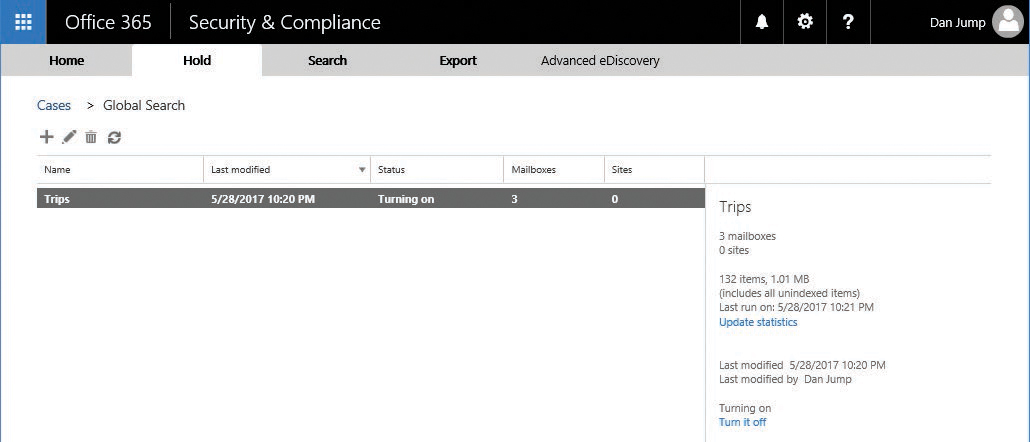
Figure 8-128 eDiscovery case hold
The number of items indicates those from all content sources that are placed on hold. If you’ve created a query-based hold, this indicates the number of items that match the query.
The number of items on hold also includes unindexed items found in the content locations. If you create a query-based hold, all unindexed items in the content locations are placed on hold, potentially including content that doesn’t match the search query.
Creating and running a content search for a case
After an eDiscovery case has been created and content placed on hold, you can create and run additional content searches. Content searches run in the context of the case are restricted to the members of the case.
To create a content search, follow these steps.
- From the Security & Compliance Center, navigate to Search & Investigation | eDiscovery and then click Open next to the case you want to manage.
- Select the Search tab.
- On the Search page, click New +.
- On the New Search page, type a name for the search.
Content searches associated with a case must have names that are unique across your Office 365 organization.
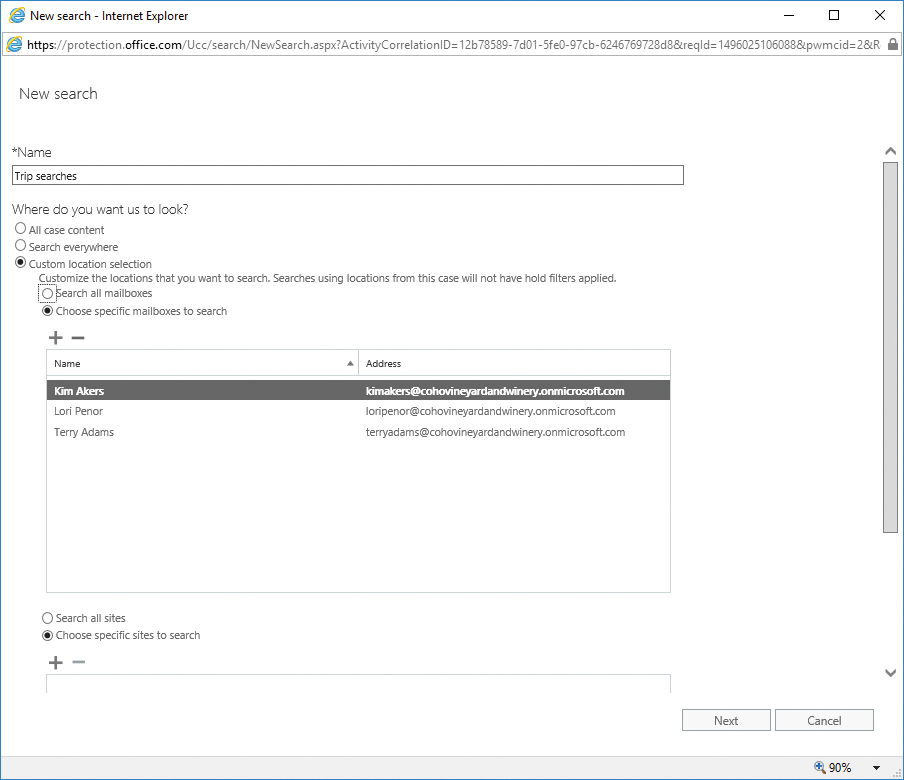
- Choose the content locations that you want to search.
You can search mailboxes, sites, and public folders in the same search. You can choose to search all content locations or specify a custom set based on the requirements of the search. Remember, you can create multiple searches per case, so you might want to perform different sets of keyword queries on the same content to return different results.
- Click Next when you have finished your content location selection. See Figure 8-129.
Figure 8-129 New content search
- Add search terms and conditions if desired. If you want to return all content, leave the keywords and conditions blank. Click Search to complete and run the search with the specified parameters.
Exporting the content search results
After the search has completed, you can create an export of the results. Exporting from an eDiscovery case is the same as exporting from a content search outside of a case.
To prepare an export for download, follow these steps.
- From the Security & Compliance Center, navigate to Search & Investigation | eDiscovery and click Open next to the case you want to manage.
- Select the Search tab.
- Select the case with results that you want to export and then click the Export button on the menu bar. Select either Export The Results (to prepare an export of the actual content) or Export Report (to prepare a report of items included in the export), as shown in Figure 8-130. You can select multiple cases by pressing Ctrl and clicking the individual cases in the Search window.
Figure 8-130 Exporting content search results
When you export the results of multiple searches, the search queries from all the searches are combined by using OR operators in a single content search. If your searches contain keywords, you are limited to 500 across all searches, which is the same limit for a single content search.
The search results that are exported are organized by the content source. If multiple searches return different items in the same data sources, they are grouped together in the export. For example, if different keyword searches return different email items in the same mailbox and you selected the option to export each mailbox to an individual PST, the results from multiple searches would be saved to the same PST.
If the same email item or document from the same content location is returned by more than one of the searches that you export, only one copy of the item will be exported.
- Select the options to suit your needs and then click Start Export.
Just like performing a content search and export outside of an eDiscovery case, if you are not a member of the eDiscovery Manager role group, you won’t be able to export results and will receive an error. If you are a member of the Organization Management role group, you can add yourself as a member of the eDiscovery Manager role, sign out of the Security & Compliance Center, sign back in, and retry the export.
- Click the Export tab, as shown in Figure 8-131.
Figure 8-131 eDiscovery Export tab page
- When the export has finished processing, click Download Exported Results.
- On the Download Exported Results page, copy the export key to the clipboard and then click the Download Results link.
After a moment, the Microsoft Client Discovery Unified Export Tool runs. The application requires Internet Explorer to run. It will not run in Firefox or Chrome.
- Paste the export key into the Export Key box, enter or browse to a directory to save the downloaded files, and click Start.
- After the files have downloaded, navigate to the path listed in Export Location and close the application. See Figure 8-132.
Figure 8-132 eDiscovery Export Tool data download complete


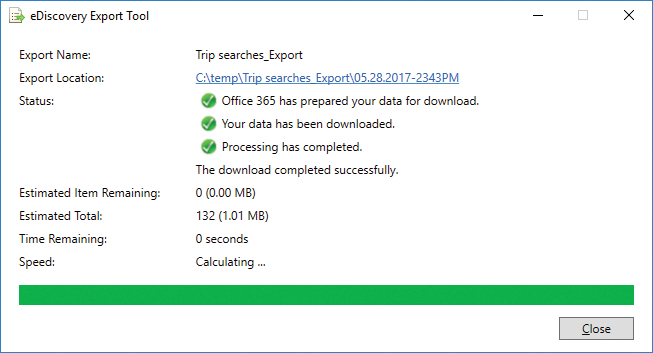
The files are saved in a subdirectory named for the search specified in the eDiscovery Export Tool. A separate subdirectory is created for exports from each service.
Preparing results for Advanced eDiscovery
If Advanced eDiscovery licenses are assigned to mailboxes in the search scope, you can also perform Advanced eDiscovery searches against them to refine further the content being returned.
In large cases, when hundreds of thousands or millions of records might be returned, advanced eDiscovery can be used to process the results further and limit the data set that is exported. Advanced eDiscovery can also perform optical character recognition to extract text from images, which can be useful on scanned documents, and enables you to apply the text and analytic capabilities of Advanced eDiscovery to text recognized from images.
Although you can prepare multiple searches at once for export, you can only prepare the results of a single search for analysis in Advanced eDiscovery at a time.
To analyze content in Advanced eDiscovery, follow these steps.
- From the Security & Compliance Center, navigate to Search & Investigation | eDiscovery and then click Open next to the case you want to manage.
- Select the Search tab.
Select the case with results that you want to process using Advanced eDiscovery and click Prepare Results For Analysis. If you have not assigned an E5 or Advanced eDiscovery license to any users in your tenant, the Prepare Results For Analysis link displays a blank page after clicking.
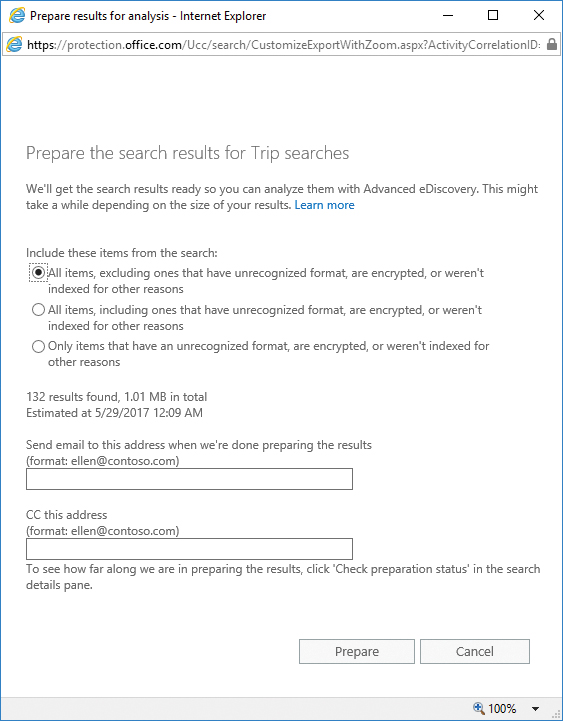
- Select options for preparing results for Advanced eDiscovery, as shown in Figure 8-133.
Figure 8-133 Preparing results for Advanced eDiscovery
- Select the preparation options and click Prepare.
Reviewing the case in Advanced eDiscovery
After you have selected an eDiscovery case to be prepared for Advanced eDiscovery, you can view its status in the Advanced eDiscovery Center.
- From the Security & Compliance Center, navigate to Search & Investigation | eDiscovery and click Open next to the case you want to manage.
- Click the Advanced eDiscovery tab.
The Advanced eDiscovery tab is shown in Figure 8-134.
Figure 8-134 Advanced eDiscovery Prepare workflow tab
- If you have more than one search that was prepared for Advanced eDiscovery, select the appropriate search under Contains and then click Process. If you need to customize the processing, click Advanced.
In addition to file data, metadata such as type, extension, creation date and time, author, owner (or custodian), and subject can be loaded into Advanced eDiscovery and saved for the case.
- Wait while Advanced eDiscovery processing takes place. See Figure 8-135.
Figure 8-135 Advanced eDiscovery processing
Advanced eDiscovery provides system metadata values such as near-duplicate groupings or relevance scores. The administrator can add other metadata, such as file annotations.
After processing has completed, Advanced eDiscovery displays the summary page, shown in Figure 8-136.
Figure 8-136 Completed Advanced eDiscovery processing
- Expand Custodians and click Manage to view current custodians, as shown in Figure 8-137. Edit custodians if necessary. Click the Analyze button in the workflow at the top of the screen when finished.
Figure 8-137 Advanced eDiscovery Process workflow tab
- Configure the analysis options for near-duplicates and email threads.
A higher percentage of similarity results in more unique documents being returned. A lower percentage of document similarity results in fewer returns.
- Click the Analyze button. See Figure 8-138.
Figure 8-138 Advanced eDiscovery Analyze workflow tab
- Review the Near-Duplicates (ND) and Email Threads (ET) results, as shown in Figure 8-139.
Figure 8-139 Advanced eDiscovery Analyze complete.
- Click the Export button on the workflow.
- Click the Create Export Session button at the bottom of the page, as shown in Figure 8-140.
Figure 8-140 Advanced eDiscovery Export
- In the fly-out that appears with the export key, click Copy To Clipboard. Paste it into a text file and save a copy of the key. Click Close. See Figure 8-141.
The eDiscovery Export tool used for normal content searches and eDiscovery exports launches automatically.
Figure 8-141 Advanced eDiscovery Download Files fly-out with export key
- Paste the export key into the Export Key box and enter or browse to a location to save the export.
- Click Start.
- Click Close and browse to the export location to view the processed files.
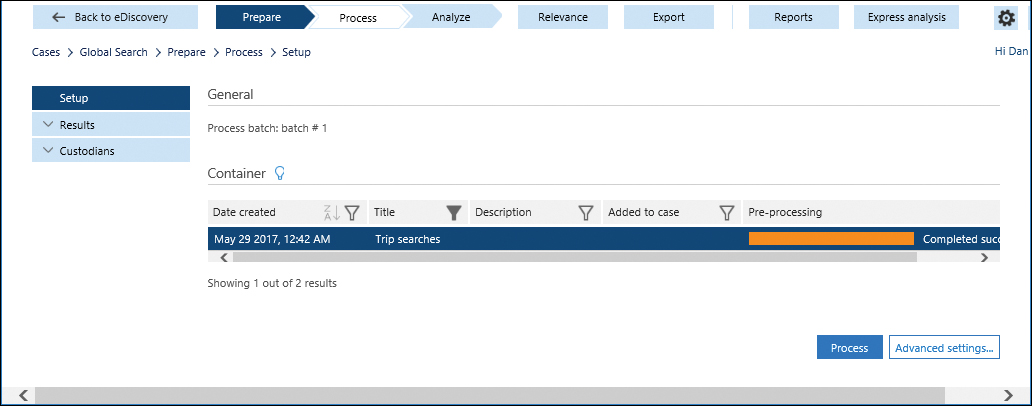


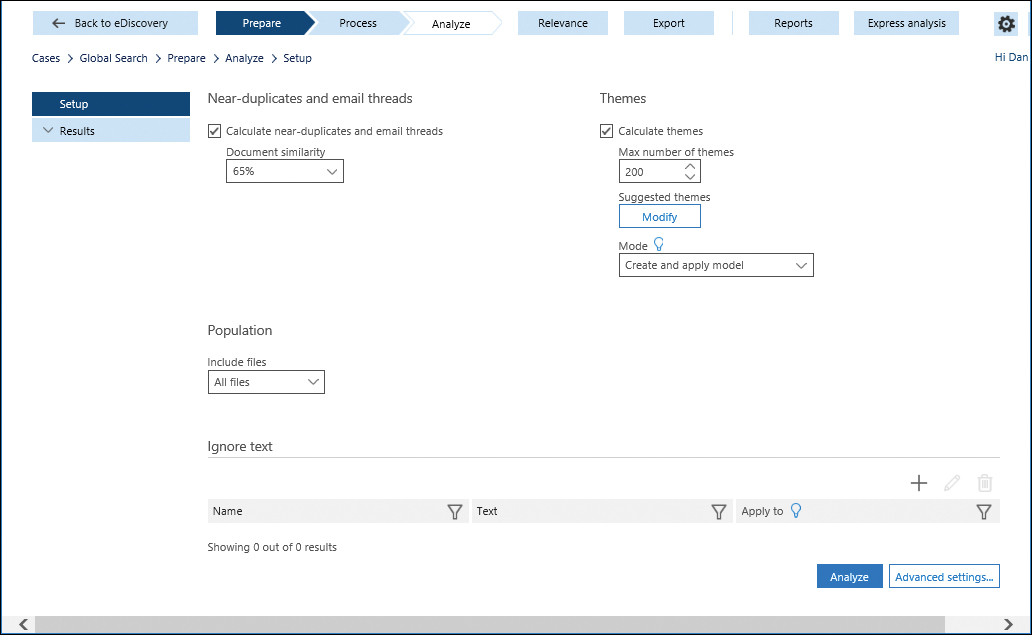
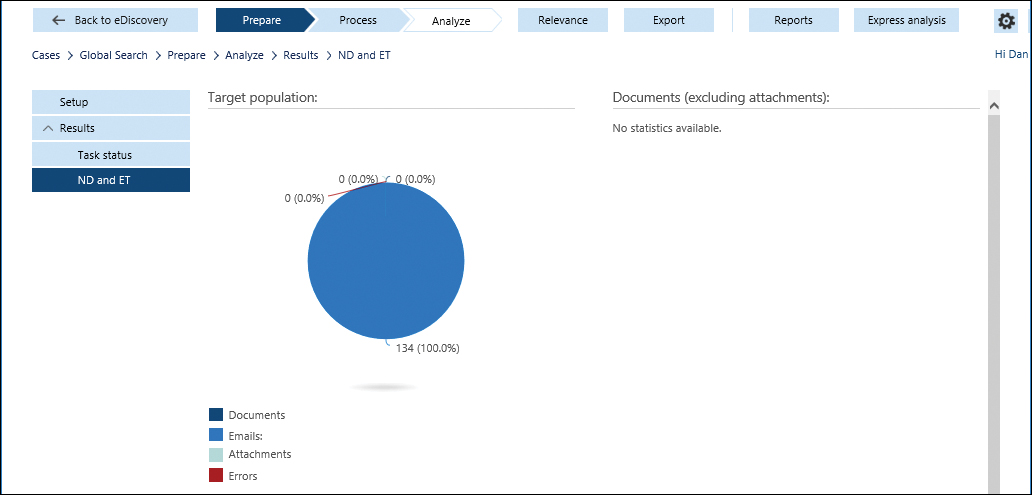


Closing a case
When the investigation that an eDiscovery case supported is complete, you can close the eDiscovery case in the Security & Compliance Center.
Closing a case releases any holds that might have been placed as part of the case. Depending on your organization’s retention policies, this might result in data being deleted.
To close a case, navigate to Search & Investigation | eDiscovery, select the case and click Close Case in the Manage This Case dialog box. See Figure 142.

Figure 8-142 Closing an eDiscovery case
Productivity App Discovery*
Productivity App Discovery, shown in Figure 8-143, is available only if you have Advanced Security Management licensing. Productivity App Discovery enables you to see how Office 365 and other cloud service apps are being used in your organization.
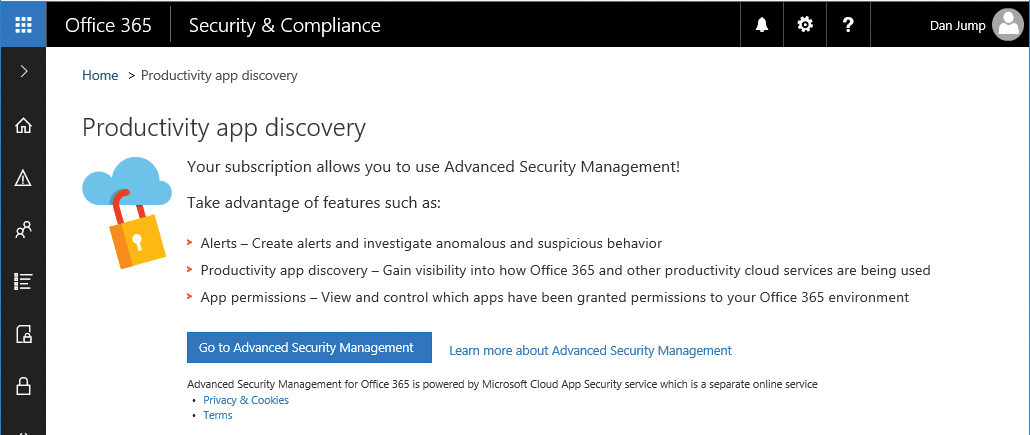
Figure 8-143 Productivity App Discovery launch page
To access Productivity App Discovery, click the Go To Advanced Security Management button. A new browser window or tab opens in https://portal.cloudappsecurity.com.
To use Productivity App Discovery, create a new report and upload traffic logs from your firewall, proxy, or other network appliances. Click the Create A New Report button, shown in Figure 8-144, to get started.

Figure 8-144 Productivity App Discovery landing page
Type a report name and a description and select the type of logs that you will upload, as shown in Figure 8-145.
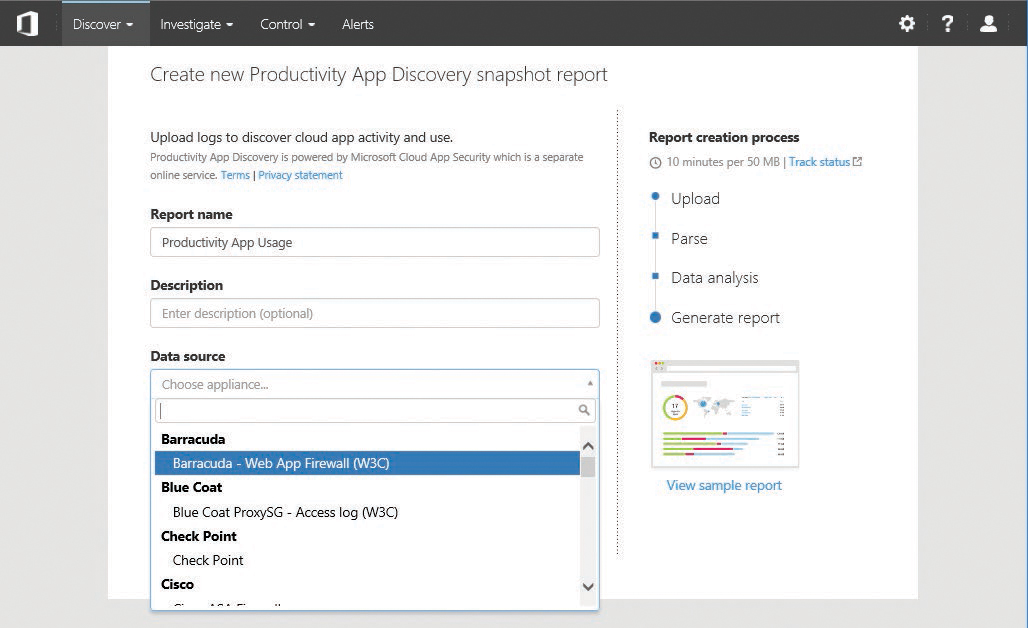
Figure 8-145 Creating a new Productivity App Discovery snapshot report
After you have uploaded the logs, Productivity App Discovery analyzes the logs and generates a report for you to download. Productivity app reports can be used to give you insight into how your users are consuming cloud services outside of the Office 365 suite, providing a more holistic view of the application landscape.
Summary
The Office 365 Security & Compliance Center offers a number of discovery and reporting tools to provide insight into your organization’s data and users’ activities. In addition, you can use policies to protect data against accidental or intentional deletion.