Chapter 2. Preparing your environment for the cloud
The previous chapter outlined each of the high-level tasks involved in an Office 365 deployment; in this chapter, you use your understanding of those tasks to start the setup of your Office 365 subscription, assign administrators, configure your network, fix up your directory, update and install client software, and start synchronizing your users to your tenant. After these tasks are complete, you can start using your Office 365 subscription and migrating your users.
Setting up your subscription
If you have not already set up your Office 365 subscription, this is the best place to start. As discussed in Chapter 1, “Office 365 Deployment Milestones,” the tenant name that you select becomes permanent and branded across your subscription, so choose carefully.
Follow these steps to sign up for either a trial or paid subscription for Office 365.
- Navigate to https://products.office.com.
- Select the Office 365 plan you wish to use, either Personal or Business. When selecting Business, you can select Enterprise plans as well.
- Select either Free Trial or Buy Now to start your Office 365 tenant creation.
- Type a user name and tenant name when prompted to create your user ID, as shown in Figure 2-1.
Figure 2-1 Signup for an Office subscription and selection of a user and tenant name
- Select Create My Account to continue.
- If you are prompted to enter captcha information, provide the necessary detail and click either Call Me or Text Me, as shown in Figure 2-2.
Figure 2-2 The Office 365 captcha page
- Record your User ID when the confirmation process is complete and click You’re Ready To Go.
After you have set up your new Office 365 tenant, the Office 365 portal opens, shown in Figure 2-3, where you can begin creating users, editing organizational information, and assigning licenses.
Figure 2-3 The Office 365 portal page for a newly created tenant


Assigning administrators
Using the information you learned in Chapter 1, you can either begin creating cloud accounts and delegating administrative privileges, or you can wait until you’ve started synchronizing your users, discussed later in this chapter, and assign permissions.
In either case, you must delegate permissions to one or more additional administrators. Keep in mind that the Global Administrator role has the rights to create other global administrators, so limit administrative delegation to one of the other administrative roles discussed in Chapter 1 and avoid creating other global administrator accounts unless necessary.
Follow these steps to create a new administrative account with User administration privileges.
- Select Add A User from the Home page or Users view, as shown in Figure 2-4.
Figure 2-4 The Active Users view in the Office 365 portal
- Type the necessary first name, last name, display name, and user name in the boxes provided, as shown in Figure 2-5.
Figure 2-5 Creating a cloud user with administrative privilege
- When creating the account, select the Roles drop-down menu, select Customized Administrator, and select the User Management Administrator check box, as shown in Figure 2-6.
Figure 2-6 Selecting an administrator role for an Office 365 User account
- Click Add to create the cloud user account.


You can use this process to modify existing cloud accounts, or even accounts that have been synchronized from on-premises Active Directory, by using the Azure AD Connect (AAD Connect) synchronization tool.
When you have completed the creation of any administrator accounts in your new tenant, you can move on to creating DNS records to verify your domains as well as any other services that you wish to add.
Configuring DNS, firewalls, and proxy servers
As discussed in Chapter 1, several network devices could affect your Office 365 deployment, connectivity, and continued success with the services provided. It is therefore strongly recommended that all network devices be updated to their latest versions, and you should contact each device vendor to ensure that your device supports Office 365 connectivity.
Often, it is merely a matter of upgrading your existing devices to support Office 365. This upgrade process, however, can be both time consuming and dangerous if not done correctly. Therefore, it is strongly recommended that any infrastructure changes required to support Office 365 be made in advance of starting your Office 365 deployment.
Public DNS records
The first configuration change you need to make is to your public DNS records; these changes enable you to verify any domain names and configure the necessary DNS records for Mail Exchanger (MX), Exchange Autodiscover, Skype for Business, and so on.
If your public DNS infrastructure is managed internally and hosted on Microsoft Windows Server through the Domain Name System role or another network appliance, the following network changes must be made manually by an authorized administrator.
If GoDaddy or another public entity hosts your public DNS, however, you can use the Office 365 portal configuration process to make the changes for you automatically.
To use the automated Office 365 portal configuration process for domain name verification, perform the following steps.
- Click the Go To Setup button on the Office 365 Admin Center home page, shown in Figure 2-7.
Figure 2-7 Starting the Office 365 Enterprise E3 setup process in the Office 365 portal
- Click the Get Started button under Set Up Mail, shown in Figure 2-8.
Figure 2-8 Starting the setup process by using the Office 365 Admin Center
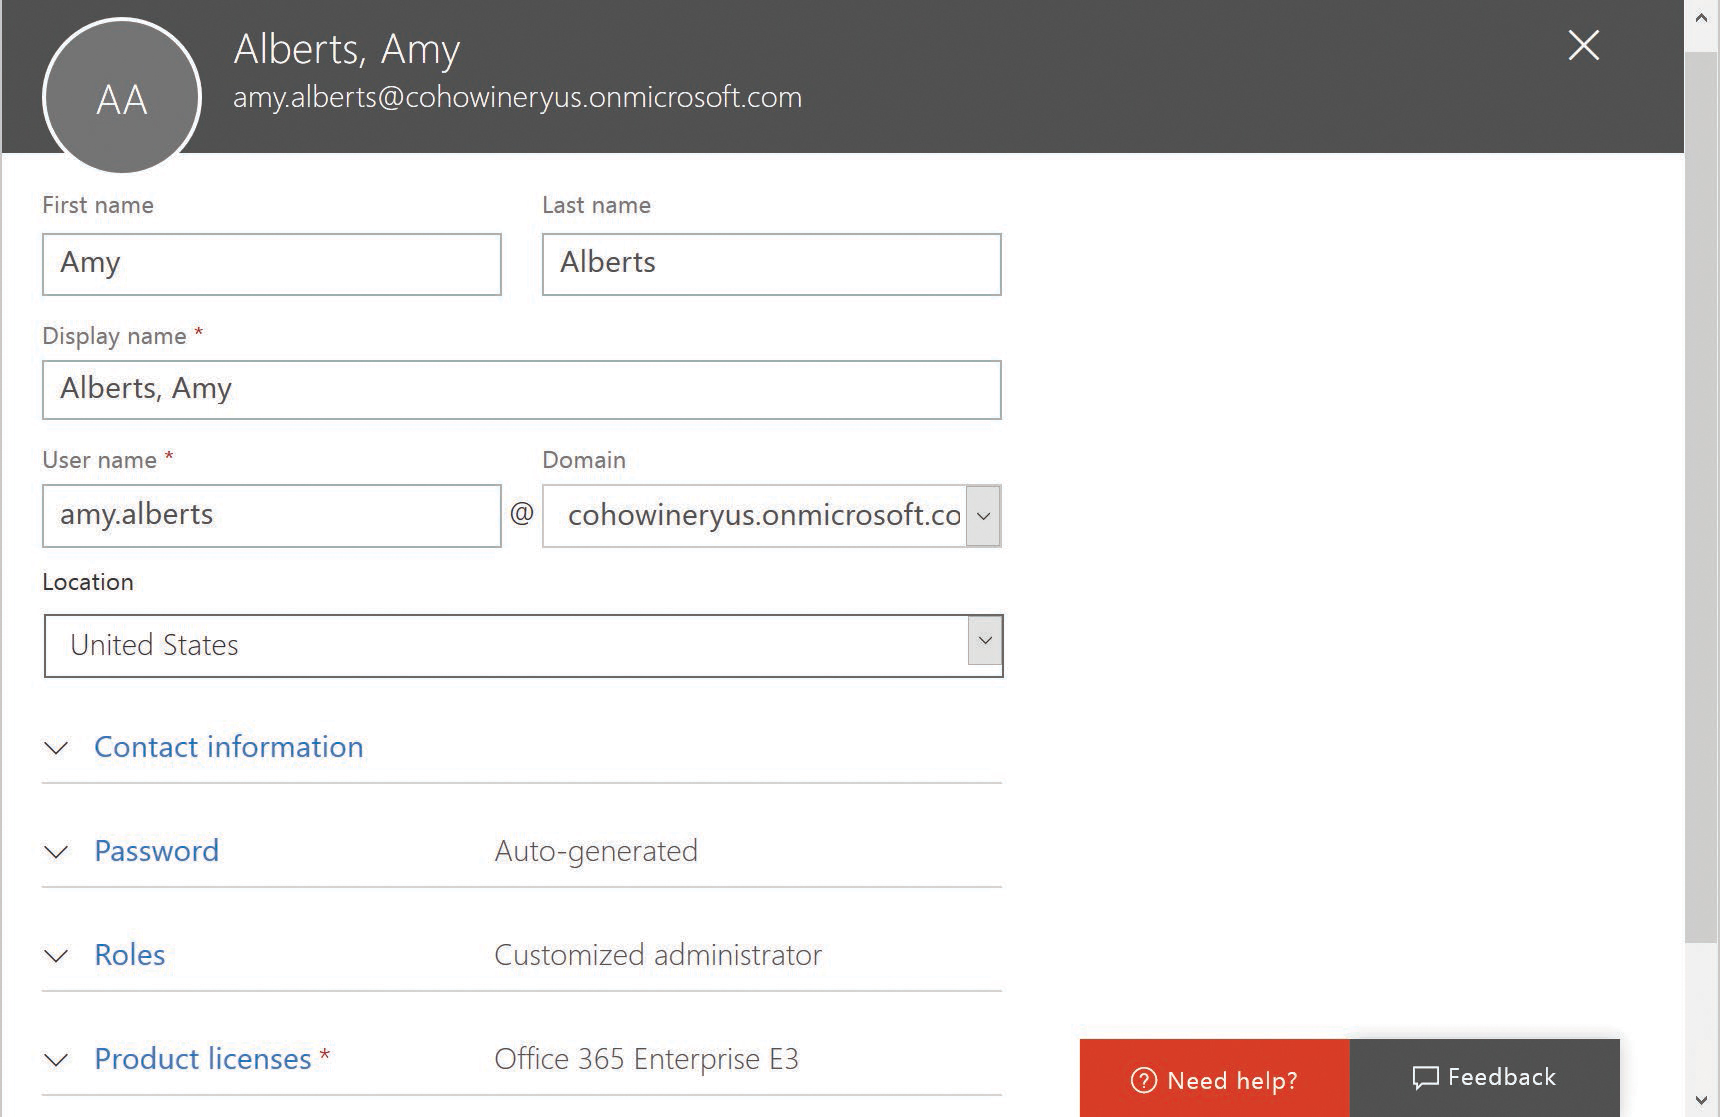
- Select Connect A Domain You Already Own and type the domain name in the box provided, as shown in Figure 2-9.
Figure 2-9 Selecting a domain you already own for sign-in and email personalization
- Click Next to verify that the domain is a valid, registered domain name on the Internet.
- Select Sign In To GoDaddy to log on to GoDaddy to prove domain ownership, as shown in Figure 2-10.
Figure 2-10 Proving you own your domain
- (Optional) If your public domain registrar is not GoDaddy, or if you manage your DNS internally, select Add A Verification Record instead to be presented with the TXT record that must be manually added to DNS to verify domain ownership.
- Click Verify.
- Enter the account information for your GoDaddy account, as shown in Figure 2-11.
Figure 2-11 Log on to the GoDaddy logon page
- Click Accept to confirm access.
When the sign-in verification process completes, the setup process automatically creates a TXT record in the domain DNS configuration, as shown in Figure 2-12.
Figure 2-12 GoDaddy DNS configuration, including verification TXT record for Office 365 domain ownership
- Click Next to skip the addition of new user accounts.
- Select Don’t Migrate Email Messages, shown in Figure 2-13, and click Next.
Figure 2-13 Migrate Email Messages page that appears during the Office 365 automated setup process
- On the Connect Your Domain page, select Add Records For Me, as shown in Figure 2-14, and click Next.
Figure 2-14 Automatically adding DNS records for Office 365 services
- (Optional) If your public domain registrar is not GoDaddy, or if you manage your DNS internally, select I’ll Manage My Own DNS Records to be presented with the list of records that you must manually update.
When the update process has completed, the DNS for your domain is updated to include Exchange Autodiscover, SIP, MX, and CNAME records, shown in Figure 2-15.
Figure 2-15 DNS records updated to support SIP, MX, SPF, and Autodiscover for Office 365
Following the final step of the automated setup, shown in Figure 2-16, you are notified that setup is complete.
- Click Go To The Admin Center to return to your Office 365 portal home page.
Figure 2-16 Completing the Office 365 Admin Center automated Office 365 setup


After you have completed the setup process, your domain is automatically registered in Office 365, and its name can be used as the domain suffix for the UserPrincipalName for user logon as well as for Exchange Online mail routing.
In addition, the Exchange Autodiscover, Sender Policy Framework (SPF), and required Server Resource (SRV) records now exist in your Office 365 tenant; these enable Microsoft Outlook and mobile client connectivity to your tenant as well as Skype client connectivity, and enable you to start sending and receiving email directly to your tenant or communicating using Instant Message (IM) and Voice Over IP (VOIP) communications through Skype for Business.
It is important to note that if your existing domain name, cohowinery.us in these examples, is already configured with MX, SIP, SMTP, CNAME, or SPF records in your public DNS and routing to your on-premises infrastructure or another email hosting provider, select the manual configuration options in the previous configuration process and make only the necessary changes to support your Office 365 setup.
Additional configuration changes for Exchange mail routing as part of the Exchange hybrid configuration, or Skype for Business hybrid, are covered in later chapters and can be performed later to avoid affecting existing functionality.
Firewall configurations
Office 365 is a cloud-based solution; therefore, your internal infrastructure must be able to communicate with your tenant without any connectivity issues created by your networking infrastructure.
If for any reason your internal infrastructure cannot communicate with Microsoft Azure, your Office 365 experience will be affected, possibly resulting in email delays and inability to authenticate and use services, add or license users, and even access cloud data.
It is strongly recommended for all network devices responsible for packet-filtering, load balancing, and network port access control to be configured to allow unrestricted outbound traffic to the Microsoft data centers.
The Microsoft data center IP ranges include all the Office 365 services and are maintained on the Office 365 support site.
The IP ranges can be viewed and downloaded at https://aka.ms/o365-ips, or you can subscribe to them with Rich Site Summary (RSS) feeds at https://aka.ms/o365-ips-rss.
Proxy servers
Proxy servers are traditionally used to proxy requests to the Internet through a single host; however, this behavior can create issues when setting up certain services for Office 365 connectivity.
Primarily, all traffic to Office 365 is outbound traffic. Some services, such as Exchange Autodiscover, Active Directory Federation Services (AD FS) authentication, and mail routing might be exceptions; however, it is important to understand that proxy server configurations can cause issues. The primary service that is affected when using proxy servers is directory synchronization.
The directory synchronization process that the AAD Connect tool performs connects regularly to Office 365 every 30 minutes to synchronize any directory updates. In addition, depending on the configuration of the tool, it also retrieves password changes and other data. If the connectivity between AAD Connect and Office 365 is affected, the synchronization might fail, resulting in incomplete data in Office 365.
It is therefore recommended to exempt the AAD Connect tool from any proxy server configurations and allow it to communicate with Azure without any proxy configuration.
If you are unable to bypass proxy servers for the AAD Connect implementation, it is recommended that you configure both Microsoft Internet Explorer and the Windows Command Shell to use the same proxy server. Both methods are used during the AAD Connect setup for communication with Office 365, so failure to enable both might result in a failed installation.
To set up Internet Explorer on the server where the synchronization tool will be installed, do the following.
- Launch Internet Explorer.
- Select Tools | Internet Options from the menu.
- Select Connections | LAN Settings from the Internet Options menu.
- Ensure that the Proxy Server check box is selected and a proxy server and port are provided in the Address and Port text boxes, as shown in Figure 2-17.
Figure 2-17 Configuring the Internet Explorer proxy server
- Click OK to close the LAN Settings and Connections dialog boxes.

When the proxy server has been properly configured in Internet Explorer, perform the following steps to configure the proxy server for the Windows Command Shell.
- Open an administrative command prompt.
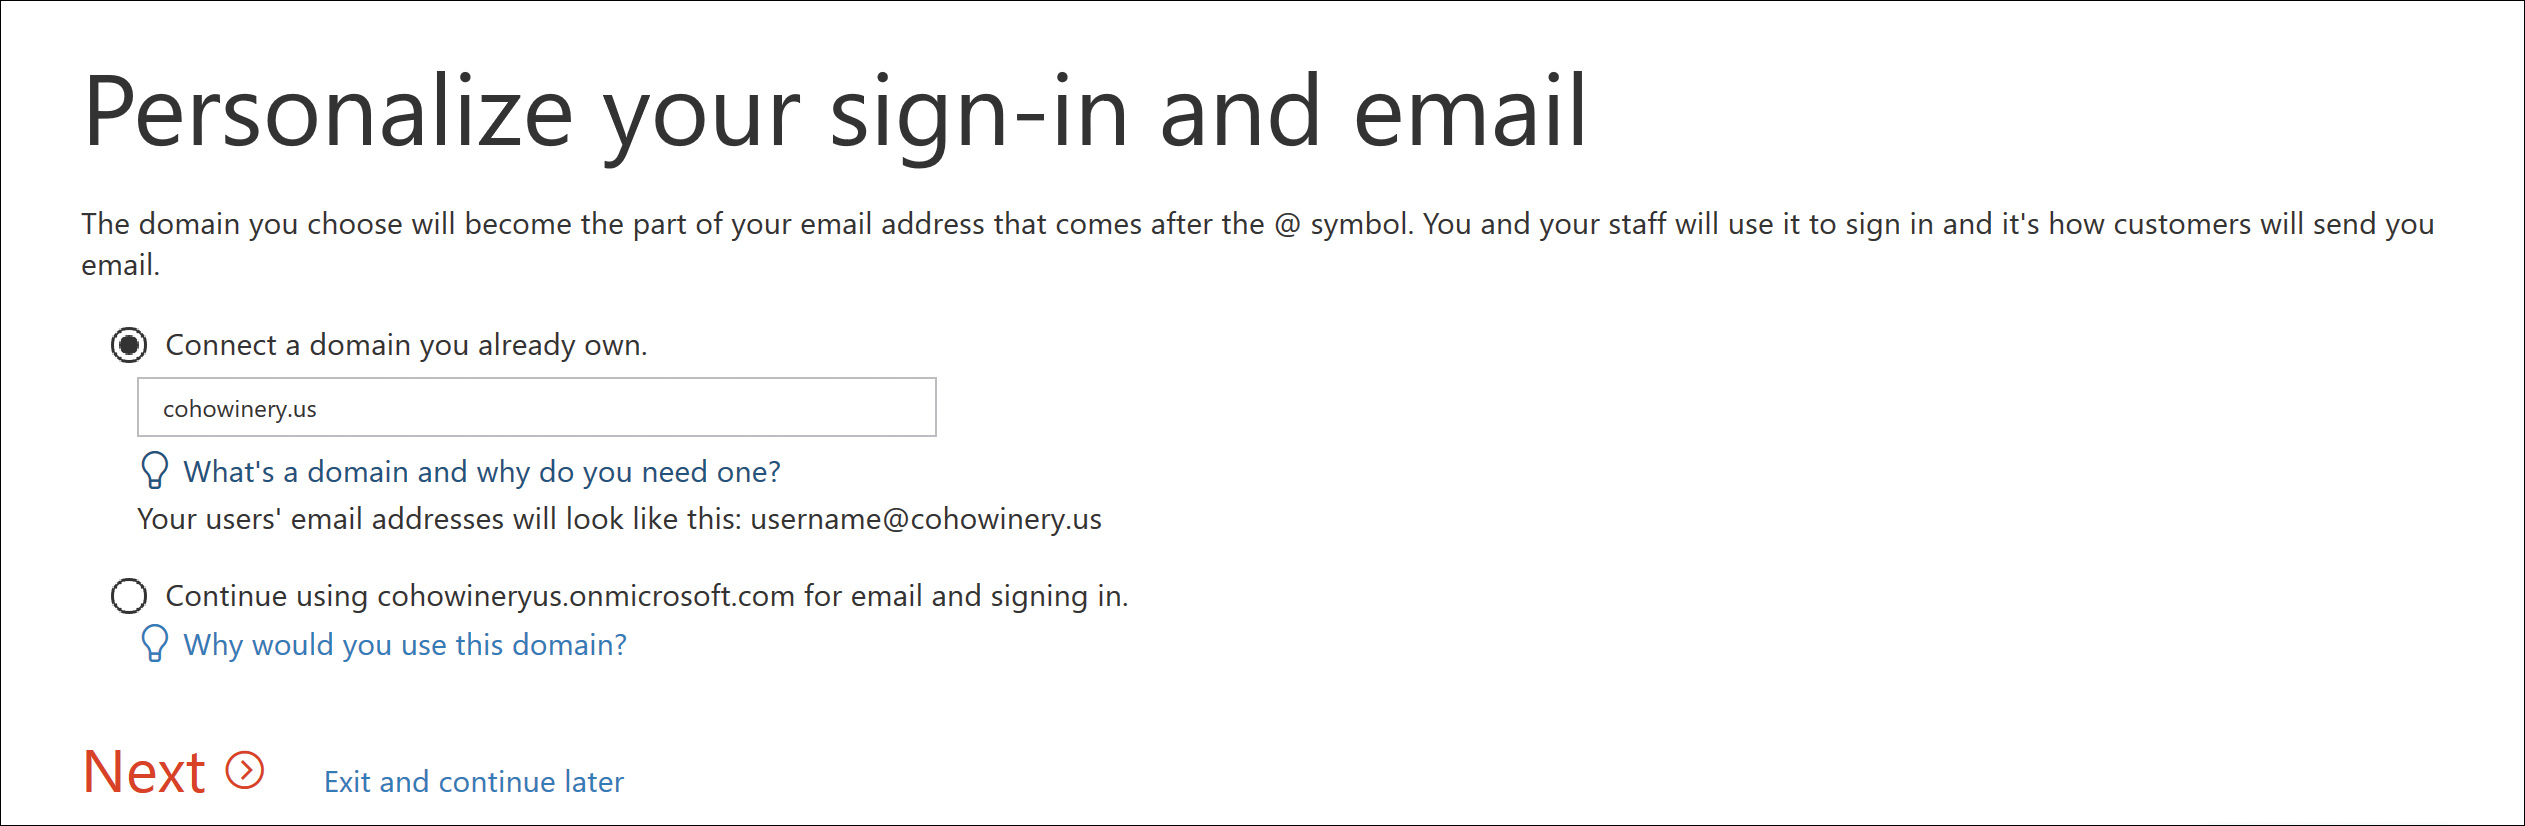
- Type Netsh WinHTTP Show Proxy and press Enter.
- If the command returns Direct Access (No Proxy Server), as shown in Figure 2-18, proceed to step 4 to configure the proxy server.
Figure 2-18 Displaying current WinHTTP proxy server configuration
- Type Netsh WinHTTP Import Proxy Source=IE and press Enter.
- If the command completes successfully, it should display the same proxy server that is configured in Internet Explorer, shown in Figure 2-19.
Figure 2-19 Configuring Netsh Proxy by using the settings from Internet Explorer

Finally, in some circumstances, it might also be necessary to modify the machine.config file that the Windows .NET configuration uses to define the proxy server that any .NET applications should use.
If the setup of AAD Connect fails to communicate with Azure properly, even after the settings in Internet Explorer and the Windows Command Shell have been configured, the .NET configuration file can be modified by performing the following steps.
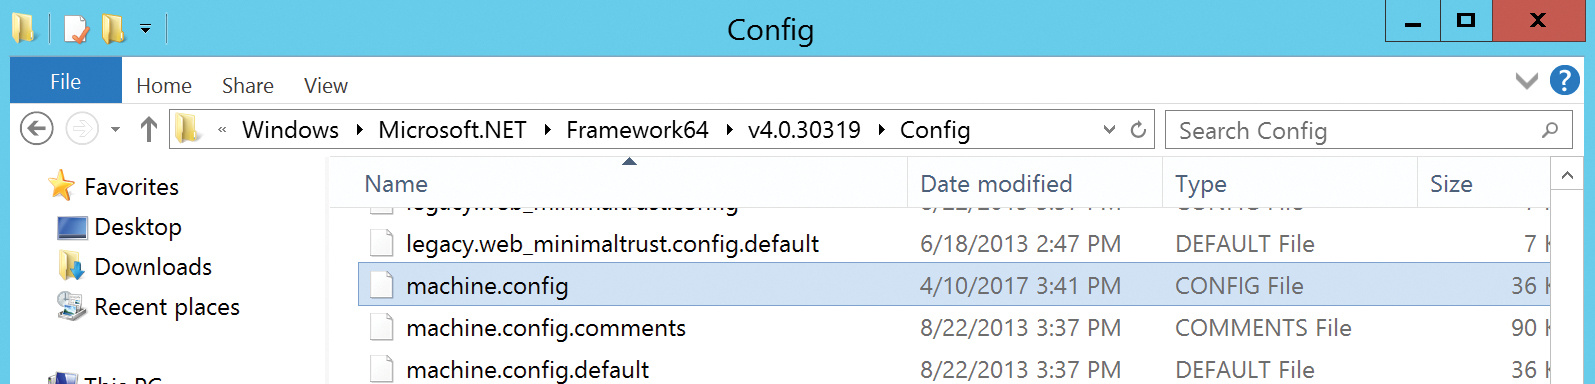
- On the AAD Connect server, navigate to C:WindowsMicrosoft.NetFramework64v4.xxxxxxxConfig, where x4.xxxxx is the v4.0 or v4.5 directory located in the Framework64 folder. This directory name depends on the .NET 4 version installed on your AAD Connect server.
- Edit the machine.config file, shown in Figure 2-20, by using Notepad.
Figure 2-20 The .NET machine.config file location
- At the bottom of the file, insert the following block of text before the </configuration> line, substituting <PROXYADDRESS> with the name or IP address of your proxy server, and <PROXYPORT> with the correct port number.
<system.net> <defaultProxy enabled=“true” useDefaultCredentials=“true“> <proxy usesystemdefault=“true“ proxyaddress=“http://<PROXYADDRESS>:<PROXYPORT>“ bypassonlocal=“true“ /> </defaultProxy> </system.net> - Save the updated file, as shown in Figure 2-21, by clicking File | Save.
Figure 2-21 The machine.config file updated to include default proxy information

After the Proxy server configurations have been made to Internet Explorer, the Windows Shell, and the .NET configuration, you may proceed with the installation and configuration of the AAD Connect tool for directory synchronization.
Network tracing
Occasionally, during the implementation or configuration of proxy server or network firewall changes, it might be necessary to review the communication between your application and Office 365. Understanding the route that Office 365 communication must take to reach Azure will help with troubleshooting network connectivity issues.
The most common reason for connectivity tracing with Office 365, other than mailbox moves, is the synchronization process because the AAD Connect sync engine, unless configured differently, connects to Azure every 30 minutes to synchronize directory changes from on-premises to the cloud.
In addition, the AAD Connect engine, depending on the additional features selected during installation, might connect as frequently as every one to two minutes to retrieve password change requests and other authentication requests from the Azure service bus.
If you need to review traffic between your AAD Connect server and Office 365, you can use tools such as NetMon3, Fiddler, or WireShark to capture network traces from the server to ensure that no other devices are preventing proper communication.
The example uses Fiddler to capture and import from the Office 365 tenant by using the AAD Connect tool. Fiddler is installed on the AAD Connect server and is configured to decrypt HTTPS traffic.
The trace is captured as follows.
- Launch the Fiddler tool and press F12 or select File | Capture Traffic.
- Start the AAD Connect tool.
- Select Connectors.
- Select the Windows Azure Active Directory connector.
- Select Run.
- Choose Full Import and click OK, as shown in Figure 2-22.
Figure 2-22 Starting a full import on the Azure Connector in AAD Connect
- After the full import completes, review the results of the Fiddler trace, shown in Figure 2-23.
Figure 2-23 Fiddler trace of the AAD Connect Full Import run step

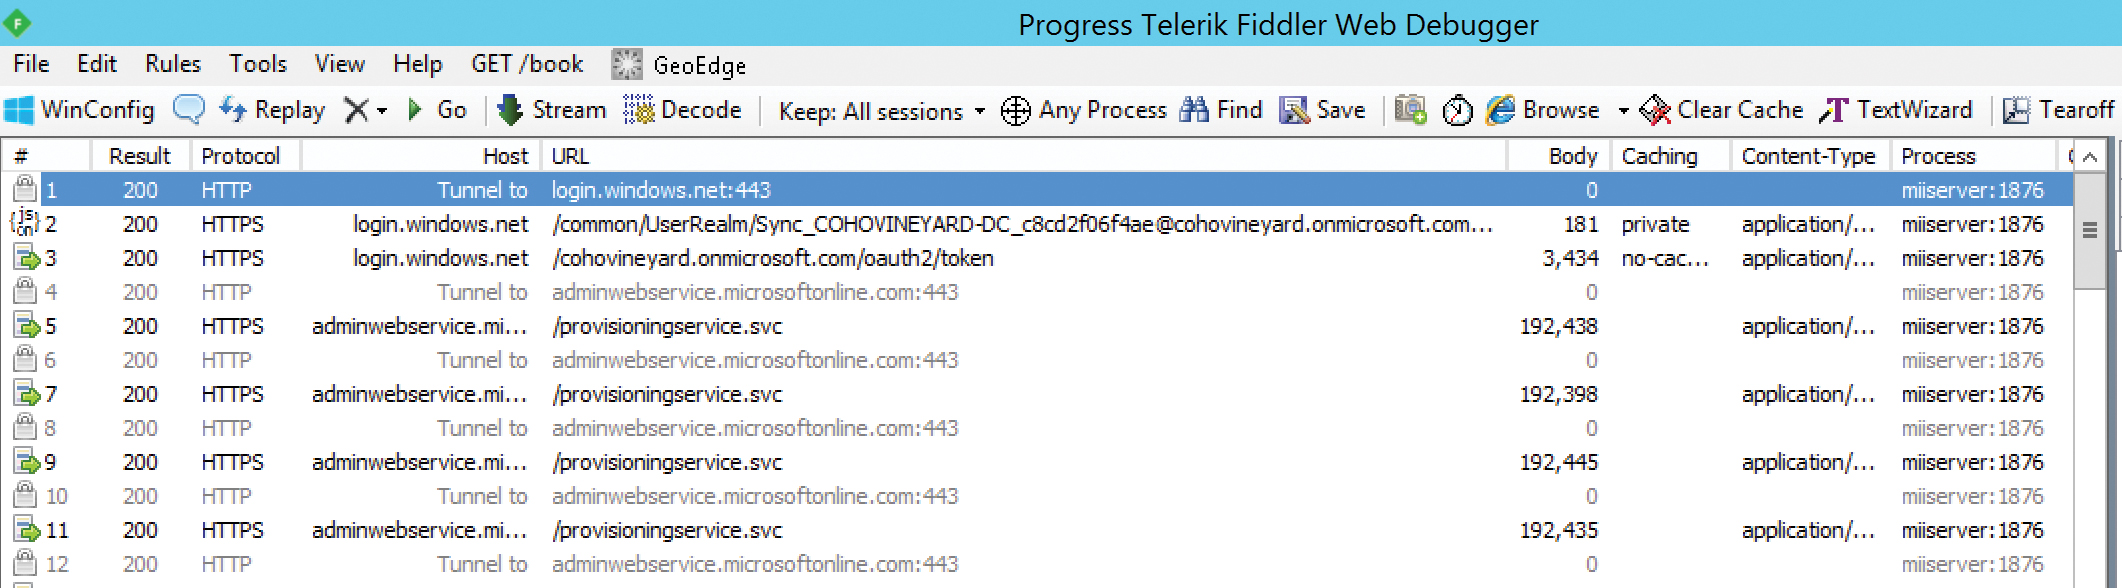
In Figure 2-23, each line represents a packet in the communication between the AAD Connect server and Azure Active Directory. The packets are performing the following actions.
- Communication is established between the synchronization engine and Azure by the login.windows.net URL over secure SSL port 443.
- Home realm discovery, a process by which the appropriate authentication provider is identified, is initiated using the [email protected] account. This account, discussed in detail in Chapter 4, “Directory Synchronization Basics,” is used to authenticate with Office 365 for the purposes of synchronization.
- The home realm discovery process results in an authentication token with the cohovineyard.onmicrosoft.com tenant.
- The synchronization engine is redirected to the adminwebservice.microsoftonline.com URL over SSL port 443.
- The synchronization engine begins reading data from the endpoint adminwebservice.microsoftonline.com/provisioningservice.svc URL, which returns the tenant data to the sync engine.
The process continues until all the directory data has been read from the Office 365 tenant into the Azure connector in the synchronization engine, at which point communication ceases.
As you can see from this example, despite the existence of a proxy server in the configuration, there was no impact on the traffic between the synchronization engine and the Office 365 tenant. If there had been issues with the traffic, you would have experienced retransmissions or transmission failures like the example in Figure 2-24.
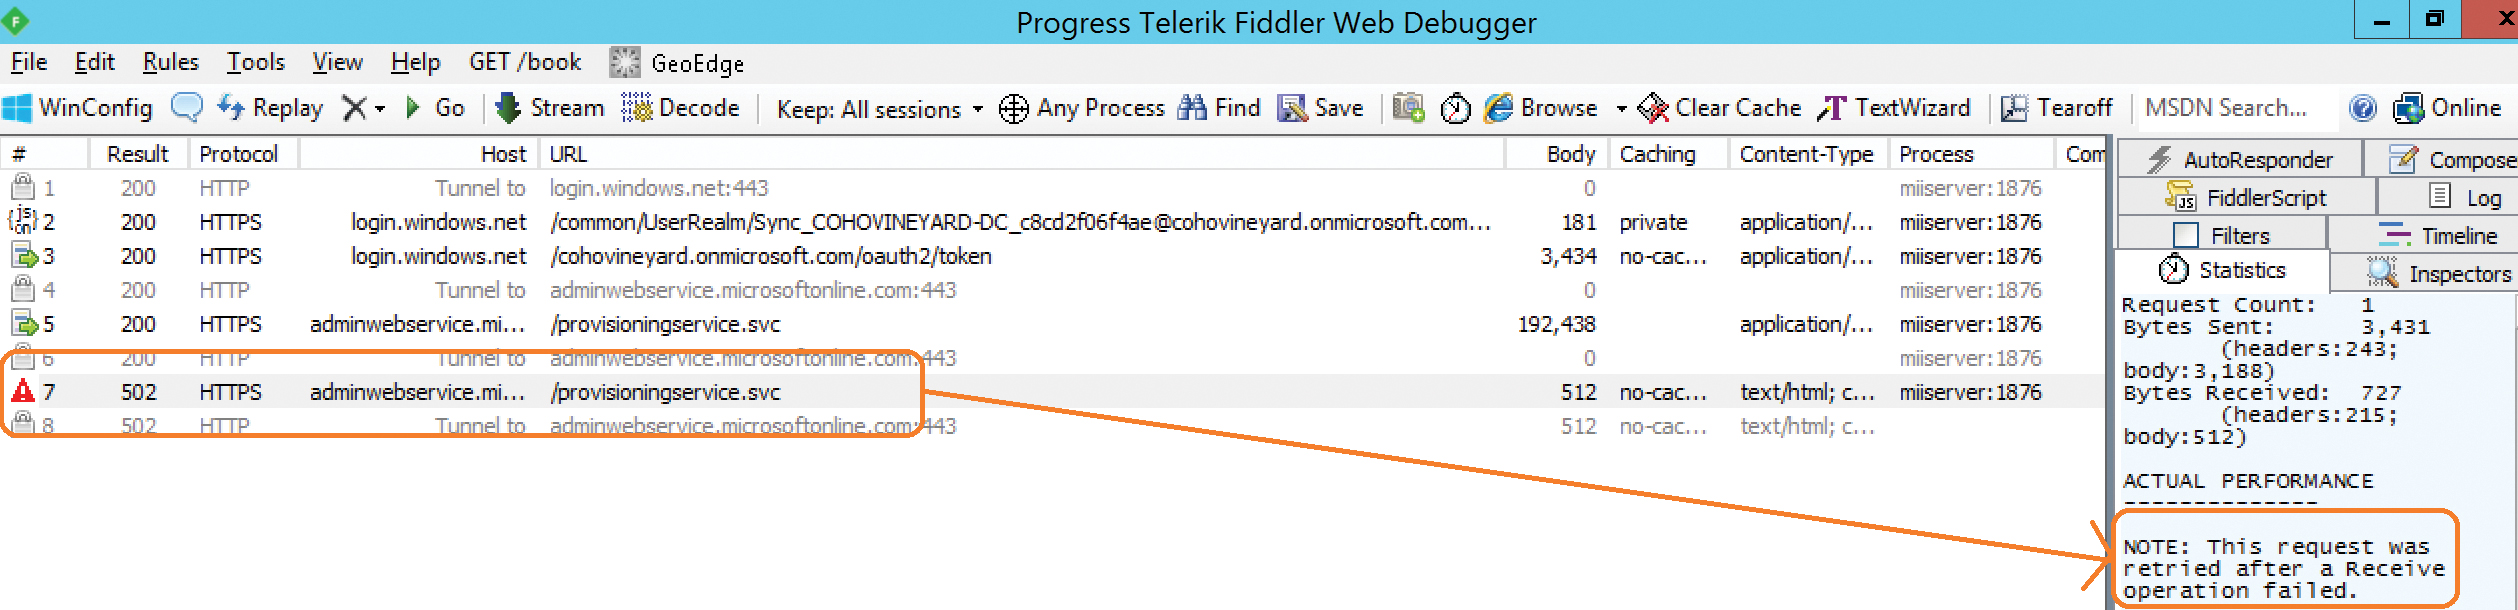
Figure 2-24 A transmission failure in a Fiddler trace
In this example, the communication with Azure AD was initiated, and the sync account authenticated properly. The transmission was interrupted, however, resulting in a retry operation that failed and stopped the import from Azure.
Tools such as Fiddler and NetMon3 can be invaluable when first setting up the synchronization process to ensure that communication is working properly and none of your network devices are affecting performance or connectivity. It is therefore strongly recommended that you become familiar with the proper functionality of the synchronization process and any other service-related connectivity (mailbox moves, Office application activation) to ensure the best possible Office 365 experience.
ExpressRoute
ExpressRoute is a frame-relay style of connection between your on-premises network and the Azure cloud. It provides direct connectivity to the Microsoft data centers through a secure and private connection and eliminates the need to traverse the public Internet for your Office 365–related traffic.
In addition to bypassing the public Internet for Office 365 traffic, ExpressRoute provides a fast and reliable connection to Azure, making replication, high availability, and data migration scenarios easier to implement.
During your implementation of Office 365, if you are considering ExpressRoute connectivity to the Microsoft cloud, it is strongly recommended that the implementation be done prior to the rest of your Office 365 readiness milestones. ExpressRoute implementation changes your network routing internally and affects things like load balancers, proxy servers, and firewalls. These changes have an impact on communication and should therefore be made prior to establishing synchronization and starting mailbox migrations.
Preparing your directories
Much like preparing your network for a successful Office 365 implementation, it is equally important to ensure that your on-premises directories are free from any issues that might affect a successful synchronization of users, groups, and contacts to your tenant.
Microsoft provides the IDFix tool, which reviews your environment and highlights any problem areas or data inconsistencies.
IDFix can be installed as follows.
- Download the IDFix installation from https://aka.ms/idfix.
- Save the ZIP file to the file system and extract the contents.
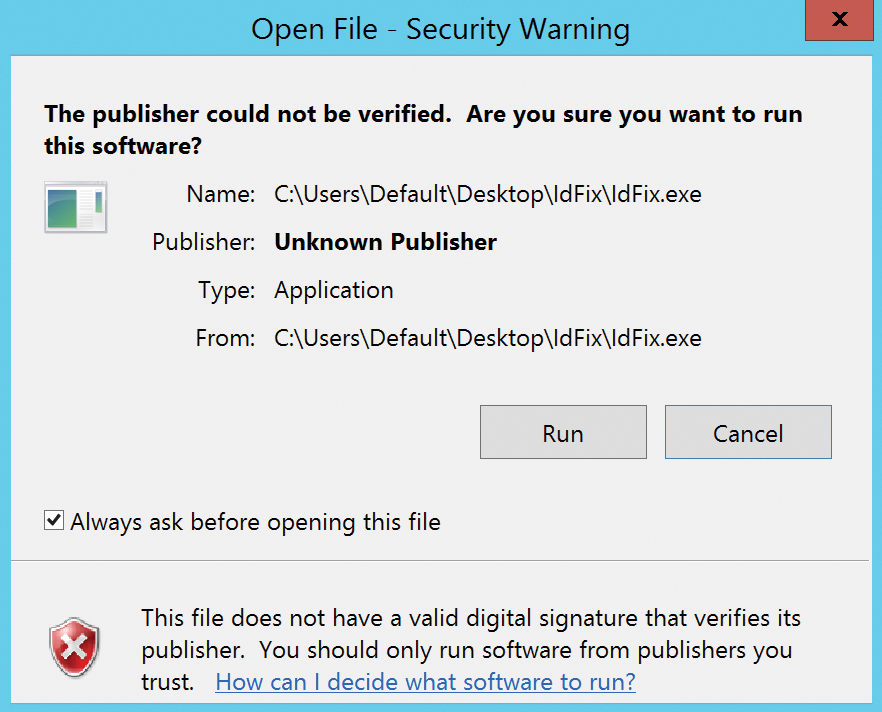
- Launch the IDFix application by double-clicking it. Select Run if a file security warning dialog box, shown in Figure 2-25, appears.
Figure 2-25 File security warning dialog box
- Click OK to proceed past the Privacy Statement dialog box shown in Figure 2-26.
This dialog box appears because the IDFix application reviews your data and provides reports that might contain sensitive information.
Figure 2-26 The IDFix Privacy Statement
- Select Query from the topmost menu, shown in Figure 2-27.
Figure 2-27 The IDFix tool main menu
While the query is running, a status appears in the lower left corner of the tool.
When the query completes, a list of all issues appears, as shown in Figure 2-28, with an error description for each. The total object count and error count appear in the lower left corner.
Figure 2-28 IDFix error report summary
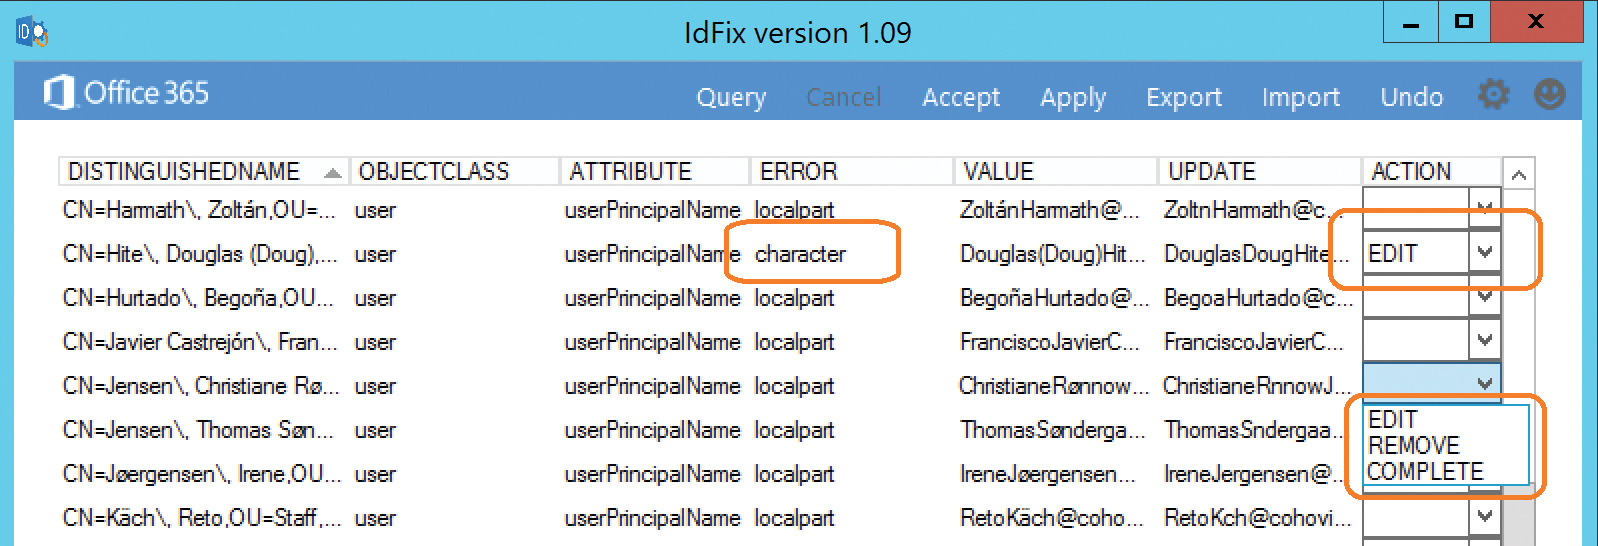
- Select a single error to use the Action column to define the behavior that should be used to resolve it.
- Choose Edit, Remove, or Complete to resolve the object in question, as Figure 2-29 shows.
Figure 2-29 Selecting actions for error objects in IDFix
- When you have selected the appropriate action for each object, select Apply at the top menu.
This returns a confirmation dialog box, shown in Figure 2-30.
Figure 2-30 IDFix Apply Pending dialog box
- Click Yes to apply all selected updates.
When complete, all updates that have been applied are marked Complete, as shown in Figure 2-31.
Figure 2-31 IDFix tool with Actions updated
It is important to note that when selecting Edit, you cannot manually edit the value in error; instead, the IDFix tool simply applies the update displayed in the Update column. You should review this new value that allows IDFix to make the change.
- Optionally, use Accept in the IDFix main menu to apply the updated value, shown in the Update column, automatically to each object in an error state, as shown in Figure 2-32.
Figure 2-32 IDFix Accept
Like Apply, Accept also displays a dialog box warning that the changes being made represent a risk because they are changing data in your directory. See Figure 2-33.
Figure 2-33 The IDFix Accept All Updates dialog box
Selecting Accept All simply changes all Action fields to EDIT; it is then necessary to use Apply to make the changes.
- When the changes have been applied, select Query to rerun the IDFix process against your directory and confirm that no additional changes are required.


In Figure 2-34, the synchronization tool showed 46 failures on export to Azure. These failures were related to bad or duplicate data in the on-premises Active Directory.

Figure 2-34 AAD Connect Azure export statistics before IDFix cleanup
After the IDFix process successfully updates all the errors reported, a resynchronization of the on-premises Active Directory results in 46 adds to Azure and zero errors, as shown in Figure 2-35.

Figure 2-35 AAD Connect Azure export statistics after IDFix cleanup
The IDFix utility is an invaluable tool that you can use to identify any issues in your Active Directory prior to starting synchronization to Office 365. It is therefore recommended to run the IDFix utility against your on-premises directories, review the results, and make the appropriate changes, either manually or with the tool, before you start synchronizing your objects to the cloud.
It’s important to note that the IDFix changes affect both authentication, in the form of UserPrincipalName changes, and mail routing, in the form of email address removal and update; therefore, take care when reviewing all changes before they are applied, because the updates have the potential to modify objects and break access to other applications or affect processes already in place.
Updating and installing client software
Prior to the migration of mailboxes to Office 365, it is critical for the Outlook version levels and updates to be up to date so that there is no interruption in the user experience.
Even a mailbox that has not yet migrated to Exchange Online might experience connectivity issues or constant credential prompts if that mailbox is delegated permission to another mailbox that has been migrated to Office 365. It is for this reason that it is strongly recommended that Office and Windows updates be approved, applied, and up to date in advance of the Office 365 implementation.
Frequently, customers choose to apply the Office Pro Plus license to all users ahead of the mailbox moves, or even SharePoint Online and Skype for Business deployments, so that all Office versions are current and support the Office 365 workloads.
Installing Office Pro Plus
Installation of the Office Pro Plus software is extremely simple.
- Log on to the Office 365 portal at https://portal.office.com.
- When prompted, log on to Office 365, using your user name and password.
- On the Office 365 portal page, shown in Figure 2-36, select Install Office 2016 in the upper right corner.
Figure 2-36 Installing Office 2016 from the Office 365 portal
The Office 365 portal displays additional information, shown in Figure 2-37, that assists in the Office 2016 installation.
Figure 2-37 Office 365 Click To Run guidance page
When the installer has successfully downloaded from Office 365, a prompt to Save, Run, or Cancel the installation appears, as shown in Figure 2-38.
Figure 2-38 Prompt for Office 2016 Click To Run installer
- Click Run to begin the Office 2016 installation.
If there are any conflicting software versions already installed on the workstation, a pop-up dialog box appears, showing the application in conflict, as shown in Figure 2-39.
Figure 2-39 Office 2016 setup conflict with existing installed versions
- Select the I Understand. I Don’t Want To Wait check box and select Install Anyway if you wish to proceed with the installation.
This removes the version or versions of software in conflict and proceeds with the installation. Clicking I’ll Wait ends the Office 2016 installation process.
- When the installation completes, a new window, shown in Figure 2-40, appears, indicating that the installation is complete.
Figure 2-40 Office installation completion page
- Click Close to complete the installation process.


When the installation completes, the Office 2016 products are available for use, and any previous documents created in past versions of Office will prompt to update the document to the latest version when applicable.
Automating the installation
Although the Office Pro Plus suite can be installed manually by using the option available on the Office 365 portal page, you can also use the Office Pro Plus installation binary to create a deployment package for use with tools such as System Center Configuration Manager (SCCM).
Deployment with SCCM or other automated application deployment tools consists of downloading the Office Pro Plus binary and creating configuration files that determine the subcomponents that should be installed. The installation can be automated by push, Group Policy object (GPO), logon script, or other automation tools that you might use in your enterprise.
You can find information about deploying Office Pro Plus, using the Microsoft System Center Configuration Manager, at https://aka.ms/ProPlusWithSCCM.
Activation
The final step in using the Office Pro Plus suite of products is activation, a process by which the Office applications connect to Office 365 to ensure that the user is properly licensed in the tenant to use the application.
The good news is that activation is automatic. No additional action is required by the user to activate their Office installation.
Activation does, however, require the computer to have Internet access to complete the process.
After Office is installed on a user’s workstation, the system tries daily to reach the Microsoft Office Licensing Service activation endpoint on the Internet. If it is unsuccessful, it retries daily for up to 30 days before the applications enter reduced functionality mode.
In reduced functionality mode, the software remains installed on the workstation, but your users can only view and print documents. Any features related to document editing or creation of new documents remains disabled until the user either types a product key or successfully authenticates with Office 365.
The reduced functionality mode displays a Product Deactivated dialog box, as shown in Figure 2-41, if Office is unable to reach the licensing service after more than 30 days.

Figure 2-41 Product Deactivated dialog box
Synchronizing your users
The next step in your deployment of Office 365 is the synchronization of your users to Microsoft Azure Active Directory.
Synchronization is performed using the Azure AD Connect tool, typically referred to as AAD Connect. AAD Connect is a free download from Microsoft for Office 365 users and is based on the Microsoft Identity Manager (MIM) product line.
The directory synchronization process, although simple in theory, can be involved when installing and configuring the AAD Connect tool. In addition to the selection of objects and OUs, the AAD Connect tool can also be configured to support additional features such as pass-through authentication, group writeback, and password writeback.
You can find additional information about directory synchronization in Chapter 4, and an in-depth look into the AAD Connect installation and all options in Chapter 5, “Installing Azure AD Connect.”
When the synchronization engine has been installed, pay attention to the synchronization statistics for each of the run profile steps on the Operations tab of the AAD Connect tool, shown in Figure 2-42.

Figure 2-42 The Operations view in AAD Connect
Although it is important to review all errors reported in the Status column, those operations for the Azure connector, typically named tenant.onmicrosoft.com, should be reviewed carefully.
Any errors on the Azure connector indicate either bad or missing data in Office 365. In fact, if the IDFix tool has been run and all issues resolved prior to installation of the AAD Connect tool, the Azure connector should not show any errors related to data problems.
If errors do appear in the synchronization statistics view, the data provided there might not be sufficient to diagnose the issue adequately. In those cases, it is recommended to review the Application Event Log for more detail.
The following list, although not exhaustive of events the AAD Connect engine returned, primarily because the tool is constantly evolving and maturing, represents the most common as well as some of the most important events that you should review when present as well as included in any event-log monitoring utilities.
Informational events
The following list of informational events, found in the Windows Server Application event log, are the most common events found during normal processing of the synchronization process. They can be monitored to provide reporting on the standard operation of the AAD Connect engine, the directory synchronization process and password synchronization.
AAD Connect engine
These events are related to the AAD Connect engine, and provide detail about events related to the operation of the Azure AD Sync service.
904 – Scheduler-related informational events Many 904 informational events are related to Scheduler starting, Scheduler settings changing, Purging AAD Connect Operations Run history, Scheduler stopping, and so on.
2001 – AAD Connect Windows Service (Azure AD Sync) Started Successfully.
2002 – AAD Connect Windows Service (Azure AD Sync) Stopped Successfully.
Directory synchronization
These events describe operations that have occurred as part of the directory synchronization process, including the start and stop of export or import cycles from Active Directory or Azure Active Directory.
104 – Export Iteration # Has Completed.
105 – Import Iteration # Has Completed.
107 – Azure AD Has Redirected The Provisioning Endpoint Service Call To https://provisioningapi.microsoftonline.com/provisioningwebservice.svc To An Alternate Endpoint.
114 – Export Cycle Has Competed.
115 – Access To Azure Active Directory Has Been Denied This event is flagged as informational despite indicating that Azure Active Directory access has been blocked. This Informational event is frequently found in conjunction with a 106 Error.
116 – Informational logging that returns directory synchronization settings related to export threshold and machine name and so on.
117 – Import Prefetch Starting: Import Steps During Synchronization Cycle Will Read From Each Connector As They Start.
Password synchronization
These events describe actions the engine takes as part of the password synchronization process from on-premises Active Directory to Azure Active Directory. Each event provides detail about the starting, stopping, and progress of the synchronization process as well as any error detail.
601 – Password Synchronization Manager Has Started This event appears for every source the Active Directory forest synchronized as a source for the Password Hash Synchronization feature.
605 – Password Synchronization Changes Have Failed For One Or More Users This Informational event refers to an error condition but is not classified as an error.
609 – Password Synchronization Manager Has Stopped.
611 – Password Synchronization Full Sync Has Started This event appears upon completion of the AAD Connect Installation Wizard, either during initial setup or when reconfiguring AAD Connect, when the Password Hash Synchronization feature has been enabled.
This action pauses any other password synchronization until it has completed. Changes that occur while it is running are queued and occur after this full sync has completed.
650 – A Batch Of Password Updates To Azure AD Has Started.
651 – A Batch Of Password Updates To Azure AD Has Completed Informational events 650 and 651 occur as part of the Full Password Sync process.
656 – A Password Change Request For One Or More Users Has Been Received From The Server And Is Being Transmitted To Azure AD.
657 – A Password Change Request For One Or More Users Was Successfully Transmitted To Azure AD Informational events 656 and 657 can contain password change requests for up to 50 users per batch. If the number of password change requests from Active Directory exceeds 50 users, multiple 656 and 657 events are generated.
658 – Windows Credentials Sync Config details.
659 – Informational logging that returns the state of the IsPasswordChangeOnLogon feature.
6201 – Server Encryption Keys Have Been Successfully Created This event is returned during the installation of AAD Connect.
6943 – Password Sync Started For Management Agent (Connector), ConnectorName.
6945 – Informational logging that returns the Management Agent Run Profile settings details about Connector Name, AD Forest partition, Service Account name, and Domain.
Warning events in directory synchronization
The following event IDs are the most common warning events related to the synchronization of user, group, and contact objects from on-premises Active Directory and should be reviewed when they appear in the Windows Application Event logs.
6012 – Full Import Failed No objects were returned from the operation.
6100 – Run Profile Step Completed With Errors This event is logged as a warning; additional information is returned, along with this warning, in the form of Error events.
6105 – The “Exported Changed Not Reimported” Error Was Returned During An Import Run Profile Operation This error indicates that data sent to Azure was not returned during import; it’s typically the result of other errors. This error should be skipped until all other export errors have been resolved.
6110 – The Configuration Has Changed Since The Last Run Profile Of This Type (Import Or Sync), However A Full Import Or Sync Was Not Performed The sync engine will continue to report this warning until a full import or sync resolves the issue.
6126 – Identical to Warning 6110.
6127 – Identical to Warning 6110.
Error events in directory synchronization
The following event IDs are the most common error events related to the synchronization of user, group, and contact objects from on-premises Active Directory and should be reviewed when they appear in the Windows Application Event logs. These events enable you to identify failures in the synchronization process and remediate errors in a timely manner.
106 – Failed To Connect To Azure AD During Export Step.
109 – Failed To Connect To Azure AD During Import Step Both error 106 and error 109 are connectivity errors when communicating with Azure Active Directory, most commonly a credential issue; however, it’s possible that network communication or proxy issues are also the cause.
6801 – Error Occurred Communicating With Azure AD.
6803 – Generic The export step encountered one or more errors.
6941 – Export Encountered One Of The Following Errors:
DataValidationFailed
InvalidSoftMatch
AttributeValueMustBeUnique
The 6941 error is logged for each error that occurs during the run step. If many export errors are visible in the AAD Connect Synchronization Manager console, there will be a large number of associated error entries. When monitoring for export failures, it’s best to use the 6803 error to indicate a failure, because monitoring for 6941 returns a large number of results.
Configuring federation
Typically, federation refers to the authentication process between your on-premises Active Directory and Azure Active Directory. The synchronization of user identities between your directory and Office 365 enables your users to authenticate with Office 365 and consume services; however, it is necessary also to configure one or more types of federation to enable this authentication process.
Chapter 3, “Federation Services and Authentication,” deals with the different federation options and implementation of each. It is strongly recommended that you review each option and available features in detail before configuring federation with Office 365.
Licensing your users
After a cloud user has been created, and you have started synchronizing identities to your tenant, you must assign licenses to your users before they can begin to consume Office 365 services.
Licensing plans and subscriptions were explained in detail in Chapter 1; however, several methods are available for licensing users in Office 365, and it is important to understand each method so that you can choose the best option for you.
Currently, there are three primary methods for license assignment in Office 365.
- Group-based licensing
- Windows PowerShell licensing cmdlets included in the MSOnline PowerShell module
- Manual licensing through the Office 365 portal
Group-based licensing
One of the newest features available for licensing in Office 365 is group-based licensing, commonly referred to as GBL.
Group-based licensing requires either Azure Active Directory Premium or Azure Active Directory Basic licenses, both paid features; however, it is one of the quickest, easiest, and most effective ways to manage Azure Active Directory licenses. As the name implies, group-based licensing uses Azure Active Directory groups for the assignment of licenses to users.
Licenses are assigned to either security groups that are synchronized to Azure in the Azure AD Connect tool or to cloud-only groups created directly in Azure. Both group types require an Azure AD Basic license.
In the example in Figure 2-43, an on-premises security group and its membership has been synchronized to Azure Active Directory and the Exchange Online Enterprise E3 and Office Pro Plus licenses assigned (2 of 15 enabled services).

Figure 2-43 Group-based license assignment in Azure Ibiza portal
In addition, dynamic groups can be created in the Azure portal and configured to define membership based on synchronized attributes. The creation of Azure Active Directory Dynamic groups, shown in Figure 2-44, requires an Azure Active Directory Premium license.

Figure 2-44 Creating a Dynamic group in the Azure Ibiza portal
After a dynamic group has been created in the Azure portal, the group can then be used for automatic license assignment through group-based licensing, as shown in Figure 2-45.

Figure 2-45 Assigning a license to an Azure Dynamic group
It is important to note the following details regarding Azure AD group-based licensing.
- All existing Azure license types are supported by Azure Active Directory group-based licensing.
- Group membership updates made in on-premises groups synced to Azure Active Directory are effective within just a few minutes of a membership change.
- Users can be members of multiple groups; licenses across groups are combined.
- If no licenses are available in the tenant, group-based licensing cannot assign licenses to a user, and no error will be returned.
- Licenses assigned through a group cannot be manually removed by Windows PowerShell or the portal.
- Users can have licenses assigned through multiple groups as well as by direct assignment (Windows PowerShell and manual).
Windows PowerShell licensing
The second method available for licensing is through use of the provided licensing Windows PowerShell cmdlets in the MSOnline PowerShell module.
The MSOnline PowerShell module includes several cmdlets you can use for user license assignment in Azure Active Directory. You can use these cmdlets to assign SKUs to users as well as to enable or disable specific plans under the SKU.
Assignment consists of three steps.
First, all users must have a Usage Location assigned to be licensed. The second step consists of defining the list of sub-plans you wish to have disabled (not enabled), and the third step consists of assigning the options directly to the user.
A user’s Usage Location is set automatically by the AAD Connect tool, provided that the msExchUsageLocation value in on-premises Active Directory is populated with a valid two-digit ISO country code. If the value is not set, the AAD Connect tool can be customized to synchronize any other Active Directory attribute (such as CountryCode) as a Usage Location, provided it is a valid two-digit ISO country code.
If the Usage Location is not set by AAD Connect, it can be set programmatically by using the MSOnline PowerShell cmdlets as follows.
Set-MsolUser -UserPrincipalName <UserPrincipalName_value> -UsageLocation <Country_Code>
In the example shown in Figure 2-46, the user, Pilar Ackerman, is being set to a Usage Location of US.

Figure 2-46 Setting UsageLocation through Windows PowerShell
The license options, or the list of disabled sub-plans, can be set as follows.
$licenseoptions = New-MsolLicenseOptions -AccountSkuId <SKU_Name> -DisabledPlans YAMMER_ENTERPRISE, RMS_S_ENTERPRISE
In the example shown in Figure 2-47, the LicenseOptions variable is being created to generate a set of disabled plans that includes Yammer and Exchange Rights Management. This variable will be used in step 3 to assign the license to a user.

Figure 2-47 Creating a LicenseOptions variable for use by the Licensing cmdlet
Finally, the LicenseOptions variable can be used with the following Set-MsolUserLicense cmdlet to assign the license to the user.
Set-MsolUserLicense -UserPrincipalName <UserPrincipalName_Value> -AddLicenses cohovineyard:ENTERPRISEPACK -LicenseOptions $licenseoptions
In the example in Figure 2-48, the Set-MsolUserLicense cmdlet assigns the E3 SKU to a user by using the LicenseOptions variable created previously.

Figure 2-48 Setting the user license with the Set-MsolUserLicense cmdlet
Manual license assignment
The final method available for license assignment is the use of the Office 365 portal to assign user licenses manually.
Manual license assignment can be done on an individual user basis by selecting the user and editing the assigned license or by selecting multiple users, as shown in Figure 2-49.

Figure 2-49 Bulk user license assignment through the Office 365 portal
Although the ability to assign user licenses is available through the Office 365 portal for both individual and bulk assignment, it does not typically scale well for large organizations with many thousands of users or with licensing requirements that might create the need to assign licenses in various combinations based on role, location, or department.
For this reason, the manual assignment of licenses is used on an ad hoc basis and as a supplement to one of the other options for license assignment.
Wrapping Up
Now that the major milestones involved in your Office 365 tenant setup have been discussed, and the chapter has provided guidance on each of these steps, you move on to more advanced topics such as federation, directory synchronization, Exchange hybrid setup, and the tasks required to help you get the most from your Office 365 experience.