Day 15 Managing Cisco IOS and Configuration Files
CCNA 640-802 Exam Topics
![]() Manage IOS configuration files (save, edit, upgrade, restore).
Manage IOS configuration files (save, edit, upgrade, restore).
![]() Manage Cisco IOS.
Manage Cisco IOS.
![]() Verify router hardware and software operation using SHOW & DEBUG commands.
Verify router hardware and software operation using SHOW & DEBUG commands.
Key Topics
IOS images and configurations files can become corrupted through intentional attacks, unintentional user errors, and device failure. To prevent these problems, you have to be able to save, back up, and restore configuration and IOS images. Today we review file management operations.
The Cisco IOS File System
Cisco IOS devices provide a feature called the Cisco IOS Integrated File System (IFS). This system allows you to create, navigate, and manipulate directories on a Cisco device. The directories available depend on the platform.
IFS Commands
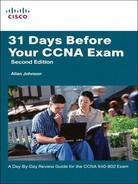
Example 15-1 shows output from the show file systems command.
The columns show the amount of available and free memory in bytes and the type of file system and its permissions. Permissions include read-only (ro), write-only (wo), and read and write (rw). Although several file systems are listed, of interest to us are the TFTP, flash, and NVRAM file systems.
Notice that the flash file system has an asterisk (*) preceding it, which indicates that this is the current default file system. Recall that the bootable IOS is located in flash. Therefore, the pound symbol (#) appended to the flash listing indicates that this is a bootable disk.
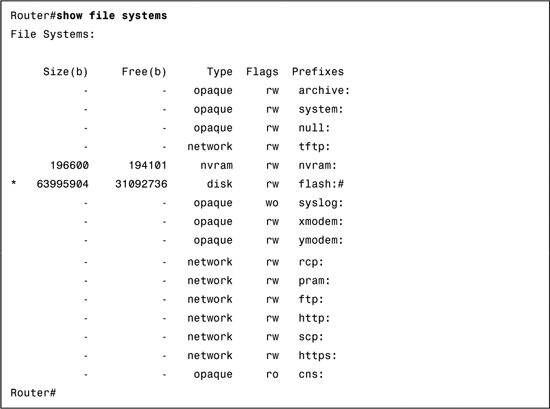
Example 15-2 lists the contents of the current default file system, which in this case is flash.
Of particular interest is the first listing, which is the filename for the IOS image.
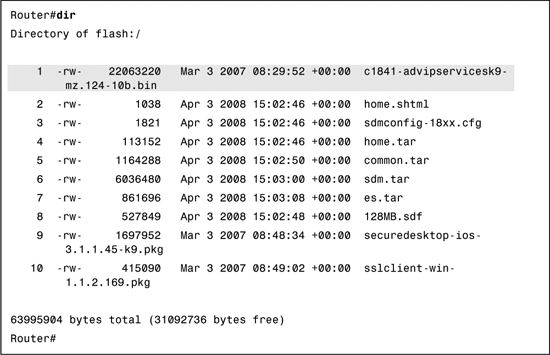
Notice that the configuration files stored in NVRAM are not shown in the output. To see these, first change directories (cd) to the NVRAM directory (nvram:). Then list the contents with the dir command, as shown in Example 15-3.
The file we are most interested in as CCNA exam candidates is the startup-config configuration file.
URL Prefixes for Specifying File Locations
File locations are specified in Cisco IFS using the URL convention as shown in the example in Figure 15-1.

In Figure 15-1, the parts of the URL tftp://192.168.20.254/configs/backup-config can be dissected as follows:
![]() tftp: is the prefix specifying the protocol.
tftp: is the prefix specifying the protocol.
![]() Everything after the double slash (//) defines the file location.
Everything after the double slash (//) defines the file location.
![]() 192.168.20.254 is the location of the TFTP server.
192.168.20.254 is the location of the TFTP server.
![]() configs is the master directory on the TFTP server.
configs is the master directory on the TFTP server.
![]() backup-config is a sample filename.
backup-config is a sample filename.
The TFTP URL shown in Figure 15-1 is an example of a remote URL. Examples of URLs for accessing the local Cisco IFS include the following:
![]() flash:configs/backup-config
flash:configs/backup-config
![]() system:running-config (this accesses RAM)
system:running-config (this accesses RAM)
![]() nvram:startup-config
nvram:startup-config
Commands for Managing Configuration Files
Knowing the URL structure is important because you use them when copying configuration files from one location to another. The Cisco IOS Software copy command is used to move configuration files from one component or device to another, such as RAM, NVRAM, or a TFTP server. Figure 15-2 shows the command syntax.

The source URL is where you are copying from. The destination URL is where you are copying to. For example, you are already familiar with the abbreviated command copy run start. However, in its most verbose form, this command specifies the file locations:
Router#copy system:running-config nvram:startup-config
The command states, “Copy the running configuration from the system’s RAM to NVRAM and save it with the filename startup-config.
Other examples include copy from RAM to TFTP:
Router#copy system:running-config tftp:
Or simply,
Router#copy run tftp
Copying from TFTP to RAM:
Router#copy tftp: system:running-config
Or simply,
Router#copy tftp run
Copying from TFTP to the startup configuration file:
Router#copy tftp: nvram:startup-config
Or simply,
Router#copy tftp nvram
The copy commands using TFTP require more configurations (covered in the next section) after you enter them to carry out the instruction.
Cisco IOS File Naming Conventions
Because of the sheer number of platforms, feature sets, and possible versions of IOS, a file naming convention is used to provide some basic information about the IOS image. Figure 15-3 shows a sample IOS image filename and what each part means.

The following details each part of the IOS filename shown in Figure 15-3:
![]() Platform: The first part, c1841, identifies the platform on which the image runs. In this example, the platform is a Cisco 1841.
Platform: The first part, c1841, identifies the platform on which the image runs. In this example, the platform is a Cisco 1841.
![]() Features: The second part, ipbase, specifies the feature set. In this case, ipbase refers to the basic IP internetworking image. Many feature sets are available:
Features: The second part, ipbase, specifies the feature set. In this case, ipbase refers to the basic IP internetworking image. Many feature sets are available:
— i: Designates the IP feature set.
— j: Designates the enterprise feature set (all protocols).
— s: Designates a PLUS feature set (extra queuing, manipulation, or translations).
— 56i: Designates 56-bit IPsec DES encryption.
— 3: Designates the firewall/IDS.
— k2: Designates 3DES IPsec encryption (168 bit).
![]() Type: The third part, mz, indicates where the image runs (m for RAM) and that the image is zip compressed (z). Other possible codes include the following:
Type: The third part, mz, indicates where the image runs (m for RAM) and that the image is zip compressed (z). Other possible codes include the following:
— f: The image runs from Flash memory.
— r: The image runs from ROM.
— l: The image is relocatable.
— x: The image is mzip compressed.
![]() Version: The fourth part, 123-14.T7, is the version number.
Version: The fourth part, 123-14.T7, is the version number.
![]() Extension: The final part, bin, is the file extension. The .bin extension indicates that this is a binary executable file.
Extension: The final part, bin, is the file extension. The .bin extension indicates that this is a binary executable file.
Manage IOS Images
As any network grows, storing Cisco IOS Software images and configuration files on the central TFTP server gives you control over the number and revision level of Cisco IOS images and configuration files that must be maintained. Figure 15-4 shows a sample topology with a TFTP server.
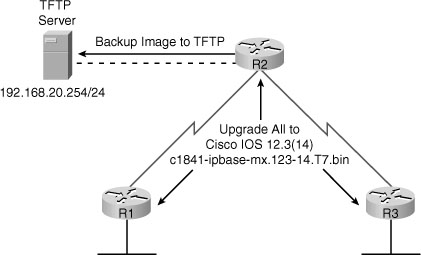
Backing Up an IOS image
Make sure a TFTP server is configured and running on the network. Then follow these steps to copy a Cisco IOS Software image from flash memory to the network TFTP server:
Step 1 Ping the TFTP server to make sure you have access to it:
R1#ping 192.168.20.254
Type escape sequence to abort.
Sending 5, 100-byte ICMP Echos to 192.168.20.254, timeout is 2 seconds:
!!!!!
Success rate is 100 percent (5/5), round-trip min/avg/max = 31/31/32 ms
R1#
Step 1 Copy the current system image file from the router to the network TFTP server, using the copy flash: tftp: command in privileged EXEC mode. You then are prompted. The command requires that you enter the IP address of the remote host and the name of the source and destination system image files:
R1#copy flash: tftp:
Source filename []? c1841-ipbase-mz.123-14.T7.bin
Address or name of remote host []? 192.168.20.254
Destination filename [c1841-ipbase-mz.123-14.T7.bin]? <CR>
!!!!!!!!!!!!!!!!!!!!!!!!!!!!!!!!!!!!!!!!!!!!!!!!!!!!!
<Output omitted>
13832032 bytes copied in 113.061 secs (122341 bytes/sec)
R1#
During the copy process, exclamation points (!) indicate the progress. Each exclamation point signifies that one UDP segment has successfully transferred.
Restoring an IOS Image
Verify that the router has sufficient disk space to accommodate the new Cisco IOS Software image with show flash: command, as shown in Example 15-4.
The show flash command helps you determine the following:
![]() The total amount of flash memory on the router
The total amount of flash memory on the router
![]() The amount of flash memory available
The amount of flash memory available
![]() The names of all the files stored in the flash memory and the amount of flash occupied
The names of all the files stored in the flash memory and the amount of flash occupied
Example 15-5 shows the commands necessary to copy an image stored on the TFTP server to flash.
Example 15-5 Upgrading the IOS Image from a TFTP Server
R1#copy tftp flash
Address or name of remote host []? 192.168.20.254
Source filename []? c1841-ipbasek9-mz.124-12.bin
Destination filename [c1841-ipbasek9-mz.124-12.bin]?
Loading c1841-ipbasek9-mz.124-12.bin from 192.168.20.254:
!!!!!!!!!!!!!!!!!!!!!!!!!!!!!!!!!!!!!!!!!!!!!!!!!!!!!!!!!!!!!!!!!!!!!!!!!!!!!!!!
!!!!!!!!!!!!!!!!!!!!!!!!!!!!!!!!!!!!!!!!!!!!!!!!!!!!!!!!!!!!!!!!!!!!!!!!!!!!!!!!
!!!!!!!!!!!!!!!!!!!!!!!!!!!!!!!!!!!!!!!!!!!!!!!!!!!!!!!!!!!!!!!!!!!!!!!!!!!!!!!!
!!!!!!!!!!!!!!!!!!!!!!!!!!!!!!!!!!!!!!!!!!!!!!!!!!!!!!!!!!!!!!!!!!!!!!!!!!!!!!!!
!!!!!
[OK - 16599160 bytes]
16599160 bytes copied in 9.656 secs (384658 bytes/sec)
R1#
The command asks for the IP address of the TFTP server and then the IOS image filename stored on the TFTP server that you want to copy over. When asked for the destination filename, you could change it, but this is not recommended because the name has specific meanings as reviewed earlier.
In Example 15-5, there is plenty of room for the new image, so the older image is not erased. So the next time the router boots, it will load the old image because the old image is listed first in the flash directory, as shown in Example 15-6.
Example 15-6 Verify the IOS that Loads by Default
R1#show flash
System flash directory:
File Length Name/status
2 13832032 c1841-ipbase-mz.123-14.T7.bin
3 16599160 c1841-ipbasek9-mz.124-12.bin
[30431192 bytes used, 2082856 available, 32514048 total]
32768K bytes of processor board System flash (Read/Write)
R1#
In this case, to finalize the upgrade to the new image (listed as file 3 in Example 15-6), you could delete the first image listed in the flash directory. After all, you have a backup on the TFTP server. To do so, enter the delete flash command, making sure you specify the file you want to erase, as shown in Example 15-7:
A better solution might be to configure the router to boot the new image using boot system commands.
R2(config)#boot system flash c1841-ipbasek9-mz.124-12.bin
This form of the boot system command tells the router to use the specified IOS image stored in flash instead of the default image. Using this method allows you to have a local backup of an IOS image that you can use right away if something happens to the boot image.
Recovering an IOS Image Using a TFTP Server
If a router loses all the contents of flash intentionally or unintentionally, it automatically boots into ROMmon mode. Very few commands are available in ROMmon mode. You can view these commands by entering ? at the rommon> command prompt, as demonstrated in Example 15-8.

The pertinent command for recovering an IOS image is tftpdnld for TFTP download. To enable the router to use the tftpdnld command, first you must set specific ROMmon variables. These variables, shown in Example 15-9, are syntax- and case-sensitive.
Example 15-9 Using tftpdnld to Recover an IOS Image
rommon 2 > IP_ADDRESS=192.168.20.1
rommon 3 > IP_SUBNET_MASK=255.255.255.0
rommon 4 > DEFAULT_GATEWAY=192.168.20.254
rommon 5 > TFTP_SERVER=192.168.20.254
rommon 6 > TFTP_FILE=c1841-ipbase-mz.123-14.T7.bin
rommon 7 > tftpdnld
IP_ADDRESS: 192.168.20.1
IP_SUBNET_MASK: 255.255.255.0
DEFAULT_GATEWAY: 192.168.20.254
TFTP_SERVER: 192.168.20.254
TFTP_FILE: c1841-ipbase-mz.123-14.T7.bin
Invoke this command for disaster recovery only.
WARNING: all existing data in all partitions on flash will be lost!
Do you wish to continue? y/n: [n]: y
Receiving c1841-ipbase-mz.123-14.T7.bin from 192.168.20.254 !!!!!!!!!!!!!!!
<Output omitted>!!!!!!!
File reception completed.
Copying file c1841-ipbase-mz.123-14.T7.bin to flash.
Erasing flash at 0x607c0000
program flash location 0x605a0000
Recovering an IOS Image Using Xmodem
If for some reason you are not able to use the Fast Ethernet interfaces on a router, you can recover an IOS image by transferring it over a console cable by using Xmodem. The method is much slower than using tftpdnld because you are transferring at 9600 bps instead of 100 Mbps.
To use Xmodem, connect a console cable and open up a terminal session with the router. Then use the xmodem command as demonstrated in Example 15-10.
Example 15-10 Using xmodem to Recover an IOS Image
rommon1>xmodem -c c1841-ipbase-mz.123-14.T7.bin
Do not start the sending program yet...
device does not contain a valid magic number
dir: cannot open device "flash:"
WARNING: All existing data in bootflash will be lost!
Invoke this application only for disaster recovery.
Do you wish to continue? y/n [n]: y
Ready to receive file c1841-ipbase-mz.123-14.T7.bin
Now use the “Send File” command for your terminal software to start the IOS transfer. For HyperTerminal, “Send File” is in the Transfer menu. Browse to the location of the file and send it. The terminal software then provides feedback on the file transfer status as it occurs. When the transfer is complete, the router automatically reloads with the new Cisco IOS image.
Recovering a Lost Password
Password recovery procedures for any Cisco router or switch are readily available online. For example, search for “1841 password recovery” and you will quickly find the procedures you need to follow to reset the password. This is why physical security is a must for all networking devices. Routers and switches should be behind locked doors.
Step 1 Use the power switch to turn off the router, and then turn the router back on.
Step 2 Press the break key specified by your terminal software within 60 seconds of powerup to access the ROMmon prompt. For HyperTerminal, use the Break key. For Tera Term, use the key combination Alt+b.
Step 3 Enter confreg 0x2142 at the ROMmon prompt. This causes the router to bypass the startup configuration where the forgotten password is stored.
Step 4 Enter reset at the prompt. The router reboots, but it ignores the saved configuration. However, the file still exists in NVRAM.
Step 5 Press Ctrl-C to skip the initial setup procedure.
Step 6 Enter enable at the Router> prompt. This puts you into privileged EXEC mode, where you should be able to see the Router# prompt.
Step 7 Enter copy startup-config running-config to copy the backup NVRAM config file into memory.
Step 8 Enter configure terminal.
Step 9 Enter enable secret password command to change the enable secret password.
Step 10 Issue the no shutdown command on every interface that you want to activate.
Step 11 From global configuration mode, enter config-register 0x2102 to restore the original configuration registry setting.
Step 12 Press Ctrl-Z or enter end to leave configuration mode.
Step 13 Enter copy running-config startup-config to commit the changes. You can issue the show ip interface brief command to confirm that your interface configuration is correct. Every interface that you want to use should display “up” and “up”.
You have now completed password recovery. Entering the show version command confirms that the router will use the configured config register setting on the next reboot.