
Now that we can see our character in the game world, it is time to get him moving! We are going to create some input events via our project settings, then receive those events in our BH_Character Blueprint. Let's start by setting up some input axis mappings and input action mappings. These mappings simply bind an input, that is, a key press or mouse change, to an axis event or action event that we can receive in our objects. Axis mappings should be used when you wish to receive varying levels from an input, these are most commonly used for analogue inputs such as joysticks and mouse movements. Whereas action mappings should be used when you wish to input from something that has no variable movement, for example, a button or key press.
Sometimes, you may need to create action or axis mappings that receive input from multiple sources. You may need to create an axis mapping for aiming that can take in input from both the mouse and analog sticks. In our case, we will be creating an action mapping for jumping and an axis mapping for moving. Open the Project Settings Window again via Edit | Project settings. Address the list of categories on the left-hand side. This time select Input, which is under the Engine section. This will show the input settings for our current project. You create mappings by clicking on the white plus (+) next to the desired mapping category. Press the white plus next to the Action Mappings field now:
You may need to click on the small arrow next to Action Mappings to expand the category. You should see a filed titled NewActionMapping_0 rename this mapping to Jump now. Now, press the small arrow next to this field. We can now map an input to this mapping. This means, when we press the specified input, in our case it will be the space bar, an action event tilted InputAction Jump will trigger in Blueprints that has included the new mapping in its event graph.
Just underneath the mapping name is a small drop-down followed by four modifiers. Clicking this dropdown will open a search for inputs, in this search type Space Bar and select the corresponding input. The modifier checkboxes specify whether or not the modifier key must be pressed for the input to register. You should see something like this:

Now, we need to make an axis mapping for movement, just below the Action Mappings category is Axis Mappings. Again, click on the small plus on the right-hand side of this category; then, expand the field. Name this new mapping to Move. By default, only one input field is present. For movement, however, we need two; one for each direction of movement along a given axis, in our case left and right along the y-axis. Fortunately, as our game Barrel Hopper only has a movement on one plane due to its side scrolling nature, we only require input for horizontal movement. Thus, one axis mapping with two inputs. If we were dealing with a game with complete 3D movement, we would require two more mappings for each axis we would like to move along.
Press the small white plus sign, next to the Move mapping. This will provide another input field. This time our input fields are followed by a value called scale. This scale parameter is the value that will be parsed through the function when the input device is at full input (analog stick fully pressed in one direction). Despite our key presses having no range of variable output, we will still be using key presses for our input, we may at some point wish to provide controller support without having to create a new mapping, and then in turn not needing to edit all of our Blueprints! Set the first input to A and set the scale to -1.0, and set the second input to D and the scale to 1.0. You should see something similar to this:

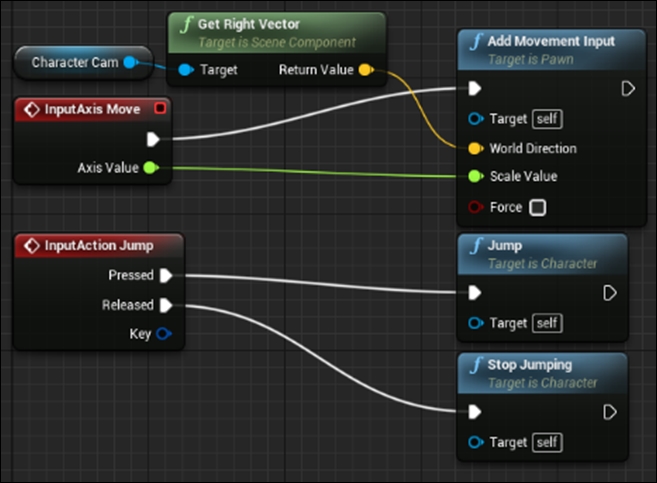
All we need to do now is receive our newly created events in our character. Luckily, the CharacterMovement component largely handles the output from these events. Open the BH_Character blueprint and navigate to the event graph, use either the Pallet or the right-click on menu to find our newly created axis mapping InputAxis Move and our newly created action mapping InputAction Jump. You will find the axis mapping under Input | AxisEvents and the action mapping jump under Input | ActionEvents. Create both of these nodes now. As you can see our InputAxis Move node outputs a float axis value (this will exist between 1.0 and -1.0, thanks to our scale values in our Move mapping). We need to plug this floating point value into some meaningful function to get our character to move.
The function we can use is AddMovementInput, find this node now. This node takes in a Target, which is the Pawn to be moved, a World Direction to move in, a Scale Value to move by, and a Force Boolean we can tick to always force movement. Leave the Target pin as the default self-reference, connect the Axis value pin to the Scale Value input pin, and leave Force unchecked. For the World Direction, we are going to use the right vector of our Camera component! To do this, drag the reference to our Camera component into the graph, create a get node, click and drag from this node's output pin to bring up the context sensitive function search. Search for the Get Right Vector node. This will create a function node that outputs the right vector of the Camera component. Plug the output vector pin from this Get Right Vector node into the World Direction input pin of the AddMovementInput node.
Now, run the project! When you press A and D you should move left and right relative to the direction the camera is looking in! You will notice that our character does not currently turn to face the direction it is moving in. To fix this, check the checkbox titled Orient Rotation to Movement in the Character Movement component's details panel.
Jumping is even easier, return to the BH_Character Blueprint. If you have not already created the InputAction Jump node, do it now. Action mappings will fire a pressed event when the input is pressed and then will fire a release event when the same input is released. Drag from the pressed pin of our InputAction Jump node and from the context sensitive search find the function node Jump. Do the same from the released pin, but instead find the function node Stop Jumping. These functions will inform the Character Movement component when it should initiate a jump action and if it should stop the jump action early; in games, this can be used to create jump actions that jump higher if the input is held down. Your current Blueprint layout should look something like this:
You will notice that, if you jump with your character now, there is no air control at all. You may have also noticed that the character turns fairly slowly, these are small but very significant factors that can affect the general feel of your game. Most of the time these slight changes are influenced by a single movement property.
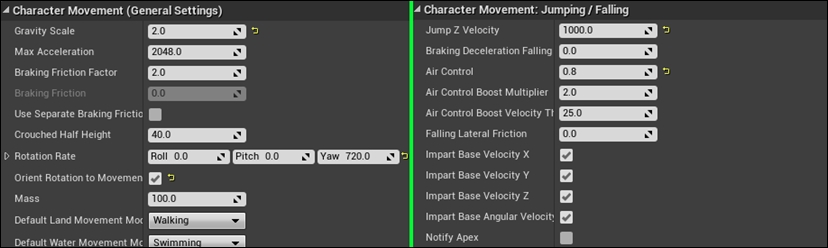
Thankfully, our Character Movement component has all of our movement properties grouped in a similar place. This is where the Details panel for the Character Movement Component comes into play. Each section of this Details panel is responsible for a different area of 3D movement. The first two we are concerned with are Character Movement (General Settings) and Character Movement: Jumping / Falling. It is within these sections that you will find the parameters that drive specific parts of character movement such as turn rate, fall speed, air movement, and gravity influence.
To give our character a better movement feel, we are going to change some of these variables. The first one we are going to modify is the Gravity Scale. One of the best ways to prevent a character from feeling floaty in a game world is to increase the jump and fall speed of the character. Change the gravity scale to 2.0; it can be found under the General Settings section of the Character Movement component Details panel. This will make our character accelerate downwards faster when falling.
Under the same section you will find Rotation Rate; change the yaw of Rotation rate to 720. This will make our player rotate much faster when moving from left to right. Orient Rotation to Movement is already checked, so we can leave that property alone. Under the Jumping / Falling section of the Details Panel change the Jump Z velocity to 1000.0, the air control parameter to 0.8 and we will be done! You can tweak these parameters later to change how your character moves through 3D space later if you wish. For now each section should look similar to this:
Now, run the project again and test how those small changes have modified the feel of moving our character. In the next section of this chapter, we will be creating the game world within which we will be moving around. Feel free to tweak these values once the level has been created to adjust the movement to your liking.