
Although there is more than a modicum of truth in the saying Software development is a process, not a product, there comes a point when the current version of an app has become a release candidate and a number of post-development housekeeping tasks remain to be completed before said app is ready for shipping.
This chapter deals broadly with two areas—testing the app once it is more or less ready for release and submission of the app to the Apple App Store.
These two areas have something in common, apart from being essential parts of the app development process—both tend to be underestimated in terms of the time they take. You are unlikely at this stage to be working to a strict release schedule, it is true, but often there is a temptation to rush things in this final stretch, now that the code is written and you are apparently (pardon the pun) ready to go, and the tasks that get overlooked or hastily completed will come back to bite the impatient developer.
These are the final steps you'll take before you hit the upload button, after which it's all down to Apple, or most of it anyway. And once your app is accepted by Apple (and this chapter will do its best to help you achieve that lofty status), it's out there in the wild, fending for itself. However deep and genuine our respect and affection for our users may be, the fact is that ten thousand of them (or even just ten, for that matter) represent the greatest challenge to you as a developer and to your app.
In this chapter we will cover the following topics:
- Installation on a physical device
- Testing in the field
- Xcode distribution settings
- Requirements for iTunes Connect
- The App Store submission and review process
You may already have an Apple Watch and you may have been using it to build and run the apps presented in this book, all with no problems at all. And if you have, good on you, you were in luck.
Quite possibly you have a watch, and you have made a detour here because things aren't running quite as smoothly as we would wish. If that's the case, we will soon have you up and running.
It is also completely plausible that you have read this far, using only the Xcode's Watch Simulator app and Xcode itself to test your code.
By now you'll have had considerable opportunity to decide whether or not you're going to get serious about developing for the Apple Watch. This is handy, because you really do need to commit to the purchase of a physical device to go any further in the process of turning an idea in your head into an app on somebody's wrist.
Although you can test at least 90% of your app's code on the Simulator, there are many aspects of an app's behavior on a real watch that will differ significantly to that on the Simulator. The latter is part of a huge computer operating system, with more speed, memory, and storage space than an Apple Watch could dream of (or is likely to possess for a decade or so, though who can tell?). It has access to an internet connection that is several orders of magnitude more reliable, and probably a good deal faster than the network conditions that your apps will have to deal with (safely and gracefully) in everyday use. You are unlikely to have walked very far with your MacBook in your hands, testing the location code, am I right?
There are just too many things that could be seriously amiss with an app to release it to the public at large without having done extensive testing on a real, shiny, visually fascinating, haptically vibrating, physical Apple Watch.
This process is the same as you'll probably have done already for your iPhone. Fortunately, it is a process that has become less and less obtrusive as the iOS platform and its development practices have matured, and it is now just a matter of telling Xcode that you will be using this device for development purposes.
The one prerequisite for device registration, apart from the watch itself, of course, is current membership of Apple's Developer Program. This isn't free, but at US$99 a year, it will sting a lot less than the cost of the watch. If you feel that paying Apple to develop the apps that make their platform so popular is a little unfair, remember that this small but significant financial hurdle contributes to making sure that apps in the App Store are being written by people who are reasonably serious about it, in contrast to some other platforms on which the user must wade through oceans of dross to find the apps worth serious consideration.
The fine details of setting up your membership are beyond the scope of this book, but the following link will set you on the right path:
You must pair the watch with an iPhone to be able to use it. It's a fun process involving pointing the iPhone camera at the watch while it displays a curiously pleasing particle-cloud animation that contains whatever hidden secrets the iPhone is looking for to complete the pairing. Sometimes Apple's design team pulls a rabbit out of the most unexpected of hats.
For the full details of pairing, refer to the instructions that come with it.
When you plug your physical iPhone, give Xcode the time it needs to perform some administrative duties, as indicated in the illustration below:
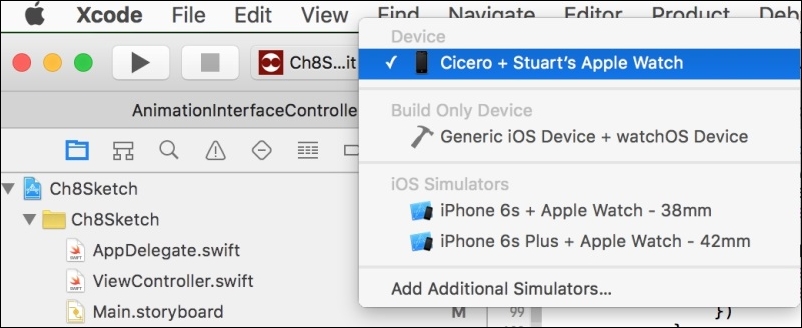
Once Xcode has finished indexing the files it needs to, select the WatchKit App scheme and then select your iPhone and Apple Watch as shown here:
If you run into the problem illustrated below, you'll need to give Xcode a little more time to work out that the iPhone is indeed paired with a watch:

You may also run into this if you are using a beta release of Xcode (if you don't know what that is, then you're not using one). The reader is encouraged, as strongly as is possible without bold text and exclamation marks, not to use a beta release while getting familiar with both the hardware and software aspects of developing for the Apple Watch. The betas throw up too many surprises. You don't want surprises.
I have found that it is a good idea to run the iPhone app scheme first, which will confirm that the companion iOS app is running healthily.
Now, with the WatchKit App scheme selected, hit Run.
Be patient, installation can take a little while, particularly the first time you install an app on the watch (all sorts of stuff gets copied across with the first build), or even the Simulator. When this is taking place on a physical device, it needs even longer. It has often taken a few minutes for this first installation to complete so keep your eye on Xcode, which will inform you that the app is being installed on the watch, as can be seen here (this is just a selection):
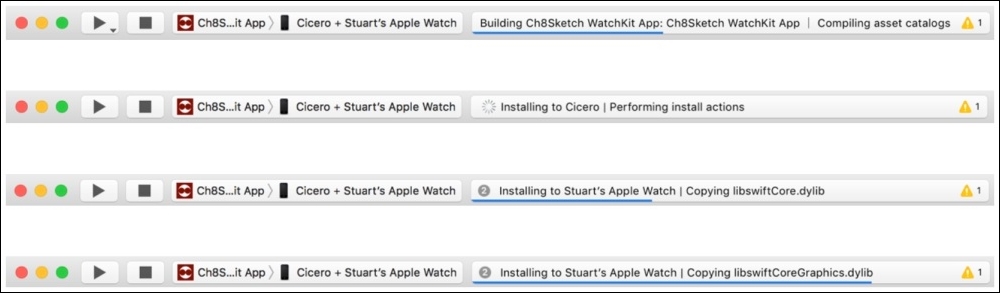
And so it goes on, seemingly forever. As you can see, there is a large range of data that need to be copied firstly to the iPhone and then from there to the watch.
Sooner or later, though, your WatchKit app will be installed on your Apple Watch, where you can test it rigorously under out-in-the-wild conditions.
This section deals with tackling installation failures. Most of the solutions offered here apply equally to the physical Apple Watch and the Simulator app.
Without doubt, the most frustrating thing that we are faced with as developers is hitting the Run button, watching the app build successfully, only to be faced with some incomprehensible installation failure. When this happens to you, and it will happen sooner or later, rest assured that you are in good company, it happens to everyone.
Sometimes it will be something that you have done wrong that you will find and fix, sometimes it will be something that inexplicably disappears after a re-launch and remains forever a mystery (and you'll never know what you did that fixed it), and sometimes it will be all Xcode's fault and you will find yourself completely blameless but equally frustrated. It's not something that ever goes away, but it is something that you come to accept as a part of the job. If you need a silver lining, bare in mind that with each installation failure, your stress levels will spike slightly less than the time before.
In the immortal words of Douglas Adams:
Don't Panic!
Yes, really. It does indeed feel like a solution that no longer has a place in the technologically advanced world that we inhabit as software engineers, but it's very often the solution that works. The question is restart what, exactly?
So let's take things in the order in which a restart (or a deletion) is likely to be least intrusive:
This is a nice quick one, no beads of sweat on your brow here. Whether on the Simulator or on a physical device, the procedure is the same: kill the app by hitting the Stop button, or simply type Command- (that's Command-Period, or -Full Stop, depending on which flavor of English you speak).
In the case of developing for the Apple Watch, this has proven to be a fix for at least half of the installation failures that arise. We are dealing with a new platform and there are many new challenges not only to ourselves, but also to those esteemed colleagues that are developing the watchOS platform and Xcode itself, not least of which is the fact that a single platform, iOS, installed on one device (or Simulator app), is responsible for the installation of another app, on its own platform, watchOS, on a different device (or Simulator).
When you get a watch installation failure message pop up in front of you, just rerun the app before you even bother to sigh. Happens all the time.
This helps too. But how do you delete an app from the Watch or the Simulator?
If you have the Watch Simulator running, type Command-Shift-H to return to the watch face if you don't see it already and then the same again to get to the home screen. If you are running on a physical device, press the Digital Crown instead of Command-Shift-H.
Locate your app (aren't you glad you added those custom icons now?) and Click-hold on it in the Simulator, or Tap-hold on it on the watch until you see the deletion x appear, as illustrated below:

This will doubtless look familiar to you from the iPhone home screen which appears very similar. Tap or click on the x to delete the app and any data that it has stored on the device. You'll be asked to confirm the deletion by the system.
The next time you hit Run in Xcode, the app will be installed afresh and very often the problem (whatever it was) is solved.
You may find that that it helps to delete the iOS app from the iPhone, which will also delete the watchOS app on the watch or Simulator.
Welcome to the iOS development community's favorite fix. Tucked away deep in your file system is a folder called DerivedData, where Xcode stores a lot of data that it uses to build your app but doesn't want to have to calculate anew with every build. Sometimes that data causes problems, ones that can be simply solved by deleting the folder containing it. This is one of the most popular pieces of advice you'll get from experienced developers who try to help on various internet forums (see below), and it's as easy to do as it is safe.
You no longer need to drill down through your file structure to get to this data. Xcode provides a button to delete the data in the Window | Projects window, which lists all the derived data folders, as shown here:
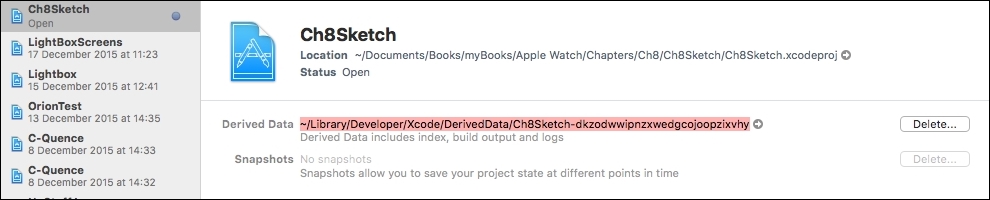
Don't worry about deleting this data, it will be replaced during the next build process (which will take fractionally longer).
This has worked often enough that it's worth inclusion in this list. Just close the project and whatever mess Xcode has got itself into disappears with it. When you restart the project, you can continue working.
When things go wrong, Xcode tries to help. Very often, Xcode believes the most helpful thing for you is to be told that Error 2554 has occurred.
Don't be intimidated by this, hardly anyone knows what these error codes mean. But do make a note of them (a screenshot is the fastest way I know of recording the errors for future reference), you'll need them when you turn to your colleagues on the web.
It is quite hard, especially when beginning development, to keep a cool head when things fall apart and making sense of these error messages seems an impossibly difficult task. It is tempting to assume that the rest of the world knows exactly what they mean and a feeling of hopeless inadequacy is added to the problem. Don't succumb to that temptation; even the most advanced developer stands clueless before one of these errors on a regular basis.
Don't be afraid to ask for help when errors occur. Some of the most valuable resources available to developers of all experience levels are the forums where like-minded people try to assist and learn from each other.
This is perhaps the number one go-to when you need help. S.O. has more than a million registered users, some of whom will have run into just about any problem that you can imagine:
To ask a question, you will need to be a member of the forum, but membership is free and takes about a minute to get done.
Apple's developer forums are a similarly helpful bunch and unlike Stack Overflow, they're all working on Apple platforms. Access is available to anyone with Developer Program membership:
https://devforums.apple.com/index.jspa
As with any technical forum, be specific, be polite, include the solutions you have already tried, and try to include any error messages that you think will help people understand your issue.