Let's take a look at an example of a stateful application. First, we will want to create and use a StorageClass, as we discussed earlier. This will allow us to hook into the Google Cloud Persistent Disk provisioner. The Kubernetes community is building provisioners for a variety of StorageClasses, including GCP and AWS. Each provisioner has its own set of parameters available. Both GCP and AWS providers let you choose the type of disk (solid-state, standard, and so on) as well as the fault zone that is needed to match the pod attaching to it. AWS additionally allows you to specify encryption parameters as well as IOPs for provisioned IOPs volumes. There are a number of other provisioners in the works, including Azure and a variety of non-cloud options. Save the following code as solidstate-sc.yaml file:
kind: StorageClass
apiVersion: storage.k8s.io/v1
metadata:
  name: solidstate
provisioner: kubernetes.io/gce-pd
parameters:
  type: pd-ssd
  zone: us-central1-b
Use the following command with the preceding listing to create a StorageClass kind of SSD drive in us-central1-b:
$ kubectl create -f solidstate.yaml
Next, we will create a StatefulSet kind with our trusty httpwhalesay demo. While this application does include any real state, we can see the storage claims and explore the communication path as shown in the listing sayhey-statefulset.yaml:
apiVersion: apps/v1
kind: StatefulSet
metadata:
  name: whaleset
spec:
  serviceName: sayhey-svc
  replicas: 3
  template:
    metadata:
      labels:
        app: sayhey
    spec:
      terminationGracePeriodSeconds: 10
      containers:
      - name: sayhey
        image: jonbaier/httpwhalesay:0.2
        command: ["node", "index.js", "Whale it up!."]
        ports:
        - containerPort: 80
          name: web
        volumeMounts:
        - name: www
          mountPath: /usr/share/nginx/html
  volumeClaimTemplates:
  - metadata:
      name: www
      annotations:
        volume.beta.kubernetes.io/storage-class: solidstate
    spec:
      accessModes: [ "ReadWriteOnce" ]
      resources:
        requests:
          storage: 1Gi
Use the following command to start the creation of this StatefulSet. If you observe pod creation closely, you will see it create whaleset-0, whaleset-1, and whaleset-2 in succession:
$ kubectl create -f sayhey-statefulset.yaml
Immediately after this, we can see our StatefulSet and the corresponding pods using the familiar get subcommand:
$ kubectl get statefulsets
$ kubectl get pods
These pods should create an output similar to the following images:
The get pods output will show the following:

Depending on your timing, the pods may still be being created. As you can see in the preceding screenshot, the third container is still being spun up.
We can also see the volumes the set has created and claimed for each pod. First are the PersistentVolumes themselves:
$ kubectl get pv
The preceding command should show the three PersistentVolumes named www-whaleset-N. We notice the size is 1Gi and the access mode is set to ReadWriteOnce (RWO), just as we defined in our StorageClass:

Next, we can look at the PersistentVolumeClaim that reserves the volumes for each pod:
$ kubectl get pvc
The following is the output of the preceding command:

You'll notice many of the same settings here as with the PersistentVolumes themselves. You might also notice the end of the claim name (or PersistentVolumeClaim name in the previous listing) looks like www-whaleset-N. www is the mount name we specified in the preceding YAML definition. This is then appended to the pod name to create the actual PersistentVolume and PersistentVolumeClaim name. One more area we can ensure that the proper disk is linked with it's matching pod.
Another area where this alignment is important is in network communication. StatefulSets also provide consistent naming here. Before we can do this, let's create a service endpoint sayhey-svc.yaml, so we have a common entry point for incoming requests:
apiVersion: v1
kind: Service
metadata:
  name: sayhey-svc
  labels:
    app: sayhey
spec:
  ports:
  - port: 80
    name: web
  clusterIP: None
  selector:
    app: sayhey
$ kubectl create -f sayhey-svc.yaml
Now, let's open a shell in one of the pods and see if we can communicate with another in the set:
$ kubectl exec whaleset-0 -i -t bash
The preceding command gives us a bash shell in the first whaleset pod. We can now use the service name to make a simple HTTP request. We can use both the short name, sayhey-svc, and the fully qualified name, sayhey-svc.default.svc.cluster.local:
$ curl sayhey-svc
$ curl sayhey-svc.default.svc.cluster.local
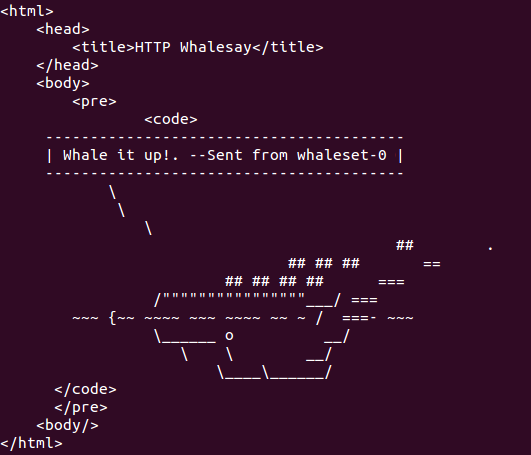
You'll see an output similar to the following screenshot. The service endpoint acts as a common communication point for all three pods:

Now, let's see if we can communicate with a specific pod in the StatefulSet. As we noticed earlier, the StatefulSet named the pods in an orderly manner. It also gives them hostnames in a similar fashion so that there is a specific DNS entry for each pod in the set. Again, we will see the convention of "Name of Set"-N and then add the fully qualified service URL. The following example shows this for whaleset-1, which is the second pod in our set:
$ curl whaleset-1.sayhey-svc.default.svc.cluster.local
Running this command from our existing Bash shell in whaleset-0 will show us the output from whaleset-1:

You can exit out of this shell now with exit.
