
Let's mount a gcePersistentDisk first. You can see more information about these drives here: https://cloud.google.com/compute/docs/disks/.
You'll need to create a Persistent Disk using the GCE GUI, API, or CLI before we're able to use it in our cluster, so let's get started:
- From the console, in Compute Engine, go to Disks. On this new screen, click on the Create Disk button. We'll be presented with a screen similar to the following GCE new persistent disk screenshot:
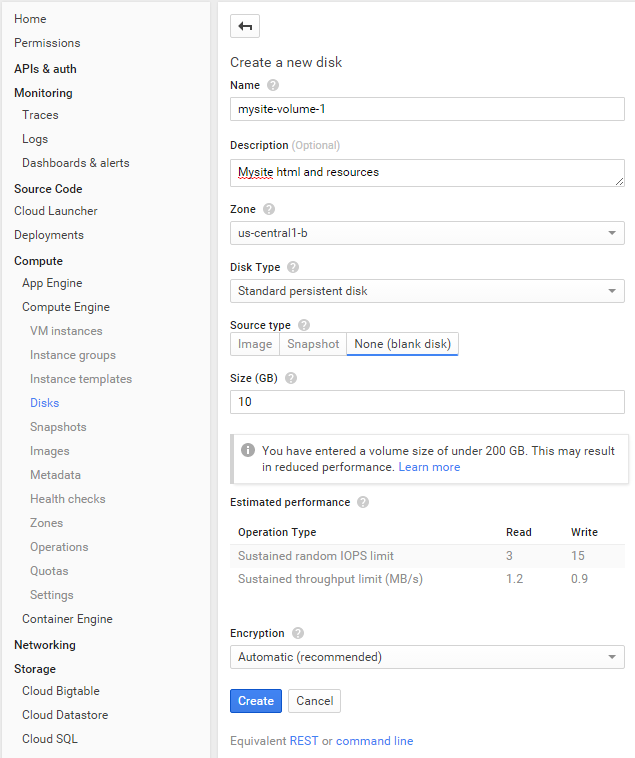
- Choose a name for this volume and give it a brief description. Make sure that Zone is the same as the nodes in your cluster. GCE Persistent Disks can only be attached to machines in the same zone.
- Enter mysite-volume-1 in the Name field. Choose a zone matching at least one node in your cluster. Choose None (blank disk) for Source type and give 10 (10 GB) as the value in Size (GB). Finally, click on Create:
The nice thing about Persistent Disks on GCE is that they allow for mounting to multiple machines (nodes in our case). However, when mounting to multiple machines, the volume must be in read-only mode. So, let's first mount this to a single pod, so we can create some files. Use the following code to make a storage-gce.yaml file to create a pod that will mount the disk in read/write mode:
apiVersion: v1
kind: Pod
metadata:
  name: test-gce
spec:
  containers:
  - image: nginx:latest
    ports:
    - containerPort: 80
    name: test-gce
    volumeMounts:
    - mountPath: /usr/share/nginx/html
      name: gce-pd
  volumes:
  - name: gce-pd
    gcePersistentDisk:
      pdName: mysite-volume-1
      fsType: ext4
First, let's issue a create command followed by a describe command to find out which node it is running on:
$ kubectl create -f storage-gce.yaml
$ kubectl describe pod/test-gce
Note the node and save the pod IP address for later. Then, open an SSH session into that node:

Type the following command:
$ gcloud compute --project "<Your project ID>" ssh --zone "<your gce zone>" "<Node running test-gce pod>"
Since we've already looked at the volume from inside the running container, let's access it directly from the node (minion) itself this time. We will run a df command to see where it is mounted, but we will need to switch to root first:
$ sudo su -
$ df -h | grep mysite-volume-1
As you can see, the GCE volume is mounted directly to the node itself. We can use the mount path listed in the output of the earlier df command. Use cd to change to the folder now. Then, create a new file named index.html with your favorite editor:
$ cd /var/lib/kubelet/plugins/kubernetes.io/gce-pd/mounts/mysite-volume-1
$ vi index.html
Enter a quaint message, such as Hello from my GCE PD!. Now, save the file and exit the editor. If you recall from the storage-gce.yaml file, the Persistent Disk is mounted directly to the nginx HTML directory. So, let's test this out while we still have the SSH session open on the node. Do a simple curl command to the pod IP we wrote down earlier:
$ curl <Pod IP from Describe>
You should see Hello from my GCE PD! or whatever message you saved in the index.html file. In a real-world scenario, we can use the volume for an entire website or any other central storage. Let's take a look at running a set of load balanced web servers all pointing to the same volume.
First, leave the SSH session with two exit commands. Before we proceed, we will need to remove our test-gce pod so that the volume can be mounted read-only across a number of nodes:
$ kubectl delete pod/test-gce
Now, we can create an ReplicationController that will run three web servers, all mounting the same Persistent Disk, as follows. Save the following code as the http-pd-controller.yaml file:
apiVersion: v1
kind: ReplicationController
metadata:
  name: http-pd
  labels:
    name: http-pd
spec:
  replicas: 3
  selector:
    name: http-pd
  template:
    metadata:
      name: http-pd
      labels:
        name: http-pd
    spec:
      containers:
      - image: nginx:latest
        ports:
        - containerPort: 80
        name: http-pd
        volumeMounts:
        - mountPath: /usr/share/nginx/html
          name: gce-pd
      volumes:
      - name: gce-pd
        gcePersistentDisk:
          pdName: mysite-volume-1
          fsType: ext4
          readOnly: true
Let's also create an external service and save it as the http-pd-service.yaml file, so we can see it from outside the cluster:
apiVersion: v1
kind: Service
metadata:
  name: http-pd
  labels:
    name: http-pd
spec:
  type: LoadBalancer
  ports:
  - name: http
    protocol: TCP
    port: 80
  selector:
    name: http-pd
Go ahead and create these two resources now. Wait a few moments for the external IP to get assigned. After this, a describe command will give us the IP we can use in a browser:
$ kubectl describe service/http-pd
The following screenshot is the result of the preceding command:

If you don't see the LoadBalancer Ingress field yet, it probably needs more time to get assigned. Type the IP address from LoadBalancer Ingress into a browser, and you should see your familiar index.html file show up with the text we entered previously!