
Before we move on, let's take a look at these three concepts in action. Kubernetes ships with a number of examples installed, but we'll create a new example from scratch to illustrate some of the concepts.
We already created a pod definition file but, as you learned, there are many advantages to running our pods via replication controllers. Again, using the book-examples/02_example folder we made earlier, we'll create some definition files and start a cluster of Node.js servers using a replication controller approach. Additionally, we'll add a public face to it with a load-balanced service.
Use your favorite editor to create the following file and name it as nodejs-controller.yaml:
apiVersion: v1
kind: ReplicationController
metadata:
  name: node-js
  labels:
    name: node-js
spec:
  replicas: 3
  selector:
    name: node-js
  template:
    metadata:
      labels:
        name: node-js
    spec:
      containers:
      - name: node-js
        image: jonbaier/node-express-info:latest
        ports:
        - containerPort: 80
This is the first resource definition file for our cluster, so let's take a closer look. You'll note that it has four first-level elements (kind, apiVersion, metadata, and spec). These are common among all top-level Kubernetes resource definitions:
- Kind: This tells K8s the type of resource we are creating. In this case, the type is ReplicationController. The kubectl script uses a single create command for all types of resources. The benefit here is that you can easily create a number of resources of various types without the need for specifying individual parameters for each type. However, it requires that the definition files can identify what it is they are specifying.
- apiVersion: This simply tells Kubernetes which version of the schema we are using.
- Metadata: This is where we will give the resource a name and also specify labels that will be used to search and select resources for a given operation. The metadata element also allows you to create annotations, which are for the non-identifying information that might be useful for client tools and libraries.
- Finally, we have spec, which will vary based on the kind or type of resource we are creating. In this case, it's ReplicationController, which ensures the desired number of pods are running. The replicas element defines the desired number of pods, the selector element tells the controller which pods to watch, and finally, the template element defines a template to launch a new pod. The template section contains the same pieces we saw in our pod definition earlier. An important thing to note is that the selector values need to match the labels values specified in the pod template. Remember that this matching is used to select the pods being managed.
Now, let's take a look at the service definition named nodejs-rc-service.yaml:
apiVersion: v1
kind: Service
metadata:
  name: node-js
  labels:
    name: node-js
spec:
  type: LoadBalancer
  ports:
  - port: 80
  selector:
    name: node-js
For this example, you won't be able to access the example from the external IP address using Minikube. In Kubernetes versions above 1.5, you can use Ingress to expose services but that is outside of the scope of this chapter.
The YAML here is similar to ReplicationController. The main difference is seen in the service spec element. Here, we define the Service type, listening port, and selector, which tell the Service proxy which pods can answer the service.
Create the Node.js express replication controller:
$ kubectl create -f nodejs-controller.yaml
The output is as follows:
replicationcontroller "node-js" created
This gives us a replication controller that ensures that three copies of the container are always running:
$ kubectl create -f nodejs-rc-service.yaml
The output is as follows:
service "node-js" created
On GCE, this will create an external load balancer and forwarding rules, but you may need to add additional firewall rules. In my case, the firewall was already open for port 80. However, you may need to open this port, especially if you deploy a service with ports other than 80 and 443.
OK, now we have a running service, which means that we can access the Node.js servers from a reliable URL. Let's take a look at our running services:
$ kubectl get services
The following screenshot is the result of the preceding command:

In the preceding screenshot (services listing), we should note that the node-js service is running, and in the IP(S) column, we should have both a private and a public (130.211.186.84 in the screenshot) IP address. If you don't see the external IP, you may need to wait a minute for the IP to be allocated from GCE. Let's see if we can connect by opening up the public address in a browser:

You should see something like the previous screenshot. If we visit multiple times, you should note that the container name changes. Essentially, the service load balancer is rotating between available pods on the backend.
Let's try playing chaos monkey a bit and kill off a few containers to see what Kubernetes does. In order to do this, we need to see where the pods are actually running. First, let's list our pods:
$ kubectl get pods
The following screenshot is the result of the preceding command:

Now, let's get some more details on one of the pods running a node-js container. You can do this with the describe command and one of the pod names listed in the last command:
$ kubectl describe pod/node-js-sjc03
The following screenshot is the result of the preceding command:

You should see the preceding output. The information we need is the Node: section. Let's use the node name to SSH (short for Secure Shell) into the node (minion) running this workload:
$ gcloud compute --project "<Your project ID>" ssh --zone "<your gce zone>" "<Node from
pod describe>"
Once SSHed into the node, if we run the sudo docker ps command, we should see at least two containers: one running the pause image and one running the actual node-express-info image. You may see more if K8s scheduled more than one replica on this node. Let's grab the container ID of the jonbaier/node-express-info image (not gcr.io/google_containers/pause) and kill it off to see what happens. Save this container ID somewhere for later:
$ sudo docker ps --filter="name=node-js"
$ sudo docker stop <node-express container id>
$ sudo docker rm <container id>
$ sudo docker ps --filter="name=node-js"
Unless you are really quick, you'll probably note that there is still a node-express-info container running, but look closely and you'll note that container id is different and the creation timestamp shows only a few seconds ago. If you go back to the service URL, it is functioning as normal. Go ahead and exit the SSH session for now.
Here, we are already seeing Kubernetes playing the role of on-call operations, ensuring that our application is always running.
Let's see if we can find any evidence of the outage. Go to the Events page in the Kubernetes UI. You can find it by navigating to the Nodes page on the main K8s dashboard. Select a node from the list (the same one that we SSHed into) and scroll down to Events on the node details page.
You'll see a screen similar to the following screenshot:
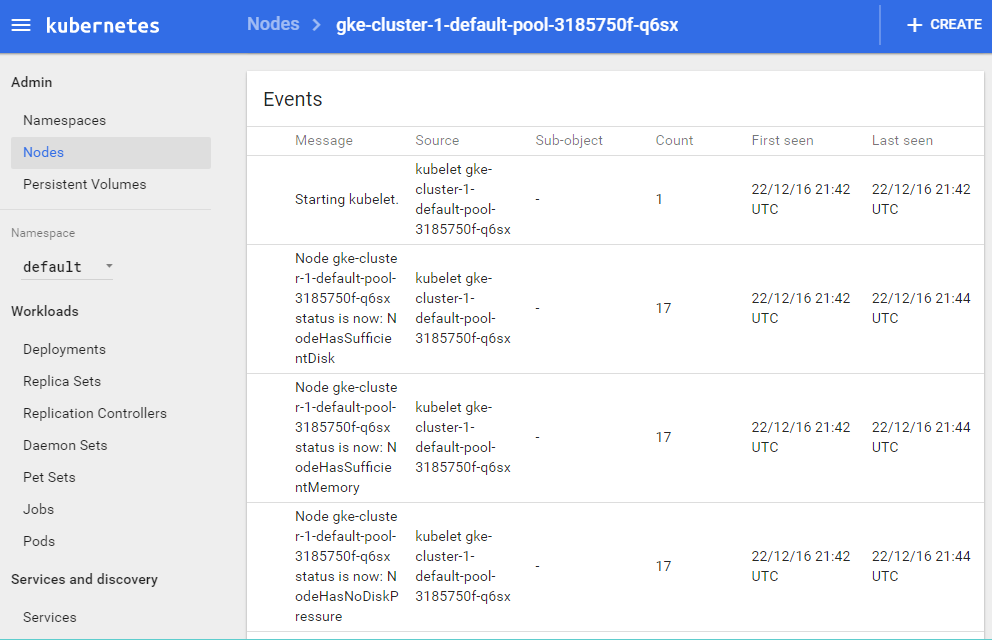
You should see three recent events. First, Kubernetes pulls the image. Second, it creates a new container with the pulled image. Finally, it starts that container again. You'll note that, from the timestamps, this all happens in less than a second. Time taken may vary based on the cluster size and image pulls, but the recovery is very quick.