
13
Ensuring Moodle Security
Moodle, like any other web application, has the potential to be misused. Moodle has dedicated an entire section to security settings that administrators can use to fine-tune its safety. After an overview of Moodle’s security, you will learn about the following topics:
- Security notifications: You will learn how to set up Moodle’s notification mechanisms that warn you about potential security issues and inspect the built-in security report.
- User security: We will look at the configuration of Moodle passwords, protection of user details, and spam prevention.
- Content security: We will deal with potential issues in content created within Moodle and the visibility thereof. You will learn how to restrict content created within Moodle, set up content visibility, and configure the antivirus scanner.
- System security: We will discuss configuration settings (location of the data root directory and cron execution), supporting HTTPS, and working with the IP blocker.
Before we cover the four aforementioned topics, let’s provide an overview of Moodle security, touching upon all layers of the technology stack.
Moodle security – an overview
Moodle takes security extremely seriously, and any potential issues are given the highest priority. Fixed vulnerabilities of serious issues usually trigger the release of minor versions, emphasizing the subject’s importance.
The following diagram illustrates the layers of a typical Moodle setup where the security of each component has to be ensured:
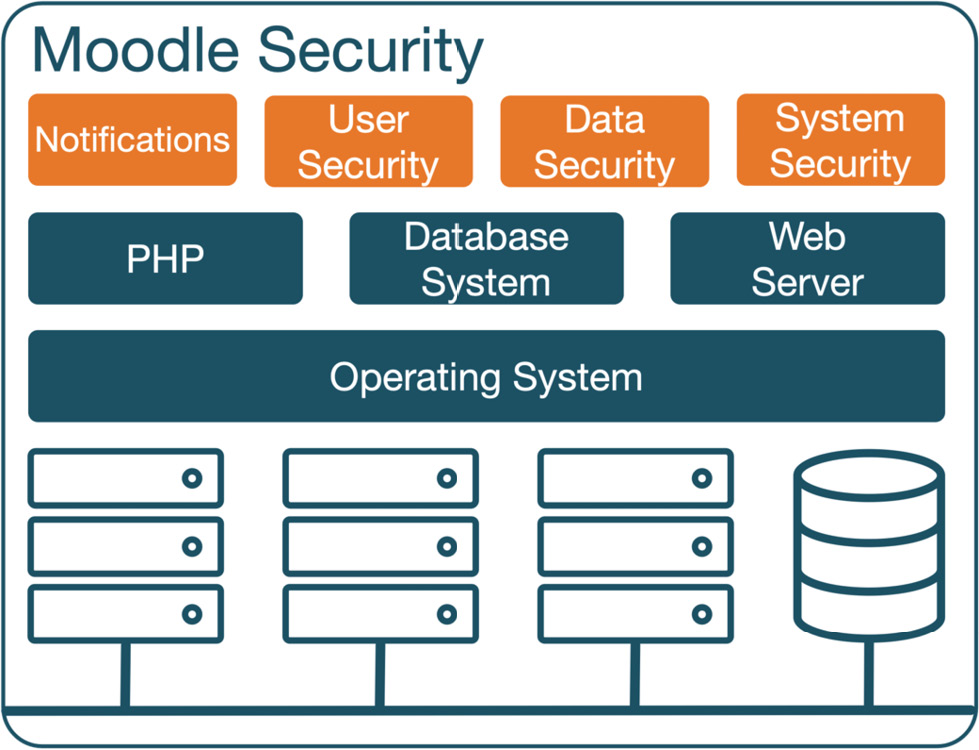
Figure 13.1 – Moodle security
The security of a system is as good as its weakest link. Since Moodle relies on underlying software, hardware, and network infrastructure, security can potentially be compromised in several areas. As this book focuses on Moodle administration, we only cover the security elements of Moodle per se. The following areas are not dealt with, and it is necessary to consult the respective documentation and experts on security issues:
- Software: As described in Chapter 2, Exploring the Moodle System, Moodle’s key components comprise a web server (usually Apache or Microsoft IIS), a database server (MySQL, Microsoft SQL Server, PostgreSQL, MariaDB, or Oracle), and a programming language (PHP). Additional PHP and operating system extensions are required, for instance, to support the aforementioned database systems.
- Operating system: An operating system’s security is under the constant threat of exploitation for malicious purposes. The hardening of the operating system is a crucial task of a system administrator.
- Hardware: Moodle runs on (physical or virtual) servers hosted internally or externally. There are ongoing safety and security improvements in such systems, reflected by ever-extending precautions taken by data centers and hosting providers.
- Network: Any system that is part of a network is potentially vulnerable. Configuration of firewalls, proxy servers, and routers, as well as general network security, are key aspects of protecting your system from attacks.
A number of these topics are covered at docs.moodle.org/en/Security.
Important note
One rule that applies to all elements is that the latest software updates should be installed regularly.
With the increasing complexity and growing popularity of Moodle, it is imperative that you ensure that all possible measures are taken to prevent any security issues. Let’s get started with security notifications.
Configuring security notifications
Moodle has set up a dedicated site at moodle.org/security that deals with security issues. If you register your Moodle instance, which is highly recommended, your email address will automatically be added to the security alerts mailing list, which gives you advanced notice of vulnerabilities and updates a couple of days prior to public release. To set this up, go to Site administration | General | Registration, fill in the required information, and click on the Register your site button.
Alternatively, follow the @moodlesecurity Twitter handle to be notified of any Moodle security announcements.
Once you are up to date with general security issues, it is time to focus on being aware of any potential issues on your Moodle system. In the remainder of this section, we will deal with setting up Moodle notifications and inspecting the built-in system report.
Setting up Moodle notifications
When you navigate to Site administration | General | Notifications, Moodle will display any potential issues with your site. This link also initiates the installed Moodle updates and plugins (refer to Chapter 8, Understanding Moodle Plugins).
Four messages are displayed in the following screenshot; the second and third issues would clearly fall into the security category:
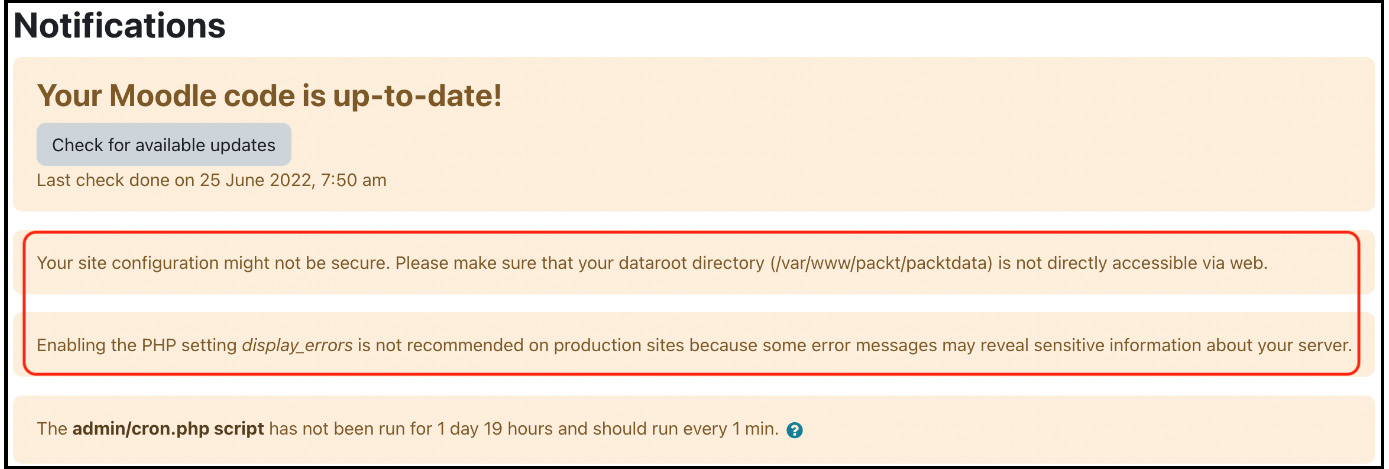
Figure 13.2 – Moodle notifications
Moodle monitors failed login attempts in its log file, as described in Chapter 12, Gaining Insights through Moodle Reporting and Analytics. Repeated login failures can indicate that unauthorized users are trying to access your system. In addition to checking your log files regularly, you should consider monitoring these activities by configuring the settings when you navigate to Site administration | General | Security | Notifications:
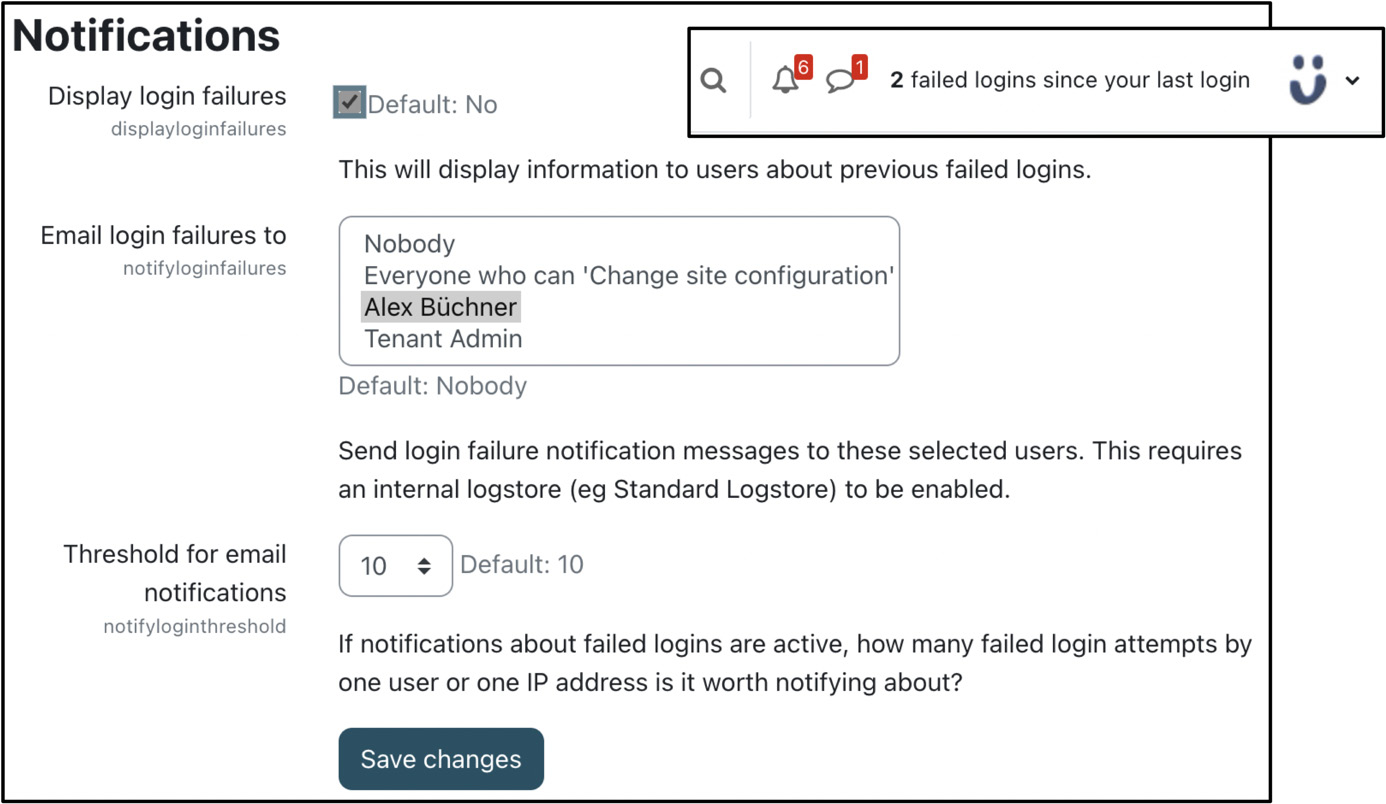
Figure 13.3 – Security notifications
You can specify whether users will see messages displayed on their screens about previously failed logins and who will be emailed about login failures. You can further set the number of failed logins from the same IP address that will trigger these notifications.
While this is not a foolproof threat alert, it can potentially highlight some problems within your system, and it is therefore recommended that you activate it. Another benefit of receiving these notifications by email is the customer care aspect of getting back to legitimate users who have felt frustrated when trying to access your site.
Inspecting security checks
Another mechanism that we already mentioned in Chapter 12, Gaining Insights through Moodle Reporting and Analytics, is the security report you find at Site administration | Reports | Security checks:
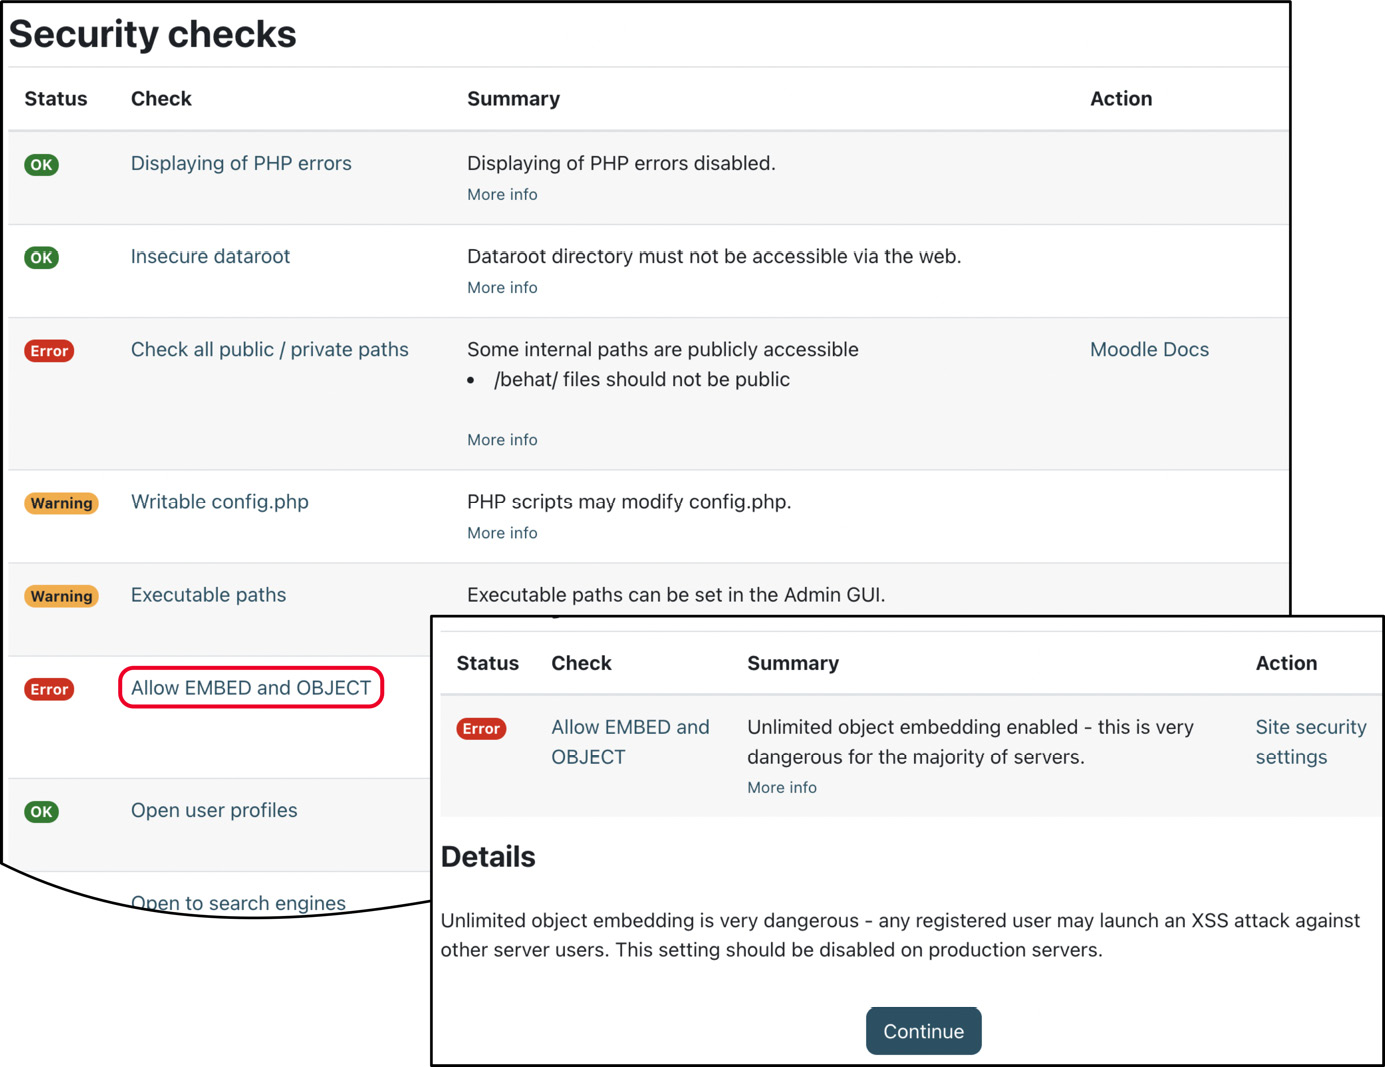
Figure 13.4 – Security checks
The report shows several potential key security issues, their status (OK, Info, Warning, Critical, or Error), and a summary. When you click on an issue name, you will be redirected to a page that provides more information about the problem and, if available, a further Action link to the settings page where you can rectify the situation.
The Security checks page is a good starting point to identify some potential issues. However, it does not replace a full security audit, penetration test, or health check offered by some Moodle Partners.
Awareness of what is going on in your Moodle system is as critical as ensuring the security of critical components. Let’s start with the weakest link in any IT setup – users.
Ensuring user security
A critical security aspect lies in ensuring that only privileged users can access your system and, once they are authenticated, they only have access to their privileged areas in Moodle.
Here is a quick recap of the key elements concerning security in the magic Moodle triangle – users, courses, and roles:
- Ensuring the correct authentication setup is critical to ensuring a secure Moodle system, especially when self-registration or guest access has been activated. We dealt with internal, external, provider-based, and system authentication methods in Chapter 5, Managing Users, Cohorts, and Authentication.
- Once users have authenticated with Moodle, you have to ensure that they can only enrol in courses where they should have permission to do so, which is controlled by enrolment methods, as discussed in detail in Chapter 4, Managing Courses and Enrolments.
- When users are enrolled in courses or access any other area of Moodle, it is crucial that they are granted the correct permissions, which are controlled via roles and capabilities, a topic covered at length in Chapter 6, Managing Permissions, Roles, and Capabilities. The six risk types of capabilities – Trust, Configuration, XSS, Personal, Spam, and Data loss – provide a good indication of the damage that can be caused.
In this section, we will focus on three topics impacting users’ security:
- Moodle passwords, dealing with password policies, and recovering the admin password
- Protection of user details
- Prevention of spam
Let’s start with Moodle passwords, a topic impacting all Moodle users.
Configuring Moodle passwords
Moodle offers a password policy feature that applies to manual accounts, which can be configured by going to Site administration | General | Security | Site security policies, as shown in the following screenshots:
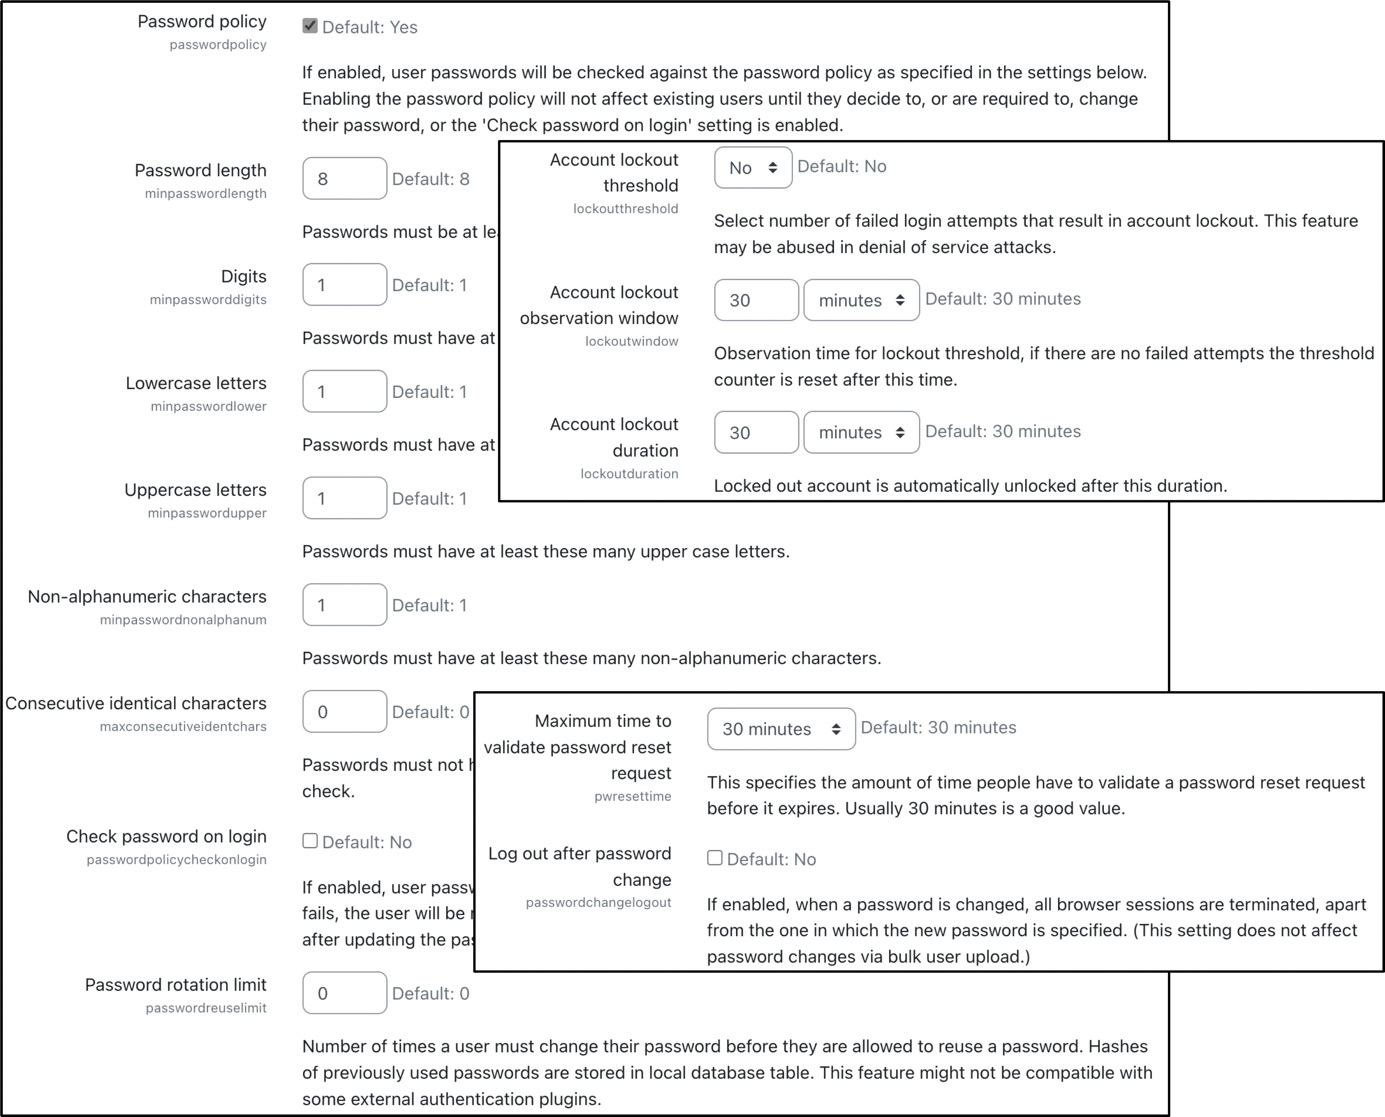
Figure 13.5 – Password policy
Moodle’s password policy supports the following configuration option types:
- Complexity: All common password requirements are supported, namely Password length, Digits, Lowercase letters, Uppercase letters, Non-alphanumeric characters, and Consecutive identical characters.
- Validity: Password expiry can be specified for manual accounts at Site administration | Plugins | Authentication | Manual accounts, where you can configure Enable password expiry, Password duration, and Notification threshold. Related settings are Password rotation limit (the number of times before a user can reuse a password), Maximum time to validate password reset request (when password recovery is being triggered), and Log out after password change (all browser sessions except the current one).
- Consequences: You can lock out user accounts after too many failed logins. Account lockout threshold lets you specify the number of failed logins required to trigger a reactivation email to the user, the Account lockout observation window setting lets you specify the period during which further failed logins will be included in the current suspension, and Account lockout duration lets you specify the time after which the account will be unlocked automatically.
Bear in mind that the password policy only applies to manual accounts. If you use a different authentication method, the lockout thresholds will be defined elsewhere – for instance, within the Lightweight directory access protocol (LDAP) instance.
Important note
It is highly recommended that you use a strong password (long, complex, and random) for the Moodle administrator account(s), even if the password policy has been deactivated.
Moodle stores passwords in a cryptographic hash using bcrypt (Blowfish). To further improve password security, Moodle supports password salting, which adds a separate random string to the hash of each user’s password. The password stored in the Moodle database has the following format:
$<hash_id>$<cost>$<secure salt><hash><hash_id> is the ID of the hashing algorithm used (2y for bcrypt), and <cost> is the cost of using that algorithm (two digits). <secure salt> is a randomly generated 22-character salt; you can find more details on salting at docs.moodle.org/en/Password_salting. <hash> is a 31-character hash of the actual password.
If you ever lose your admin password and have no means of recovering it, you have two options:
- Overriding the password in the database: You can manually override the password field in the mdl_user table in the SQL database by manually replacing the old hash with the MD5 value of the new password; it will be upgraded to the strong hash value after the first login. For example, to set the password to 'newpassword', you need to use the following SQL statement:
UPDATE mdl_user
SET password = MD5('newpassword')
WHERE username = 'admin';
If your database does not support the MD5 function, you must set the password to the actual MD5 hash tag. For example, this would be 5e9d11a14ad1c8dd77e98ef9b53fd1ba for 'newpassword'. Use one of the many available online generators to find out the tag.
- Overriding the password via the command line: The reset_password.php CLI script sets the correctly salted password for any given user. The syntax to change the admin password to 'newpassword' is as follows:
sudo -u www-data /usr/bin/php admin/cli/reset_password.php --username=admin --password=newpassword --ignore-password-policy
The passwords prevent users from unauthorized access to Moodle. Once users have identified themselves, the next step is to protect their user details, which is the topic of the following subsection.
Protecting user details
Identity theft is a common problem on the internet, and Moodle is no exception. To avoid the possibility of fraudsters gathering details about authenticated users, a number of settings can be seen by navigating to Site administration | General | Security | Site security policies:
- Protect usernames: If users cannot remember their username or password, Moodle provides a Forgotten password screen. By default, the message displayed reads If you supplied a correct username or email address then an email should have been sent to you. If the protection is turned off, however, the message reads An email should have been sent to your address at ******@<domain name>, which could allow a guess at the username.
- Force users to login: By default, Moodle’s front page is visible to everyone, even if they are not logged in to the site. Change this parameter if you wish to force users to log in before they see the front page. As a result, your users will only see the login screen when they enter your site.
- Force users to login for profiles: When set to Yes (the default setting), users will have to log in with an authentic account before accessing other users’ profile pages.
- Force users to login to view user pictures: If disabled (default), guests will be able to see pictures of other users in their profile. Otherwise, the default user image will be shown. Some organizations disable user profile images altogether, which can be achieved via the Disable user profile images option.
- Open to search engines: Moodle can be configured to allow search engines to crawl through courses with guest access and add content to its search engine database. This functionality is turned off by default.
- Allow indexing by search engines: The self-explanatory options are Everywhere except login and signup pages, Everywhere, and Nowhere. Note that these settings cannot be enforced because a tag header is added to each site to ask search engines to respect it.
- Profile visible roles: Any selected role will be visible on user profiles and participation pages.
There are two more related parameters further down in the Site security settings screen. You can activate Email change confirmation. If set to Yes, users will be sent an email to confirm that their change of email address in their profile is genuine. Moodle offers a means to remember usernames via cookies, which will be entered in the login form when opened. While this is convenient for the end user, it poses a potential security risk. To prevent this feature from being supported, configure the Remember username parameter by going to Site administration | General | Security | Site security policies. Since usernames are stored in a permanent cookie, this potentially infringes user privacy (see Chapter 14, Complying with Data Protection Regulations).
By default, Moodle triggers a notification when a login has taken place by a user from a new device. To avoid users deactivating this security measure, you might want to change the New Login notifications status to Locked in Site administration | General | Messaging | Notification settings.
Related to the protection of user details is the prevention of profile spam, which we will cover in the last topic of the user security section.
Preventing spam
If Moodle is not configured correctly, it allows spammers to insert content into user profiles of accounts created via self-registration.
Important note
Only use email-based self-registration if it is indispensable.
If you must use self-registration, ensure to undertake the following measures:
- Enable reCAPTCHA in Site administration | Plugins | Authentication | Manage authentication. On the same page, configure Allowed email domains and Denied email domains. Refer to the Common authentication settings section in Chapter 5, Managing Users, Cohorts, and Authentication. Many public online lists contain domains for disposable and temporary email addresses, which you might want to use for the denylist.
- Keep Email change confirmation enabled in General | Security | Site security policies.
- Configure the IP blocker, as described further on in this chapter.
To prevent profile spam, also make sure that the following settings in General | Security | Site security policies are set correctly (which they are, by default):
- Keep the Force users to login for profiles parameter enabled (refer to the Protection of user details section). This way, you can prevent anonymous visitors and search engines from seeing user profiles.
- You further limit access to changing profiles to only those users who are enrolled in a course via the Profiles for enrolled users only setting.
Also, be aware that legit users can be the cause of spam. Ensure that no user has any unnecessary capabilities in their roles that allow for this (refer to spam risk in Chapter 6, Managing Permissions, Roles, and Capabilities).
If your site has been victim to spam, go to Site administration | Reports | Spam cleaner. You can either let Moodle autodetect common spam patterns (the list makes for some interesting reading!) or search for your own keywords:
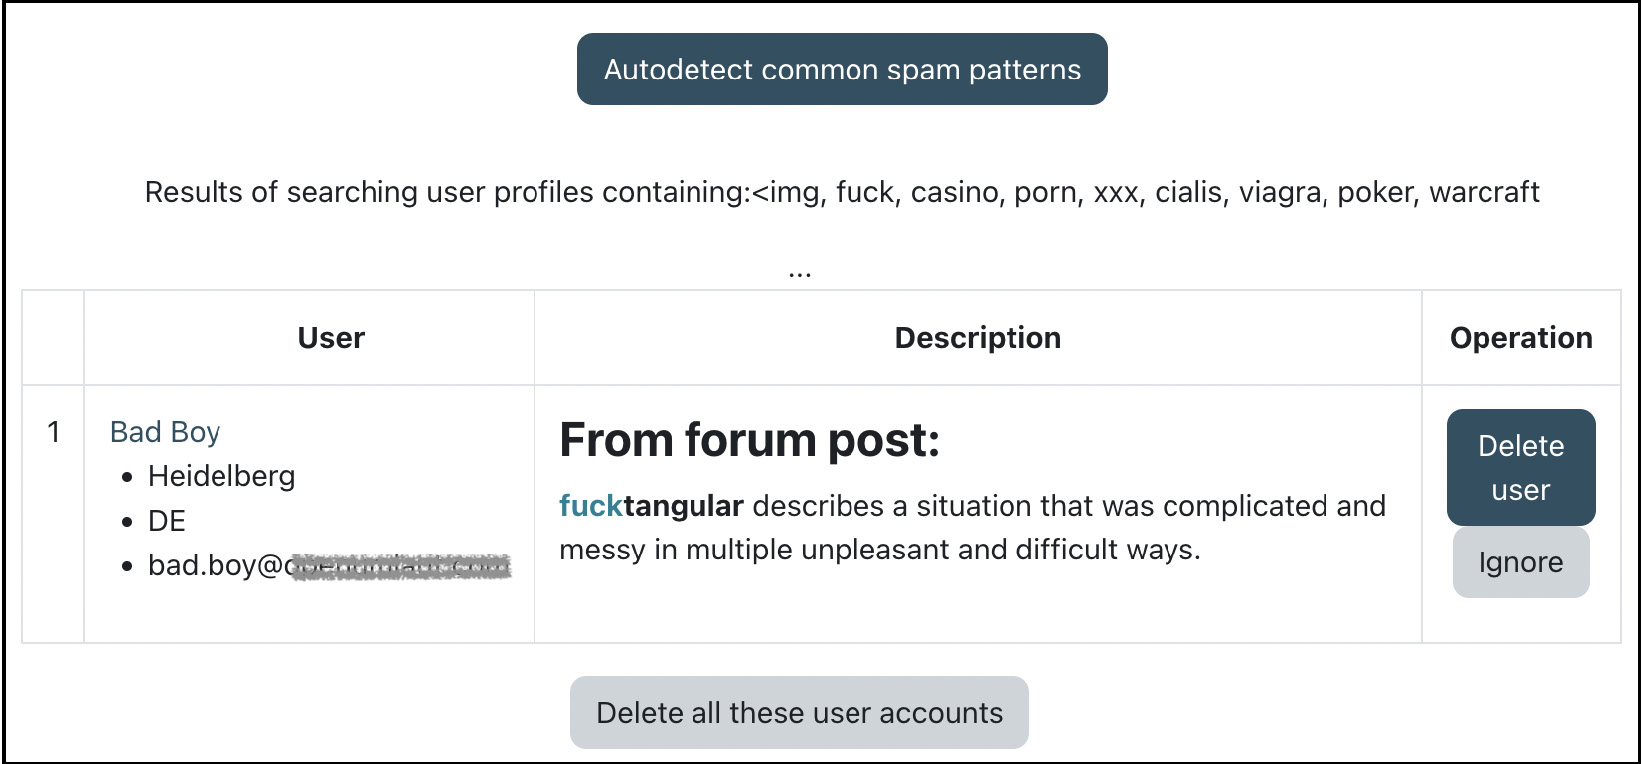
Figure 13.6 – Spam cleaner
Any user profiles where the Description field contains any of the listed keywords are shown. You then have the option to delete the user account(s). For more information on spam prevention in Moodle, check out docs.moodle.org/en/Reducing_spam_in_Moodle.
This concludes the section on user security, where we have covered the configuration of Moodle passwords, protection of user details, and spam prevention. Next up is content security.
Ensuring content security
Content by learners and teachers can potentially contain malicious code, and once created, it needs to be protected from unauthorized access. This section will ensure content security (namely, content created within Moodle), content visibility, and antivirus scanners.
Limiting content created within Moodle
Users can create Moodle content by using the Atto editor or uploading files. Two settings are available in Site administration | General | Security | Site security policies to partly prevent the misuse of these:
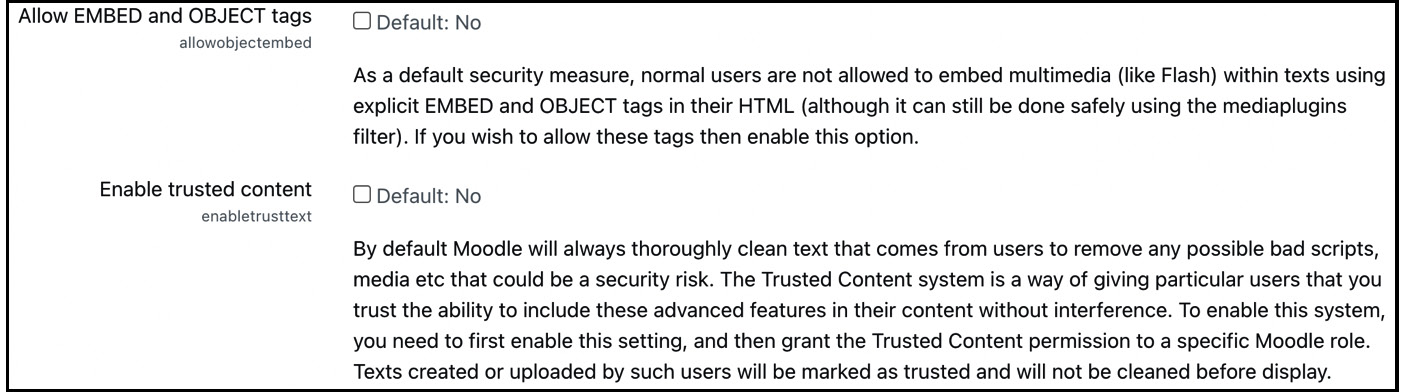
Figure 13.7 – Content security settings
The two parameters are as follows:
- HTML allows embedding code that uses the explicit <EMBED> and <OBJECT> tags. Potentially, malicious code can be put in embedded scripts, which is why its support is deactivated by default. To activate it, enable the Allow EMBED and OBJECT tags parameter.
- The Atto editor automatically removes any unwanted HTML elements and attributes. You can bypass this cleansing mechanism for individual users. First, you must set the Enable trusted content parameter, as shown in the preceding screenshot. Second, you will have to allow the moodle/site:trustcontent capability for each user you trust to submit JavaScript and other potentially malicious code. Texts created or uploaded by those users will be marked as trusted and will not be cleaned before display.
If you wish to censor obscene or other unwanted words entered by learners in activities such as forums, Moodle has developed a Word censorship filter and made it available as a plugin (moodle.org/plugins/filter_censor). Once installed and enabled, you can enter a list of censored words and phrases to be blacked out in Site administration | Plugins | Filters | Word censorship. Alternatively, you can edit the badwords language string in filter_censor.php (be careful, as this list is far from G-rated). Also, bear in mind that the filter picks up words within words and marks valid terms, such as cocktail, sextant, sparse, and altitude.
Okay, before your imagination runs completely wild, let’s set up content visibility next.
Setting up content visibility
Blogging, tagging, and commenting are Moodle social networking activities. Blog entries, tags, and comments are harnessed for searching, sharing, and performing other collaborative activities to match interests. The potential issue is that the content is visible to users who should not be able to share or view entries. Moodle has catered for this by providing several settings, which we have already dealt with in the Configuring collaboration tools section in Chapter 9, Configuring Educational Features. Here is a list of areas where the respective functionalities need to be turned on and off:
- Site administration | Appearance | Blog | Blog visibility
- Site administration | Advanced features | Enable tags functionality
- Site administration | Appearance | Blog | Enable comments
If you deactivate any mechanisms, tags, comments, and blog entries that are already on the system or kept hidden, they will reappear when the functionality is turned on again. In other words, there is no risk of data loss when turning the functionality off and back on.
You might also consider creating a dedicated role on your system – for example, a Blogger role utilizing the moodle/blog:create capability. This will limit blogging to specific users only – those who have been assigned the new role. You can find more details on the Blogger role in the Moodle Docs at docs.moodle.org/en/Blogger_role.
The last component of content security is the configuration of virus scanners, which is dealt with in the following subsection.
Configuring antivirus scanners
Moodle supports the scanning of uploaded files for viruses, which can be configured at Site administration | Plugins | Antivirus plugins | Manage antivirus plugins:

Figure 13.8 – Managing antivirus plugins
There are some common antivirus settings applicable to all antivirus plugins. The three-step process behind Moodle’s (and most other) antivirus scanning mechanism is as follows:
- Detection: Files are scanned for potential threats, where the antivirus plugin determines the detection method.
- Quarantine: Any potentially malicious or infected files will be isolated. They are placed in the $CFG->dataroot/antivirus_quarantine quarantine folder for later inspection.
- Removal: Detected files will be deleted immediately after detection when quarantine is disabled, after inspection of the quarantine folder, or when the maximum quarantine time has been exceeded.
ClamAV is available as a standard scanner; more antivirus plugins are available from the Moodle plugins directory at moodle.org/plugins/?q=type:antivirus. ClamAV is an open-source antivirus engine. Refer to www.clamav.net for more details, downloads for different operating systems, and how to keep the virus definition database up to date. You must install ClamAV on your system before the scanner can be configured via the Settings link.
There are two running methods for ClamAV:
- Via command line: This is the default method for which you need to specify the path where ClamAV has been installed.
- Via system sockets: On Unix systems, better performance can be obtained using either a Unix domain socket or a TCP socket. You need to contact your system administrator for configuration details on these parameters.
ClamAV has two limitations. First, ClamAV does not exist for Windows servers, and you will need to install a Windows-based virus scanner to provide this functionality and monitor any quarantined files separately. Second, ClamAV will impact your system’s performance, which becomes an issue if the file upload facility is plentifully used. If this is the case, you might have to allocate 10–20% more RAM to your server(s).
This concludes the section on content security, where we covered content created within Moodle, content visibility, and antivirus scanners. The last section deals with ensuring system security.
Ensuring system security
In the last section of this Moodle security chapter, we deal with configuration settings impacting system security, covering access to dataroot, cron execution, secure HTTP, and the IP blocker.
Configuring access to dataroot
In the Notifications screenshot earlier in the chapter, you probably spotted the warning that the dataroot directory is directly accessible via the internet. Moodle requires additional space on a server to store uploaded files, such as course documents and user pictures. The directory is called dataroot and must not be accessible via the web. If this directory is accessible directly, unauthorized users can get access to content.
Important note
$CFG->dataroot must not be accessible via the web!
To prevent dataroot from being accessible, move the directory outside the web directory (ensure not to mangle permissions) and modify config.php accordingly by changing the $CFG->dataroot entry.
In externally hosted environments, it is often not possible to locate the directory outside the web directory. If this is the case, create a file called .htaccess in the data directory and add a line containing denyfromall.
The second system security measure is the protection of the execution of the cron process, which is covered next.
Protecting cron execution
We have already described the cron process in Chapter 1, Installing Moodle, and will go into more detail about this in Chapter 15, Optimizing Moodle Performance. cron is a script that regularly runs to perform certain operations, such as sending notifications, processing statistics, and cleaning up temporary files. Scripts that run at the operating system level can potentially contain malicious code.
It is possible to run a script via a web browser by simply typing in the following URL: <yourMoodlesite>/admin/cron.php. Two mutually exclusive settings can be set in Site administration | General | Security | Site policies to prevent this:
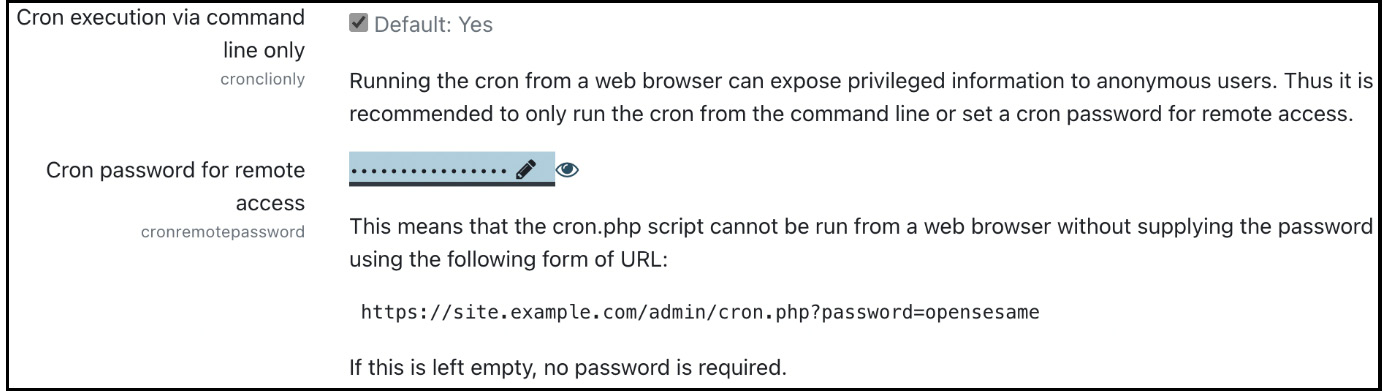
Figure 13.9 – Configuring cron execution
If you only allow the cron process to be executed from the command line, running the script via a web browser will be disabled, and a message will be displayed, saying Sorry, internet access to this page has been disabled by the administrator. The cron process can still be executed automatically if it’s set up correctly.
If the Cron password for remote access parameter is set, Moodle requires that executing the cron script via a web browser requires the provision of a password in the form of a parameter, such as <yourMoodlesite>/admin/cron.php?password=yourpassword. If the password is not provided or is incorrect, an error message, which is the same as the one we saw earlier, is displayed.
Next up is the configuration of HTTP security.
Configuring HTTP security
Moodle offers full HTTPS support, which runs HTTP requests over SSL (a more secure but slightly slower socket layer). Given the rapid advance in hacking technology and the negligible cost of SSL certificates, every public-facing web page containing user data should run over HTTPS.
Important note
Repeat after me: every public-facing Moodle site should run over HTTPS, with no exception.
To ensure that all data transferred from a user’s browser to the server that hosts Moodle is encrypted, HTTPS must be enabled on your web server. You will also have to purchase or generate an SSL certificate. Every web server has a different method to enable HTTPS, so you should consult your server’s documentation. A good starting point for setting up SSL/TSL for Apache can be found at httpd.apache.org/docs/current/ssl/ssl_howto.html.
Once the web server has been configured to work with HTTPS, the Moodle installation script will work with those details (see Chapter 1, Installing Moodle). If you need to transition from HTTP to HTTPS, we recommend that you follow the instructions on Moodle Docs (docs.moodle.org/en/Transitioning_to_HTTPS) and make use of the HTTPS conversion tool provided by Moodle at the bottom of Site administration | General | Security | HTTP security:
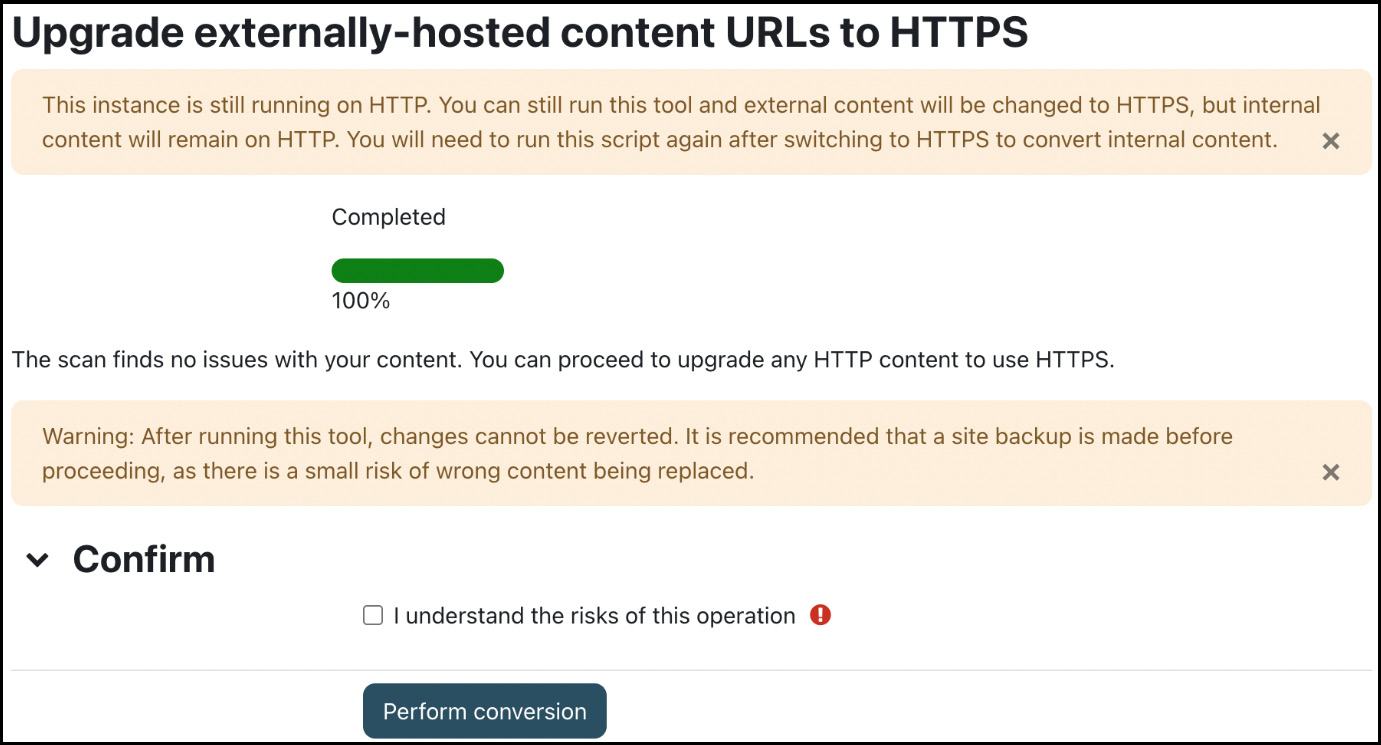
Figure 13.10 – HTTPS conversion tool
The tool performs two tasks. First, it scans any course content and notifies you if there are any potential issues or conflicts. Second, once you have ticked the confirmation box, an irreversible conversion is performed; all HTTP links are changed to HTTPS.
The tool can also be executed in CLI mode using the following syntax:
sudo -u www-data /usr/bin/php admin/tool/httpsreplace/cli/url_replace.php --replace --confirmFor more details on the tool, consult docs.moodle.org/en/HTTPS_conversion_tool.
Important note
If you turn on HTTPS without the relevant system components installed – that is, the PHP extension added along with the correct web server configuration – you will lock yourself out of your system!
There are a number of related settings in Site administration | General | Security | HTTP security that you should double-check:
- Secure cookies only: Web servers can be configured in a way that they only accept HTTPS URLs. If this is the case on your system, you should enable this parameter.
- Only http cookies: Moodle supports instructing web browsers to send cookies only with real requests, which prevents some XSS attacks.
- Allow frame embedding: See the tip in the Moodle as LTI tool section in Chapter 9, Configuring Educational Features.
- cURL blocked hosts list: Block hosts for Moodle’s cURL implementation – for example, localhost variants.
- cURL allowed ports list: Restrict Moodle’s cURL implementation to specific web ports. The defaults are the standard ports, 80 and 443.
HTTP security defines over what protocol your Moodle instance is accessed and the related settings. The last system security topic deals with allowing and blocking IP addresses accessing your site.
Allowing and blocking IP addresses
Users will access your system from stationary and mobile devices. What they all have in common is that they will access your site via an IP address. You can limit this access by specifying an allowlist and a denylist at Site administration | General | Security | IP blocker:
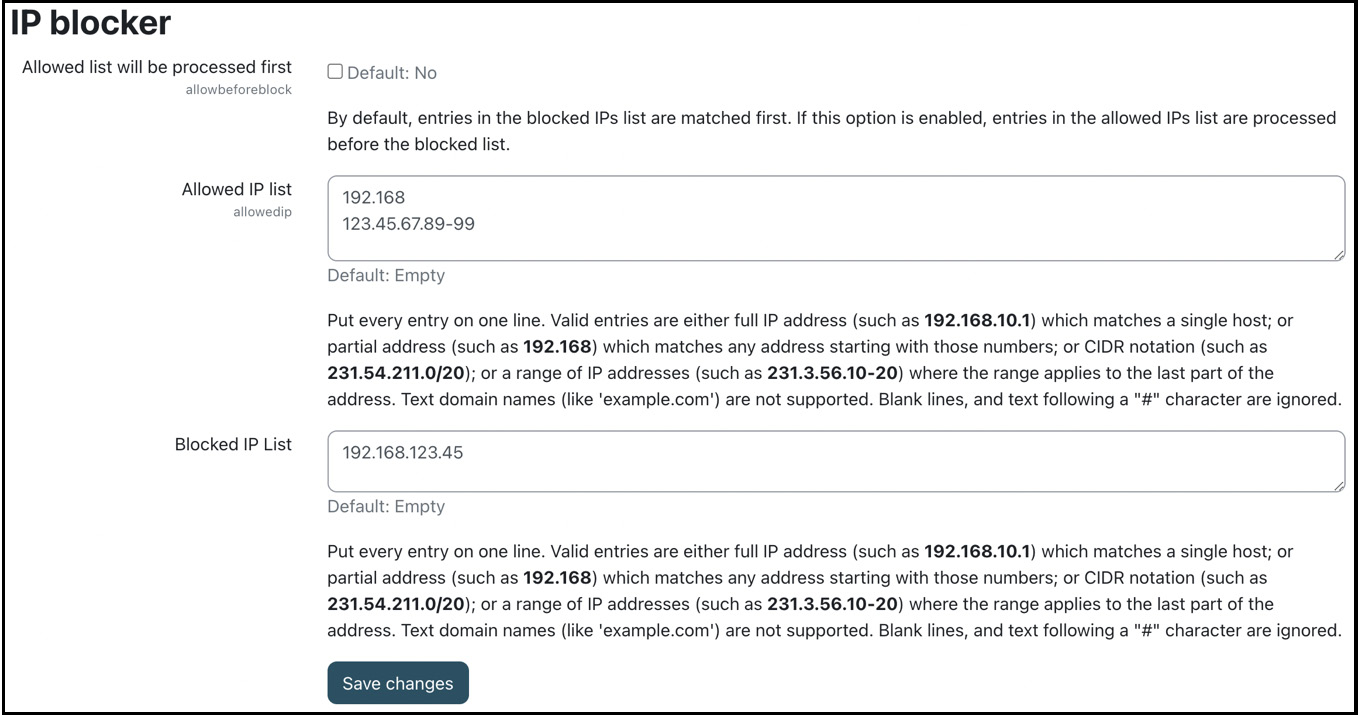
Figure 13.11 – IP blocker
The allowlist (Allowed IP list) can contain IP addresses in several formats (the full IP address, partial address, ranges of IPs, and the CDIR notation). The same applies to the denylist (Blocked IP list). By default, the denylist has priority over the allowlist. If you wish to reverse this, select Allowed list will be processed first.
Important note
Be aware that with any entries in the allowlist, the effect is to allow ONLY those IP addresses and block all others. Exercise care with this setting, as it is possible to lock yourself out of Moodle.
For example, you might want to add 192.168.*.* to your allowlist, and denylist a particular IP – say, 192.168.123.45 – that was trying to guess your admin password multiple times.
This concludes the section on system security, in which we dealt with access to dataroot, cron execution, HTTPS, and IP blockers.
Summary
This chapter taught you how to protect your Moodle system from potential misuse and to keep a regular check on its security. To summarize, here is a short list of best practices in the following checklist. While this list is by no means complete, it gives an indication of the elements you are responsible for as a Moodle administrator:
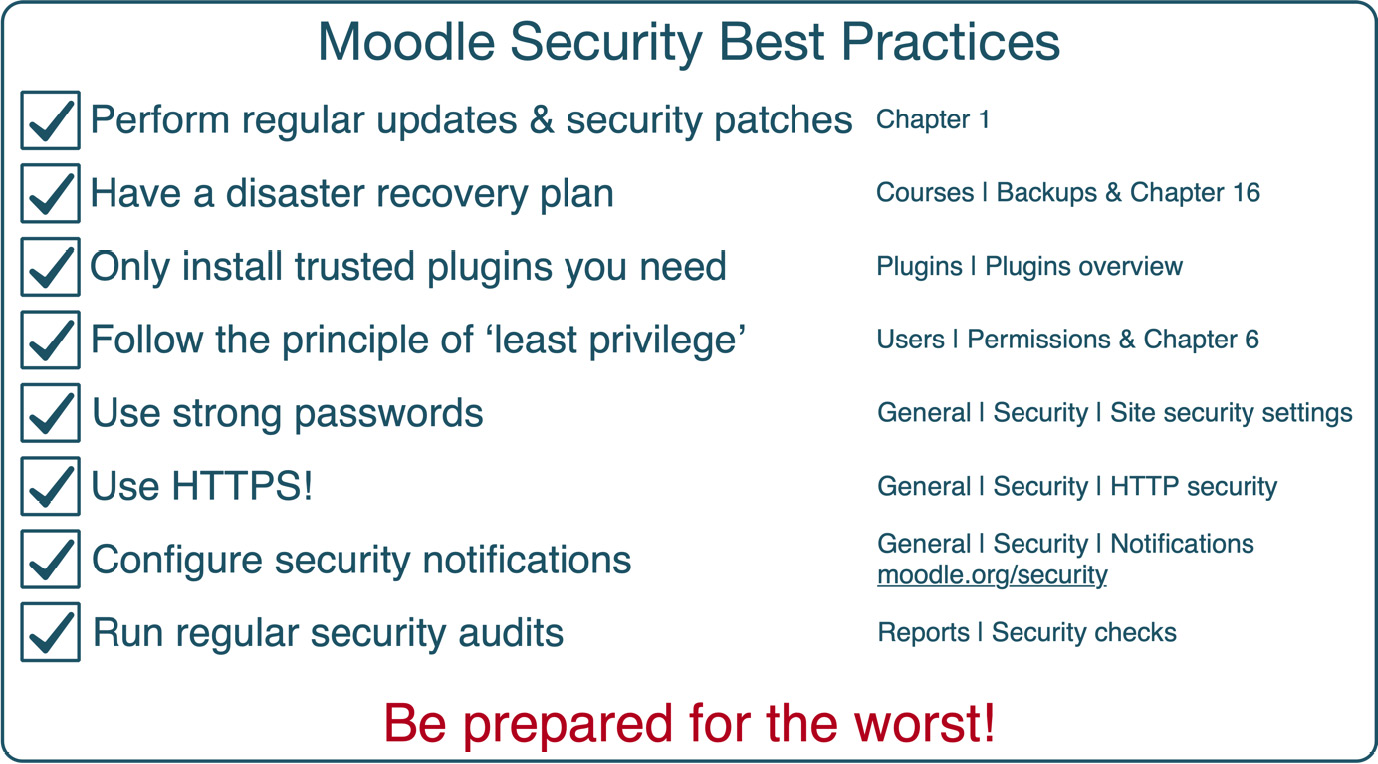
Figure 13.12 – Moodle security best practices
It is important to stress that Moodle’s security is only a single variable in the overall equation. Ensure that all other underlying software, infrastructure, and hardware components are set up correctly as well.
It is also important to stress the importance of an emergency plan if a security threat arises. This includes a strategy for identifying the problem, measures to resolve the situation, and a list of users to notify, among others.
Most Moodle systems run on the LAMP platform, which has proven to be very secure if configured correctly. Moodle’s developers are very conscious that security is vital when dealing with personal user data, such as grades, assignments, and competencies. Hence, the topic has been given the highest priority. However, there is no guarantee that your system is 100% protected against misuse. New hacking techniques will emerge in today’s world of cyber threats, and users will continue to be careless with their credentials (you have all seen the Post-it notes under the keyboard). So, ensure security patches and updates on your entire system, not just Moodle, are always up to date, and keep educating your users about the dangers. Also, consider undergoing a regular security audit or health check, which some Moodle Partners offer.
Now that your system is secure, let’s ensure that its privacy setup complies with data protection regulations.