
6
Managing Permissions, Roles, and Capabilities
Permissions are complex yet powerful and can be seen as the backbone of Moodle. In this chapter, we will cover contexts, roles, and capabilities, which define what users can and cannot see and do in your Moodle system.
In this chapter, we will cover the following topics:
- Exploring Moodle’s predefined roles
- Understanding contexts
- Assigning roles to users
- Understanding capabilities
- Roles and context management
We will start with a short definition that should be kept in mind when managing permissions.
Important note
A role is a collection of capabilities with corresponding permissions and risks. A role is assigned to a user in a context.
Let’s have a look at the following high-level diagram, which visualizes the preceding definition before we cover all permission-related topics in detail:
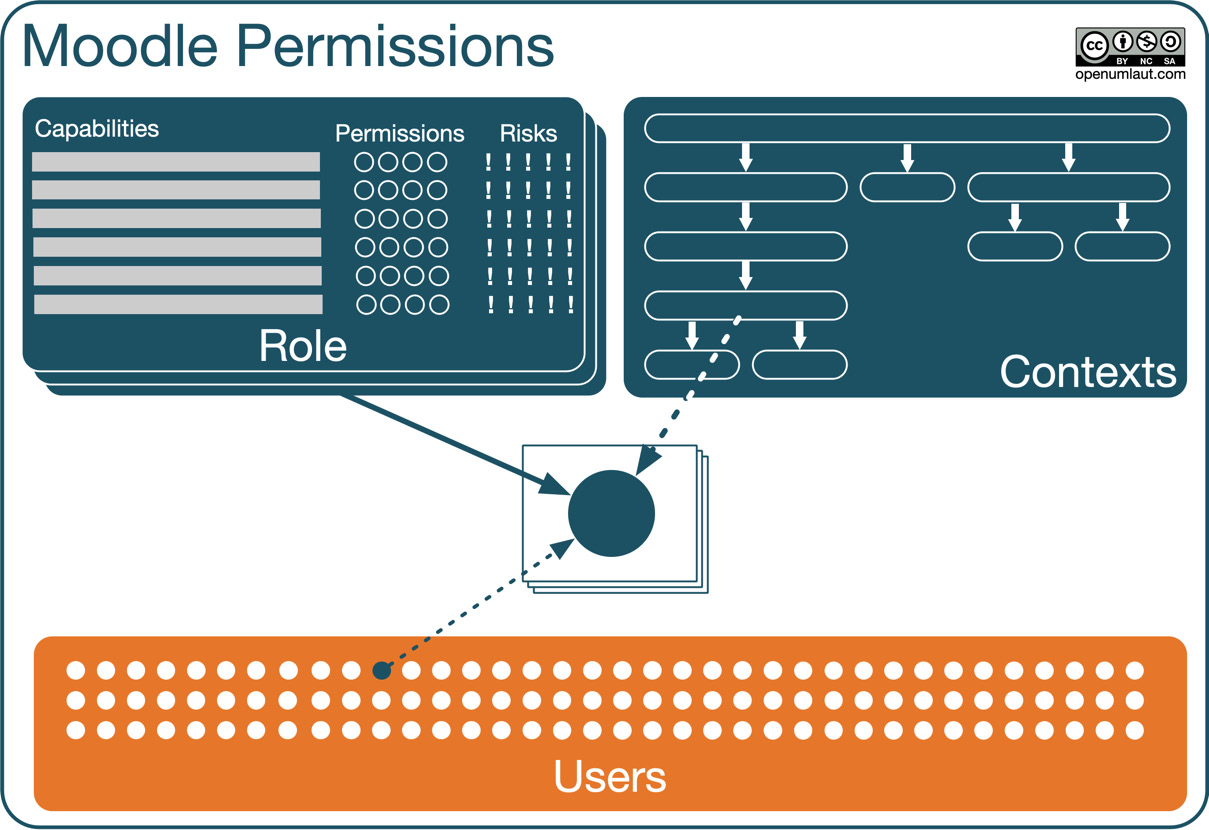
Figure 6.1 – High-level permissions overview
Every user in your Moodle system is assigned one or many roles, and a role comprises many capabilities with associated permissions and risks. Each role assignment takes place in a particular context, representing a hierarchically organized ring-fenced area.
We will begin this chapter by exploring the standard roles of Moodle before covering the slightly abstract concept of contexts. It will get more practical when we assign roles in different contexts. Next, we will look at how roles are structured and modified before creating our own roles. We will conclude this chapter with role management and some best practice advice.
By the end of this chapter, you will have understood the core concepts of the Moodle permission system, which comprises roles, contexts, capabilities, and the management thereof.
Exploring Moodle’s predefined roles
Moodle comes with several predefined roles. These standard roles are suitable for most educational setups, but some institutions require modifications to be made to the roles system to tailor Moodle to their specific needs.
Each role has capabilities for several actions that can be carried out. For example, an administrator and a course creator can create new courses, whereas all the other roles are denied this right. Likewise, a teacher is allowed to moderate forums, whereas students can only contribute to them.
The description of each standard role and the short names that are used, internally and in operations, such as user batch upload, are listed in the following table (taken from Site administration | User | Permissions | Define roles):
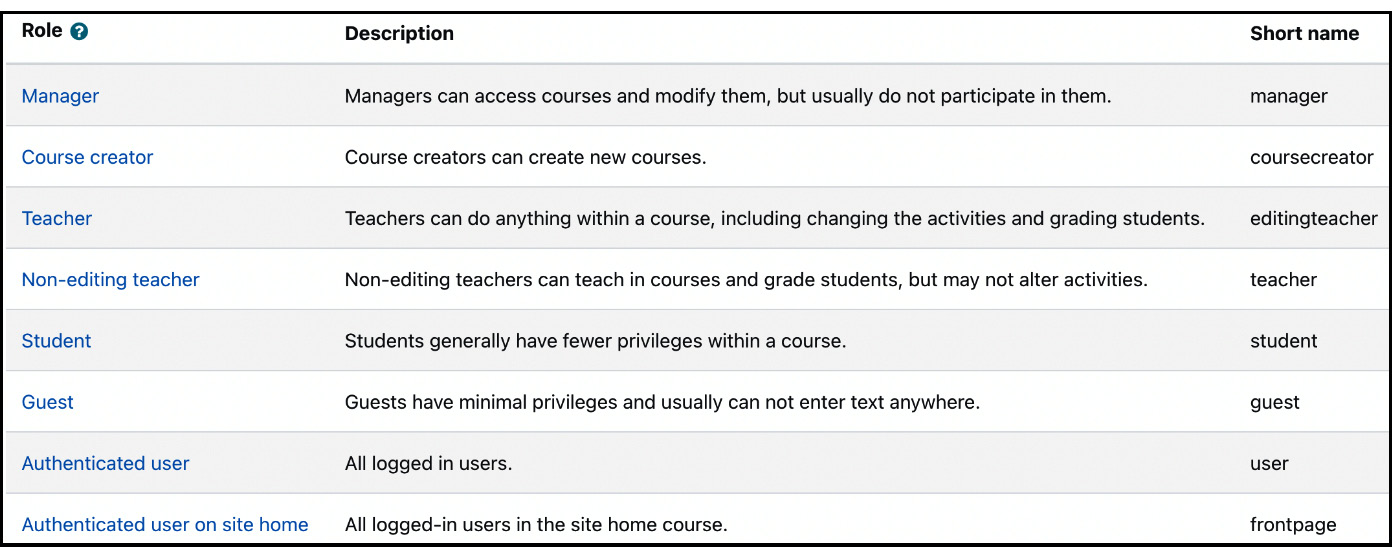
Figure 6.2 – Moodle’s predefined roles
Moodle Workplace has various extra roles to handle its business-oriented audience, such as tenant administrator, certification manager, dynamic rules manager, organization structure manager, program manager, and report builder manager.
Before we can do anything with roles, we need to understand the concept of contexts, which will be dealt with next.
Understanding contexts
A role (remember, a collection of capabilities with corresponding permissions) can be assigned within different contexts. So, what are contexts?
Important note
Contexts are the areas in Moodle where roles can be assigned to users.
A user has a role in any given context.
A context can be a course, a category, an activity, a user, a block, or Moodle itself. Moodle comes with seven contexts, each with a given scope:
- System: Moodle itself – that is, the entire system, also known as the core or global context
- Course category: A category and its sub-categories
- Course: A single course
- Activity module: A course activity or resource
- Block: A sidebar block
- User: A user account
- Site (Front page): The home page and files that can be accessed outside courses (often referred to as the front page context)
Important note
Each context has a scope. A scope is a ring-fenced area or boundary in which specific actions can be carried out
This arrangement is compared to a large building with multiple floors and rooms. A floor manager has certain rights and responsibilities for every room on a level, but these do not apply to rooms on other floors of the property.
Role assignments must be made at the correct context level to implement, such a structure. For example, the teacher role should be assigned at the Course context level, the moderator for a particular forum at the Activity context level, the administrator at the System context level, and so on. While it is technically possible to assign any role in any context, some roles just don’t make sense. Unfortunately, Moodle doesn’t warn you about this since it cannot distinguish between intentional and inadvertent assignments.
Contexts are hierarchical; that is, permissions are inherited from higher to lower contexts. Rights in a higher context are more general, whereas those in a lower context are more specific. The same applies to our building analogy – a manager at the building level would have the same rights at the floor or room level, whereas the opposite is not true.
The following diagram shows the contexts that exist in Moodle and how they are arranged hierarchically:
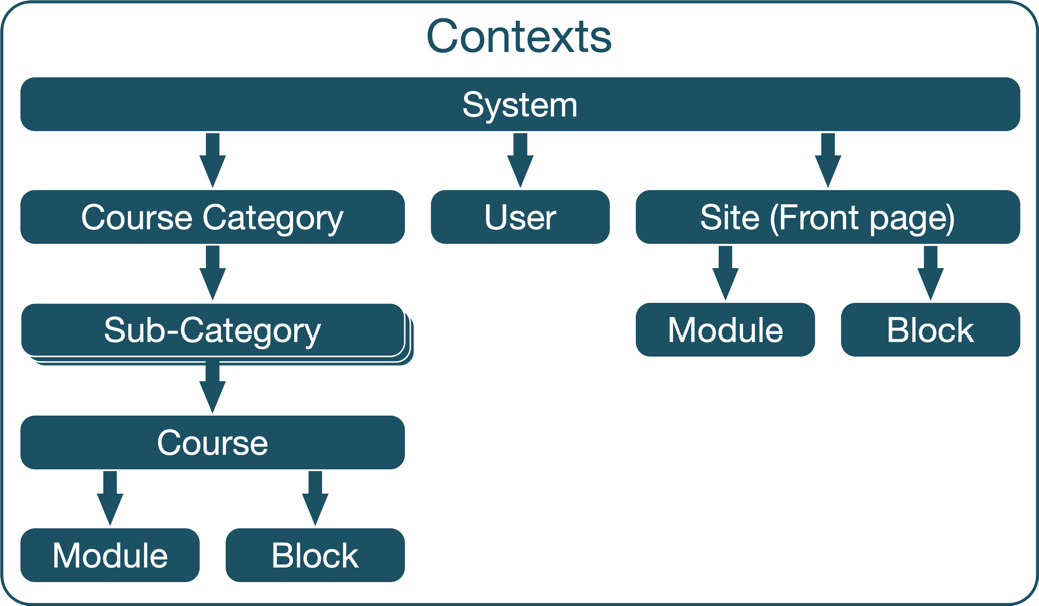
Figure 6.3 – Moodle context hierarchy
The System context is the root node of the hierarchy; every role assigned in this context will apply to any other context below it. The Course Category context on the next level acts as a parent to the Course context. If Sub-Category and Sub-Sub-Category, and so on, have been created, respective contexts will exist. You can see the Module and Block contexts on the lowest level. Like the Course context, the Site context has a Module and Block sub-context. Site refers to the home page and is often referred to as the Front page context for legacy reasons. Internally, Site is treated as a course (with course ID 1). The User context is a standalone entity with no children in the hierarchy.
For example, Jim is a teacher in a course. He is assigned the Teacher role in the relevant context (the class he is teaching), and he will have this role throughout the course, including blocks and activity modules (activities and resources). If, however, Jim had been assigned the Teacher role in the Course Category context instead, he would have the same rights in all the courses in this category and all its sub-categories. Jim will receive emails about all the assignments in all the courses, even if he doesn’t teach them. Not only that, but he will also become a teacher in all future courses created in this category!
Organizing contexts hierarchically has several advantages that will sound familiar to those who know of object-oriented technologies:
- Inheritance: Rights and permissions set at one level are passed down to lower levels, which simplifies maintenance
- Overriding: Rights and permissions can be changed at lower levels
- Extensibility: New contexts might be added in future versions of Moodle, when and if required, without changing any of the existing roles in the system
Now we know what roles look like and which roles Moodle ships with, it is time to assign some roles.
Assigning roles to users
The process of role assignment is similar for each context. What is different is the location of each context and its access method. The process of assigning roles to users will be described first before we outline how and where to assign them in individual contexts:
- Navigate to any Assign roles screen for the required context – for example, Home | Participants | Assigned roles in the Permissions section of the pull-down menu. On our system, you can see that 2 teachers and 18 students have been assigned (only up to 10 names can be displayed):
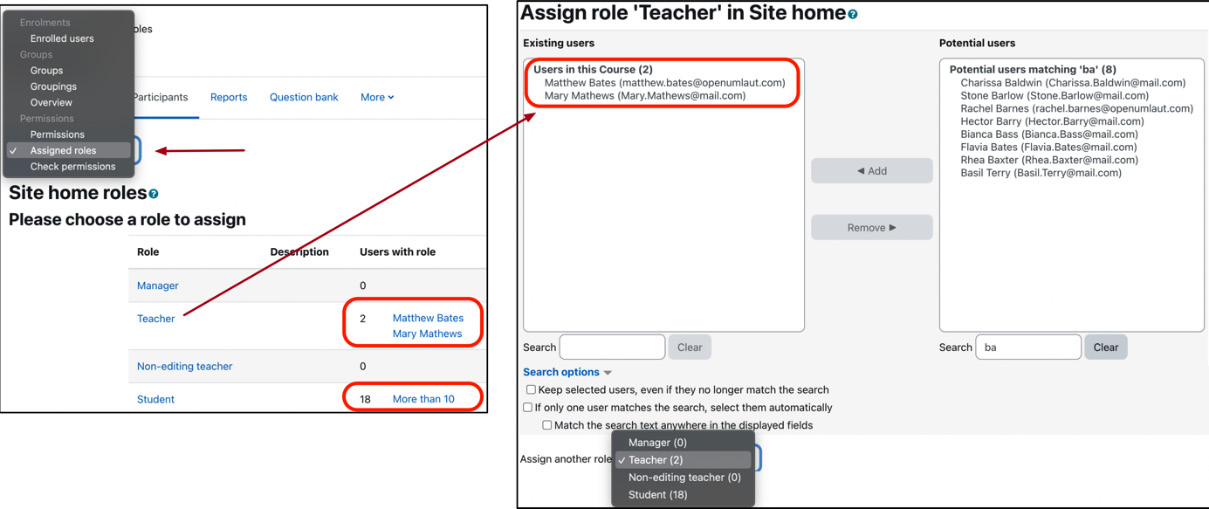
Figure 6.4 – Assigning roles to users
- Select the role you wish to assign a user to by clicking on the role’s name. If there are more than 10 assignees, click on the More than 10 link. You will see the screen shown in Figure 6.4 throughout Moodle whenever you wish to assign users to a role (except in courses, where a different modal interface has been developed).
- Assign the role to users by selecting their names from the Potential users list and moving them to the respective category using the Add button.
- Hold down the Shift key to select a range of users and the Ctrl key (Command key on macOS) to select multiple users.
- To revoke users’ role assignments, select the person from the Existing users list and move them back to the Potential users group by clicking on the Remove button.
Important note
Once a user has been assigned a role, permissions will be granted immediately. There is no need to save any changes.
If your list of potential users contains more than 100 entries, no user names will be shown, and you will have to use the Search box to filter the list of accounts (you can change this value via the maxusersperpage setting in Site administration | Users | Permissions | User options). Moodle uses a live search; as soon as you start typing, the list of users is updated immediately. There are three self-explanatory Search options underneath the left Search box. You might have to expand the area if it is collapsed:
- Keep selected users, even if they no longer match the search
- If only one user matches the search, select them automatically
- Match the search text anywhere in the user’s name
You can switch to the assignments of another role in the current context via the drop-down at the bottom.
Important note
Assigning roles in an incorrect context is a common source of problems. It is highly recommended that you check the current context regularly to ensure no unintended rights have been granted. In other words, test your role assignments thoroughly.
So far, we have dealt with the general concept of contexts and looked at how to assign roles to users within a context. We will now deal with each context, following our Moodle context hierarchy. Let’s start at the top with the System context.
System context
The System context covers the entire Moodle system. Assignment takes place from Site administration | Users | Permissions | Assign system roles. In our system, only two roles appear that can be assigned. We already mentioned that assigning certain roles in certain contexts doesn’t make sense. Inside a role, it is possible to specify in which context roles may be assigned. Only the Manager and Course creator roles have been selected, which is the reason for the limited choice:
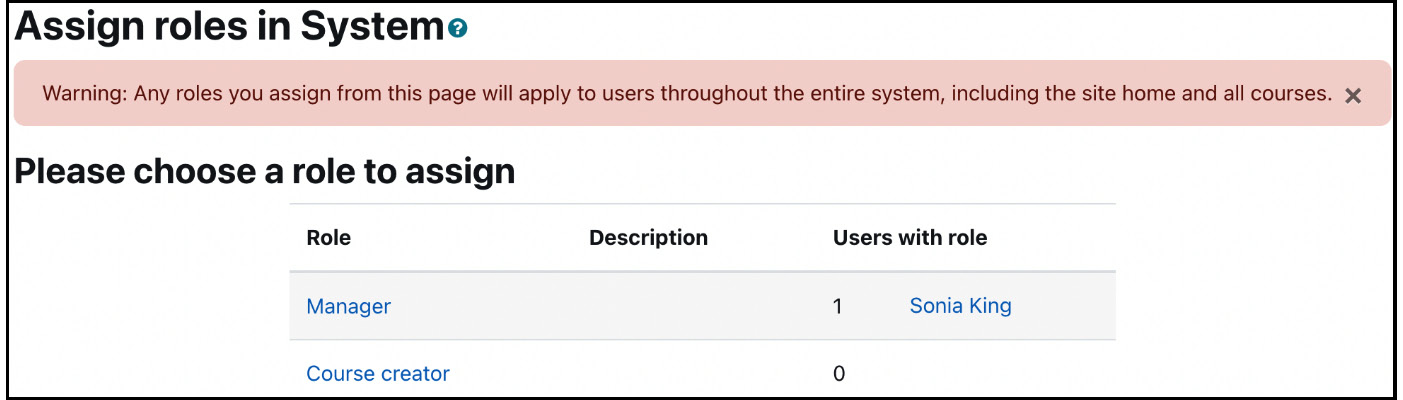
Figure 6.5 – System context
You will see a familiar screen that allows you to assign roles to users. The only difference from the generic screen outlined earlier is the warning, which I can only repeat: Any roles you assign from this page will apply to the assigned users throughout the entire system, including the front page and all the courses.
In most Moodle systems with predefined roles, it only makes sense to assign the Manager role if you wish to allow read-only access to a user for all the courses, such as an inspector, business manager, or school principal. Assigning the Course creator role to a user allows you to create new courses in any category. If, for example, a Teacher role is assigned in the System context, the user is allowed access to every single course on the site and all the courses created in the future!
There are scenarios when global roles are justified, such as in very small organizations or if Moodle hosts only a small number of courses attended by all users. Also, some new user-defined roles, such as school inspector, are designed to be assigned at the global level.
One role that can only be assigned at the system level is the Administrator role. This task has been given a dedicated area under Site administration | Users | Permissions | Site administrators. A primary administrator was created when you installed Moodle, which cannot be modified or deleted. You can, however, create additional administrator accounts. This procedure is identical to assigning users in any other context, except that you must confirm the assignment. Furthermore, you can make any site administrator the main site administrator (via the Set main admin button).
Important note
Make sure you keep the number of Moodle administrators to a minimum! This restraint improves the consistency of your system, increases security, and avoids potential mismanagement of the site.
Moving down one level in the context hierarchy, we reach the Course Category context, which is the topic of the following subsection.
Course Category context
The Course category context covers all the courses within a category and its sub-categories. The role assignment takes place under Site administration | Courses | Manage courses and categories. You must select Permissions in the respective Settings drop-down menu and Assign roles from the familiar dropdown. The same mechanism applies to sub-categories, sub-sub-categories, and so on.
A typical role that’s assigned in the Course category context is the Course creator role. It allows a dedicated user to create new courses within the specified category, often a department or division. The standard Course creator role does not include teacher capabilities; that is, a course creator cannot edit any course content. In smaller organizations, it may be required to grant the Teacher role access to all the courses within the category.
Moving down a level, we reach the Course context.
Course context
As the name suggests, all role assignments in a course are granted in the Course context. The assignment takes place in the actual course, which we already came across in Chapter 4, Managing Courses and Enrolments, when we dealt with enrolments.
Important note
Enrolments in courses are treated as roles in the Course context.
As enrolments contain some unique options (start date, end date, and the suspension option), and because these enrolments are often carried out by (non-technical) teaching staff, a different user interface has been implemented. However, within a course, when you go to Participants | Enrolment methods and then click on the Enrol users icon in the Edit column of the Manual enrolments method, you will see a familiar-looking screen. We covered the additional expiry options shown in the center of the screen when we covered enrolments:
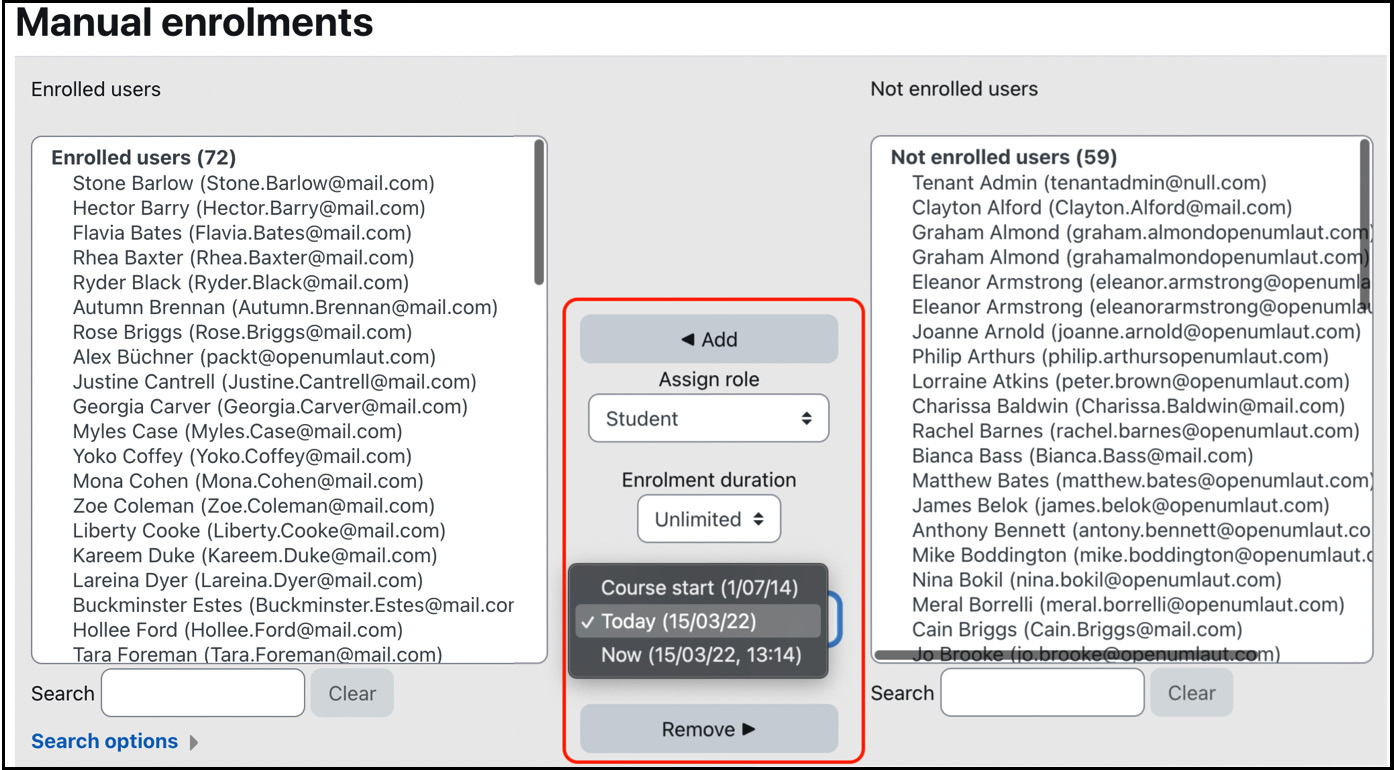
Figure 6.6 – Course context I
When a student is enrolled in a course, either by self-enrolment or any other enrolment mechanism, Moodle automatically assigns the Student role in the relevant Course context. This also applies if you upload users in batch mode and specify a course to which a user has to be enrolled.
If you have to assign roles to users who are not enrolled but have a role in the course, select Other users from the drop-down in the Participants menu and click on the Assign roles button. This applies to the Manager role, for instance, or a newly-created role, such as supervisor teacher. You will see a list of users who are not enrolled in the course but have inherited or assigned roles:
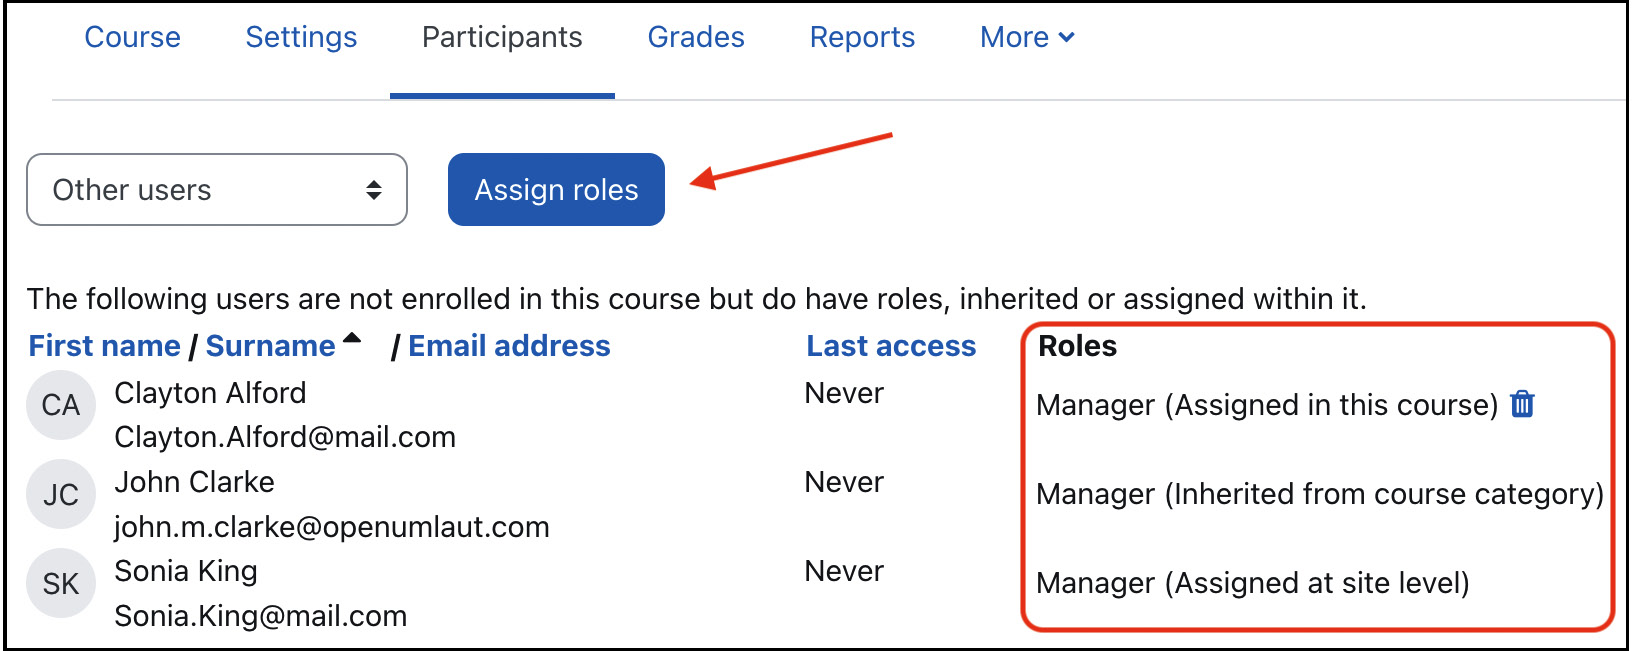
Figure 6.7 – Course context II
There is one level missing in the context level hierarchy, which deals with modules and blocks.
Module context
Once you are inside a course, it is possible to assign roles to users for individual modules – that is, resources and activities. When you select a module, there is a Permissions link in the More menu with three roles-related options. Locally assigned roles will lead to the familiar screen to Assign roles. Permissions and Check permissions let you change the inherited roles and verify the roles of the individual users. We will deal with this later in this chapter:
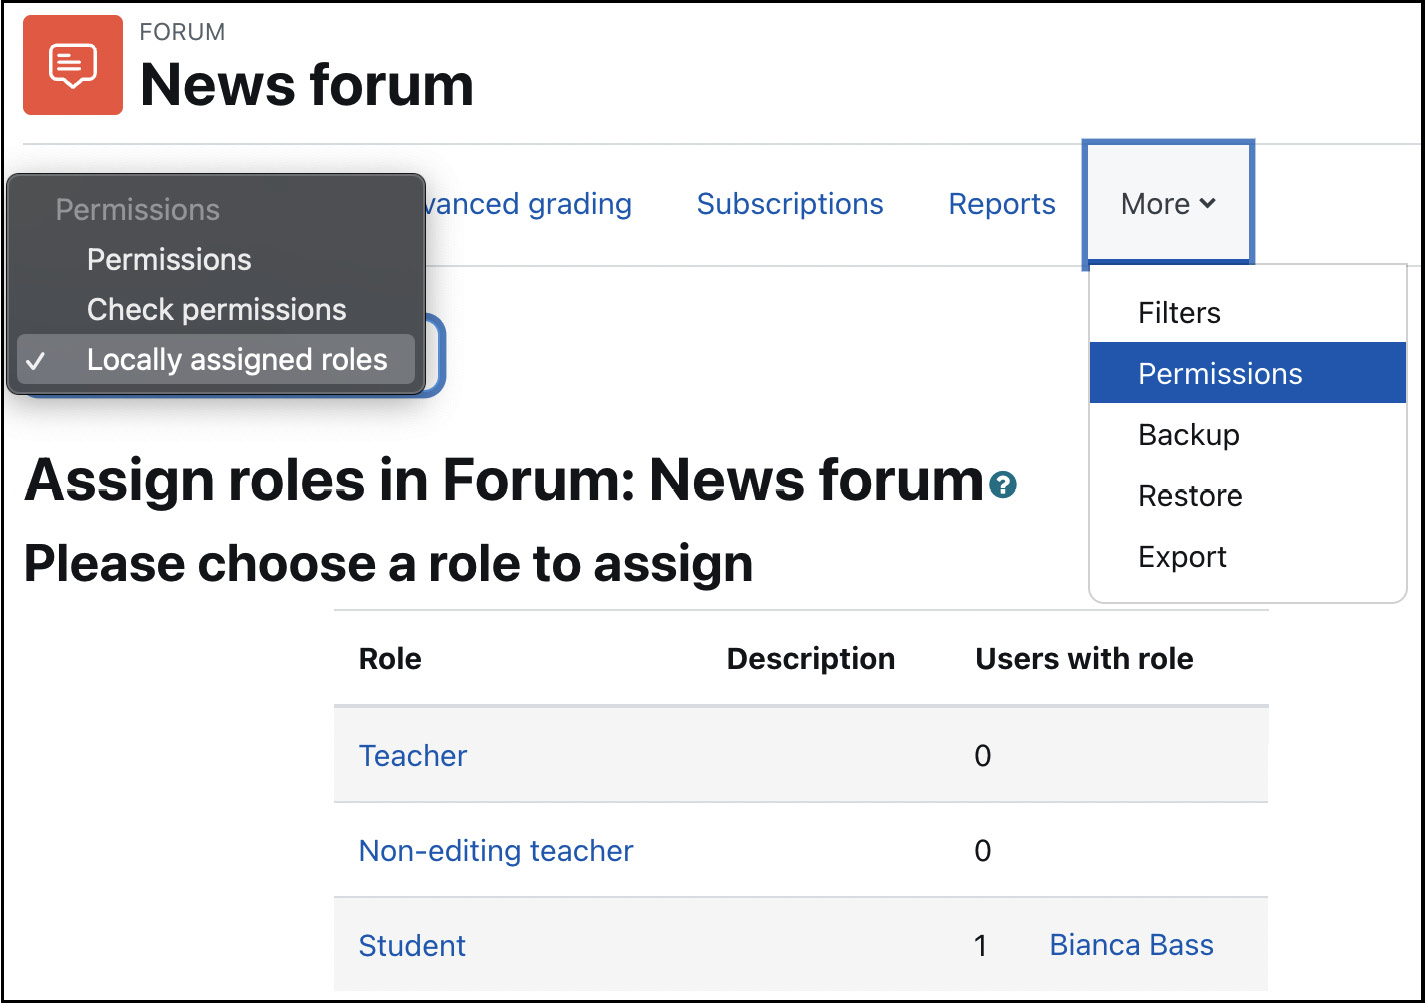
Figure 6.8 – Module context
Teachers often use role assignments in the Module context to grant or revoke additional rights to their students. A regularly cited example is that of a forum moderator. If you wish to put students in charge of a forum to help them learn how to moderate discussions, they require the rights to edit and delete posts (among others). These rights are part of the Teacher role, and it is perfectly feasible to assign a Teacher role to a student in a single activity. Just make sure they cannot grade any exams!
By default, users with a Teacher role have the right to assign roles in the Module context. However, it is often up to the Moodle administrator to carry out the task on their behalf due to the complexity of the roles system. The same applies to the Block context, which will be covered next.
Block context
The Block context allows the rights to be assigned at the block level, which is located within a course’s block drawer. You will see an Assign roles in <blockname> block link in the drop-down menu (editing must be turned on):
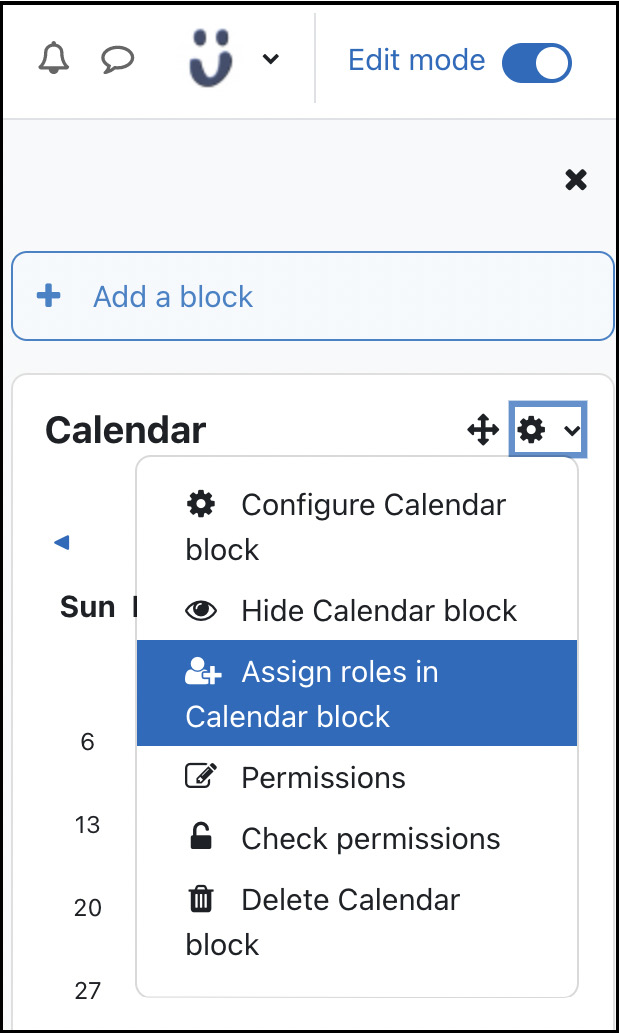
Figure 6.9 – Block context
By default, your system doesn’t contain a role that has been granted rights to be assigned in the Block context; as a result, the link will be hidden. We will deal with modifying roles later on.
It is possible to control the users who can view blocks. Suppose there is a block that guests are not allowed to see. To hide that block, access the Permissions link in the block menu, and delete the Guest role from the moodle/block:view capability. Alternatively, you can select the Guest role from the Advanced role override drop-down list and the mentioned capability to Prevent. We will deal with capabilities later in this chapter.
The same mechanism also applies to blocks throughout the system, whether on the dashboard, the profile page, a course, or inside activities. It also applies to blocks on the home page, which is covered by the Front page context.
Front page context
In Moodle, the home page is covered by the Front page context. The front page is like a course and, at the same time, not like a course. In other words, it is a special course! This idiosyncrasy is also the reason why the Front page context is referred to as the Site course context.
The Front page context has the System context as the parent and, like the Course context, Module and Block as the sub-contexts. This familiar interface can be accessed via the Assigned roles link in the Permissions drop-down in the Participants section.
A typical user in the Front page context is a designer, who is responsible for the layout and content of the front page of the Moodle system. When assigned, only the Front page menu and its submenus are accessible. Most sites apply either the Teacher role or create a dedicated designer role.
User context
The User context is a standalone context with only the System context as the parent. It deals with all the issues relating to users outside courses, and it includes the user’s profile, learning plans, forum posts, blog entries, notes, reports, logs, and grades.
Roles are assigned in the user’s profile, where you must select Preferences from the Administration pane. The Assign roles relative to this user link does not appear by default! You need to have a role that can be assigned in the User context. None of the predefined roles make sense to be applied in such a way, which is why this only applies to user-defined roles. An often-cited example of a custom role to be applied in the User context is the Parent/Mentor role, which we will deal with in the Creating custom roles section later in this chapter:

Figure 6.10 – User context
Roles assigned in the User context will only have access to information that’s accessible from the user screen. They will not have access to any courses.
Moodle also supports assigning roles to cohorts (Site administration | Users | Permissions | Assign user roles to cohort), which effectively automates manually assigning roles in the User context. This feature is useful in setups where supervisors are responsible for groups of learners.
Multiple roles
It is common for users to be assigned to more than one role. For example, a class teacher is also made course creator for the year group they are responsible for (the Course category context), they are in charge of the Moodle administration (Site), they act as a support teacher in a different class (Course), or they are the parent of a child (User). Every logged-in user is automatically assigned the Authenticated user role in the System context. We will deal with this later in this chapter.
A significant part of the roles infrastructure in Moodle is the ability to simultaneously assign multiple roles to a user. In our initial building example, the equivalent is a floor manager in charge of a particular floor level, temporarily covering the ground floor during holidays.
As discussed earlier, the actual context has to be selected to specify an additional role. You will then be able to assign additional roles as necessary.
The problem is the potential for conflicts, which Moodle has to resolve. For example, if one role can delete a forum post and another one doesn’t, but a user has been assigned both roles in the same context, which right applies? While Moodle has a built-in resolution mechanism for these conflicts, it is best to avoid such scenarios altogether.
It is technically possible to assign two or more roles to the same user in the same context. It is hard to think of situations where such a setup would make sense.
Tip
The inner workings of the built-in permission resolution mechanism are well-documented in the Conflict resolution of permissions section at docs.moodle.org/en/Override_permissions.
This concludes this section on role assignments. Roles are made up of capabilities, which we will tackle next.
Understanding capabilities
So far, we have assigned existing roles to users in different Moodle contexts. In the following few pages, we will look inside a role where capabilities dictate what functionality is allowed and what isn’t. Remember, a role is a collection of capabilities with corresponding permissions. Once we have understood capabilities, we can modify existing roles and create entirely new ones.
Role definitions
The existing roles can be accessed via Site administration | Users | Permissions | Define roles. The screen shown is the one from earlier when we explored Moodle’s predefined roles. When you click on a role name, its composition is shown. You might recall the role element shown in Figure 6.1. Let’s zoom in on the role to see what its elements are:

Figure 6.11 – Role structure
Each role contains a unique Short name (utilized in batch operations), a Custom full name, and an optional Custom description. The Role archetype field specifies which permissions are set if the role is reset to its default value. This setting further determines what values any new permissions will have when introduced in future versions of Moodle. These settings will then be applied during the update process.
The Context types where this role may be assigned field is set to the context in which the role will be allowed as an option. This restriction reduces the risk of assigning roles in contexts where they shouldn’t. We encountered this when we tried to assign roles in the Block or User context, and Moodle prevented us from doing so.
The next four fields (Allow role assignments, Allow role overrides, Allow role switches, and Allow role to view) show which roles users assigned the current role are allowed to assign, override, switch, and view, respectively. The Role risks field indicates which of the six available dangers the current role has. All this information will make more sense once we have dealt with roles in more detail.
In addition to these parameters, each role consists of a large number of capabilities. Moodle’s role system currently has approximately 450 (!) of them, and Moodle Workplace adds another 50+. If you have installed plugins, this number might even be higher.
Important note
A capability is a permissible action of a particular Moodle feature.
Each capability represents a legitimate Moodle action and is displayed as a single row in the list of all the capabilities. To simplify searching for capabilities, use the Filter option so that only the capabilities that match the filter criterion are shown (covering the name as well as the description):
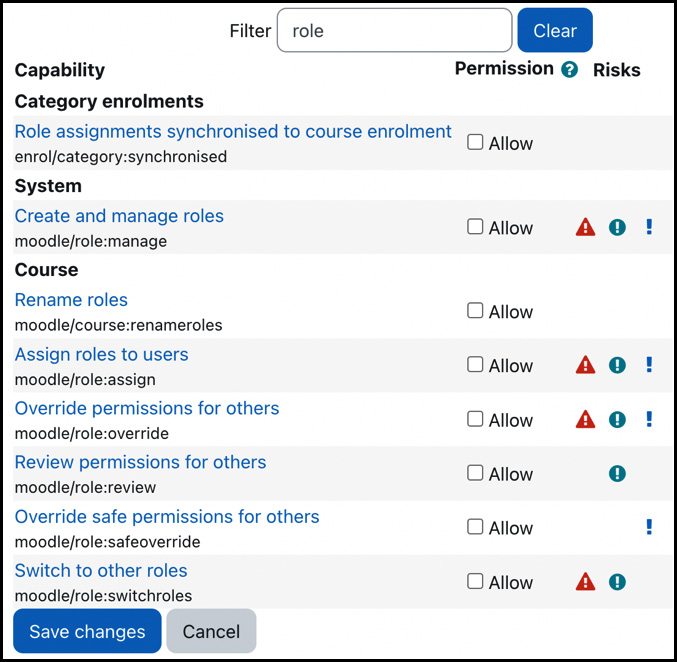
Figure 6.12 – Capabilities
Each capability has the following components:
- Description: The description, for example, Upload new users from file, provides a short explanation of the capability. Clicking a capability opens the online Moodle documentation for that capability in a separate browser window.
- Name: The name, for example, moodle/site:upload users, follows a strict naming convention, level/type:function, which identifies the capability in the overall role system. The level states which part of Moodle the capability belongs to (such as moodle, mod, block, tool, enrol, or wp). The type is the capability class, and the function identifies the actual action.
- Permission: The permission of each capability has to have one of the four values explained in the following table:
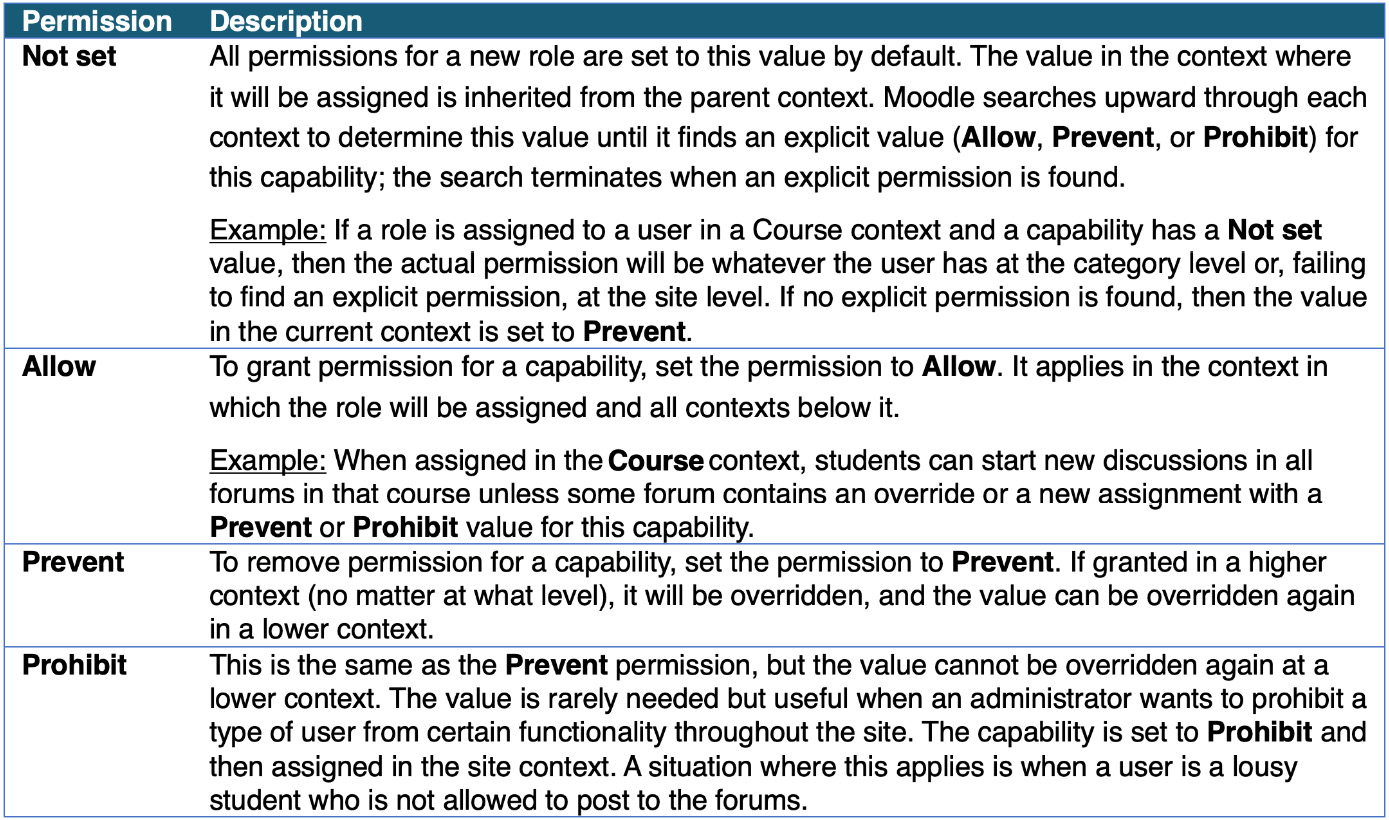
Figure 6.13 – Permissions
Important note
Principally, permissions at lower contexts override permissions at higher contexts. The exception is Prohibit, which, by definition, cannot be overridden at lower levels.
- Risks: Moodle displays the risks associated with each capability – that is, the risks that each capability can potentially raise. They can be any combination of the following six risk types:
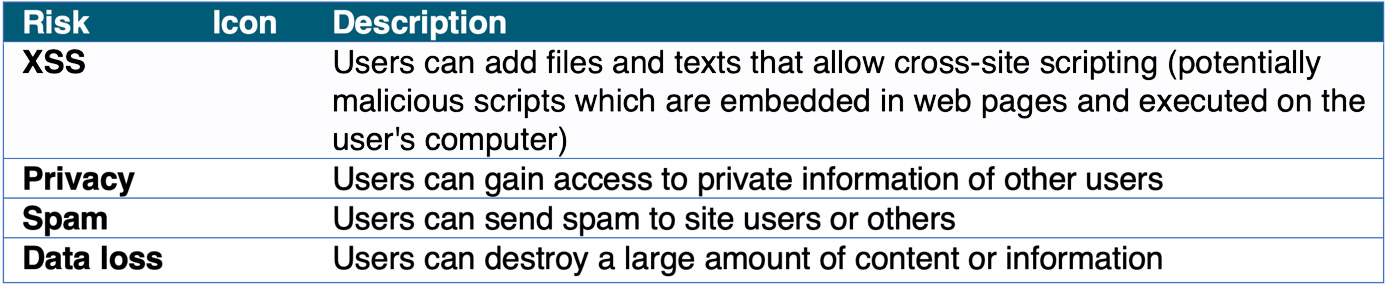
Figure 6.14 – Risks
Important note
Risks are only displayed; it is impossible to change these settings since they only act as warnings. The Risks documentation page is opened in a separate browser window when clicking on a Risk icon.
Moodle’s default roles have been designed with the following capability risks in mind:
- Administrator: All capabilities, with a few exceptions
- Teacher: Certain capabilities with XSS and privacy risks, mainly adding and updating content
- Student: Certain capabilities with spam risks
- Guest: Only capabilities with no risks
Now that we have covered the ingredients of roles, let’s start modifying them.
Modifying roles
To edit a role, click on the Edit button at the top of the view role details screen or select the appropriate icon in the Edit column on the main roles screen:

Figure 6.15 – Role operations
You can change the standard fields and their permissions when editing a role. For example, some schools change the Student role name to Pupil, while some training organizations change Teacher to Instructor. In Moodle Workplace, the two roles have been relabeled to Learner and Trainer, respectively. Bear in mind that this only changes the name of the role, not the corresponding labels used throughout Moodle. You will learn how to do this in the Managing localization section in Chapter 10, Configuring Technical Features.
When you change capabilities in a role derived from a Role archetype, its original values are highlighted when you click on the Show advanced button. For example, if your organization decides not to allow users to see the profiles of other users due to privacy or other reasons, you would edit the Student role, search for the moodle/user:viewdetails capability, and change it from Allow to Not set. Now, Not set is selected, but the Allow value remains highlighted; do not forget to save your role changes once applied:

Figure 6.16 – Role operations
Unless you are confident with role modifications, it is recommended to duplicate a role first (via the Export functionality at the top of the screen in Figure 6.16 and by creating a new role described further down) and then edit it. Keeping the default roles untouched makes maintenance more manageable if multiple administrators work on the same system or a third party provides support.
Important note
It is not possible to modify the Administrator role via the Moodle interface.
Modifying roles can often be avoided using the role’s overriding mechanism, which we will cover in the next section.
Overriding roles
It is possible to override the permissions of a role in a given context. Picture the context hierarchy where a role definition has taken place at the top level. At a lower level, say category or course, you now wish to modify the permissions of that role. Role overrides facilitate precisely that.
Important note
Overrides are permissions designed to change a role in a specific context, allowing you to tweak your permissions as required. Tweaking involves granting additional or revoking existing rights.
Using the Permissions link in the familiar dropdown with the same name, you can see which role has been given or has inherited which permission for any of the capabilities of the current context (here, an assignment in the Module context):
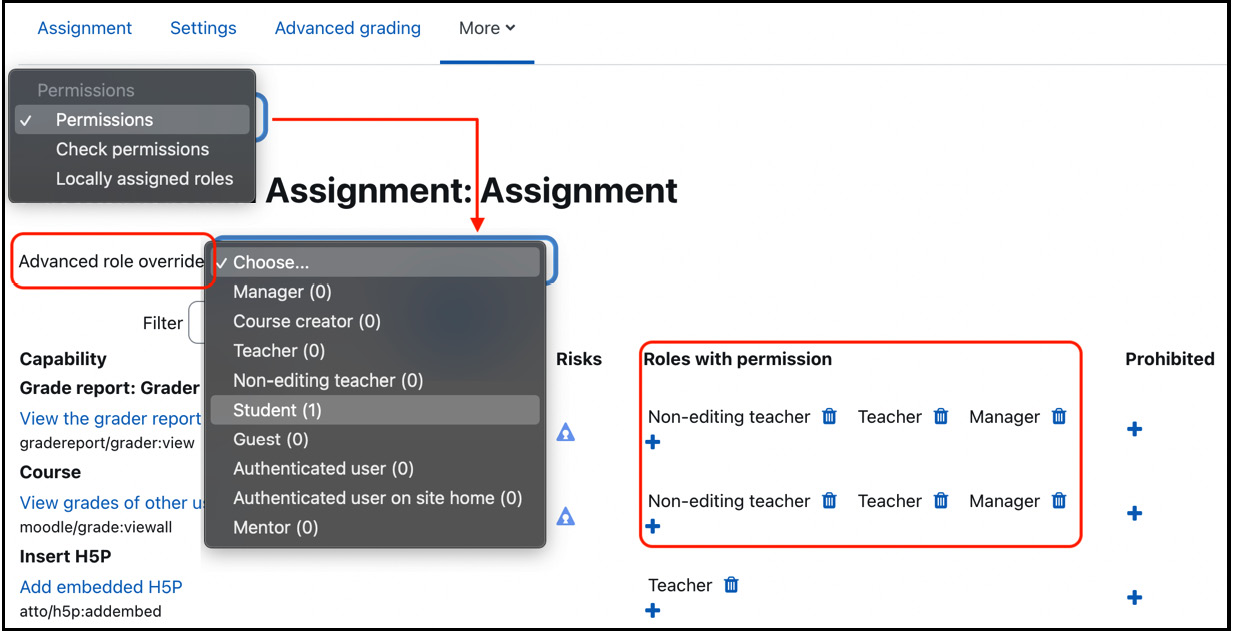
Figure 6.17 – Overriding roles I
The number shown in brackets indicates the number of overrides for each role. In the Roles with permission column, you can remove a role for each capability (using the standard Delete icon) or select a role to be added to the list of allowed roles (via the + symbol). The same applies to the Prohibited column.
Once you select a role from the Advanced role override dropdown, you will see a screen that shows details of each activity capability for this particular role. Overrides can now be used to open up areas in that context to grant extra permissions to users. Suppose you want to experiment with giving students the ability to grade some assignments; you would change the corresponding capability (mod:assign/grade) from its inherited value of Not set to Allow:
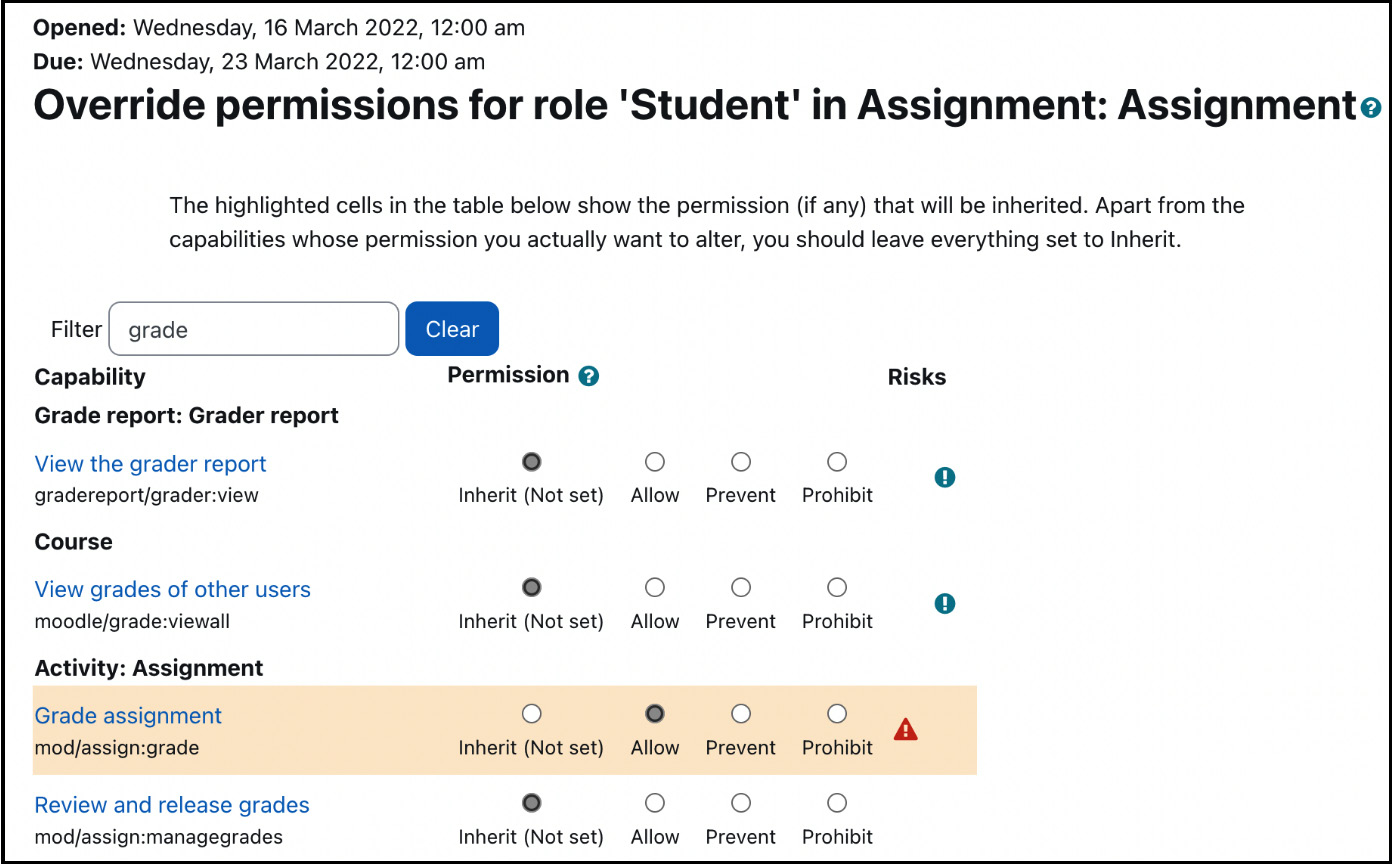
Figure 6.18 – Overriding roles II
Any changes to the roles system are highlighted, and datetime stamps are shown at the top of the screen.
Overrides can also be used to deny functionality in that context and remove permissions from users. For example, while learners with the role of student in a course are usually allowed to start new discussions in forums, there is one particular forum for which you want to restrict that capability: you can set an override that prevents the capability for students to start new threads in this forum (mod/forum:startdiscussion).
So far, we have understood the composition of roles and learned how to modify and override capabilities at different levels in the context hierarchy. Now, it is time to create our first custom role.
Creating custom roles
Moodle allows you to create new roles. Examples of such custom roles are parent, teaching assistant, secretary, inspector, and librarian in an educational setting and training coordinator, assessor, mentor, or staff manager in a business context. New roles can be defined by going to Site administration | Users | Permissions | Define roles and using the Add a new role button.
Before you get to the familiar role-editing screen, you have three options to choose from:
- Use role or archetype: Using an existing role or role archetype as a basis is commonly used to create a new role. It minimizes the amount of work required and reduces errors in creating new roles.
- Use role preset: Import a role (in XML format) that has been exported either in your Moodle instance or another system (using the Export button when viewing role details).
- No selection: Create a role from scratch without any presets or inherited archetypes:
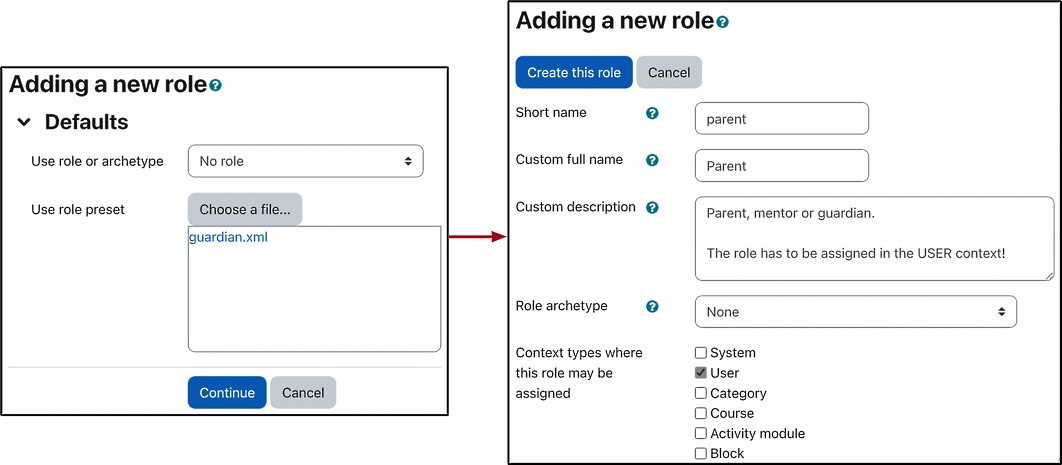
Figure 6.19 – Adding a new role
Make sure that you specify Context types where this role may be assigned. If you miss a context, assigning the role will not be possible. If you allow a context that is not suitable for the role, you run the risk that it will potentially cause problems.
Let’s look at some example roles you might want to add to your Moodle system.
Example roles
Moodle Docs has provided several sample roles that might be relevant to your organization (docs.moodle.org/en/Creating_custom_roles). If not, they offer a good starting point for you to create other roles. Some valuable examples are as follows:
- Calendar editor: This role enables users to add site events to the calendar (for more details, refer to docs.moodle.org/en/Calendar_editor_role)
- Demo teacher: This role is used to provide a demonstration teacher an account that has a password and profile that cannot be changed (docs.moodle.org/en/Demo_teacher_role)
- Forum moderator: This role is used in a particular forum and allows users to edit or delete forum posts, split discussions, and move discussions to other forums (docs.moodle.org/en/Forum_moderator_role)
- Learning plan viewer: This role allows teachers to view their students’ learning plans (docs.moodle.org/en/Learning_plan_viewer)
- Question creator: This role enables students to create questions for use in quizzes (docs.moodle.org/en/Question_creator_role)
- Question sharer: This role allows teachers to access and share questions at the category or site level (docs.moodle.org/en/Question_creator_role)
One prominent entry that’s missing from the list is the infamous parent or mentor role, which we will be creating step by step in the following subsection.
The parent/mentor role
One of the most popular and sought-after custom roles in Moodle is the one of a parent, guardian, or mentor. The idea is to grant permission to users to view certain profile information, such as activity reports, grades, learning plans, blog entries, and forum posts regarding their children, wards, or mentees. It also allows the assignee to consent to policies on someone’s behalf (see Chapter 14, Complying with Data Protection Regulations). Furthermore, the specially-introduced Mentees block has to be placed on the front page to give users who have been assigned the role access to the User context.
To create a new role, follow these steps:
- Go to Site administration | Users | Permissions | Define roles.
- Click Add a new role, continue to the next screen, and name it Parent or Mentor. Provide an appropriate Short name and Custom description.
- Leave the Role archetype type set to None and select the User checkbox for the Context types where this role may be assigned field.
- Change the capabilities shown in the following screenshot to Allow:
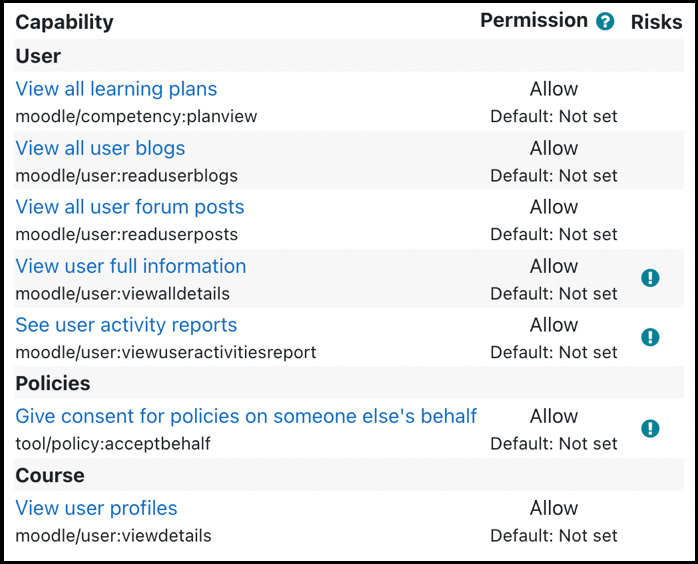
Figure 6.20 – Modified capabilities for the parent role
- Save the role using the Create this role button.
- Each parent requires a separate user account, which must be created either manually or in bulk. In our example, the caring and loving father is Ozzy Harris, and his children are Kelly Harris and Jack Harris:
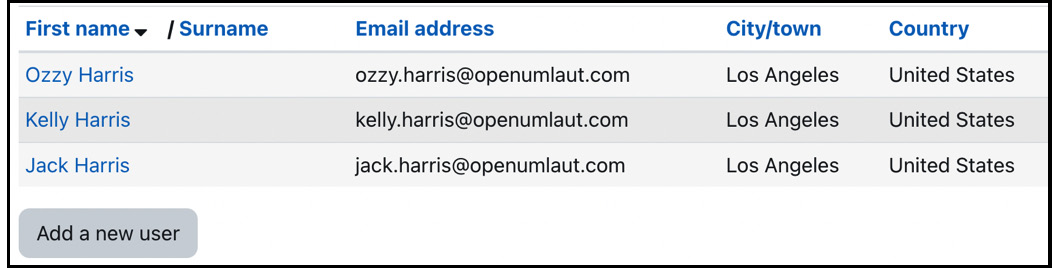
Figure 6.21 – Parent and children accounts
- Each parent must be linked to each child (again, manually or in batch). To do so, follow these steps:
- Access the first child’s profile page, select the Preferences link in the Administration pane, and click on Assign roles relative to this user.
- Choose Parent as the role to assign.
- Select the parent (Ozzy Harris) from the Potential users list and add him to the Existing users list. Repeat these steps for all kids.
If a mentor has many mentees, you can add them to a cohort and automate the role assignment (Site administration | Users | Permissions | Assign user roles to cohort). While this is unlikely to happen in a family context, it might be helpful in other setups, such as supervision. We covered this option when we dealt with user contexts earlier.
- A special Mentees block has been introduced to facilitate access to user information:
- Go to your home page and switch to Edit mode.
- Add the Mentees block to the block drawer (it can also be added on the default dashboard) and change its title to Parent access via the Configuration icon.
- Log in as Ozzy Harris; you should see the following block:
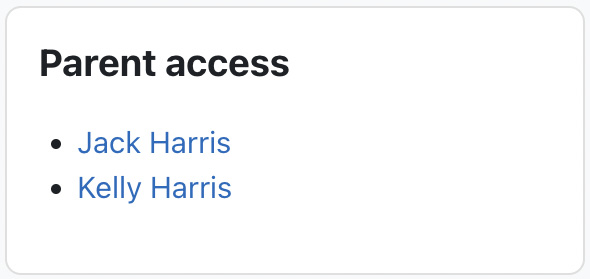
Figure 6.22 – Mentees block
When a name is clicked, the respective user profile will be shown, including posts sent to forums, learning plans, blog entries, and activity reports, including logs and grades.
The creation of the parent role hopefully demonstrates not only the potential but also the versatility and complexity of custom roles. Therefore, you must test new roles diligently.
Testing new roles
After creating a new role, it is recommended that you create a test account and assign the new role to it in all supported contexts. Log out as an administrator and log in as the newly created user to test the new role or use the Login as function to masquerade as the test user. Alternatively, use a different browser to test the role without logging out as an administrator.
Important note
It is highly recommended to test new roles thoroughly before assigning them to any users.
If you have modified a predefined role and would like to roll it back to its factory settings, go to Site administration | Users | Permissions | Define roles, select (do not edit) a role, and click the Reset button. This will replace its existing values with the ones from the built-in capabilities.
The complexity of the roles system and the ability to assign multiple roles to multiple users in multiple contexts calls for a mechanism to verify the correctness of the permissions set. This problem is amplified by the fact that permissions can be inherited and then overridden at lower levels again.
Moodle has a built-in permission checker that displays the values of any capability in the context in which the checker has been initiated. You can access this facility via the Check permissions link in a specific context. For example, in the following screenshot, we have called the permission checker in the User context of Kelly Harris and showed the permissions of user Ozzy Harris (go to Kelly’s profile, follow the Preferences link in the Administration block, and select the Check permissions link in the Roles block. Then, select Ozzy and Show this user’s permissions). It confirms the settings of the previously created Parent role:
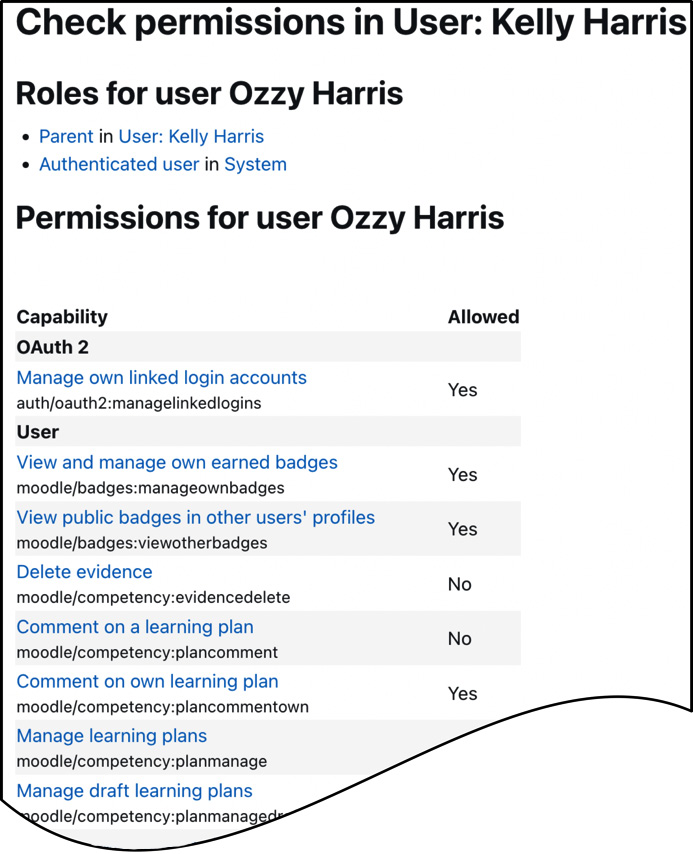
Figure 6.23 – Permission checker
At the site level, two additional mechanisms help identify any potential issues with roles. The capability report (Site administration | Users | Permissions | Capability overview) shows, for a selected capability, what permission it has in the definition of one or many selected roles. It also shows if the capability has been overridden anywhere in the system, which is a great help when you are trying to locate local modifications.
In the example screenshot, I have picked the mod/assign:grade capability, selected All roles, and filtered the results to Show differences only. The following report shows the capability’s values in all the roles. Of particular interest is the Student role in the assignment context, where it has been overridden:
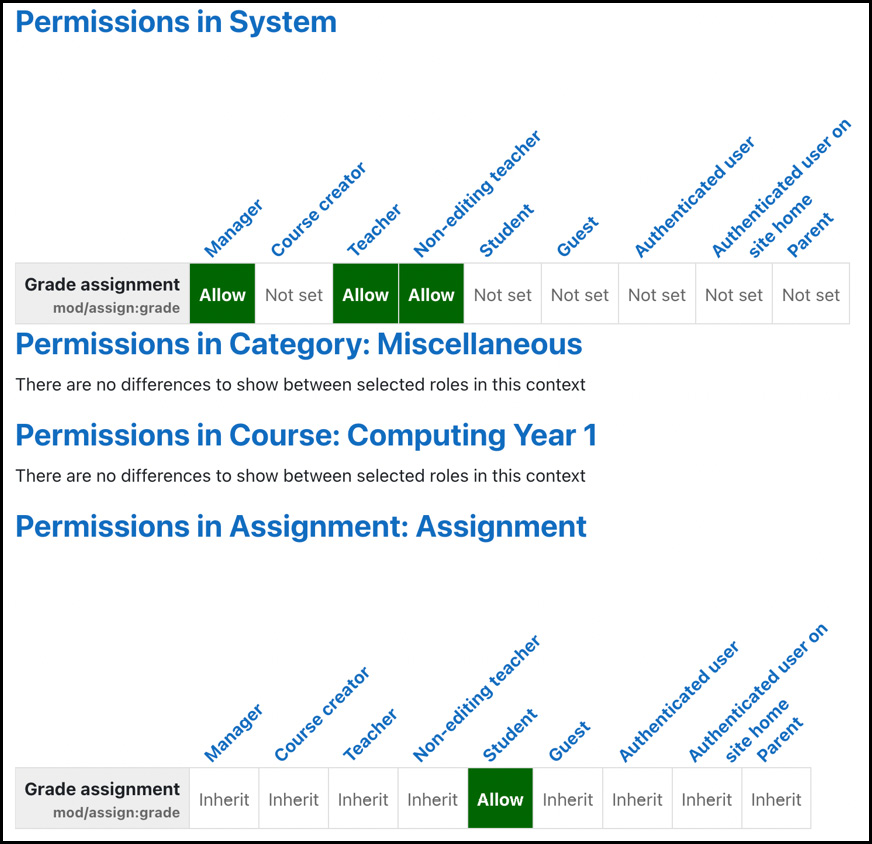
Figure 6.24 – Capability overview
The second tool can be found at Site administration | Users | Permissions | Unsupported role assignments. As the name suggests, it lists any invalid role assignments that can occur when upgrading from a previous version of Moodle. If any assignments are listed, you will have to modify or remove them manually.
This ends this section on creating and testing new roles. We will conclude this chapter with some miscellaneous roles-related features that didn’t fit any of the previous sections.
Roles and context management
We have now dealt with the essential tools so that we can use, modify, and create roles. Moodle offers some crucial features when working extensively with roles, which we will cover in this section. We will deal with role assignments and override allowances before assigning default roles. Then, we will learn about context freezing and conclude with best practice advice.
Allowing roles assignments and overrides
By default, some roles have the right to allow other roles to assign roles. For instance, a teacher is allowed to assign Non-editing teacher and Student roles, whereas the manager is allowed to assign all the roles except the Guest, Authenticated user, and Authenticated user on site home roles (these are automatically assigned when a user signs in for the first time). There will be instances when you wish to change the default settings; for example, a teacher should be allowed to assign roles to other teachers or when the newly created roles have to be managed. To achieve this, select the Allow role assignments tab by navigating to Site administration | Users | Permissions | Define Roles:
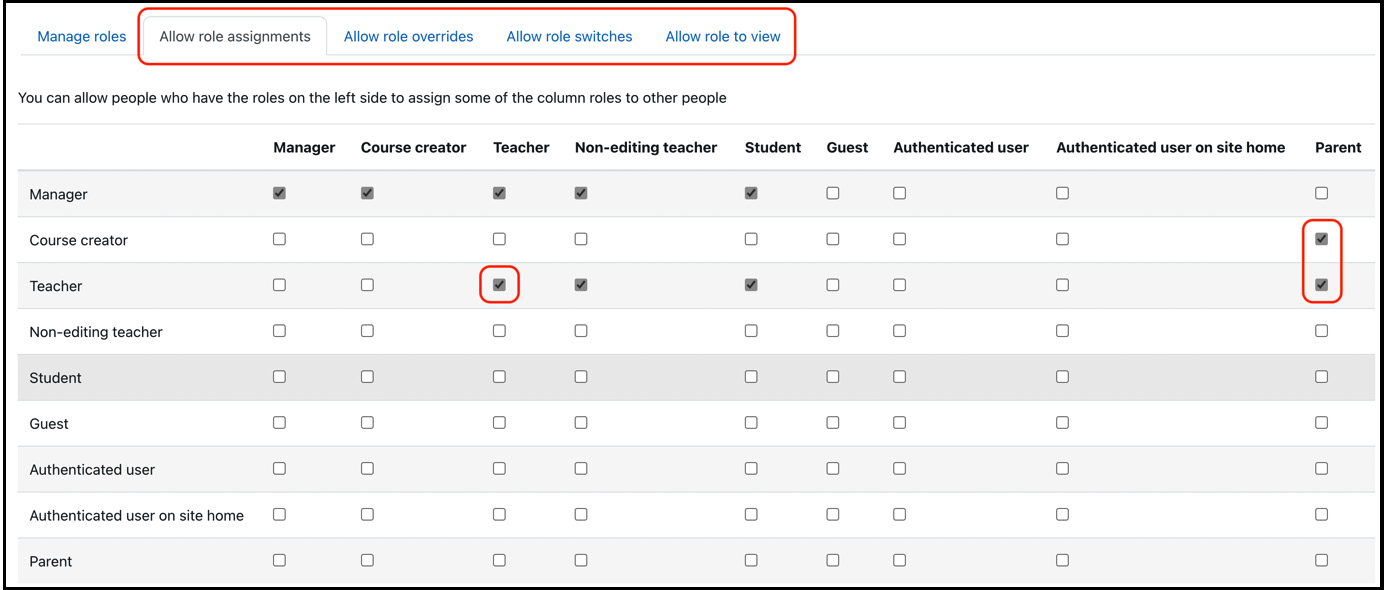
Figure 6.25 – Allowing role assignments
In the preceding screenshot, the modified allowances have been highlighted. Teachers can assign the Teacher role, and both course creators and teachers can assign the new Parent role.
An identical mechanism exists for role overrides, role switches, and role viewing. They can be accessed via the Allow role overrides, Allow role switches, and Allow role to view tabs on the same screen, respectively.
Assigning default roles
In certain situations, standard roles are assigned automatically. These can be specified in the User policies section under Site administration | Users | Permissions:

Figure 6.26 – Default role assignments
The preceding screenshot shows the assignment of the default Role for visitors (users who are not logged in) and Role for guest.
Moodle comes with a predefined role called Authenticated user – that is, Default role for all users. It is assigned to every logged-in user, in addition to any other roles. This role has been created to grant users access to certain functionality, such as posting blog entries, managing personal calendar entries, changing profile fields, and so on, even if they are not enrolled in a course.
You can further specify what role is given automatically (via the Creator’s role in new courses drop-down list) to users who have created a course but don’t have any permissions yet in the course. An equivalent setting exists for users restoring courses from backups called Restorers’ role in courses (see Chapter 16, Avoiding Sleepless Nights – Moodle Backup and Restore).
Important note
Changing the User policies settings can significantly impact what new users are allowed to do on your Moodle system, so double-check the default roles before they are applied!
In addition to the default roles in the User policies section, it is possible to specify a default home page role, which can be set by going to Site administration | General | Site home | Site home settings. The Default site home role field can be set to enable logged-in users to participate in activities on the front page, usually Student or Teacher. It is also possible to allow the logged-in users to participate in these activities by setting an authenticated user role override.
Next up is context freezing, which effectively puts content in a context in read-only mode.
Context freezing
Context freezing allows administrators or those with the relevant capability to make course categories, blocks, courses, or modules read-only; that is, users cannot modify or add to the content anymore.
Go to Site administration | Development | Experimental | Experimental settings and enable this feature to enable context freezing. Administrators can always modify frozen content unless the Context freezing applies to administrators setting is enabled:
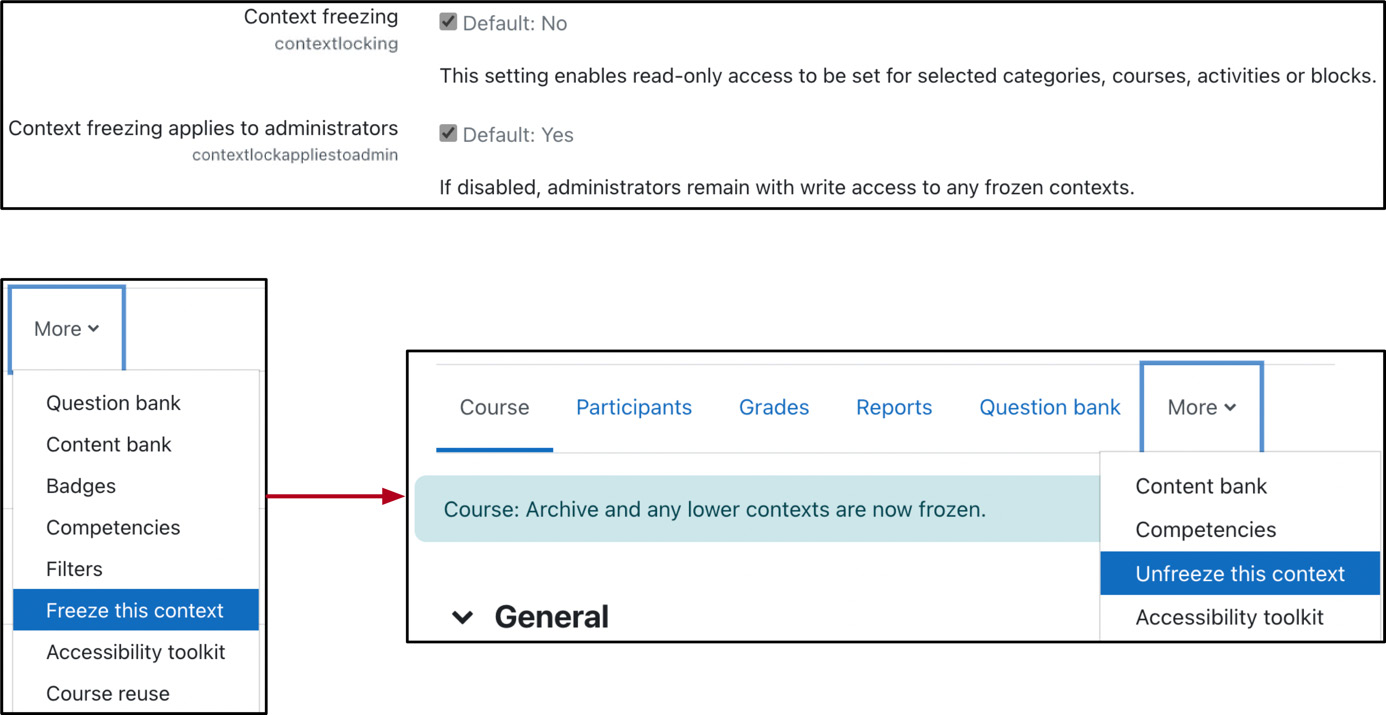
Figure 6.27 – Context freezing and unfreezing
Once a user has been granted the moodle/site:managecontextlocks capability, they can use the context freezing feature in the course, front page, and category context. For example, teachers may lock courses once they are over, or they may close forums when discussions are to be ended. This locking can also be reversed via the unfreeze option.
At the time of writing, context freezing has been an experimental feature, but it is expected to leave its trial phase shortly.
Moodle role assignment – best practices
Roles sometimes cause problems in Moodle sites, and it is therefore advised to follow some recommendations regarding roles:
- Only touch the roles once you have understood them thoroughly
- Never grant users a role that is beyond their competence
- Avoid assigning multiple predefined roles to users when possible
- Avoid system roles as much as possible
- Avoid creating too many new roles
- Avoid role assignments that don’t make sense
- Keep track of role assignments to ensure maintainability in the future
- Do not change the permissions of predefined roles
- Test role modifications and new roles intensively
This list also serves as a good summary of this chapter as it touches upon the most covered topics.
Summary
In this chapter, you learned what roles are and how they are applied in different contexts. We covered modifying existing roles before creating custom roles such as parent, inspector, and librarian. Finally, we looked at managing administrative role-related settings, including context freezing.
Getting your head around the concept of roles is vital if you wish to add, modify, or remove functionality for a distinct group of users. There is always a trade-off between the complexity of such a system and its flexibility. While you can argue about the user-friendliness of the roles system, it has undoubtedly proven to be one of the most powerful concepts in Moodle.
The interconnectedness between courses, users, and roles is crucial. Once this has been set up and configured correctly, your Moodle is technically ready to take off. However, before that, you probably want to change its look and feel first. This is what the next chapter is all about.