
19
Setting Up Moodle Networking
Moodle provides a unique feature that lets you network multiple Moodle sites. This networking functionality is useful in several contexts – for example, when you want to share resources with remote LMSs, partner with another organization, or have a multi-campus setup where each site has its own Moodle instance.
After providing an overview of Moodle networking (MNet), we will learn which networking components are required and how networking is enabled. Next, we will will learn how to link two Moodle sites, which entails setting up peer-to-peer connections, roaming across instances, configuring remote authentication and enrolment, and using the Networks server block. Lastly, we will learn how to connect multiple Moodle sites to a central MNet hub.
We will finish this chapter with a new platform closely related to MNet known as MoodleNet, a platform for finding, sharing, and curating open educational resources. You will learn how to enable MoodleNet so that your educators can make use of it.
We will cover the following main topics in this chapter:
- Configuring Moodle networking prerequisites
- Setting up peer-to-peer networks
- Setting up a Moodle hub
- Enabling MoodleNet
Understanding Moodle networking
Learning management systems are usually standalone systems. But learning is a lot about communication and collaboration, and MNet overcomes this limitation by providing a powerful facility to establish logical links among multiple Moodle sites.
Moodle Docs contains a very well-written page on MNet, and this chapter follows the document in part: docs.moodle.org/en/MNet.
The following two networking topologies are supported:
- Peer-to-peer: This layout connects two Moodle systems directly. This topology is favorable if you have two partnering organizations or one site that offers courses in which students from another site wish to enrol.
- Moodle hub: A hub is a Moodle server (known as the MNet hub) that’s been configured to accept connections from other Moodle servers and provide services to users of these remote servers. This topology is favorable if you have a portal for sharing learning resources or courses.
The two topologies are not mutually exclusive and can be mixed in the same network, as visualized in the following diagram. All participating Moodle instances connect to a central hub, and the two Moodle systems on the left have established a peer-to-peer connection:
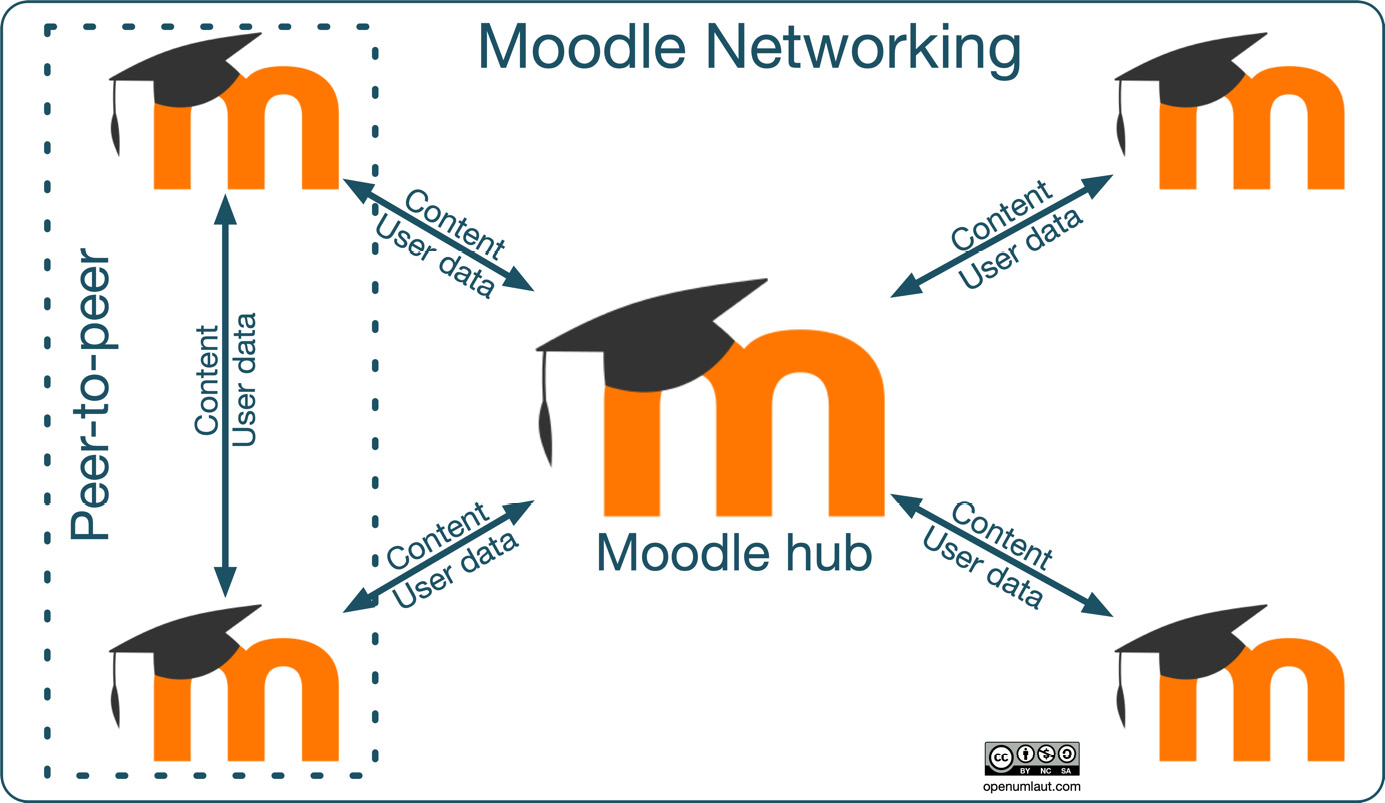
Figure 19.1 – Moodle networking topologies
MNet supports single sign-on (SSO), which provides seamless integration of multiple Moodle systems. Security is guaranteed by fully encrypting authentication and content exchanges.
Information
MNet has been designed for Moodle-Moodle pairing. The plan is to replace MNet in the future with OAuth2 (for authentication) and web services (for communication and data exchange).
Now that we’ve covered some networking prerequisites and security issues, let’s learn how to set up peer-to-peer networks and an MNet hub.
Configuring Moodle networking prerequisites
MNet requires three additional components to be installed on all participating servers that deal with secure communication and safe data exchange.
Checking the required PHP extensions
The following elements must be installed on all Moodle servers participating in the network:
- curl: A PHP library of calls designed to safely fetch data from remote sites. If not installed, you must recompile PHP and add --with curl when running configure.
- openssl: The OpenSSL PHP library provides encryption functionality without the need to purchase an SSL certificate (--with openssl).
- xmlrpc: A PHP library that supports remote procedure calls via XML (--with xmlrpc).
It is possible to add trusted hosts to Moodle, which allows them to execute calls via XML-RPC to any part of the Moodle API. Trusted hosts are potentially very dangerous and are only meant for developers; we will not be dealing with this functionality here:

Figure 19.2 – Moodle networking prerequisites
To check that the required PHP extensions have been installed, go to Site administration | Server | Environment and ensure the status for all three components is OK.
Enabling Moodle networking
The aforementioned PHP extensions ensure secure communication and that data is safely transmitted between participating sites. Moodle will generate a certificate to encrypt the communication, which is done via PHP using the certificate mentioned earlier.
Once networking has been enabled, Moodle generates a public/private key pair using OpenSSL. When you later connect to another Moodle site (which also has a set of keys), the public key is exchanged, and you will have to confirm that your site will trust this public key. When the two sites exchange data, the sender will sign each request using their private key and encrypt the message with the recipient’s public key. The receiver, who is the holder of the sender’s public key and its private key, will be able to decrypt the message and execute the request. So much for the theory. Now, back to the real world.
To activate Mnet, go to Site administration | General | Advanced features and turn on Networking, which will add the Networking menu to the site admin menu. This step has to be performed on all participating servers in the Moodle network.
Go to Site administration | Networking | Settings, where you will see the public key created by OpenSSL:
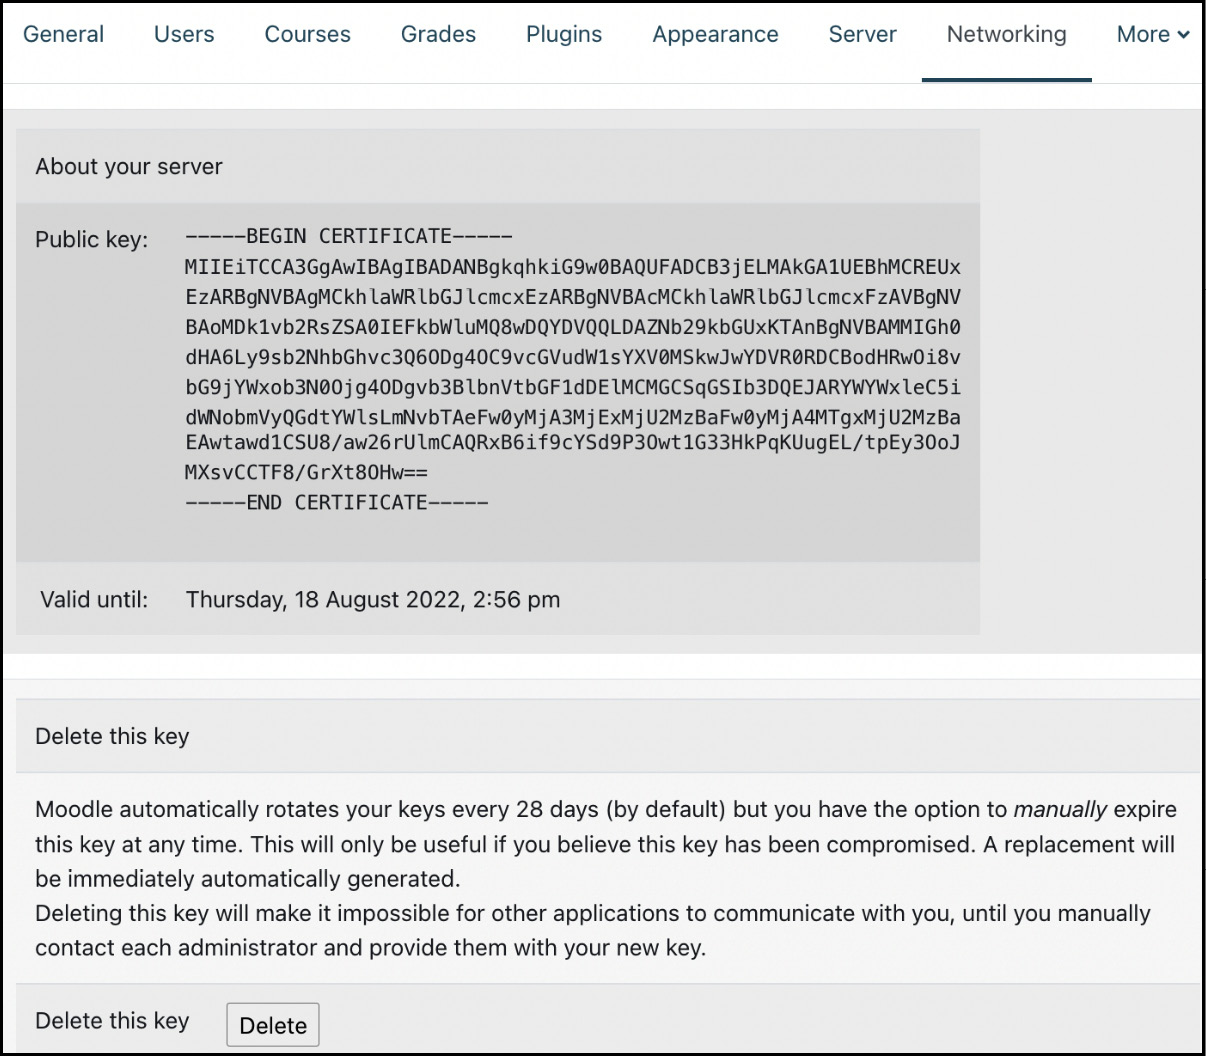
Figure 19.3 – Moodle networking public key
The key has an expiry date that is 28 days from creation; after this, a new key is created (key rotation). The key can be renewed manually by using the Delete option on the same screen.
Important note
The key expiry duration cannot be changed via a Moodle parameter; however, it can be changed via a configuration setting (see the Appendix, Configuration Settings). Add $CFG->mnetkeylifetime=365 to config.php to increase the expiry period to a full year to avoid regularly having to renew keys.
Now that MNet has been enabled and the public key has been generated, it is time to get the servers talking to each other.
Setting up peer-to-peer networks
This section deals with peer-to-peer networks, where two Moodle servers are connected.
For demonstration purposes, we have set up two local sites (two peers); one is located at localhost:8888/one and the other is located at localhost:8888/two.
The two sites do not have to be in the same domain or organization. For example, two universities or two high schools might want to offer a collaborative course. They both have their own Moodle system in their domain, and they both control who gets access to which part of their site.
If your two sites are hosted in the same top-level domain, and you are accessing both sites from the same web browser simultaneously, change the cookie prefix of one site (Site administration | Server | Session handling) to avoid any conflicts.
Adding network peers
Go to Site administration | Networking | Manage peers and add a new remote host you want to connect to. We are currently working on localhost:8888/one; to establish a link to the remote server, we have to enter localhost:8888/two. Then, perform the equivalent step on the other host:
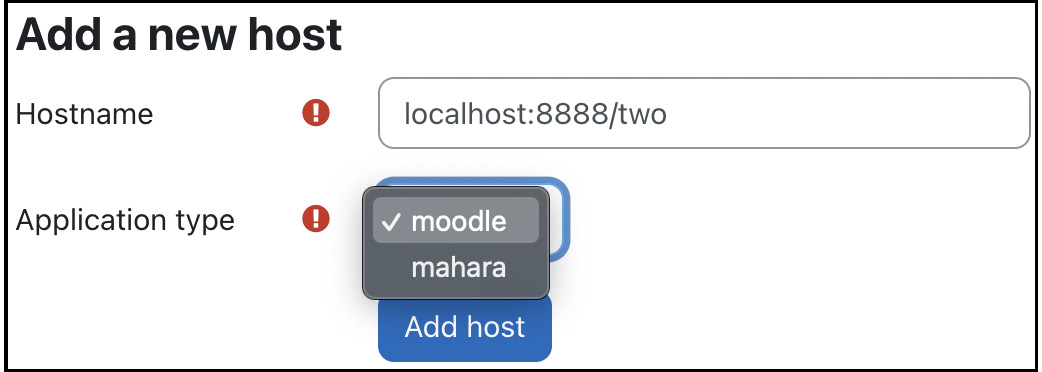
Figure 19.4 – Adding a peer I
The pull-down menu offers an additional Application type: mahara. We won’t cover the integration with Mahara here and leave this setting as-is (moodle).
Information
Mahara is an open source ePortfolio system that can be integrated via MNet. The integration between Moodle and Mahara has been affectionately named Mahoodle, which has been documented in great detail at wiki.mahara.org/wiki/System_Administrator’s_Guide/Moodle//Mahara_Integration.
Once the host has been added, the Site, Hostname, and Public key details are retrieved automatically. The SSL verification parameter determines the level of security; it is recommended to leave this at its default value of Verify host and peer. Optionally, select Force theme that will be used when roaming:
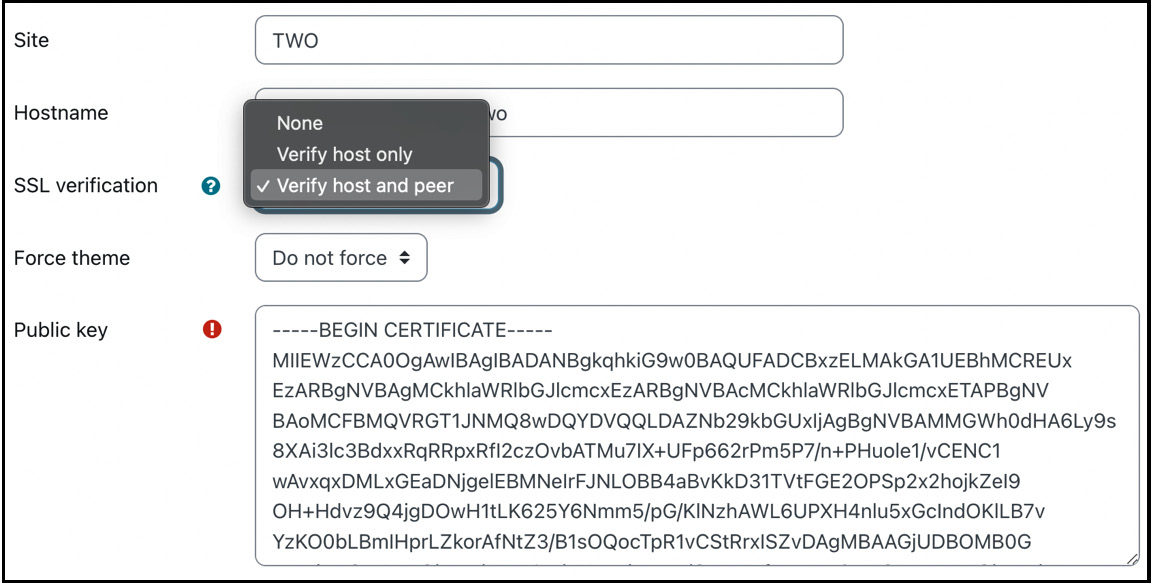
Figure 19.5 – Adding a peer II
Once the peer details have been saved, certificate details of the remote server are displayed. You will also see the following three tabs at the top of the screen:
- Review host details: We just dealt with the details of the peer connection. You can always return to this screen by selecting the respective host under Site administration | Networking | Peers.
- Services: Peer services define what SSO is enabled between the sites.
- Profile fields: This determines which fields are populated when users roam from the local to the remote site.
Important note
Deleted peers are kept on the system and can be reactivated when you attempt to add a new host with the same address.
Now that the two sites are talking to each other, let’s start configuring user roaming by configuring the peer services.
Configuring peer services
The SSO supported by MNet avoids the need to log in when roaming to a remote site. The Services tab contains four areas. We will focus on the last two, which deal with SSO; the enrolment and portfolio services will be dealt with later.
Two SSO services represent a two-way process, and both services must be set up on both Moodle sites by the respective administrators.
Important note
Peer services can be published and subscribed to.
It is important to note that the local administrator fully controls publication and subscription. The administrator of the other site will never be able to modify any of those settings on your site.
You must publish the identity provider service to allow your users to roam to the other site without having to log in again. Subscribe to the identity provider service to allow authenticated users from the other site to access your site without having to log in again.
You must publish the service provider service to allow authenticated users from the other site to access your site without having to log in again. Subscribe to the service provider service to allow your users to roam to the other site without having to log in again there:
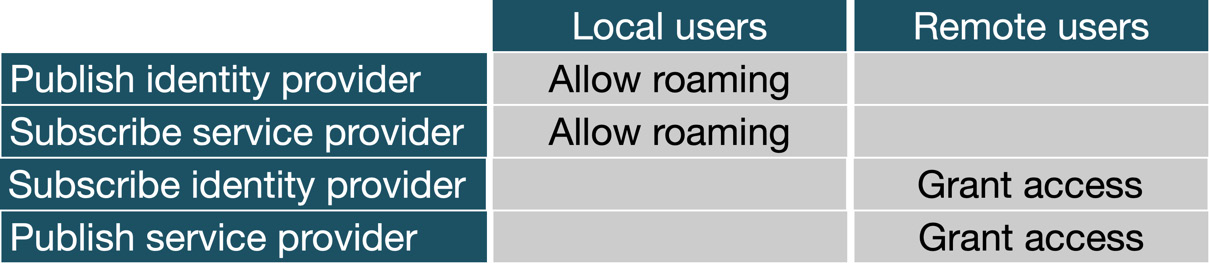
Figure 19.6 – Peer services
Let’s look at an example of two collaborating universities. University A will publish the identity provider, while University B will subscribe to it. Students from University A can now access restricted areas at University B’s site without having to log in again.
Each service has a reciprocal dependency on the other server, as shown in the preceding table. For example, the subscribed SSO (Service Provider) on the local site requires the SSO (Service Provider) to be published on the remote site. To allow roaming in both directions, all four boxes on both peers in your Moodle network have to be checked by the respective administrator.
Configuring profile fields
When a user from one site roams to another site for the first time, a local user account is created, and specific profile fields are populated by fetching the data from the remote site. You can override the default fields by selecting any of the shown profile fields in the provided list. This setting exists for Fields to import (users who roam from a remote site to the local site) and Fields to export (vice versa):
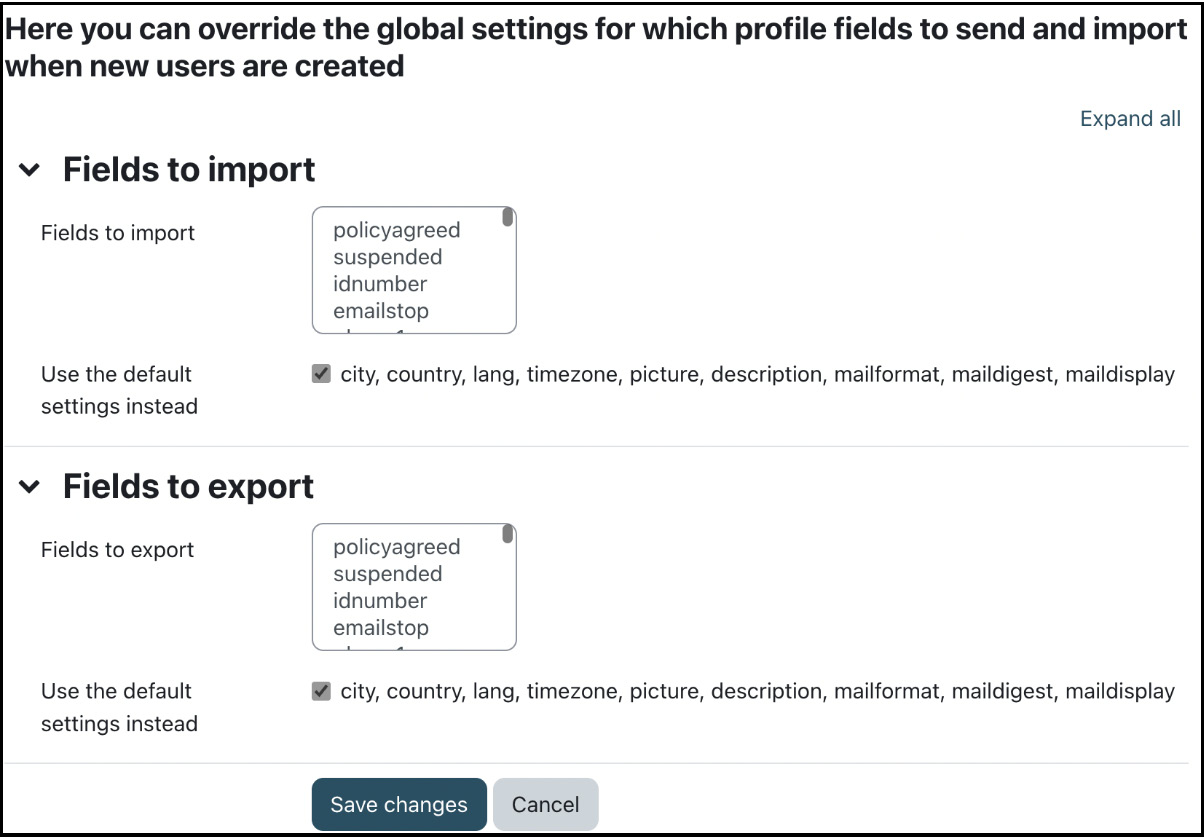
Figure 19.7 – Profile fields
The default fields can be changed under Site administration | Networking | Profile fields. Fields included in your import list but excluded from the remote site’s export list will be ignored.
Bear in mind that no password will be stored on the remote server. As the authentication mechanism will be set to MNet authentication, Moodle checks the credentials every time a user logs in. We will deal with authentication next.
Enabling MNet authentication
To initiate roaming, you must enable the Moodle network authentication plugin on both sites. Go to Site administration | Plugins | Authentication | Manage authentication and enable the MNet authentication option. Every time a new user from a remote site logs into this site, a user account is created automatically.
When you select the Test connection link beside the authentication plugin, you will see a list of which hosts that users are allowed to roam to your site and which local users are allowed to roam out:
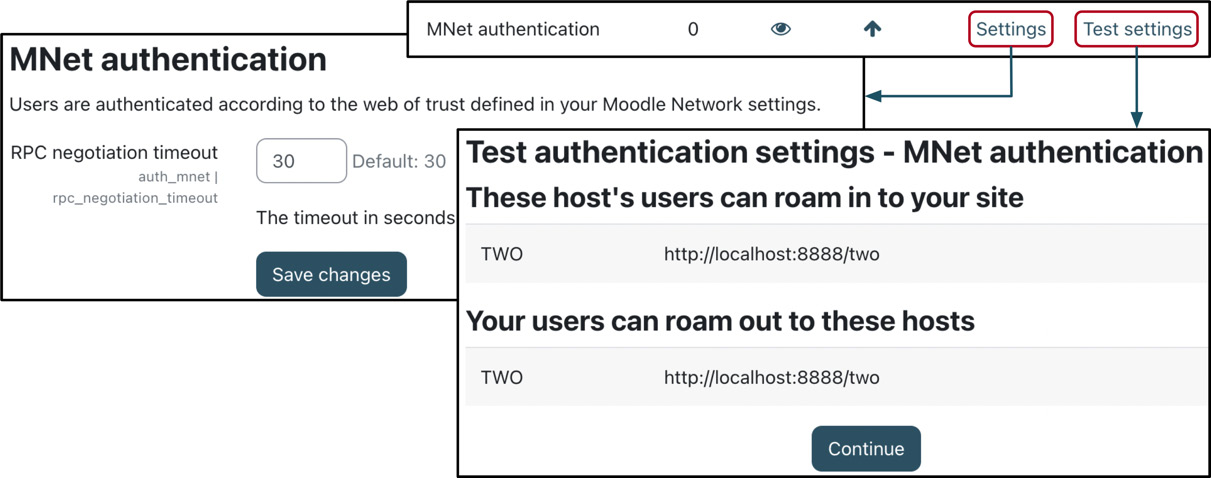
Figure 19.8 – MNet authentication
Only change the RPC negotiation timeout parameter on the Settings screen if users experience intermittent timeout problems when roaming from one site to another.
Allowing roaming
Only users that have been assigned a role with the moodle/site:mnetlogintoremote capability are allowed to roam to other sites. By default, this Roam to a remote Moodle capability is turned off and has to be allowed for each role. Revisit Chapter 6, Managing Permissions, Roles, and Capabilities, for details on how to do this.
To turn on roaming for all users logged into your site, allow the capability in the Authenticated user role. Unless all users are allowed to roam, it is worth considering creating a separate roaming role. Alternatively, if you wish to grant (or deny) access to individual users from a remote host, go to Site administration | Networking | SSO access control. You have to specify a username, a remote host (the All hosts option is only relevant for the community hub mode, which will be discussed later), and the access level (Allow or Deny).
The newly added username does not have to exist on either Moodle site! The remote hub ID is displayed in the list of users, which is the internal ID. This is similar to a user ID, group ID, or role ID:

Figure 19.9 – Allowing roaming
Network users can also be assigned via CSV batch upload, which we described in detail in Chapter 5, Managing Users, Cohorts, and Authentication; the relevant field in the CSV file is mnethostid.
Adding the Network servers block
Moodle provides a Network servers block, which can be added to the home page. This block cannot be configured and is only displayed if the role of the logged-in user has the moodle/site:mnetlogintoremote capability mentioned previously set to Allow:
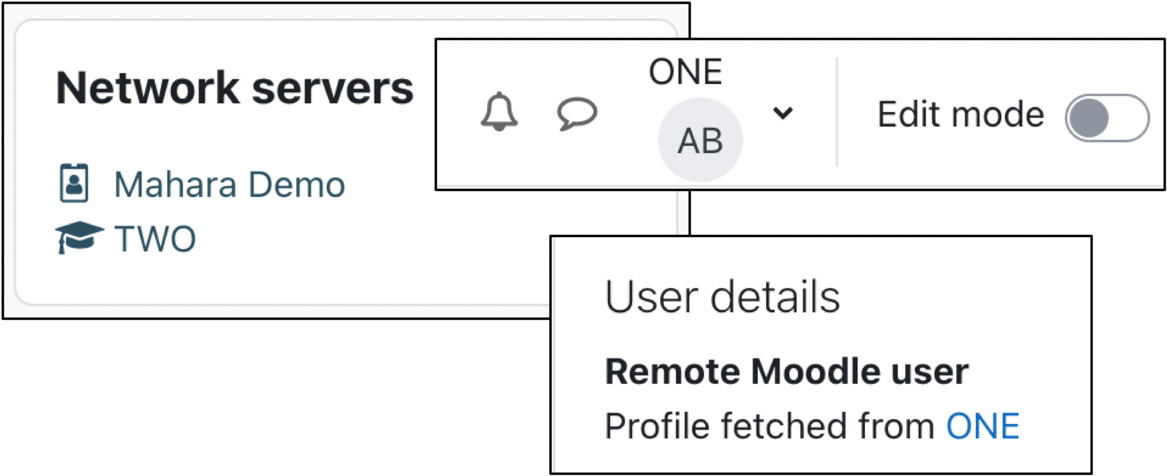
Figure 19.10 – Network servers block
The block acts as a launch pad from which to access remote sites. Here, in addition to our Moodle peer, we have also set up a link to a Mahara instance. Once you click on the remote server, you will be redirected to the selected site, where you can enroll in remote courses.
With that, your first peer-to-peer network has been set up!
Moodle shows the host you logged in from above the user icon, similar to when you masquerade as another user. When you click on your name, you access the profile of the newly created user on the remote server, which cannot be changed. The Remote Moodle user – Profile fetched from <peer> message will be displayed.
If you want to deny a remote user access – for example, because of misconduct – go to Site administration | Users | Accounts | Browse list of users; you will see that an additional column has been added to the list of users. Remote users cannot be edited locally; only the site they have logged in from is displayed. In the right-hand column, you can select Deny access to revoke access to the site. To reverse the operation, select Allow access:

Figure 19.11 – Remote users
The Network servers block adds the final compulsory piece to the Moodle networking puzzle: hosts can talk to each other, and users can roam to remote sites. There is one more goodie in Moodle’s networking bag known as remote enrolment, which we will cover in the following subsection.
Configuring network enrolment
This last step is optional and only required if you wish to grant an administrator in one Moodle system permission to enrol local users in remote courses and vice versa. Remote enrolment is helpful if you run a shared course on your server, but learners from the remote site should be participants. To minimize the administrative effort at your end, you can grant the remote administrator the right to take on this task, which is limited to the courses you have specified.
First, on the local site (that is, the one that grants the rights to the remote site), go to Site administration | Plugins | Enrolments and enable the MNet remote enrolments plugin, which allows the local server to receive enrolments from its remote counterpart. You can change the default role (Student) for MNet enrolments on the Settings screen.
Now, go to Site administration | Networking | Peers, select the remote host, and click on the Services tab. Publish and Subscribe to Remote enrolment service, which grants remote administrators the right to enrol students on your site and allows local students to enrol in courses on the remote site, respectively. This step has to be repeated on the peer.
Both Moodle sites have now been configured to allow communication between the two servers, and courses have been set up to enrol remote students. Ensure you activate the MNet enrolment method inside your course (see Chapter 4, Managing Courses and Enrolments, for details).
When you go to Site administration | Networking | Remote enrolments client, you will see a list of remote hosts where local users are enrolled. When you click on a host, courses offered for remote enrolment are displayed. You can then edit the enrolments, just like how you manage users in a local course:
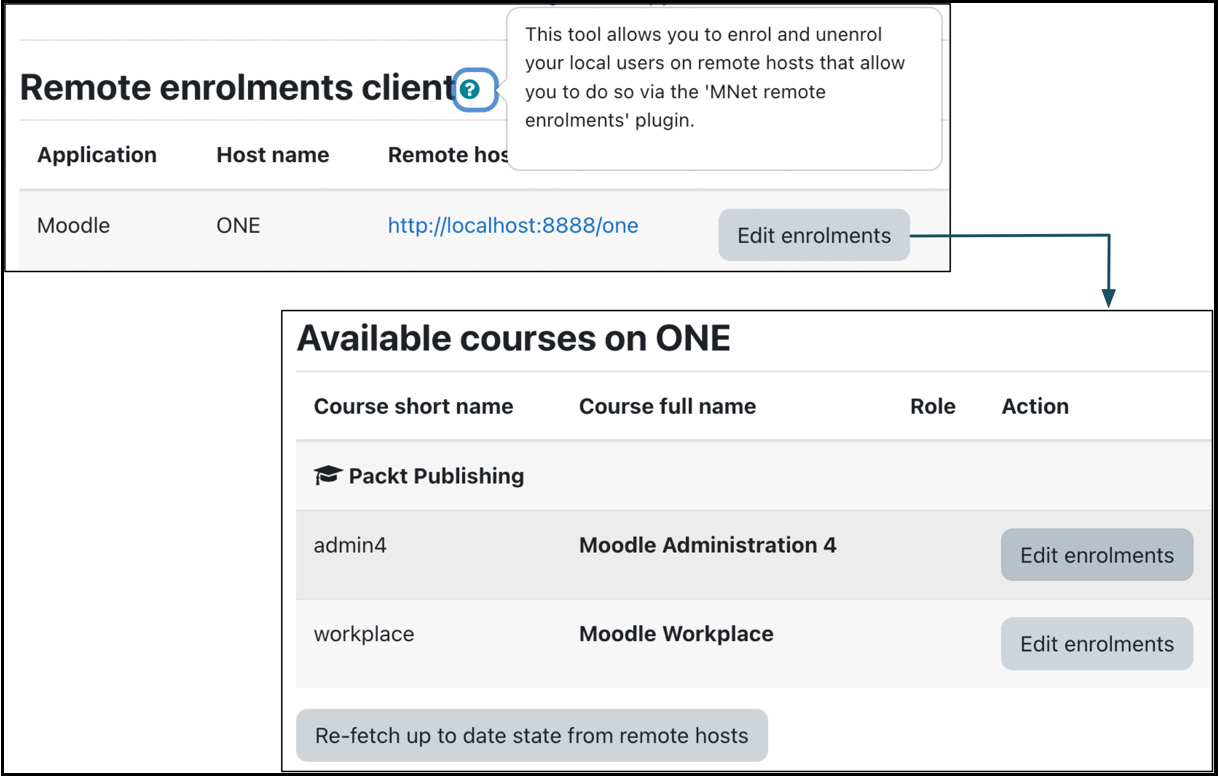
Figure 19.12 – Remote enrolments
This concludes this long section on setting up peer-to-peer connections between Moodle hosts. Next, we will look at another supported networking topology: Moodle hubs.
Setting up a Moodle hub
A Moodle or MNet hub is similar to a peer-to-peer network, with the only difference being that it accepts connections from multiple Moodle (and Mahara) servers. While this could be set up manually using several peer-to-peer connections, hub mode automatically accepts any hosts that try to connect to it. Potentially, this is a big time and maintenance saver, but at the cost of opening up your site to other Moodle instances.
A public learning portal with resources to be shared across many sites is typically implemented using hub mode. Each Moodle instance that wishes to access the portal must be configured to connect to the hub.
Once networking has been turned on, choose the Moodle site that will act as a hub and go to Site administration | Networking | Manage peers to turn on Register all hosts (promiscuous mode). Effectively, a hub is a regular Moodle site that operates in a special mode.
All hosts are treated like peer-to-peer sites, except the Review host details tab is empty. All the other settings are identical to the peer-to-peer parameters. You might decide that traffic (that is, authentication and enrolment) should only go one way: from the different Moodle sites to the hub. You can control this using the SSO-Publish and SSO-Subscribe options under the Services tab:

Figure 19.13 – Moodle hub versus connecting peers
The primary use case for setting up an MNet hub is a portal to share resources across sites. A more contemporary alternative to MNet is MoodleNet, which we will cover in the following section.
Enabling MoodleNet
MoodleNet is Moodle’s open social media platform for educators that focuses on sharing openly licensed learning resources. MoodleNet forms an integral part of the Moodle ecosystem and can be reached from within Moodle or directly via moodle.net.
Important note
MoodleNet aims to find, share, and curate open educational resources.
While the platform is targeted at teachers and content creators, you, as an administrator, must enable your colleagues to share (appropriate and legal) resources internally and with peers worldwide.
The workflow of MoodleNet’s integration is illustrated in the following diagram:
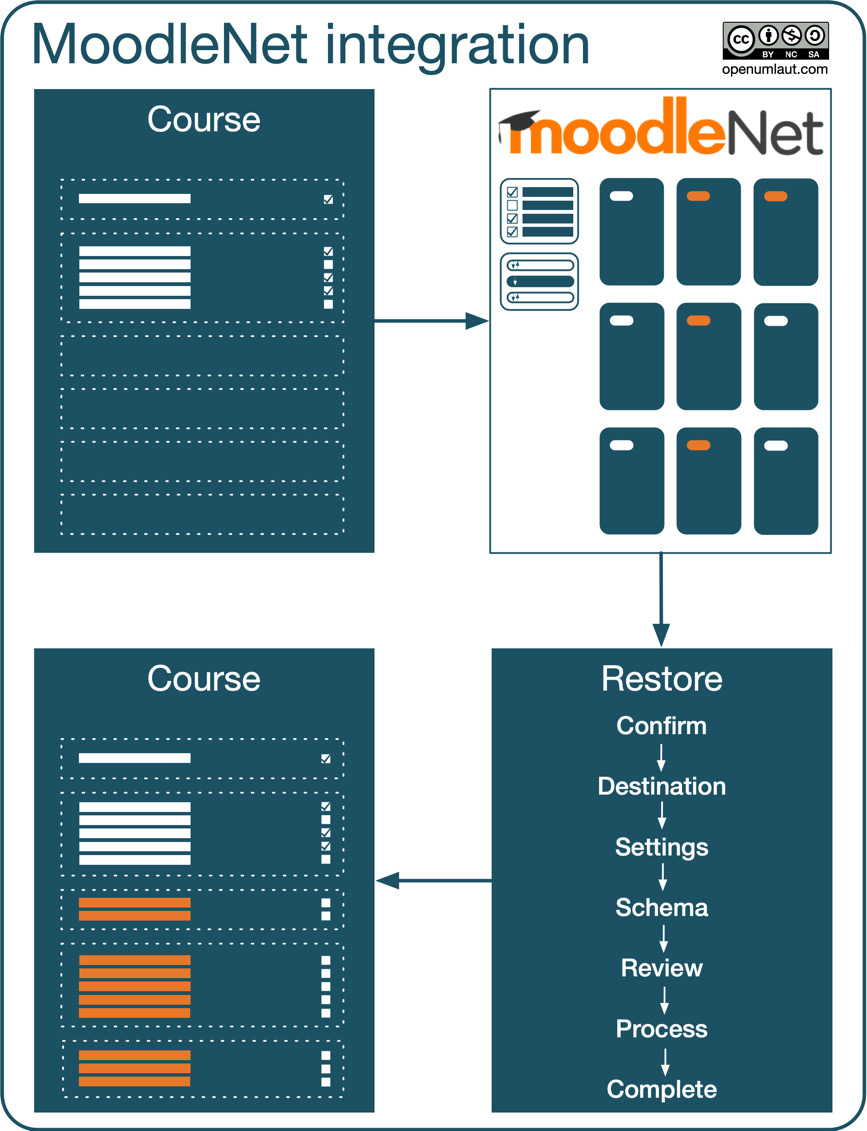
Figure 19.14 – MoodleNet integration
Let’s assume you are a course creator who has started developing a module about a particular topic. From within the course (via the activity chooser), MoodleNet is called, and resources are browsed. When an element (from a simple learning nugget to an entire curriculum) is chosen, Moodle’s standard restore process is utilized to import the resources into your course. These steps can be repeated multiple times and support effective content curation.
The MoodleNet connection is turned on by default, so ensure that the Enable MoodleNet integration option under Site administration | General | Advanced settings is ticked.
Users who have permission to create or manage activities can browse the public catalog at moodle.net from the activity chooser and import resources into their courses. Ensure that the MoodleNet option has been selected under Site administration | Course | Activity chooser | Activity chooser settings for the link to appear at the bottom of the activity chooser:
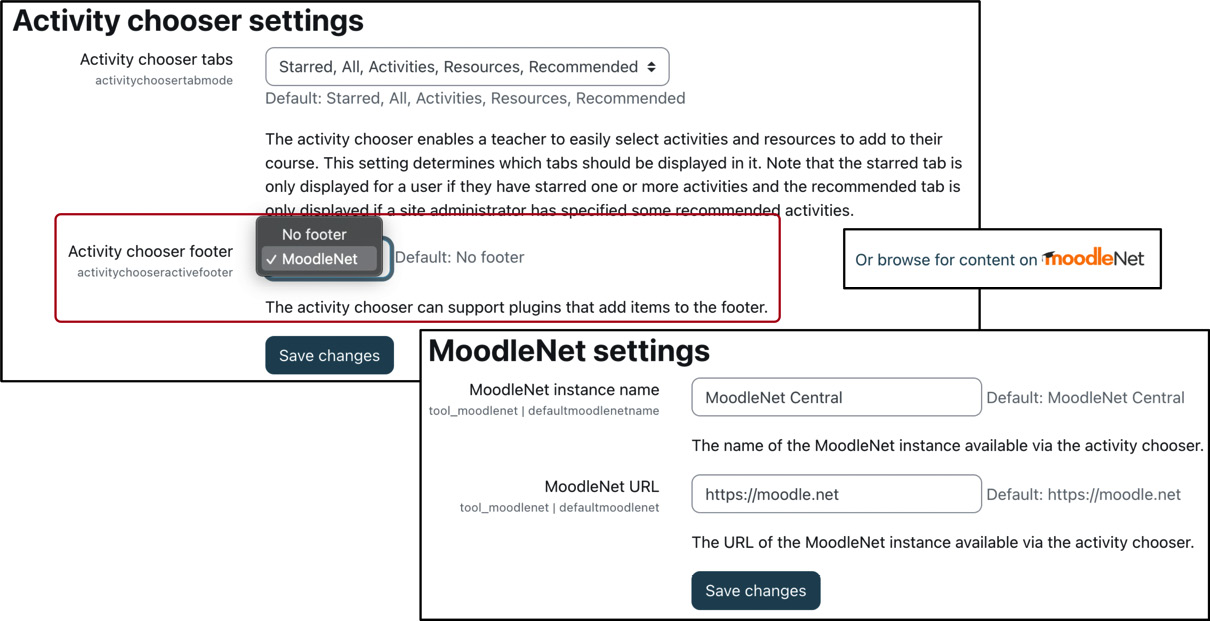
Figure 19.15 – MoodleNet configuration
If you wish to change the name of the MoodleNet instance that’s been made available to your users, go to Site administration | General | MoodleNet | MoodleNet settings, where you will see two parameters, MoodleNet instance name and MoodleNet URL. Only change the latter option if you are running your own instance or wish to connect to an alternative MoodleNet system.
Moodle lets you deploy your own secure and scalable MoodleNet instance. MoodleNet has been developed using Node.js and ArrangoDB. You find details on how to set up a local instance at www.npmjs.com/package/@moodlenet/ce-platform.
The integration between Moodle and MoodleNet is planned to be enhanced in the future. The key feature to be looking forward to is the ability for educators to share activities to MoodleNet easily. Check the release notes for upcoming versions to find out what administrative tasks will be available for you to configure this upcoming feature.
This concludes this section on the administrative aspects of enabling your teachers and content creators to share resources via MoodleNet.
Summary
In this chapter, you learned how to network disparate Moodle systems. The setup process required several steps, summarized in the following checklist:
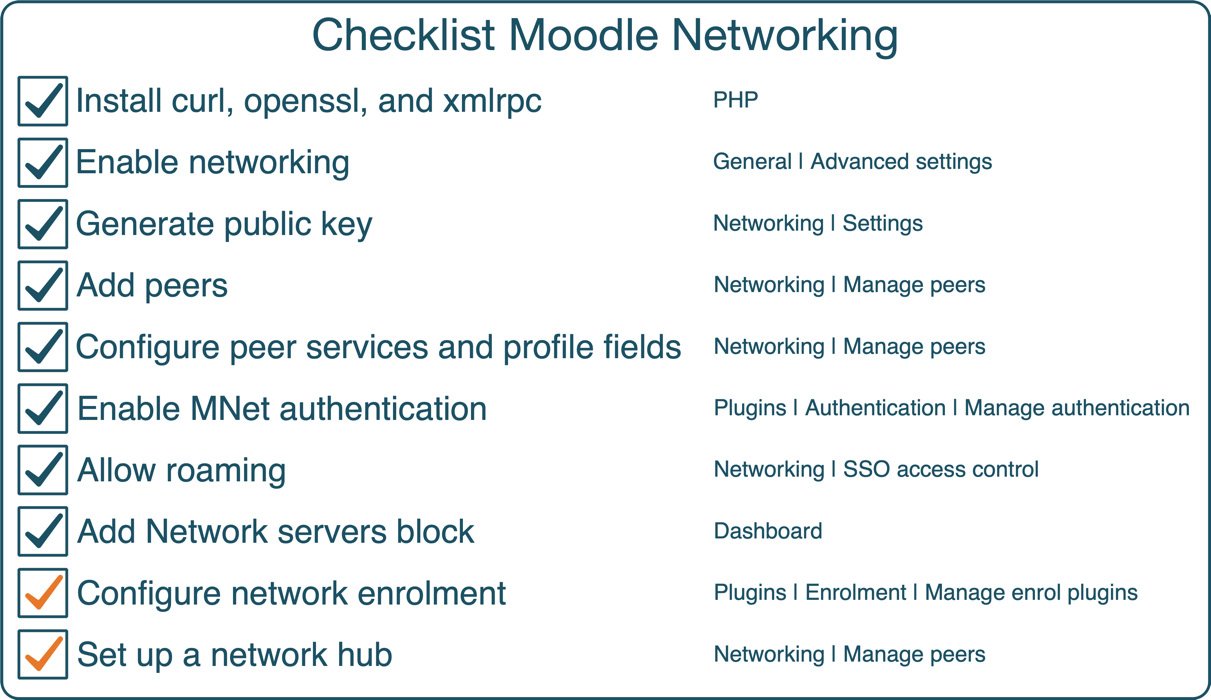
Figure 19.16 – MoodleNet checklist
After providing an overview of MNet, we covered the required components and how networking is enabled.
We linked two Moodle sites, which entailed setting up peer-to-peer connections, roaming across instances, configuring remote authentication and enrolment, and using the Networks server block.
Then, we introduced the concept of a central MNet hub to connect multiple Moodle sites.
Finally, we enabled MoodleNet, a platform for finding, sharing, and curating open educational resources.
Moodle’s networking facility introduces a new dimension to learning management systems. Disparate systems can be connected logically, and roaming from one Moodle site to another can be facilitated. Networking Moodle hosts opens up entirely new opportunities, whether among entities within your organization or with external sites.
Another setting in which multiple entities are represented is multi-tenancy, which is the topic of the final chapter of this book.