
3
Exploring Courses, Users, and Roles
The objective of this chapter is to give you a quick rundown of the underlying foundation of Moodle: courses, users, and roles.
The three concepts are inherently intertwined, and any one of these cannot be used without the other two. We will deal with the basics of the three core elements and show how they work together.
Moodle courses are central to Moodle, as this is where learning takes place. Teachers upload their learning resources, create activities, assist in learning, grade work, monitor progress, and so on. Students, on the other hand, read, listen to, or watch learning resources, participate in activities, submit work, collaborate with others, and so on. You will be introduced to courses and how they are organized in categories. You will also learn about the key components of courses, namely activities and resources.
Moodle users are individuals accessing our Moodle system. Typical users are students and teachers/trainers, but there are others such as teaching assistants, managers, parents, assessors, examiners, or guests. Oh, and the administrator, of course! We will cover the basic concepts of authentication – how to get access to Moodle – and enrolment – how to get access to a course – before briefly dealing with two different types of user collections: cohorts and groups.
Moodle roles are, effectively, permissions that specify which features users can access, and where and when (in Moodle) they can access them. You will become familiar with the concepts of roles, contexts, and capabilities, which are essential for controlling permissions in Moodle.
Bear in mind that this chapter only covers the basic concepts of these three core elements. The dedicated chapters – Chapter 4, Managing Courses and Enrolments, Chapter 5, Managing Users, Cohorts, and Authentication, and Chapter 6, Managing Permissions, Roles, and Capabilities – will deal with the three concepts in greater detail.
In this chapter, we will be covering the following:
- A high-level overview of core Moodle concepts
- Exploring Moodle courses
- Exploring Moodle users
- Exploring Moodle roles
By the end of the chapter, you will have a good understanding of Moodle’s three core concepts: courses, users, and roles.
A high-level overview of core Moodle concepts
Let’s look at the following diagram to give you an overview of courses, users, and roles. It shows how central the three concepts are and how other features are related to them. Again, all their intricacies will be dealt with in due course, so for now, just start getting familiar with some Moodle terminology.
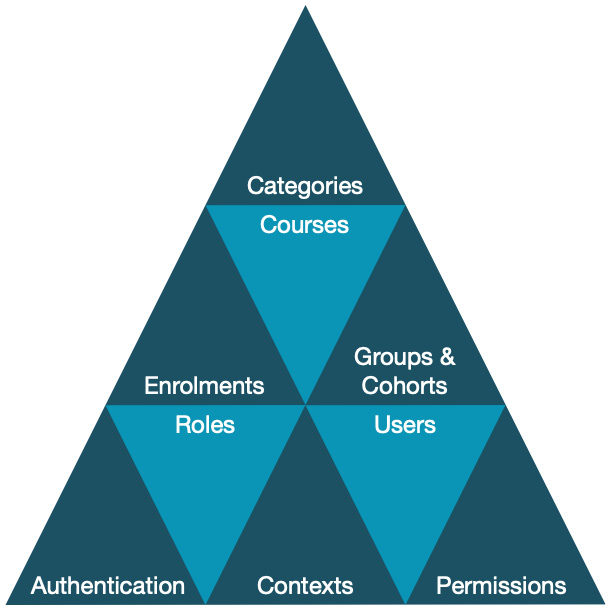
Figure 3.1 – Core Moodle concepts
Let’s start at the bottom left and cycle through the pyramid in a roughly clockwise fashion. Users have to go through an Authentication process to get access to Moodle. They then have to go through the Enrolments step to participate in Courses, which themselves are organized into Categories. Groups & Cohorts are different ways to group users at course level or site-wide, respectively. Users are granted Roles, in particular, Contexts, which are ring-fenced Moodle areas; the scope of the role is specified by configuring Permissions.
The diagram also demonstrates a chicken-and-egg situation. If we start with users, we have no courses to enrol them on; if we start with courses, we have no users who can participate in them. Not to worry, though – Moodle lets us go back and forth between administrative areas and often perform multiple tasks simultaneously.
A short note on the enrol vs enroll lingua dispute that appears to be as old as Moodle itself. While this book has to be written in US English, we decided to use the British English spelling for the term for two main reasons: first, in Moodle internally, enrolment is used throughout – for example, as a parameter in batch files – and second, Moodle Docs use enrol (Moodle is Australian after all). So, enrol and enrolment it is! Switch to the en_us language pack if this drives you mad. Or crazy. Or both.
Now that you have been given a high-level overview, let’s start with the top corner of our triangle, dealing with courses.
Exploring Moodle courses
Courses are central to Moodle, as this is where content is presented to learners and most of the learning and collaboration takes place.
In the following sections, first, we will cover the two most essential learning elements of courses: resources and activities. Then, we will look at categories that organize courses hierarchically. Finally, you are going to create your first course.
Important note
Moodle is a course-centric system.
Resources and activities
Moodle manages activities and stores resources in courses, and this is where the vast majority of learning takes place:
- Resources are learning elements where the learner is passive – for instance, a PDF document can be read, a URL can be navigated to, a podcast can be listened to, or a video can be watched
- Activities are learning elements where the learner is active and more engaged – for example, posting to a discussion forum, responding to a feedback questionnaire, collaborating with others to author FAQs, or answering questions in a SCORM-based quiz
Resources and activities can be arranged in any order, and dependencies can be specified via a combination of access restrictions and activity completion criteria. To illustrate the workings of the sequencing versus non-sequencing of content, let’s look at a sample blended learning course. In our example, this comprises three phases (called topics in Moodle), but any other structure would be possible: preparation (pre-seminar), webinar (face-to-face), and follow-up (post-seminar):

Figure 3.2 – Sample course content
During the preparation section, participants are welcome to read the provided PDF document and watch a motivational video. They are also asked to introduce themselves in a forum, so attendees can start networking before the event. While the first two activities are optional, the introduction is compulsory and a prerequisite for attending the seminar. The trainer must mark the webinar activity off before access to the handouts is granted. The follow-up comprises four activities: a certain percentage has to be achieved in the quiz to complete the assessment, and the feedback questionnaire has to be submitted before the diploma (via a third-party plugin) is issued. Access to the alumni forum will only be granted when all three activities have been completed.
Course categories
Categories act as containers for courses, and they can have subcategories, sub-subcategories, and so on. The hierarchical arrangement is similar to that of files and folders on your computer, where categories are like folders and courses are like files:
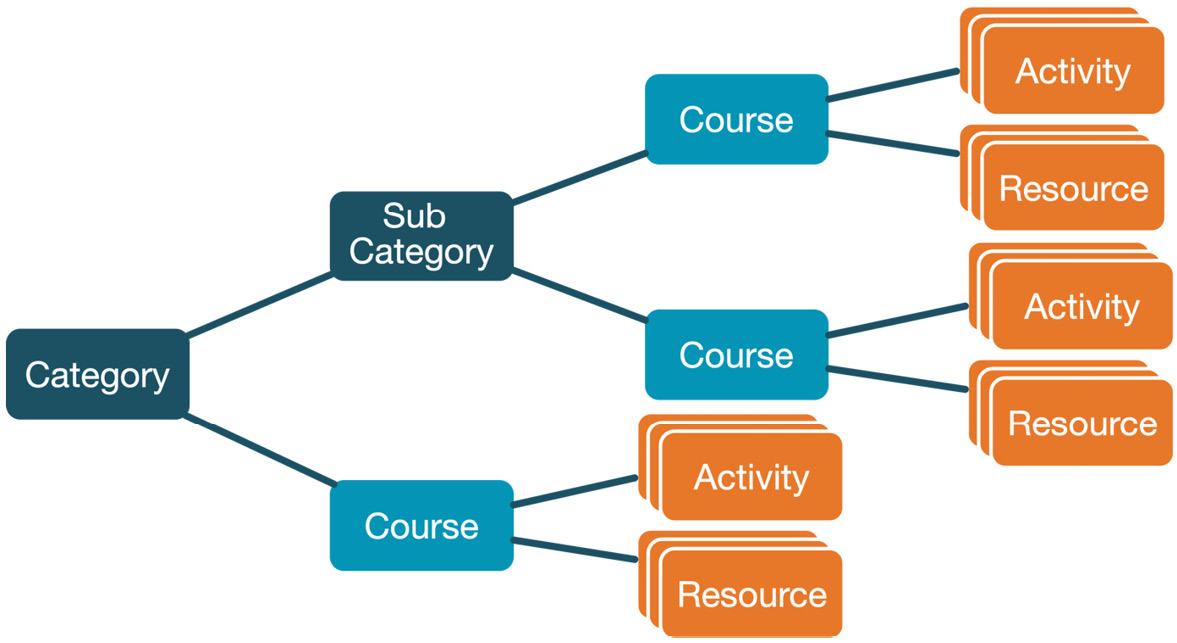
Figure 3.3 – Categories, courses, activities, and resources
Moodle comes with a default category called Category 1, which is sufficient to show the basics of courses. We will deal with categories in more detail in Chapter 4, Managing Courses and Enrolments.
Important note
A course always belongs to a category. It cannot belong to multiple categories and cannot be without a category.
Creating a Moodle course
The quickest way to create a new course is via Site administration | Courses | Add a new course. For now, let’s focus on the two compulsory fields, namely Course full name and Course short name:
- Enter a course full name (here, we used Algorithms & Data Structures I), which is displayed at various places in Moodle.
- Enter a course short name (here, we used ALGDS1), which is used by default to identify the course.
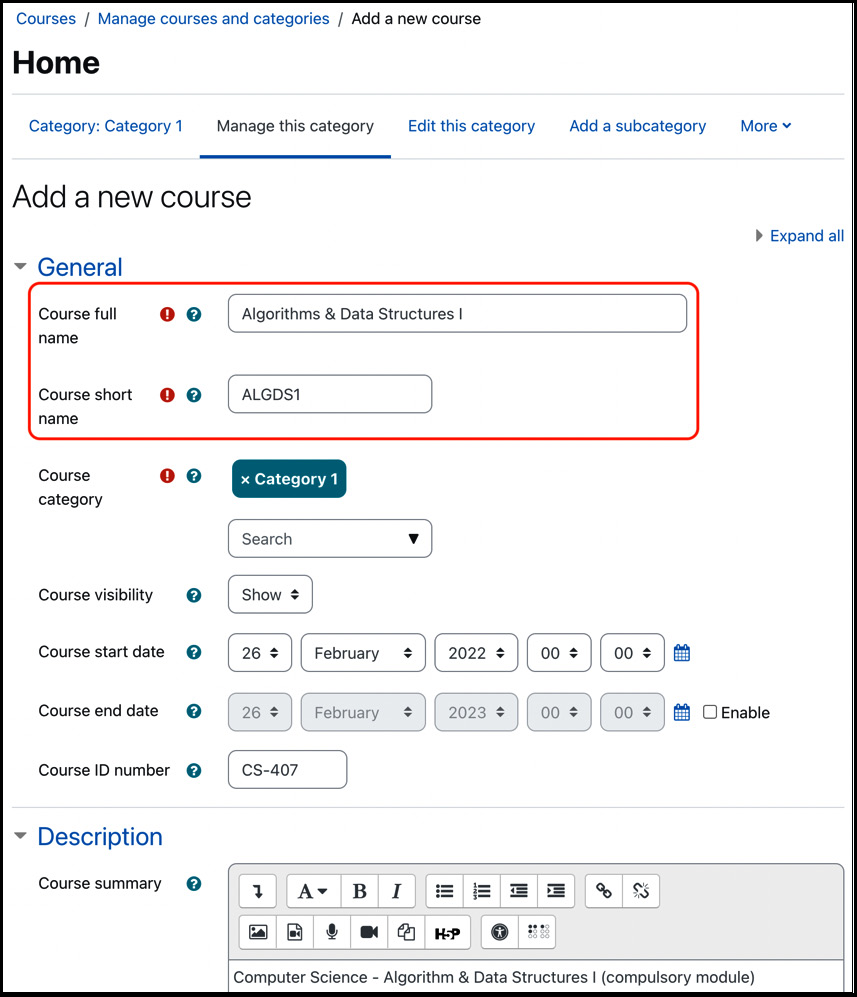
Figure 3.4 – Creating a Moodle course
You can also see the already mentioned default course category, Category 1. To change its name or add other categories and subcategories, you need to select the respective option in the menu at the top.
For now, we will leave all the other fields empty or at their default values and save the course by clicking on the Save and display button at the bottom. The displayed screen shows the skeleton of the course without any content, except an announcement forum.
When you select the Participants tab, you will see that your account has already been added. Moodle does this automatically. However, we cannot add any further learners to the course yet, since we haven’t added any users to our system. Let’s rectify this situation by adding some users before returning to this screen.
Exploring Moodle users
Each user in Moodle is represented as a user account, which contains information about the person’s profile. In the following subsections, we will briefly explain the difference between user authentication and enrolment before creating your first user account(s) and enroling these users in a course.
Authentication and enrolment
Before we start, it is vital to understand the difference between authentication and enrolment. Users must be authenticated to log in to Moodle, and authentication grants your users access to the system through a login where a username and password must be given. Moodle supports a significant number of authentication mechanisms, such as MS-AD, LDAP, and SAML. For now, let’s work with so-called manual authentication to simplify overall user management.
Enrolment happens at a course level. However, a user must be authenticated on the system before enrolment on a course can take place. The house and key analogy might help: you need a key (authentication) to the house (Moodle), and you then need a separate key (enrolment) for each room (course).
So, a typical workflow is as follows (there are exceptions as always, but this will do for now):
- Create your courses (and categories)
- Create user accounts
- Associate users with courses and assign roles
Again, this sequence demonstrates nicely how intertwined courses, users, and roles are in Moodle. Another way of looking at the difference between authentication and enrolment is how a user will get access to a course. Please bear in mind that this is a very simplistic view that ignores supported features such as external authentication, guest access, and self-enrolment:
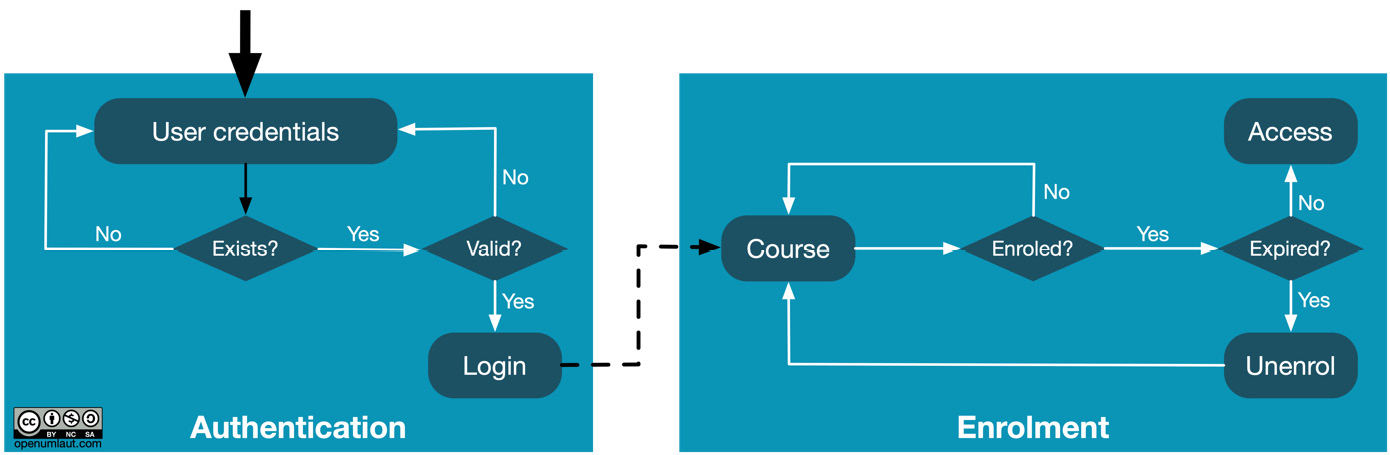
Figure 3.5 – Authentication and enrolment
During the authentication phase, a user enters their credentials (username and password), or they are entered automatically via single sign-on. The user is granted access if the account exists locally – that is, within Moodle – and the password is valid. The check will be carried out remotely if the account is held externally – for instance, in an active directory.
Once this is successful, the next phase is enrolment. If the user is enroled and the enrolment hasn’t expired, access is granted to the course where resources and activities can be worked through. As mentioned before, this graphic only shows the very basics, but for now, it hopefully demonstrates the difference between authentication and enrolment. You will come across a more detailed version of these graphics in Chapter 4, Managing Courses and Enrolments, when we deal with various enrolment methods.
Adding a user account
To add a user account manually, go to Site administration | Users | Add a new user. As with courses, we will only focus on the mandatory fields, which should be self-explanatory:
- Provide a unique username.
- Set a new password. If a password policy has been set, certain rules might apply.
- Enter the user’s first name and surname.
- Provide the user’s email address. It must be unique, although there are ways around this restriction.
- Ensure you save the account information by selecting Create user at the bottom of the page:
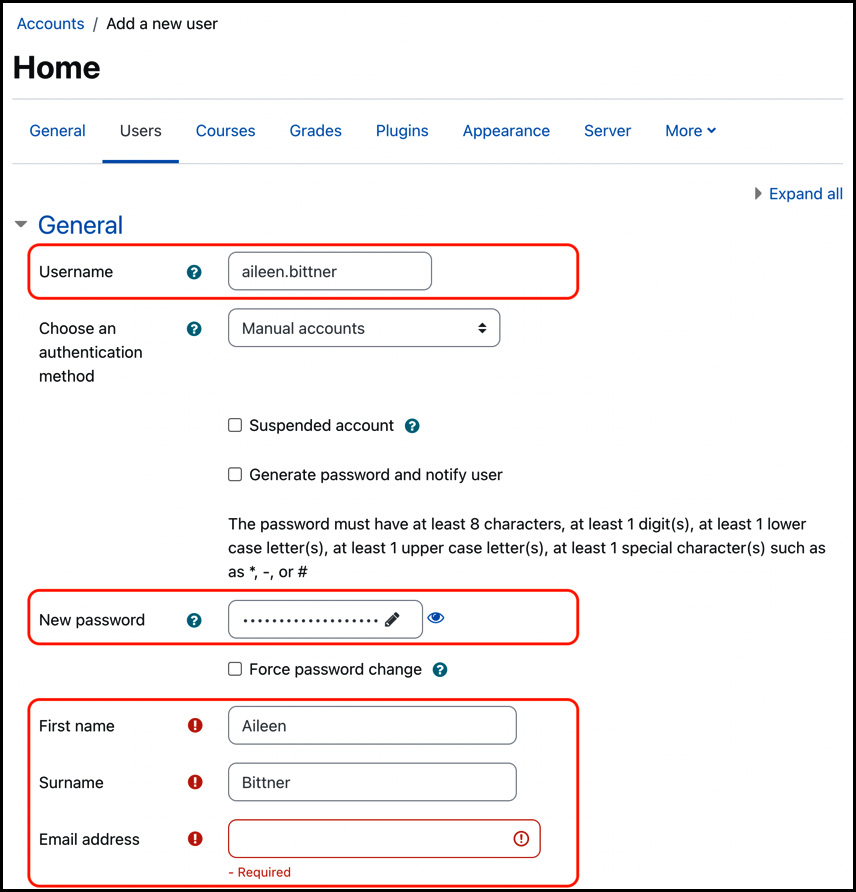
Figure 3.6 – Adding a Moodle user account
Here, a few more accounts were created via batch upload, which will be dealt with in Chapter 5, Managing Users, Cohorts, and Authentication. To see who has access to your Moodle system, select Users | Browse list of users from the Site administration menu, where you will see all users:
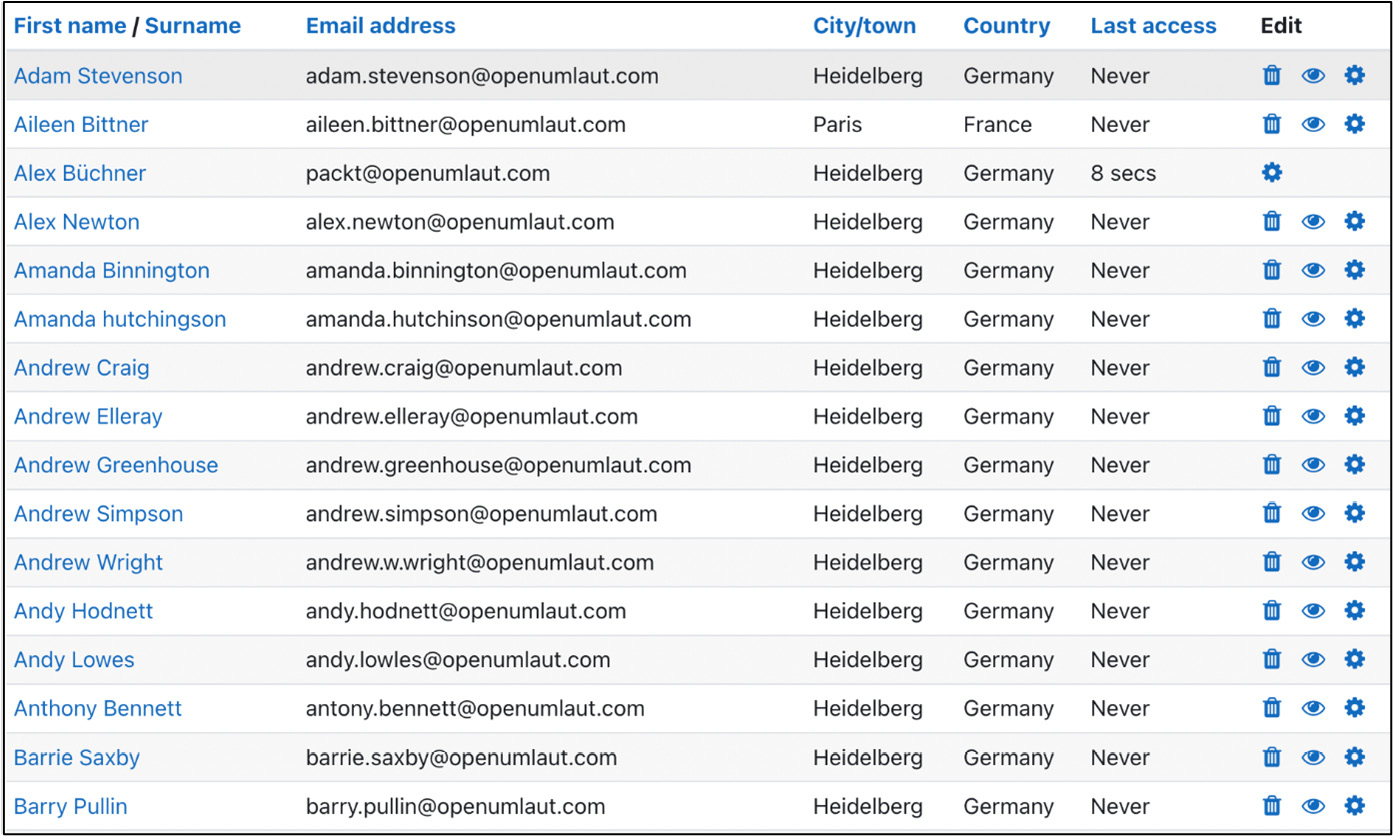
Figure 3.7 – Moodle user accounts
Now that we have a few users on our system, let’s go back to the course we created earlier and manually enrol new participants.
Enroling users
To achieve this, go to My courses on the Site menu. Why does the course appear in the list of my courses? Remember that when we created the course earlier on, Moodle automatically added our account to the course. Click on a course, select the Participants tab again, and click on the Enrol users button to add more users. A pop-up window will appear, where you select one or many users via the Search field:
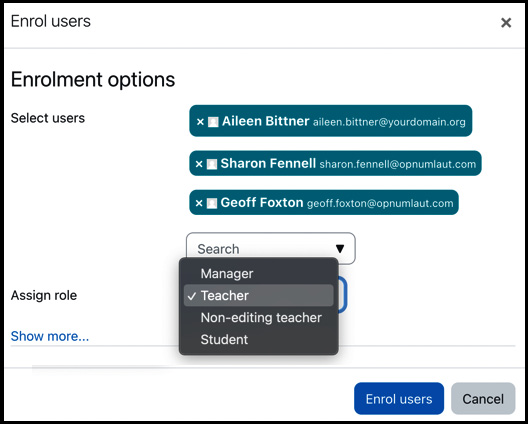
Figure 3.8 – Enroling users
You have probably spotted the Assign role dropdown below the list of selected user accounts. This is where you select what role the selected user(s) will be granted, which leads us to the third vertex of our triangle: roles.
Exploring Moodle roles
Roles define what users can or cannot see and do in your Moodle system. Moodle comes with several predefined roles – we already saw Student and Teacher – but it also allows us to create our own roles – for instance, guardians or external assessors.
Putting roles into context
Each role has a specific scope (called its context), defined by a set of permissions (expressed as capabilities). For example, a teacher is allowed to grade an assignment, whereas a student isn’t. Alternatively, a student is allowed to submit an assignment, whereas a teacher isn’t.
Important note
A role is assigned to a user in a context.
Okay, so what is a context? A context is a ring-fenced area in Moodle where roles can be assigned to users. A user can be assigned different roles in different contexts. The context can be a course, a category, an activity module, another user, a block, the home page, or Moodle itself. For instance, you are assigned the Administrator role for the entire system, but additionally, you might be assigned the Teacher role in any courses you are responsible for; or a learner will be given the Student role in a course, but might have been granted the Teacher role in a forum to act as a (temporary) moderator.
Defining roles
To give you a feel of how a role is defined, let’s go to Site administration | Users | Permissions | Define roles. Click on the Teacher role, and after some general settings, you will see a (very) long list of capabilities:
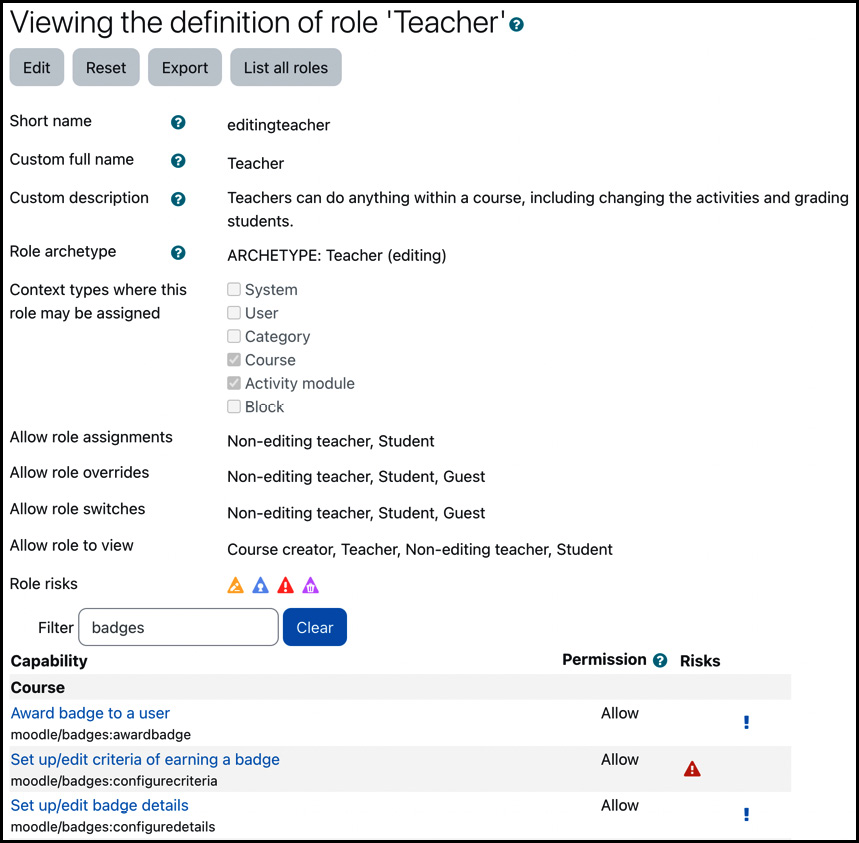
Figure 3.9 – Roles, permissions, and capabilities
We will deal with all this in greater detail in Chapter 6, Managing Permissions, Roles, and Capabilities, so there’s no need to panic!
For now, we only want to stick with the example we used throughout the chapter. Now that we know what roles are, we can slightly rephrase what we have done. Instead of saying, “We have enroled the user aileen.bittner in the course ALGDS1 as a student,” we would say, “We have assigned the student role to the user aileen.bittner in the context of the course ALGDS1.”
Roles are critical when granting and denying permissions to users. However, try sticking with the preconfigured roles in Moodle when you get started, since they have proven to be sufficient in most setups. You can always adjust roles at a later stage, if or when required.
This concludes the section on permissions, completing the triangle of courses, users, and roles. Being equipped with this knowledge, you are now ready to take on the three core concepts in more detail.
Summary
This chapter briefly introduced the concepts of Moodle courses, users, and roles. We also saw how central they are to Moodle and how they are inherently intertwined. Any one of these concepts simply cannot exist without the other two, which is something you should remember throughout.
Just to recap, the three key takeaways from this chapter are as follows:
- Courses comprise activities and resources, and this is where your students’ learning takes place. Courses are organized hierarchically into categories.
- Users are represented by an account; access is granted to the system by authentication and courses by enrolment.
- Roles grant permissions for certain features to certain users in certain contexts, such as courses.
If you haven’t fully understood any of the three areas, don’t worry. The intention was to provide you with a high-level overview of the three core components and touch upon the basics.
There are chapters dedicated to each concept, hopefully clarifying any outstanding issues and going significantly into them in more detail. In the next chapter, we will tackle courses and the management thereof.