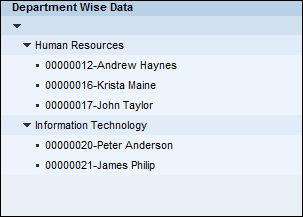
In this recipe, we will see how we can display a tree in our Web Dynpro application. We will create a tree that will display the employee department-wise data, that is, nodes showing department names, each of which when opened will display a list of employees within the department along with the employee names.
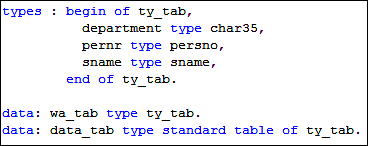
For the sake of this recipe, we assume that we have an internal table DATA_TAB comprising of three fields, department, pernr, and sname containing the department name, employee number, and the employee names respectively sorted according to the department name.
We will now follow the steps as shown:
- We first define a context node
TREE_NODE. TheTREE_NODEcontext node has a cardinality of0..Nand theSingletonproperty should beOff. AnIS_OPENEDattribute will be based on the typeWDY_BOOLEAN. - Within the
TREE_NODEcontext node there is another node,TREE_NODE_ITEM, which is also a non-singleton node having cardinality0..N. An attributeITEM_TEXTis created within theTREE_NODE_ITEMnode. TheITEM_TEXTattribute has a typeSTRING.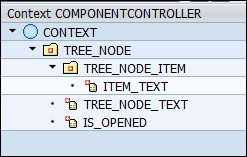
- We will then define a
TREEUI element in our view layout. We create aTREEUI element along with two subelements. These are based onTreeNodetypeandTreeItemtype, having the namesMY_NODESandMY_ITEMS, respectively.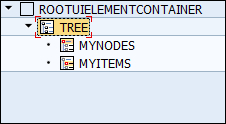
- We bind the
TREEUI elementdatasourceproperty with theTREE_NODEcontext node. ForMYNODES, the text property is bound with theTREE_NODE.TREE_NODE_TEXTattribute. Likewise, forMYITEMS, the text property is bound with theTREE_NODE.TREE_NODE_ITEM.TREE_ITEM_TEXTattribute. TheIS_OPENEDattribute of the context node is assigned to the expanded property of theMYNODESsubelement. - Next, we will write the code into the
WDDOINITmethod of the view created. We define reference variables for the context nodesroot_node,TREE_NODE, andITEM_NODE. We also define data variables pertaining to theELEMENT_TREE_NODEelement and theELEMENT_TREE_NODE_ITEMelement.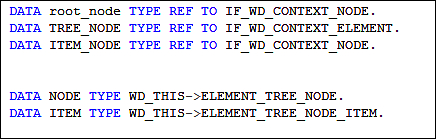
- We then get the reference to the
TREE_NODEcontext node by calling theGET_CHILD_NODEmethod. The reference is stored inroot_node.
- Next, we populate the context nodes with appropriate data that may be displayed in the tree.
- We run a loop at the
DATA_TAB, the table that contains the department name with employee name and numbers. We place aAT NEW DEPARTMENTstatement within which we assign the department name to theNODEstructure corresponding to ourTREE_NODEcontext node. We then call theBIND_STRUCTUREmethod of theroot_nodecontext node and supply the data to be added to the node's element collection. We then get the reference to theTREE_NODE_ITEMchild context node and store it in theITEM_NODEvariable (to be used later within the loop). - Outside the
AT .. ENDATblock, we use theCONCATENATEstatement in order to combine the personnel number and name and store it in theITEM-ITEM_TEXTvariable. This is then added to theITEM_NODEcontext node's collection using theBIND_STRUCTUREmethod.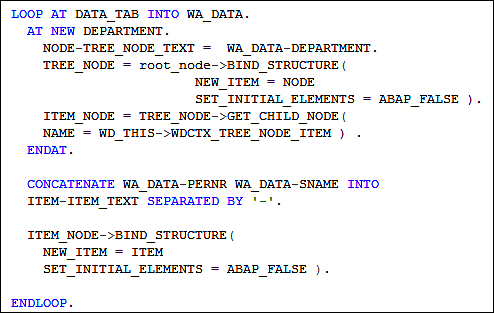
We create a TREE UI element on the view layout. We create two subelements for the TREE element; one is the TreeNodetype type and the other TreeItemtype type. The MYNODES subelement (of type TreeNodetype) and MYITEMS subelement (of type TreeItemtype) correspond to the department names, and the employee names and number respectively in the final display. Appropriate bindings are defined for MYNODE and MYITEMS with relevant context data node attributes.
A loop is used to populate the data for the TREE_NODE context node. We kept the IS_OPENED attribute as a space while populating the data for the TREE_NODE context node and its child node TREE_NODE_ITEM. When displayed, the department nodes are not expanded. When the application is run, within the browser, we see a list of departments as shown in the following screenshot:
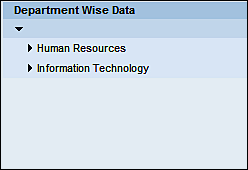
When the relevant nodes are expanded, the employees within the departments are displayed along with their number and name, as shown in the following screenshot: