In this recipe, we will see how we can create an application based on the OIF Floorplan. We will create the application configuration, then the IDR and the component configuration.
We will use the Web Dynpro component and application used in the Integrating Adobe forms in Web Dynpro recipe in Chapter 14, Web Dynpro for ABAP. However, we need to make certain changes in the component and its application in order for them to be used in the FPM design.
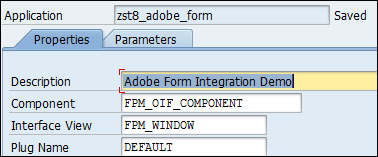
First, on the Properties tab of the created application, we will assign the FPM_OIF_COMPONENT component in the Component field and the FPM_WINDOW component in the Interface View field.
Next, at the component level, a change is also required. On the Implemented Interfaces tab, we will add the IF_FPM_UI_BUILDING_BLOCK component.
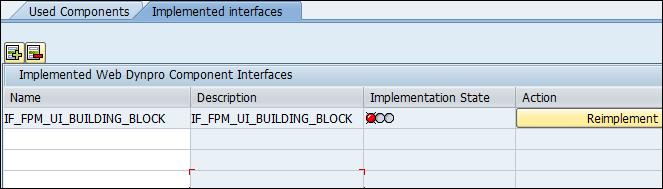
Then, click on the Reimplement button in the Action column. The Implementation State column should show a green signal. A message will appear saying that the interface was successfully implemented.

This adds a number of methods (related to the Floorplan design) to the component controller. Each method is called at a particular instance during the execution of the application. Each method serves a particular purpose and we can write coding within them in order to serve our requirement.
For creating an FPM OIF application, proceed as follows:
- Call transaction
SE80. In the left-hand pane, choose the Web Dynpro Component option in the list box and enterFPM_OIF_COMPONENTin the field provided. Then press Enter. - In the list that appears, under Web Dynpro applications, right-click our application
zst8_adobe_form, and from the context menu that appears, choose the option Create/Change Configuration.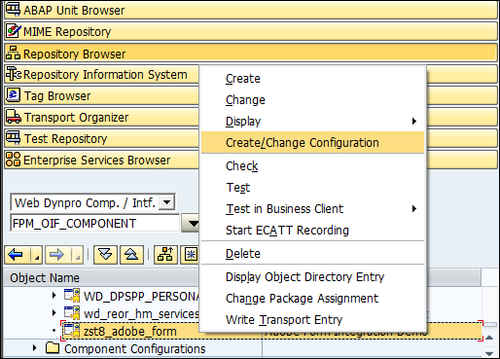
- This will open the Editor for the Web Dynpro ABAP Application Configuration window. Enter a suitable ID in the Configuration ID field provided (in our case
ZST8_MY_OIF_DEMO) and click the Create button.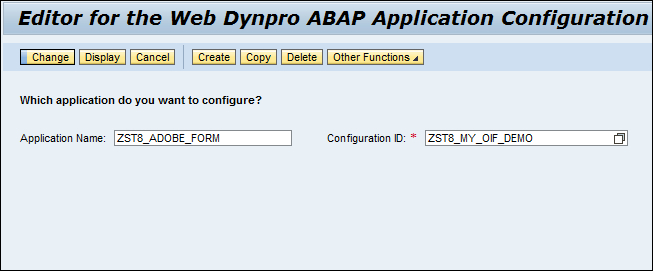
- This leads you to the screen shown in the following screenshot:
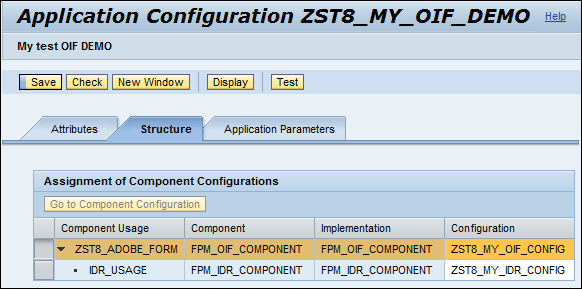
- On the Structure tab, enter the name of the configuration components
ZST8_MY_OIF_CONFIGandZST8_MY_IDR_CONFIGin the fields provided. - First, select the OIF component row and click the Go to Component Configuration button. This will take you to the screen that looks like the following screenshot:
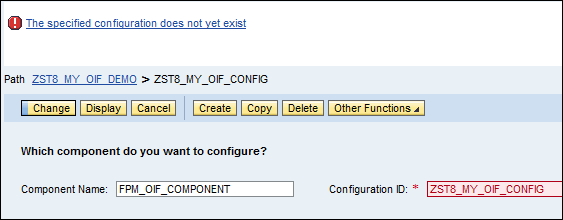
- Since the component configuration does not exist, an error occurs. Click the Create button. The pop-up box appears as shown as follows:
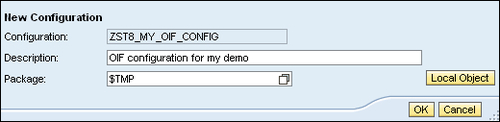
- Enter suitable description and package (in our case local
$TMP). Press the OK button. - The message appears, The Configuration ZST8_MY_OIF_CONFIG has been created successfully. Click the Change button.
- This will lead you to the Configuration Editor window showing one Main View (Main View 1) having one Subview (Subview 1 1). On the left-hand pane, there is a tree showing the various components.
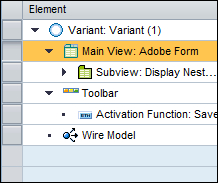
- We will now assign a UIBB to our subview.
- On the right-hand side is the detail screen for the object selected in the left-hand pane. Select the Subview 1 1 option, and make sure the attributes appear in the lower part of the screen. Within the Component field, enter the name of the component that we are using (
ZST8_ADOBE_FORM). Also, enterZST8_WEB_DYNPROin the View field, the respective window containing the view that we like to display in the subview at the execution of the application.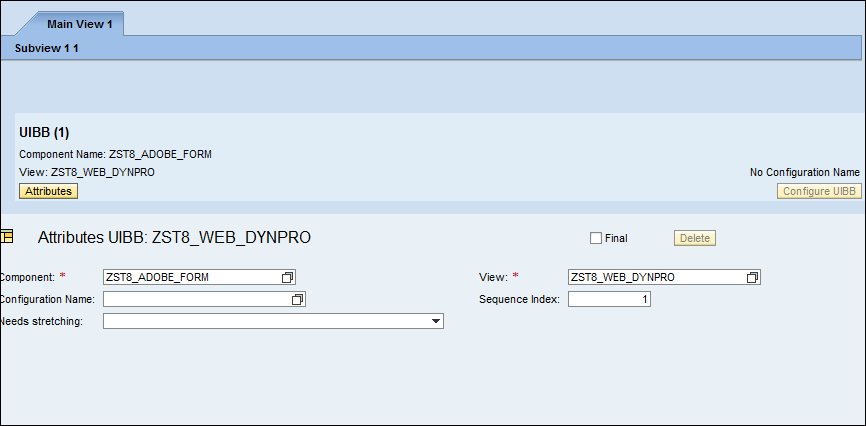
- If we need to change the displayed text for the main view and subview, simply select the Main View or Subview node in the left-hand pane and then enter the new text in the Main View name attribute or SubView name attribute. Save your entries.
- Now return to the application configuration screen. Now, we will create the IDR configuration. Select the row showing the FPM_IDR_COMPONENT component and click the Go to Component Configuration button. This will take you to the screen that looks like the following screenshot:
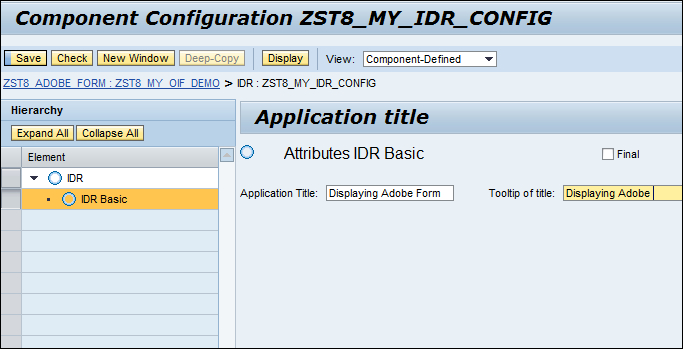
- In the left-hand pane, click the IDR Basic node. On the right-hand side, enter the application title and the tooltip. Save your entries. You may click the Check button to check the consistency of your configuration.
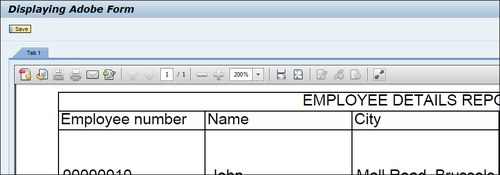
We created an application configuration based on OIF Floorplan. It comprised of the IDR configuration in which we specified the application title. We also created the component configuration of the component FPM_OIF_COMPONENT and within the view and subview we assigned the window (and view) that has been created earlier by us. You may add further subviews to the application. The views displayed within the subviews may be in different Web Dynpro components.
On the left-hand side of the component configuration, click the Add button and select the Initial Screen option. You may then specify the component and view to be used as an initial screen. The Initial Screen window is displayed before the OIF application is displayed.
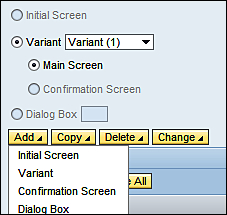
Similarly, we may add a confirmation screen as well. The confirmation screen is displayed at the end of the execution of the OIF application.
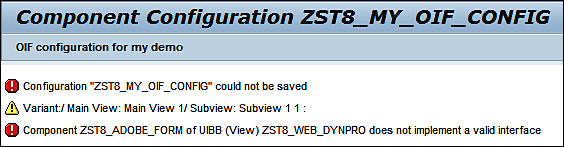
In addition, we need to make sure that the Implemented Interfaces tab on the used components have the interface IF_FPM_UI_BUILDING_BLOCK implemented, otherwise the error occurs as shown in the following screenshot: