
In this chapter, you review the AVI and MOV video formats, and then look at how they can be formatted as MP4 for the web with Media Encoder. You then learn how to stitch video clips together. Later you look at two other file formats for the web.
Note
This chapter does not have any actual projects; however, you can use the files in the Chapter 26 folder to practice opening and viewing for this lesson. They are at https://github.com/Apress/graphics-multimedia-web-adobe-creative-cloud .
Working with Your RAW Files (AVI or MOV)
The quality and format of the digital video that you shoot largely depends on the device that it was shot from, or in an animation, the software it was produced in. In filming, you may have used your smartphone, camera, camcorder, or archived film that was converted to a digital format. Other video footage, as you saw in Part 4, might come from a program like Animate CC in the form of an animation or MOV. Regardless of how you acquired your video footage or still images, if you are planning on using the files for your website, you need to use Media Encoder CC to convert them to the correct file format that runs in an HTML5 <video> or <audio> tag when you insert the link into Dreamweaver CC.
Two common file formats that you encounter when working with RAW video are AVI (.avi) and MOV (.mov); they are uncompressed video, so their file size may be considerably large—up to a gigabyte or more depending on the length and quality of the video. So, if you’re working with video that is more than a gigabyte, you should have an external drive to do your rendering and file storing to avoid a computer crash.
Note
You may have your RAW video for a project in another file format other than .avi or .mov; if this is the case, refer to the Media Browser panel to see if your file type can be imported into Media Encoder CC. You look at a case where this is an issue in Chapter 27.
Audio Video Interleave
Audio Video Interleave (AVI, .avi) is a multimedia container format introduced by Microsoft in November 1992 as part of its video for Windows software. AVI files can contain both audio and video data or moving image content in a file container. This container supports synchronous audio-with-picture playback. When these files are created with a digital camera (e.g., Canon) they are accompanied with a THM (.thm) file, which is a thumbnail image of the video file or a preview the first frame; it is like a JPEG file. While it is not necessary to keep the THM, it is quite small and it does allow a preview of the video to load faster.
For more information on AVI, visit https://en.wikipedia.org/wiki/Audio_Video_Interleave .
QuickTime File Format
QuickTime File Format (MOV , .mov) is a computer file format used natively by the QuickTime framework and was developed by Apple Inc. The format specifies a multimedia container file that contains one or more tracks, each of which stores a particular type of data: audio, video, or text (e.g., for subtitles), single still image, or timecode. Each track either contains a digitally-encoded media stream (using a specific format) or a data reference to the media stream located in another file.
The QuickTime Video Player is often found with Apple computers; it is not loaded onto Microsoft platforms, so it does not always work on alternate players like Windows Media Player. Thankfully, after the MOV is rendered (as in the video imported from Animate CC), you can use Media Encoder to preview the file and render it in a format that you can view in your media player.
Convert Video with Export Settings
Once you have imported your video files it is time to Export them to the correct formats for your website. There are three main formats that most desktop and mobile browsers recognize for the web.
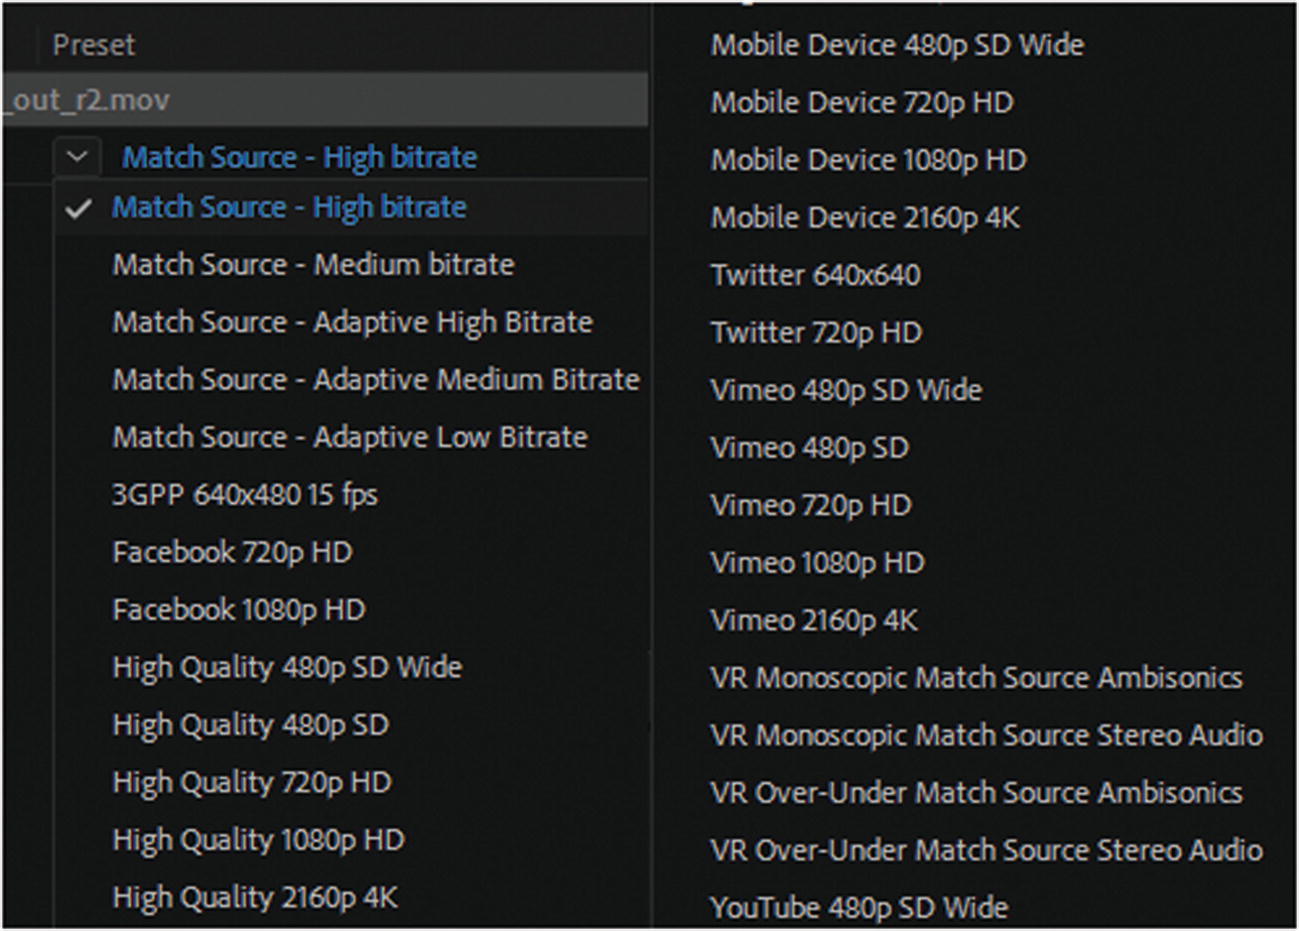
Preset Options for an MP4 file. There are many to choose from
Notice that there are settings for files specifically for Facebook, mobile devices, Twitter, Vimeo, and YouTube. If you are not sure what setting to choose and the video is relatively small, as a suggestion, I generally stick with the choice of Match Source – High Bitrate; however, you may want to render your video in several MP4 formats to check which has the smallest file size, dimensions, and optimum quality for your video.

MPEG4 file format for mobiles
This creates a small file size specifically for mobile devices with the .3gp extension. This file extension may not play in all browsers and has a low frame rate, so it is better to use MP4 or H.264 for your website.
Having said that, a 3GP file can come in handy when working with audio conversion, as you discover in Chapter 27. For more information on MPEG4, visit https://en.wikipedia.org/wiki/MPEG-4 .
Match Source (see Figure 26-1) matches the source and frame rate of whatever speed the video is shot at. As you saw in Animate CC, a good frame rate for the web is generally between 24 fps and 30 fps; however, there are higher frame rates up to 60 fps. Larger frame rates mean a larger file size, and if you alter the frame rate of your video animation, it can either slow down or speed up the action and effect the audio as well. Nevertheless for conversions where you need to increase the frame rate from 24 to 30 frames, Media Encoder can successfully create in between frames that can fill in the blanks for footage when required.
Export Settings Dialog Box
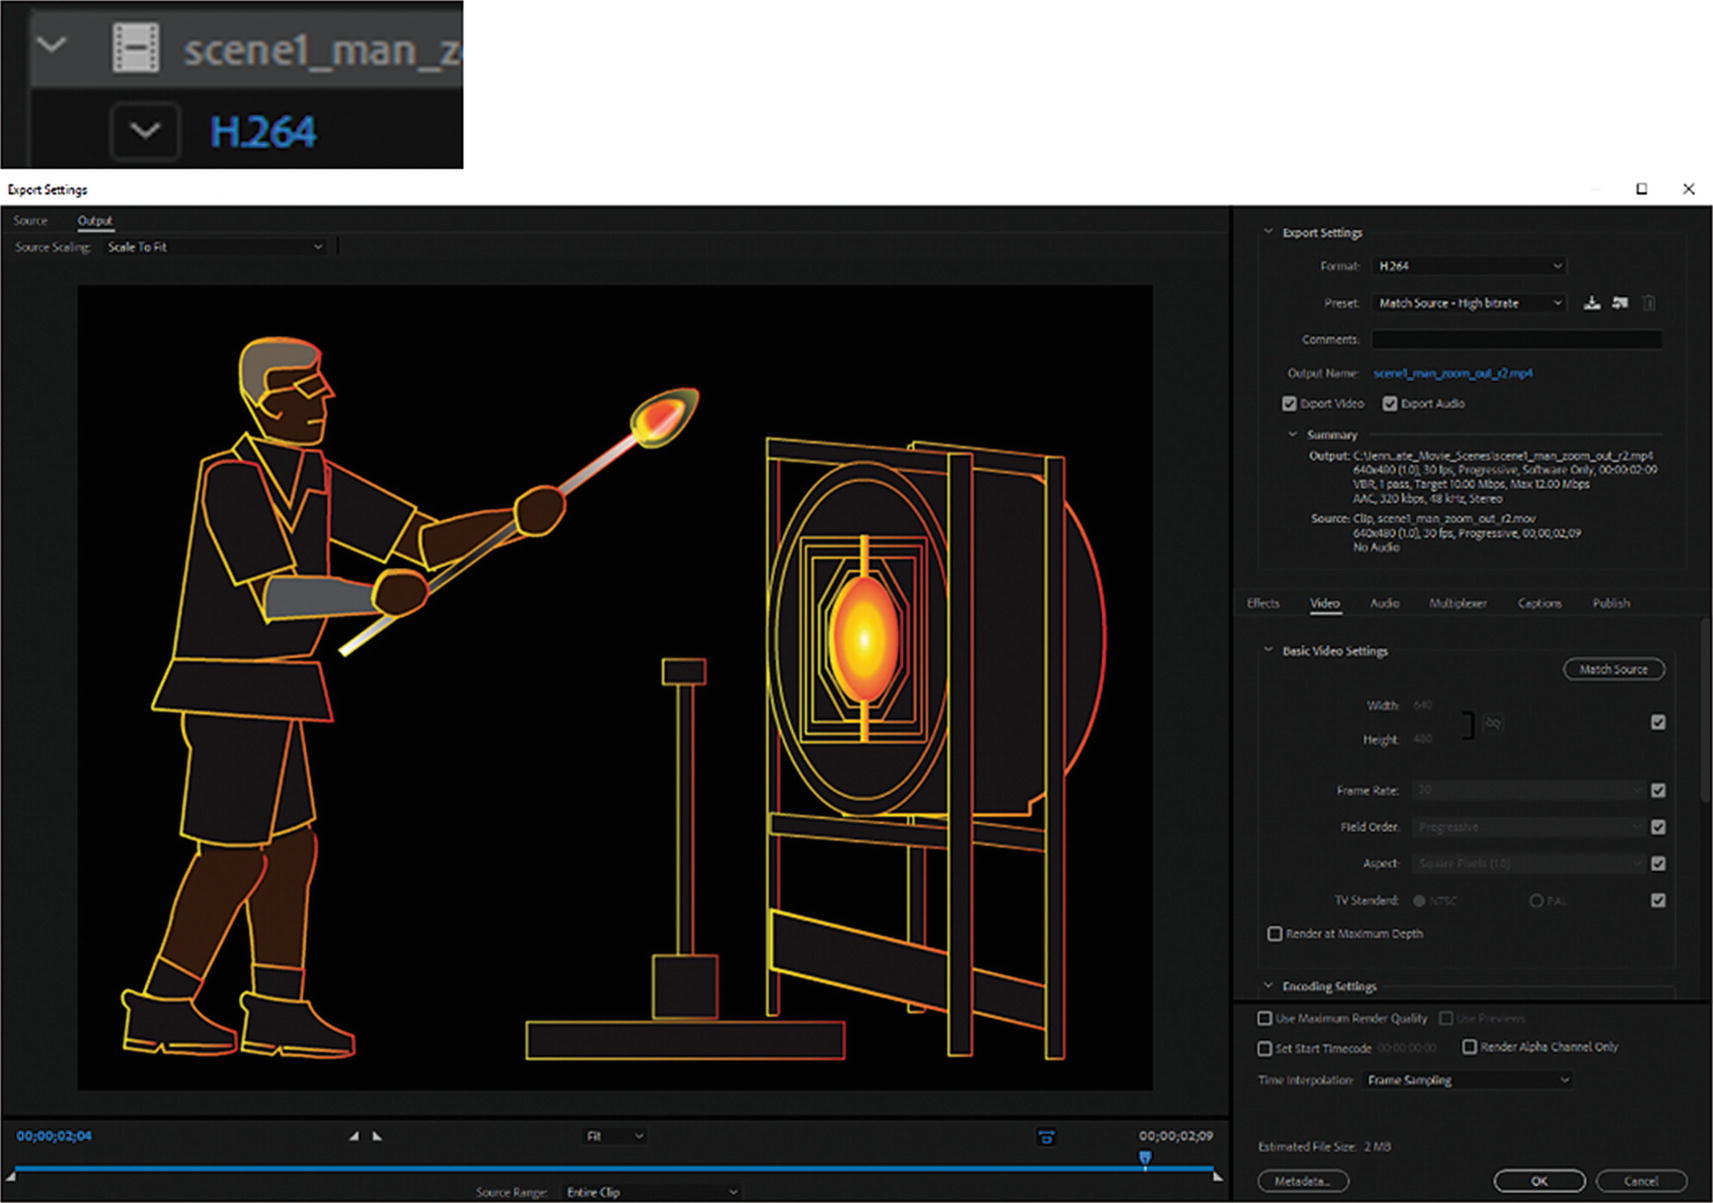
The Export Settings dialog box is revealed when you click the format name of the file
Now let’s look at each part in the panel.
Source Tab

Crop using the source image to determine the video final size

Choosing a Crop proportions setting
The handles of the Crop tool can be dragged to any custom size. In this animation, my plan was to bring it into Photoshop as part of the intro. I had already built it to the correct size, so no pre-cropping was required. Sometimes when you are working in Photoshop, it’s good to leave some of the extra footage on the edges rather than crop because you can use that extra area to center your frame better for a scene; however, if the footage is going straight to the web, the Crop tool is very useful for editing tiny amounts of video quickly. For now, set all the crop points back to 0 pixels and crop proportions back to none, as seen in Figure 26-4, and unselect the Crop tool so that the options are not available .
Output Tab
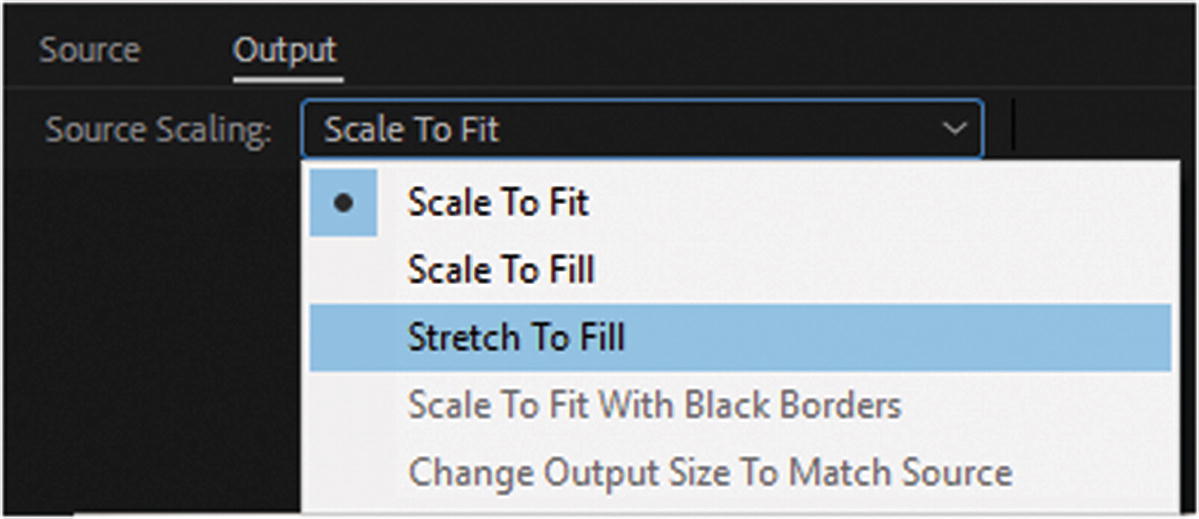
Output settings
Scale To Fit (default): Scales the source frames to fit within the output frame while maintaining pixel aspect ratio of the source. It trys to match the original video ratio that was set in the Source Video tab. If it does not match additional black side bars may be added to the footage.
Scale To Fill: Scales the source frame to completely fill the output frame while cropping the source frame as necessary, but still maintains the pixel aspect ratio.
Stretch To Fill: Resizes the source frame to completely fill the output frame. With this setting, distortions can occur because the pixel aspect ratio is not maintained and the output ratio might be different.
Scale To Fit With Black Borders: The source frame, including the cropped area, is fit within the output frame. Even though the pixel aspect ratio is maintained, a black border is applied if the output dimension is smaller than the original.
Change Output Size To Match Source: Automatically sets the height and width of the output video frame to the height and width of the source video frame, overriding the output frame size settings. This setting is not available to all export formats.
Options that are not available are grayed out in the drop-down list. In some cases, other options in Export Settings have to be altered for them to become available.
Further details can be referenced at https://helpx.adobe.com/media-encoder/using/export-settings-reference.html .
Preview Settings

The video timeline and playhead

Setting points to clip in the video
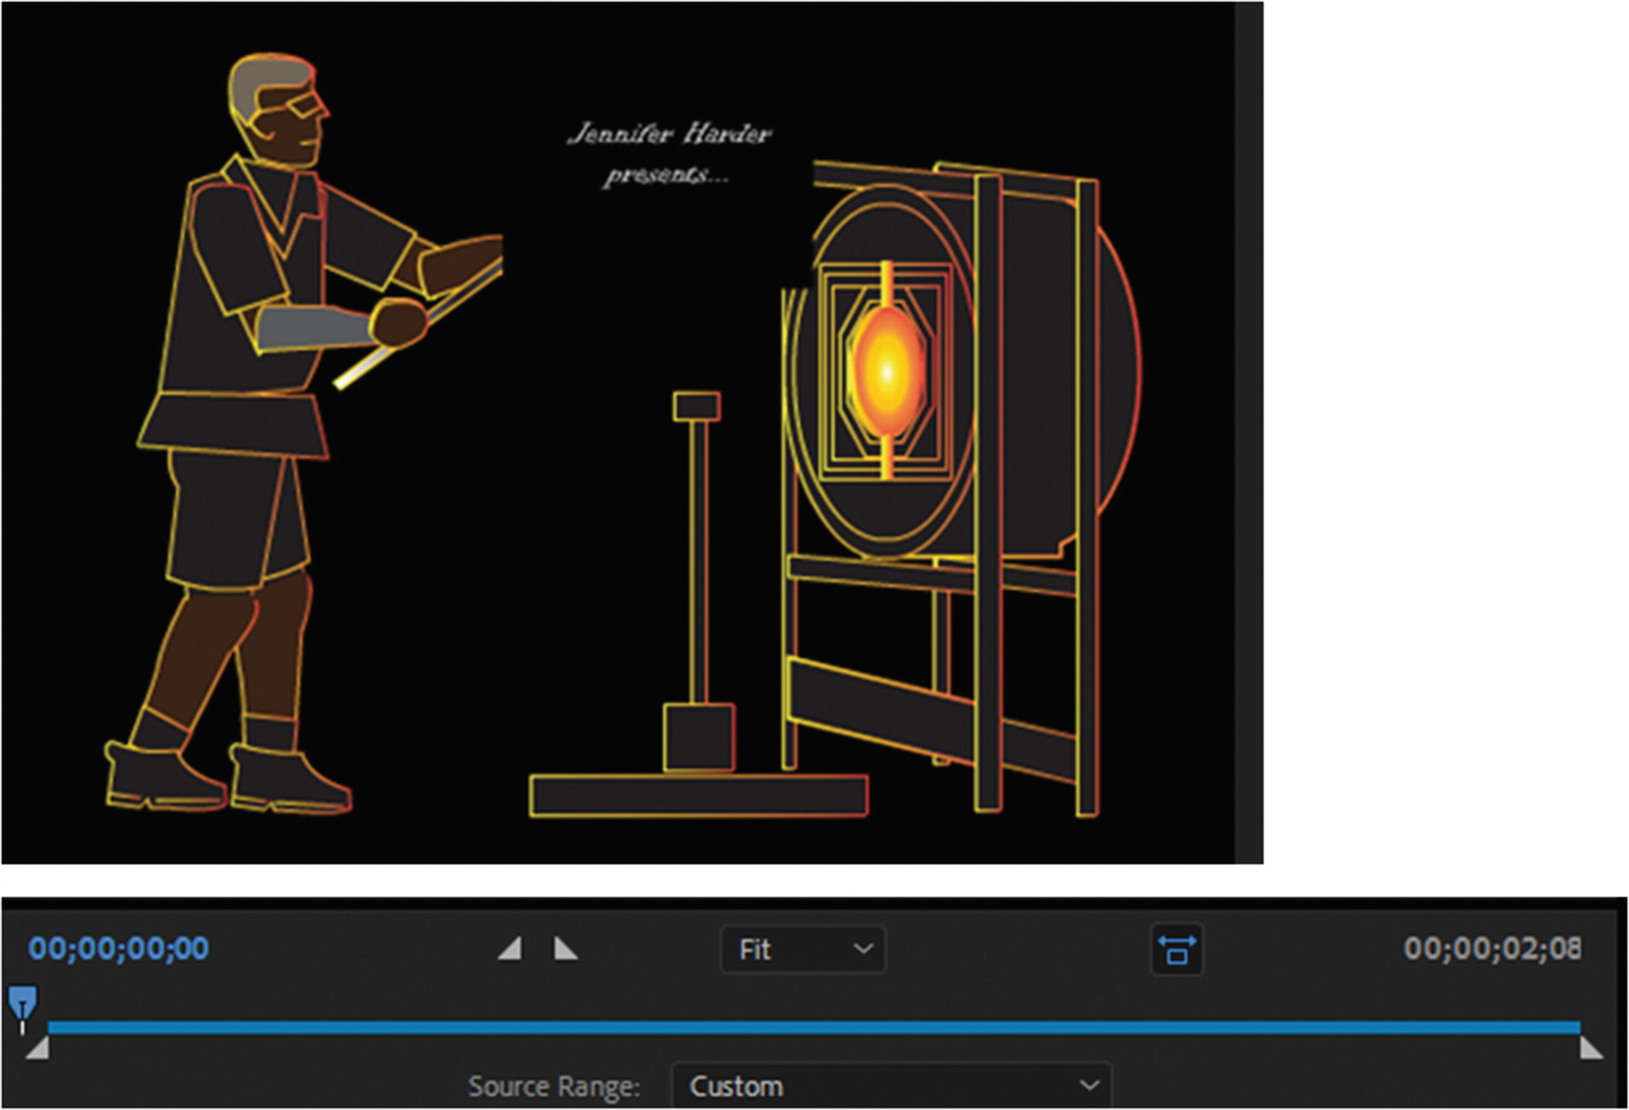
The first frame in this movie clip came in as a distorted camera angle, so I moved the point on the left in so that that frame is not part of the final rendering for the movie upon export
Alternatively, using the scrub in combination with the left and right set point buttons, you can accurately set where you want your video to begin and end. I find this very useful if I am doing a quick edit directly from the footage from my camera, and I want to chop out something at the end or beginning of my video. If you have several points to crop, it is better to make more duplicates in the Queue panel of the footage and then move the point marker to a different location for each.
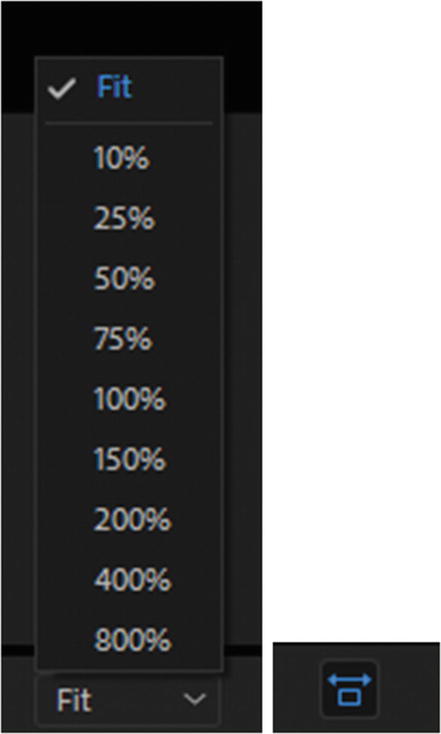
The Fit drop-down and aspect ratio correction icon enabled
Export Settings and Summary
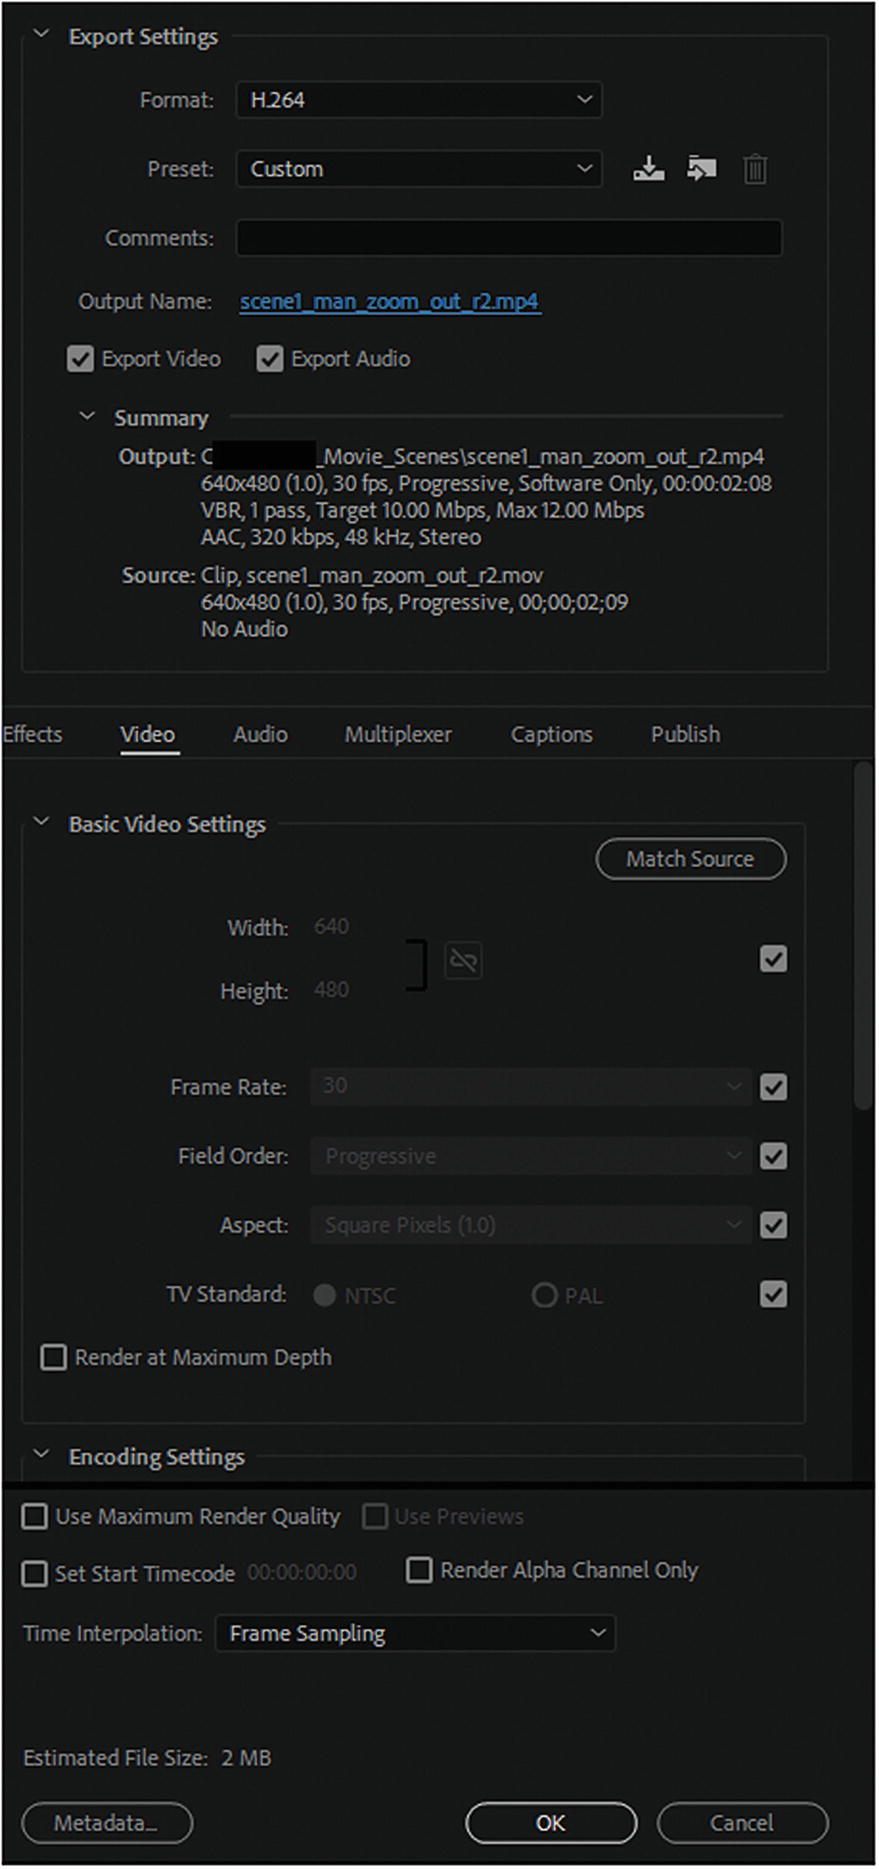
Advanced format settings overview

Advanced Export settings and summary
You can add comments to your video if you are doing editing elsewhere, and you can review the output name.
If you want both the video and the audio to export, then both check boxes should be enabled; otherwise, only one or the other export. This is a good option if you only want to export the audio out of a video clip, as you see in Chapter 27. Or alternatively, only export the video if the audio does not relate to the story. This video had no audio to begin with, so that was detected for the output in the summary when the video was imported.
The summary lists the current setting to output and source file.
As you move down the right column, you see that there are other advanced edits that you can make to the video. Most of these (other than the Video or Audio tabs) you likely leave at default for your basic projects, but it is good to know what options are available. By clicking the arrow tabs, you can contract and expand the details of these tabs’ settings. Checking them applies the settings. At default, most are unchecked or are autoenabled without the check box option.

Advanced Export settings tabs
Effects Tab
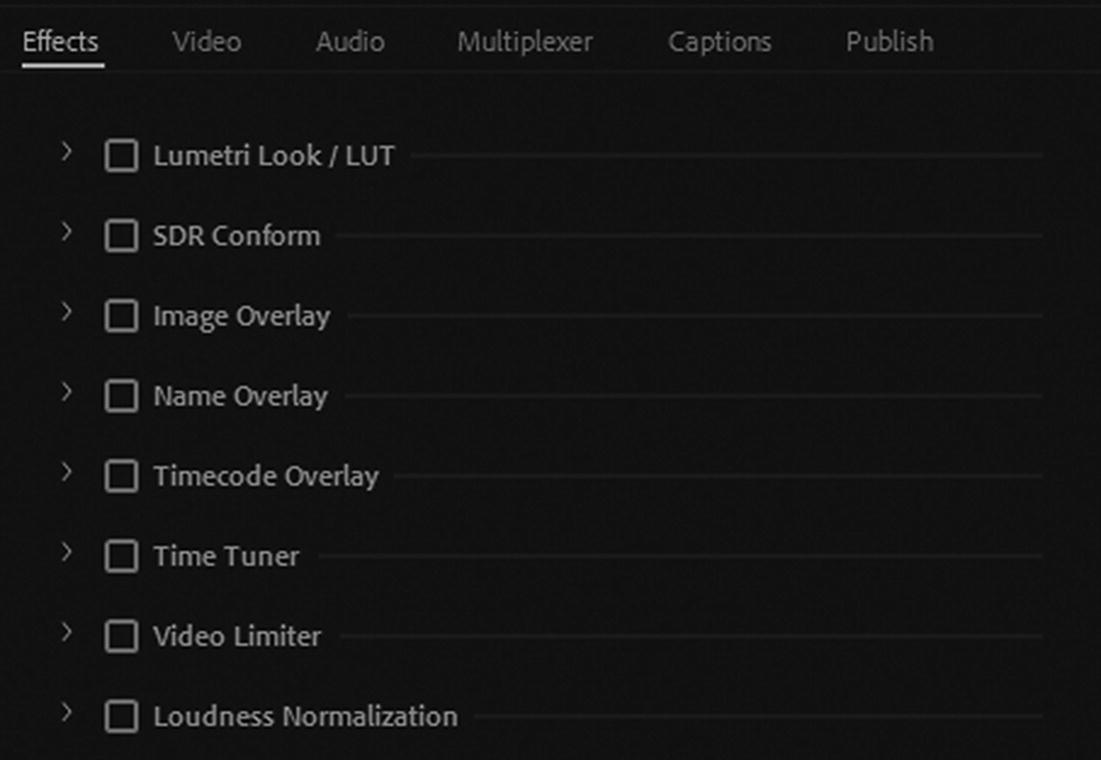
Effects tab settings
Lumetri Look/LUT
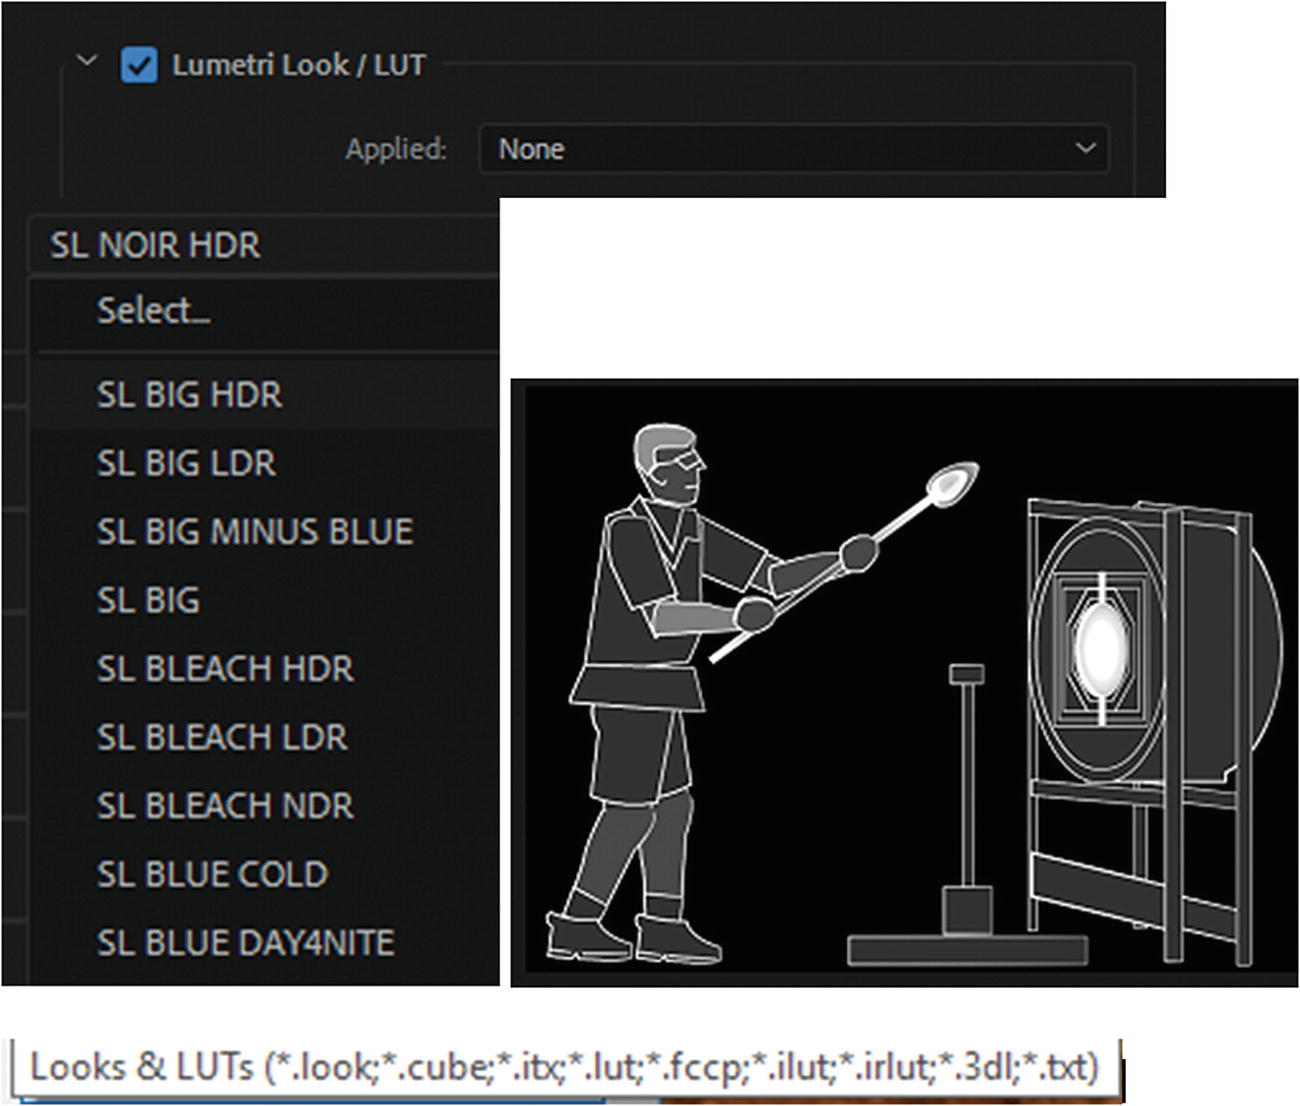
Effects tab settings for Lumetri Look/LUT and select options
When you want to preview, toggle the check box on or off to compare how the video looks before or after. While this may not be as robust as working in a program like After Effects or Photoshop, it is a good option if you want all of your video to have a consistent color grade in your video sequence.
SDR Conform
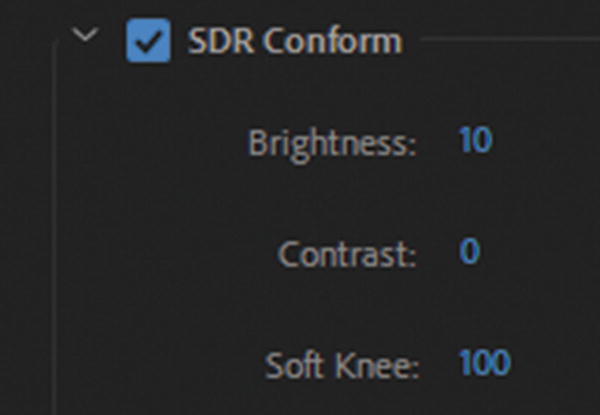
Effects tab settings for SDR Conform
Soft knee refers to the transition to full compression mode; this can affect the graininess, shadows, or quality of the video. You can either enter a number or drag the number left or right to get a range. To compare before or after, enable and disable the checkbox. SDR Conform allows you to convert HDR (high dynamic range) video to the SDR (standard dynamic range) settings for playback on non-HRD devices.
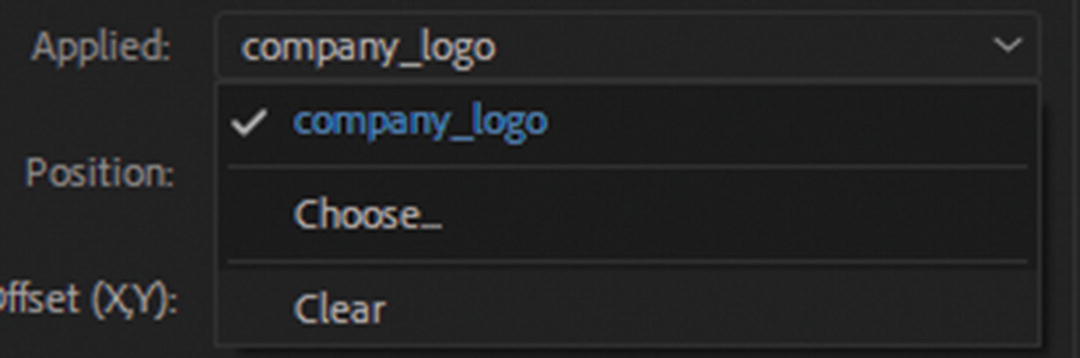
Image Overlay
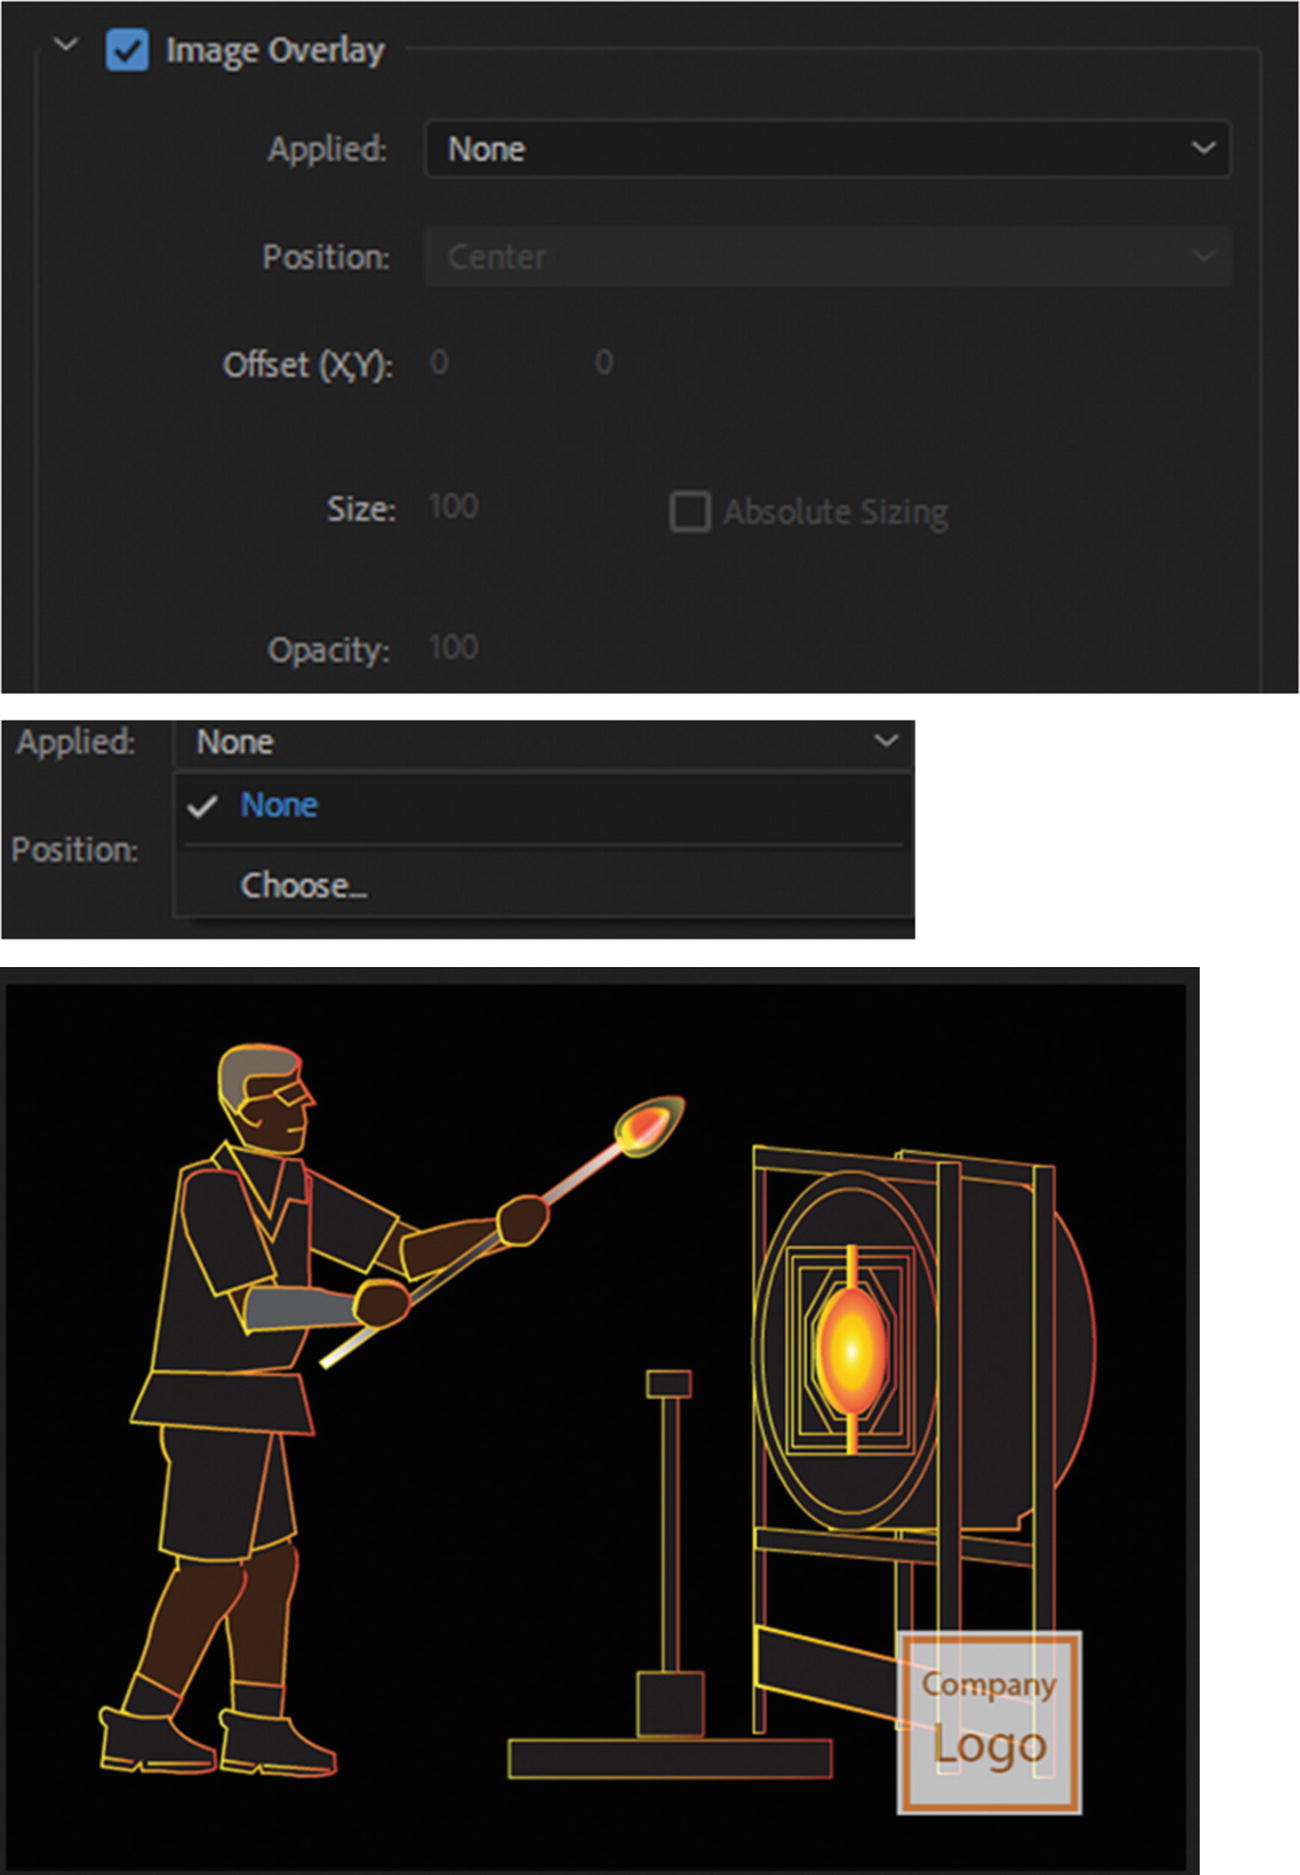
Effects tab settings for Image Overlay
Once an image is chosen, you can adjust the position from the drop-down menu and use the offset (X, Y) for a custom position. Sizing and absolute sizing are based on video resolution. You can also set the opacity of this overlay image.
Effects tab settings for Image Overlay remove overlay
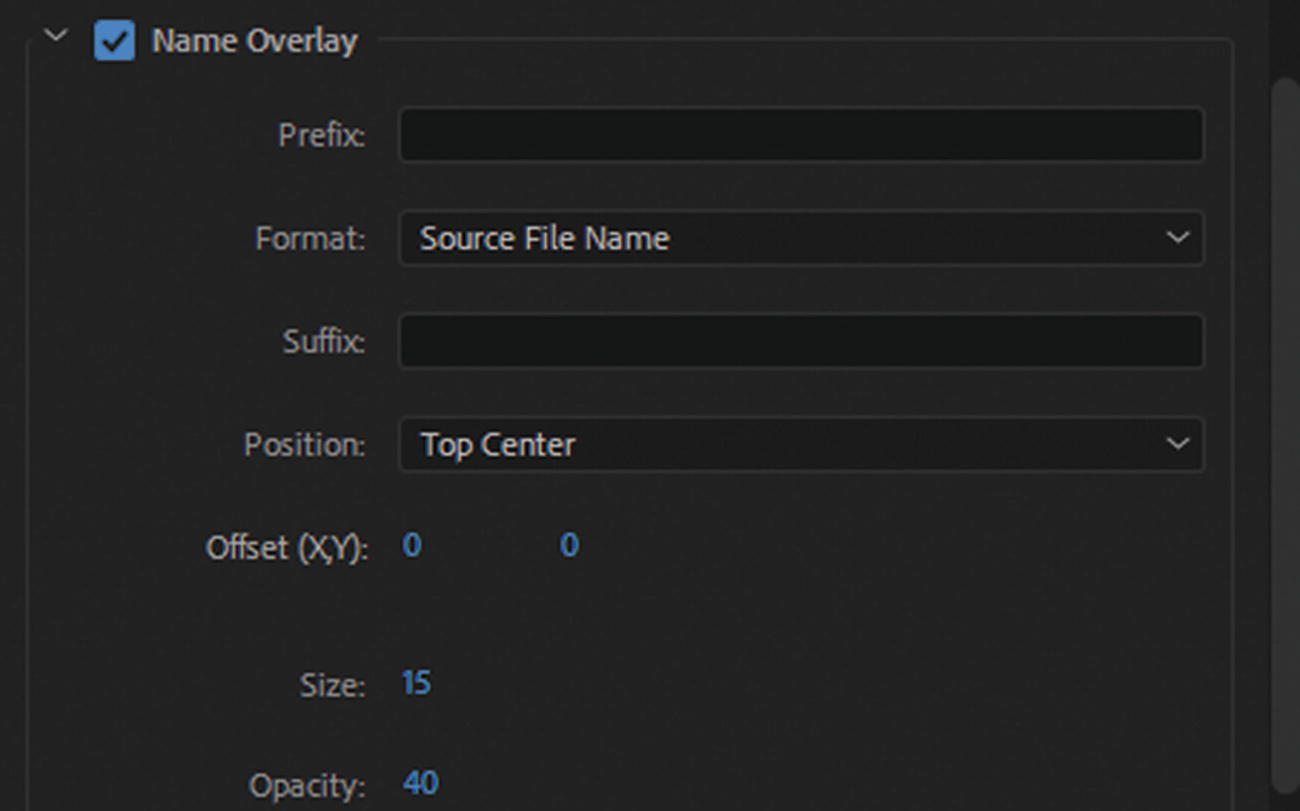
Name Overlay
Effects tab settings for Name Overlay
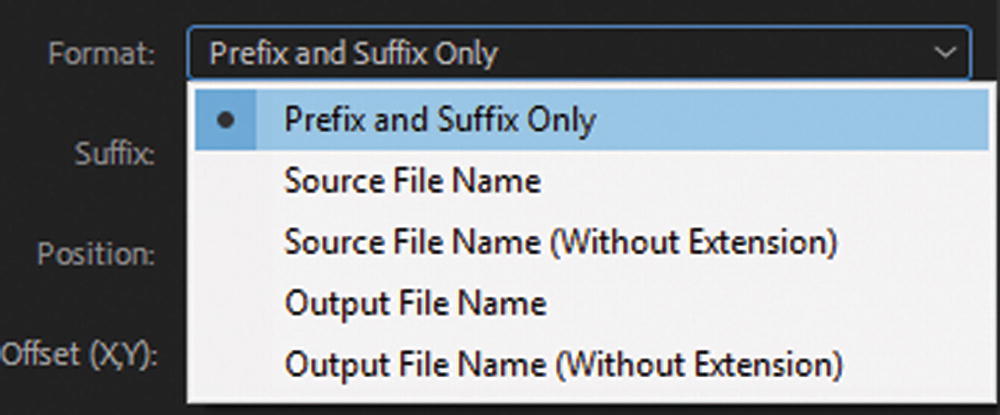
Prefix: Text can be added to the beginning of the source file name.
Format: Source File Name adds the current name of the file. Alternatively, you can have it without the file extension. It can also be the Output File Name with or without extension. Prefix and Suffix Only lets you enter your own text without file name or extensions that you can type into the prefix or suffix text field areas of this dialog box. Refer to Figure 26-20.
Format options in Text Overlay
Suffix: Text can be added to the end of the source file name.
Position: Sets a location or relative position of the text within the output frame using the drop-down menu.
Offset (X, Y): This is a custom position.
Size: Adjusts the size of the text.
Opacity: Sets from 0–100 to make transparent or visible, as seen in Figure 26-21.

Format options in Text Overlay with name on image
There does not appear to be a way to alter the color of the text (e.g., color picker) only white, so adding colored overlay text in Photoshop might be a better option in some cases. You can also remove the text by unchecking this option.
Timecode Overlay

Effects tab settings for Timecode Overlay as media file or generate timecode

Effects tab settings for Timecode Overlay generate timecode settings

Effects tab settings for Timecode Overlay generate timecode settings for format
If you would like to learn more about timecode, refer to www.edithouse.com.au/information/about_timecode.html .
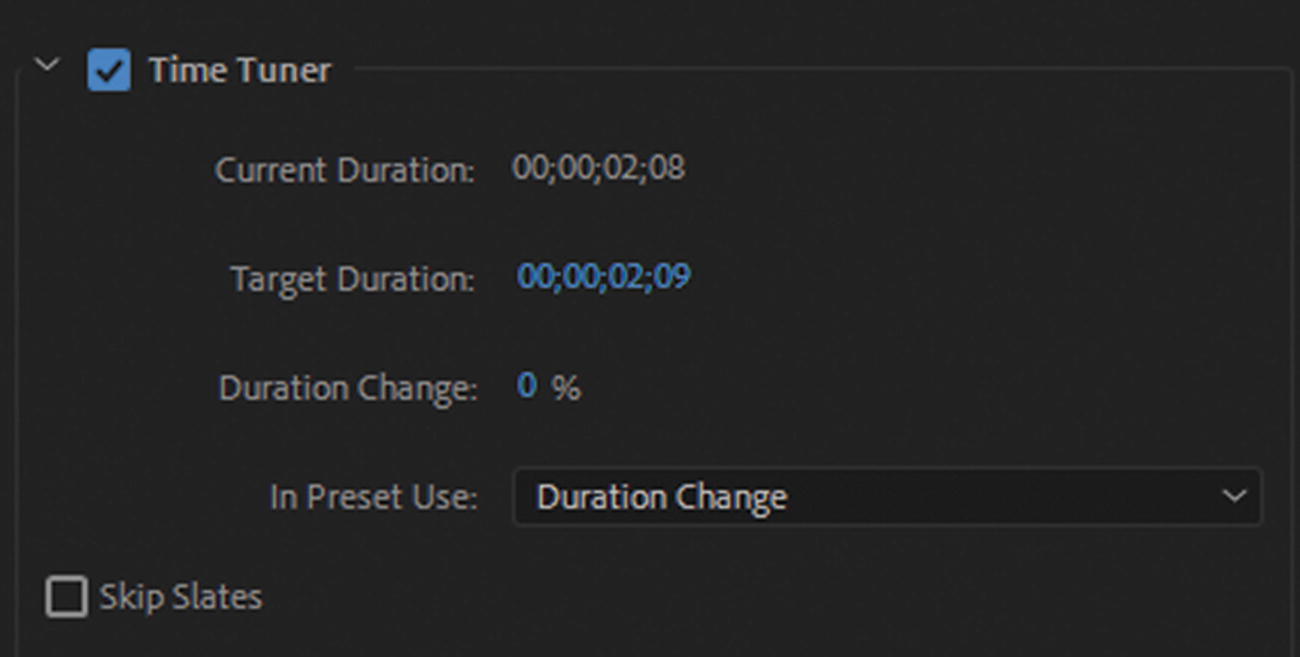
Time Tuner
Effects tab settings for Time Tuner
This effects the duration change by percentage. In Preset Use: There are two choices: Target Duration adjust all outputs of a specific target duration, while Duration Change adjusts each as a percentage of the original source duration. You may need to run tests with each preset to help you decide which option to choose your your project.
Skip slates refers to a series of still images (slates) with a combined duration longer than 10 seconds. Checking this prevents the time tuner from being applied to them.
The time tuner may cause part of the video to drop or drag, and this may not be what you want. It could affect audio as well, so make sure to experiment with this setting if you plan to use it.
Video Limiter
Depending on the settings that you choose, it can affect or constrain the luminance and color of the output file so that the range is compressed within safe broadcasting limits.
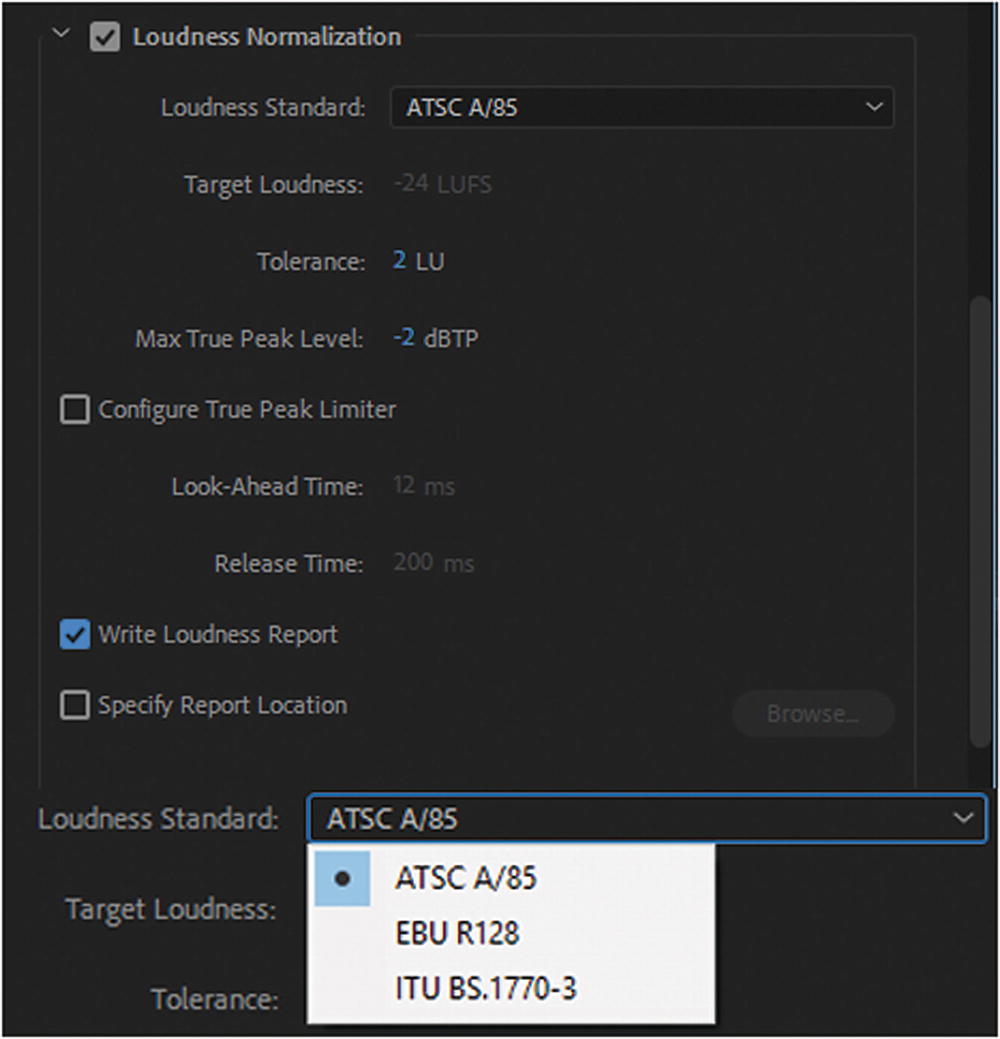
Loudness Normalization

Effects tab settings for Video Limiter for clip level and compression
Effects tab settings for Loudness Normalization
You can ensure that your video and audio projects meet broadcast standards for loudness. You can also apply adjustments to the standards, such as target and tolerance, and maximum true peak level. Configure True Peak Limiter for Look ahead and Release time and view a written report of the loudness values. You can also specify where the report is published on your hard drive or external drive.
ATSC A/85
EBU R128
ITU BS.1770-3: Only with this option can you alter the target loudness. The earlier noted standards do not allow you to alter the target loudness.
Adobe states that loudness normalization natively works with mono, stereo, and 5.1ch audio. If you use something other than those channel types (such as 4ch, 8ch, 16ch, and so on), the Channel Configuration screen appears.
Internet viewers may watch your video on their smartphones or websites. You can generally leave this area unchecked; however, if you plan to output the MP4 video for a use other than your website, you may want to experiment with these settings or check with your broadcaster. You can make other adjustments in the Audio tab.
Video Tab

Video tab settings
Basic Video Settings: Allows you to match the source files width and height, unlink to make disproportionate, adjust frame rate, field order, aspect ratio, and TV standard (NTSC or PAL). Refer to Figure 26-29.

Video tab settings for Basic Video Settings
Match Source: Resets all the setting back to original source.
Frame Rate: Refers to the number of frames per second.
Field Order: This has to do with interlacing; discussed in Part 2. The options are progressive, upper first, and lower first. Progressive is used for the computer screen and film.
Aspect: The pixel aspect ratio of the video.
TV Standard: NTSC is a format used by the USA, Canada, and Japan. Europe and Asia use PAL. Changing this area also alters the frame rate.
Render At Maximum Depth: Improves the bit depth quality, but increases how long the encoding takes.
Encoding Settings: This can affect other encoding information in the video. Refer to Figure 26-30.

Video tab settings for Encoding Settings
Profile: Constrains the bitrate range and controls other properties such as compression algorithm and Chroma format.
Level: Constrains encoding parameters such as bit rate range and maximum frame size. This can only be accessed if you first unselect the profile
Rec. 2020 Color Primaries: This can only be accessed when the profile of High 10 is chosen from the drop-down menu.
High Dynamic Range: This can only be accessed when Rec. 2020 Color Primaries is selected.
Bitrate Settings: This can control the rate or megabits per second (Mbps) of a video. Refer to Figure 26-31.

Video tab settings for Bitrate Settings
Bitrate Encoding: There are three to choose from: CBR (constant bit rate), VBR (variable bit rate) 1 pass, and VBR 2 pass. Pass refers to the number of encoding passes.
Target Bitrate (Mbsp): The target rate allowed by the encoder; you can set a range or type in a number (0.19–14)
Maximum Bitrate (Mbsp): Higher values can improve maximum quality but increase decoder requirements. Like target bitrate, it ranges from (0.19–14) and is linked to the target so that when a number is selected from the target, it limits the range of the maximum bitrate. For example, if target is 14 then the maximum can only be 14.
Advanced Settings : By default, this is unchecked and has a default of 72, which is determined by Media Encoder based on the frame rate of the video clip; however, when checked, you can chose from a range for the keyframe distance. Keyframes are complete video frames (or images) that are inserted at consistent intervals in a video clip. The frames between the keyframes contain information on changes that occurs between keyframes.

Video tab settings for Advanced Settings
Video is VR: By default, this is unchecked. Once checked, you can adjust the frame layout for virtual reality. It adds video metadata. Refer to Figure 26-33.

Video tab settings for Video is VR
When you hover over each option in the menu it describes how monoscopic and stereoscopic imagery is laid out in the frame. For each type you can now adjust the horizontal and vertical field of view.
Monoscopic means there is a single point of view in the recording, whereas stereoscopic means there is a separate recording for both eyes, adding more depth, such as in 3D or virtual reality video. This does not make the video one or the other, it only adds the information or metadata to the file.
To create 3D 360-degree view in monoscopic or stereoscopic video, you need a camera that can record in one of these formats. Then using professional video editing software like After Effects CC, you could stitch the final video together. A good article explaining monoscopic and stereoscopic is at www.onlinecmag.com/stereoscopic-videos-vs-monoscopic-360/ .
Audio Tab
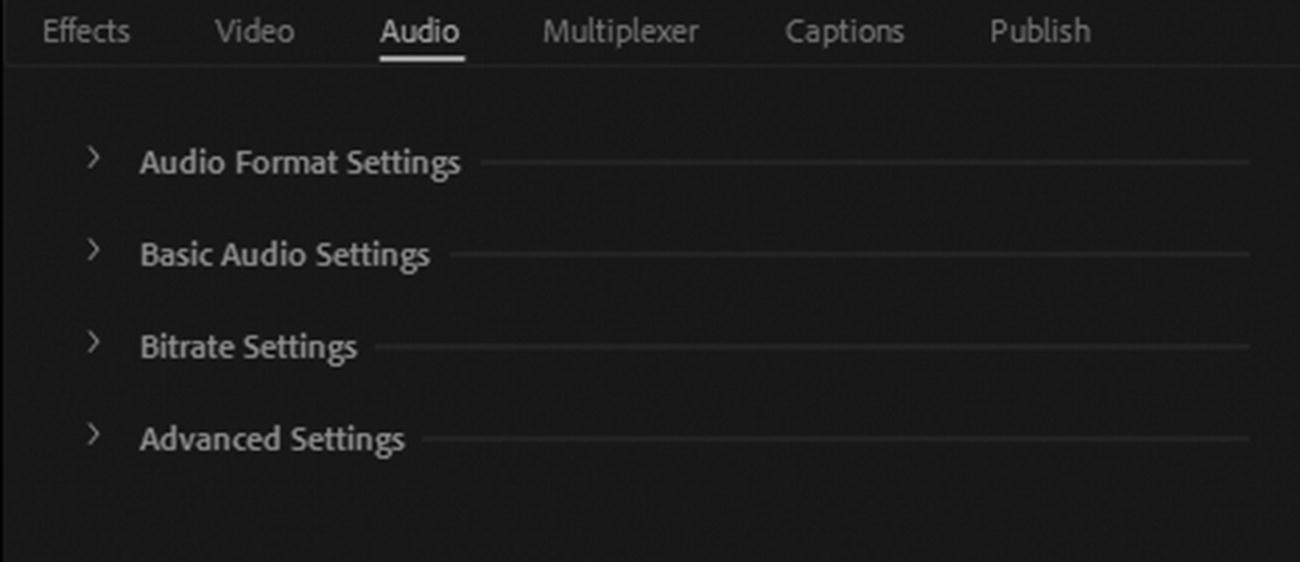
Audio tab settings
Audio Format Settings: Can be either ACC (advanced audio coding) or MPEG. Refer to Figure 26-35.

Audio tab settings for Audio Format Settings
Basic Audio Settings: Sets the parameters for the audio for either ACC or MPEG. Refer to Figure 26-36.

Audio tab settings for Basic Audio Settings ACC and MPEG
Audio Codec: This refers to the codec used to encode the audio stream. There are several ACC versions to choose from in the drop-down menu.
Sample Rate: This is the sample rate of the audio in Hz (hertz).
Channels: The number of channels in the output audio (mono, stereo, 5.1).
Parametric Stereo: Recommended for stereo audio that has a bit rate below 40 kbsp (kilobytes per second). Only available for Audio Codec ACC+Version 2 when Channels is set to Stereo.
Audio Quality: High, medium or low.
Audio Layer: For MPEG-1 can be one or two layers: MPEG-1 Audio Layer I or MP1. It is a deliberately simplified version of MPEG-1 Audio Layer II and is created for applications where lower compression efficiency could be tolerated in return for a less complex algorithm that could be executed with simpler hardware requirements. While supported by most media players, the codec is considered largely obsolete, and replaced by MP2 or MP3. MPEG-1 Audio Layer II or MPEG-2 Audio Layer II (MP2) is a lossy audio compression format and is a standard for audio broadcasting. You can save the audio separately as an (.mp3) file, as you see in Chapter 27.
Stereo Mode: For MPEGs can be normal, joint stereo, or dual channel. This is only available if the channel setting is stereo.
Bitrate Settings: When you encode the audio, a higher bitrate means better quality. Refer to Figure 26-37.

Audio tab settings for Bitrate Settings
Advanced Settings: Depending on if you choose ACC or MPEG, these settings differ. Refer to Figure 26-38.

Audio tab settings for Advanced Settings ACC and MPEG
Precedence: For ACC, bitrate constrains the sample rate based on the earlier chosen bitrate. Sample rate this constrains the bitmap values for the given sample rate. The option of Oversampled Mode may be available depending on what settings you changed earlier in the Audio tab.
Psych Model: For MPEG, known as a Psychoacoustic model, it has to do with amplitude and noise level; you can choose either model 1 or 2.
De-emphasis: Decreases the magnitude of some frequencies. By default, it is set to No emphasis. Refer to Figure 26-39 and see https://en.wikipedia.org/wiki/Emphasis_(telecommunications) .

Audio tab settings for Advanced Settings MPEG de-emphasis
Enable CRC: Cyclical Redundancy Code (CRC) to detect errors in the bitstream.
Enable Private Bit: Available for private use.
Enable Copyright Bit: The copyright bit relates to what is called DRM (Digital Rights Management) and to whether it is legal or illegal to copy the audio.
Enable Original Bit: This relates to the original bit stream, which can be recovered from audio using other software in certain cases.
Multiplexer Tab

Multipexer tab settings for Basic Settings
Basic Settings is the default, in this case in MP4. You can choose different multiplexer options in the drop-down menu. When you choose MP4, different stream compatibility options are available such as standard, PSP, or iPod.
Captions Tab
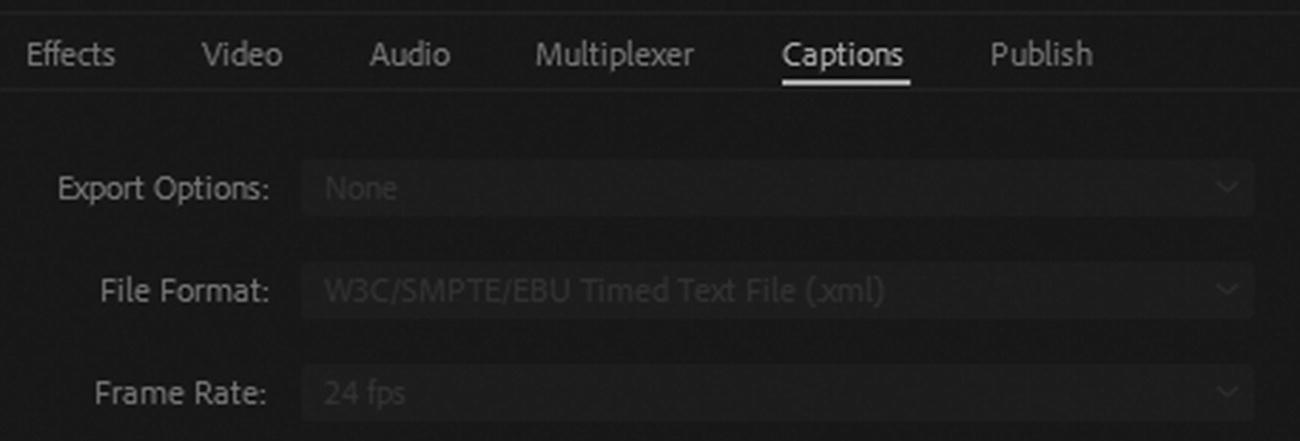
Captions tab settings for Basic Settings
Note
The Export options, file format, and frame rate relate to the captions, not to the frame rate of the video.
Publish Tab
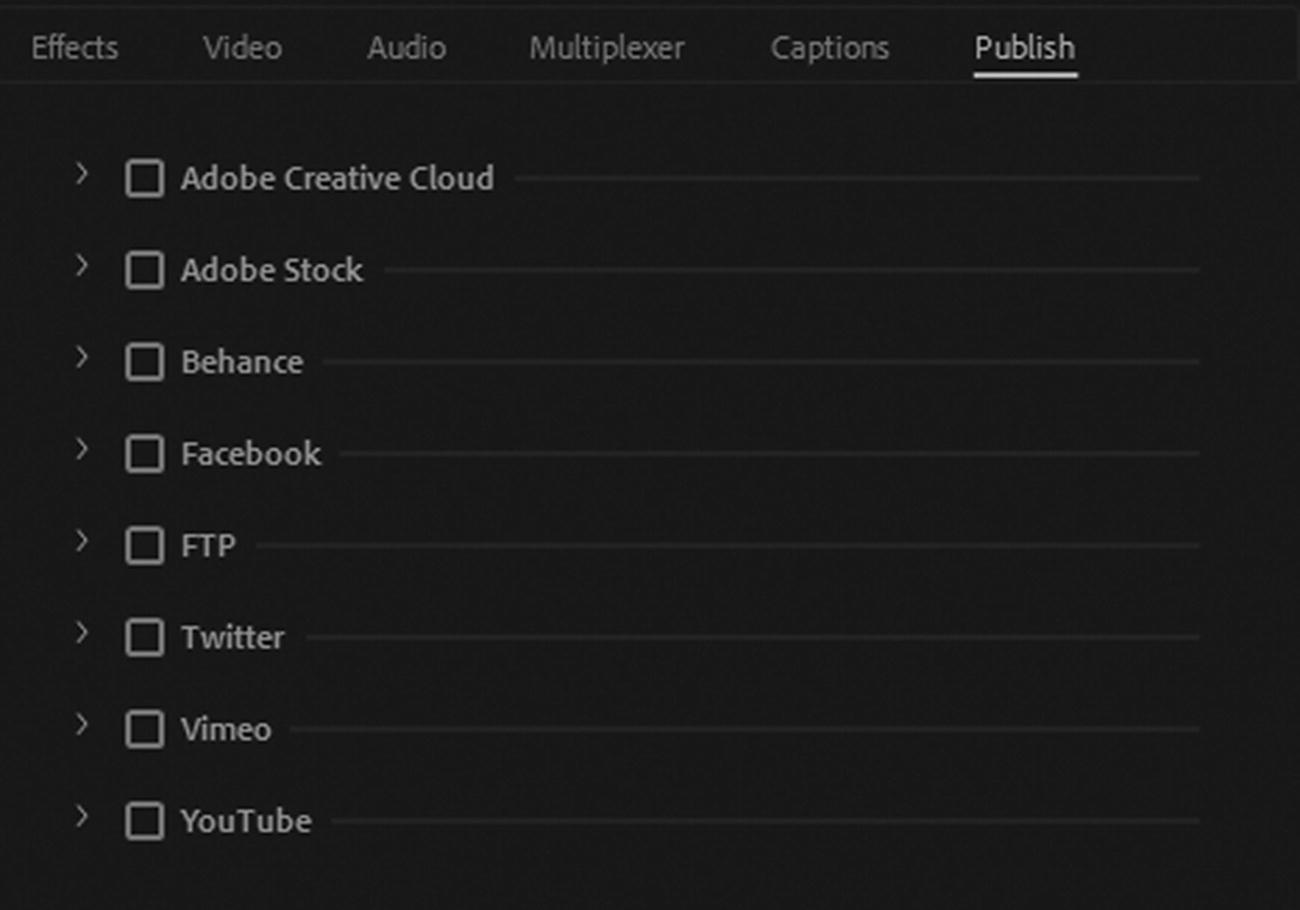
Publish tab settings
Media Encoder allows you to enable and enter login information for various sites and saves the information so that you don’t have to do it each time for the same file.

Publish tab settings for Adobe Creative Cloud
This is like having the Libraries CC panel as in the other Adobe programs where you can upload a file to the Creative Cloud.
Adobe Stock: If you have an account with Adobe Stock, you can sign in. Refer to Figure 26-44.

Publish tab settings for Adobe Stock
Behance: If you have an account with Behance, you can sign in and add a description and tag to the file. There is also the option to delete the local file after upload; leave this unchecked should you want to use the same file elsewhere. Refer to Figure 26-45.

Publish tab settings for Behance
Facebook: If you have a Facebook account, you can sign in and add a the page to upload to, the title, and description, before you upload the file. There is the option to delete the local file after upload; leave this unchecked should you want to use the same file elsewhere. Refer to Figure 26-46.
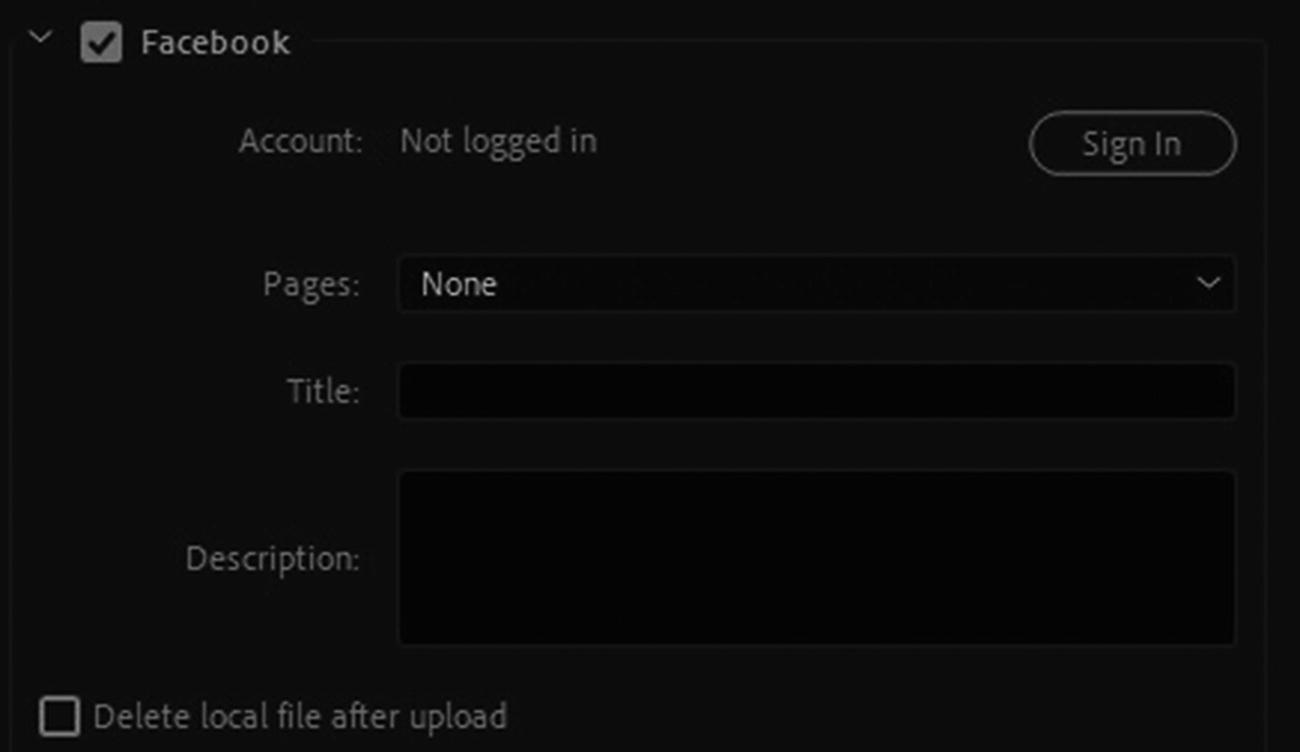
Publish tab settings for Facebook
FTP: Also known as File Transfer Protocol, this is a good option if you have already set up your site using Dreamweaver CC and have an FTP account set up. Rather than going through Dreamweaver CC, you can upload the new file directly to the folder in the site if there is a last minute change to the video. Refer to Figure 26-47.

Publish tab settings for FTP
Enter your username, password, and server, and set up the remote URL path. You look at this in more detail in Part 6. Leave port and retries at the default unless you have different settings within your company. Skype has been known to affect the port number, so this is something to check if you run into issues.
Twitter: If you have an account with Twitter, you can sign in and add status information. Refer to Figure 26-48. Like the previous publishing options, you can choose whether or not to delete the local file after upload.

Publish tab settings for Twitter
Vimeo: If you have an account with Vimeo, you can sign in and add a channel to upload, the title, and a description of the file. You can also choose privacy settings (viewable by) and add tags. Like previous publishing options, you can choose whether or not to delete the local file after upload. Refer to Figure 26-49.

Publish tab settings for Vimeo
YouTube: If you have an account with YouTube, you can sign in and add a channel and playlist to upload to as well as a, title and description to the file. You can then choose privacy settings and add tags. Custom Thumbnail is the cover or poster image, which could be none (default), from an image that you created, or a frame chosen from the video. Like previous publish options, you can choose whether or not to delete the local file after upload. Refer to Figure 26-50.
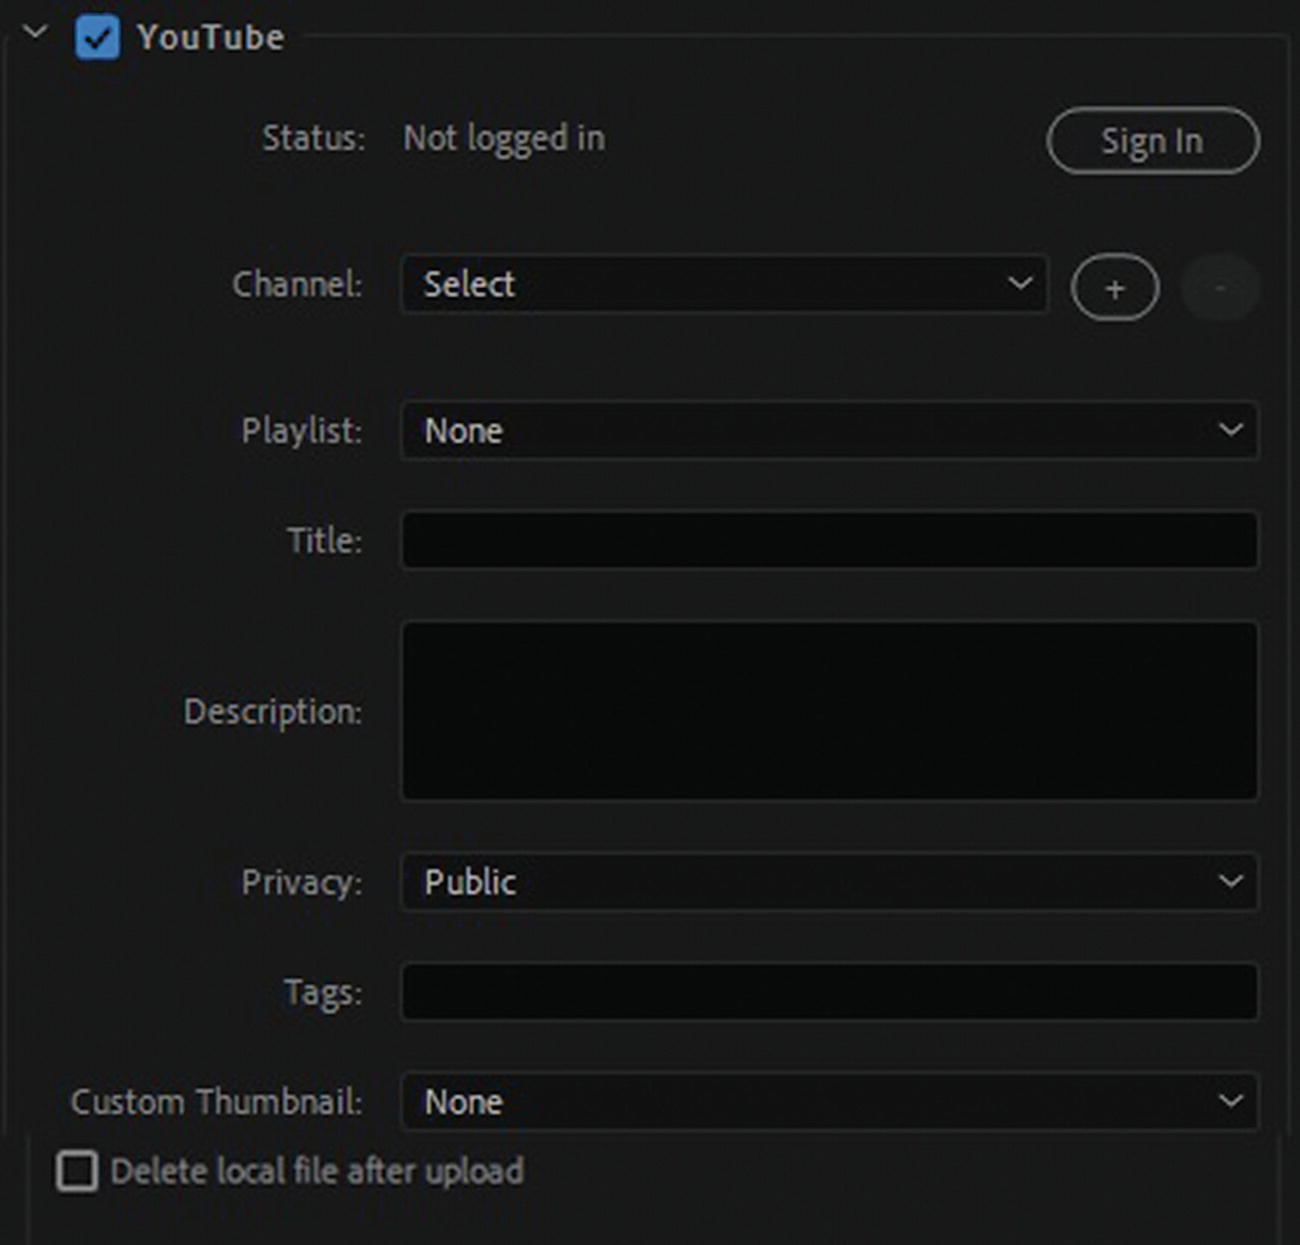
Publish tab settings for Vimeo
Render, Time Code, and Alpha and Output Size
Use Maximum Render Quality: Increases encoding time if enabled.
Use Previews: For sequence exports from Premier Pro; if these files are already created by Premiere Pro, then selecting this option selects those preview files making the rendering faster.
Set start time code: This sets the start in the format of hh:mm:ss:ff.
Render Alpha Channel Only: Use if the original video format has this channel.
Time Interpolation: Depending on the setting from the drop-down menu, you can create smoother motion by blending adjacent frames when the input frame rate does not match the output frame rate. The default is Frame Sampling. Refer to Figure 26-51.

Final export settings in the lower right

Metadata Export dialog box
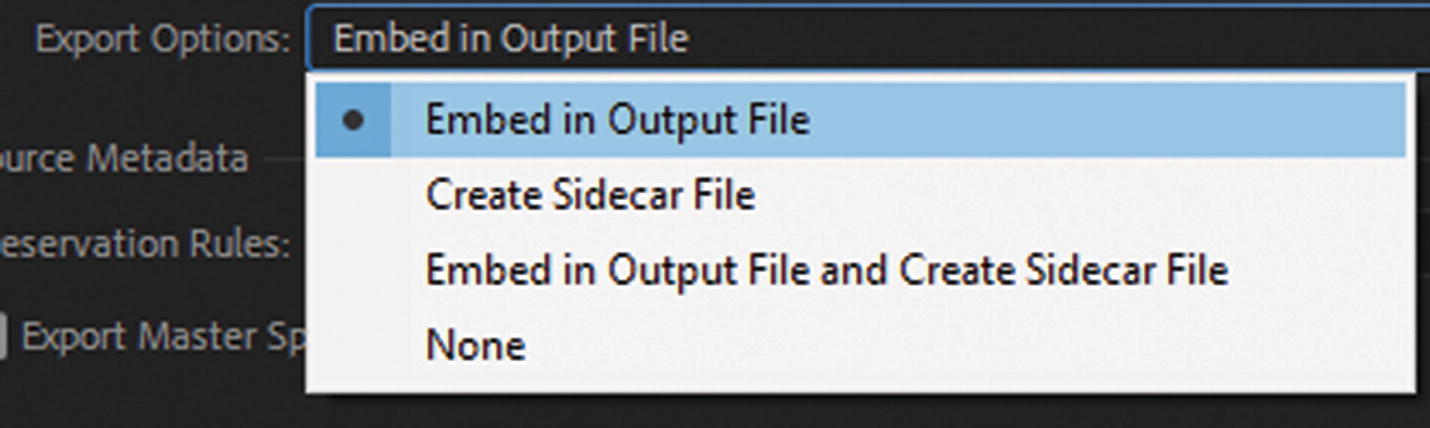
Metadata Export dialog box embed output settings
When done, click Cancel to exit the dialog box. And then in Export Settings, either click OK to confirm your settings or Cancel to exit and return to the Queue panel to continue adjusting other files before you export the MP4 file by pressing the green Play arrow.
Combine Video (Stitch Clips)
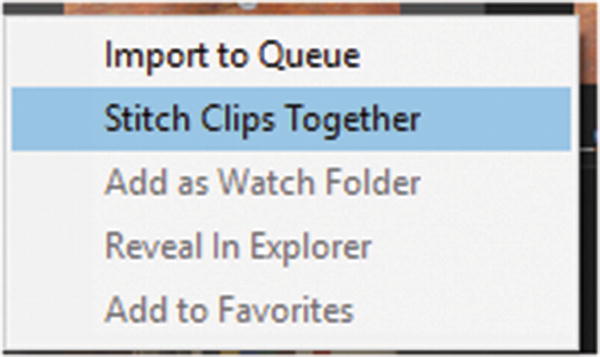
Combining video clips
Like a single MP4 or WAV file, when selected in the Media Browser panel and then reordered in the Queue panel by dragging up or down to change the order. However, if a clear transition is not previously created between the two video files then the blend may appear choppy between transitions. A scene may break at the wrong location or the audio may not appear consistent upon reaching the stitch point. If video sources in a stitched clip do not have the same properties (for example, different frame sizes, frame rates, and so on), the properties of the first clip in the series determines the properties of the entire stitched clip.
Sources with differing frame sizes are scaled to fit the frame size of the first clip automatically. Though pixel aspect ratio is maintained, letter boxing and pillar boxing can occur, which may not be the effect you are trying to achieve. If this a concern, it is better to stitch your RAW video or animations together using Photoshop CC, Animate CC, or Premiere Pro CC, and then bring the file into Adobe Media Encoder for a final rendering. This way, you can control exactly where video or audio starts or stops and adjust frame sizes.
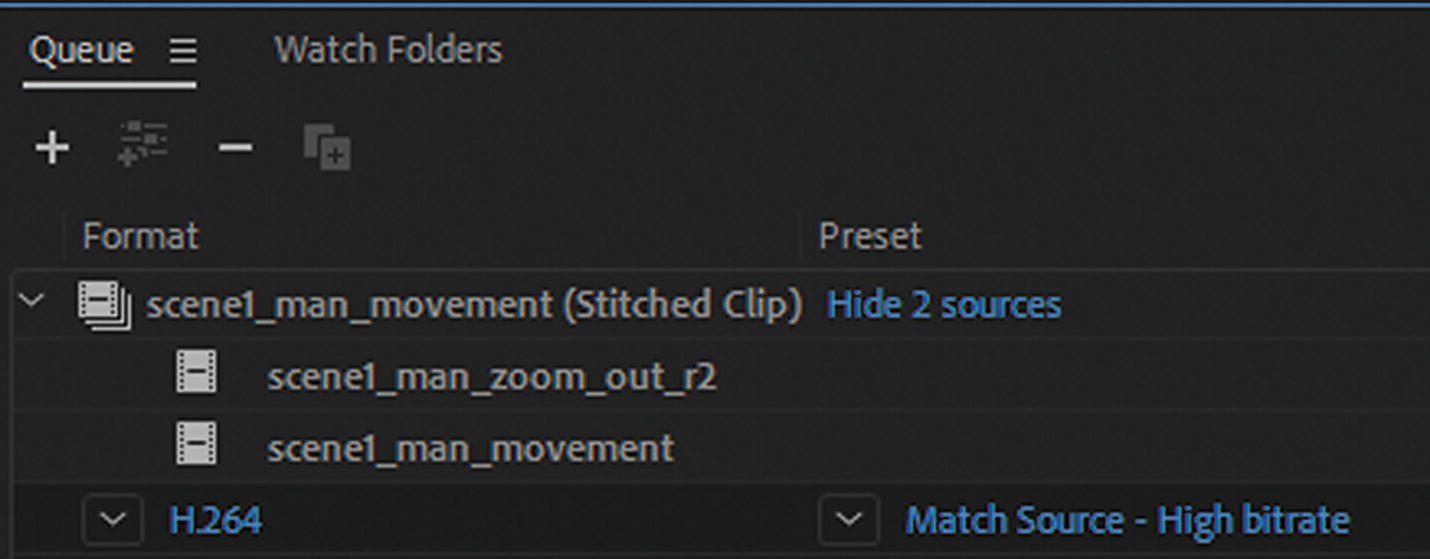
Combining video clips in Media Encoder
The combined files go into the selected output folder and render with their export settings when you click the green arrow to the right of the Queue panel.
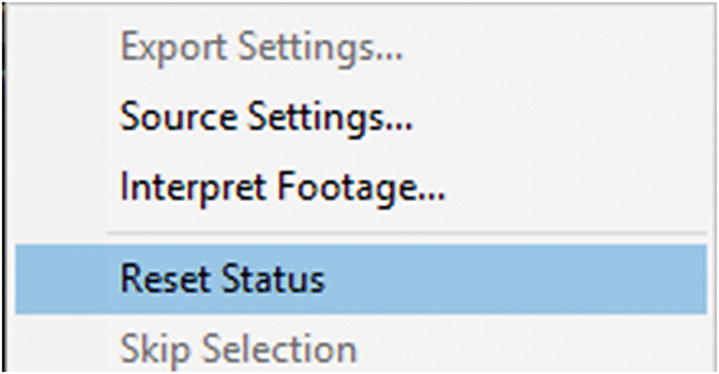
Reset the status of a file back to ready in the Queue panel
Remember
If you are not sure of the exact format size or preset to use for any of files that were discussed in this section, you can always refer to the Preset Browser panel and look at the Comment section to see what Adobe recommends.
WebM and Ogg
The other two formats that are supported by web browsers are WebM (.webm) and Theora (.ogg).
WebM is a media file format. It is primarily intended to offer a royalty-free alternative to use in the HTML5 video and the HTML5 audio tags.
Theora Ogg is a free lossy video compression format. It includes the Vorbis audio format and the Ogg container.
Media Encoder does not allow you to export as either of these formats without acquiring a third-party plugin. If you need these file formats for your project, you can download them from a company recommended on the Adobe forums that works with Adobe Media Encoder or Premier Pro (see www.fnordware.com/WebM/ and https://github.com/fnordware/AdobeOgg ).
Another great option is a free program like Miro Video Converter is useful to download as well to convert to these formats. It is very simple to use, but you may not have all the codec setting which come in a program like Media Encoder and is best for small files. Larger files take longer to render and sometimes the quality is not always the greatest.
Since MP4 is viewed my most browsers, this may be the only file format you need for your video; however, if you are worried about browser compatibility WebM and Ogg are important backup source files for older browsers, as you see in Part 6.
For more information on these formats, visit https://en.wikipedia.org/wiki/WebM and https://en.wikipedia.org/wiki/Theora .
Summary
In this chapter, you looked the RAW files—AVI and MOV, and available export settings for an MP4 (H.246) file for your website. You discovered that you can stitch multiple clips together in Media Encoder. Finally, you looked at two other video web formats: WebM and Ogg.
In the next chapter, you look at how to export the audio out of video files, and you work with an audio format that you cannot import into Media Encoder until you adjust its file format name.