When a client application sends a request to a service, it's quite common that this service handles authentication, the processing of the incoming request, and the access to other services (resources) required to satisfy the incoming request.
In a cloud environment, in order to improve the overall security of the system, it could be useful to split this behavior into two different layers:
- A layer that handles the incoming request
- A layer that processes the request and provides access to other resources
This architectural pattern is called Gatekeeper pattern. With this pattern, between the CLIENT and the CLOUD SERVICES that handle the requests, there's an extra layer (the GATEKEEPER) that validates and sanitizes the incoming requests.
The Gatekeeper pattern can be represented as follows:

When this pattern is implemented, a client sends an incoming request for a cloud service to the Gatekeeper public endpoint. The Gatekeeper service is limited to handle only the validation of the incoming request (no processing) and it rejects requests that do not meet the validation requirements. The Gatekeeper has no access to credentials and keys. It's typically recommended that this service runs in a limited privilege mode (no access to other cloud resources or to the trusted host).
When the Gatekeeper validates the incoming request, it forwards the request to the trusted host (the destination cloud service) that handles the processing of the request (it can call an internal endpoint of the trusted host or it could place a message on a queue for an extra level of decoupling). Only the trusted host can have access to other cloud services (such as storage services).
The benefits of using this pattern is that you can decouple the validation of the incoming requests to the processing of them. Your cloud architecture will expose to the external clients only the public endpoint of the Gatekeeper, while all the other cloud services are not visible to the outside world.
As you can imagine, the Gatekeeper could be a single point of failure on your architecture. If this service is down, requests are not validated and their processing will not be performed. In order to avoid this (and to improve the overall scalability of the solution), it's recommended to have more than one instance of the gatekeeper service (or use autoscaling).
An Azure Application Gateway provides a full set of features for application delivery control and can be created via the Azure portal by navigating to Networking | Application Gateway:

Azure API Management services permits you to publish custom APIs to the cloud. An API is based on a set of operations available for developers and each API can be added to one or more products (the final package on which APIs are surfaced to developers). To use an API, developers subscribe to a product that contains that API, and then they can call the API's operation. Each API contains also a reference to the backend service that implements the API, and its operations map to the operations implemented by the backend service itself.
Azure API Management service is composed of the following components:
- API gateway: This is the endpoint that accepts the calls to the APIs, validates them, and routes them to your backend.
- Publisher portal: This is the interface where you can setup your API, policies for access and users.
- Developer portal: This is a portal for developers that use the APIs. Here, they can read the API's documentation, make API subscriptions for using them, and test an API.
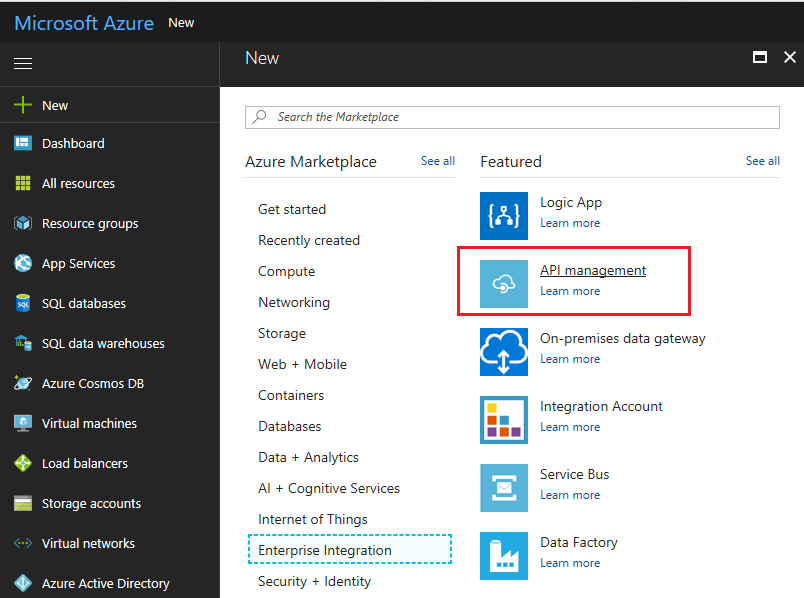
To create a new Azure API Management service instance, on the Azure portal perform the following steps:
- Navigate to New | Enterprise Integration | API management:

- In the API Management Service blade, select a name for your API (that must be unique) and complete the settings.
The Organization name is used in the title in the developer portal for the API and also as the sender name for notification emails. These emails will be sent to the Administrator email address you have specified in this window. Here, as a Pricing tier (View full pricing details) I've selected Developer (No SLA). This is only for evaluation and test; this must not be used in production.

- Click on Create to create your API Management service.
- Now that the service is in place, you can select your API Management service instance and import your custom API. (It's better if you've deployed it before as an Azure website.) When your API is imported, you can see and test all the methods:

- You also have access to the Publisher portal and Developer portal previously described:

- When an operation is invoked from the Developer portal, you can see its response status, response headers, and response content.
